

The Week 13: Practical Oceanography from CS:GO's Operation Riptide came with another mix of different game modes that will keep your boredom away for a while, but also with a few more tips and tricks to learn that not only will help you complete the missions faster, but also assist you in the future matchmaking games you'll play.
Since there are just 2 more weeks until the operation will come to an end, Valve is probably planning something nice for its ending, but for now, we can only wait a little bit longer until we will find for sure what's everything about.
You can even consider doing some shopping in the themed market with the stars collected, because, as soon as the operation will be over, you won't be able to spend those stars anymore.

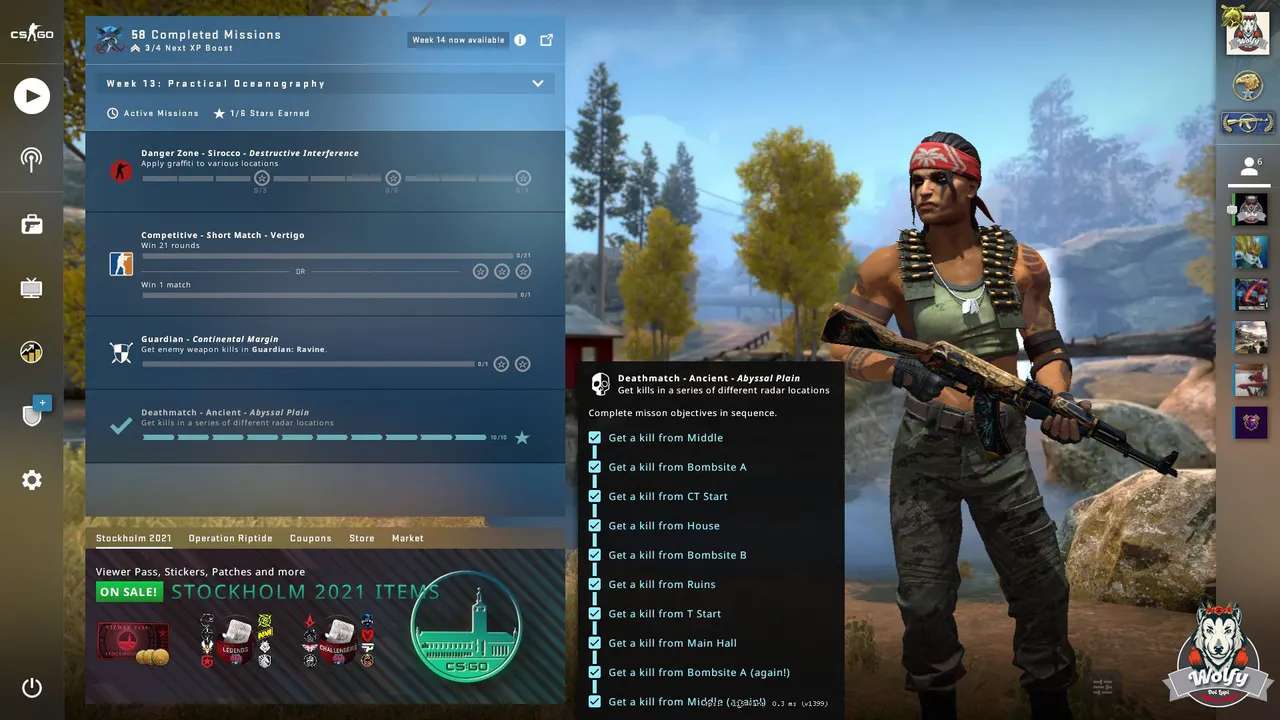
Anyway, here's the full list with the 4x missions available in the Week 13: Practical Oceanography that can be completed for the total of 9x stars to be rewarded:
- Danger Zone - Sirocco - Destructive Interfence: where you have to apply graffiti in 9 locations on the map [★★★]
- Competitive - Short Match - Vertigo: being needed to win an entire match OR collect 21 winning rounds from more matches played [★★★]
- Guardian - Ravine - Continental Margin: where you are required to kill 20 bots with enemies' weapons [★★]
- Deathmatch - Ancient - Abyssal Plain: you have to make 10 kills in different radar locations [★]
The first mission I decided to complete, can be seen in the picture from above, namely the Deathmatch one, where it's also have been a good way to learn some new positions on the Ancient map that is not usually going on my playing maps.
The full list of locations can be seen down below, and they must be completed in sequence, so make sure to follow the order that will be shown on the screen during the gameplay:
- Get a kill from Middle;
- Get a kill from Bombsite A;
- Get a kill from CT Start;
- Get a kill from House;
- Get a kill from Bombsite B;
- Get a kill from Ruins;
- Get a kill from T Start;
- Get a kill from Main Hall;
- Get a kill from Bombsite A (again!);
- Get a kill from Middle (again!).
The list of kills being needed to be made starts from the Middle which is a pretty challenging position with enemies coming from all directions, and it ends in the same place, being required to do one more kill in that place.
I actually needed around 2 or 3 matches on this map just because I am not used to playing it, nor with the names of the positions, so I can consider it a pretty productive task that taught me something new. 😀
The 2nd mission we completed, was the Guardian one, which so far was never missing during the fourteen weeks of missions released, where, this time you are not forced to make the kills with a specific gun, but actually be allowed to use any weapon you wish, the single condition being to make those kills with a weapon used by one of the enemies.
The best solution I see here is to wait until the enemies will bring the AK-47 which is one of the bests in the game.
The next mission we took care of was the Danger Zone one where you have to place graffiti in different radar locations. This is similar to the one on the Blacksite map from the Week 9: Nautical Mile.
Personally, the biggest challenge I've seen here, was the waiting period until you could play again the Sirocco map because there are 10 minutes dedicated to each of the 3 maps available on this mode and you won't be able to play another match until the other two maps have their time expiring.
The full list with the locations can also be seen down below:
- Spray graffiti at the arch West of Kasbah;
- Spray graffiti in the spiral staircase of Kasbah;
- Spray graffiti at the Dome;
- Spray graffiti in the helipad circle at Base;
- Spray graffiti while on a barge at Floatilla;
- Spray graffiti inside Hotel Aurore in Town;
- Spray graffiti on Silo 3 at Tanks;
- Spray graffiti at the Lighthouse Tower;
- Spray graffiti at the pier at Fishing.
Just like in the previous similar mission of Week 9, the places are pretty easy to be reached since you can pick your spawn location and you can always decide on a new one whenever the time arrives, but make sure to stay away from enemies and sneak as fast as possible to the next place where you have to place a graffiti because it's really annoying to always take a break of 20 minutes until you can play the map again. 😒

And last, but not least, we also completed the Competitive mission which was one of the least enjoyable missions I played in this operation because I literally hate the Vertigo map. It's the single one that I can't figure out how to play, nor understand the sounds which are not helping you to figure out where the enemies are coming from, so I'll just say that we prayed for a good team to play with and collect those rounds faster. 😅
| Game | Counter-Strike: Global Offensive |
|---|---|
| Release Date | 21st August 2012 |
| Played On | Steam |
| Genre | Multiplayer |
| Hours Played | 4,739 hrs |
| Episodes | Stars Earned | |
|---|---|---|
| Week 1: | Shark Week ✅ | 13x ★ |
| Week 2: | Seal The Deal ✅ | 8x ★ |
| Week 3: | Surf’s Up ✅ | 10x ★ |
| Week 4: | Gendarmerie ✅ | 8x ★ |
| Week 5: | Tropical Paradise ✅ | 10x ★ |
| Week 6: | Rumble In The Jungle ✅ | 10x ★ |
| Week 7: | Land, Sea, and Air ✅ | 8x ★ |
| Week 8: | Midway ✅ | 9x ★ |
| Week 9: | Nautical Mile ✅ | 10x ★ |
| Week 10: | Decompression ✅ | 8x ★ |
| Week 11: | Water, Water, Everywhere ✅ | 9x ★ |
| Week 12: | Remember Your Training ✅ | 10x ★ |
| Week 13: | Practical Oceanography ✅ | 9x ★ |
| Week 14: | A Little Competition ✅ | 9x ★ |
| Week 15: | Barrier Reef ✅ | 8x ★ |
| Week 16: | Riptide! ✅ | 10x ★ |

FIND ME ON:
↪ Blog: http://gabrielastravels.wordpress.com/
↪ Fiverr: https://www.fiverr.com/gabrielatv/
↪ YouTube: https://www.youtube.com/gabiivdesign
↪ Instagram: https://www.instagram.com/gabriela.tv/
↪ TikTok: https://tiktok.com/@gabrielastravels/
↪ Discord: GabrielaTravels#0104
↪ Facebook: https://www.facebook.com/gabrielaistraveling/
↪ Twitter: https://twitter.com/GabrielaTravels
↪ PayPal/Contact: gabriela.valceanu19@gmail.com