This post was also written in English


Olá Comunidade, Boas Vibes!
Começarei uma série de postagens especiais, voltadas para os desafios sociais, explicando sobre os elementos que existem no Splinterlands. Como todos sabem, existem ao todo 6 elementos onde temos os Summoners e os cards de monstros que são “agrupados” por esses elementos, sendo:
- Fogo 🔥
- Água 💧
- Terra 🍃
- Vida ✨
- Morte 💀
- Dragão 🐲
Essa analise e explicação das características, será focada na expansão Chaos Legion e tem um toque mais pessoal, sempre gosto de deixar a minha marca nas análises, seja replays ou como joguei determinada partida.
Assim como vários outros jogadores, venço os desafios diários na garra e na força de vontade, sempre evoluindo a cada passo dado. Os cards utilizados aqui, são os da minha coleção, então todos os níveis que aparecem já são os níveis que costumo utilizar, salvo um ou outro card que é alugado e pode aparecer aqui.
Acredito que me identifico com muitos assim, que começam pequeno e gradualmente vai evoluindo, então, como esse pessoal, darei dicas que costumo usar e uma explicação de quais regras de batalhas são mais favoráveis ou não para cada Summoner, assim como quais cards e em qual posição colocar seus monstros.
Hoje, falarei sobre o elemento que se tornou o meu principal: O FOGO!
Depois que dei a sorte grande tirar um GRUM FLAMEBLADE, este se tornou o meu elemento preferido! Então vem comigo e vamos ver o que posso compartilhar com vocês!
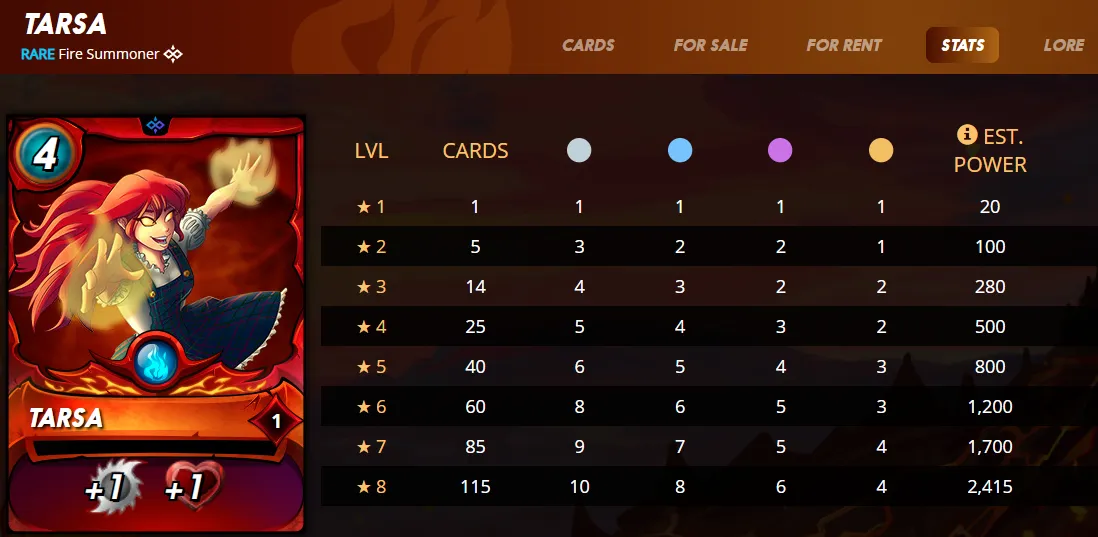
🔥 Tarsa e o Fogo 🔥
“Como explicar o fogo? Aquele que tudo queima e tudo destrói. Basta um pequeno fagulho que tudo pode arder, esse é o poder destrutivo daquilo que tudo consome. Seu poder é simplesmente incrível, um combustível, um comburente e pronto, nasce a destruição ou também a salvação. Qualquer lugar é teu início, qualquer lugar pode ser o seu fim, qual grande é o poder de engolir tudo em labaredas de chamas?”
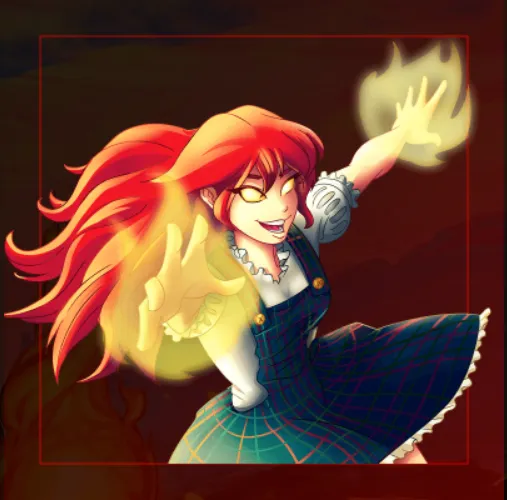
TARSA, a Summoner de fogo. Aquela que “convoca e controla o fogo”. Desde o início da Chaos Legion achei super interessante este personagem. Parece que saiu diretamente de um anime ou um desenho do X-men, controlando as chamas e desafiando a todos com o seu poder.
“Sua aparência jovem e inocente só a ajudou a manipular ainda mais as pessoas ao seu redor. “Tarsa sempre consegue o que Tarsa quer” é o que ela diz para si mesma toda vez que algo ou alguém a desafia.”Splinterlands Lore
TARSA sempre consegue aquilo que quer, com características bem explosivas e muita vontade de mostrar ser a mais forte dentre todos, acredito que isso influência justamente suas habilidades.
Concedendo +1 de ataque (corpo a corpo) e vida para seus monstros, ela combina exatamente a força e vitalidade do fogo.
A estratégia básica a ser levado em conta é utilizar cards de ataque corpo a corpo, para que assim consigam 100% de sinergia com o seu Summoner. Dependendo de algumas regras de batalhas, podemos colocar em campo verdadeiros monstros com um ataque muito alto.
É a Summoner que mais utilizo nessa nova expansão e bem, tenho um carinho grande demais por nossa pequena esquentada, que faz os inimigos gritarem, enquanto ela ri de suas dores (e do que sobrou deles).
Coloque seus monstros que adoram surrar seus inimigos, afinal, “só usa poder quem não se garante no soco!”
🔥 Habilidades, Estratégia e Regras de Batalhas 🔥
Bem, explicarei a estratégia principal que costumo utilizar ao escolher a TARSA, como minha Summoner para a batalha! Antes, vou explicar suas habilidades e suas sinergias.
Habilidades

+1 de ataque corpo a corpo para todos os monstros aliados

+1 de vida para todos os monstros aliados
- Utilizando monstros que tem ataque corpo a corpo, pois assim são buffados com suas 2 habilidades.
- Utilizando monstros de ataque a longe distância e mágico, pois recebem apenas sua habilidade que concede +1 de vida.
Estratégia
A estratégia que costumo utilizar é aproveitar bastante suas habilidades com monstros de ataque corpo a corpo. Existem boas opções com esse tipo de ataque e conseguem realizar o ataque sem ter que esperar chegar na primeira posição.
Esses monstros são aqueles que possuem as habilidades:
- Reach: Monstros de ataque corpo a corpo que conseguem atacar quando posicionados na segunda posição.
- Snake: Permite atacar de qualquer posição e será focado sempre o último monstro da equipe inimiga.
- Opportunity: Permite atacar de qualquer posição e será focado o monstro inimigo com menor vida, seguindo a ordem de posicionamento da equipe.
Com isso a ideia chega a ser bem simples: um tanque na frente para segurar o dano, e o resto da equipe, monstros com essas habilidades para ir finalizando os adversários.
Claro que você tem que analisar também, não precisa ser sempre monstros de combate corpo a corpo e que consigam atacar fora da primeira posição, às vezes, um dano a longa distância ou mágico ajuda bastante também, sem contar as cartas de suporte que desempenham um papel bem diferente, ajudando outros monstros a ficarem vivos.
Regras de Batalha
As regras de batalhas que considero mais favoráveis para essa estratégia, são as que seguem abaixo, apenas lembrando, é uma opinião pessoal!

✔️Up Close and Personal: Apenas monstros de combate corpo a corpo podem ser utilizados, se por acaso a regra par for Back to Basics (monstros perdem suas habilidades), acredito que não compensa, pois apenas 1 monstro vai bater por vez.
Então talvez compensa colocar 1 ou 2 tanques e monstros com ataque a longa distância ou mágico.

✔️Equal Opportunity: Todos os monstros ganham a habilidade Opportunity, que foca os monstros adversários com menor vida.
✔️Melee Mayhem: Monstros de ataque corpo a corpo podem atacar de qualquer posição.

✔️Super Sneak: Todos os monstros ganham a habilidade Sneak e focam o ultimo monstro da equipe adversaria.
As regras que considero ruins para a estratégia, são:

❌Keep Your Distance: Monstros que tem o ataque corpo a corpo não podem ser utilizados. Com certeza a pior regra possível.

❌Back to Basics: Como disse acima, sem ter as habilidades necessárias ativadas nos monstros, fica bem mais difícil ganhar, mesmo com os buffs recebidos.

❌Fog of War: Não que seja o fim do mundo, mas se você não consegue utilizar os cards com Sneak (todos os cards perdem as habilidades Sneak e Snipe), fica bem mais complicado vencer e ter uma boa sinergia.
🔥 Monstros e Funções 🔥
Tanques
Esses são os cards que costumo utilizar na primeira posição da minha equipe. São os tanques que conseguem segurar um bom dano, enquanto isso, abrem espaço para que os finalizadores façam seu trabalho.
Com a exceção do GRUM, que possui a habilidade Void Armor, onde os ataques mágicos acertam sua defesa no lugar de acerto direto, ataques mágicos se tornam a fraqueza principal dos outros 2 tanques que costumo utilizar, mas em contra partida, corpo a corpo e longa distância são muito bem bloqueados.
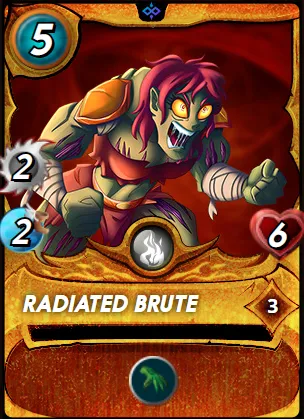
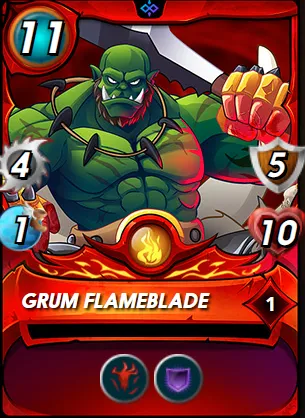 | “Considero ele um monstro especial, pois pode ser tanto um tanque como um finalizador. normalmente, com grandes capacidades de mana, costumo utilizar ele na primeira posição. Com sua habilidade Void Armor (dano mágico acerta armadura primeiro) ele fica protegido contra os 3 tipos de ataque que existem e com a Bloodlust (+1 em todos os status ao abater um adversário) ele vai ficando gigante a medida que vai derrotando seus inimigos. Uma ótima estratégia é utilizar ele quando tem as regras de batalha Equal Opportunity, Melee Mayhem ou Super Sneak, assim, podemos colocar ele nas posições medianas da equipe, ficando protegido e crescendo a medida que abate os inimigos.” |
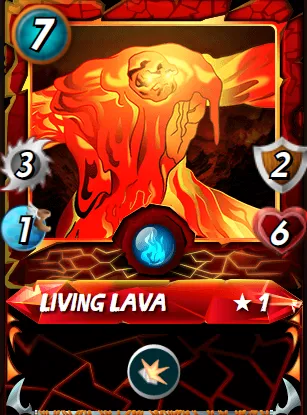 | “O bom e velho LIVING LAVA, ele é sempre um clássico a ser utilizado. Quando a capacidade de mana é razoável, costumo utilizar ele na primeira posição. Você pode arriscar o LIVING LAVA em posições medianas quando tem as regras que mencionei para o GRUM, mas não acredito que seja tão bom assim.” |
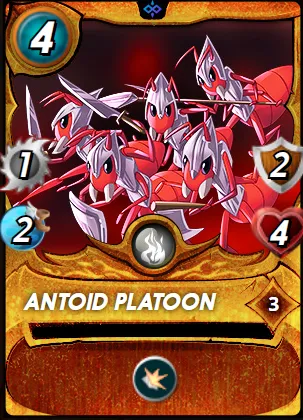 | “Quando as coisas estão apertadas e não temos muitos recursos, gosto de usar nossas amigas formigas, que com um custo 4 de mana, e a habilidade Shield reduzem o dano corpo a corpo e a longa distância pela metade. É o nosso tanque de baixo custo, simples assim.” |
Semi-Tanques
Eu chamo de semi-tanques, outros podem chamar apenas de monstros com Reach, mas com a estratégia de maximizar a eficiência das habilidades da TARSA, precisamos sempre ter alguém na segunda posição da equipe que consiga atacar. Esses 2 são os que mais utilizo e sempre desempenham um ótimo trabalho em ajudar a derrotar o tanque da equipe inimiga.
 | “Um das antigas, como possui a habilidade Reach se torna um card fantástico de usar. Com status robustos e o buff que recebe, consegue ajudar bastante o tanque na primeira posição, além de que, se o nosso primeiro guerreiro cair, este assume a posição de um semi-tanque e desempenha bem o papel.” |
 | “Basicamente desempenhando o papel de um semi-tanque também, possui status bem interessantes para o custo 5 de mana. Lembrando sempre de adicionar +1 de ataque e vida, este card se encaixa perfeitamente na estratégia. É uma boa opção quando a capacidade de mana exige qualidade com um custo menor.” |
Finalizadores
Esses cards, são aqueles que possuem um poder de ataque alto ou um bom trabalho de equipe. O importante aqui é a sinergia, entre os monstros que possuem Sneak e Opportunity. Sendo assim, aliado ao ganho de ataque que eles tem, conseguem finalizar pela retaguarda os cards do oponente que nem sempre joga em volta de tantos Sneaks.
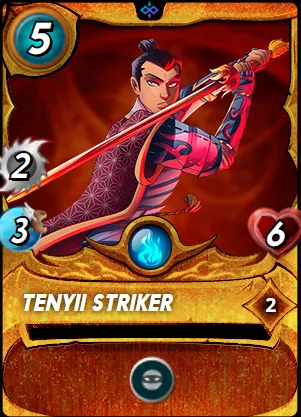 | “O que torna o TENYII STRIKER um finalizador? A habilidade Sneak foi pensada justamente nisso, pois você foca justamente a última posição da equipe adversária, onde geralmente temos cards mais fracos e sem defesa, causando quase sempre o dano direto. Jogar em volta de cards com Sneak é sempre complicado e isso pode surpreender bastante o adversário. O trabalho de equipe também é bem pensado na estratégia: pode não finalizar todos, mas ajuda bastante para que outros monstos façam isso!” |
 | “Um monstro das antigas, possui a habilidade Opportunity, que procura sempre pelo monstro adversário com menor vida. Então sendo o verdadeiro fecha caixão, ele vai sempre ajudar e muito a finalizar quem já estiver bem ferido, seja no começo ou no fim da equipe adversária!” |
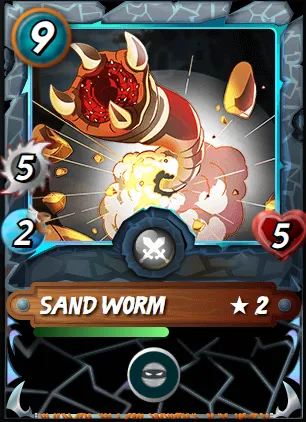 | “Nosso primeiro card neutro, nem preciso comentar muito que essa carta é insana de forte. Já no nível 1, ela tem 5 de ataque e com o buff, fica com 6. A jogada é simples, proteja a SAND WORM e deixe ela ser a ruína de seus adversários na retaguarda inimiga.” |
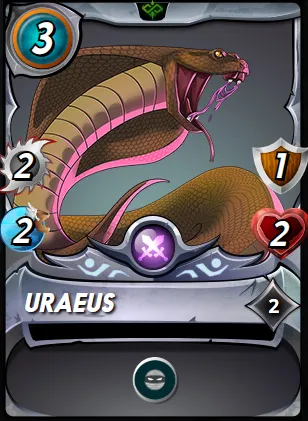 | “URAEUS é um monstro que merece respeito. Aos poucos fui descobrindo sua utilidade e se encaixou perfeitamente em toda a estratégia e sinergia com a TARSA, pois com custo 3 de mana, se torna bastante versátil. Gosto de colocar ela na quinta ou sexta posição, pois possuindo 1 de defesa, consegue segurar pelo menos 1 ataque de Sneak ou talvez de um Opportunity” |
Longo Alcance
Sim, utilizo alguns monstros de longo alcance. Não são muitos, mas em certos momentos, é bom variar e surpreender o seu adversário. Vou falar sobre os 2 cards que mais utilizo.
 | “LAVA LAUNCHER é um monstro incrível e versátil, que mesmo pegando apenas o buff de +1 de vida, ainda causa um estrago e protege seu time. Algumas vezes utilizo ele na ultima posição para segurar os Sneaks por possuir uma defesa e vida elevados. Como possui a habilidade Close Range, pode atacar na primeira posição, então, em certas batalhas utilizo ele na terceira posição, se tornando um tanque de longo alcance.” |
 | “Gosto de utilizar este card em alguns momentos, por exemplo quando tem a regra de batalha Holy Protection, em que todos os monstros ganham Divine Shield. Por possuir a habilidade Blast ela ajuda a retirar a proteção dos monstros adjacentes. Gosto também de sua velocidade e o 2 de dano que causa, então todo esse conjunto de sinergias é o que faz ela entrar em algumas batalhas.” |
Tec Cards
Bem, aqui categorizei de forma bem genérica como um card técnico. Alguns podem considerar a função como suporte, mas acredito que fica mais como uma entrada bem técnica mesmo, ou seja, pensada para uma situação bem especifica.
 | “Voltado para situações bem especificas, como por exemplo as regras de batalhas que já mencionei aqui, como Equal Opportunity, Super Sneak e Melee Mayhem, sua habilidade Demoralize faz com que os monstros de ataque corpo a corpo recebam -1 de ataque. Não se apegue apenas a isso, as vezes coloco ele na terceira ou quarta posição mesmo que não haja nenhuma habilidade atribuída a ele, que o faça atacar. Todo esse processo é uma ajuda para que os outros cards que estão na batalha consigam sobreviver por mais tempo.” |
🔥 Replays 🔥
Chegando a parte final, vou deixar aqui alguns replays para que vocês possam ver como utilizo os cards que expliquei. Infelizmente não tenho muitos replays que mostrem exatamente todas as situações, mas já dá para ter uma ideia.
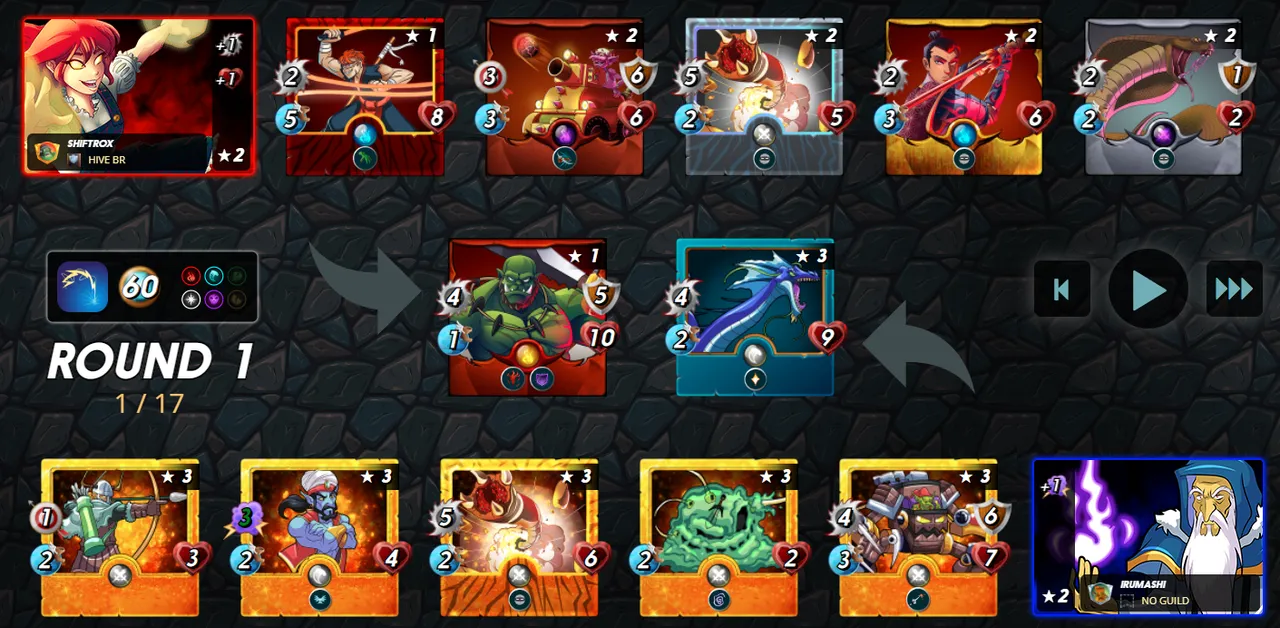
Aqui temos uma batalha de Equal Opportunity e Holy Protection. Como todos meus monstros poderiam atacar, neste caso não utilizei o FIRE ELEMENTAL, em contra partida coloquei o DISINTEGRATOR, pois joguei em volta do meu adversário utilizar muitos monstros de ataque corpo a corpo, o que não aconteceu exatamente.
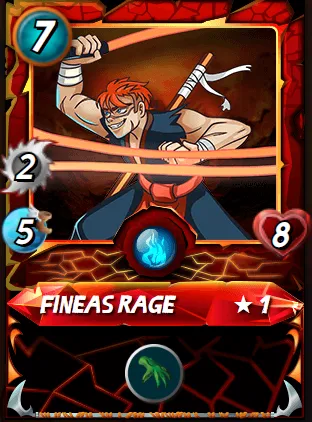
LIVING LAVA em primeiro para ser o Tanque, FINEAS RAGE em segundo, GRUM FLAMEBLADE em terceiro, pois aqui entrou como Finalizador e não como Tanque, SAND WORM, protegido para causar aquele estrago e CHARLOK MINOTAUR, que não citei neste post, mas praticamente só utilizo ele nas regras favoráveis para o elemento fogo, como já explicado no post, por conta de sua habilidade True Strike, ou seja, ele nunca erra um ataque!
>> REPLAY 1 <<
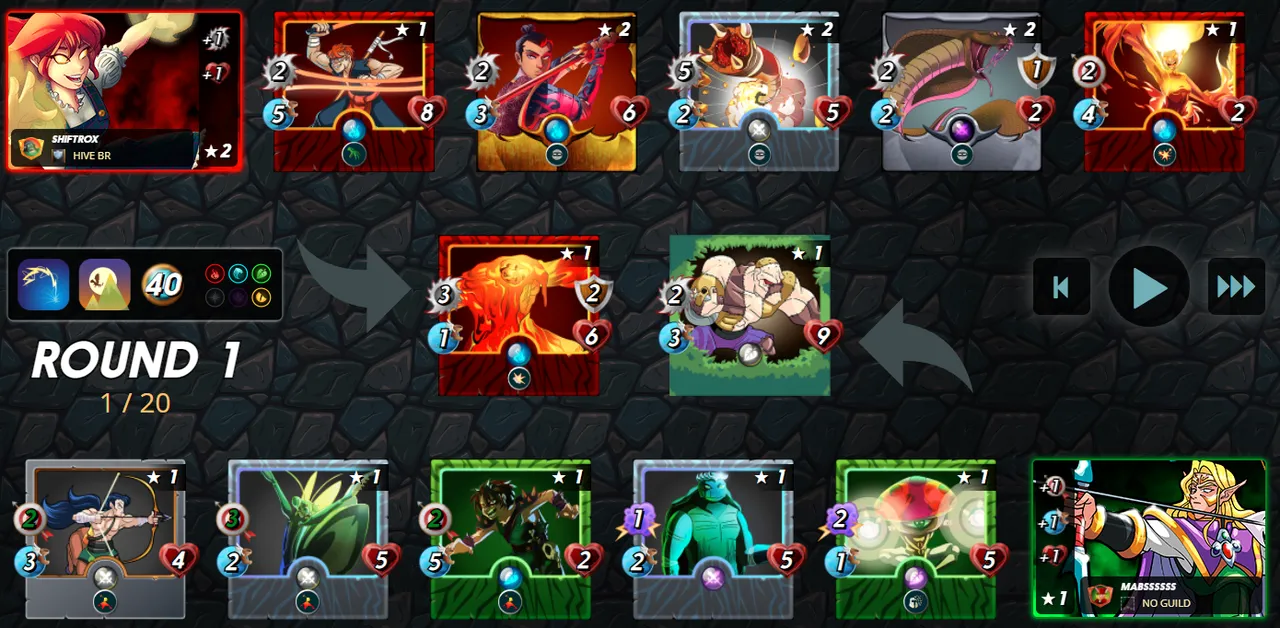
Aqui novamente, temos uma batalha de Holy Protection e com pouca capacidade de mana. Então seguindo a lógica precisava aproveitar o máximo as habilidades da TARSA.
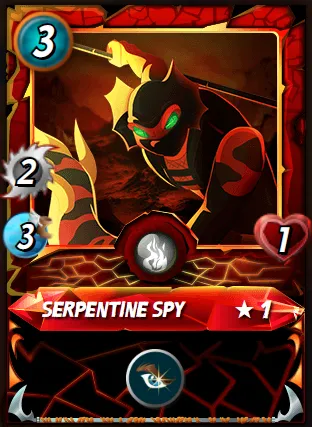
ANTOID PLATOON em primeiro para ser o Tanque, SERPENTINE SPY em segundo e TENYII STRIKER em terceiro. Acredito que aqui fui bem ambicioso, pois tinha uma grande chance de tudo dar errado por conta dos vários monstros que o adversário colocou.
Foi acirrado e levei o ANTOID PLATOON ao limite, mas a vitória veio, com muito suor, estratégia e sorte!
>> REPLAY 2 <<
Aqui temos uma batalha de Weak Magic, os ataques mágicos vão acertar a defesa primeiro.
GRUM FLAMEBLADE em primeiro para ser o Tanque, FINEAS RAGE em segundo, LAVA LAUNCHER em terceiro para ser a proteção, já que possui uma defesa e vida alta e seria bem aproveitado com a regra de batalha, SAND WORM para causar aquele estrago, TENYII STRIKER e URAEUS para fazer uma tríplice Sneak.
Poderia ter me apegado mais a regra de batalha e colocar mais monstros com defesa, mas acreditei que desta forma tudo daria certo, que o GRUM FLAMEBLADE iria conseguir segurar o dano, enquanto meus cards com Sneak iriam fazer a festa e foi o que aconteceu!
>> REPLAY 3 <<
Por fim, uma batalha com Weak Magic e Lost Legendaries, onde os ataques mágicos vão acertar a defesa primeiro e o uso de cards lendários não é permitido, mas Summoners podem ser utilizados e foi o que aconteceu.
LIVING LAVA em primeiro para ser o Tanque, FINEAS RAGE em segundo, TENYII STRIKER, SAND WORM e URAEUS, novamente a tríplice Sneak e FIRE ELEMENTAL.
Nessa batalha, realmente não sei bem por que coloquei FIRE ELEMENTAL, ainda mais que meu adversário veio forte com um Summoner lendário e 3 cards com Snipe, então seu uso foi quase que nulo. Alguns ataques deram miss e isso me preocupou, foi outra batalha bem acirrada, mas no fim deu tudo certo.
>> REPLAY 4 <<
Então, vocês podem notar que em algumas batalhas, coloquei 3 cards com Sneak, muitos adversários na retaguarda com pouca vida e assim, segurando o jogo na frente, esses cards fizeram a festa pelas costas do meus oponentes.
Utilizando as regras de Equal Opportunity ou Melee Mayhem, consigo fazer um estrago também, colocando muitos monstros de ataque corpo a corpo buffados e isso causa um estrago enorme.
🔥 Considerações 🔥
Espero que tenham gostado desse guia, acredito que pode ajudar muitas pessoas que ainda tem dúvidas quanto ao funcionamento dos cards e suas estratégias.
Como disse na introdução, gosto de aplicar meu toque pessoal nas jogadas e nas explicações, então obviamente pode ser que tenham muitas outras formações e cards melhores para se usar e obter boas vitórias.
Sintam-se a vontade para votar, comentar e reblogar! Dúvidas, críticas e elogios são sempre bem vindos.
Vamos interagir e trocar o conhecimento! Até a próxima pessoal!

Hello Community, Good Vibes!
I will start a series of special posts, geared towards social challenges, explaining about the elements that exist in Splinterlands. As you all know, there are a total of 6 elements where we have Summoners and monster cards that are “grouped” by these elements, as follows:
- Fire 🔥
- Water 💧
- Earth 🍃
- Life ✨
- Death 💀
- Dragon 🐲
This analysis and explanation of the features will be focused on the Chaos Legion expansion and has a more personal touch, I always like to leave my mark on the reviews, whether it's replays or how I played a certain match.
Like many other players, I overcome the daily challenges with determination and willpower, always evolving with each step taken. The cards used here are from my collection, so all the levels that appear are the levels I usually use, except for one or another card that is rented and can appear here.
I believe I identify with many like this, who start small and gradually evolve, so, like these people, I'll give tips that I usually use and an explanation of which battle rules are more favorable or not for each Summoner, as well as which cards and in which position to place your monsters.
Today, I'm going to talk about the element that became my main one: THE FIRE!
After I was lucky enough to get a GRUM FLAMEBLADE, this became my favorite element! So come with me and let's see what I can share with you!
🔥 Tarsa and the Fire 🔥
“How to explain fire? The one who burns everything and destroys everything. Just a small spark that everything can burn, this is the destructive power of what consumes everything. Its power is simply incredible, a fuel, an oxidizer and that's it, destruction or even salvation is born. Any place is your beginning, any place can be your end, how great is the power to engulf everything in flames of flame?”
TARSA, the Summoner of Fire. The one who "summons and controls the fire". Since the beginning of Chaos Legion I found this character super interesting. She looks like she straight out of an anime or an X-men drawing, controlling the flames and challenging everyone with her power.
“Her young and innocent appearance of hers only helped her manipulate the people around her even more. “Tarsa always gets what Tarsa wants” is what she says to herself every time something or someone challenges her.”Splinterlands Lore
TARSA always gets what she wants, with very explosive characteristics and a lot of desire to show that she is the strongest of all, I believe that this influences precisely her abilities.
Granting +1 attack (melee) and health to her monsters, she exactly combines the strength and vitality of fire.
The basic strategy to consider is to use melee attack cards, so that they get 100% synergy with your Summoner. Depending on some battle rules, we can field real monsters with a very high attack.
She is the Summoner that I use the most in this new expansion and well, I have a great affection for our little hothead, who makes enemies scream, while she laughs at their pain (and what's left of them).
Put your monsters that love to beat their enemies, after all, "only use power who doesn't guarantee the punch!"
🔥 Skills, Strategy and Battle Rules 🔥
Well, I will explain the main strategy I usually use when choosing TARSA as my Summoner for battle! First, I'll explain their abilities and their synergies.
Skills
+1 melee attack for all ally monsters
+1 health for all ally monsters
- Using monsters that have melee attack, as they are buffed with their 2 skills.
- Using ranged and magic monsters, as they only receive their ability that grants +1 health.
Strategy
The strategy I usually use is to make the most of your abilities with melee monsters. There are good options with this type of attack and they are able to carry out the attack without having to wait to reach first position.
These monsters are the ones that have the abilities:
- Reach: Melee attack monsters that can attack when positioned in second position.
- Snake: Allows you to attack from any position and will always focus on the last monster on the enemy team.
- Opportunity: Allows you to attack from any position and the enemy monster with the lowest health will be focused, following the team's positioning order.
With that, the idea is quite simple: a tank in front to hold the damage, and the rest of the team, monsters with these skills to finish off the opponents.
Of course you have to analyze it too, it doesn't always have to be melee monsters that can attack out of the first position, sometimes a long-distance or magic damage helps a lot too, not to mention the support cards that play a role. very different role, helping other monsters to stay alive.
Battle Rules
The battle rules that I consider most favorable for this strategy are the ones below, just remembering, it's a personal opinion!
✔️Up Close and Personal: Only melee monsters can be used, if by chance the par rule is Back to Basics (monsters lose their abilities), I believe it's not worth it, because only 1 monster will hit at a time.
So maybe it pays to put 1 or 2 tanks and monsters with ranged or magic attack.
✔️Equal Opportunity: All monsters gain the ability Opportunity, which focuses on opposing monsters with the lowest health.
✔️Melee Mayhem: Melee monsters can attack from any position.
✔️Super Sneak: All monsters gain the Sneak ability and focus on the last monster on the opposing team.
The rules that I consider bad for the strategy are:
❌Keep Your Distance: Monsters that have melee attack cannot be used. Definitely the worst possible rule.
❌Back to Basics: As I said above, without having the necessary skills activated on the monsters, it is much harder to win, even with the buffs received.
❌Fog of War: Not that it's the end of the world, but if you can't use cards with Sneak (all cards lose Sneak and Snipe abilities), it becomes much more complicated to win and have good synergy.
🔥 Monsters and Roles 🔥
Tanks
These are the cards I usually use in my team's first position. It's the tanks that can handle good damage, meanwhile, they make room for the finishers to do their job.
With the exception of GRUM, which has the ability Void Armor, where magic attacks hit your defense instead of direct hit, magic attacks become the main weakness of the other 2 tanks that I usually use, but against match, melee and ranged are very well blocked.
| “I consider it a special monster, as it can be both a tank and a finisher. normally, with large mana capacities, I tend to use it in the first position. With his skill Void Armor (magic damage hits armor first) he is protected against the 3 types of attacks that exist and with Bloodlust (+1 in all stats when killing an opponent) he is getting giant as it defeats its enemies. A great strategy is to use it when it has the Equal Opportunity, Melee Mayhem or Super Sneak battle rules, so we can place it in the mid-range positions of the team, staying protected and growing as we go. that slaughters enemies.” |
| “The good and old LIVING LAVA, it is always a classic to be used. When mana capacity is reasonable, I tend to use it in the first position. You can risk LIVING LAVA in middle positions when you have the rules I mentioned for GRUM, but I don't think it's that good.” |
| “When the things are tight and we don't have a lot of resources, I like to use our ant friends, which at a cost of 4 mana, and the Shield ability reduce melee and ranged damage by half. It's our low cost tank, simple as that.” |
Semi-Tanks
I call it semi-tanks, others might just call it monsters with Reach, but with the strategy of maximizing the efficiency of TARSA's abilities, we always need to have someone in the second position of the team who can attack. These 2 are the ones I use the most and they always do a great job of helping to defeat the enemy team's tank.
| “One of ancient, as it has the ability Reach it makes for a fantastic card to use. With robust stats and the buff it receives, it can help the tank a lot in the first position, and if our first warrior falls, it assumes the position of a semi-tank and plays the role well.” |
| “Basically performing the role of a semi-tank too, has very interesting stats for the 5 mana cost. Always remembering to add +1 attack and health, this card fits the strategy perfectly. It's a good choice when mana capacity demands quality at a lower cost.” |
Finishers
These cards are those that have high attack power or good teamwork. The important thing here is the synergy, between the monsters that have Sneak and Opportunity. So, combined with the attack gain they have, they can finish off the opponent's cards from the rear that don't always play around so many Sneaks.
| “What makes the TENYII STRIKER a finisher? The Sneak ability was designed just for that, because you focus on the last position of the opposing team, where we usually have weaker and defenseless cards, almost always dealing direct damage. Playing around cards with Sneak is always tricky and can surprise your opponent quite a bit. Teamwork is also well thought out in the strategy: it may not finish everyone, but it helps a lot for other monsters to do it!” |
| “A monster of old, it has the ability Opportunity, which always looks for the enemy monster with the lowest health. So being the real coffin, he will always help a lot to finish whoever is already well injured, either at the beginning or at the end of the opposing team!” |
| “Our first neutral card, I don't need to comment too much that this card is insanely strong. Already at level 1, she has 5 attack and with the buff, she gets 6. The move is simple, protect the SAND WORM and let her be the ruin of your opponents in the enemy's rear.” |
| “URAEUS is a monster that deserves respect. Gradually I discovered its usefulness and it fit perfectly into all the strategy and synergy with TARSA, because with a cost of 3 mana, it becomes quite versatile. I like to put it in the fifth or sixth position, because having 1 defense, it can hold at least 1 Sneak attack or maybe an Opportunity” |
Long Range
Yes, I use some ranged monsters. There aren't many, but at certain times, it's good to vary and surprise your opponent. I'm going to talk about the 2 cards I use the most.
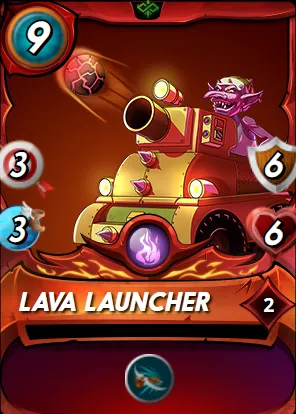
| “LAVA LAUNCHER It's an amazing and versatile monster, that even taking only the +1 health buff, still causes damage and protects your team. Sometimes I use it in the last position to hold the Sneaks for having a high defense and health. As it has the ability Close Range, it can attack in the first position, so in certain battles I use it in the third position, becoming a long-range tank.” |
| “I like use this card at times, for example when it has the Holy Protection battle rule, in which all monsters gain Divine Shield. By having the ability Blast it helps to remove protection from adjacent monsters. I also like her speed and the 2 damage she does, so this whole set of synergies is what gets her into some battles.” |
Tec Cards
Well, here I categorized it very generically as a technical card. Some may consider the function as support, but I believe it is more like a very technical entry, that is, designed for a very specific situation.
| “Situation-oriented very specific, as for example the rules of battles that I already mentioned here, like Equal Opportunity, Super Sneak and Melee Mayhem, its ability Demoralize makes the monsters of melee attack take -1 attack. Don't just get attached to that, sometimes I put him in the third or fourth position even though there is no skill assigned to him that makes him attack. This whole process helps the other cards in the battle to survive longer.” |
🔥 Replays 🔥
Coming to the final part, I'll leave some replays here so you can see how I use the cards I explained. Unfortunately I don't have many replays that show exactly all the situations, but you can get an idea.
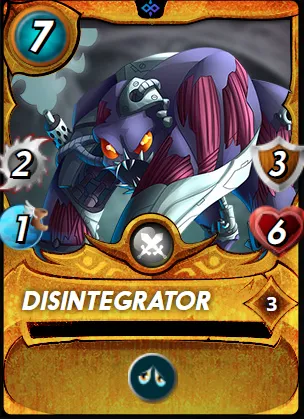
Here we have a battle of Equal Opportunity and Holy Protection. As all my monsters could attack, in this case I didn't use the FIRE ELEMENTAL, instead I used the DISINTEGRATOR, because I played around my opponent using many melee attack monsters, which didn't exactly happen.
LIVING LAVA in first to be the Tank, FINEAS RAGE in second, GRUM FLAMEBLADE in third, because here it entered as Finisher and not as Tank, SAND WORM, protected to cause that damage and CHARLOK MINOTAUR, which I didn't mention in this post, but I practically only use him in the favorable rules for the fire element, as already explained in the post, because of his True Strike ability, that is, he never misses an attack!
>> REPLAY 1 <<
Here again we have a Holy Protection battle and low mana capacity. So logically, I needed to make the most of TARSA's abilities.
ANTOID PLATOON in first to be the Tank, SERPENTINE SPY in second and TENYII STRIKER in third. I believe that I was very ambitious here, because I had a great chance of everything going wrong because of the various monsters that the opponent placed.
It was fierce and I took ANTOID PLATOON to the limit, but the victory came, with a lot of sweat, strategy and luck!
>> REPLAY 2 <<
Here we have a Weak Magic battle, magic attacks will hit defense first.
GRUM FLAMEBLADE in first to be the Tank, FINEAS RAGE in second, LAVA LAUNCHER in third to be the protection, since it has a high defense and health and would be put to good use with the battle rule, SAND WORM to cause that one damage, TENYII STRIKER and URAEUS to make a triple Sneak.
I could have stuck to the battle rule more and put more monsters with defense, but I believed that this way everything would work out, that GRUM FLAMEBLADE would be able to hold the damage, while my cards with Sneak would make the party and it was What happened!
>> REPLAY 3 <<
Finally, a battle with Weak Magic and Lost Legendaries, where magic attacks will hit the defense first and the use of legendary cards is not allowed, but Summoners can be used and that's what happened.
LIVING LAVA in first to be the Tank, FINEAS RAGE in second, TENYII STRIKER, SAND WORM and URAEUS, again the triple Sneak and FIRE ELEMENTAL.
In this battle, I really don't know why I put FIRE ELEMENTAL, even more because my opponent came strong with a legendary Summoner and 3 cards with Snipe, so its use was almost nil. Some attacks missed and that worried me, it was another very fierce battle, but in the end it all worked out.
>> REPLAY 4 <<
So, you can notice that in some battles, I put 3 cards with Sneak, many opponents in the rear with low health and so, holding the game in front, these cards made the party behind my opponents' backs.
Using the rules of Equal Opportunity or Melee Mayhem, I can do some damage too, putting a lot of buffed melee monsters and that does a lot of damage.
🔥 Considerations 🔥
I hope you liked this guide, I believe it can help many people who still have doubts about how the cards work and their strategies.
As I said in the intro, I like to apply my personal touch to plays and explanations, so obviously there may be many other formations and better cards to use and get good wins.
Feel free to vote, comment and reblog! Questions, criticism and praise are always welcome.
Let's interact and exchange knowledge! Until next time folks!

If you want to meet, give it a chance and let's play together!
 |  |  |  |
|---|---|---|---|
| Splinterlands | Rising Star | Dcrops | Rollercoin |
