
Introduction
 Tarsa just finished her schooling for the day and is now getting ready for bed. She decided to take a snap before ending the day.
Luckily, our resident stalk... photographer was able to get a copy of this amazing history before she deleted it in her Sweetter Account.
Materials and Sources

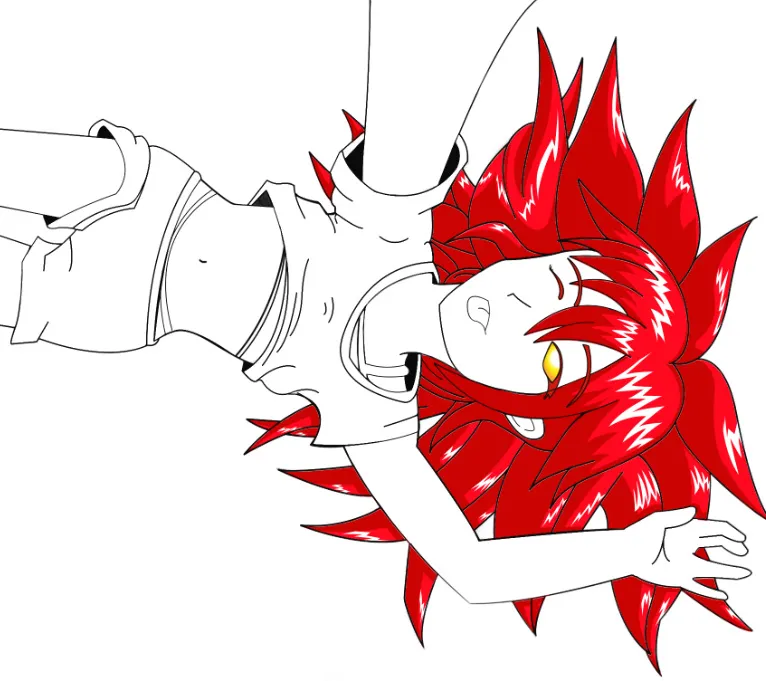
You can use the lineart I made for practice. The character is Splinterlands' kusogaki, Tarsa. She's an overachiever and often misinterpreted summoner in Splinterlands.

Color Scheme

Eyes Color Scheme
Step by Step
Step 1: Lineart and Color Scheme
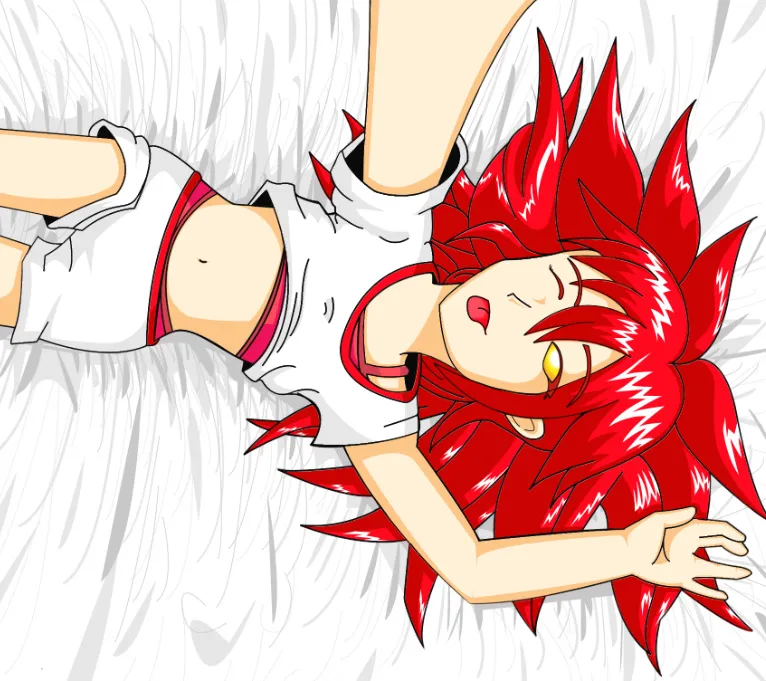
I want to make a more sexy version of Tarsa. Unfortunately, with my current skills, it didn't become 100% what I wanted. It's still better though than the last but worse than me 5 years ago.
This is the color scheme I used for this art. The usage would be as follows, starting from the left:
- Hair highlight > Hair base color > Hair Shadow
- Skin Base > Skin Shadow
- Tongue Base > Tongue Shadow
- [Above] Lining Base > Lining Shadow ; [Below] Shirt Base > Shirt Shadow > Shirt Inner Shadow
- [Above] Underwear Base > Underwear Shadow ; [Below] Underwear Lining Base > Underwear Lining Shadow
- Bed Base > Bed Soft Shadows > Bed Hard Shadows
Step 2: Hair and Eyes

The eyes are made with brushes at 50% hardness. Tarsa's eyes are interesting as it doesn't have pupils and this is how I was able to recreate it.
I used these three colors for the eyes. You use them from Back to front like layering with the highlights going at the very last. The eyelids are the same color as the hair shadows.
Step 3: Hair

On how I make my base colors and shadows, refer to my previous post:
Tarsa Goes to School
This is an old highlighting style that I remembered I was using before. The idea is to use zigzag, lightning style lines to represent highlights. This is a good starting highlights for those who are struggling at colors or just new in digital coloring overall.
One tip I want to share is use 1 px or 2px when doing the edges/guides. It's weird seeing the round edges and I had to redo it after getting an itch looking at it for some time. Then color the shadow/highlight part.
Step 4: Skin

On my previous post, Tarsa Goes to School, I taught about my previous coloring guide using the color balance to provide Shadows color scheme. The problem I got with this is it's too pale. What I discovered is that having a solid foundation of color scheme is important to make a more vibrant digital art. How to do that is I don't know.
There are a lot of tutorials in youtube and online teaching about color scheme and color palette but I think it's best to have your own set of color palettes that you're comfortable to use rather than copying others. Trial and error seems to be the best solution.
Step 5: Clothes and Tongue

For the clothes, imagination if your best friend. the curves on the clothes is pretty forgiving. Just remember not to do two contradicting lines to signify the stretches on clothes and you'll be fine.
I'm using a two-color style right now as my basics on color scheme is not yet polished but if possible, try to make at least 3 color schemes for every part, Highlights > Base > Shadows.

This seems to be a weird combination and yes, it is. You can do this after doing the skin colors but the order is not that important. Do it at your own pace.
Step 6: Bed
I was planning to use another's work on the bed because doing backgrounds while re-learning everything else is VERY DIFFICULT. I can't emphasize enough that I have at least 5 years gap from the last time I drew and not drawing for 5 years is like not sharpening your katana. Your skills would get dull.
Going back, when I was trying to find something to use as a bed background, I accidentally saw this art made by @mysterious_artist Night on picsart. I'm not sure if I'm allowed to post the photo so I will provide the link instead: https://picsart.com/i/198904853000202 .
If this is still not allowed, tell me in the comments so I can delete it and avoid doing it in future posts.
I tried using the same idea of not using black lines and the above was what I got. I further pushed on the idea by adding another layer of dark shadows and the result is what you can see on the picture.
Also, this is probably the most fun I had doing a background. It's like abstract art of sort.
Final Output
The final output is what you can see above but why stop there? If you have all those layers cleanly put in place, you can make a simple mini-timelapse using Photoshop's Animation.

Disclaimer
If you're interested in playing Splinterlands, use my referral that you can find here
Unless otherwise indicated, the images used in this post are either mine or from bitmoji. The character is Tarsa from Splinterlands and the bed inspiration is cited above.
Everything is combined, edited, and enhanced using Photoshop CS5.
Previous Related Posts:
Tarsa Goes to School

Good night and Sleep well...