Español
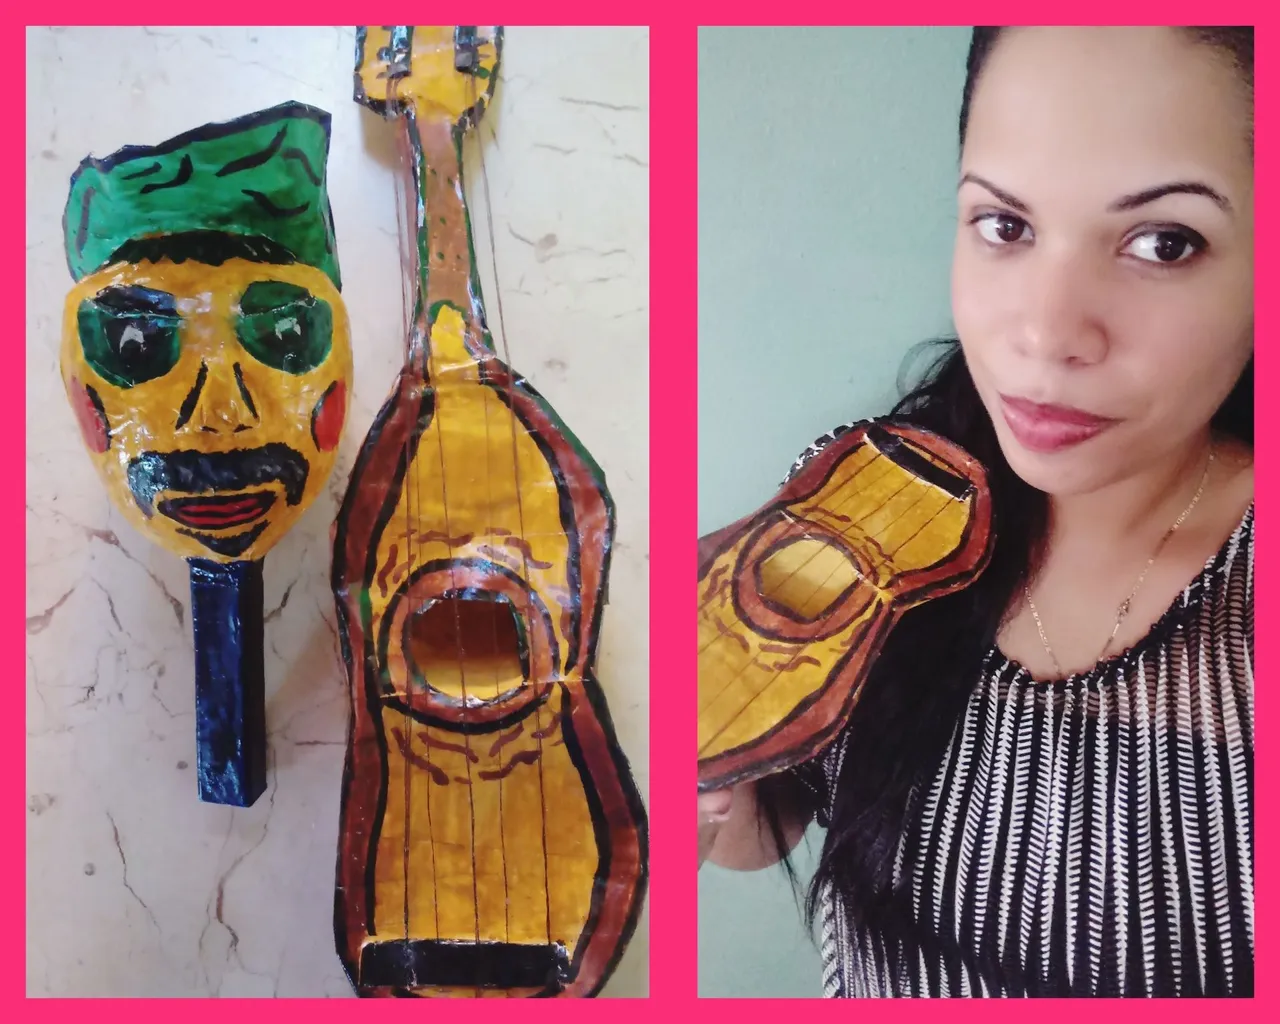
Saludos amigos creadores🙋🎶. Escuchar música en todos sus géneros, resulta muy grato para mi y más cuando realizo manualidades, quizás ustedes también comparten este gusto cuando realizan sus creaciones inspiradoras. Hoy, he decidido traerle como tutorial, utilizando la técnica de papel maché, la confección de dos instrumentos musicales que desde pequeña me han cautivado: maracas y una pequeña guitarra.
Materiales
.Molde: Estructura completa redonda
.Tiras de papel blanco
.Cartulina
.Pega elaborada de harina
.Pegamento
.Tijera
.Hilos
.Temperas
.Acuarelas
.Barníz
.Palitos de madera
.Semillitas o granos pequeños
Modo de confección
Maracas🎤
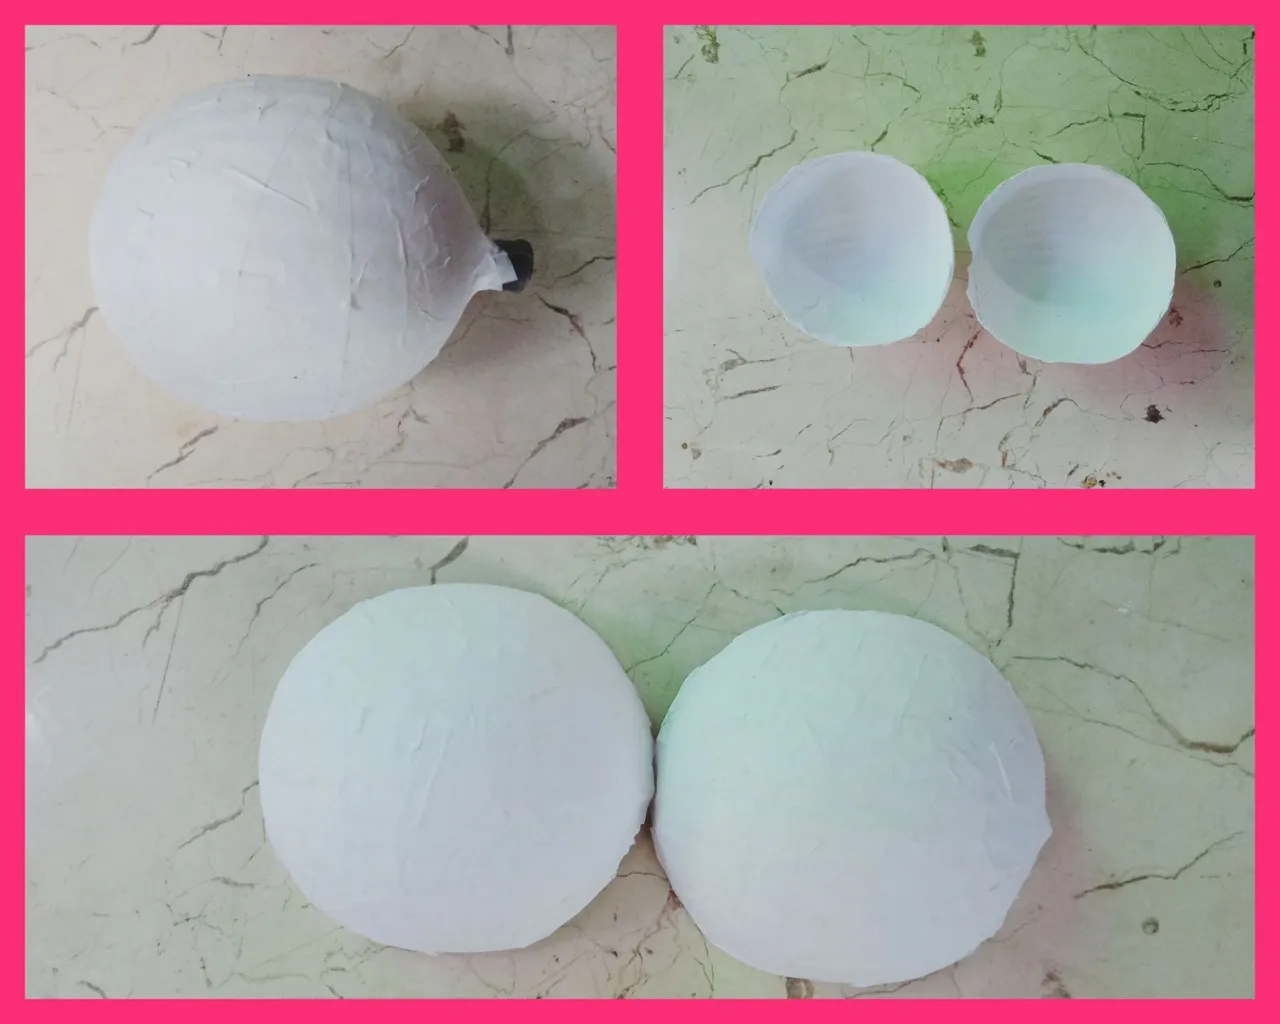
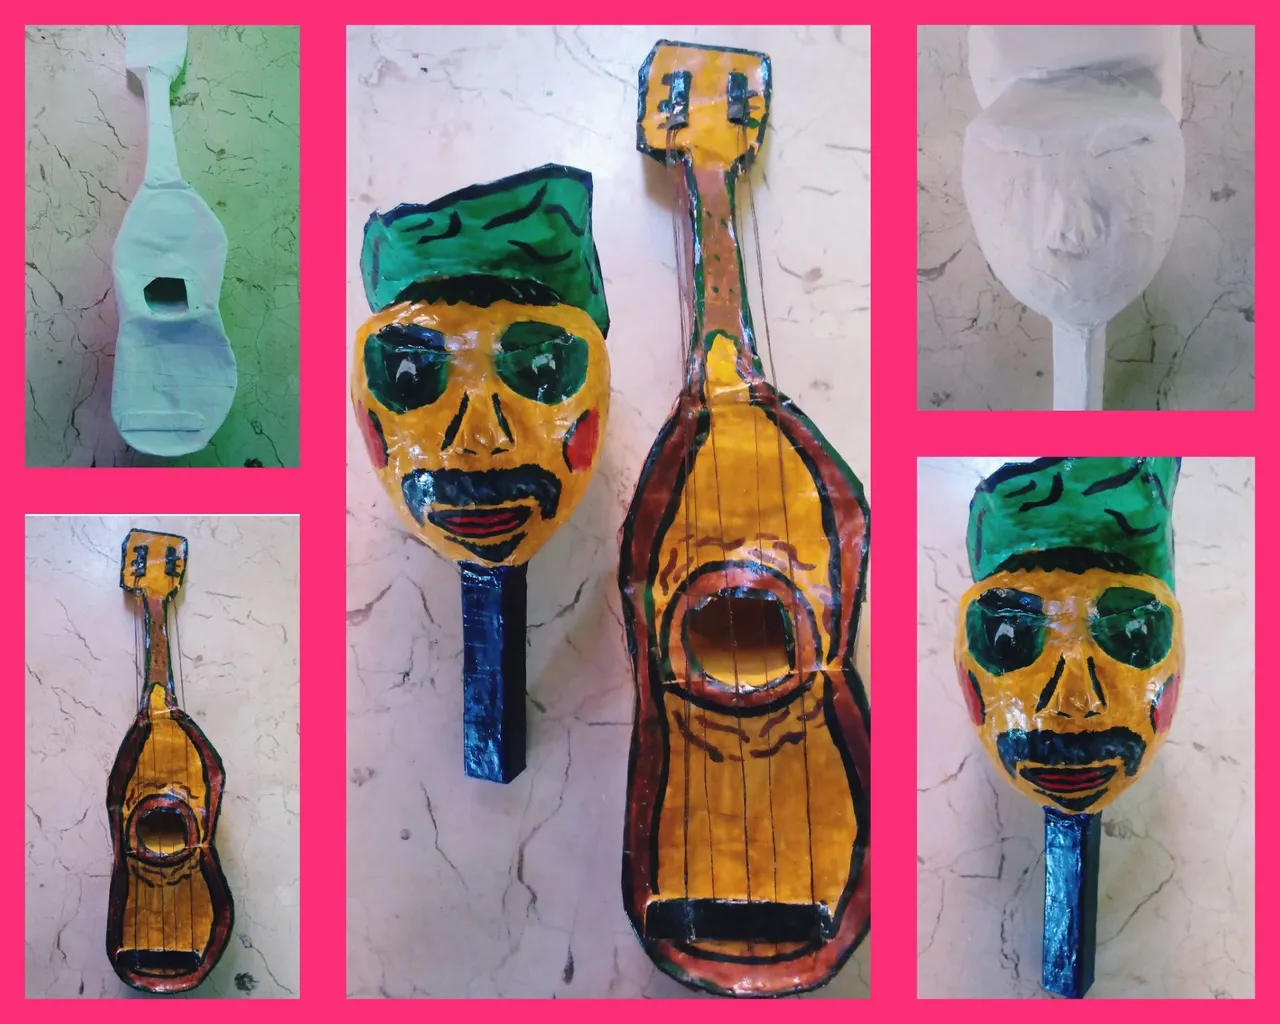
1-Tomar el molde redondo y humedecerlo en su totalidad con agua .
2-Humedecer tiras blancas en agua y cubrir todo el molde, generándole una primera capa.
3-Realizarle al molde dos capas de empapelado, con tiras blancas y la pega elaborada de harina. Dejarlo secar por ocho horas.
4-Utilizando una tijera, cortar cuidadosamente por todo su centro, permitiéndonos obtener dos mitades de igual diámetro al desmoldarlo.
5-Unir las dos mitades, realizando una cuarta capa de empapelado, con tiras blancas y pega elaborada de harina, dejarle un pequeño orificio descubierto.
6-Intruducir las semillitas o granitos por el orificio y posteriormente la tablita de madera.
7-Realizar una quinta capa de empapelado a la estructura completa generándole firmeza y dureza.
Accesorios
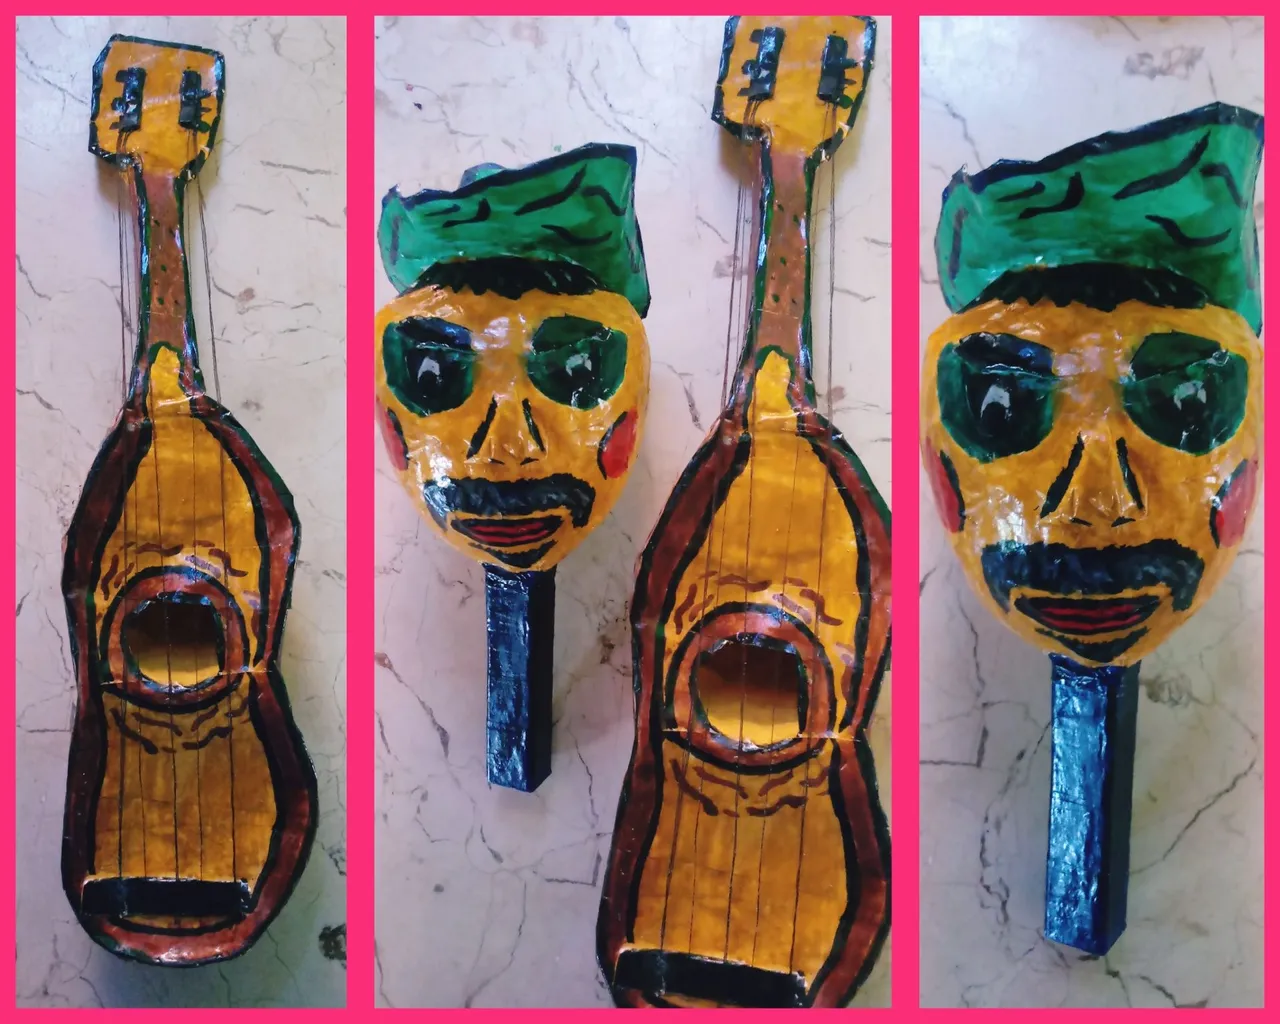
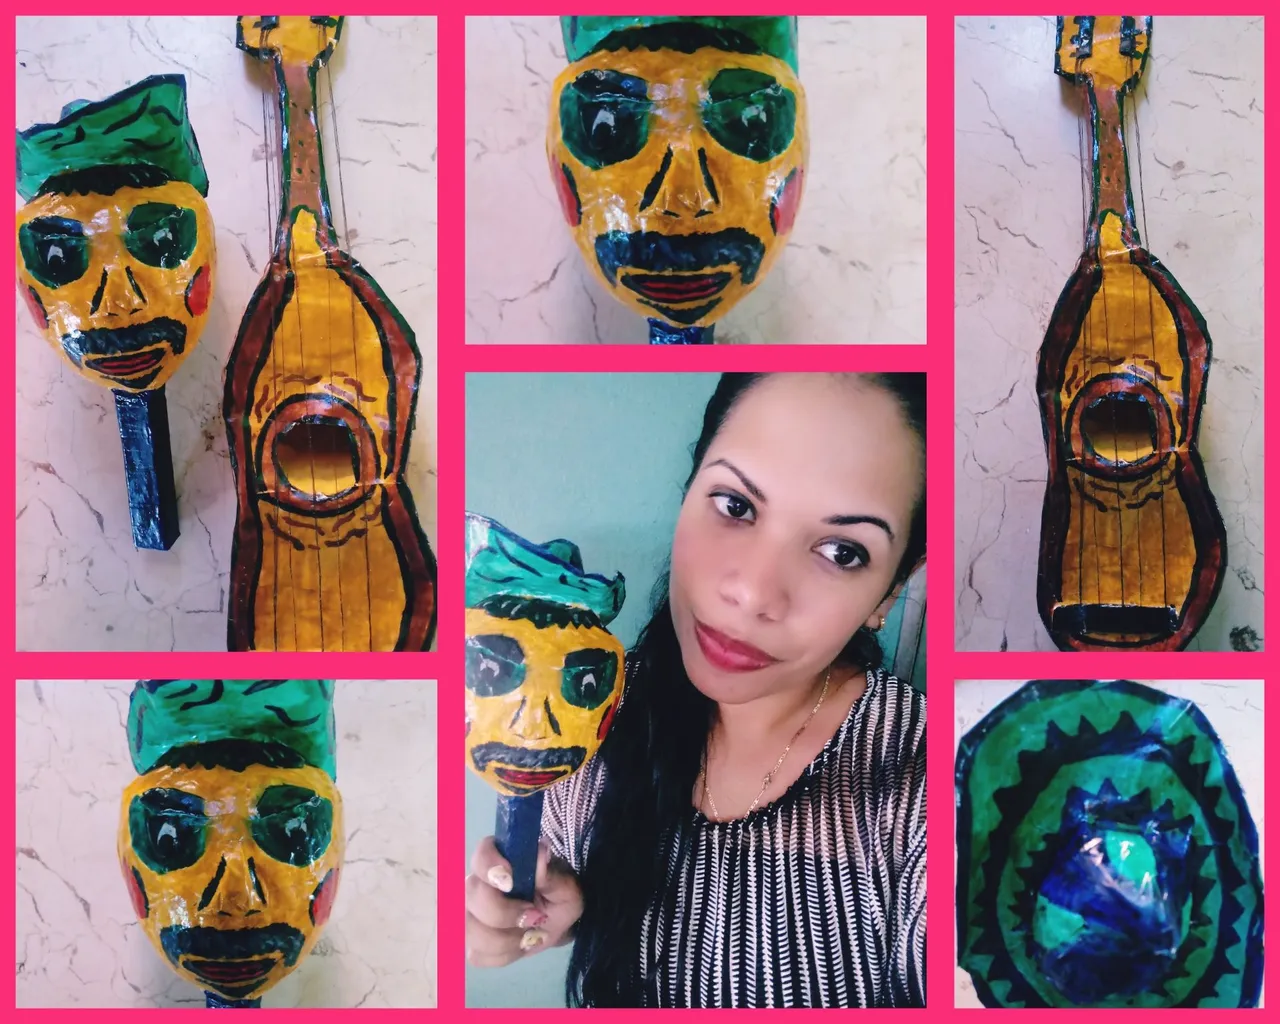
Los accesorios varían según como queramos personalizar a nuestra maraquita, yo realizando un sombrero, quise que representara a esos campesinos que al compás de las maracas, claves y guitarras nos deleitan con décimas populares.
Sombrero
1-Recortar un cuadrado mediano de cartulina.
2-Estrujar papel en forma redonda.
3-Adherir la cartulina al papel estrujado.
4-Empapelar la estructura completamente con tiras blancas de papel y pega elaborada de harina, amoldándolo según como deseemos el estilo del sombrero.
5-Utilizando pegamento adherir el sombrero a la maraquita.
Gitarra🎸
Para hacer la caja de resonancia
1-Tomar el molde redondo y humedecerlo con agua en su totalidad.
2-Realizar una primera capa de empapelado al molde con tiras de papel previamente cortadas humedecidas en agua.
3-Empapelar completamente el molde dándole dos capas con las tiras blanca y la pega elaborada de harina. Dejarlo secar por ocho horas.
4-Recortar por todo su centro permitiéndonos obtener dos mitades de igual diámetro.
5-Utilizando el pegamento, pegamos las dos mitades colocadas sucesivamente.
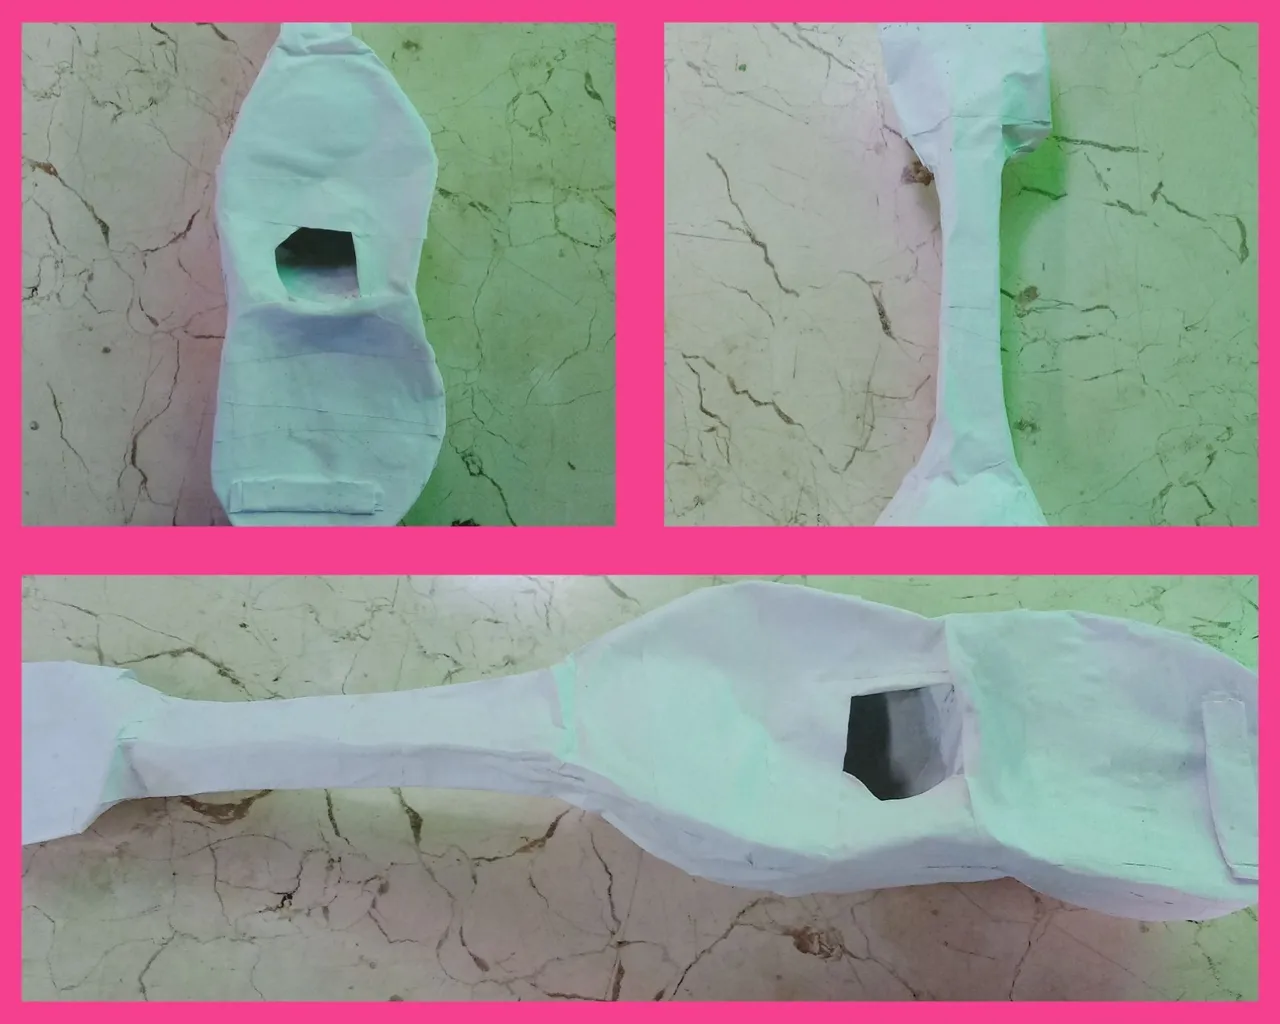
6-Empapelar completamente dejándole un agujero central descubierto. Dejar secar por ocho horas.
Para hacer el mango
1-Tomar la cartulina y recortar un cuadrado mediano.
2-Tomar una tablita y adherirle con pegamento el cuadrado.
3-Empapelar completamente la estructura con tiras de papel blanco y pega elaborada de harina.
4-Unir con el pegamento la caja de resonancia con el mango.
5-Empapelar completamente generándole firmeza y dureza a la guitarra.
Cuerdas
1-Recortar seis hebras de hilo de un mismo diámetro.
2-Adherirlo con el pegamento a la guitarrita.
Ya tenemos nuestra maraca y guitarra lista, ahora pasamos amigos a decorarla dándole nuestro estilo propio con acuarelas y temperas.Yo escojí el verde, naranja, marrón, pues me gustan como combinan y para resaltarlos me apoyé en el negro y el barníz para su acabado.

Espero que les haya gustado el tutorial de hoy, amigos. Los exhorto que disfruten una tarde relajada confecciónando sus instrumentos musicales preferidos, que nos sirven de decorativos para nuestros hogares, además de ser muy útiles, cuando queremos enseñar a los pequeños de casa de forma didáctica sobre la música y sus orígenes.
Bendiciones y excelentes días, comunidad🙋🎼
Confecciones y fotografías propias.
English
Greetings fellow creators🙋🎶. Listening to music in all its genres, is very pleasant for me and more when I make crafts, maybe you also share this taste when you make your inspiring creations. Today, I have decided to bring you as a tutorial, using the papier mache technique, the making of two musical instruments that have captivated me since childhood: maracas and a small guitar.
Materials
.Mould: Full round structure
.White paper strips
.Cardboard
.Paste made of flour
.Glue
.Scissor
.Threads
.Temperas
.Watercolors
.Varnish
.Wooden sticks
.Small seeds or small grains
Mode of preparation
Maracas🎤
1-Take the round mold and moisten it completely with water.
2-Moisten white strips in water and cover the entire mold, generating a first layer.
3-Make the mold two layers of wallpaper, with white strips and the glue made of flour. Let it dry for eight hours.
4-Using a scissors, carefully cut all over its center, allowing us to get two halves of equal diameter when unmolding it.

5-Join the two halves, making a fourth layer of wallpaper, with white strips and glue made of flour, leaving a small hole uncovered.
6-Insert the seeds or granites through the hole and then the wooden board.
7-Make a fifth layer of wallpaper to the complete structure generating firmness and hardness.
Accessories
The accessories vary according to how we want to customize our maraquita, I making a hat, I wanted it to represent those peasants who to the beat of the maracas, claves and guitars delight us with popular tenths.
Hat
1-Cut out a medium square of cardstock.
2-Squeeze paper into a round shape.
3-Adhere the cardboard to the squeezed paper.
4-Wallpaper the structure completely with white strips of paper and glue made of flour, molding it according to how we want the style of the hat.
5-Using glue adhere the hat to the maraquita.

Gypsy🎸
To make the soundboard
1-Take the round mold and moisten it with water in its entirety.
2-Make a first layer of wallpaper to the mold with previously cut paper strips moistened in water.
3-Completely wallpaper the mold giving it two layers with the white strips and the glue made of flour. Let it dry for eight hours.
4-Cut out all over its center allowing us to get two halves of equal diameter.
5-Using the glue, we glue the two halves placed successively.
6-Completely wallpaper leaving a central hole uncovered. Leave to dry for eight hours.
To make the mango
1-Take the cardstock and cut out a medium square.
2-Take a small board and glue the square to it.
3-Completely wallpaper the structure with strips of white paper and glue made of flour.
4-Join the sounding board with the handle with the glue.
5-Completely wallpaper generating firmness and hardness to the guitar.

Strings
1-Trim six strands of yarn of the same diameter.
2-Stick it with the glue to the guitar.
We already have our maraca and guitar ready, now we have friends over to decorate it giving it our own style with watercolors and tempera.I chose the green, orange, brown, because I like how they combine and to highlight them I leaned on the black and the varnish for its finish.
I hope you liked today's tutorial, friends. I urge you to enjoy a relaxing afternoon making your favorite musical instruments, which serve as decorations for our homes, as well as being very useful, when we want to teach the little ones at home in a didactic way about music and its origins.
Blessings and great days, community🙋🎼
Own clothing and photographs.