Fundamental Focus

In this week's Social Media Challenge, let us focus on one of the fundamental aspects of a Splinterlands battle: the Mana Allocation set for each match. Every battle has a randomly assigned Mana capacity along with specific rulesets, and players must build their teams within these constraints. However, a frequent misconception is that players should use every single point of Mana, leading them to stack their teams with high-cost Monsters. Today, I'm going to share a battle example that demonstrates how you can still emerge victorious without maxing out the available Mana! 😅

The Battle
While fulfilling my responsibilities in the Splinterlands scholarship account I have with Balthazar, bltzr-wizard-729, I was able to engage in a battle that has a generous mana capacity but only have to utilize a portion of it for my team setup. To get right into the action, the battle link can be found here. Otherwise, do read on as I go into more detail regarding the lineup and fight.

Let us start by breaking down the rulesets used in this battle. To begin with, we have the Equalizer ruleset, which sets the initial Health of all Monsters to match that of the Monster with the highest base Health on either team. Additionally, there is the Lost Magic ruleset, which prohibits the use of any Monster with Magic attacks. This battle allows for a generous mana cap of 42 and restricts the available Splinters to the Life and Dragon.

Summoner, Quix The Devious
After reviewing the battle's rulesets, I devised a strategic plan for assembling my team. Since I wanted to integrate the Dragon Splinter into my approach, I quickly chose Quix The Devious as my Summoner. Quix The Devious provides a -1 Ranged attack debuff, which is particularly valuable in this battle, especially given the Lost Magic ruleset, which usually results in more Ranged Monsters being used. This strategic edge gave me the confidence to enter the battle with an upper hand! 😏
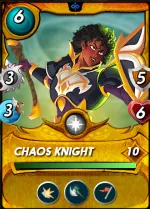
First Position, Chaos Knight
In this battle governed by the Lost Magic ruleset, the Chaos Knight stands out as an excellent choice for a tanking position! Equipped with the Shield ability, this Monster can mitigate damage from both Melee and Ranged assaults. Additionally, its Giant Killer skill enables it to inflict double the damage on target costing 10 or more mana. Most importantly, the Chaos Knight possesses the Inspire ability, granting a +1 Melee attack boost to my lineup, which is a vital component of my strategy! 💪
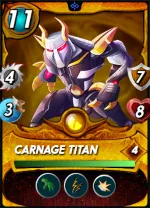
Second Position, Carnage Titan
The Carnage Titan stands out as a formidable force on the battlefield, boasting exceptional stats and potent abilities. Despite being a Melee-type Monster, it can still dish out damage from the second position thanks to its Reach ability. Additionally, its Double Strike skill allows the Carnage Titan to deliver crushing hits to its foes. With the Shield ability further enhancing its resilience, the Carnage Titan can endure reduced Melee and Ranged damage when under attack! 😝
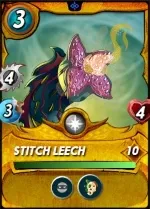
Third Position, Stitch Leech
Positioning the Stitch Leech in the middle of the lineup allows for optimal use of its Life Leech ability. With the sturdy tanking skills of the Chaos Knight and Carnage Titan providing cover, the Stitch Leech has the opportunity to accumulate Health by targeting the enemy's backline through its Sneak ability. This setup ensures that if the front two units fall and the Stitch Leech is pushed to the front, it can effectively step into a tank role, maintaining the defensive strategy's flow! 😜
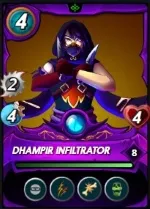
Fourth Position, Dhampir Infiltrator
In this battle, where my strategy centered on targeting the enemy's backline, the Dhampir Infiltrator proved to be an invaluable asset in my lineup. Its strength comes from its aggressive approach, quickly taking down foes from the rear ranks of the opposition. With both Double Strike and Sneak abilities at its disposal, the Dhampir Infiltrator can deliver powerful attacks alongside other Sneaky Monsters, posing a significant threat to the enemy's forces! 😉
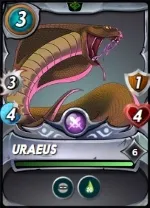
Fifth Position, Uraeus
I purposefully included Uraeus in my team to align with my broader battle strategy. As a member of the Neutral Splinter, it serves as a flexible option frequently utilized in Diamond and Champion League Ranked Battles. Despite its modest mana cost, Uraeus delivers a solid 3 Melee damage to the enemies' backline through its Sneak ability. However, what makes Uraeus truly stand out is its ability to inflict Poison on enemy Monsters, introducing a powerful strategic element to the battle! 😵
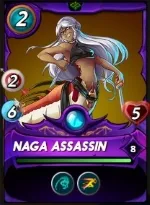
Last Position, Naga Assassin
The Naga Assassin is renowned for its remarkable Speed, making it one of the quickest Monsters around. I strategically placed it in the last slot to capitalize on its Backfire ability, offering a defense against Sneak attacks. This ability causes damage to any enemy Monster that targets the Naga Assassin and fails to hit. Additionally, its Swiftness ability enhances the entire team's Speed, increasing the likelihood of enemy Monsters missing their attacks during battles! 👊

The Analysis
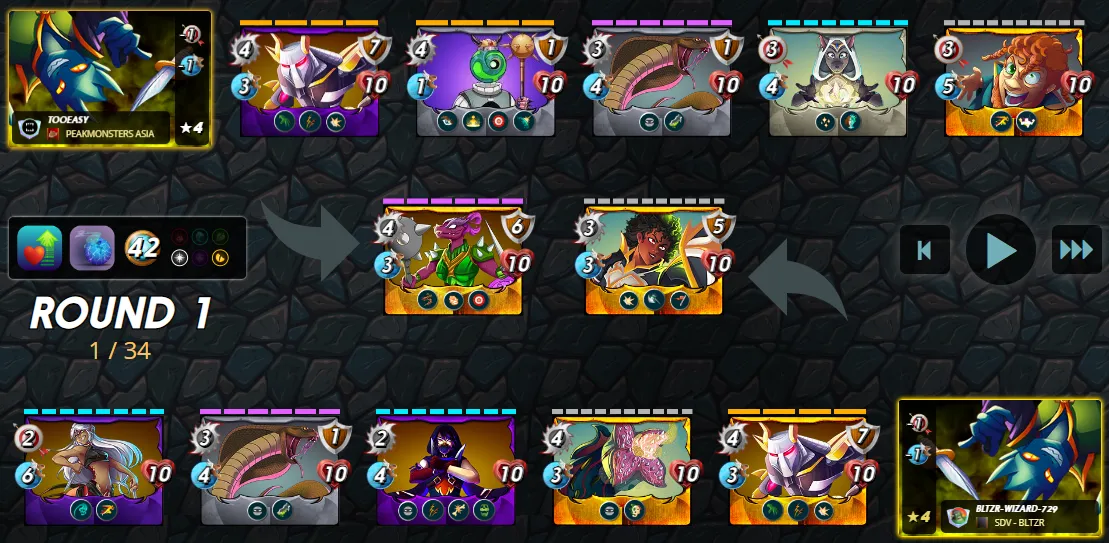
Today's post is centered on efficient Mana allocation rather than just using it all, and the battle I am showcasing here perfectly illustrates my point. If you examine my lineup, you will see that I spent only 33 out of the 42 Mana available! 😂
One reason this is possible is due to the Equalizer ruleset governing the battle, which sets all Monsters' initial Health to that of the highest Health Monster on either team. This aspect benefits low-Mana Monsters often overlooked in high-Mana battles, as they might seem too weak to participate 😕
My lineup focuses on Melee attacks and includes three low-Mana Sneak Monsters, allowing me to effectively deal massive damage to the enemy's backline. The Chaos Knight's Inspire ability, providing a +1 Melee attack buff, made these Melee Monsters even more powerful! 😁
With the Lost Magic ruleset in effect, the battle only involves Melee and Ranged attackers, which made having Chaos Knight and Carnage Titan with their Shield ability particularly beneficial for my lineup. These two Monsters served as dependable tanks, offering a strong defense! 😤
Do you guys have any better recommendations for setting up the team in this particular ruleset? Do share them with me in the below comments 😜

If you made it this far, I sincerely appreciate your time and value your encouragement. Please feel free to leave any comments or suggestions so that we can discuss about other strategies. Thinking about giving Splinterlands a try but haven't signed up yet? Feel free to use my referral link: https://splinterlands.com?ref=ak08, and be sure to reach out to me if you have any questions!
Are you interested in reading some of my future writings? Don't forget to follow me! In the meantime, here are some of my most recent blogs if you'd like to view them:
 |  |
|  |
All banners, dividers card and battle images used in this article are open source and obtained from the Splinterlands team or made by flauwy. Do check out his link for other amazing designs.