¡Hola, hola! Mi gente de Hive y linda comunidad de DIYHub 😊, espero todos se encuentren súper bien, animados e inspirados.
Quiero presentarles otro trabajito realizado con materiales reciclados, esta es mí TERCERA ENTRADA en el CONCURSO PURR-FECT DIYHUB - En tributo a los GATOS, inspirado por la celebración del Día Internacional del Gato, celebrado el pasado 8 de agosto.
Y es que a pesar de no tener un gatito como mascota, de verdad me parecen muy hermosos y sigo teniendo muchas ideas de manualidades que podría hacer con motivo de gatos; y es que sin duda alguna el resultado siempre es súper muy tierno.
Hello, hello! My Hive people and beautiful DIYHub community 😊, I hope you are all super well, encouraged and inspired.
I want to present you another little work made with recycled materials, this is my THIRD ENTRY in the PURR-FECT DIYHUB CONTEST - In tribute to CATS, inspired by the celebration of International Cat Day, celebrated last August 8.
And despite not having a kitten as a pet, I really find them very beautiful and I still have many ideas of crafts that I could do with a cat motif; and there is no doubt that the result is always super very cute.
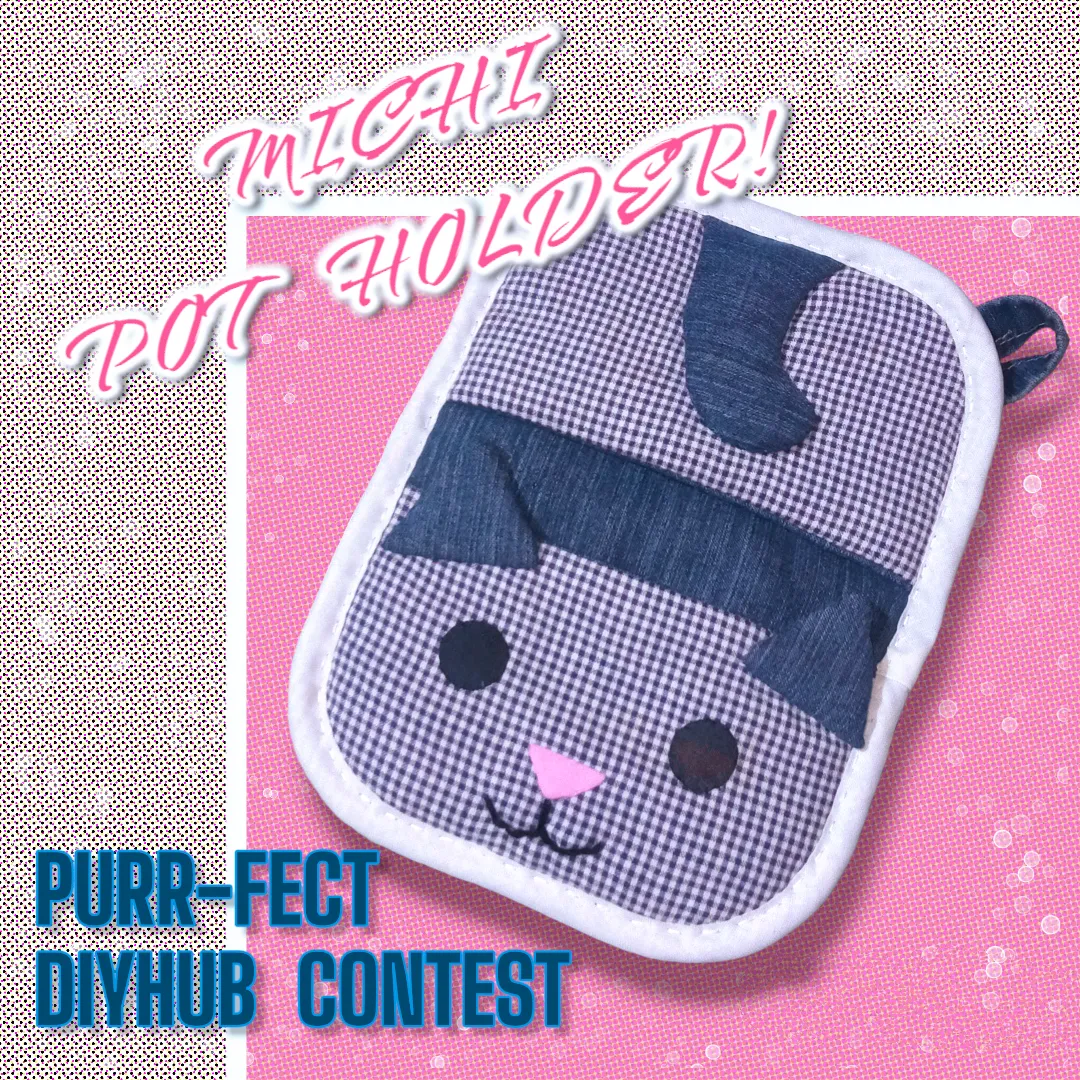
¡Michi agarra ollas! / Michi pot holder!
Resulta que a mi mamá se le quemo el único guante para agarrar las ollas que tenía en la cocina, y tenemos meses sin tener un agarra ollas decente, y esta es la principal razón por la que decidí hacer uno, cabe destacar que no soy costurera profesional ni nada parecido por el estilo jajaja… pero como siempre, me esforcé muchísimo para lograr que quedara súper lindo y muy bien hecho.
El guante quemado lo tenía guardado con la intención de colocarle tela nueva y así recuperarlo, pero no tenía la tela adecuada, y como hace poco hice un lindo antifaz para dormir con tela de un blue jean viejo que no utilizaba pensé que la tela sobrante del pantalón podría ser ideal para hacer el agarra ollas, ya que esta no se quemaría tan fácil y al ser gruesa protegería aún más nuestras manos del calor del fuego de la estufa. Acá puedes ver el post de como hice el antifaz @laranitacrochet/antifaz-para-dormir-realizado-con-materiales-reciclados-sleeping-mask-made-from-recycled-materials
Y ya que tenía la idea de hacer más manualidades con motivo de gatitos decidí hacer el “Michi Agarra Ollas” jajaja…. y también otro agarra ollas que haga juego con el Michi, pero ese se los muestro luego ya que aún no lo he realizado.
Materiales:
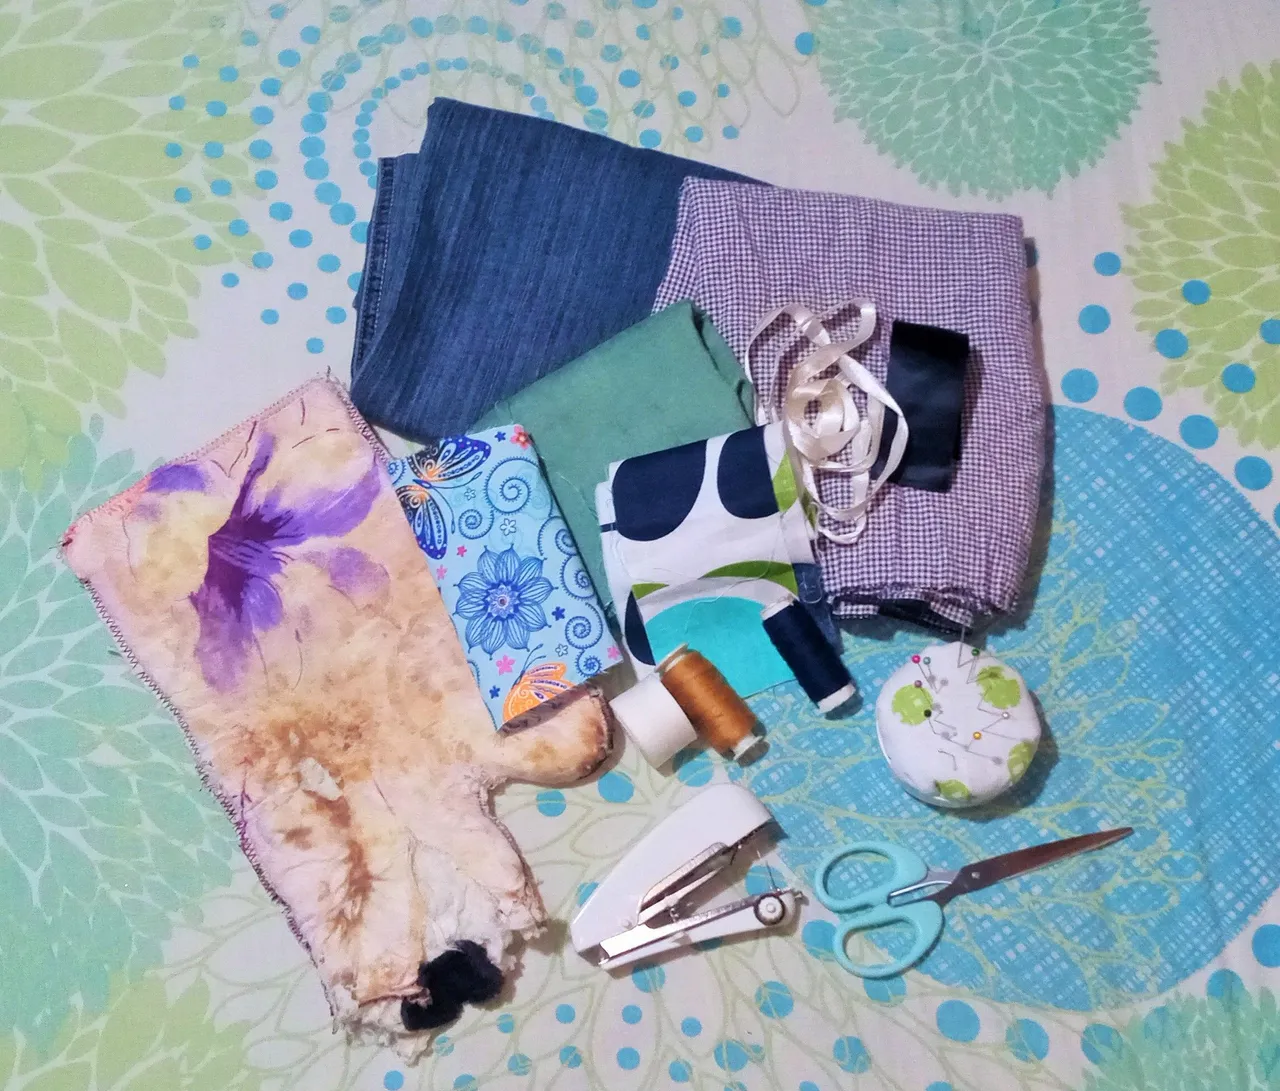
Para realizar este trabajo, tuve la suerte de conseguir todo lo necesario en casa:
- El guante quemado que no deseche porque tiene un muy buen relleno que es puro algodón, y realmente es de muy buena calidad, la tela que lo recubría no lo era tanto.
- Un retazo de tela de unos jeans viejos.
- Tela de algodón estampada que en este caso es de una blusa súper antigua de mi hermana que nunca boto porque le gustaba muchísimo.
- Un pequeño rectángulo de guata delgada.
- Cinta de raso en color negro, para hacer los ojos del Michi.
- Sesgo blanco, un diminuto trozo de tela rosada para hacer la nariz, hilo y aguja para coser y una buena tijera para cortar la tela.
- También utilice un par de hojas recicladas para hacer el patrón, una escuadra y por supuesto lápiz, borrador y tijeras para cortar papel.
It turns out that my mom burned the only pot holder glove she had in the kitchen, and we have months without having a decent pot holder, and this is the main reason why I decided to make one, it should be noted that I am not a professional seamstress or anything like that hahaha ... but as always, I tried very hard to make it super nice and very well done.
I had the burned glove saved with the intention of putting new fabric on it and recover it, but I didn't have the right fabric, and since I recently made a nice sleeping mask with fabric from an old blue jean that I didn't use I thought that the leftover fabric from the pants could be ideal to make the pot holder, since it wouldn't burn so easily and being thick it would protect our hands even more from the heat of the stove fire. Here you can see the post of how I made the mask @laranitacrochet/antifaz-para-dormir-realizado-con-materiales-reciclados-sleeping-mask-made-from-recycled-materials
And since I had the idea of making more kitty-themed crafts I decided to make the "Michi Pot Holder" hahaha.... and also another pot holder to match the Michi, but I'll show you that one later since I haven't made it yet.
Materials:
To do this job, I was lucky enough to get everything I needed at home:
- The burnt glove that I did not discard because it has a very good filling that is pure cotton, and it really is of very good quality, the fabric that covered it was not so good.
- A piece of fabric from an old pair of jeans.
- Printed cotton fabric that in this case is from a super old blouse of my sister's that she never threw away because she loved it so much.
- A small rectangle of thin wadding.
- Satin ribbon in black, to make Michi's eyes.
- White bias, a tiny piece of pink fabric to make the nose, thread and needle for sewing and a good scissors to cut the fabric.
- Also use a couple of recycled sheets to make the pattern, a square and of course pencil, eraser and scissors to cut paper.
Paso a paso:
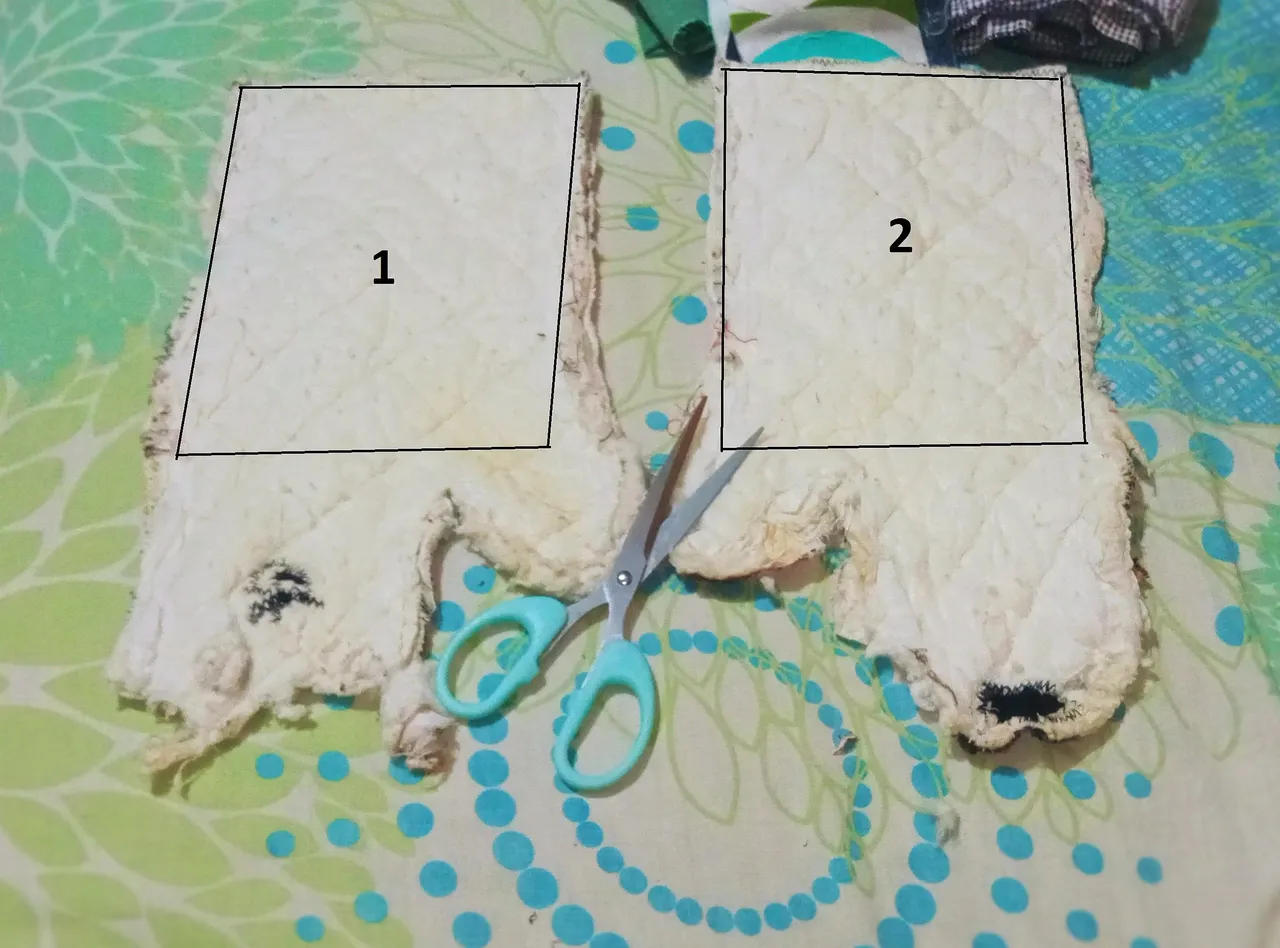
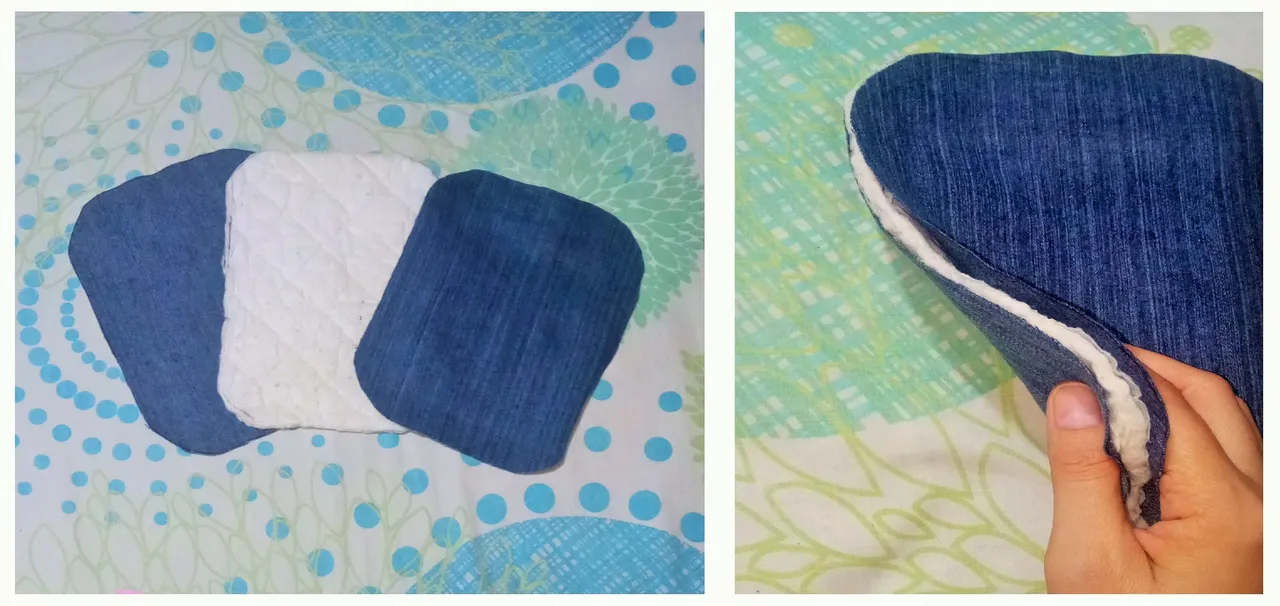
Bueno para realizar este lindo trabajo, lo primero que hice fue desarmar el guante viejo y quedarme solo con el relleno, y de este pude sacar 2 rectángulos perfectos para realizar un par de agarra ollas.
Step by step:
Well to make this nice work, the first thing I did was to disassemble the old glove and stay only with the stuffing, and from this I could get 2 perfect rectangles to make a pair of pot holder.
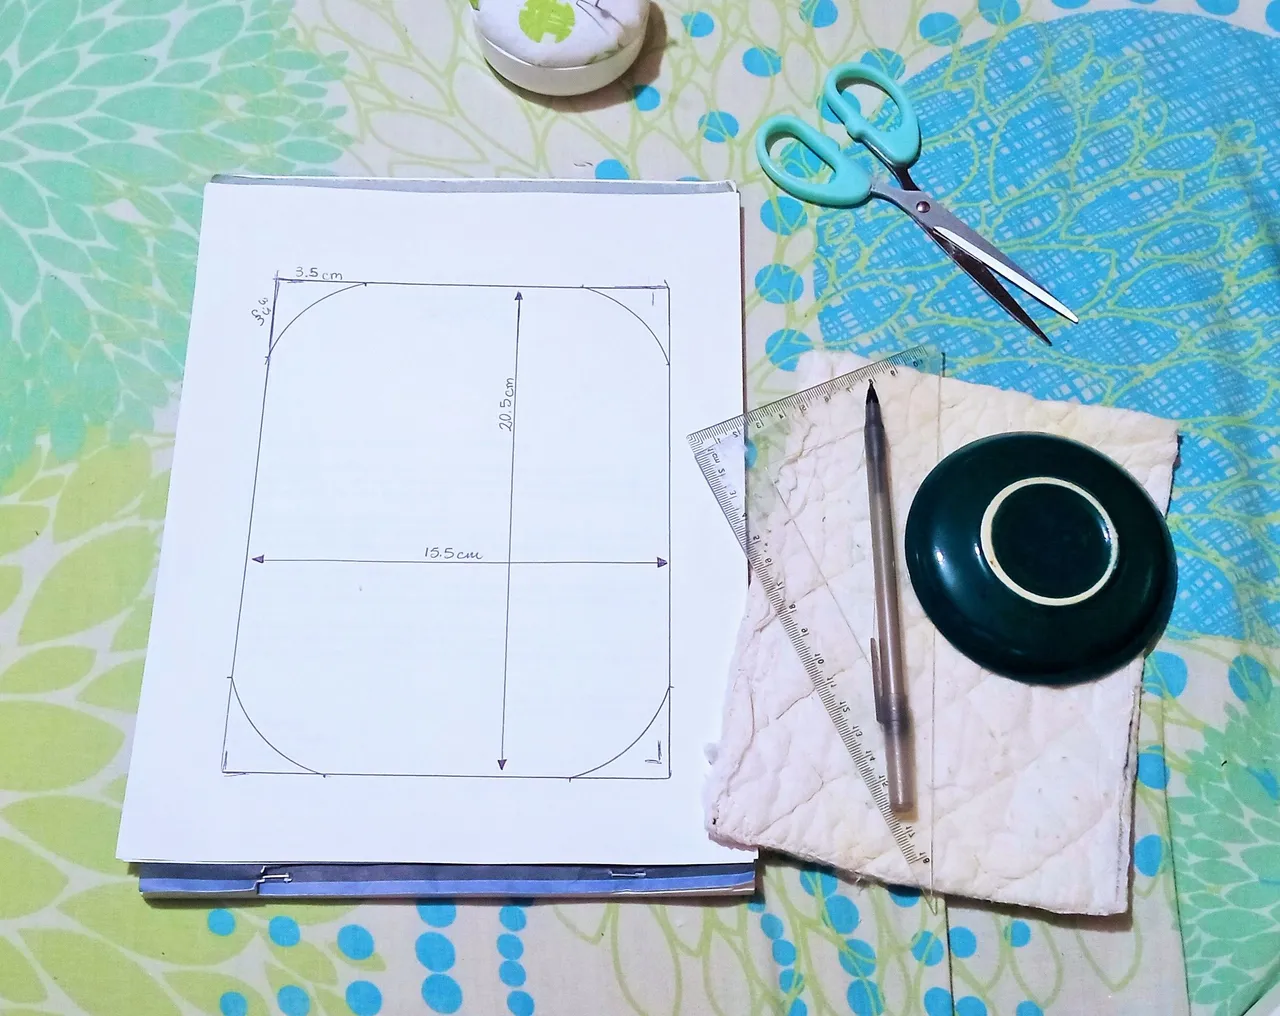
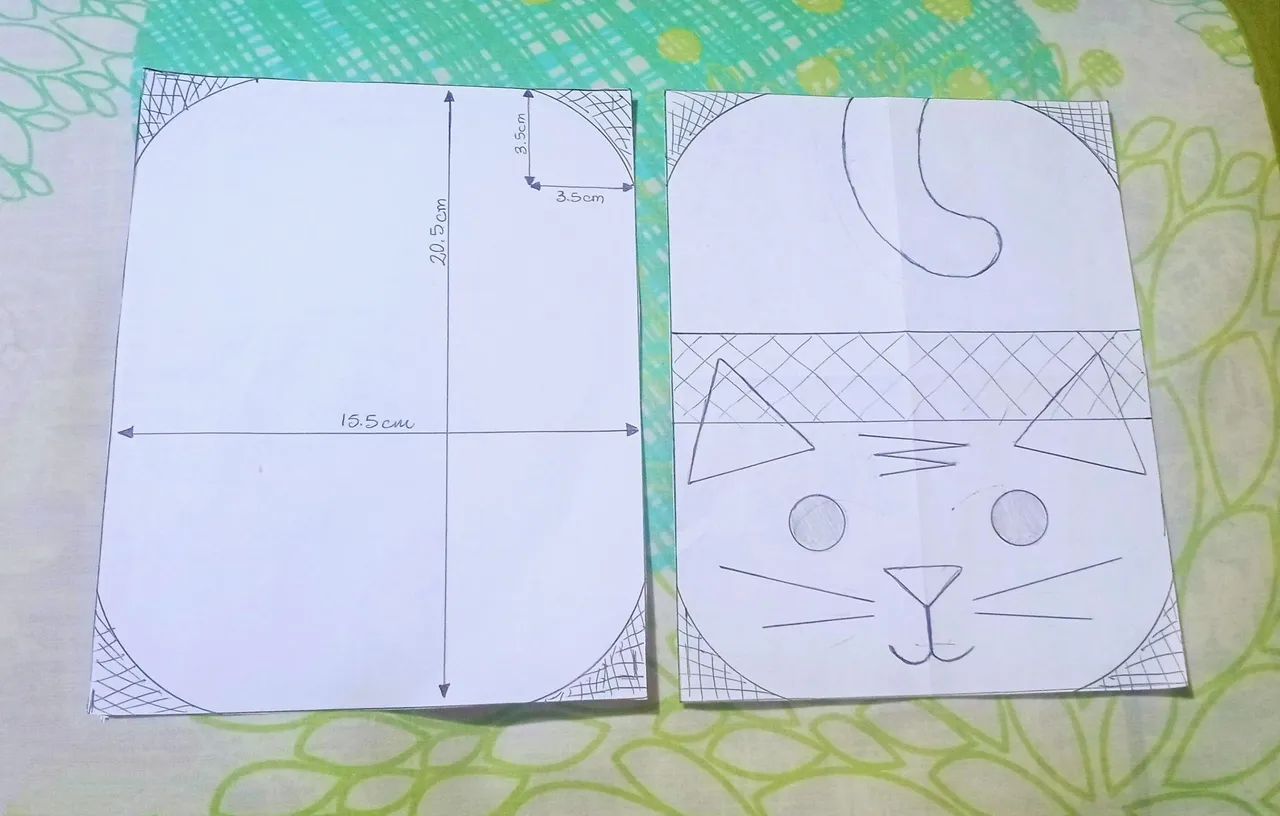
Luego procedí a hacer el patrón de lo que sería el “Michi Agarra Ollas” y a recortarlo. Las medidas serían las mismas del rectángulo de relleno que saque del guante viejo.
Then I proceeded to make the pattern of what would be the "Michi pot holder" and cut it out. The measurements would be the same as the stuffing rectangle I took out of the old glove.
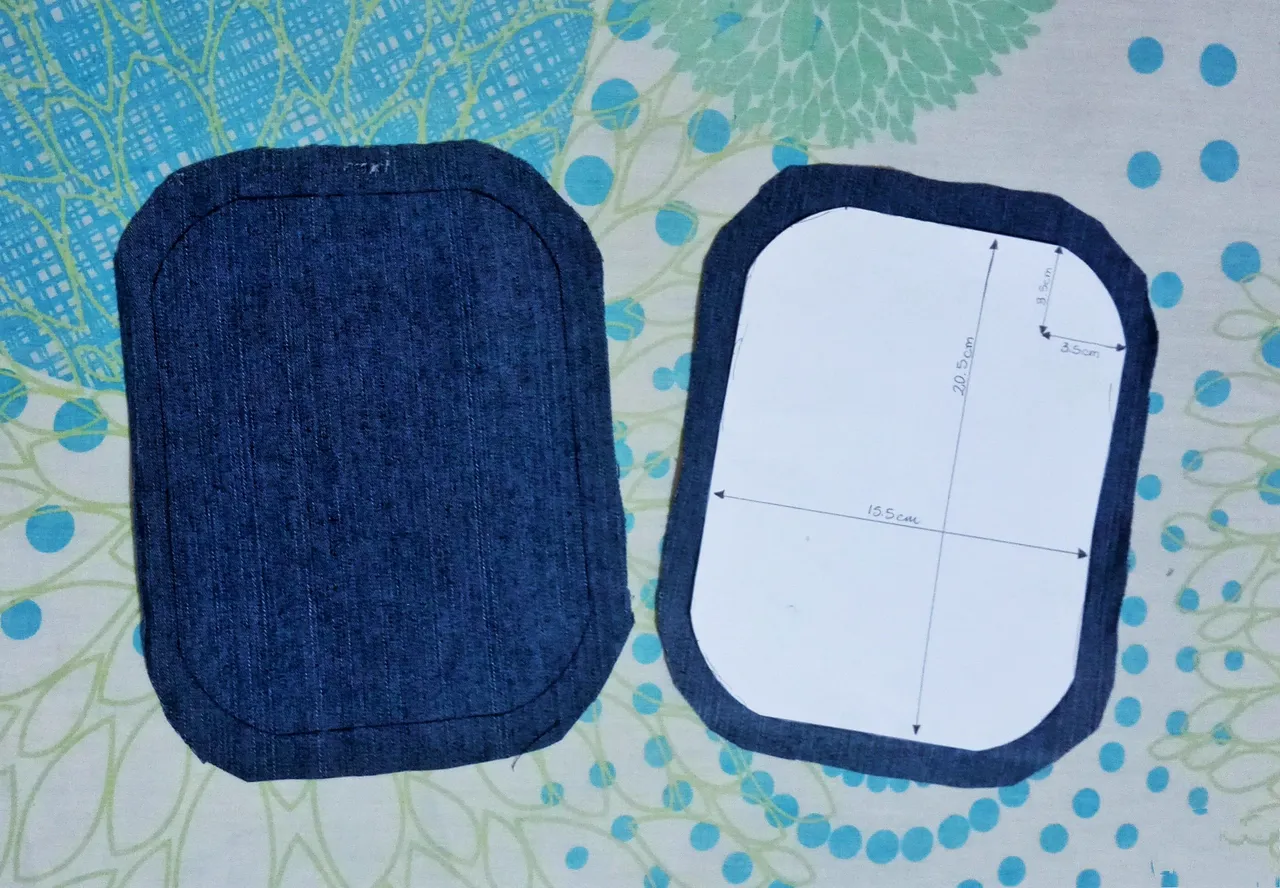
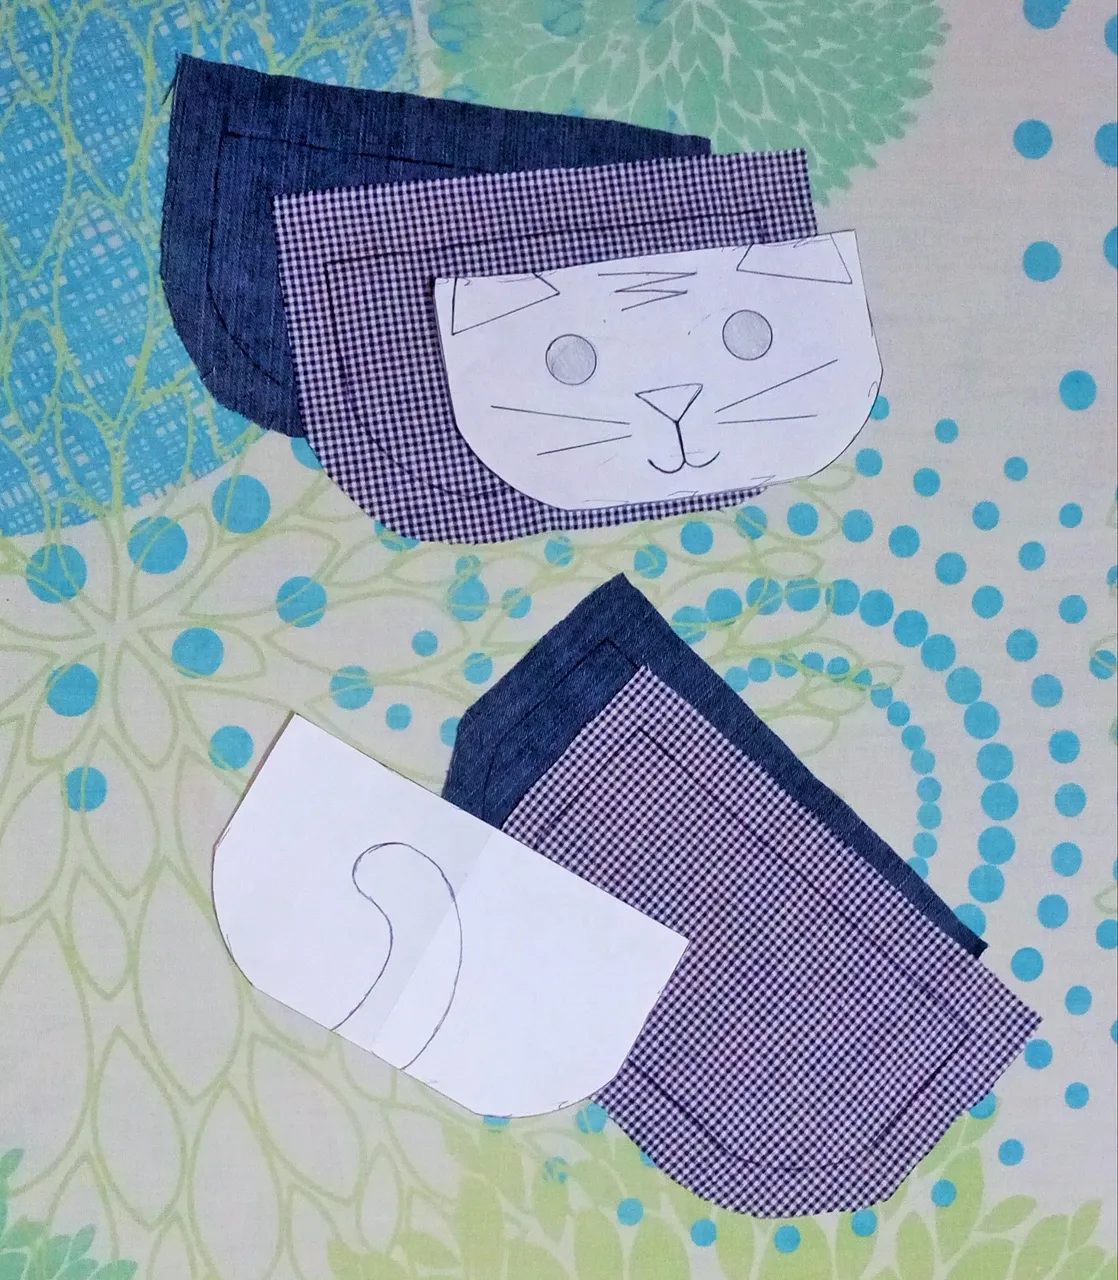
Seguidamente lo que hice fue transferir el patrón a las telas y cortarlas para así iniciar el armado del agarra ollas.
Then I transferred the pattern to the fabrics and cut them to start assembling the pot holder.
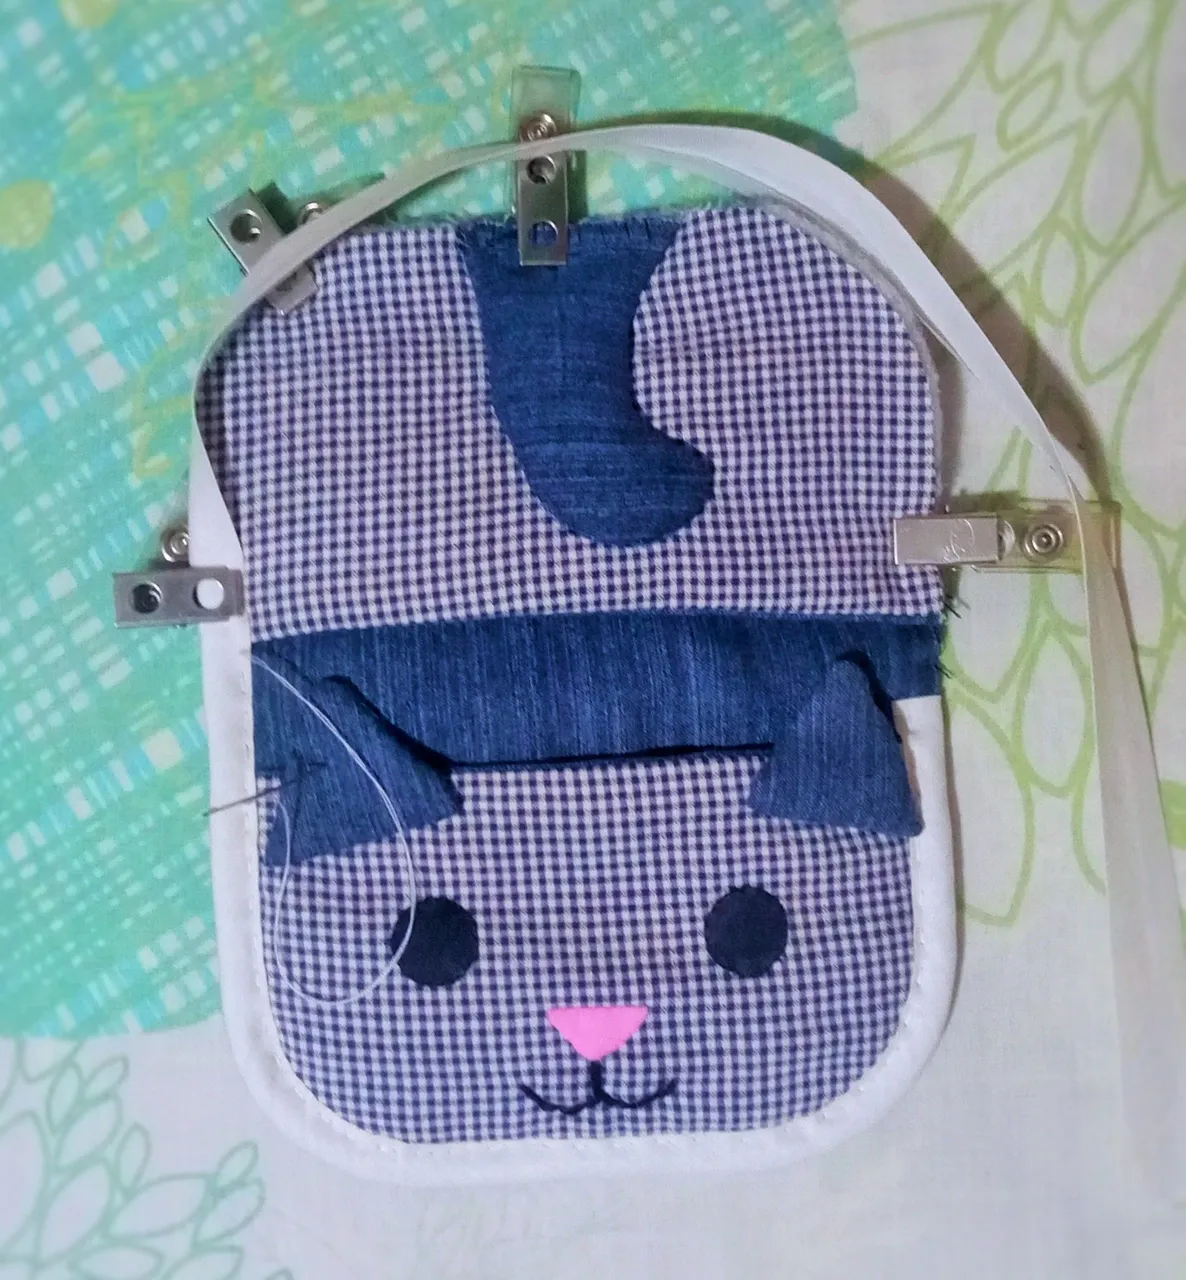
Ahora viene la parte en la que se hace la magia jajaja… cocer todo para unirlo. Les cuento que esta parte se me complico en ciertos instantes porque como les dije al inicio no soy costurera y tengo muy pocos conocimientos en esta área.
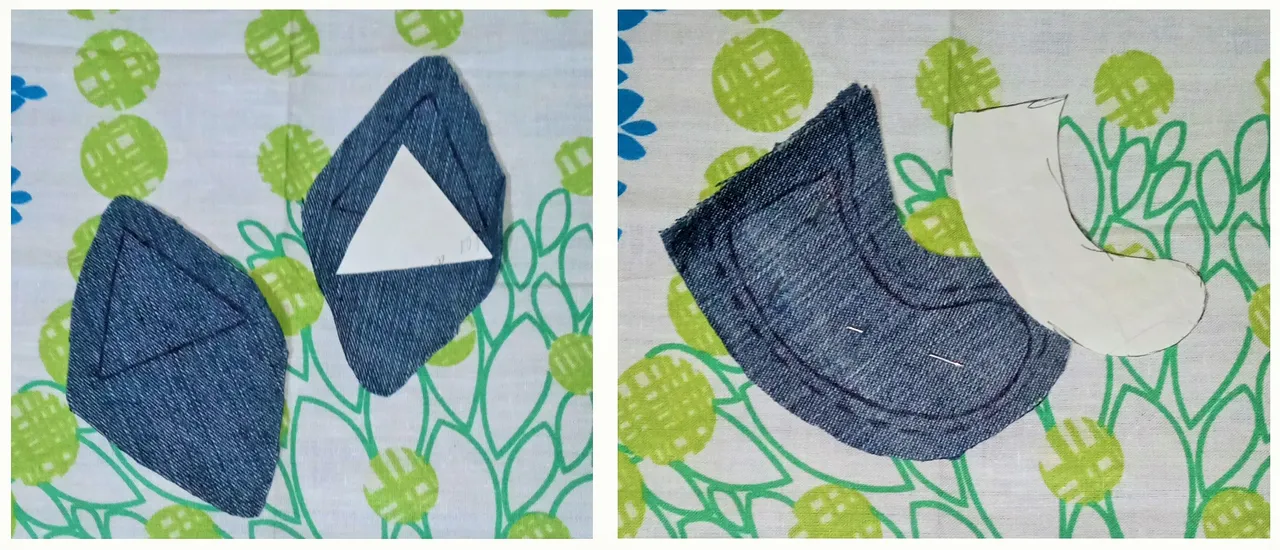
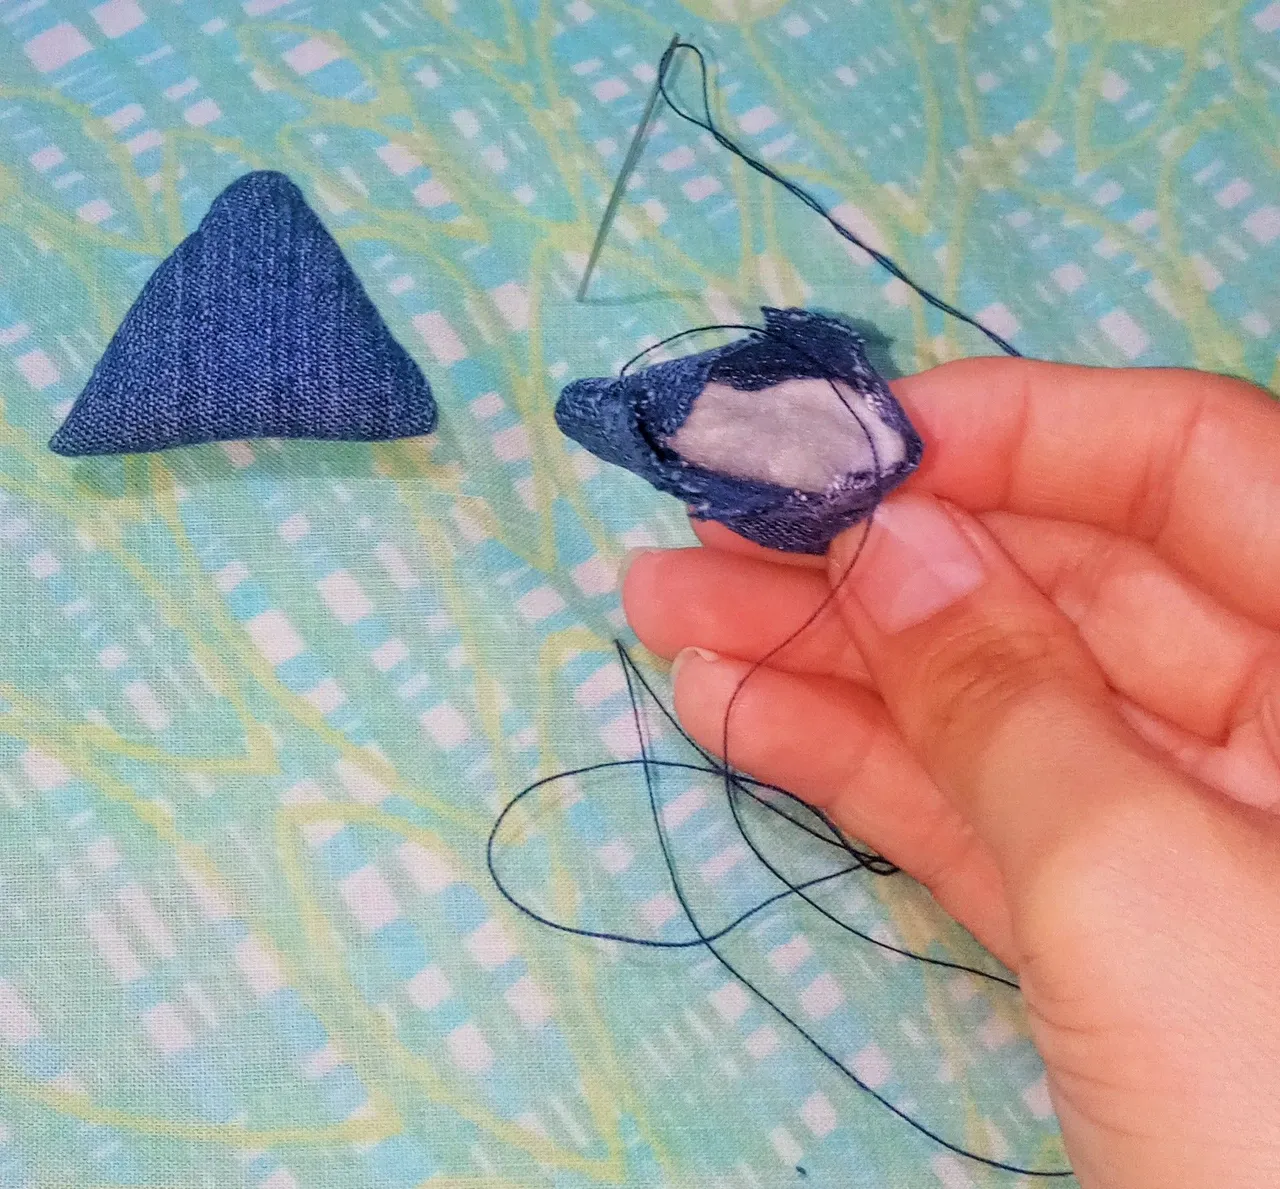
Lo más complicado para mí fue coser las orejas y la nariz ya que son piezas bastante pequeñas y tenía que darles vuelta luego de cocerlas y hacerles una costura invisible. Y como sabía que esta sería la parte más difícil para mí, fue lo primero que hice. Las orejas son un triángulo equilátero de 4cm en sus lados.
Now comes the part where the magic happens hahaha... sewing everything together. I tell you that this part was complicated at times because as I said at the beginning I am not a seamstress and I have very little knowledge in this area.
The most complicated for me was to sew the ears and nose because they are quite small pieces and I had to turn them over after sewing them and make an invisible seam. And since I knew this would be the most difficult part for me, it was the first thing I did. The ears are an equilateral triangle of 4cm on its sides.
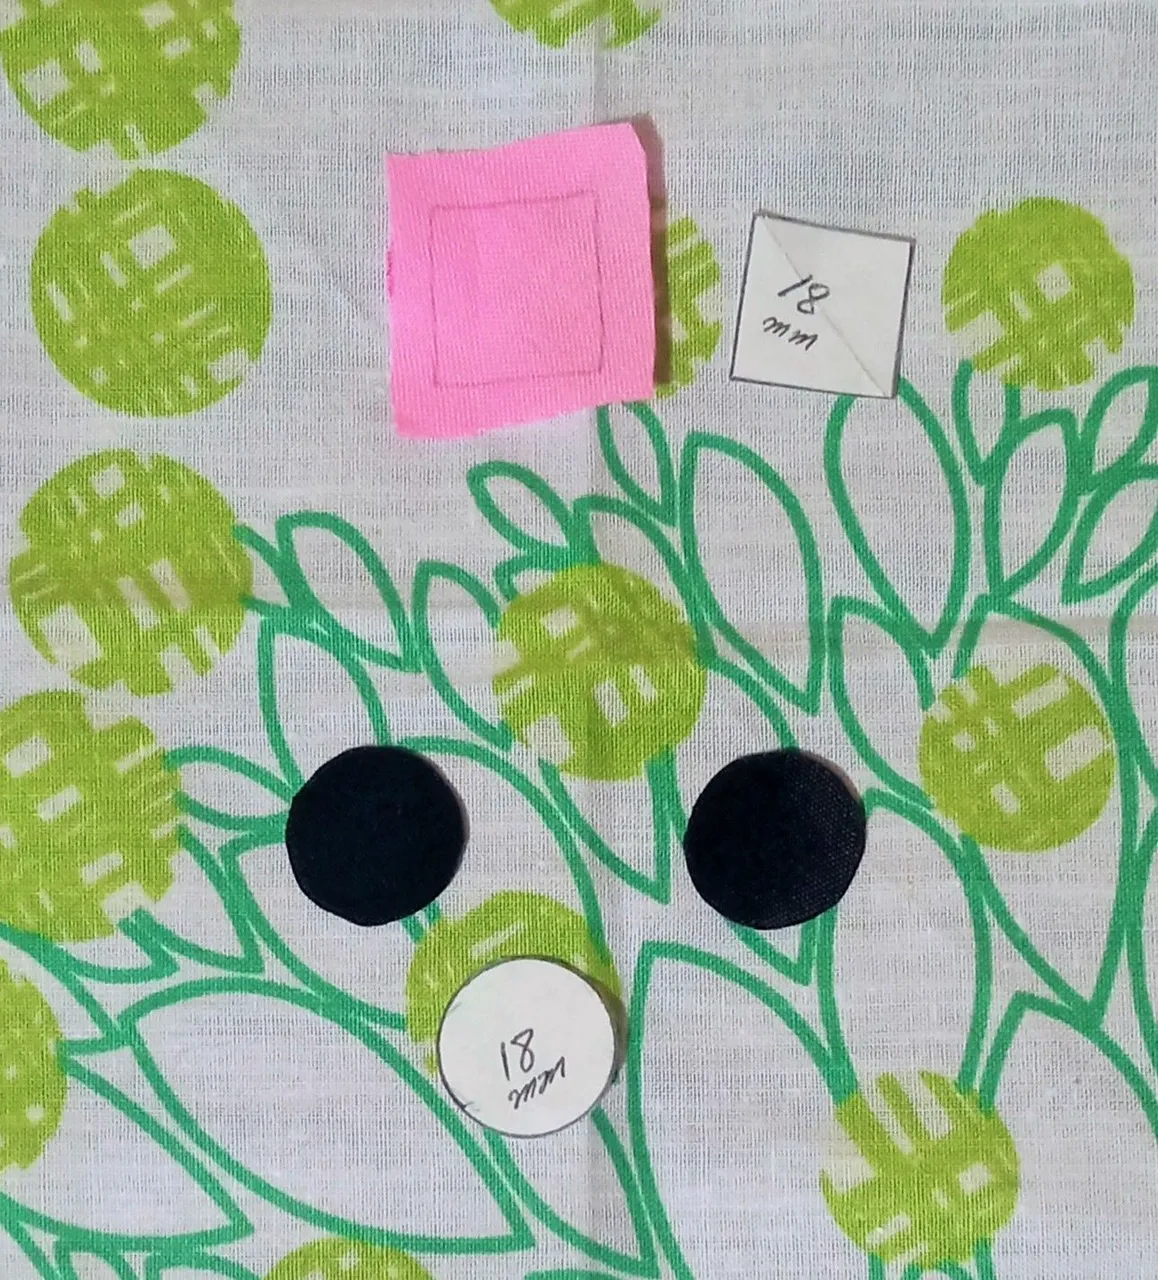
Luego hice los ojitos, con un pequeño trozo de cinta negra que me sobro de una manualidad anterior, lo que hice fue sacar 2 círculos de 1.8 cm de diámetro y luego los queme por los bordes para evitar que se deshilache. La nariz también mide 1.8 cm en sus lados ya que la hice con un pequeño cuadrado de tela rosada.
Then I made the eyes, with a small piece of black ribbon that I had left over from a previous craft, I made 2 circles of 1.8 cm in diameter and then burned them at the edges to avoid fraying. The nose also measures 1.8 cm on its sides since I made it with a small square of pink fabric.
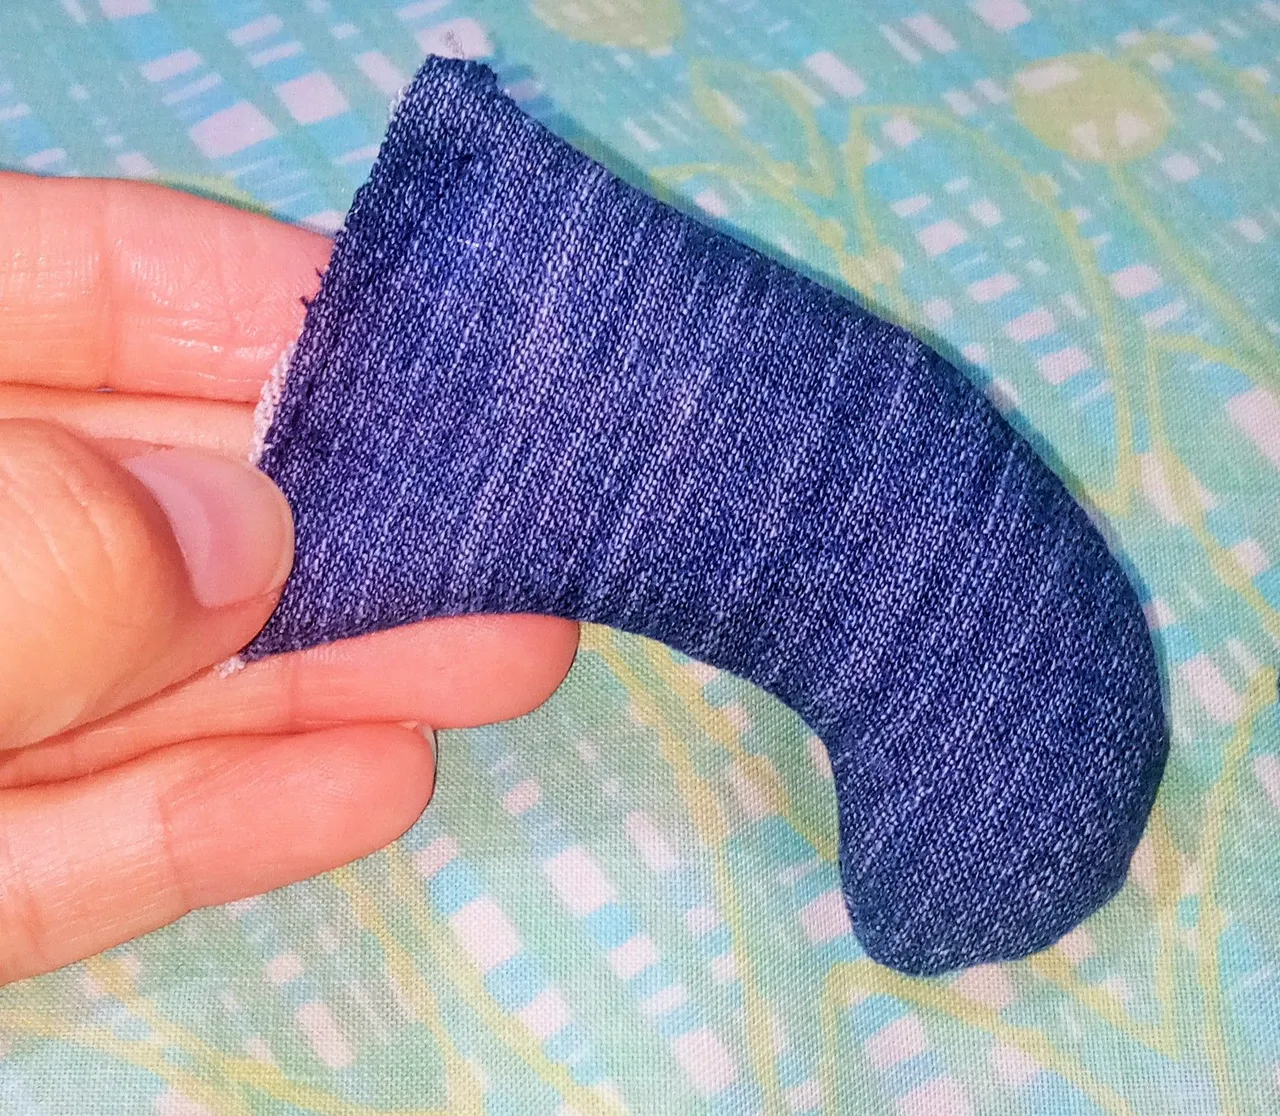
Ahora cosí y rellene la colita del Michi, solo le coloque un poquito de guata para darle algo de volumen.
Now I sewed and stuffed the Michi's tail, I just put a little bit of wadding to give it some volume.
Ahora cosemos las piezas principales que son las más grandes, al momento de unir las piezas para coserlas lo que hice fue enfrentar los derechos de cada tela, y posicione la guata para luego asegurar todo con alfileres y proceder a coser.
Les cuento que parte de la costura la realice con mi maquinita de coser manual que con nuestro mejor aliado que es YouTube aprendí a usarla jajaja… y cada que la uso me emociono mucho porque sí hace que el trabajo sea más rápido y así puedo ver más rápido el resultado final jajaja… pero la mayor parte de la costura la hice a mano.
Now we sew the main pieces which are the biggest ones, at the moment of joining the pieces to sew them what I did was to face the rights of each fabric, and position the wadding and then secure everything with pins and proceed to sew.
I tell you that part of the sewing was done with my manual sewing machine that with our best ally that is YouTube I learned to use it hahaha... and every time I use it I get very excited because it makes the work faster and I can see the final result faster hahaha... but most of the sewing was done by hand.

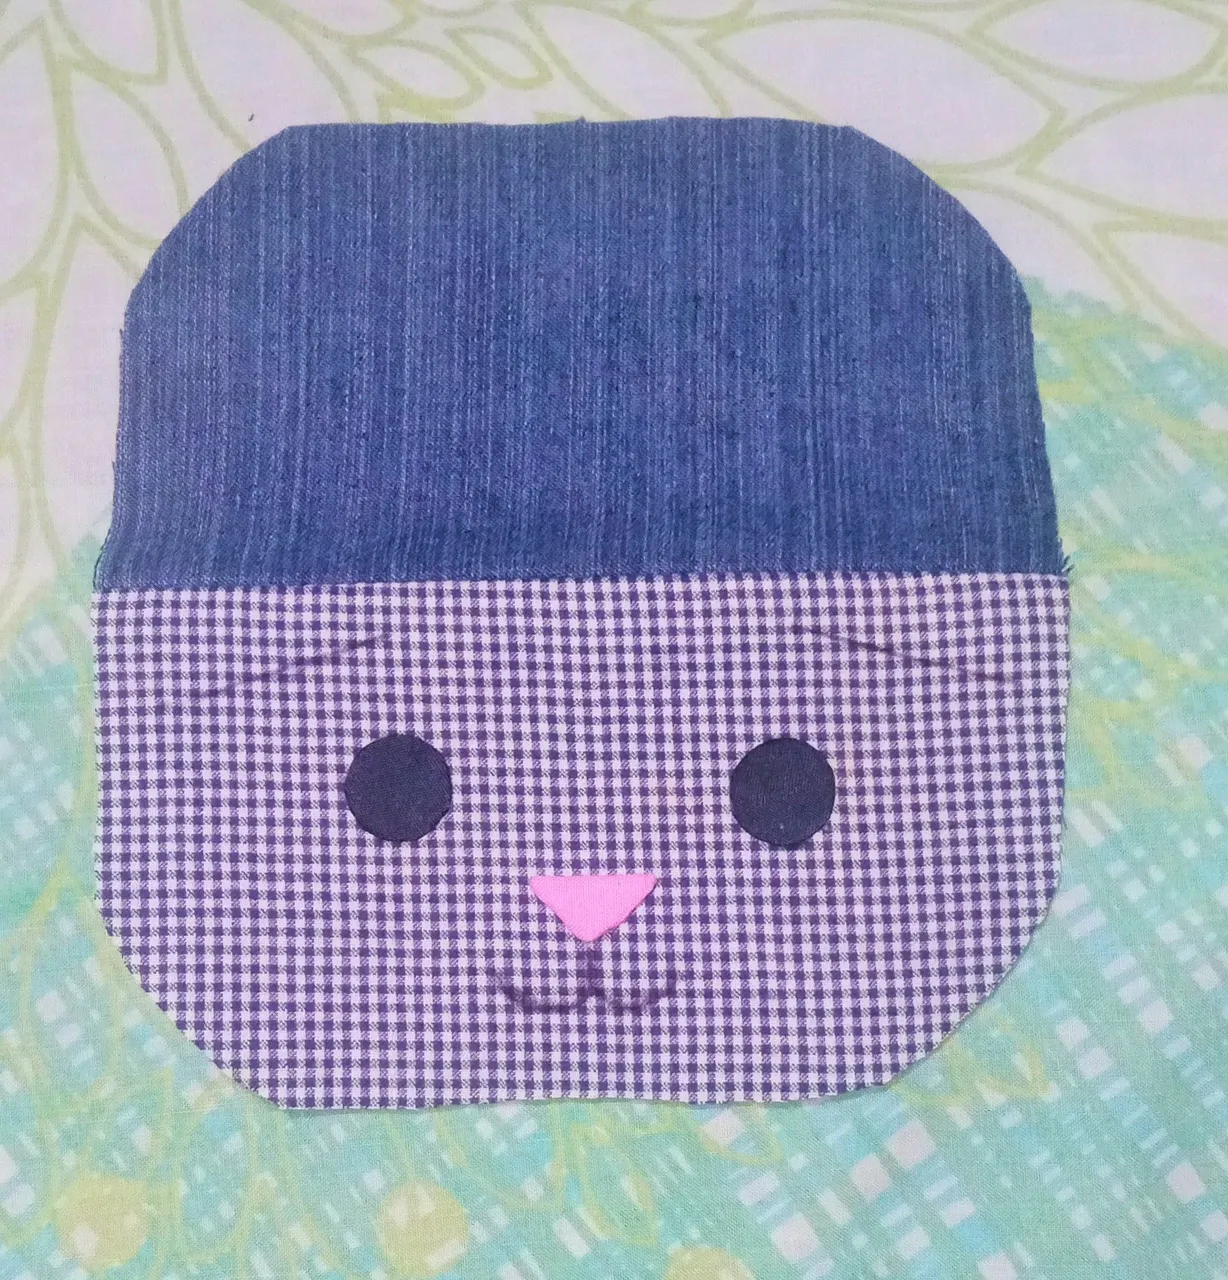
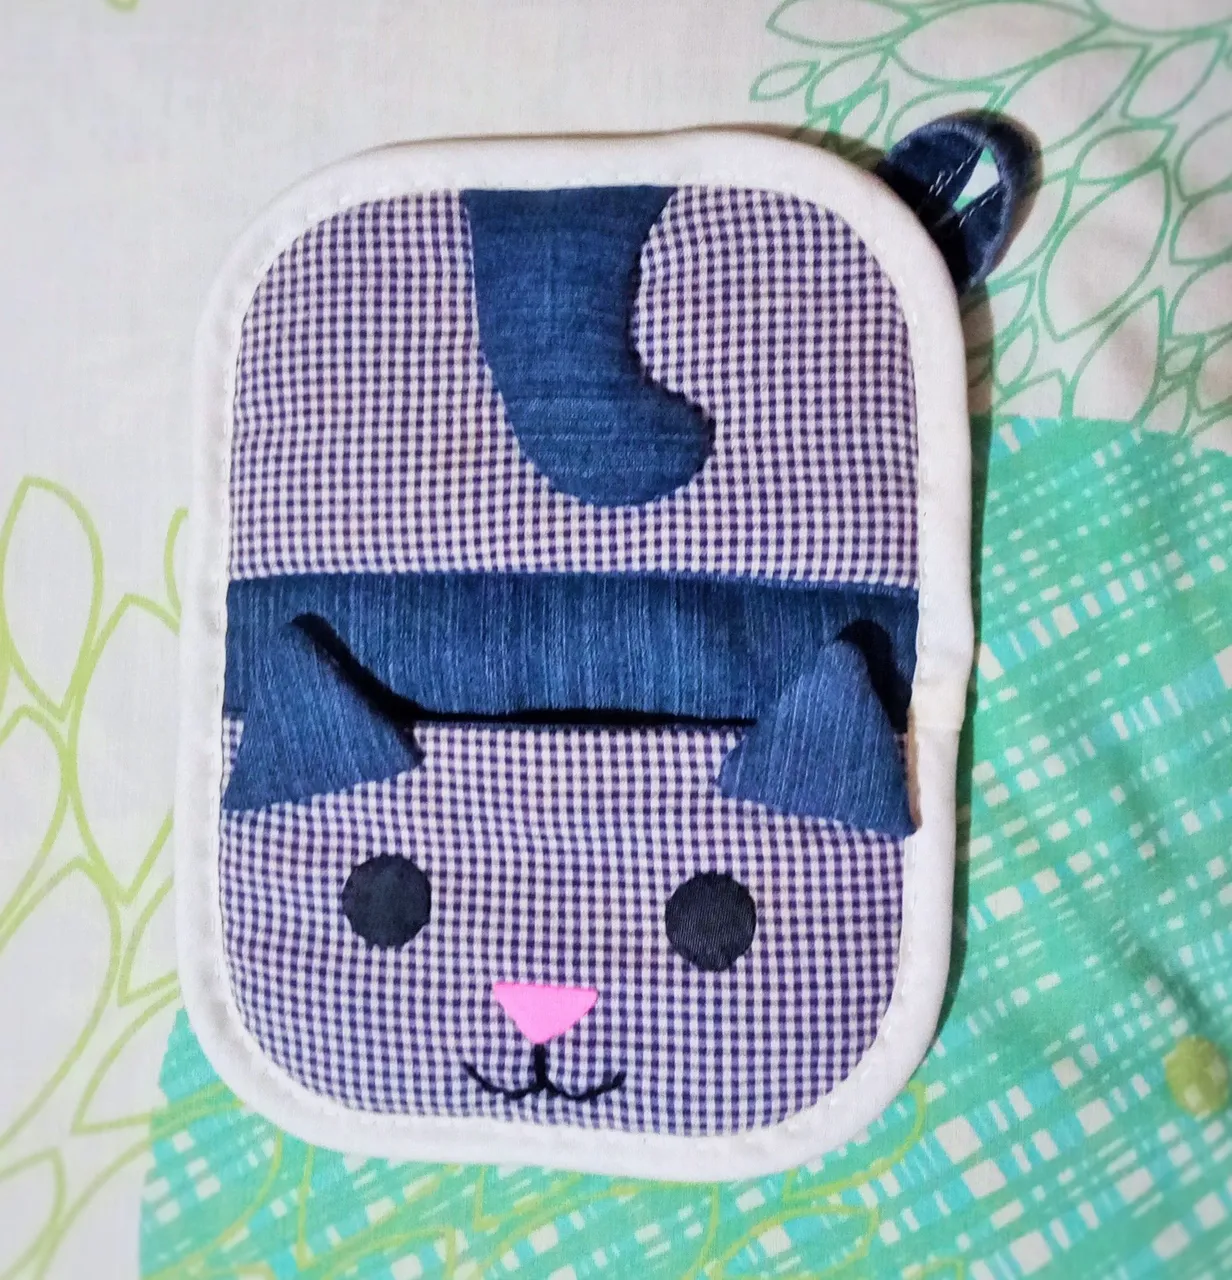
Luego de coser cada pieza por separado y de pegar y coser los ojos, nariz y orejas y de bordar la boca del Michi, uní todas las piezas usando algunas pinzas y comencé con otro de los retos o dificultades de hacer este agarra ollas, ya que nunca había colocado un sesgo, pero la verdad fue más fácil de lo que había pensado, aunque si demore bastante haciéndolo jajaja… pero lo logre y aquí pueden apreciar el hermoso resultado.
After sewing each piece separately and gluing and sewing the eyes, nose and ears and embroidering the Michi's mouth, I joined all the pieces using some tweezers and began with another of the challenges or difficulties of making this pot holder, since I had never placed a bias, but the truth was easier than I had thought, although it took me a long time to do it hahaha ... but I did it and here you can see the beautiful result.
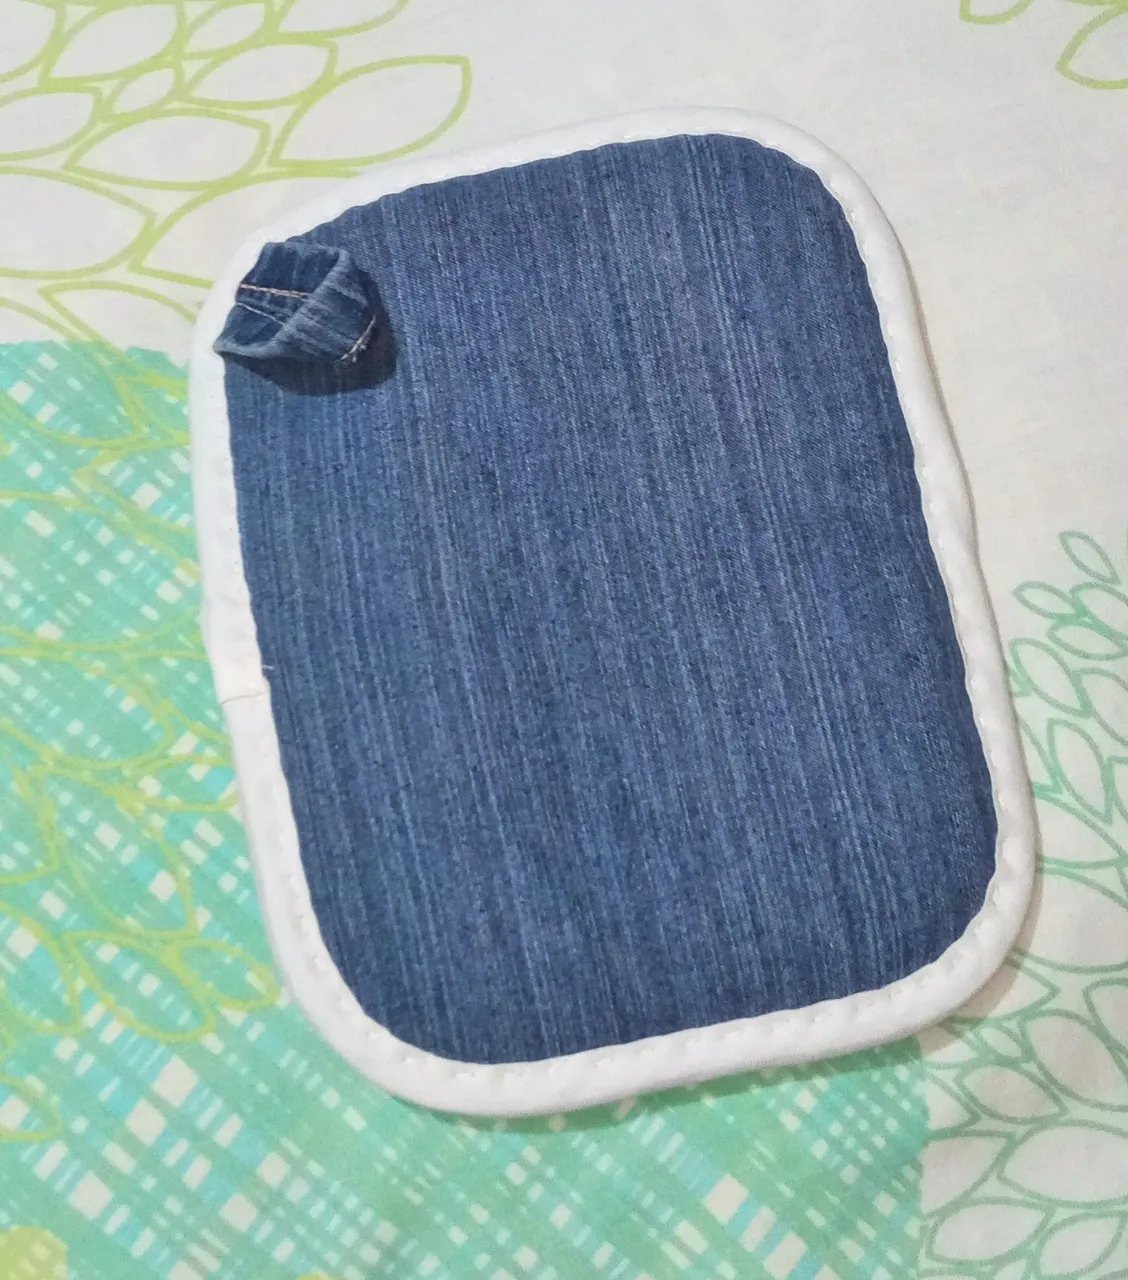
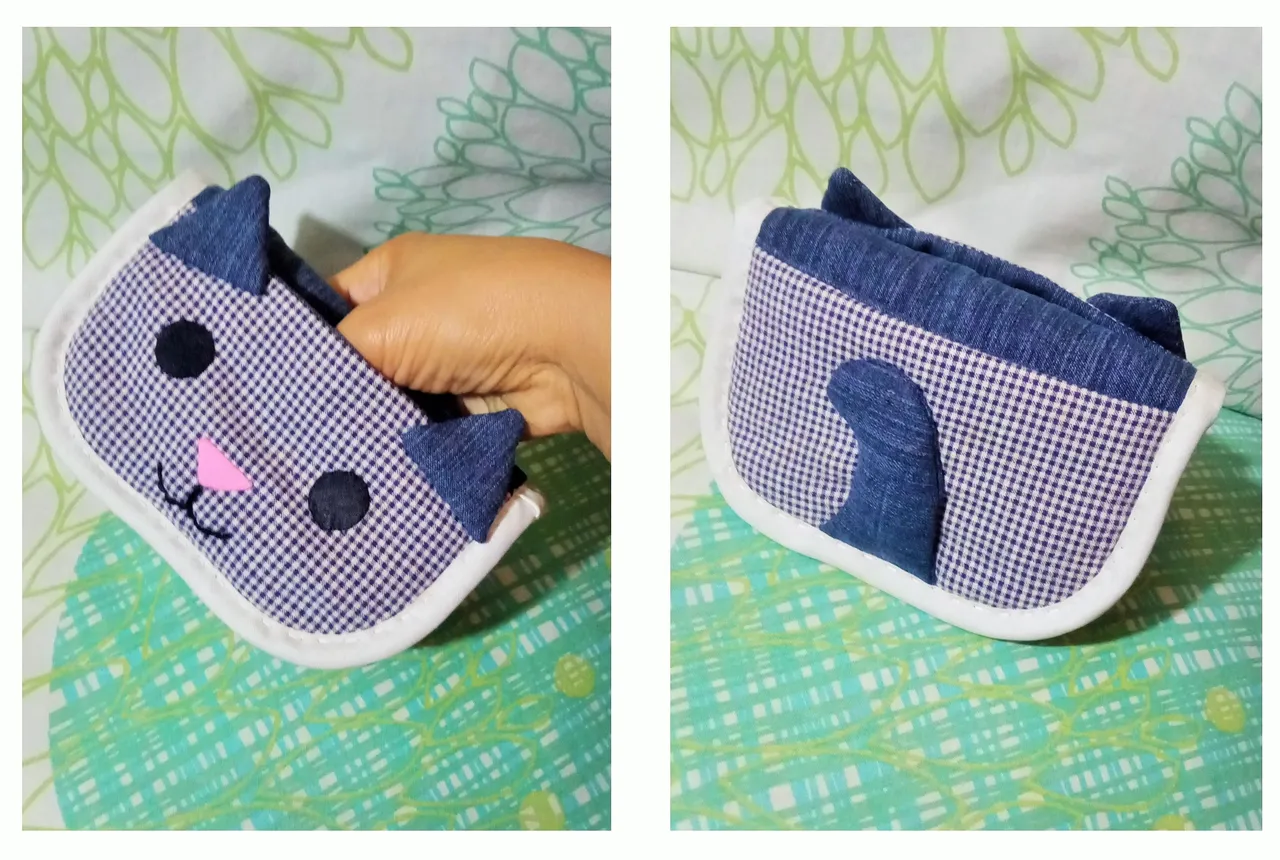
Siendo completamente sincera, jamás pensé que se vería tan bien hecho y tan lindo, tuve dudas de si usar o no la tela estampada o si usar otro color o si mejor hacer otra cosa, pero estoy realmente feliz con el resultado.
To be completely honest, I never thought it would look so well done and so cute, I had doubts whether or not to use the printed fabric or to use another color or to do something else, but I'm really happy with the result.
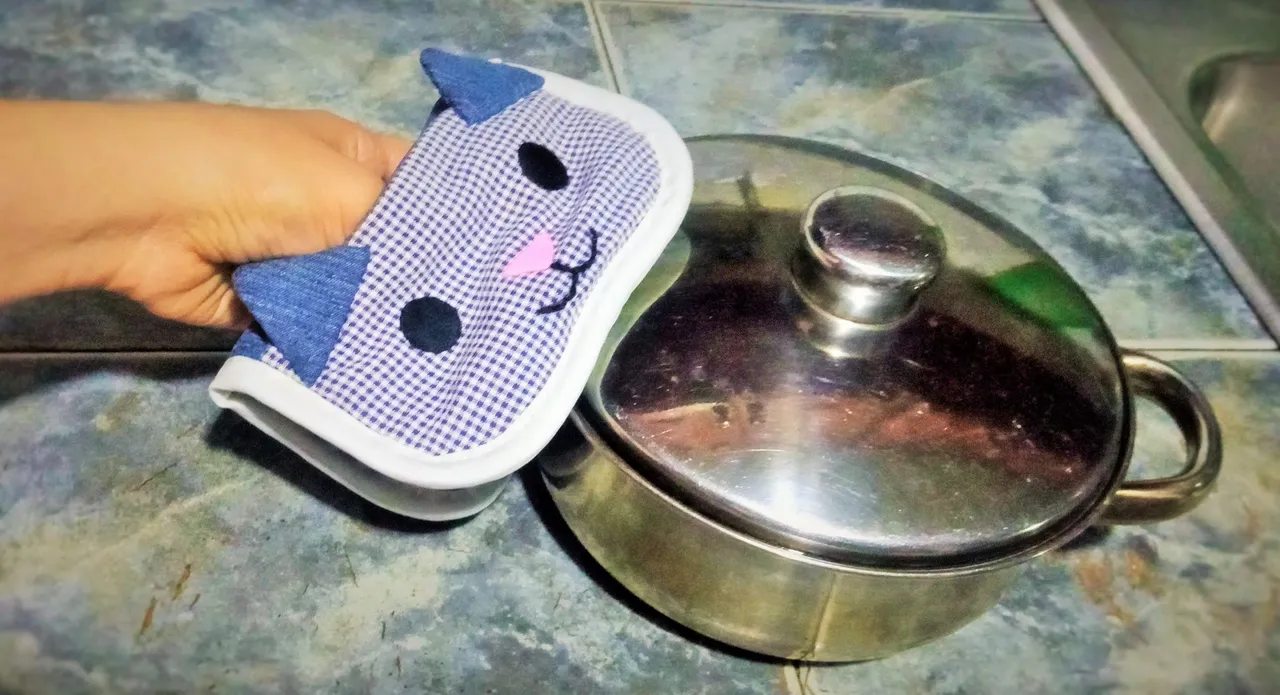
Deseo les haya gustado el tutorial y el resultado de este “Michi Agarra Ollas” tanto como a mí y aunque no es un trabajo de crochet como normalmente acostumbro, es una linda manualidad que vale la pena realizar ya que es súper útil a la hora de cocinar. ESPERO SUS BONITOS COMENTARIOS Y/O VOTOS, ASÍ ME MOTIVAN PARA SEGUIR COMPARTIEDO MIS CREACIONES CON USTEDES 😊 💟
Me ha encantado participar en este concurso, de verdad me gustó muchísimo el tema de gatos y me he sentido muy inspirada haciendo las manualidades con las que he participado y realmente espero todos lo hayan disfrutado tanto como yo.
Se despide de ustedes con mucho cariño su amiga Nathalie @laranitacrochet
I hope you liked the tutorial and the result of this "Michi pot holder" as much as I did and although it is not a crochet work as I usually do, it is a nice craft that is worth doing because it is super useful when it comes to cooking. I LOOK FORWARD TO YOUR NICE COMMENTS AND/OR VOTES, THIS WAY YOU MOTIVATE ME TO CONTINUE SHARING MY CREATIONS WITH YOU 😊 💟
I really enjoyed participating in this contest, I really liked the theme of cats and I have felt very inspired making the crafts I have participated with and I really hope you all enjoyed it as much as I did.
Farewell to you with love from your friend Nathalie @laranitacrochet
*Todas las fotografías utilizadas en la publicación son propiedad de la autora.
*Las fotografías fueron tomadas y editadas con mi REDMI 9 y con PhotoRoom.
*La traducción la hice en https://www.deepl.com/es/translator
*All photographs used in the publication are the property of the author.
*Photographs were taken and edited with my REDMI 9 and PhotoRoom.
*Translation was done at https://www.deepl.com/es/translator