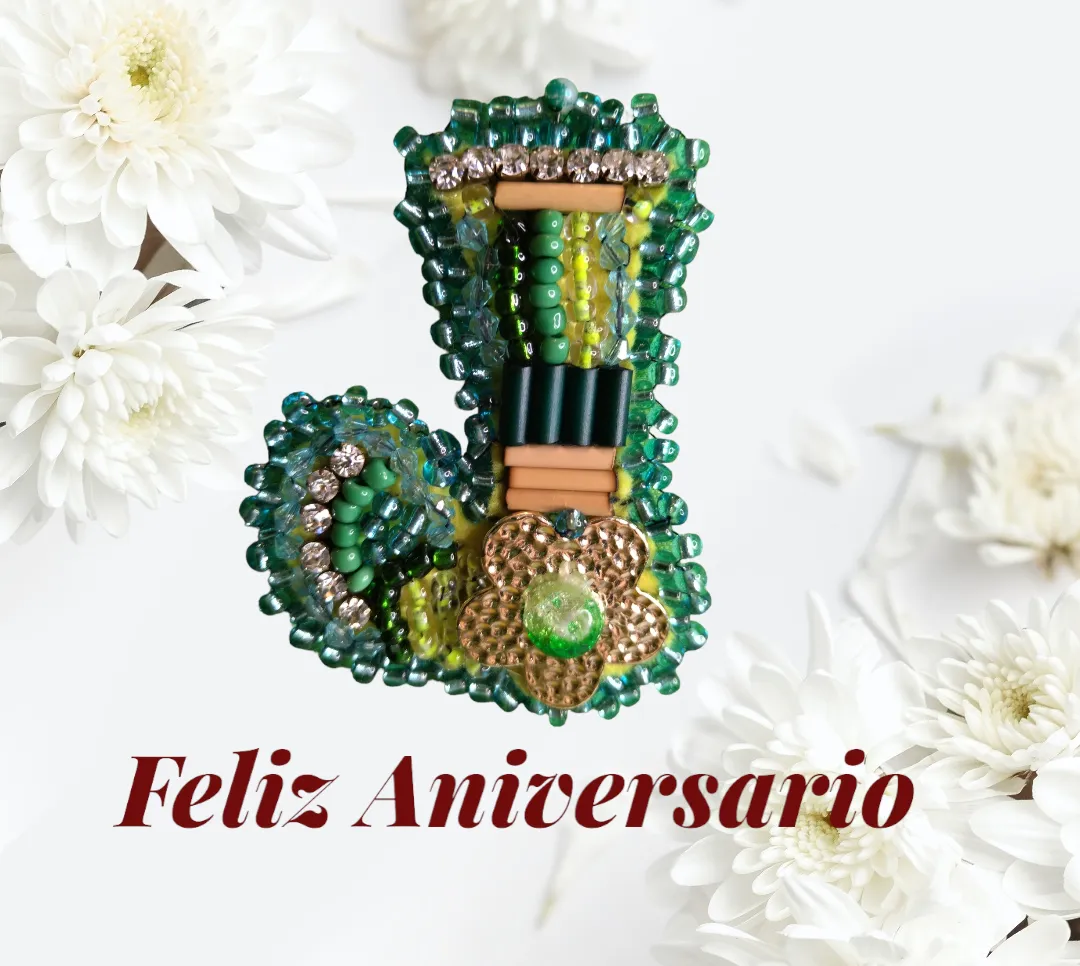
Hola amigos 🙋 estamos de fiesta 🥳 ya que nuestra querida comunidad está de 🎈 Aniversario 🎈. Vamos a celebrar en grande regalándole contenido de calidad. Muchos como yo son aprendíces de bisutería, no obstante no podemos ponernos límites y siempre debemos estar en constante aprendizaje. Es por ello que yo he aprovechado esta celebración para poner en práctica una de las técnicas de bordado que he estado estudiando. Espero que les guste, es la primera vez que bordo una letra completa 👏 con este tipo de materiales.
Quiero aprovechar para invitar a las amigas @linita @aarolita y @vicmito74 para que nos muestren sus creaciones. Me encantaría también que ustedes se sumen a este concurso y si no están suscritos, háganlo, no se arrepentirán.
Debo confesar que las palabras escritas "que no sea una publicación más" me tenían perturbada 🤦 todos los días amanecía con el deseo de empezar el proyecto para este día, pero enseguida me poseían esas palabras. Estuve entonces más relajada y esperé que la inspiración se apoderara de mi mente y dejara salir esos pensamientos limitantes para mí. Así fue que luego de pensarlo tanto se me ocurrió decorar una linda letra J para agasajar a @Jewelry, esta comunidad se merece todo el empeño que pongamos para hacer nuestros proyectos, es un compromiso continuar aprendiendo y mejorar cada vez más.
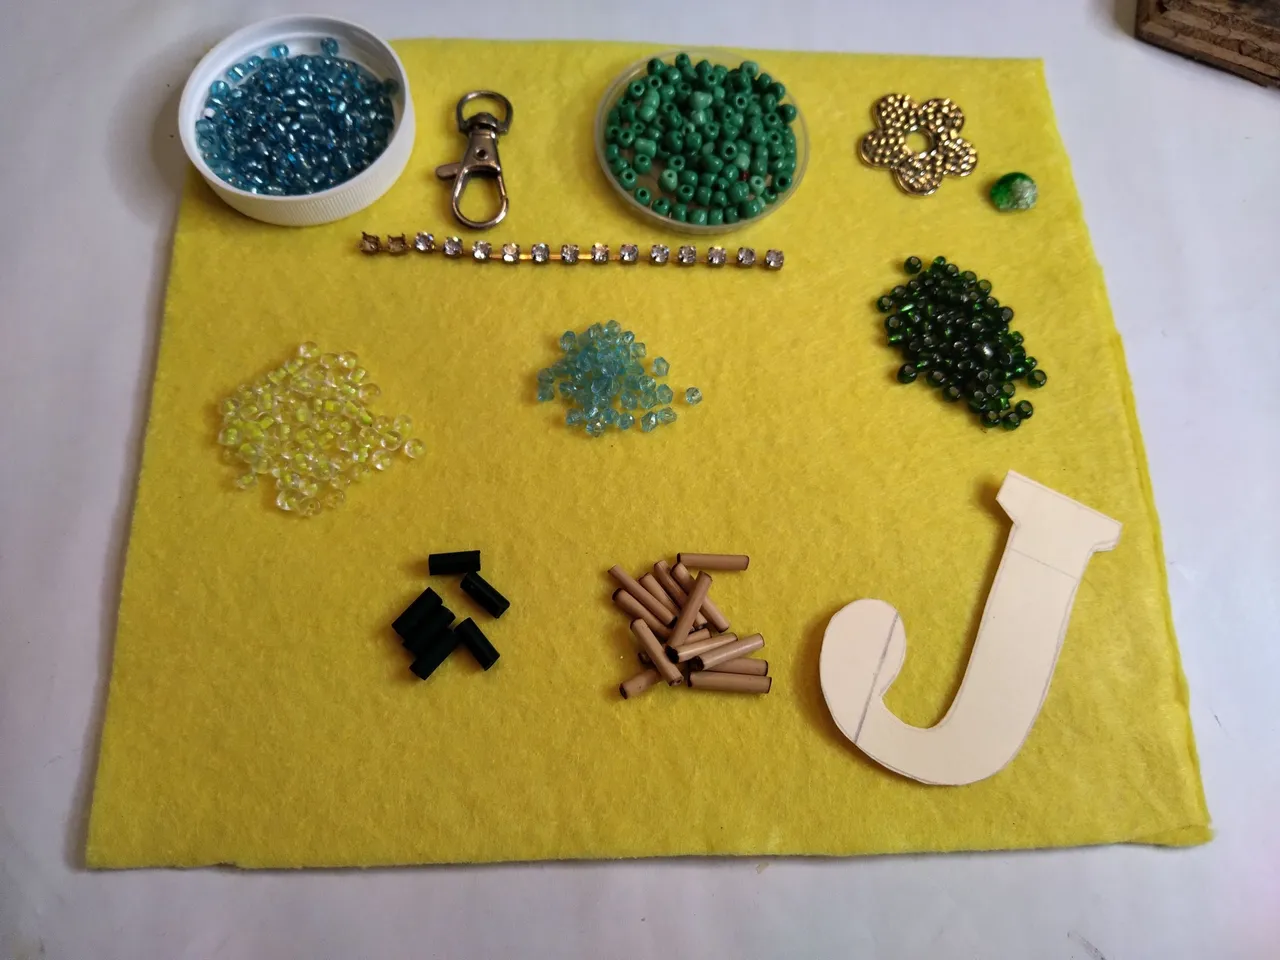
Una de las decisiones más difíciles de tomar para iniciar este proyecto fue elegir los colores y los materiales que usaría, como pueden ver este es un tipo de bordado "multiforma", en el que lo más importante es rellenar la letra con todos los detalles que queramos; dijes, mostacillas, cuentas, perlas, canutillos, etc. A la vez esta característica del diseño me motivó a realizarlo ya que como siempre les digo, me gusta usar hasta el mínimo balín que esté rodando por las cajitas.
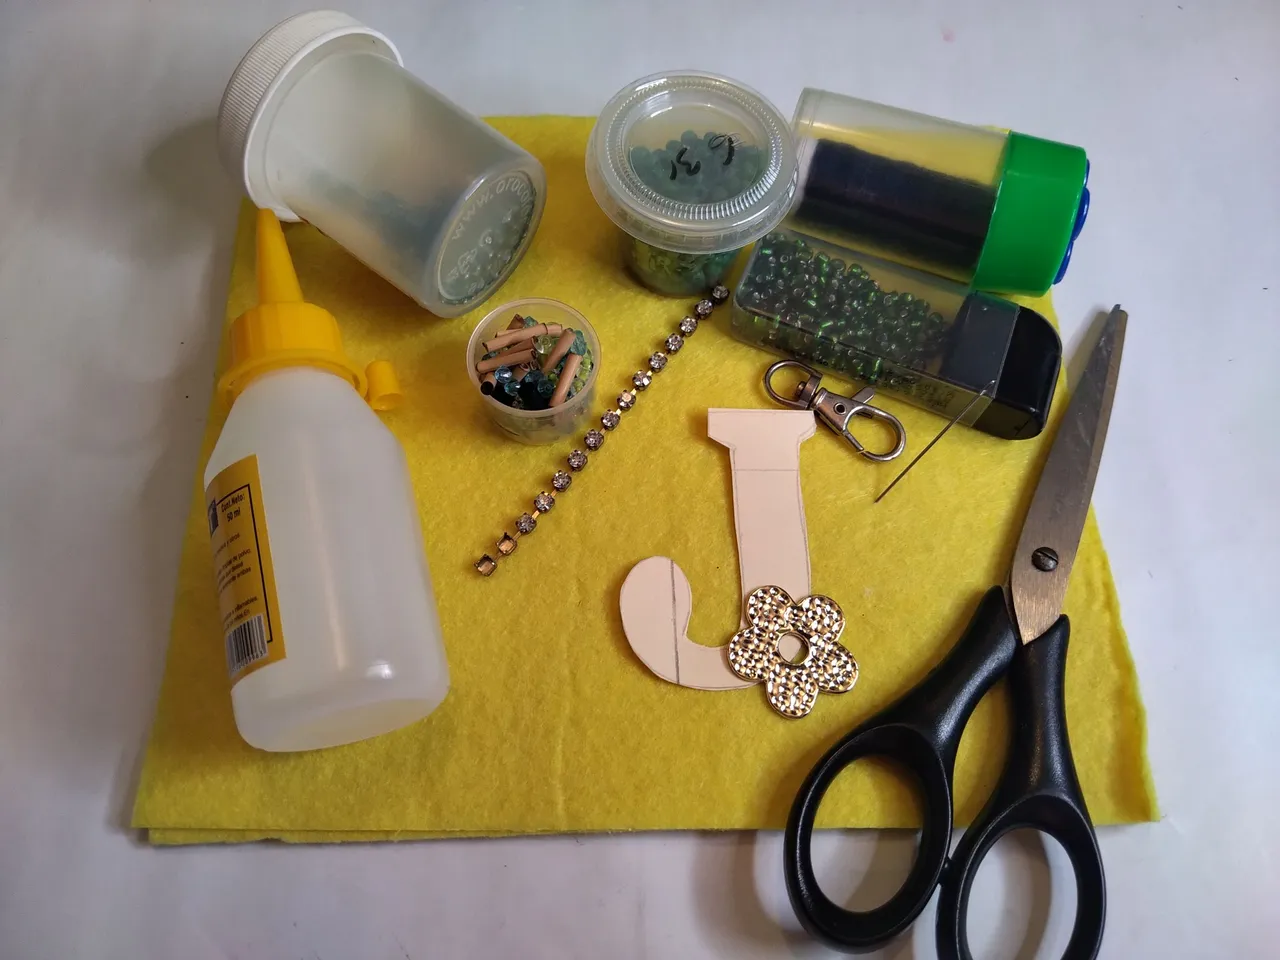
MATERIALES.
- Tela de fieltro color amarillo.
- Mostacillas.
- Swarovski.
- Canutillos.
- Flor de metal.
- Media perla verde de vidrio.
- Estrás.
- Aguja de coser.
- Hilo de coser.
- Pegamento.
PROCEDIMIENTO.
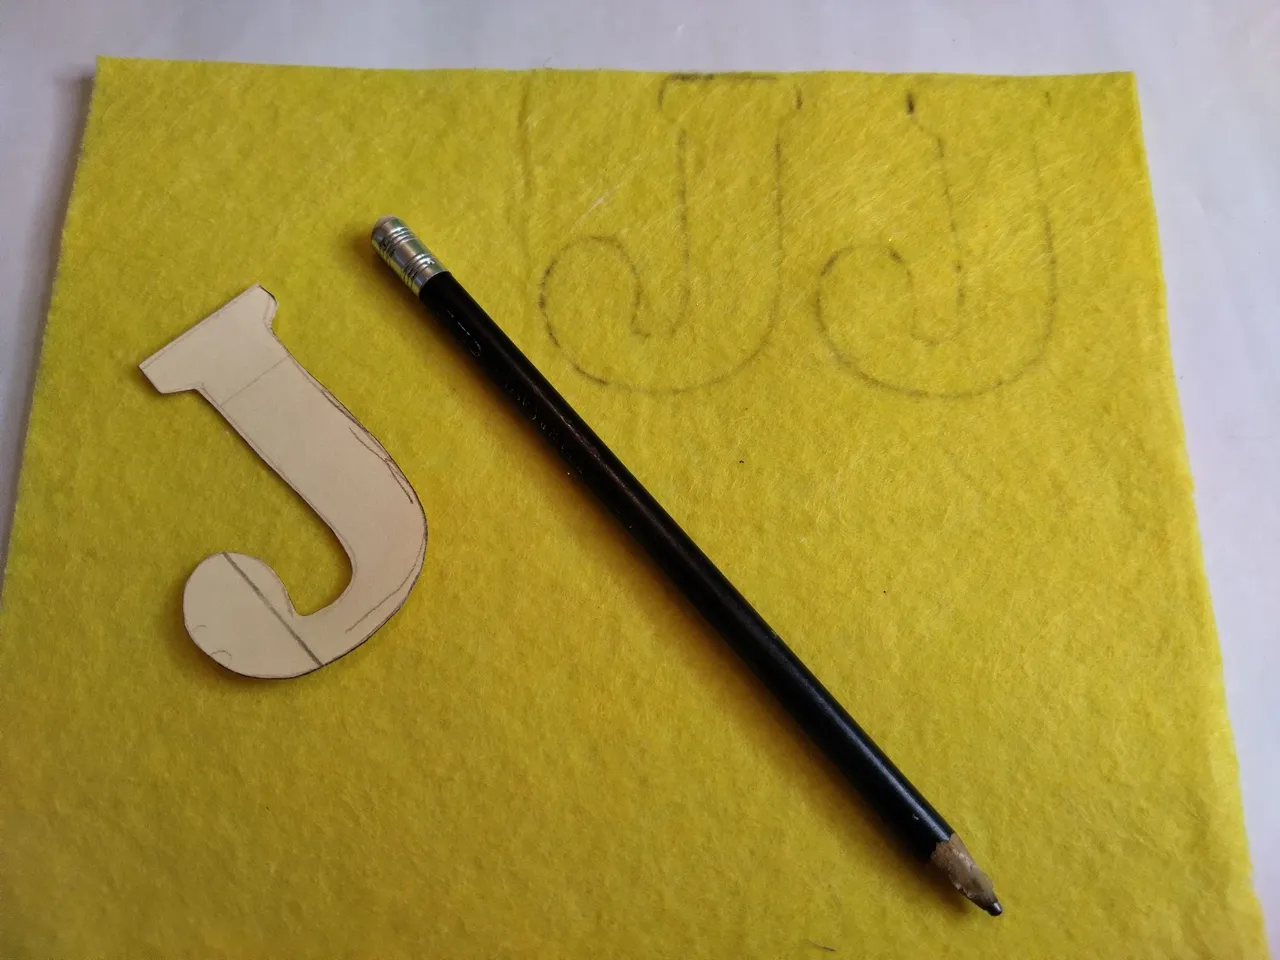
- Este proyecto lo empecé diseñando la letra J, para calcarla sobre el fieltro primero la dibujé en una cartulina, la recorté y la monté sobre la tela. Con el lápiz dibujé el contorno de la letra sobre el foami, recorté solo el cuadrado donde dibujé la letra.
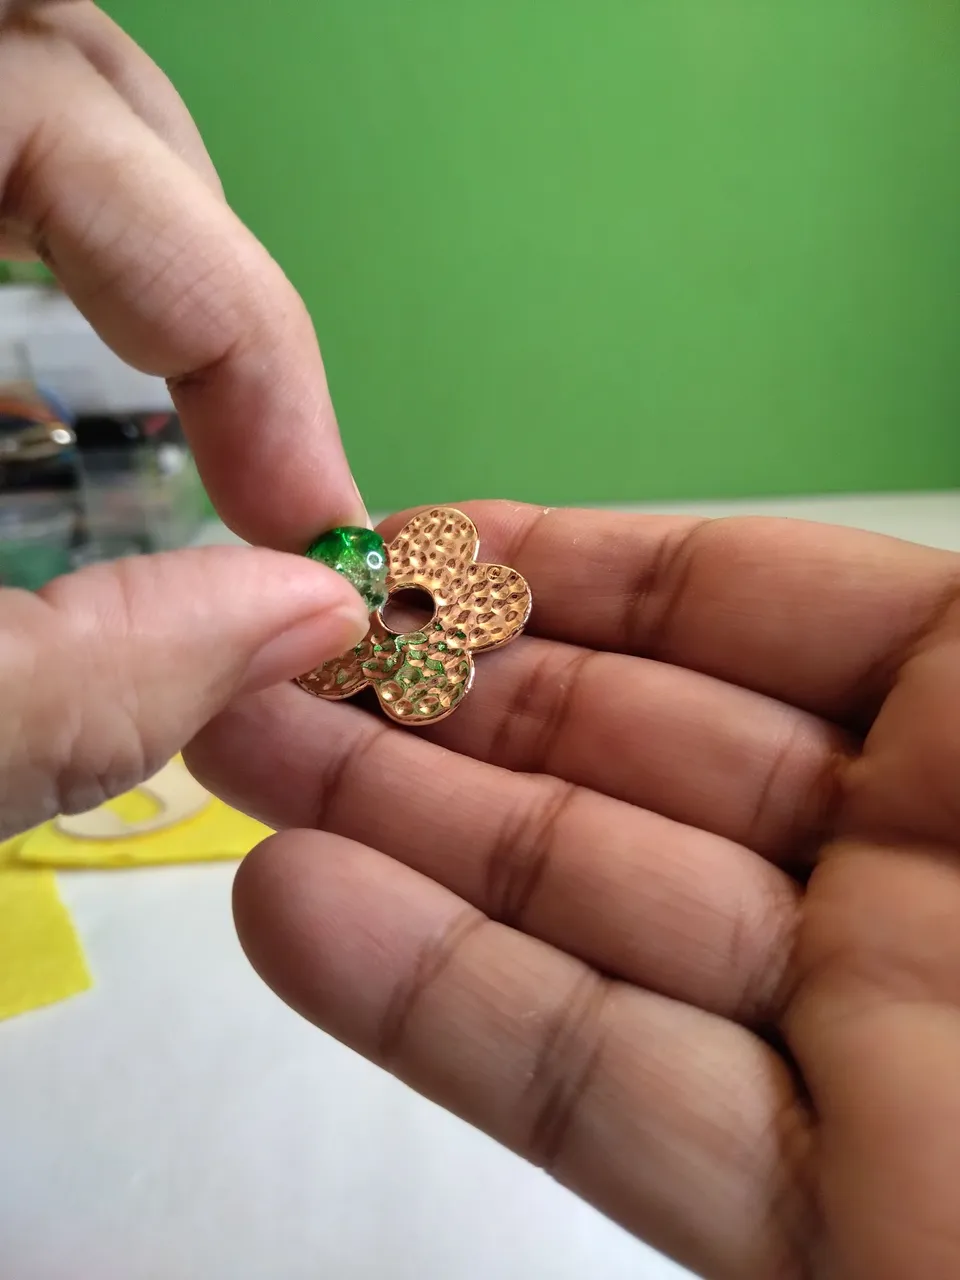
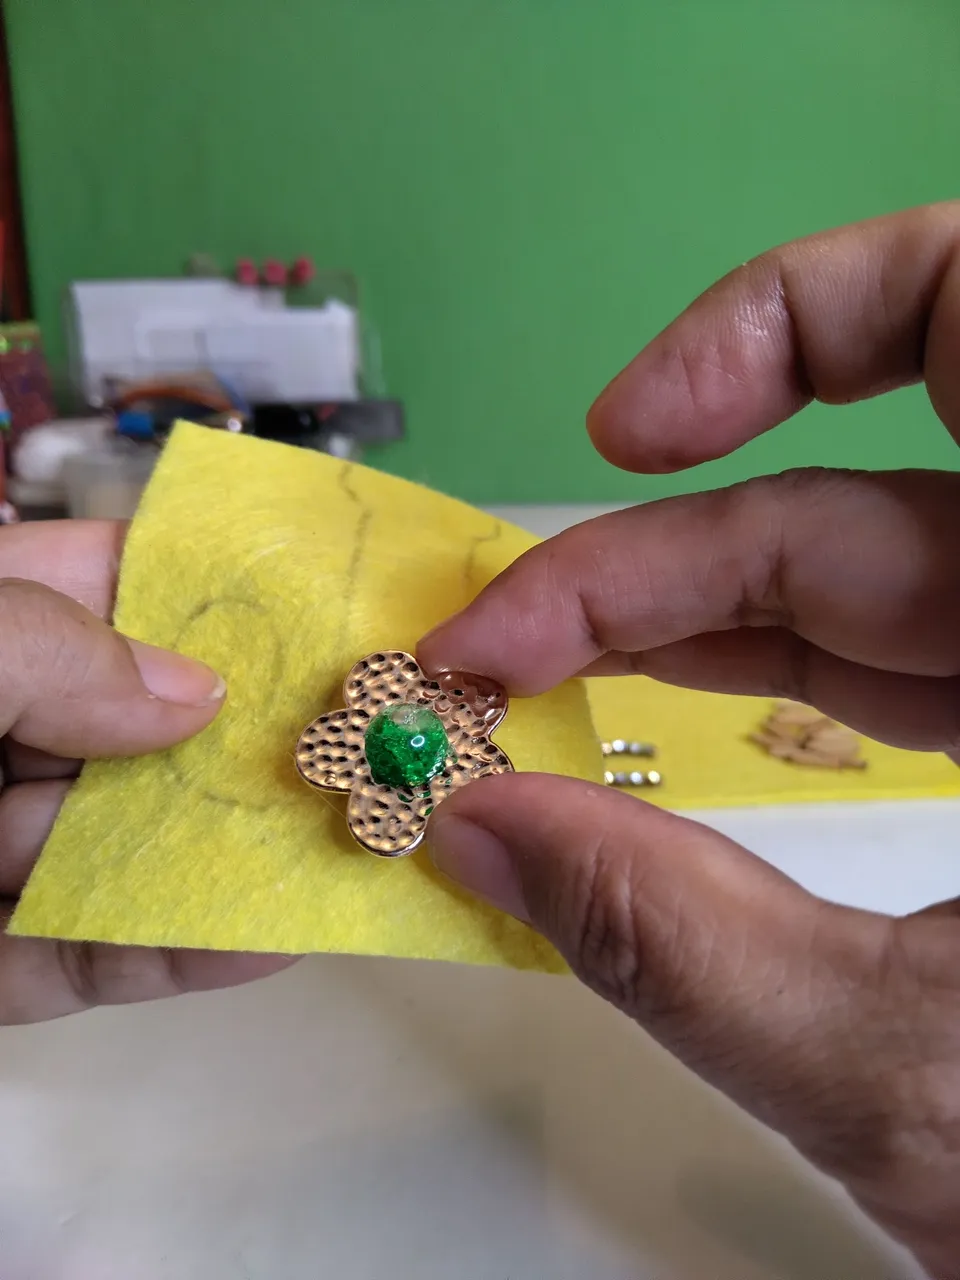
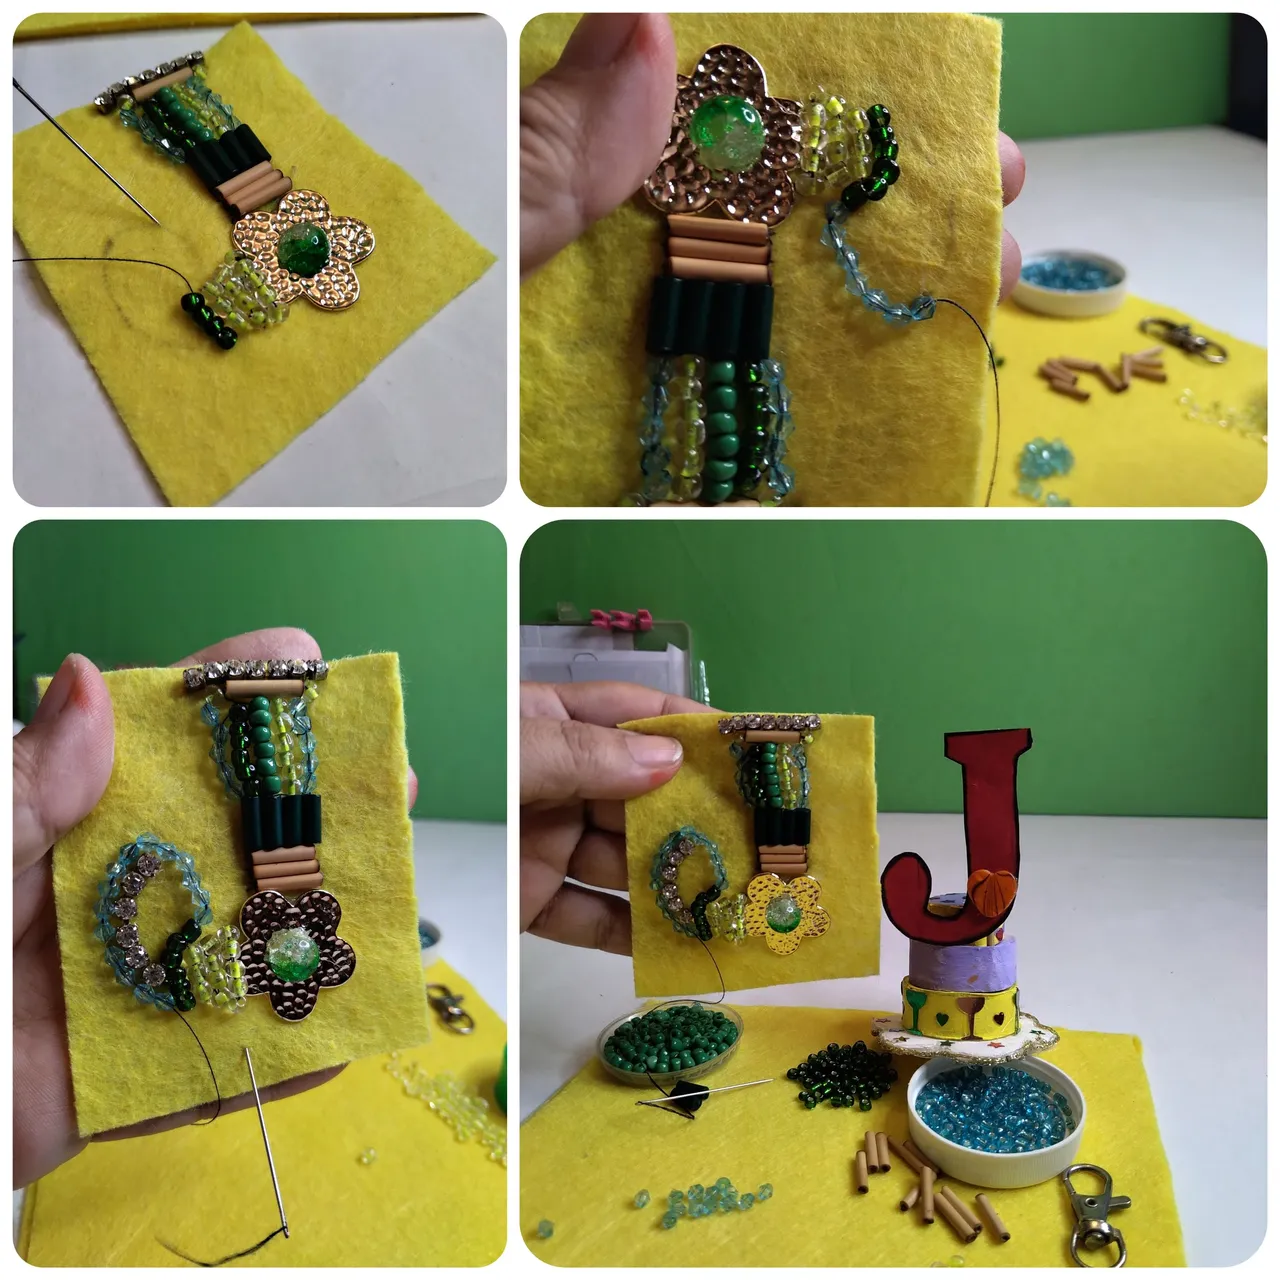
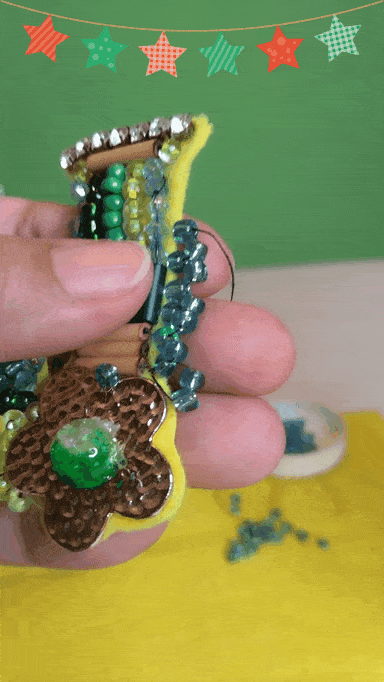
- Luego elegí el detalle más grande que lleva la letra, le podemos poner uno o dos a este tamaño de letra, yo solo elegí uno y fue una flor de metal muy linda. Como tiene un agujero en el medio usé la media perla verde de vidrio para colocarla en el centro de la flor.
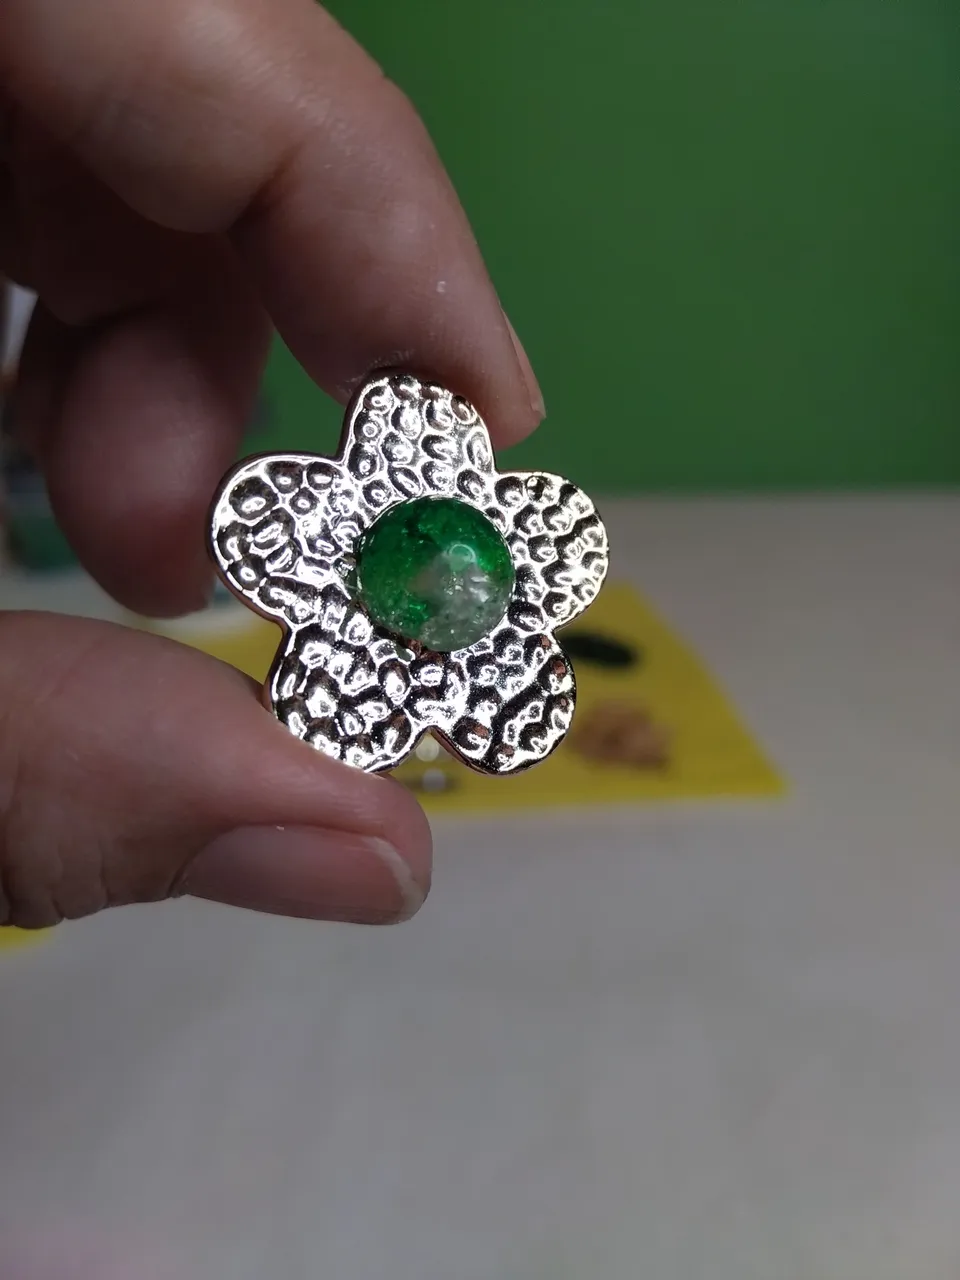
- El próximo paso fue elegir el lugar donde pondría la flor. Me gustó verla en la base sobresaliendo un poco de la letra. Allí la fijé usando silicón caliente.
- Teniendo ya disponibles los materiales que usaría visualicé el orden en que los colocaría. Cabe destacar que también aproveché para practicar la lección de analogía cromática 😃 busqué una paleta de colores 🌈 del color verde porque ya había pensado resaltar este color en cualquiera que fuera mi proyecto. El 2023 representa para mí la esperanza, el logro, el avance y lo positivo 🙏 quiero que mi regalo para la comunidad esté impregnado de todos estos propósitos para que sigamos creciendo y nos multipliquemos.
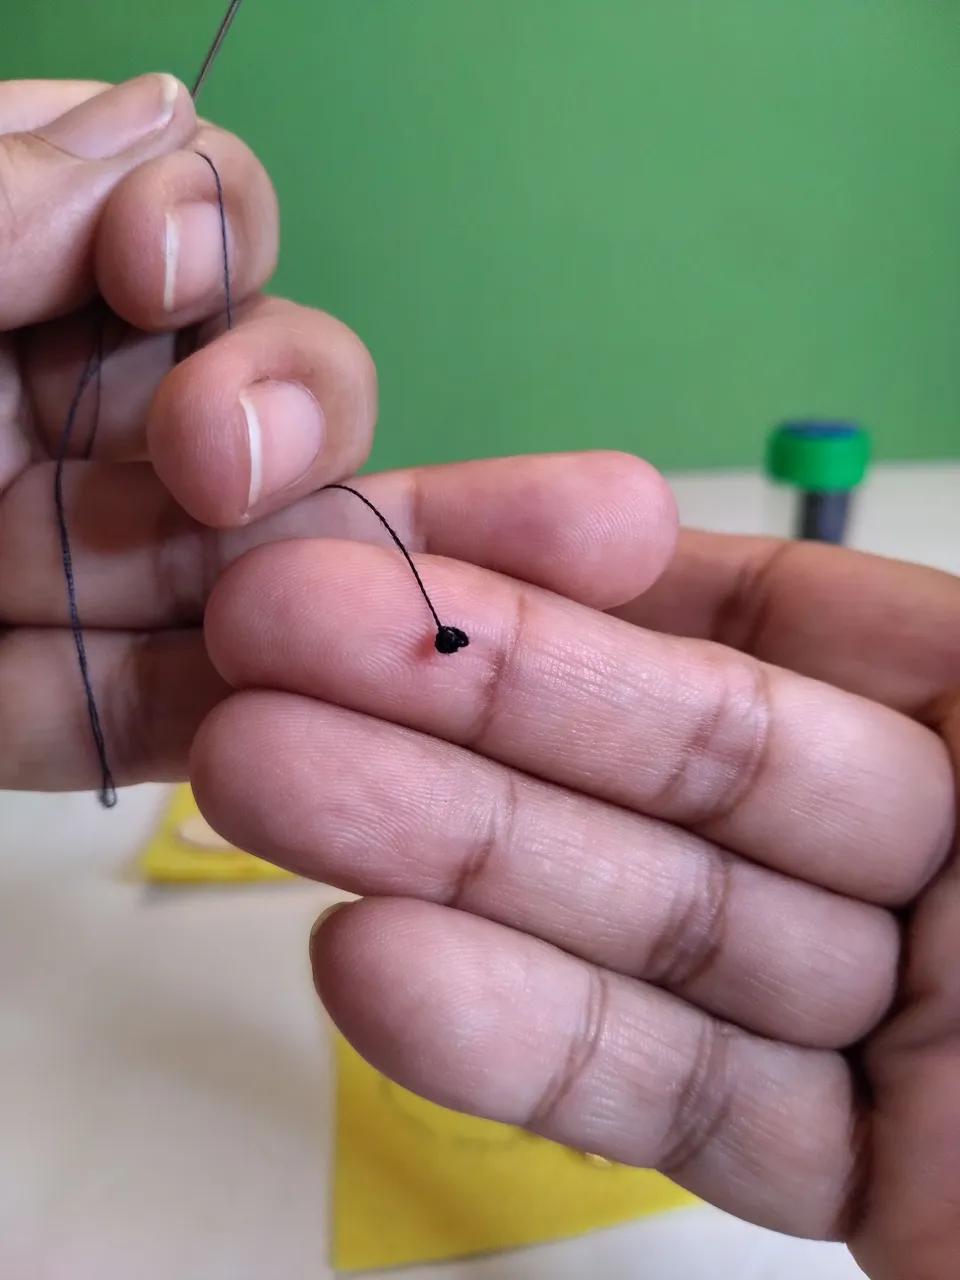
- Ensarté la aguja luego de comprobar que los materiales que elegí pudieran ser atravesados por la aguja y el hilo dos veces, usé el hilo en una sola hebra para bordar toda la letra.
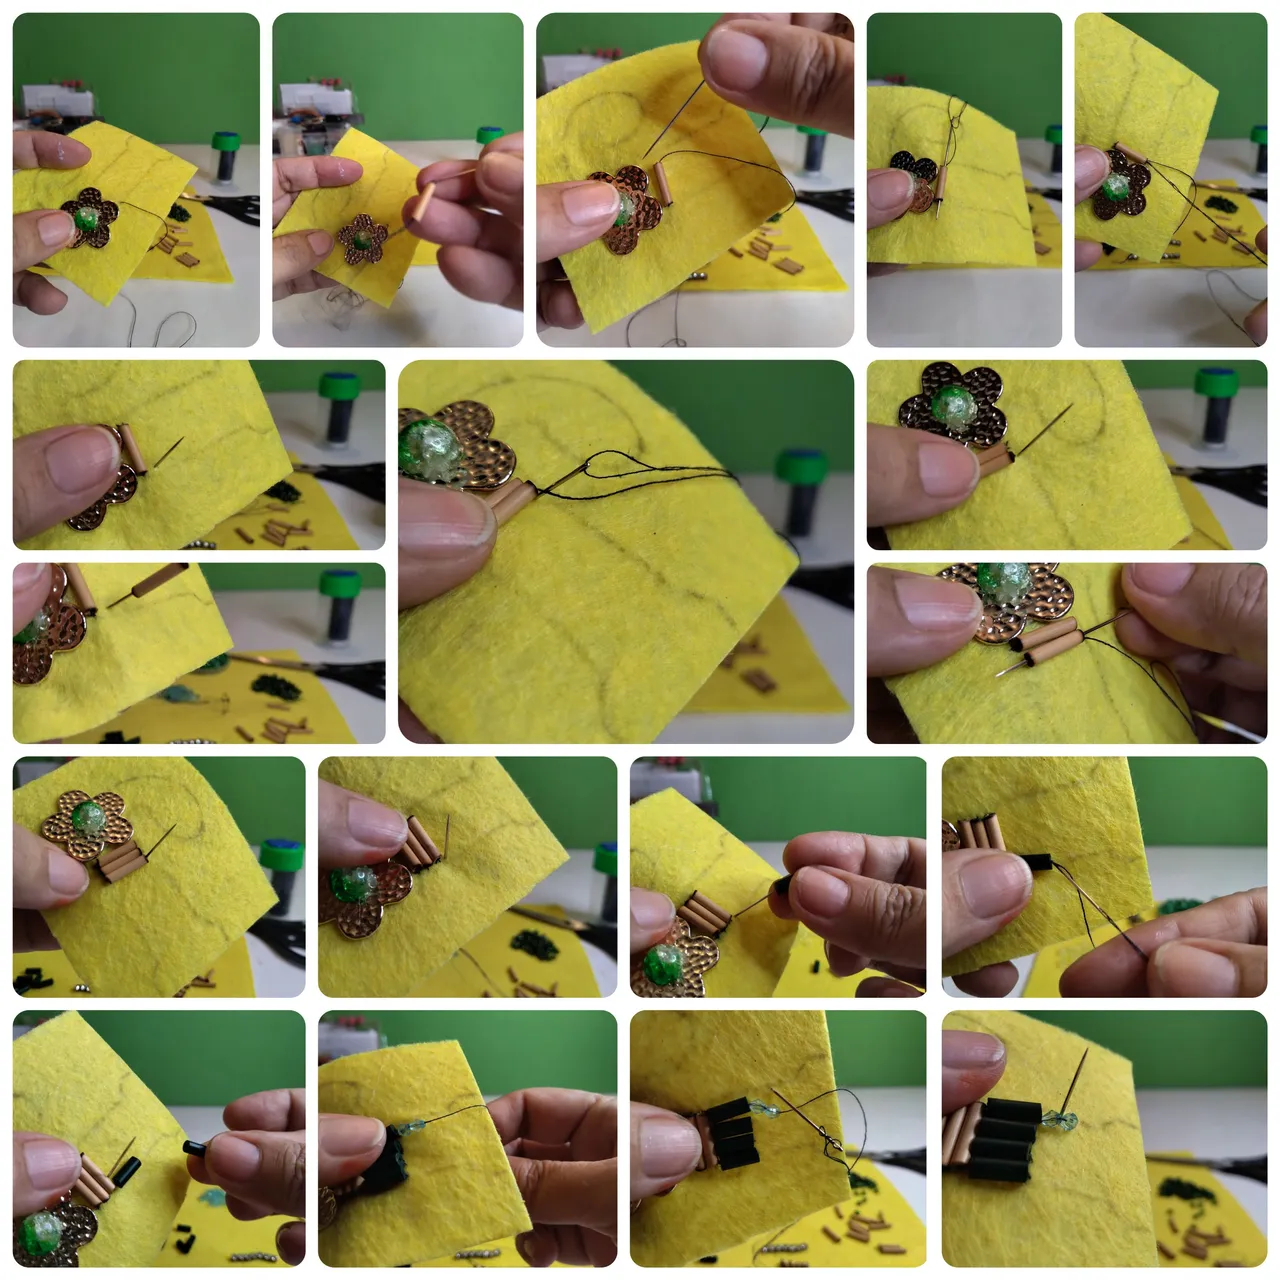
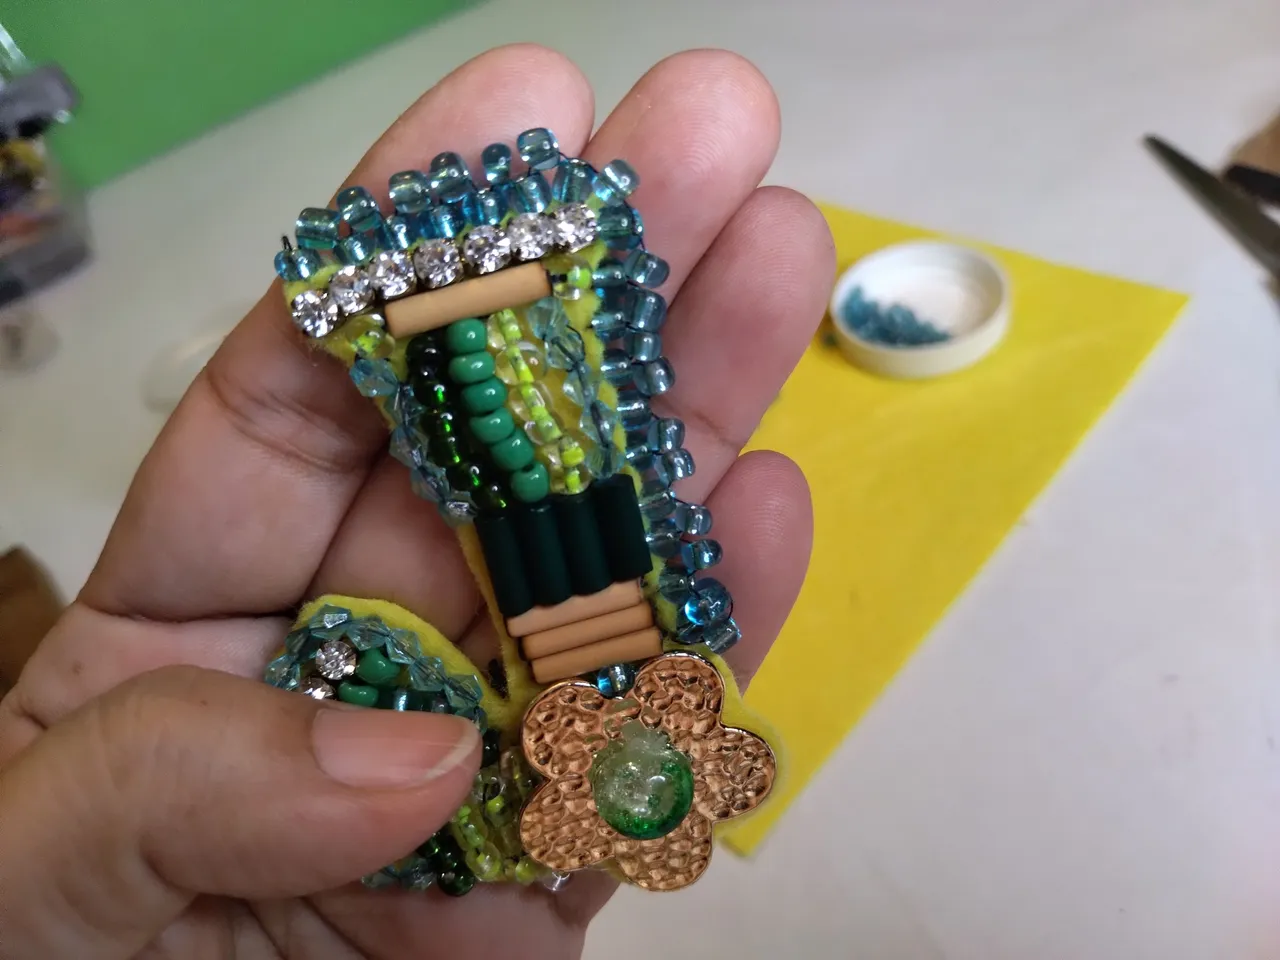
- Comencé bordando algunos canutillos de bambú, para hacerlo pasé el hilo desde la parte de atrás de la tela ubicándolo en la parte de arriba cerca de la flor. Para fijar los canutillos se pasa el hilo por dentro y el hilo que sale se pasa para atrás de la tela ajustando suavemente. Se saca el hilo hacia arriba de nuevo muy cerquita del canutillo fijado, se pasa el otro canutillo por el hilo y se fija sacando el hilo por detrás de la tela. Así hice cada vez que fijé un canutillo en esta letra. Hay canutillos de bambú y canutillos acrílicos color verde 🌿. Los canutillos de bambú los coloqué en forma vertical y los verdes de forma horizontal en esta primera parte.
- Después bordé varias líneas verticales alternando entre las
mostacillas en tonos verdes y los SWAROVSKI azules claros, éstos los coloqué en los extremos de esa parte de la letra y todos los verdes en el centro. Por cada dos MOSTACILLAS que fijé hice el refuerzo que consiste en pasar de nuevo el hilo por la primera mostacilla bordada de la línea, pasamos el hilo hacia atrás y lo sacamos justo en donde está esa primera mostacilla para atravesarla y dejar el hilo disponible para el próximo punto.

- Para finalizar esta parte de la letra J de JEWELRY 💍 bordé de forma horizontal un SWAROVSKI, un canutillo y otro SWAROVSKI en la misma línea. Sobre esa línea fijé con pegamento 3cm de estrás.
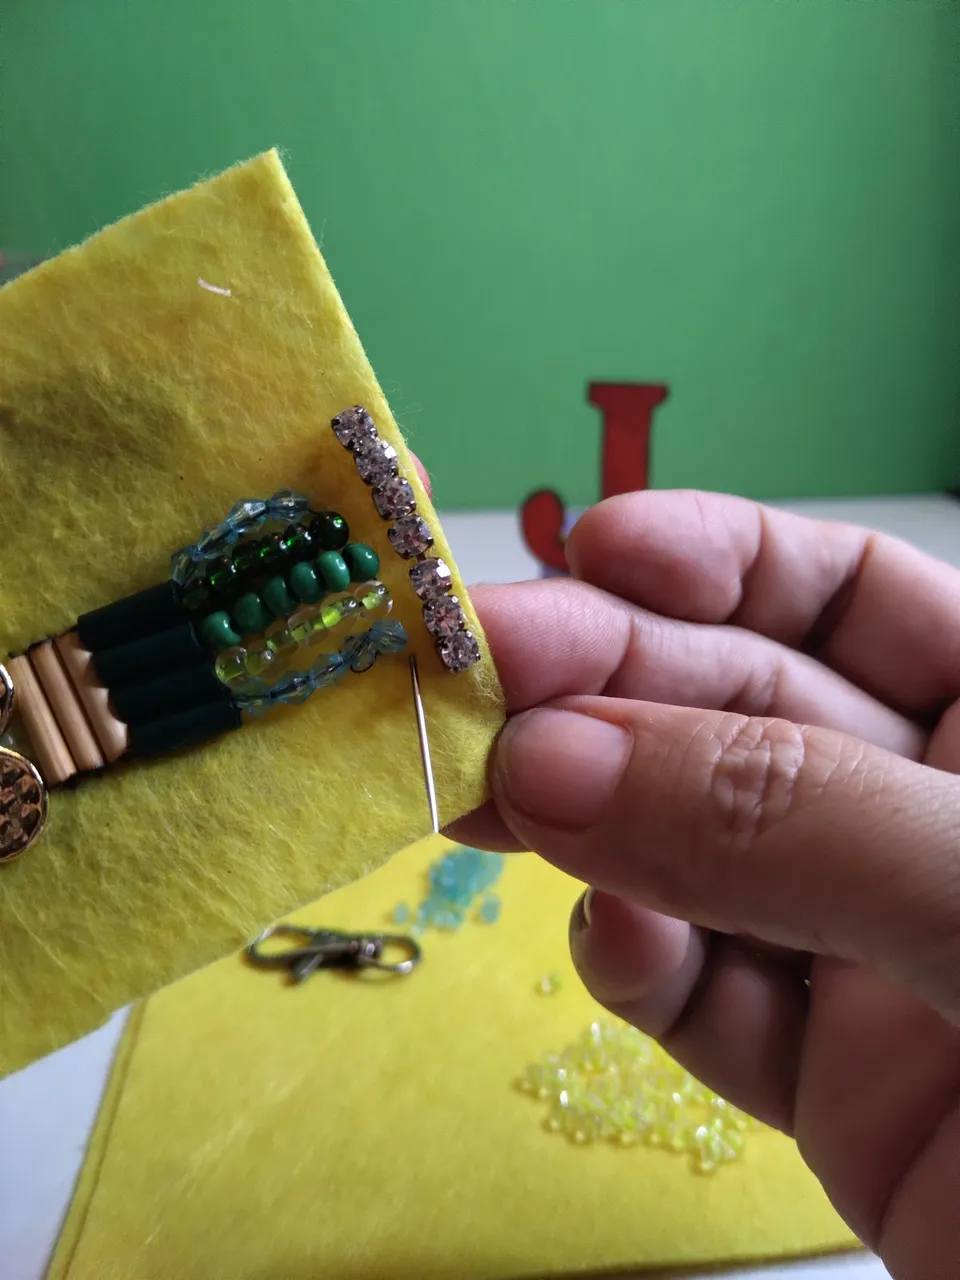
- En la parte ovalada de la J decidí colocar MOSTACILLAS de varios tonos de verde dentro de un borde de Swarovski. Siguiendo el mismo procedimiento de bordado rellené todo ese espacio. Me gustó mucho bordar esta letra porque no me dió problema para cubrir todo su espacio, sólo me quedó vacío el encuentro entre la parte alta de la flor y la primera línea de canutillos, para cubrirlo coloqué una mostacilla verde.
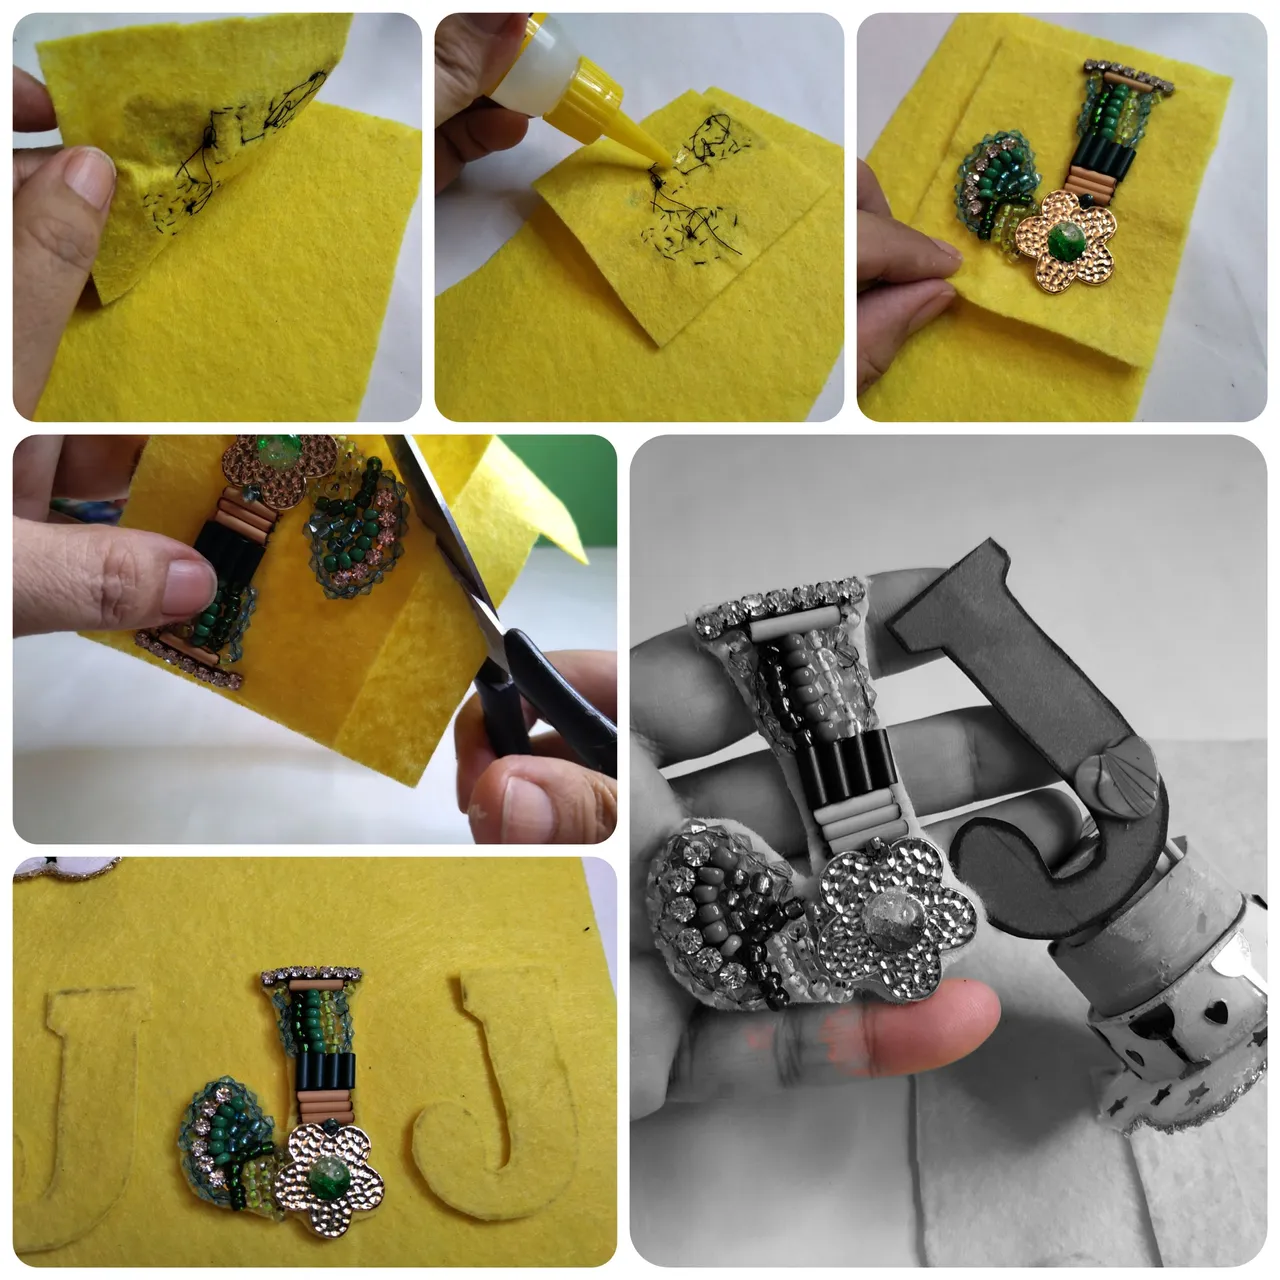
- Al terminar el bordado hice un nudo en la parte de atrás de la tela, rematé y escondí la hebra. Luego tomé un trocito de fieltro amarillo para pegarlo en la parte de atrás de la letra bordada. Usé pegamento para fijar ambas telas. Después que secó recorté por todo el borde dejando un espacio mínimo por donde haría luego la costura.
🤦 A esta altura de la labor hice una pausa porque quería tomar cafecito, descansar un ratito y estirar las piernas 🤣 estaba muy entusiasmada y quería verlo listo este mismo día. Además ya pronto me corresponden mis evaluaciones médicas y no podía dejar pendiente un proyecto tan importante 🤗
El último paso consiste en hacer un borde decorativo que a la vez sirve para esconder la orilla de la unión de las dos telas. Para hacer este borde elegí una mostacilla traslúcida de color azul 👑 rey. Me encantan estas MOSTACILLAS transparentes 😃 parecen de 💧 agua.
Para hacer este borde tuve que recordar antes como se empezaba 🤔.Pasé el hilo desde la parte de atrás de la tela solo por el borde de la unión, sin hacer nudo en la hebra ni agarrar los SWAROVSKI ni las MOSTACILLAS cercanas. Con este hilo agarré 3 MOSTACILLAS azules y luego pasé de nuevo el hilo desde atrás hacia el frente, sujetándolas con mi dedo las acomodé para pasar el hilo por la primera mostacilla que pasé por el hilo. De esta forma se hace una especie de triángulo en este primer punto.
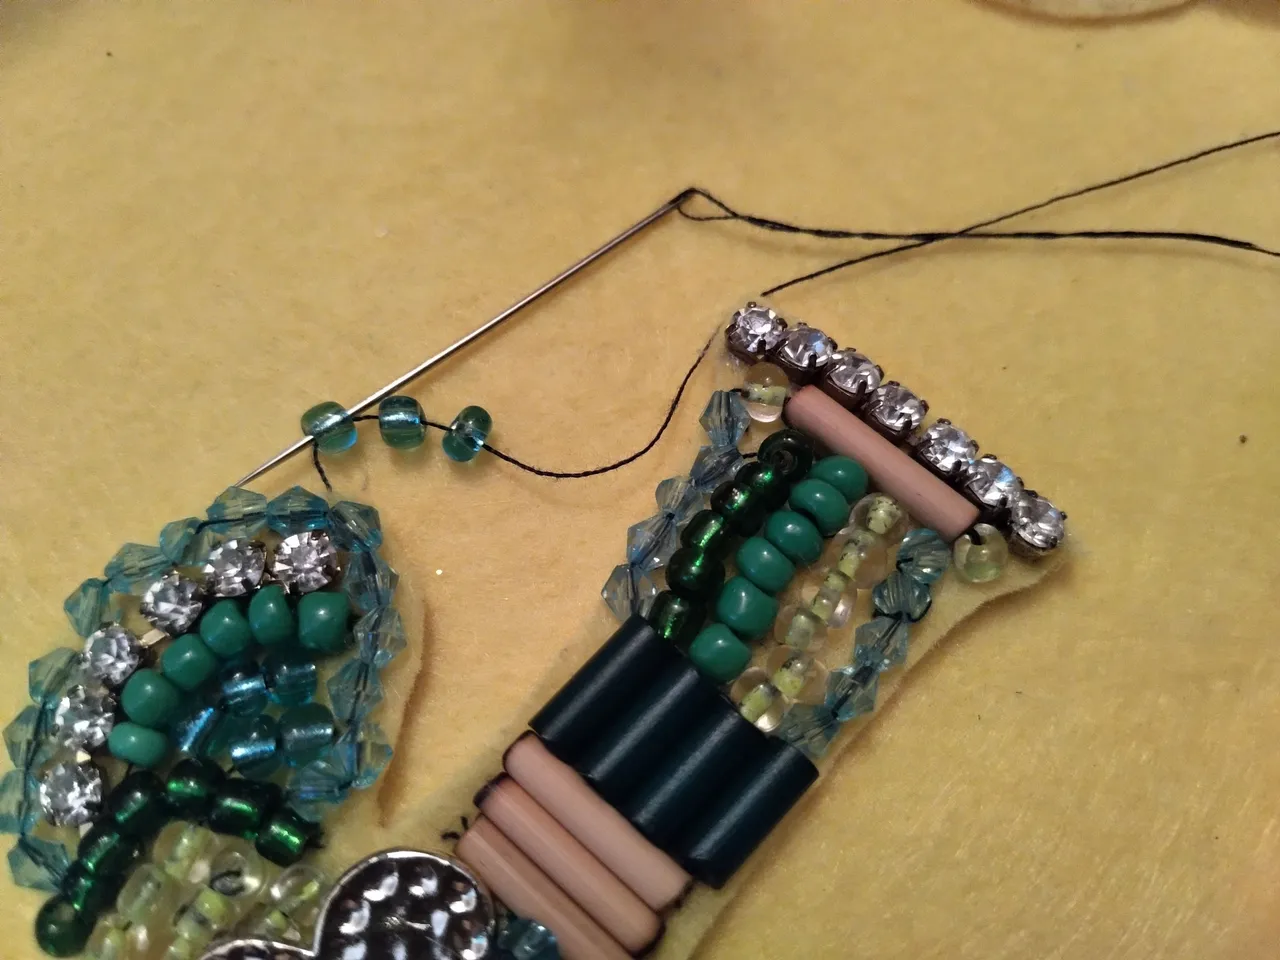
- A partir de aquí solo meteremos dos MOSTACILLAS por puntada. Con el hilo que sale de la mostacilla anterior agarramos 2 MOSTACILLAS azules y las pasamos desde atrás hacia al frente, las sujetamos y luego pasamos la hebra por dentro de la segunda mostacilla que acabamos de pasar.
- Repetí todo el proceso hasta decorar todo el borde de la letra. Me encantó el resultado, se ve como quería porque esta letra debe ser brillante y muy iluminada, porque aunque no sea de oro está realizada con mucho cariño para todos ustedes.
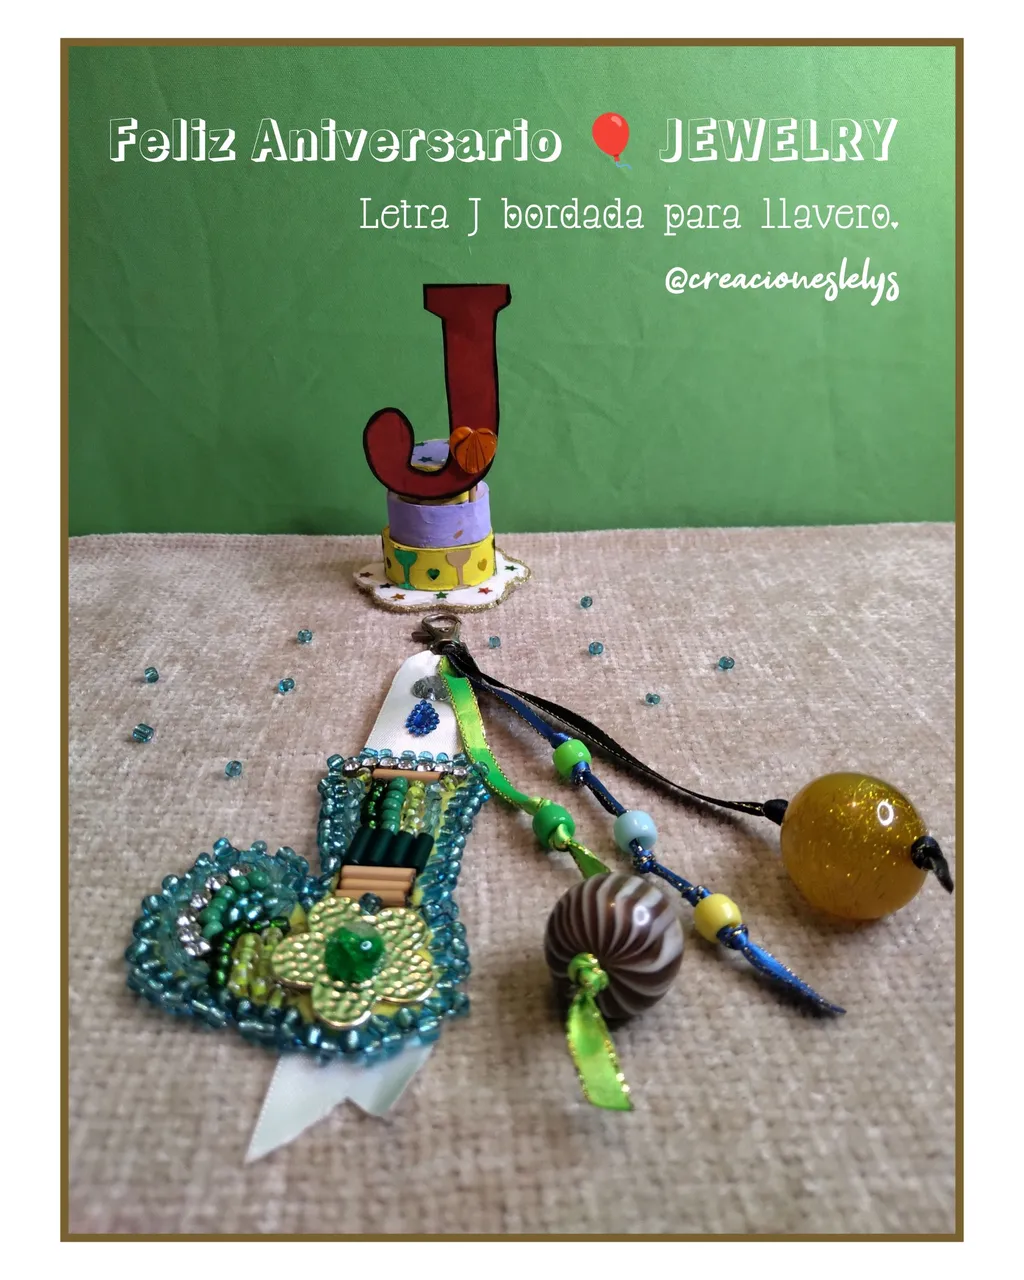
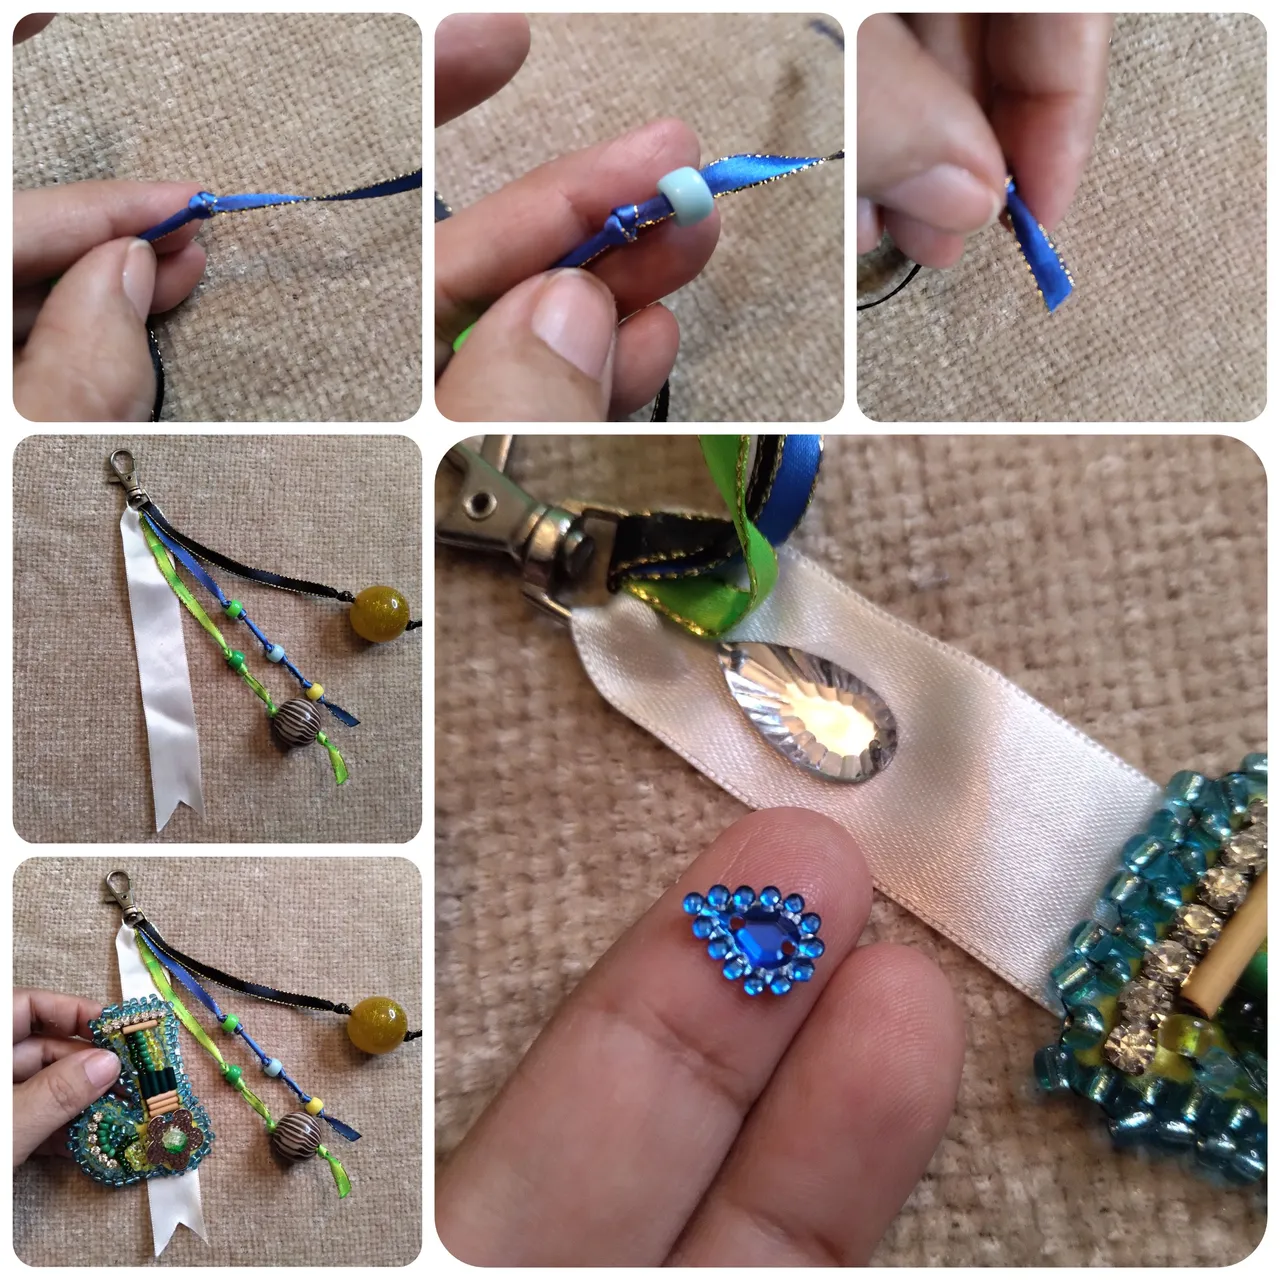
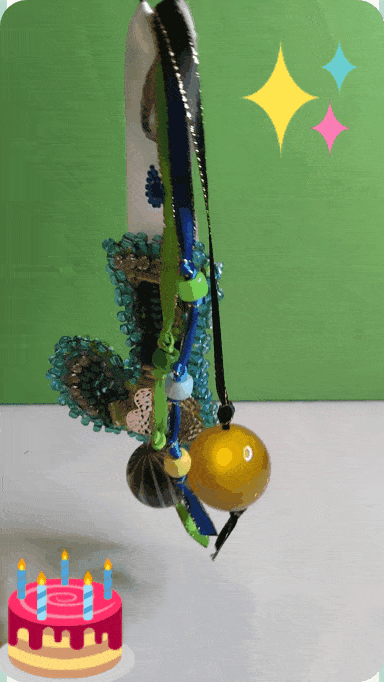
- Ahora los detalles adicionales que decidí agregar para usarlo como llavero. Empecé colocando la cinta de raso color blanco por dentro del aro del llavero, solo la punta para dejarla fija. Sobre esta cinta pegué la letra J. Para hacerlo más llamativo usé cintas de raso, cuentas plásticas y bolas acrílicas grandes para hacer otros colgantes. Como puedes ver en las imágenes uní solo en una de sus puntas tres cintas delgadas de 25cm por ½cm.
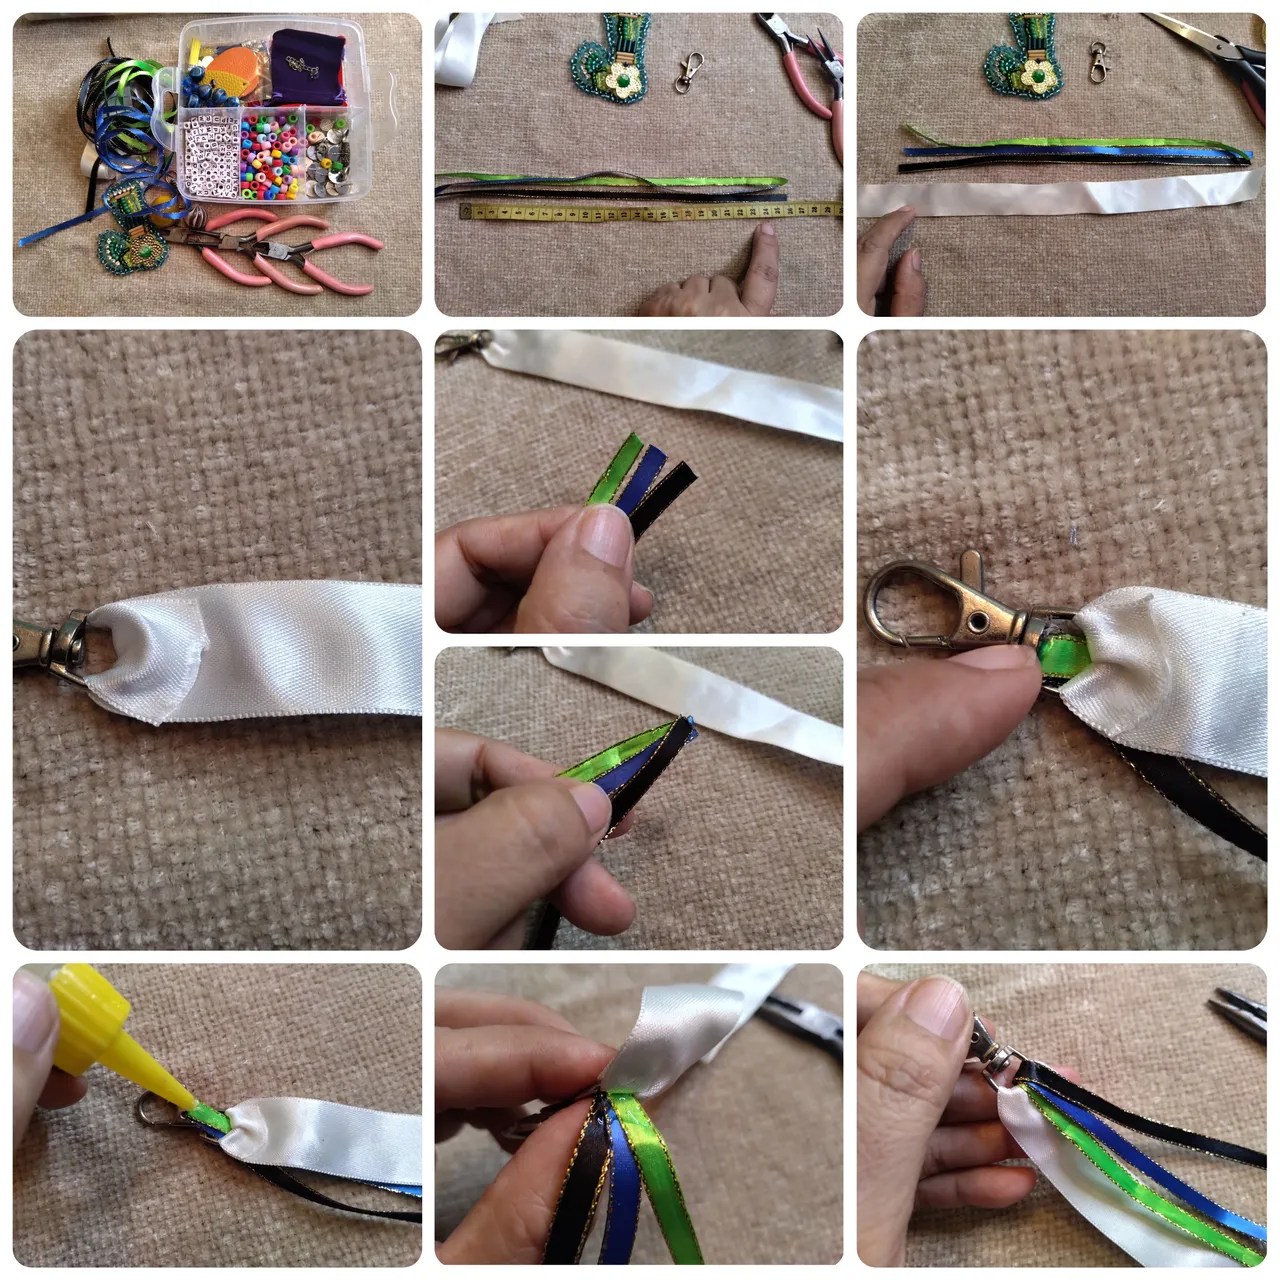
- En cada una de las cintas delgadas coloqué las cuentas, dejando las más grandes en la punta inferior de la cinta y las cuentas repartidas en la cinta sostenidas por nudos. A mí me gusta como se ve.
A mí me encantó hacerlo y disfruté mucho porque crear me gusta un montón. Muchas gracias por tu apoyo. Todas las fotos son de mi propiedad. Usé el traductor de Deepl. Usé Gifs la app. Hasta pronto. No dejes de participar en este reto de Aniversario 🎈
English.
Hello friends 🙋 we are celebrating 🥳 as our beloved community is on 🎈 Anniversary 🎈. Let's celebrate in a big way by giving you quality content. Many like me are learners of costume jewelry, however we can't set limits for ourselves and we should always be constantly learning. That is why I have taken advantage of this celebration to put into practice one of the embroidery techniques I have been studying. I hope you like it, it is the first time I embroider a complete letter 👏 with this kind of materials.
I want to take this opportunity to invite friends @linita @aarolita and @vicmito74 to show us their creations. I would also love for you to join this contest and if you are not subscribed, do it, you won't regret it.
I must confess that the written words "let it not be just another publication" had me disturbed 🤦 every day I woke up with the desire to start the project for this day, but I was immediately possessed by those words. I was then more relaxed and waited for inspiration to take over my mind and let out those limiting thoughts for me. So it was that after thinking about it so much it occurred to me to decorate a nice letter J to honor @Jewelry, this community deserves all the effort we put to make our projects, it is a commitment to continue learning and improving more and more.
One of the most difficult decisions to make to start this project was to choose the colors and materials to use, as you can see this is a "multiform" type of embroidery, in which the most important thing is to fill the letter with all the details we want; charms, beads, beads, beads, beads, beads, etc.. At the same time, this characteristic of the design motivated me to make it since, as I always say, I like to use even the smallest ball that is rolling around in the boxes.
MATERIALS.
- Yellow felt fabric.
- Beads.
- Swarovski.
- Beads.
- Metal flower.
- Half green glass bead.
- Rhinestones.
- Sewing needle.
- Sewing thread.
- Glue.
- I started this project by designing the letter J, to trace it on the felt I first drew it on a cardboard, cut it out and mounted it on the fabric. With the pencil I drew the outline of the letter on the foami, I cut out only the square where I drew the letter.
- Then I chose the biggest detail of the letter, we can put one or two to this size of letter, I only chose one and it was a very pretty metal flower. As it has a hole in the middle I used the half green glass bead to place it in the center of the flower.
- The next step was to choose where I would put the flower. I liked to see it at the base sticking out a little from the letter. There I attached it using hot silicone.
- Having already available the materials I would use I visualized the order in which I would place them. It should be noted that I also took the opportunity to practice the chromatic analogy lesson 😃 I looked for a color palette 🌈 of the color green because I had already planned to highlight this color in whatever my project would be. The 2023 represents for me hope, achievement, advancement and positive 🙏 I want my gift to the community to be impregnated with all these purposes so that we continue to grow and multiply.
- I threaded the needle after checking that the materials I chose could be passed through the needle and thread twice, I used the thread in one strand to embroider the entire lettering.
- I started by embroidering some bamboo beads, to do this I passed the thread from the back of the fabric placing it at the top near the flower. To fix the bamboo canutillos, pass the thread through the inside and the thread that comes out is passed to the back of the fabric, adjusting it gently. The thread is pulled up again very close to the fixed comb, the other comb is passed through the thread and fixed by pulling the thread out behind the fabric. This is how I did it every time I fixed a comb in this letter. There are bamboo and green colored acrylic canutillos 🌿. I placed the bamboo grommets vertically and the green ones horizontally in this first part.
- Then I embroidered several vertical lines alternating between the green beads and the light blue SWAROVSKI.
Then I embroidered several vertical lines alternating between the green beads and the light blue SWAROVSKI, I placed them at the ends of that part of the letter and all the green ones in the center. For every two MOSTACILLAS that I fixed I made the reinforcement that consists of passing the thread again through the first embroidered bead of the line, we pass the thread backwards and we take it out just where that first bead is to cross it and leave the thread available for the next stitch.
- To finish this part of the letter J of JEWELRY 💍 I embroidered horizontally a SWAROVSKI, a canutillo and another SWAROVSKI on the same line. On that line I attached with glue 3cm of rhinestones.
- In the oval part of the J I decided to place MOSTACILLAS in various shades of green inside a Swarovski border. Following the same embroidery procedure I filled in all that space. I really liked embroidering this letter because I had no problem to cover all its space, I only had an empty space between the top of the flower and the first line of beads, to cover it I placed a green bead.
- When I finished the embroidery I tied a knot in the back of the fabric, finished it off and hid the thread. Then I took a small piece of yellow felt and glued it to the back of the embroidered letter. I used glue to attach both fabrics. After it dried I trimmed all around the edge leaving a minimal space where I would make the stitching later.
🤦 At this stage of the work I took a break because I wanted to have some coffee, rest for a while and stretch my legs 🤣 I was very excited and I wanted to see it ready this very day. Besides, I was due for my medical evaluations soon and I could not leave such an important project pending 🤗.
The last step is to make a decorative border that at the same time serves to hide the edge of the junction of the two fabrics. To make this border I chose a translucent 👑 king blue 👑 mustard. I love these translucent MOSTACILLS 😃 look like 💧 water.
To make this border I had to remember earlier how to start 🤔.I ran the thread from the back of the fabric only along the edge of the join, without knotting the strand or grabbing the SWAROVSKI or the nearby MOSTACILLAS. With this thread I grabbed 3 blue MOSTACILLAS and then passed the thread again from the back to the front, holding them with my finger I arranged them to pass the thread through the first MOSTACILLAS I passed through the thread. This makes a sort of triangle in this first stitch.
- From this point on, we will only slip two MOSTACILLAS per stitch. With the thread that comes out of the previous stitch, grab 2 blue MOSTACILLAS and pass them from the back to the front, hold them and then pass the thread through the inside of the second stitch that we just passed.
- I repeated the whole process until I decorated the entire edge of the letter. I loved the result, it looks as I wanted because this letter must be shiny and very illuminated, because although it is not gold it is made with love for all of you.
- Now the additional details I decided to add to use it as a key ring. I started by placing the white satin ribbon on the inside of the keychain ring, just the tip to fix it. On this ribbon I glued the letter J. To make it more eye-catching I used satin ribbons, plastic beads and large acrylic beads to make other pendants. As you can see in the pictures I joined only at one end three thin ribbons of 25cm by ½cm.
- On each of the thin ribbons I placed the beads, leaving the larger ones on the bottom tip of the ribbon and the beads spread out on the ribbon held in place by knots. I like the way it looks.
I hope you liked the final result. I loved making it and I enjoyed it a lot because I like creating a lot. Thank you very much for your support. All photos are my property. I used Deepl translator. I used Gifs the app. See you soon. Be sure to participate in this Anniversary challenge 🎈