I didn't think my first post would have any impact(#introduceyourself), unless it generated controversy. There were some comments that fervently claimed that my creations were made with AI.
As a bioinformatician I recognize the potential of AI, with enough data and computational resources many things can be achieved, especially abstract concepts. There is still something in which human power is still superior, transmitting feelings.
At first I said Woow, I am so good that they confuse what I do with what an artificial intelligence does that has access to terabytes of training images with framed concepts, then I was sad because they saw me as a single human machine and then aroused my anxiety to show my humanity.
If I had to take a piece of paper and a brush, I doubt I would be able to do anything decent, I respect plastic artists a lot and I even envy them. Luckily for me, computers were invented as a means of creating and expanding my capabilities.... I feel my laptop is part of my brain, like a powerful tool, like the side wheels on my bike when I was little.
My statement remains, "all science is art and all art is science." Perhaps this misunderstanding is the result of the fact that in many cases in my digital expression I use a bit of computational mathematics (something that I will explain briefly later) creating my own stamp. Yes, I make my digital compositions through a bit of drawing and a bit of science of my own, taken from my mind and what brilliant teachers have taught me.
I'm a pretty shy person, I've been making compositions for 5 years, this is the first time I show the world what I'm passionate about, it's hard for me to do it but I'm working on it, Hive was my choice for its clean dynamics (at least until now) of other evils that terrified me on the social platforms we know. While it's hard for me to understand that I can't even compare myself to an artist, it still shocks me when there are misunderstandings about the science behind it. For this reason, I dedicate this post to show my steps, without ties or misgivings, openly, for science, for an art typical of the 2021 century.
The goal
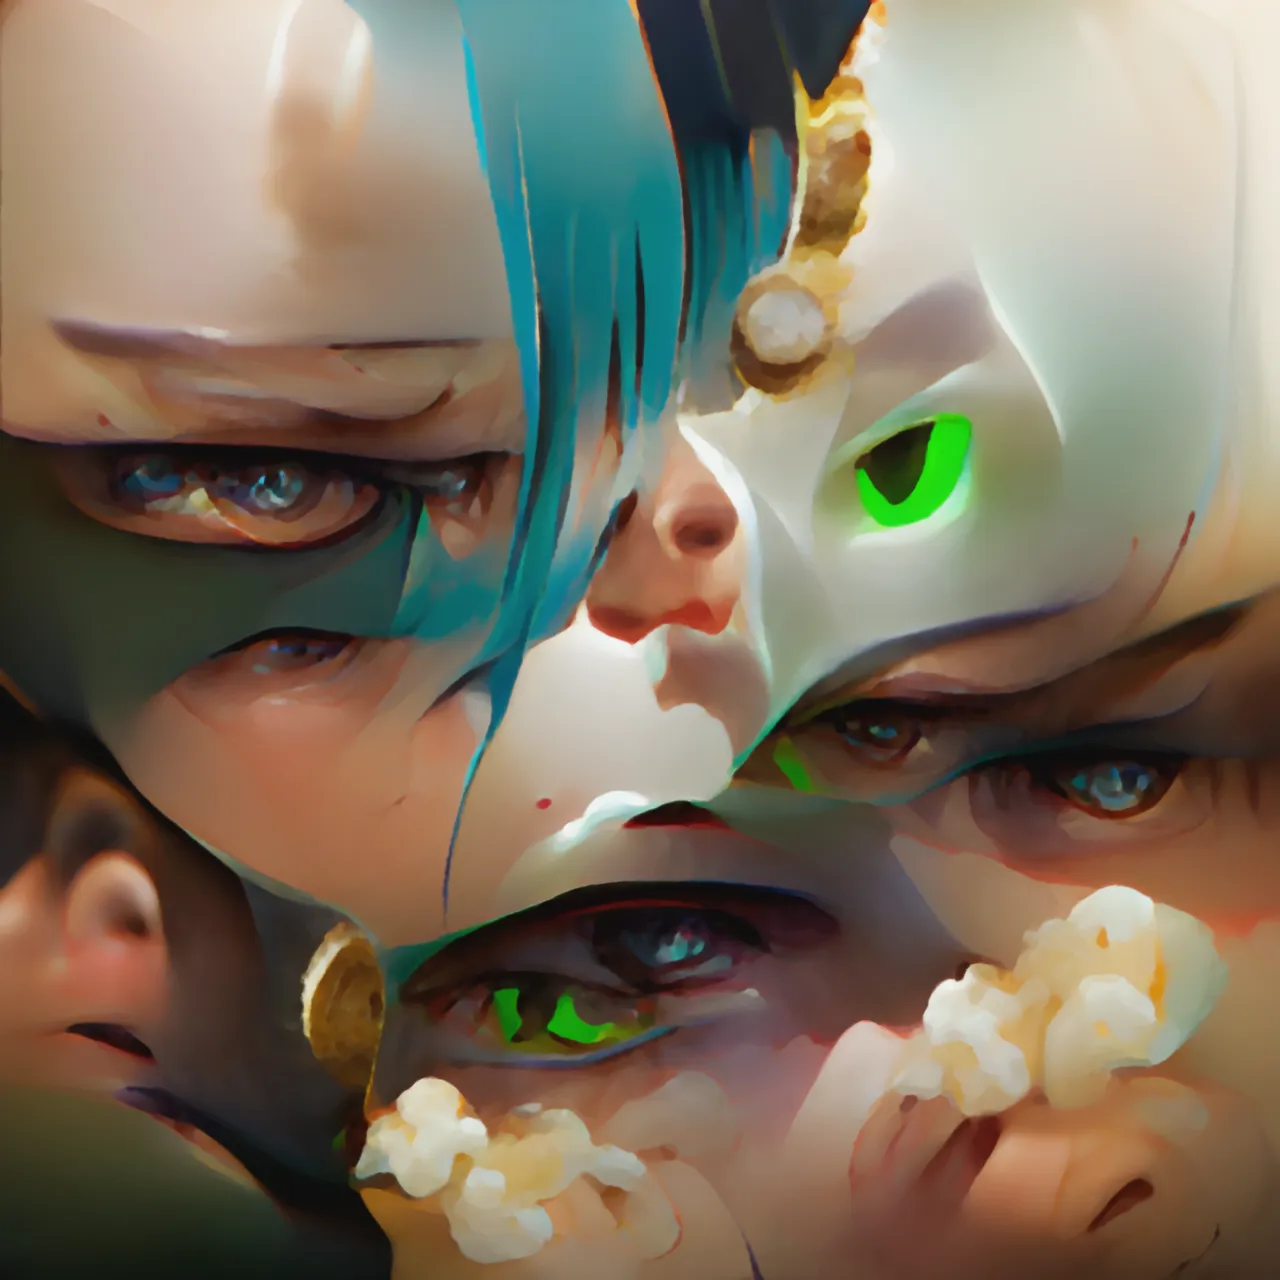
Today we will make a representation that although it seems complex, it is not at all. Today, my friends, we will try to express a cardinal sin, envy.
Search for information.
First of all, it is pertinent that I know what I want to express and then move on to the question of How I want to do it.
Some important points:
- Envy refers to the internal discomfort or pain of not having something that another person has.
- It is usually expressed with movements, gestures and thoughts residual to that sensation.
- I personally feel that it is a degenerative and unhealthy feeling.
Creation process
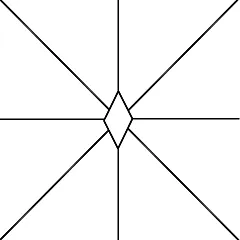
I always like to start with a geometric shape that gives me something called a vanishing point, an artistic resource used to converge the gaze, usually in the form of an asterisk or cross. Although I want the image in its entirety to be observed so the following form may give me what I want:
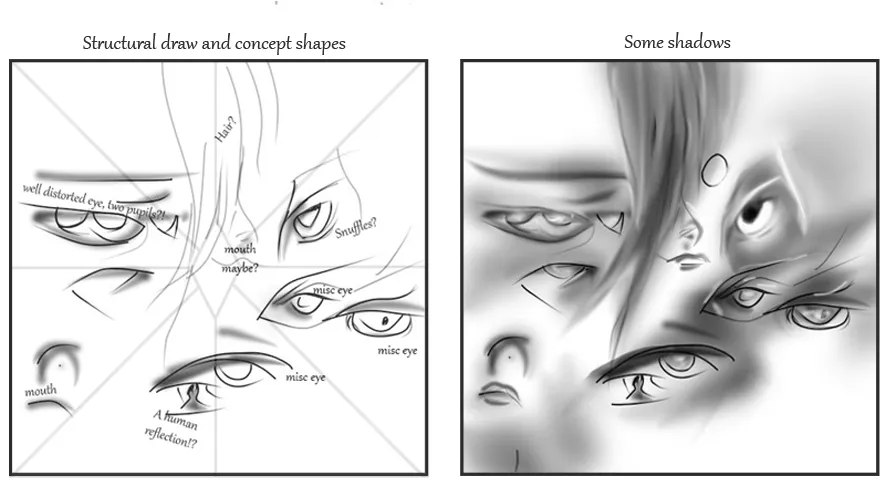
After several attempts, if I manage to understand and become passionate about what I am about to do, it only remains to take a few more steps, but first I need to do a proof of concept, this helps me to visualize a final result and to work with more enthusiasm😆. In this case what terrifies me the most are the eyes, and as a challenge in the sketches I made some, even a little surreal, my starting point, then, will be the most surreal:
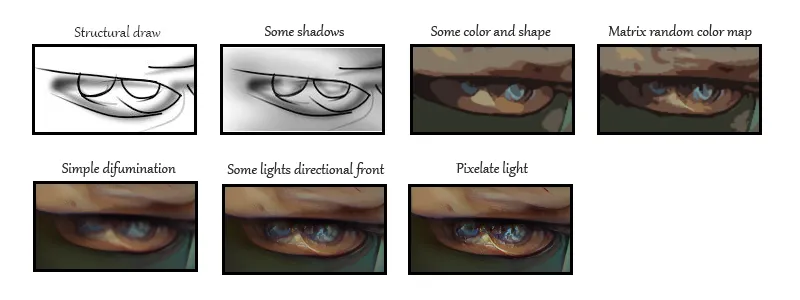
The image above illustrates quite well how an amateur like me can achieve moderately good results with simple steps. With nothing more to add, it only remains to start, using of course the knowledge extracted from the previous test and of course, if it is to my liking to use it in the final result. Many thanks to my cat Snuffles who gave me a sign of envy in these years ha, ha, she showed a quantification of faces when she caressed her daughter and not her, that's why I add it to my work😌. The other, any resemblance to someone close to me is not a mere coincidence.
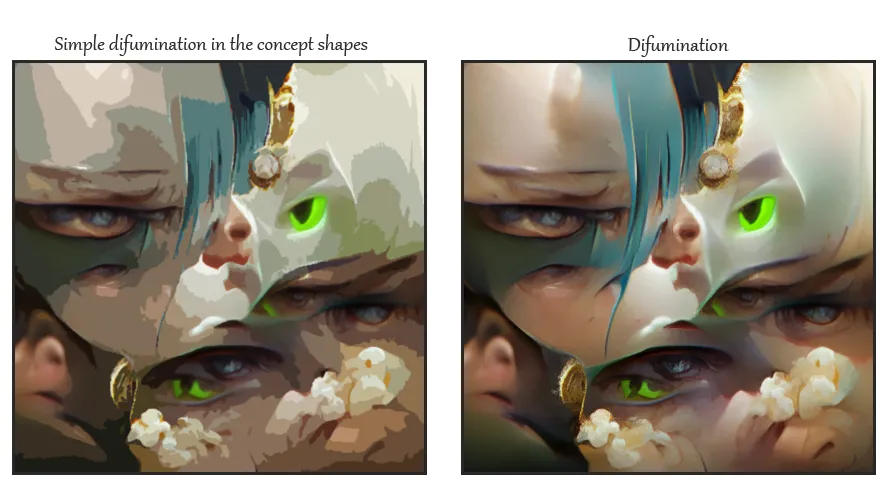
It only remains to apply modifiers for better visuality such as an increase in saturation in this case and more detailed smoothing.
Disclaimer: The following section is a bit of the science I use behind my works, knowledge of math and programming is required. Excuse me for that, those who are not attracted to these topics, immediately skip this part
Advanced
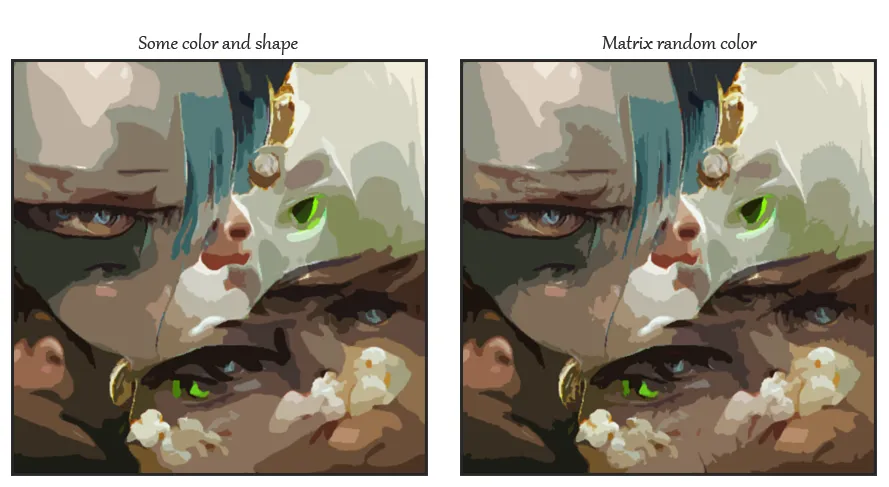
As I mentioned before, I am not an artist, much less equal to those who are, I am a man of science and as such I have to find a way to defend myself in this world that I am passionate about🤣🤣. As many of us know, an image is nothing more than a matrix of mathematically interpretable numbers, a bitmap with a very well defined scale. This resource of knowledge opens many doors, the modifiers. Another extremely important point is the use of masks to delimit the effect of the modifier to a specific area, every image is a mask if it defines an inactive color and another active color. In my case I usually use the gray scale, it not only provides a deterministic way to the process but also provides an interpretable parameter such as intensity.
The effect of randomness in the color islands is relatively simple, it is necessary to generate a mask that delimits each color island in Cartesian coordinates and the image of the color islands as a tonality information mask, showing the general algorithm:
# Island randomness
Be:
p1: point to modify
direction: The directional vector perpendicular to the line tangent to the curve at p1.
random_unif(start, end) : uniformly random value or vector between start and end.
slope_transform: random_unif(mask_direction(point) , direction).
eucl_dist(p1,p2): function that returns the Euclidean distance between p1 and p2.
nearest_active_point(p1): closest active point to p1 not coming from its nature.

BEGIN:

DEFINE mask_delim: The delimiting mask;
DEFINE mask_color: The color mask;
DEFINE mask_direction: The modifier motion vector direction mask;
DEFINE iterations: the iterations of movement;
DEFINE threshold_dist: threshold distance between p1 and nearest_active_point(p1);
DEFINE store(p1): dictionary that stores the visited pixels given p1 and their color in mask_color;
DEFINE point_size(var1,var2): returns a random variable that defines the number of pixels in the range [var1 - var2] that represents a point;
DEFINE clean(p1): updates mask_delim by turning off the pixels represented by p1;

FOR EACH point IN mask_delim:
    IF point is an active point:
        CALCULATE direction
        CALCULATE slope_transform
        CALCULATE diff = threshold_dist - nearest_active_point(p1)
        IF diff >= 0:
            CALCULATE steps = diff * iterations * random_unif(0,0.7);
            FOR EACH pos IN steps:
                CALCULATE position: with direction random_unif(direction, slope_transform) and step size pos;
                point.point_size(1.5);
                store(point);
                clean(point);
                MOVE point TO position;

DRAW image: Using mask_color with respect to the store dictionary taking mask_color as image and mask_delim with active and inactive points reversed. In addition to this, the vector direction necessarily needs to be corrected to avoid loops and reversals. I tried to capture the general algorithm here, sorry reader if you notice something strange, I wrote the script a long time ago in my flux of knowledge hehehe.
END;
Of course, all the variables that necessarily have to be integers have to be rounded, I usually use rounding to the nearest integer, although sometimes and to generate more distortion I round it to the top nearest integer.
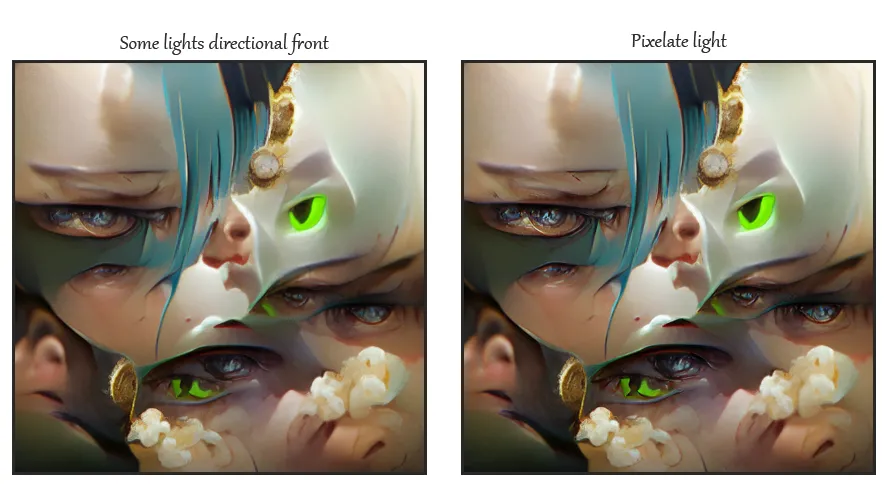
I usually use sharpness scoring methods(Simple tutorial) and image interpolation methods(Simple explanation) to achieve a focus pixelation effect, add an effect that seems interesting to me, adding color values, you get a kind of hypersaturation in the areas that are applied, in the example above, a luminosity layer in turn applies to the pixel effect mask.
With respect to the roughness and relief that is applied to the works, it can be generated by means of textures that indicate the luminosity and/or shadows that a pixel takes with respect to its color scale, the textures can either be generated by an equation evaluated in 2D matrices or downloaded from the internet (preferably converted to gray scale).
As can be seen, the nature of the algorithms are mostly deterministic, with stochasticity only influencing positional or scale characters.
That's all for today, my resources don't allow me much more haha, I hope one day I can write more and be able to explain a little better😓
No pensé que mi primer post tuviese impacto alguno(#introduceyourself), menos que generara polémica. Hubieron algunos comentarios que afirmaban fervientemente que mis creaciones fueron hechas con IA.
Como estudiante de bioinformática reconozco las potencialidades de la IA, con suficientes datos y recursos computacionales son muchas cosas las que se pueden lograr, sobre todo conceptos abstractos. Todavía hay algo en lo que el poder humano sigue siendo superior, transmitir sentimientos.
Al principio dije Woow, tan bueno soy que confunden lo que hago con lo que hace una inteligencia artificial que tiene acceso a terabytes de imágenes de entrenamiento con conceptos enmarcados, luego tuve tristeza pues me vieron como sola máquina humana para luego despertar mi ansiedad por mostrar mi humanidad.
Si tuviera que tomar un papel y un pincel dudo que pueda hacer algo decoroso, respeto mucho a los artistas plásticos y hasta los envidio. Por suerte para mí se inventaron las computadoras, como medio de creación y extensión de mis capacidades.... Siento mi laptop como parte de mi cerebro, como una herramienta poderosa, como las rueditas laterales en mi bici cuando era pequeño.
Mi afirmación remanece, "toda ciencia es arte y todo arte es ciencia". Quizás este malentendido sea resultado de que en muchos casos en mi expresión digital utilizo un poco de matemática computacional(algo que explicaré brevemente más adelante) creando mi propio sello. Si, hago mis composiciones digitales por medio de un poco de dibujo y un poco de ciencia propio, sacado de mi mente y lo que brillantes profesores me han enseñado.
Soy una persona bastante tímida, desde hace 5 años realizo composiciones, esta es la primera vez que doy a mostrar al mundo lo que me apasiona, me cuesta hacerlo pero estoy trabajando en ello, Hive fue mi elección por su dinámica limpia(al menos hasta ahora) de otros males que me aterraban en las plataformas sociales que conocemos. Si bien me es difícil comprender que no puedo siquiera compararme con un artista más me impacta cuando existen malentendidos con respecto a la ciencia que respalda. Por ello, este post lo dedico a mostrar mis pasos, sin ataduras ni recelos, abiertamente, por la ciencia, por un arte propio del siglo 2021.
La meta
Hoy haremos una representación que si bien parece compleja no lo es para nada. Hoy, amigos míos, intentaremos expresar un pecado capital, la envidia.
Búsqueda de información.
Primeramente es pertinente que sepa que quiero expresar para luego pasar a la pregunta del Cómo quiero hacerlo.
Algunos puntos importantes:
- La envidia se refiere a la molestia o dolor interno de no tener algo que otra persona tenga.
- Habitualmente se expresa con movimientos, gestos y pensamientos residuales a esa sensación.
- Personalmente siento que es una sensación degenerativa y poco saludable.
Proceso de creación
Me gusta siempre comenzar con una forma geométrica que me brinde algo llamado punto de fuga, un recurso artístico utilizado para confluir la mirada, usualmente en forma de asterisco o cruz. Aunque deseo que la imagen en su totalidad sea observada por lo que la siguiente forma puede darme lo que quiero:
Después de varios intentos si logro entender y apasionarme por lo que estoy a punto de hacer pues solo resta dar unos cuantos pasos mas pero primero necesito hacer una prueba de concepto, esto me ayuda a visualizar un resultado final y a trabajar con más ganas😆. En este caso lo que más me aterra son los ojos, y como reto en los bocetos hice algunos, incluso un poco surreales, mi punto de partida, entonces, será el más surrealista:
La imagen superior ilustra bastante bien como un amateur como yo puede llegar a resultados medianamente buenos con pasos sencillos. Sin nada mas que agregar, solo resta comenzar, utilizando claro está los conocimientos extraídos de la prueba anterior y por su puesto, de quedar a mi gusto utilizarla en el resultado final. Muchas gracias a mi gata Snuffles que me dió muestra de la envidia en estos años ja, ja, mostraba una cuantificación de caras cuando acariciaba a su hija y no a ella, por eso la agrego en mi obra😌. Lo otro, cualquier parecido con alguna persona cercana a mi no es mera coincidencia.
Solo resta aplicar modificadores para mejor visualidad como un aumento de saturación en este caso y suavizaciones más detalladas.
Disclaimer: La siguiente sección es un poco de la ciencia que utilizo detrás de mis obras, es necesario el conocimiento de matemáticas y programación. Discúlpenme por ello, los que no se sienten atraídos por estos temas, saltarse inmediatamente esta parte
Avanzado
Como antes comenté, no soy artista, mucho menos me igualo a los que lo son, soy un hombre de ciencia y como tal tengo que buscar una vía para defenderme en este mundo que me apasiona🤣🤣. Como muchos sabemos una imagen no es más que una matriz de números matemáticamente interpretables, un mapa de bits con una escala muy bien definida. Este recurso de conocimiento abre muchas puertas, los modificadores. Otro punto sumamente importante es la utilización de máscaras para delimitar el efecto del modificador a una zona específica, toda imagen es una mascara si en ella se define un color inactivo y otro color activo. En mi caso suelo utilizar la escala de grises, no solo aporta una forma determinista en el proceso sino que también aporta un parámetro interpretable como la intensidad.
El efecto de aleatoriedad en las islas de colores es relativamente sencillo, es necesario generar una máscara que delimite cada isla de color en coordenadas cartesianas y la propia imagen de las islas de color como máscara de información de tonalidad, mostrado el algoritmo general:
# Aleatoricidad de islas
Sea:
p1: punto a modificar
direction: el vector direccional perpendicular a la recta tangente a la curva en p1.
random_unif(start, end): valor o vector uniformemente aleatorio entre start y end.
slope_transform: random_unif(mask_direction(point) , direction).
eucl_dist(p1,p2): función que retorna la distancia euclidiana entre p1 y p2.
nearest_active_point(p1): punto activo mas cercano a p1 no procedente de su naturaleza.

BEGIN:

DEFINIR mask_delim: La máscara delimitadora;
DEFINIR mask_color: La máscara de color;
DEFINIR mask_direction: La máscara de dirección vectorial de movimiento modificador;
DEFINIR iterations: las iteraciones de movimiento;
DEFINIR umbral_dist: distancia umbral entre p1 y nearest_active_point(p1);
DEFINIR store(p1): diccionario que almacena los pixeles visitados dado p1 y su color en mask_color;
DEFINIR point_size(var1,var2): retorna variable aleatoria que define la cantidad de pixeles en el rango [var1 - var2] que representa un punto;
DEFINIR clean(p1): actualiza mask_delim inactivando los pixeles representados por p1;

FOR EACH point IN mask_delim:
    IF point es un punto activo:
        CALCULAR direction
        CALCULAR slope_transform
        CALCULAR diff =  umbral_dist - nearest_active_point(p1)
        IF diff >= 0:
            CALCULAR steps = diff * iterations * random_unif(0,0.7);
            FOR EACH pos IN steps:
                CALCULAR position: con dirección random_unif(direction, slope_transform) y tamaño de paso pos;
                point.point_size(1,5);
                store(point);
                clean(point);
                MOVE point TO position;

DIBUJAR imagen: Utilizando mask_color con respecto al diccionario store  tomando mask_color como imagen y mask_delim con los puntos activos e inactivos revertidos.
END;
Claro está que todas las variables que necesariamente tengan que ser enteras tienen que ser redondeadas, usualmente utilizo el redondeo al entero más cercano, aunque a veces y para generar mas distorsión redondeo al mayor entero cercano. Además de ello necesariamente la dirección vectorial necesita ser corregida para evitar lazos y retrocesos. Intenté plasmar el algoritmo general aquí, disculpe el lector si nota algo extraño, escribí el script hace un buen tiempo atrás en mi afluencia de conocimientos jejeje.
Suelo utilizar métodos de puntuación por enfoque de nitidez(Tutorial simple) y métodos de interpolación de imágenes(Explicación simple) para lograr un efecto de pixelado de enfoque, agrega un efecto que me parece interesante, agregando valores de coloración se obtiene una especie de hipersaturación en las zonas que se aplica, en el ejemplo de arriba, una capa de luminosidad a su vez aplica para la mascara de efecto de pixelado.
Con respecto a la rugosidad y relieve que se aplica a las obras puede ser generado mediante texturas que indiquen la luminosidad y/o sombras que toma un pixel con respecto a su escala de color, las texturas pueden o bien ser generadas por una ecuación evaluada en matrices 2D o bien descargadas de internet(preferentemente transformadas a la escala de grises).
Como se puede ver, la naturaleza de los algoritmos son deterministas en su mayoría influyendo solamente la estocasticidad en caracteres posicionales o de escala
Eso ha sido todo por hoy, mis recursos no me permiten mucho más jaja, espero poder algún día escribir más y poder explicar un poco mejor😓