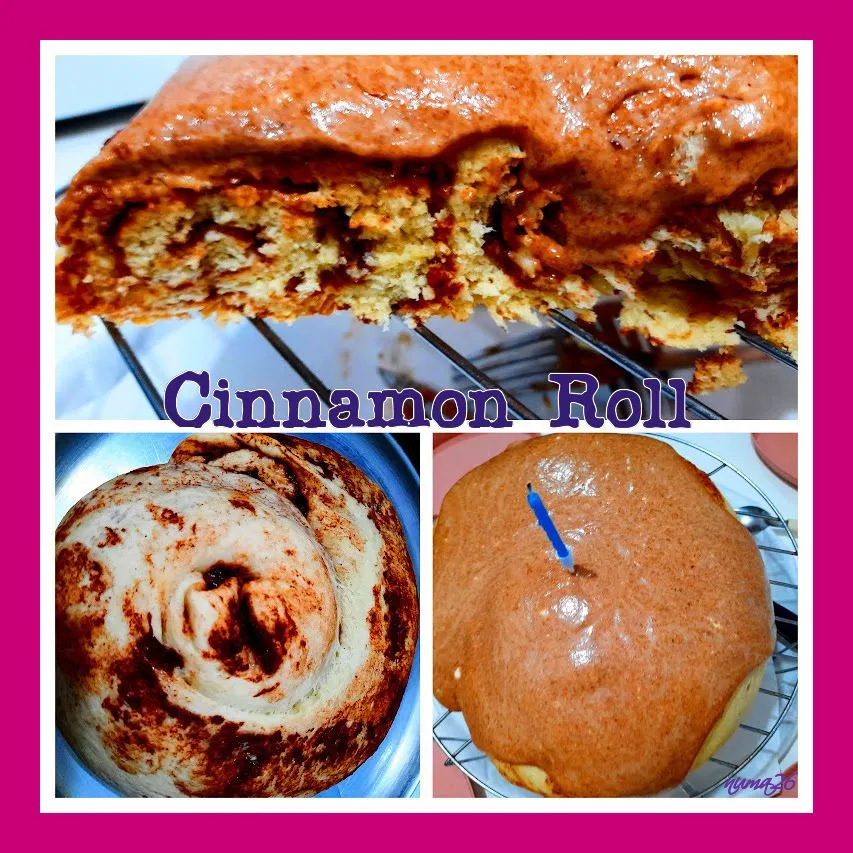
Luego de haber celebrado el cumpleaños de mi hijo mayor, @opyavi, decidí compartir la receta de su “Torta”. Es decir, el Rol de canela más grande que he preparado, con la intención de complacer su petición, para variar de pastel este año. Seguidamente, les explico, en detalles, la receta y su proceso. Verán que consta de varios pasos, pero es algo sencillo y además, en cada imagen que les muestro, está el seguimiento ilustrado, para complementar lo escrito. Así que a preparar un Cinnamon Roll al estilo cumpleaños.
After celebrating the birthday of my oldest son, @opyavi, I decided to share the recipe for his "Torta". That is, the largest cinnamon Rol I have ever prepared, with the intention of fulfilling his request, to change the cake this year. Next, I will explain in detail the recipe and its process. You will see that it consists of several steps, but it is something simple and in addition, in each image that I show you, there is the illustrated follow-up, to complement what is written. So let's prepare a Cinnamon Roll birthday style.
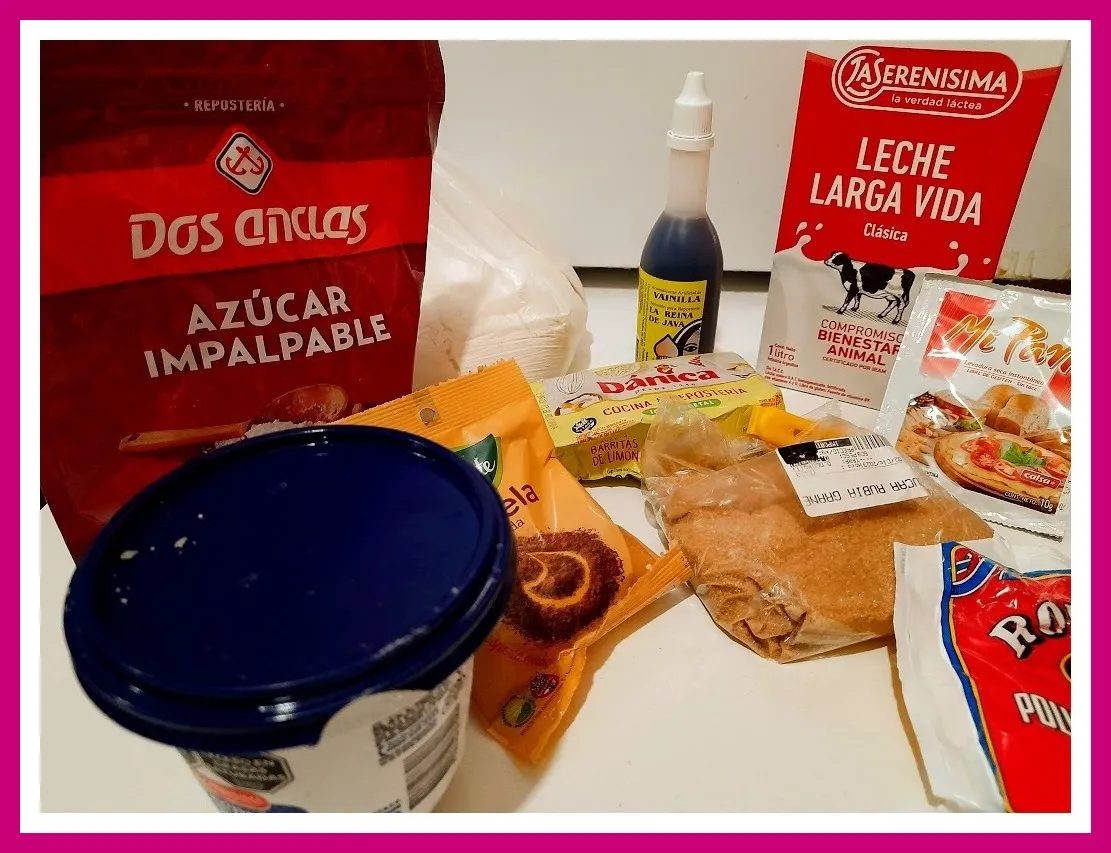
Ingredientes para la masa
2 tazas de harina de trigo
1/2 taza de mantequilla
10 GR. de levadura seca
1 taza de leche líquida tibia
Para el relleno
1/2 Taza de azúcar morena
1/4 Taza de mantequilla
1/4 taza de azúcar blanca
1 pizca de sal
Para el glaseado
2 Cucharadas de leche en polvo
1 Taza de queso crema
Vainilla al gusto
1/4 taza de azúcar glass
(Le agregué a mi glaseado, lo que sobró del relleno.)
Ingredients for the dough
2 cups of wheat flour
1/2 cup butter
10 GR. dry yeast
1 cup of warm liquid milk
For the filling
1/2 cup brown sugar
1/4 cup butter
1/4 cup white sugar
1 pinch of salt
For the glaze
2 tablespoons powdered milk
1 cup cream cheese
Vanilla to taste
1/4 cup powdered sugar
(I added the leftover filling to my frosting).
Primer Paso: Preparar el líquido para la masa.
En un bowl, vaciar la leche tibia, la mantequilla derretida, la levadura y mezclar. Dejar reposar por unos diez minutos, para la debida fermentación.
Step 1: Prepare the liquid for the dough.
In a bowl, pour the warm milk, melted butter, yeast and mix. Let stand for about ten minutes for proper fermentation.

Segundo paso: La fermentación.
Como pueden apreciar en la imagen, la levadura, junto con los ingredientes líquidos, ha fermentado de forma ideal. Seguidamente, la agregaremos, a la harina para así, comenzar con el primer amasado.
Second step: Fermentation.
As you can see in the image, the yeast, together with the liquid ingredients, has fermented in the ideal way. Next, we will add it to the flour to begin the first kneading.
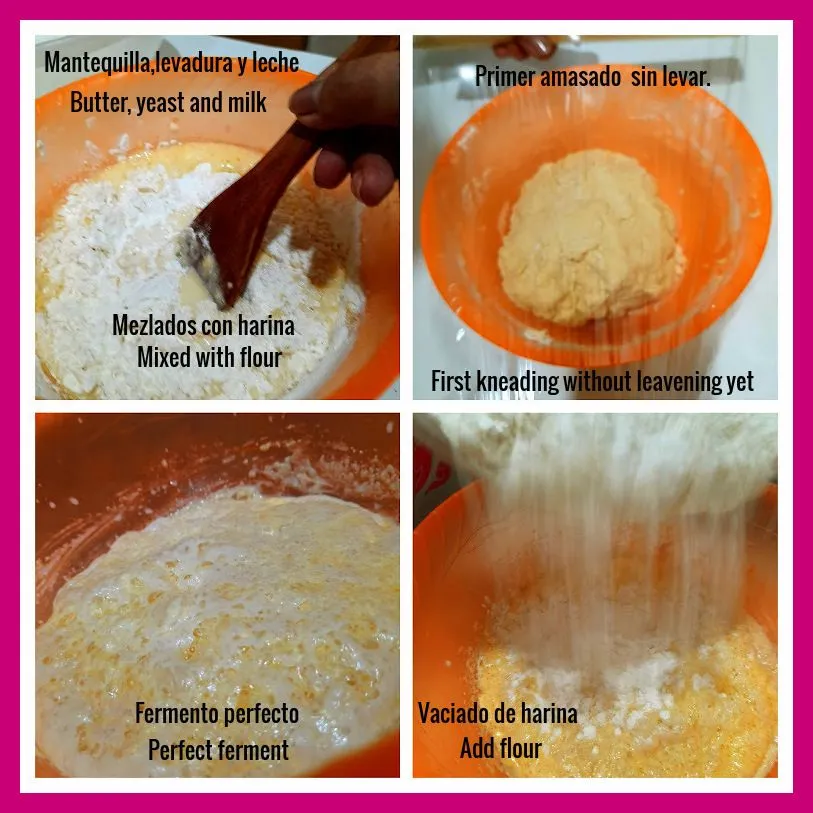
Tercer paso: En la siguiente imagen se puede observar el resultado, luego de mezclar los líquidos fermentados, con la harina. Se puso a reposar durante 40 minutos cubierta con un papel transparente especial para recetas de cocina, y pasado el tiempo, la masa creció el doble. Ahora se procederá al amasado final.
Third step: In the following image you can see the result, after mixing the fermented liquids with the flour. It was put to rest for 40 minutes covered with a special transparent paper for cooking recipes. After this time, the dough has doubled in size. Now we will proceed to the final kneading. This kneading should have a duration time equal to 10 minutes.

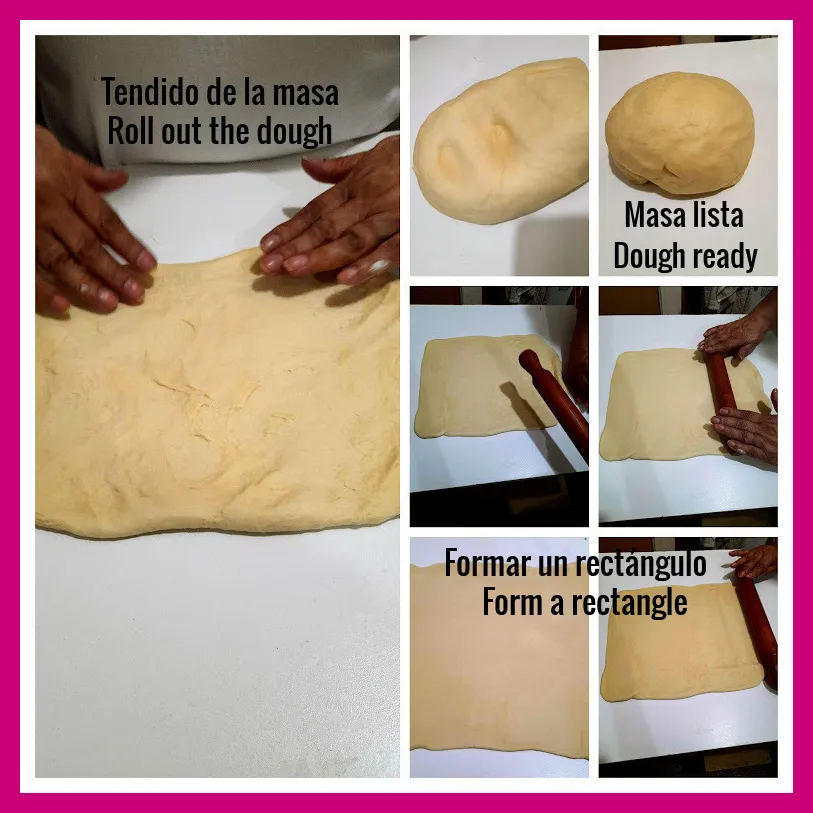
Cuarto paso: Engrasar el molde con mantequilla solamente. Elegí un molde para pizzas porque la intención es hacer un solo cinarol, del tamaño de una torta. Seguidamente, procedemos a hacer, el último amasado. Este amasado debe tener un tiempo de duración igual a 10 minutos. Mezclar la primera bola de masa, con una pizca de polvo de hornear, para que complete el crecimiento durante la cocción.
Fourth step: Grease the mold with butter only. I chose a pizza pan, because the intention is to make a cinnamon roll, the size of a cake. Next, we proceed to make the last kneading. This kneading should have a duration time equal to 10 minutes. Mix the first ball of dough, with a pinch of baking powder, to complete the growth during cooking.

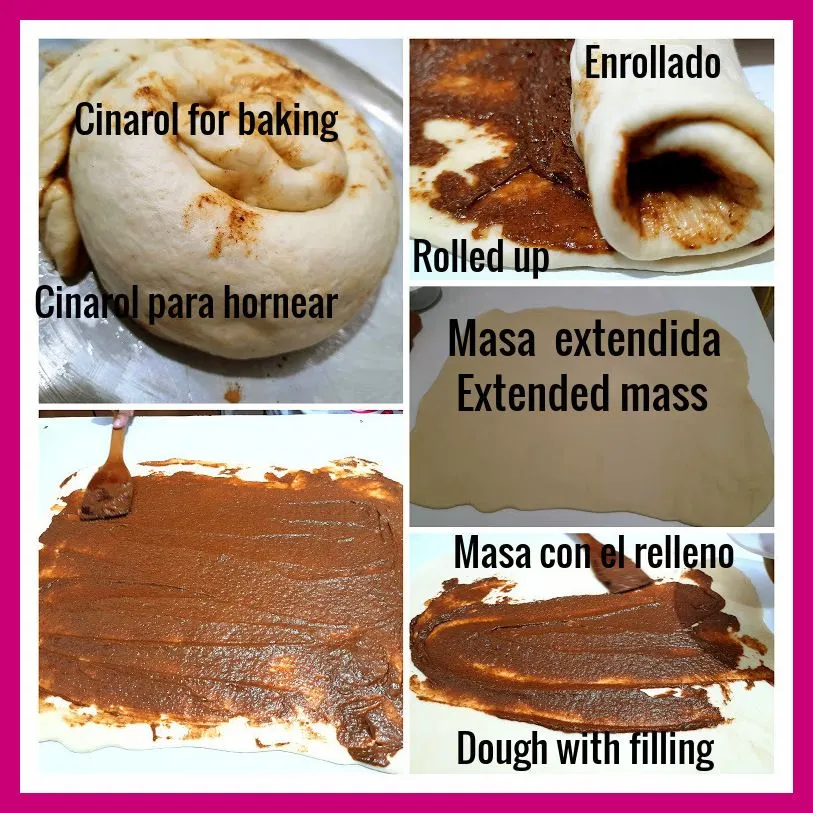
Cuarto paso: Amasado final. Se comienza a amasar sin parar durante los 10 minutos reglamentarios, se va rociando harina en polvo, para evitar que se pegue a la mesa. ¿Cómo saber si la masa está en su punto? Pues al colocar los dedos, encima, se van a marcar y sentirás una textura muy suave y sin nada de grumos. Lo siguiente es tomar el rodillo, y estirar la masa, hasta formar un rectángulo.
Fourth step: Final kneading. It begins to knead without stopping during the 10 regulatory minutes, sprinkling flour powder, to prevent it from sticking to the table. How to know if the dough is ready? Well, when you place your fingers on it, they will be marked and you will feel a very soft texture without any lumps. Next, take the rolling pin and stretch the dough into a rectangle.
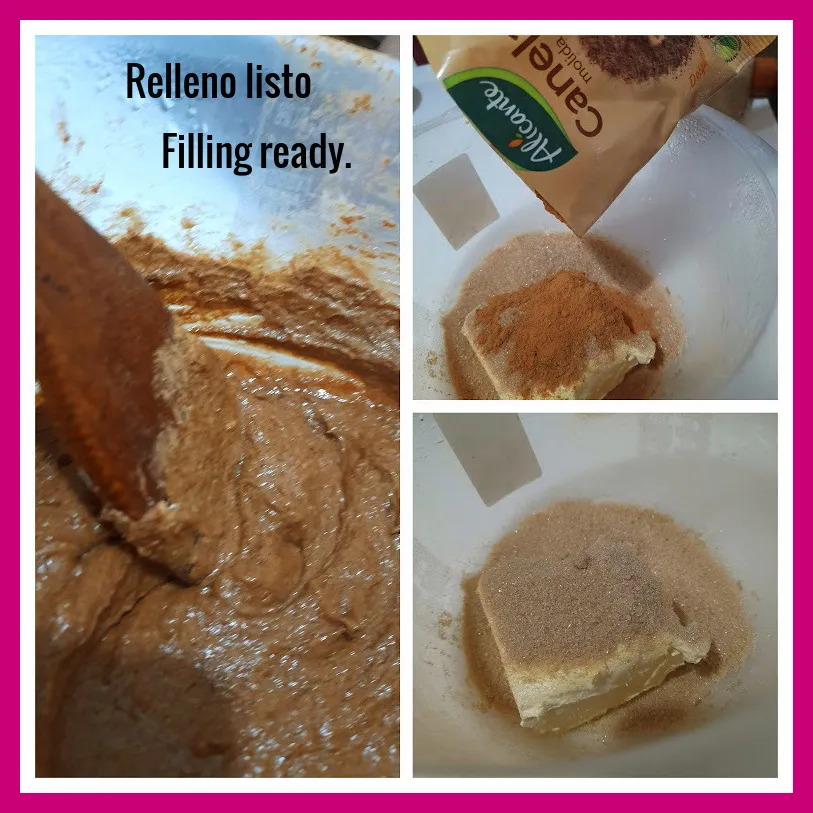
Quinto paso: Para el relleno, se va a necesitar: El azúcar morena, mantequilla, azúcar blanca, canela y una pizca de sal. Todo se va mezclando hasta formar una pasta cremosa. Con esta pasta se va a rellenar el rectángulo previamente preparado.
Fifth step: For the filling, you will need: Brown sugar, butter, white sugar, cinnamon and a pinch of salt. Everything is mixed until a creamy paste is formed. Use this paste to fill the previously prepared rectangle.
Sexto paso: Momento de colocar el relleno, sobre la masa extendida previamente. Al completar este proceso, se procede a enrollar, hasta llegar a las esquinas, en forma alargada. Seguidamente, se levanta de la mesada y se coloca con mucho cuidado en la bandeja previamente engrasada. Se va dando forma, hasta quedar con la típica forma de un rol de canela, pero de mayor tamaño.
Sixth step: Time to place the filling on the previously rolled out dough. Once this process is completed, proceed to roll it, until it reaches the corners, in an elongated shape. Then, it is lifted from the table and carefully placed on the previously greased tray. It is shaped until it has the typical shape of a cinnamon roll, but larger in size.
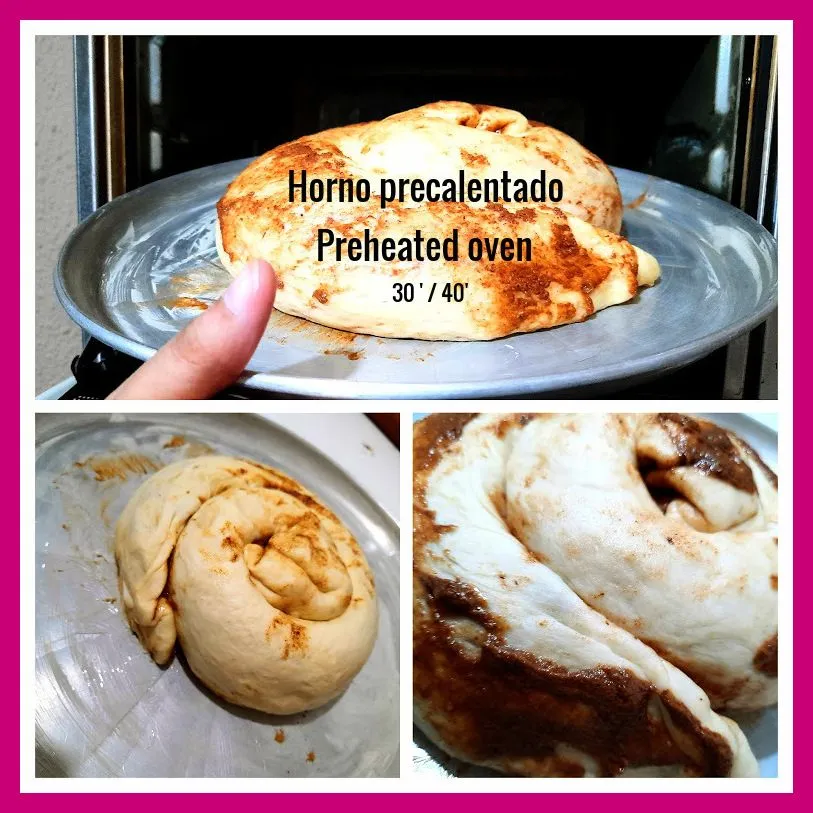
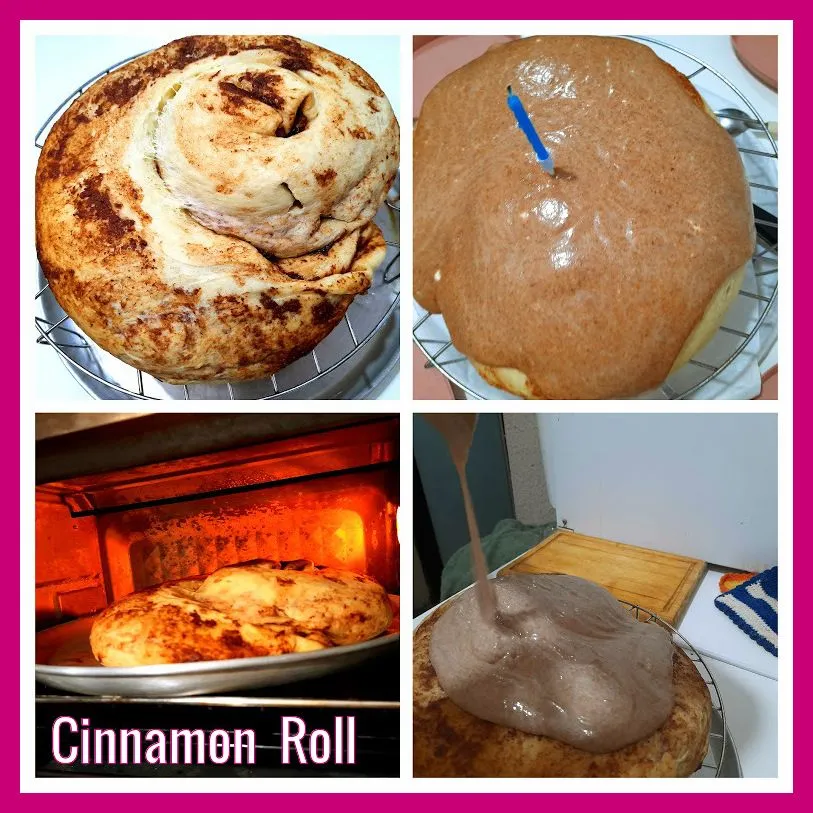
Séptimo paso: Una vez colocado el relleno, se llevará al horno precalentado a 200°/180° dependiendo de si es eléctrico o a gas. Mientras se hornea, se procede a preparar el glaseado que va a cubrir nuestro rollo de canela.
Seventh step: Once the filling is in place, place it in a preheated oven at 200°/180° depending on whether it is electric or gas. While baking, proceed to prepare the glaze that will cover our cinnamon roll.
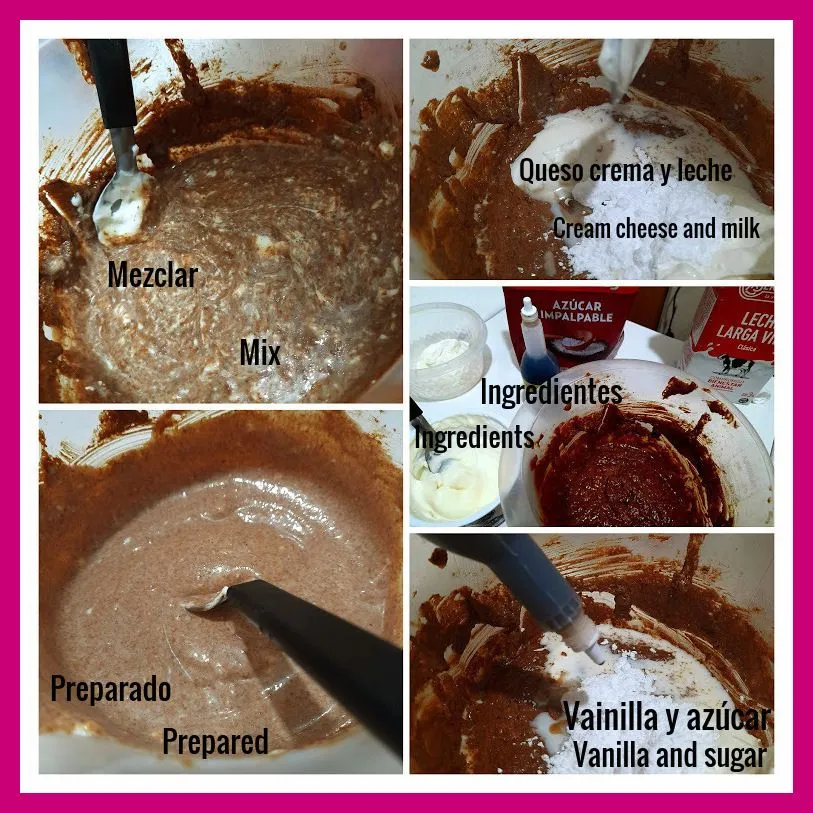
Octavo paso: Para preparar este glaseado, aproveché un poco de relleno que me quedó y lo agregué. Generalmente, el glaseado para los rollos de canela, suelen ser blancos. En fin, aclarado esto, se mezclaron los ingredientes: azúcar blanca o impalpable, la vainilla, el queso crema, y la leche en polvo. Se mezcló todo, y como ven en la imagen, quedó un hermoso glaseado de color marrón claro. Añadido también el sabor de la canela que al mezclarlo con la vainilla, el queso crema y la leche, resultó ser una deliciosa mezcla de sabores al paladar.
Eighth step: To prepare this glaze, I used some of the leftover filling and added it. Generally, the icing for cinnamon rolls is usually white. Anyway, having clarified this, I mixed the ingredients: white or impalpable sugar, vanilla, cream cheese, and powdered milk. Everything was mixed together, and as you can see in the image, a beautiful light brown frosting was left. I also added the cinnamon flavor which, when mixed with the vanilla, cream cheese and milk, turned out to be a delicious mixture of flavors on the palate.
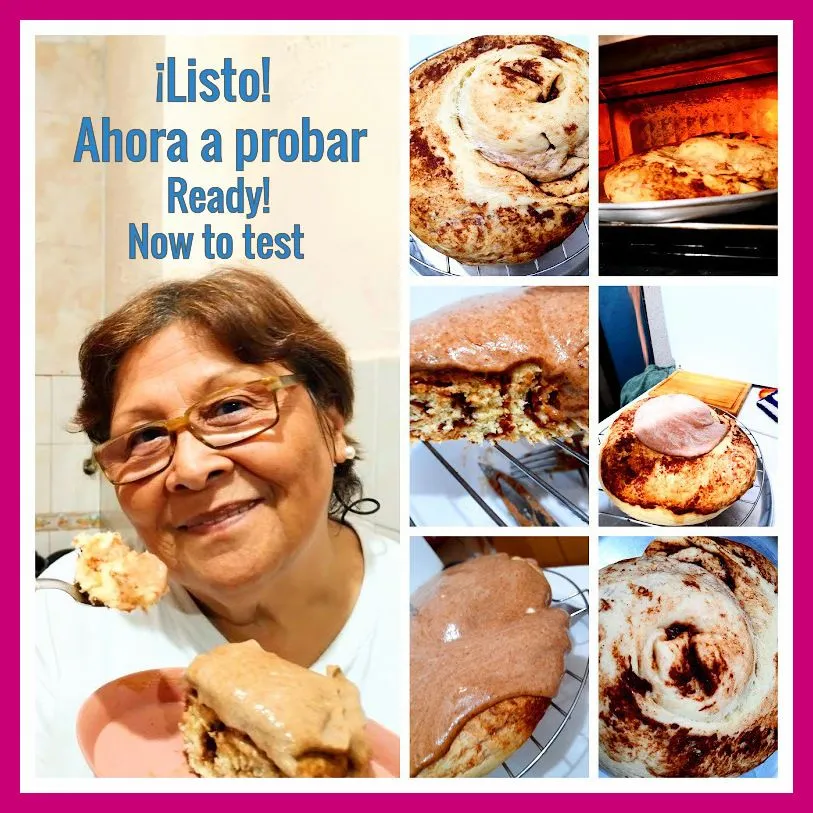
Noveno paso: Ha llegado el momento de sacar del horno el cinarol. Transcurridos los minutos de horneado, celebramos que el cinarol de cumpleaños, salió mejor de lo que me esperaba. Lo coloqué sobre una rejilla para vaciarle encima el delicioso glaseado y cubrir, pero no totalmente. No lo dejamos enfriar, porque los roles, nosotros los aprendimos a comer calientes y con café, con leche. Una cosa es lo que les muestro y comento, y otra ha sido probarlo. Provocaba chuparse los dedos.
Step 9: It's time to take the cinarol out of the oven. After the minutes of baking, we celebrated that the birthday cinarol came out better than I expected. I placed it on a rack to pour the delicious glaze on top. We didn't let it cool, because we learned to eat the roles hot and with coffee, with milk. One thing is what I show and comment, and another was to taste it. It was finger-licking good.
¡El Cinnamon Roll está listo! Los invito a replicar esta deliciosa receta. Aclaro que escribí el nombre "Cinarol", porque a todos en la familia, nos transporta a la primera franquicia que conocimos. Les recuerdo, que esta receta se preparó intencionalmente, y la celebración tuvo un toque diferente y delicioso, gracias a esta atípica torta. ¡Cómo me gustaría que la hubiesen probado! Afortunadamente, salió genial para todos.
The Cinnamon Roll is ready! I invite you to replicate this delicious recipe. I clarify that I wrote the name "Cinarol", because to all of us in the family, it transports us to the first franchise we knew. I remind you that this recipe was prepared intentionally, and the celebration had a different and delicious touch, thanks to this atypical cake. How I wish you had tried it! Fortunately, it turned out great for everyone.
Thank you for visiting my blog.
Traductor
Editor
Fotografías : Samsung A-12
X