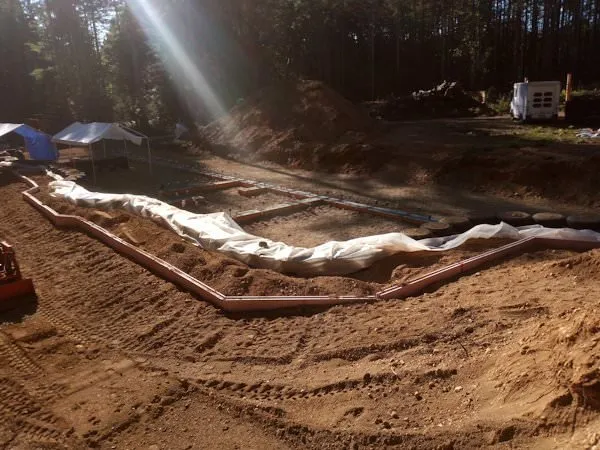
One of the most essential pieces of an Earthship is the so called thermal wrap, which in most cases goes hand-in-hand with the vapor barrier. Over the last couple of weeks we spent a great deal of time installing these two features, which involved discussing the specifications of the plans, strategizing their implementations, and then going out and putting them in practice. Given the extremely wet climate, the local regulations call for extra drainage, all of which had to be placed exactly as the plans indicated. This fairly simple concept required a relatively complex undertaking to realize it, but it was an important step before the next course of tires could go up.
What’s a Thermal Wrap Anyway?
When defining an Earthship, I like to focus on the insulated thermal mass before mentioning tire-walls or greenhouses. The building maximizes solar gain, and stores the heat in its thermal mass walls. This may just as well be made out of granite, water-tanks, volcanic glass, or anything that stores heat in its mass. When it gets cold outside, these massive walls will radiate the heat back into the living space. How can we make sure that the heat won’t escape into other directions? By insulating the mass from behind. This is why all proper Earthships have a layer of insulation inside the berm, running along the walls. However, where heat meets cold, water will condensate, which calls for a vapor barrier. In most Earthships this is a layer of plastic next to the thermal wrap.
Adapting to the Regional Climate or Bureaucratic Overkill?
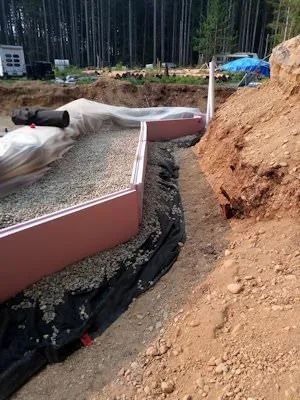
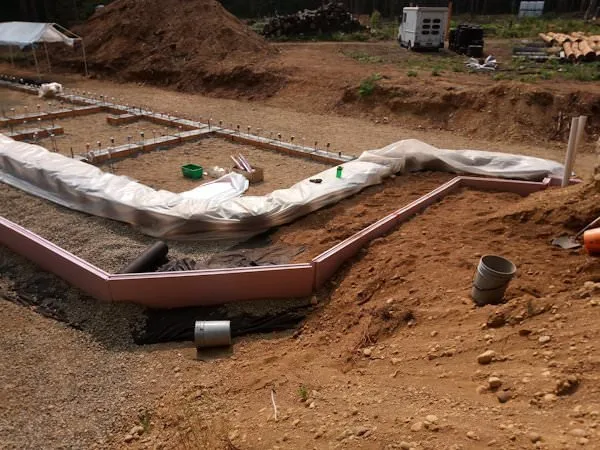
In the case of the Doighouse Earthship, the thermal wrap and vapor barrier have been raised to levels I’d never encountered before. One aspect I was quite happy about, is the extension of the thermal wrap to under the entire building. Usually Earthships are insulated under the roof and around the three walls, but not under the floor. In desert climates this might not be in issue, but I’ve always wondered how much more efficient they could be if they didn’t let the heat escape into the ground. Our plans call for four inches (10 cm), that is two sheets of XPS (expanded polystyrene), all around the wall, including under the floor, and four feet (120 cm) under the berm.
Another important issue is drainage. Sure enough, there is a vapor barrier in form of a ten mil plastic sheet, placed just outside the tire wall. But unlike other Earthships, the local building code calls for a drainage pipe next to it, and an additional one outside the thermal wrap. Both drain-pipes are laid in a bag of filter-cloth filled with gravel, but in order to maximize drainage, the space between the vapor barrier and the thermal wrap has to be covered with another foot (30 cm) of gravel and another layer of filter-cloth before it can be covered with backfill. All this may be necessary in order to prepare for the deluge-like conditions of a typical winter on Vancouver Island. On the other hand, this may be just the architect and the engineer covering their hides by adjusting this radically new building type to the local building code.
Sequences and Strategies
The requirements I just described are clearly stated on the plans. Implementing them, however, is a bit tricky, as it requires a careful strategy: You can’t pour the gravel before the insulation is set and the pipes are connected. But first, the plastic has to be glued and taped according to the specifications. On the other side, the vertical pieces of insulation must be in place before the outside pipe is laid. However, the foam sheets will be held in place by the dirt and gravel around them. Finally, the dirt between the tires and the vapor barrier can’t be backfilled until there is some gravel on the outside, or else it would push against the plastic, blocking the drain-pipes.
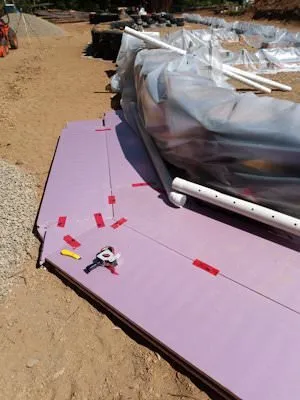
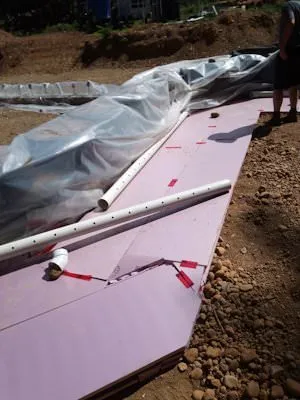
After long deliberations, and a few practical attempts, we figured out a workable sequence: First, we glued and taped the plastic sheets together, with a piece of polystyrene placed temporarily behind them. Then we puzzled together the four feet (120 cm) of horizontal insulation running along the tire wall. Dealing with round tires and straight foam pieces, this required its fair share of creativity. Then came the pipes: cutting and gluing them so they ran right along the wall. The next step was “bagging the pipe”, that is filling the filter-cloth with gravel. Now we could add a few buckets of dirt behind the vapor barrier, massage them into the spaces between the tires, and finally pull out the sheet of foam we placed behind the plastic. The dirt would (hopefully) fill all the spaces between the tires, but since the pipes were bagged, the plastic would be standing straight between these two layers.
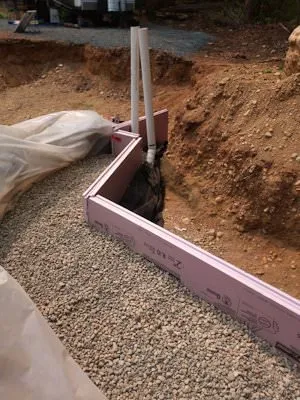
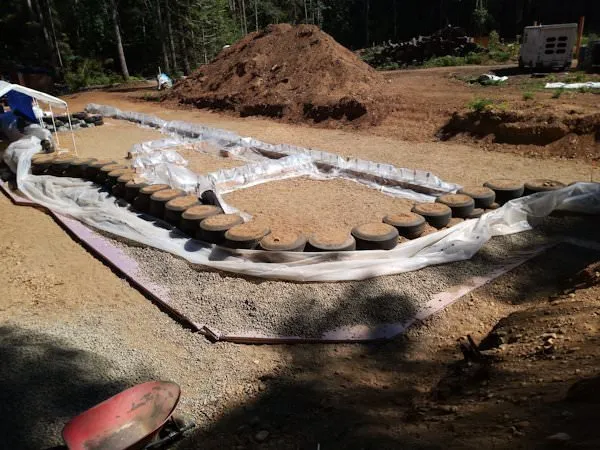
Having completed these steps along the entire length of the house, we continued with the second part: We cut and glued another pipe outside the horizontal insulation, and once it was ready to be bagged, we stood up the vertical polystyrene sheets. We then carefully filled both sides at the same time with gravel, wrapped the bag, and covered everything with dirt. Then more dirt, followed by even more dirt. At this point we could actually make use of the little tractor Tony has sitting around. In all the previous steps it would not have proper access, so we did most of the graveling with shovels, buckets, and sometimes a wheel-barrow.
Ready for the Next Courses
Finally, there is something like a berm behind our tire-wall. It’s essential at this point, since the first two courses are footings, but starting with the third course we’ll have to batter each course an inch and a half (3.8 cm) behind the previous one. Without a berm holding it up, the tires would tumble and fall. Next week we’ll have a guy with a bobcat come for some major dirt-moving, and then we’ll be ready to pound the next course of tires.
If you like this project, please visit the other posts I have published in my Doighouse Series:
- Earthship and Permaculture - Introducing the Doighouse Series
- Shower for the Earthship Build
- Complementing the Earthship: The Permaculture Garden
- Essential for the Helping Hands: The Volunteer Kitchen
- Preparing for the Earthship Build: Milling Lumber
- Week of Volunteers - Getting Started on the Tires (finally!)
- The Most Annoying Part of the Build: Satisfying the MAN
- Official Clearance – Building Permit and Inspections for the Doighouse
- Field Trips from the Doighouse
If you're interested in coming to visit, or better volunteer for a while, please contact Susanmdoig@gmail.com and visit http://thedoighouse.com/ Looking forward to getting to know you!
Please check out these great communities I'm contributing to:

#homesteadersonline | Website | Discord Community

#ecotrain | What is EcoTrain | Discord Community

#cyclefeed | Introducing CycleFeed | Discord Community

Introducing SteemitDreamit | Facebook Group | Discord Community