No farm? No garden? With Red Worms No Problem!
Composting is the Alpha and the Omega of food. Compost replenishes the nutrients lost from the soil during food production, at the same time it deals with the bucketloads of organic kitchen waste that accumulates during food preparation. The compost beautifully connects the garden with the kitchen.
What about those of us who don't farm? Those who don't even have small yard? Not that uncommon in cities, even though people still tend to have a kitchen there. For all those who think that this situation makes composting unfeasible, I'd like to share my experience in urban composting using Eisenia foetida, or California Red Worms), first in a Budapest apartment without even a balcony, then on my rooftop in Mexico City.
We are all producers anyway, let's make the most of it.
Before getting immersed in the details of urban vermiculture, let's stop and think about all the stuff we add to this world on a regular basis: many household garbage bags contain all kinds of lovely-nasty things, from eggshells to tea-bags, from banana peels to coffee grounds, from toenail clippings to that cucumber that grew moldy from being ignored for too long. Not very nice gifts to the world, especially since these things tend to get smelly and gooey very quickly. So it's not surprising that they are generally seen as a 'problem'. Also, our trash can would be so much cleaner without all this: just clean pieces of plastic, paper, glass, and metal, that is pure recyclables, so no more household trash!

Now let's imagine getting a regular supply of liquid fertilizer (maybe 4 liters / 1 gallon every week), as well as solid humus (around 40 liters / 10 gallons every 6 months). That is a lot, especially for someone who doesn't have a garden. But in their converted forms these former problem items become highly desired goods by those who do, so they can be sold, traded, or gifted. In the end, the little effort put into it pays of quite handsomely.
How does vermicomposting work?
The principle is pretty straight forward: Decomposers, such as fungi, bacteria, and other microorganisms break down our kitchen wastes and make their nutrients available for plants. There are thousands, even millions of these useful little critters, so how can we collect them all to form an ecosystem in our little bin? Fortunately, there is something like a packaged deal:

Many microbes that are happy to eat our food scraps live in a close symbiosis with another important decomposer, the composting worm (aka California Red Wiggler or Eisenia foetida) and they can be found in the same dirt the worms live in. Together they can turn our kitchen waste into nutritious humus, given the proper conditions. It’s important to mention, that it’s not the worms who bite into the apple-core, but all the microbes digest it down to a juice they all slurp and exude. Yum! This is also the reason why it’s always best to get the worms with a good amount of soil as inoculant.
Setting up the Wormery
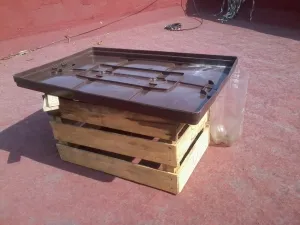
For the bin I usually use a 40 liter / 10 gallon storage box, ideally the stackable kind, which will come in handy once the first bin is full. Drilling lots of small holes on the bottom will make sure that it drains well, and prevent the foul smell that accompanies anaerobic decomposition. The drained liquid, by the way, is the fertilizer mentioned above, sometimes referred to as 'compost juice' or 'worm tea'. I use the lid of the box as a saucer to catch it. From there I let the compost juice drain through a strategically placed hole into a bucket. It’s important to make sure the entire system is sufficiently inclined, so the water can drain in its proper direction.

Making it nice and comfy inside
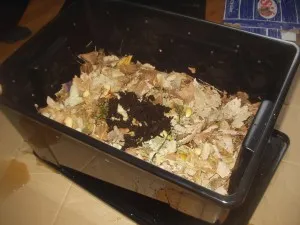
Once their home is completed it needs to be furnished before our decomposing friends can move in. Filling the bin half way with some organic material, preferably high in carbon, such as dry leaves, straw, hay, woodchips, or if these things are hard to find, ripped-up pieces of cardboard, and paper. Ideally I’d use a good mix of whatever I can find. I usually also include a handful of forest soil, in order to inoculate the system with wild microbes, as well as a good number of sticks and twigs, to guarantee aeration when the compost starts to compact. To really make the new tenants happy, it’s also a good idea to prepare some partially composted food, as it is the juice seeping out of the decomposing food the worms live on.
The needs of this community of decomposers, as anyone who has composted before will know, are a good ratio of carbon and nitrogen, good aeration, and sufficient moisture. As for the worms, they are also not too fond of light, so it’s good to keep the inside of the wormery in constant darkness. The bin should be set up in a shady spot, protected from the rain. Worms need moisture, but they can’t swim. When temperatures approach freezing they will curl up and go dormant, only to become active again in the spring. So don’t assume they froze to death, they’re just sleeping.
Adding the worms
Once the bin is ready the worms can arrive. The old adage ‘the more the merrier’ certainly applies to them, as long as they are of the right kind of worms. Using regular earthworms, or night-crawlers, will most likely kill them, dooming the entire composting system to fail. For my first worm-bin I was given a kilo of red worms by a friend. In my latest one, however, I had to make do with only about 200 individual wigglers, which I bought for an arm and a leg from a stingy worm farmer. They immediately disappeared into the box, making me wonder if they were still alive for the next couple of months. But these Red Wigglers are amazing at multiplying: if they are happy, they can double their population in only 90 days.
Please stay tuned for the second part, where I'm going to write about how to feed the worms properly, explain what to do when the bin gets full, and tell the story of how nature helped me out in dealing with another potential 'problem'.
Sources: This is a modified form of an article I published once before here. All the photos are originals. There are also some good vermicomposting articles on Steemit: Some of the ones I especially liked are here, here, here, and here.