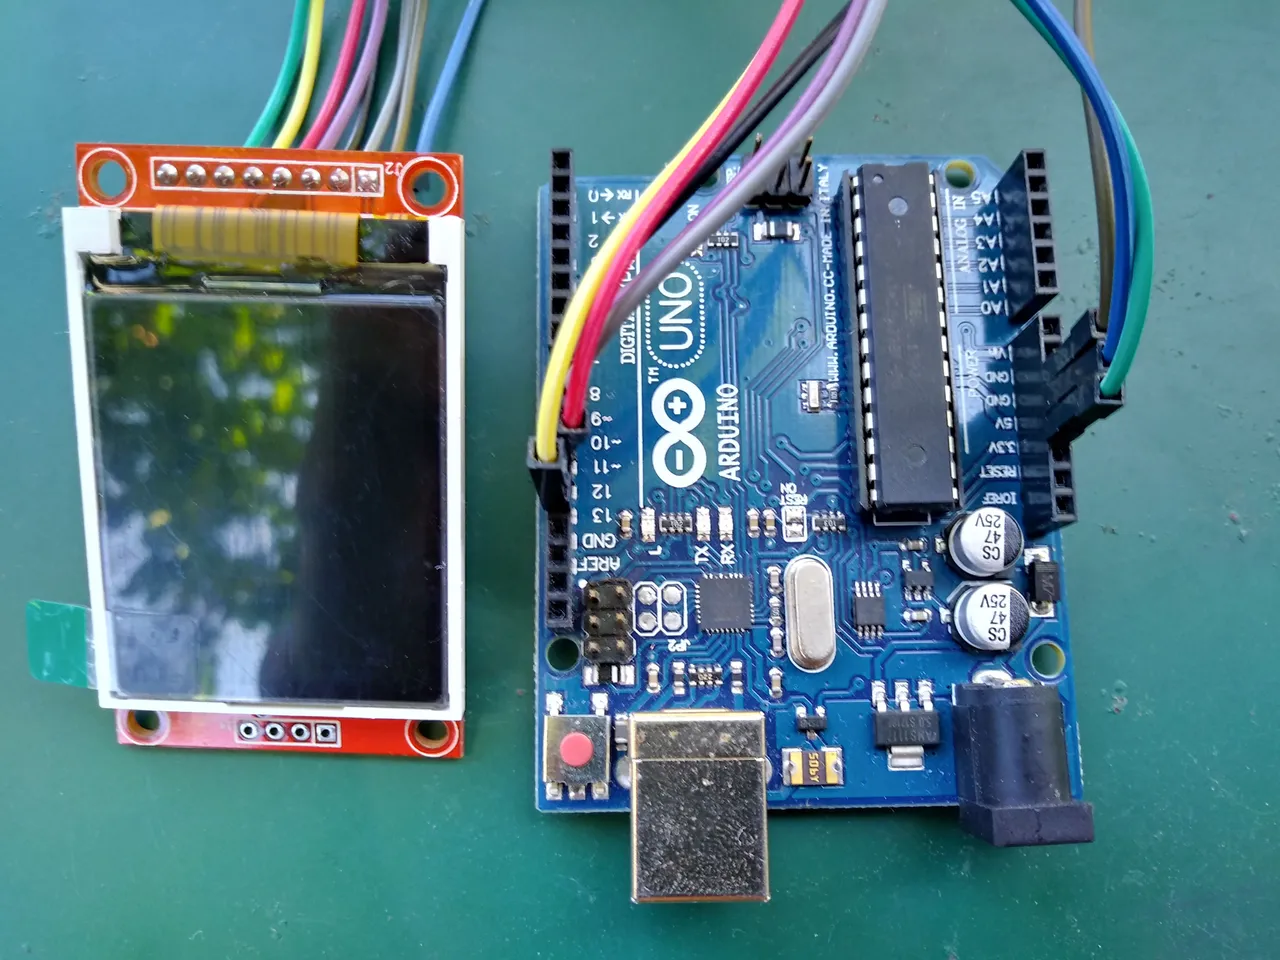
The resolution of the 1.8 inch display is 160x128 pixels and on the back of the module we can find an SD card breakout! this tutorial is actually the first impression of the ST7735 to arduino by using the the arduino software IDE and adafruit libraries we can program the display easily.
What Will I Learn?
In this tutorial, you will learn the following
- how to connect 1.8" TFT ST7735 LCD with breakout SD to arduino
- how to program a code on arduino Desktop IDE
- how to do this in solderless way
Requirements
For this part, you will need the following
HARDWARE
- Arduino UNO/NANO/MEGA microcontroller board
- Male to Female jumper wires
- Type B Usb cable for Data transfer between Arduino to your PC
SOFTWARE & LIBRARIES
Difficulty
Either choose between the following options:
- Basic electronic tutorial
Tutorial Contents
Before we start, you need to download the Software IDE of arduino and Adafruit Libraries listed above. once Downloaded add the libraries to IDE by locating sketch options and include libaries. so we can make a sketch easily. in this tutorial we will the arduino UNO R3 board, this is a clone but it works fine for this project.
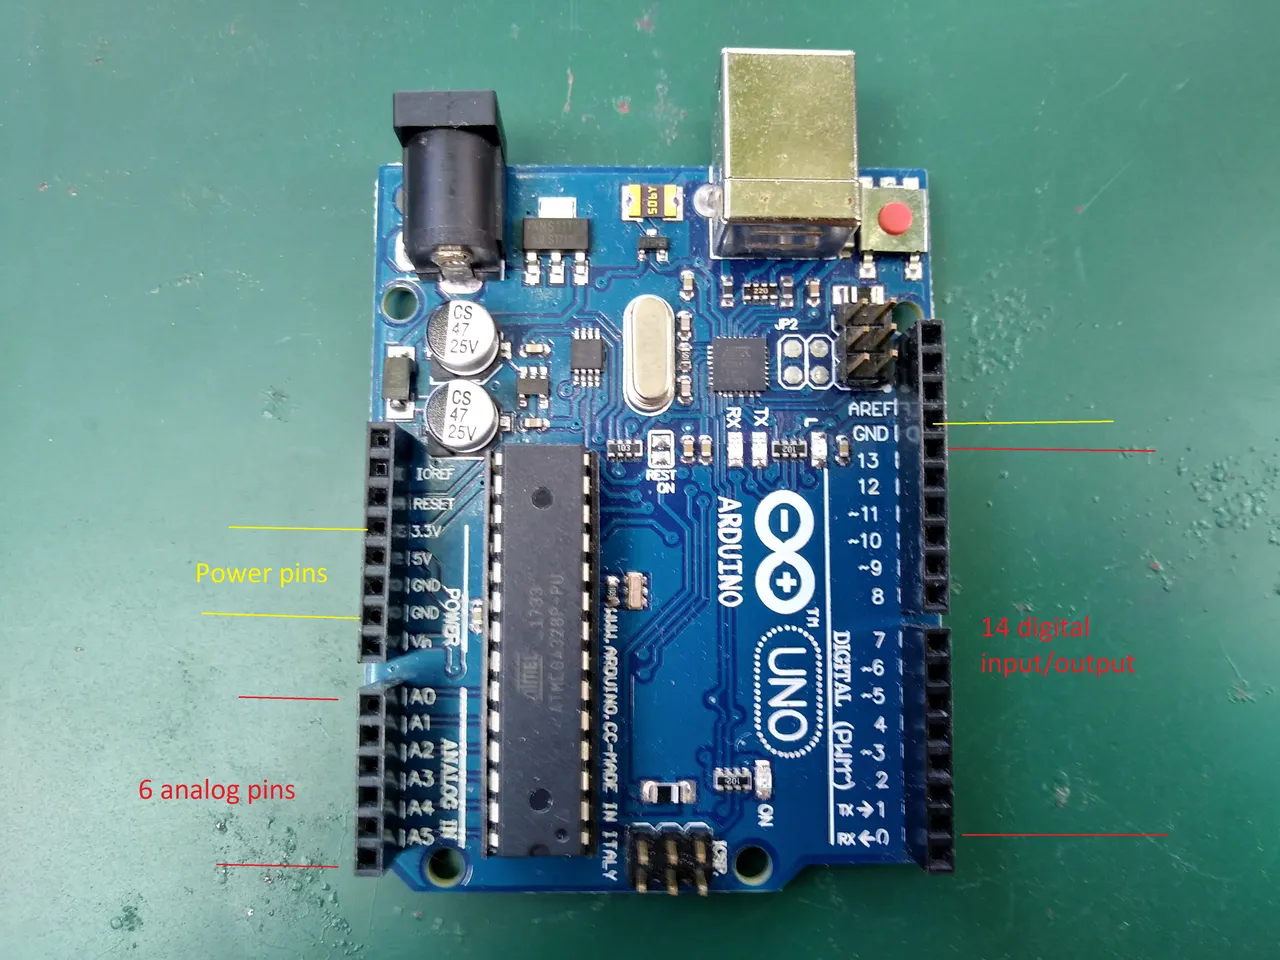
It has 14 digital input/output pins (of which 6 can be used as PWM outputs), 6 analog inputs, a 16 MHz quartz crystal, a USB connection, a power jack, an ICSP header and a reset button. It contains everything needed to support the microcontroller; simply connect it to a computer with a USB cable or power it with a AC-to-DC adapter. reference
- Step 1: Experimental Procedures
The LCD 1.8 TFT has 8 pins, 2 power pins, 1 pin for the boolen or backlight and 5 digital outputs. the VCC it refers to the power signal of the LCD typically connected to 5volts, and the GND or sometimes zero voltage, It is also the common connection of the LCD must connect to in one way or another path in order to complete the circuit.
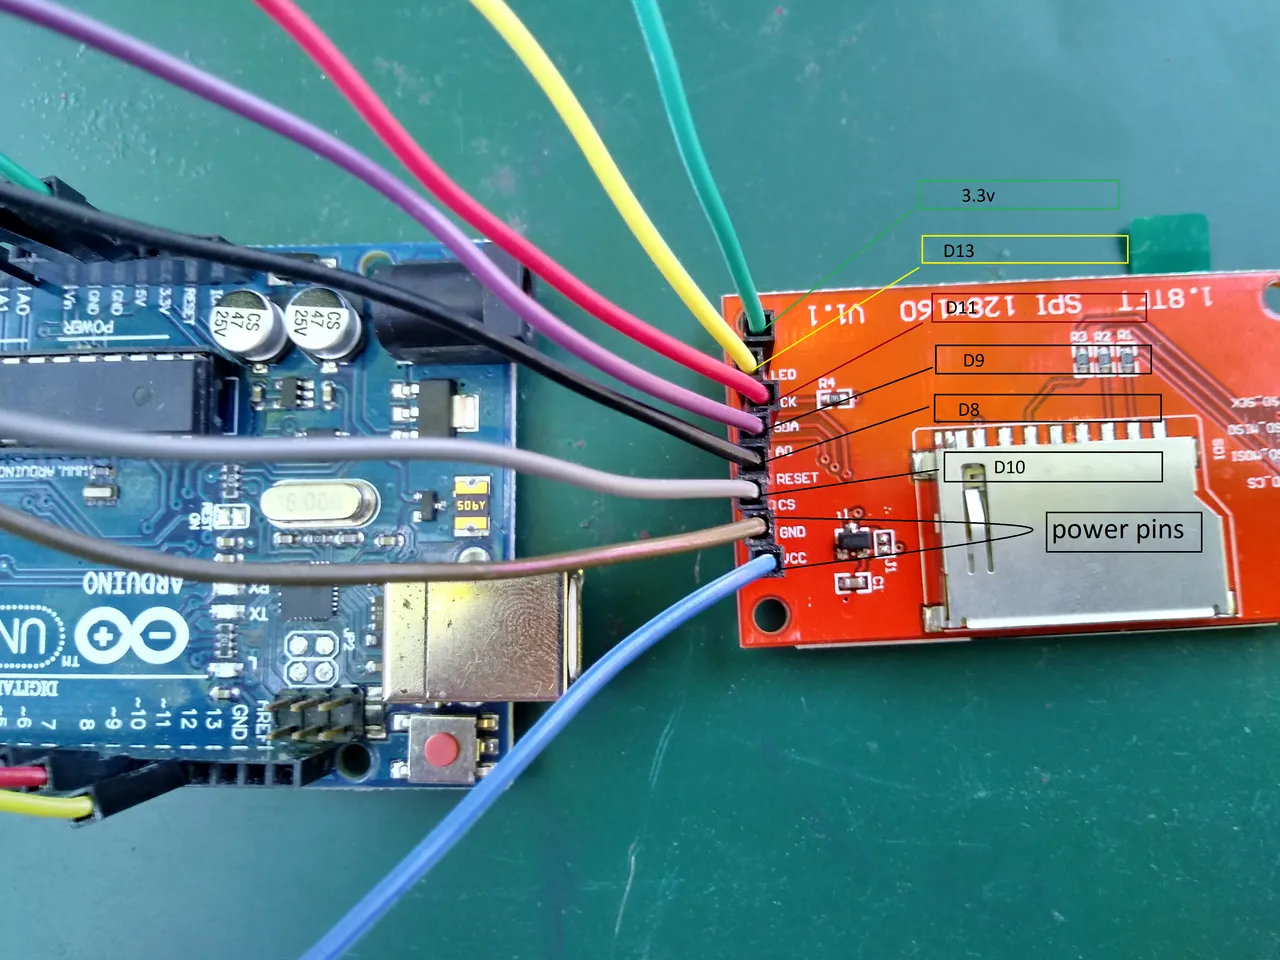
- Step 2: Connect the following pins of the LCD to Arduino R3 board
| 1.8" TFT LCD | ARDUINO R3 |
|---|---|
| LED | 3.3V |
| SCK | D13 |
| SDA | D11 |
| AO | D8 |
| RESET | D9 |
| CS | D10 |
| GND | GND |
| VCC | 5V |
- Step 2: Programming
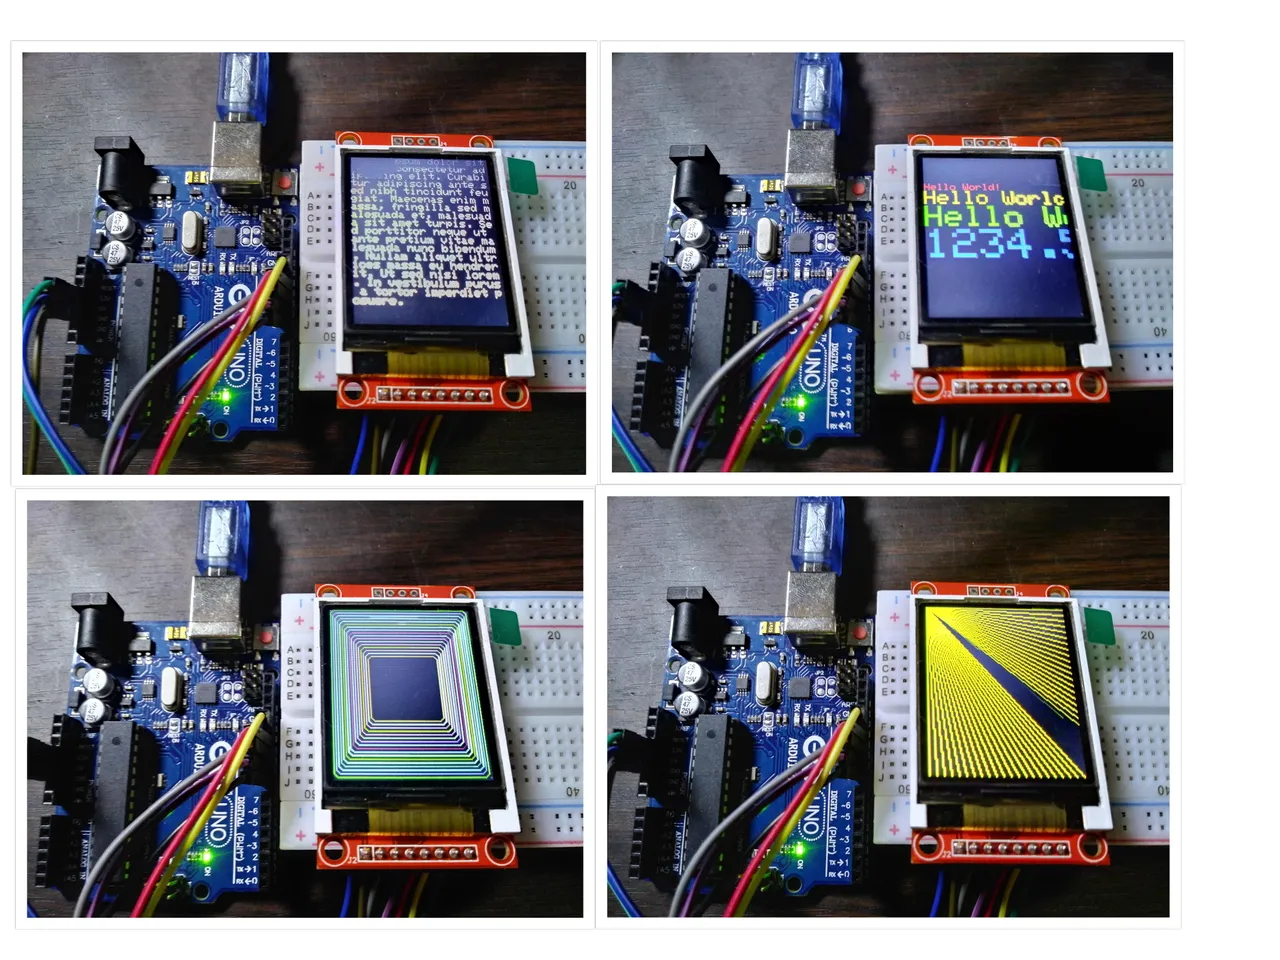
Open the arduino IDE navigate Examples > ST7735 library. at this part we will be using then graph test to show some graphics, text, number and symbols to lcd, i am going to select one of example code with tutoring part on it , you can copy it below
SOURCE CODE
#include <Adafruit_GFX.h>    // include Core graphics library
#include <Adafruit_ST7735.h> // include Hardware-specific library
#include <SPI.h>
// For the breakout, you can use any 2 or 3 pins
// These pins will also work for the 1.8" TFT shield
#define TFT_CS     10
#define TFT_RST    8  // you can also connect this to the Arduino reset
#define TFT_DC     9  // in which case, set this #define pin to -1!
// Option 1 (recommended): must use the hardware SPI pins
// (for UNO thats sclk = 13 and sid = 11) and pin 10 must be
// an output. This is much faster - also required if you want
// to use the microSD card (see the image drawing example)
Adafruit_ST7735 tft = Adafruit_ST7735(TFT_CS,  TFT_DC, TFT_RST);
// Option 2: use any pins but a little slower!
#define TFT_SCLK 13   // set these to be whatever pins you like!
#define TFT_MOSI 11   // set these to be whatever pins you like!
//Adafruit_ST7735 tft = Adafruit_ST7735(TFT_CS, TFT_DC, TFT_MOSI, TFT_SCLK, TFT_RST);
float p = 3.1415926;
void setup(void) {
  Serial.begin(9600);
  Serial.print("Hello! ST7735 TFT Test");
  // Use this initializer if you're using a 1.8" TFT
  tft.initR(INITR_BLACKTAB);   // initialize a ST7735S chip, black tab
  // Use this initializer (uncomment) if you're using a 1.44" TFT
  //tft.initR(INITR_144GREENTAB);   // initialize a ST7735S chip, black tab
  // Use this initializer (uncomment) if you're using a 0.96" 180x60 TFT
  //tft.initR(INITR_MINI160x80);   // initialize a ST7735S chip, mini display
  Serial.println("Initialized");
  uint16_t time = millis();
  tft.fillScreen(ST7735_BLACK);
  time = millis() - time;
  Serial.println(time, DEC);
  delay(500);
  // large block of text
  tft.fillScreen(ST7735_BLACK);
  testdrawtext("Lorem ipsum dolor sit amet, consectetur adipiscing elit. Curabitur adipiscing ante sed nibh tincidunt feugiat. Maecenas enim massa, fringilla sed malesuada et, malesuada sit amet turpis. Sed porttitor neque ut ante pretium vitae malesuada nunc bibendum. Nullam aliquet ultrices massa eu hendrerit. Ut sed nisi lorem. In vestibulum purus a tortor imperdiet posuere. ", ST7735_WHITE);
  delay(1000);
  // tft print function!
  tftPrintTest();
  delay(4000);
  // a single pixel
  tft.drawPixel(tft.width()/2, tft.height()/2, ST7735_GREEN);
  delay(500);
  // line draw test
  testlines(ST7735_YELLOW);
  delay(500);
  // optimized lines
  testfastlines(ST7735_RED, ST7735_BLUE);
  delay(500);
  testdrawrects(ST7735_GREEN);
  delay(500);
  testfillrects(ST7735_YELLOW, ST7735_MAGENTA);
  delay(500);
  tft.fillScreen(ST7735_BLACK);
  testfillcircles(10, ST7735_BLUE);
  testdrawcircles(10, ST7735_WHITE);
  delay(500);
  testroundrects();
  delay(500);
  testtriangles();
  delay(500);
  mediabuttons();
  delay(500);
  Serial.println("done");
  delay(1000);
}
void loop() {
  tft.invertDisplay(true);
  delay(500);
  tft.invertDisplay(false);
  delay(500);
}
void testlines(uint16_t color) {
  tft.fillScreen(ST7735_BLACK);
  for (int16_t x=0; x < tft.width(); x+=6) {
    tft.drawLine(0, 0, x, tft.height()-1, color);
  }
  for (int16_t y=0; y < tft.height(); y+=6) {
    tft.drawLine(0, 0, tft.width()-1, y, color);
  }
  tft.fillScreen(ST7735_BLACK);
  for (int16_t x=0; x < tft.width(); x+=6) {
    tft.drawLine(tft.width()-1, 0, x, tft.height()-1, color);
  }
  for (int16_t y=0; y < tft.height(); y+=6) {
    tft.drawLine(tft.width()-1, 0, 0, y, color);
  }
  tft.fillScreen(ST7735_BLACK);
  for (int16_t x=0; x < tft.width(); x+=6) {
    tft.drawLine(0, tft.height()-1, x, 0, color);
  }
  for (int16_t y=0; y < tft.height(); y+=6) {
    tft.drawLine(0, tft.height()-1, tft.width()-1, y, color);
  }
  tft.fillScreen(ST7735_BLACK);
  for (int16_t x=0; x < tft.width(); x+=6) {
    tft.drawLine(tft.width()-1, tft.height()-1, x, 0, color);
  }
  for (int16_t y=0; y < tft.height(); y+=6) {
    tft.drawLine(tft.width()-1, tft.height()-1, 0, y, color);
  }
}
void testdrawtext(char *text, uint16_t color) {
  tft.setCursor(0, 0);
  tft.setTextColor(color);
  tft.setTextWrap(true);
  tft.print(text);
}
void testfastlines(uint16_t color1, uint16_t color2) {
  tft.fillScreen(ST7735_BLACK);
  for (int16_t y=0; y < tft.height(); y+=5) {
    tft.drawFastHLine(0, y, tft.width(), color1);
  }
  for (int16_t x=0; x < tft.width(); x+=5) {
    tft.drawFastVLine(x, 0, tft.height(), color2);
  }
}
void testdrawrects(uint16_t color) {
  tft.fillScreen(ST7735_BLACK);
  for (int16_t x=0; x < tft.width(); x+=6) {
    tft.drawRect(tft.width()/2 -x/2, tft.height()/2 -x/2 , x, x, color);
  }
}
void testfillrects(uint16_t color1, uint16_t color2) {
  tft.fillScreen(ST7735_BLACK);
  for (int16_t x=tft.width()-1; x > 6; x-=6) {
    tft.fillRect(tft.width()/2 -x/2, tft.height()/2 -x/2 , x, x, color1);
    tft.drawRect(tft.width()/2 -x/2, tft.height()/2 -x/2 , x, x, color2);
  }
}
void testfillcircles(uint8_t radius, uint16_t color) {
  for (int16_t x=radius; x < tft.width(); x+=radius*2) {
    for (int16_t y=radius; y < tft.height(); y+=radius*2) {
      tft.fillCircle(x, y, radius, color);
    }
  }
}
void testdrawcircles(uint8_t radius, uint16_t color) {
  for (int16_t x=0; x < tft.width()+radius; x+=radius*2) {
    for (int16_t y=0; y < tft.height()+radius; y+=radius*2) {
      tft.drawCircle(x, y, radius, color);
    }
  }
}
void testtriangles() {
  tft.fillScreen(ST7735_BLACK);
  int color = 0xF800;
  int t;
  int w = tft.width()/2;
  int x = tft.height()-1;
  int y = 0;
  int z = tft.width();
  for(t = 0 ; t <= 15; t++) {
    tft.drawTriangle(w, y, y, x, z, x, color);
    x-=4;
    y+=4;
    z-=4;
    color+=100;
  }
}
void testroundrects() {
  tft.fillScreen(ST7735_BLACK);
  int color = 100;
  int i;
  int t;
  for(t = 0 ; t <= 4; t+=1) {
    int x = 0;
    int y = 0;
    int w = tft.width()-2;
    int h = tft.height()-2;
    for(i = 0 ; i <= 16; i+=1) {
      tft.drawRoundRect(x, y, w, h, 5, color);
      x+=2;
      y+=3;
      w-=4;
      h-=6;
      color+=1100;
    }
    color+=100;
  }
}
void tftPrintTest() {
  tft.setTextWrap(false);
  tft.fillScreen(ST7735_BLACK);
  tft.setCursor(0, 30);
  tft.setTextColor(ST7735_RED);
  tft.setTextSize(1);
  tft.println("Hello World!");
  tft.setTextColor(ST7735_YELLOW);
  tft.setTextSize(2);
  tft.println("Hello World!");
  tft.setTextColor(ST7735_GREEN);
  tft.setTextSize(3);
  tft.println("Hello World!");
  tft.setTextColor(ST7735_BLUE);
  tft.setTextSize(4);
  tft.print(1234.567);
  delay(1500);
  tft.setCursor(0, 0);
  tft.fillScreen(ST7735_BLACK);
  tft.setTextColor(ST7735_WHITE);
  tft.setTextSize(0);
  tft.println("Hello World!");
  tft.setTextSize(1);
  tft.setTextColor(ST7735_GREEN);
  tft.print(p, 6);
  tft.println(" Want pi?");
  tft.println(" ");
  tft.print(8675309, HEX); // print 8,675,309 out in HEX!
  tft.println(" Print HEX!");
  tft.println(" ");
  tft.setTextColor(ST7735_WHITE);
  tft.println("Sketch has been");
  tft.println("running for: ");
  tft.setTextColor(ST7735_MAGENTA);
  tft.print(millis() / 1000);
  tft.setTextColor(ST7735_WHITE);
  tft.print(" seconds.");
}
void mediabuttons() {
  // play
  tft.fillScreen(ST7735_BLACK);
  tft.fillRoundRect(25, 10, 78, 60, 8, ST7735_WHITE);
  tft.fillTriangle(42, 20, 42, 60, 90, 40, ST7735_RED);
  delay(500);
  // pause
  tft.fillRoundRect(25, 90, 78, 60, 8, ST7735_WHITE);
  tft.fillRoundRect(39, 98, 20, 45, 5, ST7735_GREEN);
  tft.fillRoundRect(69, 98, 20, 45, 5, ST7735_GREEN);
  delay(500);
  // play color
  tft.fillTriangle(42, 20, 42, 60, 90, 40, ST7735_BLUE);
  delay(50);
  // pause color
  tft.fillRoundRect(39, 98, 20, 45, 5, ST7735_RED);
  tft.fillRoundRect(69, 98, 20, 45, 5, ST7735_RED);
  // play color
  tft.fillTriangle(42, 20, 42, 60, 90, 40, ST7735_GREEN);
}- Step 4: Connect the Arduino board to your PC using Type B usb cable ( once plug verify the port and model of your board on IDE > TOOLS option)
![20180419_145016_HDR[1].jpg](https://images.ecency.com/p/TZjG7hXReeVthqpTJZmwvzsLcvMeG4TU4Gjdfy268vjnwMjeGg6B2hb2gtFc3265YLc6Ei7ShdeCHuBkhChLNwTBxBGomTHRq1xrMjZbGLySSiy2bMxM8R1iwdXMnWBhX9mSeRGBh4W7g2.png?format=match&mode=fit)
- Step 5: Copy the source code above and Upload the code to arduino, ( you will see an arrow shape on the IDE stands for upload) go back to the components make sure you wire it up on the right specific pins before you upload. once uploaded HELLO WORLD!
This is the introduction tutorial of the ST7735 LCD we can Display diffirent types of images, play games and play video using this LCD which i will make a tutorial soon. i hope this help, thank you for dropping by.
Posted on Utopian.io - Rewarding Open Source Contributors