What will we learn?
- NodeJS Private Lessons / Part 1
Requirements:
- Notepad+
- NodeJS İnstaller
Difficulty Level:
- Easy Level
Let's Start the Course :
Installation with Installers (Windows and MacOS):
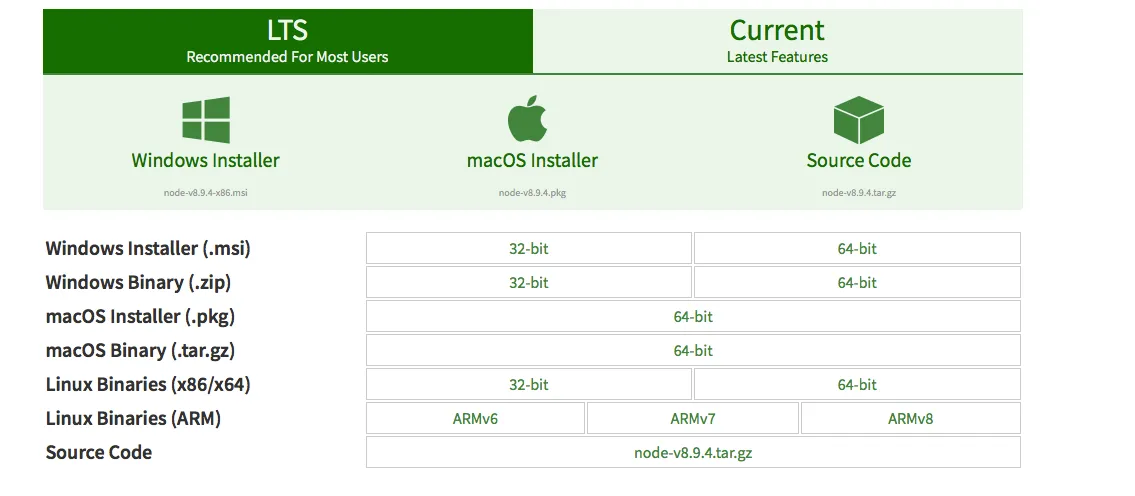
The first method is to install with 'Installers'. Obviously, I do not have to do a lot of things for that. According to your operating system type. Once you have made your selection, you can complete the installation by downloading the installation file. We need to pay attention to 'installer' in the installation with NodeJS offers you two options. LTS (Long Term Support) So long as you can support the relevant NodeJS version (ie better suited for Production), the other option is the stable version, which is published every six months. If you want to get the latest version of NodeJ here, you can also download the nightly versions of NodeJS in the GitHub repos. (https://goo.gl/VT7eao) But use it carefully. Because 'nightly' (nightly versions) are automatically built every 24 hours. If you are not interested in being a 'contributor' to the NodeJS project, I recommend you stay away.
Download Link : https://nodejs.org/en/download/
INSTALLED WITH HOMEBREW (MACOS X):
For many MacOSX users, HomeBrew, which was launched with the slogan "The missing package manager for OS X," is filling a gap in managing our operating system applications. Of course, this area is not the only one, there is an important competitor like MacPorts.
Note: If you're using a Mac, you can easily set up Homebrew by going to http://goo.gl/PSAKTO.
Once you have completed the homebrew installation (if not already installed), it is sufficient to run it on the following line terminal display.
brew install node
Homebrew was updated to update itself with brew update command, followed by brew install mode command to complete NodeJS installation. Note that the installed node package is a Stable version. The installed NodeJS is located in /usr/local/bin/ node in the operating system.
INSTALLATION WITH NVM (NODE VERSION MANAGER) (LINUX AND MACOS X):
We have reviewed NodeJS setup in two different ways above. Finally we will be using NVM (Node version Manager). This is the most preferred method by developers in recent times, including myself. Why?
NodeJS defines itself as one of the reasons for producing Scalable Network Applications. However, when we look at it by 2016, it is far beyond the target. In addition to producing simple server-side software, Frontend is involved in the development of many of the tools used by the development.
With the NPM it contains, it uses package management in many projects. These; the lonic Framework, which is one of the most popular Frameworks we want to develop hybrid applications, React Native, which is a very different interpretation of Native mobile application developer, and many more, uses NPM in dependency management.
Note: You can find the projects and companies that use Nodejs at https://goo.gl/mAz39X
A different sample can be added to the above. When we look at this point, we have to build a somewhat flexible development environment to achieve this in an area where there is a very fast developing language like JavaScript to support the same kind of project.
Let us think; we have a web project. We are doing both the back-end with NodeJs and the Front-end using the 'gulp task runner' (we will use the details in the Development Tools section). In this case, we will use 'third party' modules in addition to what we wrote. However, some of the modules we will use do not support the new stable version of NodeJS. What will we do in this situation? Are we going to remove the existing version, install the old version, run our task, and then get back to doing all the work again? Of course no !
NVM is an open source project that we use to allow us to switch between different node versions in our applications.
The project you can reach via Github via https://goo.gl/eZ1jTl is among the popular projects with 10,000+ stars.
it allows you to switch between different active node swarms for Mac and Linux development environments.
NVM installation is quite simple. to install with curl or wget, paste the link on your terminal screen.
Or if you have a node installed in your system with the NPM NVM installation can do. ( I don't recommend it very much) )
curl -o- https://raw.githubusercontent.com/creationix/nvm/v0.17.2/install.sh | bash
or
curl -q0- https://raw.githubusercontent.com/creationix/nvm/v0.17.2/install.sh | bash
or
npm install -g nvm
With this section, you can install Nodehs in many ways. So many different installations are showing how flexible and developer-friendly Nodej is.
Nvn installation can be troublesome in some cases. Check that you are authorized during installation and that you can access NVM Globally.
The NVM command must be running when you close and reopen the terminal screen after the setup is complete.
Now, let's examine the features and capabilities of NVM.
nvm install 5.3.0
With this command, the appropriate node version is downloaded for NVM to use.
nvm use 5.3.0
We have stated that we will use version 5.3.0 from the nodejs versions already installed. We need to note that if we want to use the version of NodeJS that we have not yet installed, we will get the error.
nvm list
Lists the currently installed versions of nodejs.
nvm current
Displays the NodeJS version that is currently active
nvm which 5.3.0
Returns the path of the file to which the corresponding nodejs version was installed as output.
nvm run 5.3.0 index.js
This command allows us to run our code in the version we specify. This means that even if the active version is different, NodeJS will be in version 5.3.0.
nvm exec 5.3.0 node index.js
Allows it to execute arbitrary version after setting it. Notice the previous command.
nvm alias default 5.3.0
By default, we set our nodejs version. The point to note is that use only when working in the relevant session of the terminal, we set the version to default independent of that session.
In other words, when we say NVM use 4.2.4 (LTS version ) and then use nodejs 4.2.4 version, the default version will still be 5.3.0 when we turn off and turn off our terminal screen.
Previously on this example ;
vnm alias default 5.3.0
command is set by default when the version is 5.3.0.
- 2 versions are installed on the operating system we are using. It is already listed with the 'nvnmlist' command. 4.2.4 (LTS) and 5.3.0 (Stable) versions.
- Nvm use 5.3.0 command has been set to use 5.3.0 for the relevant session.
- When we run our node project with Node index.js, it prints. "Version: v5.3.0" has been.
- We changed the Node version with Nvm use 4.2.4.
- When we do node index.js again, we see "version: v4.2.4".
Finally, with the 'use' command we have specified the active Node version as 4.2.4. When we turn off the terminal and turn it back on and run every node code, we will see "version: v5.3.0". Because we did not use the use command in the related (new beginning) sesion and it returned to version 5.3.0 we set as default.
There's something missing here. Let's assume we have more than one project, and let's imagine that these projects will have different node versions. Is there a different solution to 'nvm use'? Of course there is.
'.nvmrx;' This file is the 'config' file for Node management in the project. If you do not specify a version, you will use the version of the file '.nvmrc' when you use NVM. Now create a folder called 'nvm-project' and create a '.nvmrc' file and move the previous 'index.js' file to the appropriate folder.
- We open a new terminal screen and print the "default" Node version with the command "npm current".
- We only write and save the '.nvmrc' file to 5.3.0.
- Although I do not specify any version when I write 'nvm use' command, NVM will find and activate version 5.3.0 in our project.
- The output of the Node 'index.js' command will be as we specified in '.nvmrc'.
we have completed the Node Js setup with this example. Let's sum it up again.
NodeJs installer, a package manager such as Homebrew, NVM and many other ways you can setup your workspace. I think the best way for developers is to install with NVM without doing any NodeJS installation.
ECMASCRİPT 6 VE NODEJS
In this section we will briefly describe the general properties of Ecmascript 6. If this article was a text addressing font-end technologies, I would say that we would have some problems at this point. But we do have back-end technology and we work on a modern 'Engine' like the V8, and with technology like 'IE', we are at least able to develop code with the latest technologies without getting in trouble in the back-end domain.
First of all, what is the difference between "Ecmascript" and "JavaScript"? , summarize without going into too much history.
Ecmascript is the name of the standardized version of the JavaScript language. In other words, we can say that it is the standard of the JavaScript language. As of June 2015, the final version of JavaScript has been released as the final version of EcmaScript 6. With the new version of JavaScript, many new features have entered our lives.
DEFAULT, REST VE SPREAD PARAMETERS (ES6)
Parameter usage in Javascript differs from other languages.
After the method is defined in Java, the method is called according to the signature of the method, while the name and the assigned parameters establish the identity of the method.
In JavaScript, the parameters do not have any meaning as an identity when calling the function.
Let's examine the use of parameters in JavaScript with a classic example.
We have defined a function with no parameters as follows. It takes values from an object that has two variables in it, similar to the array type named arguments.
function myEcmascript5Func () {
var firstparameter = arguments [0] ;
var secondparameter = argumaents [1] ;
     returun firstparameter+ secondparameter;
}
//We have defined a variable. We called the function we defined above as follows and passed the parameter.
var result = myEcmascript5Func (25.12);
console.log  (result);
//The result will be 37 values.
In this case we passed a parameter to a function that does not contain parameters and we could listen to the parameters with arguments object named 'arguments'. The arguments here are an array-like object, but not an array, which is an object that allows us to listen to and use the parameters that come up when the function is called, and adds flexibility to the javaScript.
By using this object, we could add many features such as assigning a default parameter. But he was not very smart about programming.
In this case, new features came along with Ecmascript 6. Now let's examine them.
DEFAULT
We can do a fairly simple assignment of the default parameter assignment with ES6, which we have mentioned above, in a way that is not very elegant, which we are referring to, Ecmascript.
function myESDefaultParameter ( x, y=20) {
     return x + y;
}
var result = myESDefaultParameter(10);
console.log(result);
We have defined a function named 'myESDefaultParameter'. If we had not assigned a value when the function was called by assigning y = 20 to the second parameter, the 'Y' parameter would be 20.
Finally, we pass the value to the 'result' variable that we call this function.
Obviously it will be '30'.
In this post we made so much comment for now. I will guarantee you will come to the best places in this program by telling you part of the part of our NodeJs narration :) I will see you in our next post.
For the rest of the article, follow our series.
Series :
1 - NodeJS Private Lessons / Part 1 #1
Posted on Utopian.io - Rewarding Open Source Contributors