What will we learn?
- AngularJS , We will teach you how to set up and use
Requirements:
- Notepad+
- Linux Operating System
- HTML
Difficulty Level:
- Easy Level
Let's Start the Course :
AngularJS is distributed as a JavaScript file because it is a library written in Javascript. All we need to do is to add this file with a < script > tag from my CDN source, or upload this file into my project file and upload it to the page in the same way.
Note: CDN is an abbreviation for Content Delivery Network. A CDN is a distribution structure that is intended for the delivery of your static content to the browser normally.
< html >
< script src="http://ajax.googleapis.com/ajax/libs/angularjs/1.4.8/angular.min.js">< /script >
< body >
< !----content---->
< /body >
< /html >
In our sample code, we add our page with the reflection ** < script > ** element on AngularJs googleapis.com CDN.
or you can download the file from this link. Record it on the project. Once you have saved, integrate it into your project file :
< html >
< script src="angular.min.js">< /scripts >
< body >
< !----content---->
< /body >
< /html >
Note: The min statement in the name of the Javascript file to which we added our page means that the file is being minimized and is not readable.In order for the file to take up a lot of space and be processed quickly, this is done in JavaScript files, which are broken up by fragmentation and are not expected to be modified.
One of the lessons we need to get out of this is that the AngularJs library is working offline. Often, page loads are faster, as users' files are pre-fetched on the CDN provided by google.However, in cases where our application needs to work offline (for example, client files such as cordova), you need to be in the project folder of the library file.So we will present our application on a server. It makes more sense to upload the AngularJs library from the CDN servers offered by Google.
AngularJs First Application Example
We now know how to add the concepts, working logic and HTML page you need to know about AngularJs. Let's start by creating a few simple single page applications.
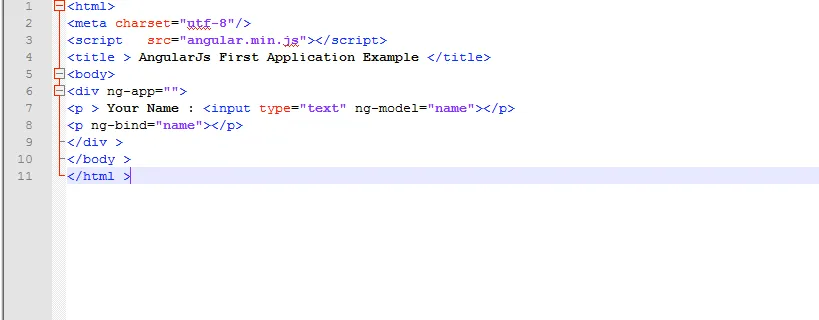
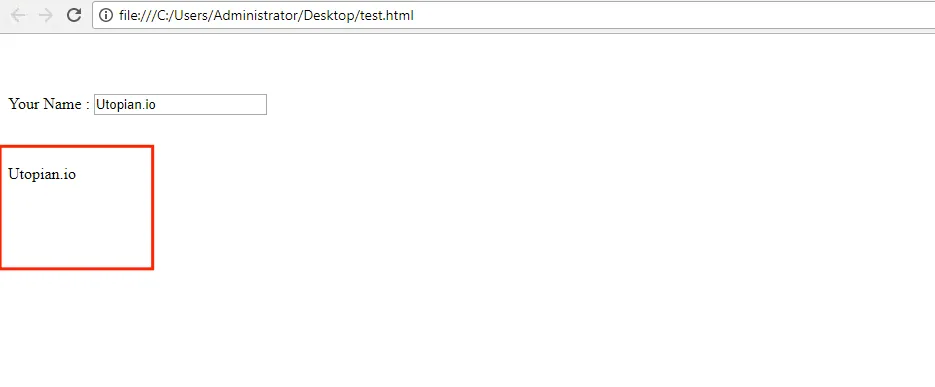
< !DOCTYPE html >
< html >
< meta charset="utf-8"/ >
< script src="angular.min.js"> < /script >
< title > AngularJs First Application Example < /title >
< body>
< div ng-app="">
< p > Your Name : < input type="text" ng-model="name">< /p >
< p ng-bind="name">< /p>
< /div >
< /body >
< /html >
Example:
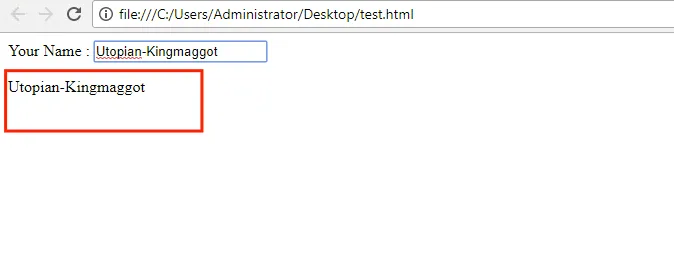
Let's create an HTML file and add the code above to this html file. Later I'll register and run my HTML file with a modern browser.
The Conclusion:
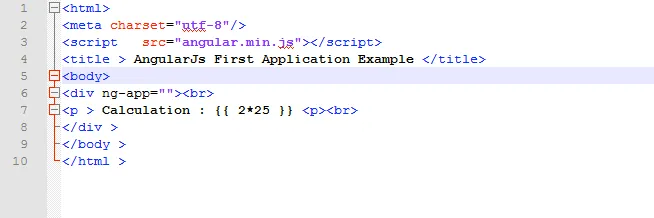
Another Example
< html >
< meta charset="utf-8"/ >
< script src="angular.min.js"> < /script >
< title > AngularJs First Application Example < /title >
< body>
< div ng-app="">
< p > Calculation : {{ 2*25 }} < p>
< /div >
< /body >
< /html >
Output:Calculation : 50 it will be
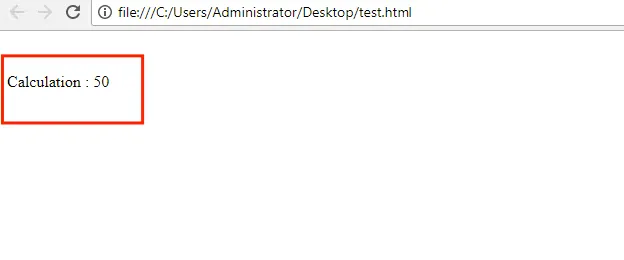
AngularJS, {{}} The variable or computable expressions between the lines are printed at the time of writing. In the next example, we will print the model variable created by AngularJS, which performs the same function as the first example we gave,
< !DOCTYPE html >
< html >
< meta charset="utf-8"/ >
< script src="angular.min.js"> < /script >
< title > AngularJs First Application Example < /title >
< body >
< div ng-app="">
< p > Your Name : < input type="text" ng-model="name">< /p >
< p >{{name}}< /p>
< /div >
< /body >
< /html >

It gives an output which gives the same function as the first sample we gave in this code. In the example you can also see how we use the variable name in the expression holder.
What Have You Learned :
In this episode, we entered AngularJS very quickly. We talked about what it is and how it works and immediately took the big step towards creating our first application. See you in the next chapter.
Series :
1 - ANGULARJS How To Use / Establish #1
Posted on Utopian.io - Rewarding Open Source Contributors