
Repository
https://github.com/nuxt/nuxt.js
What Will I Learn?
- Learn how to use mapActions
- Submit data to API
- Process data with Vuex
Resources
- Nuxt.js Website - https://nuxtjs.org/
- Nuxt.js Github. - https://github.com/nuxt/nuxt.js
- Axios- https://github.com/axios/axios
- JSON Placeholder- https://jsonplaceholder.typicode.com/
- Vuex - https://github.com/vuejs/vuex
Difficulty
Intermediated
Tutorial Contents
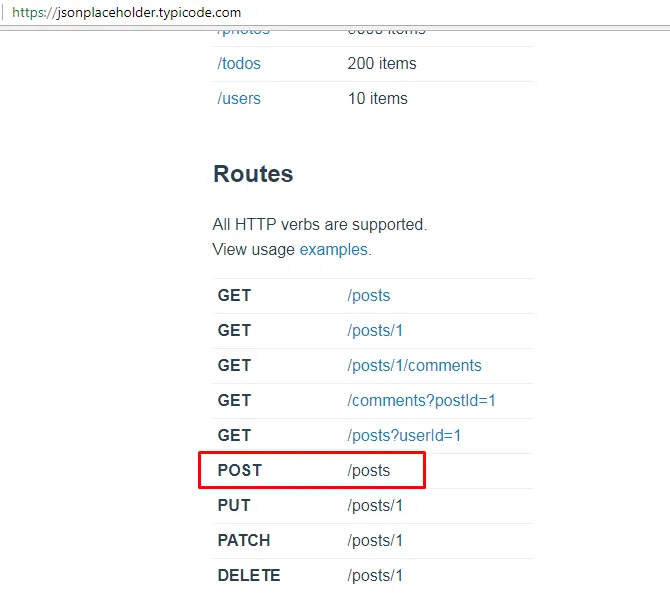
in the previous tutorial, we have learned how to request to retrieve data via endpoint API, in this tutorial, we will learn how to submit data to the API and we will also learn about mapActions on Vuex. so I suggest you follow the tutorial about Vuex, so that later you will not find any difficulty to follow this tutorial. to submit the API we will still use tools from JSON Placeholder, we will do Request POST in JSON Placeholder, to be able to do post we need the endpoint as in the picture below.
Submit data to the API
Before we do POST data on the API we need to create a data form in frontend section. If in the previous tutorial we learn about mapState then in the tutorial we will learn about mapActions.
- Create Form Data
We will use Bootstrap to create a data form on our frontend. in the previous tutorial we have installed bootstrap, you can see it in this tutorial. We will change the part of the form to make it more interesting and neat.
Index.vue
<template>
  <div>
      <div style="text-align: center;">
          <app-logo/>
          <h1 class="title">
            millenuxt
          </h1>
          <h2 class="subtitle">
            Vuex in Nuxt.js
          </h2>
      </div>
      <hr>
      <div class="container">
          <div class="row">
            <div class="col-md-6">
              <h3>Add new country</h3>
              <form>
                <div class="form-group">
                  <label for="country">Country</label>
                  <input type="text" class="form-control" id="country" placeholder="Country">
                </div>
                <div class="form-group">
                  <label for="city">Password</label>
                  <input type="text" class="form-control" id="city" placeholder="City">
                </div>
                <button type="submit" class="btn btn-primary">Submit</button>
              </form>
            </div>
            <div class="col-sm-6">
              <h3>List Of Countries</h3>
                <div class="alert alert-primary" role="alert" v-for="item in countries" :key="item.id">
                 <p>Country : {{item.name}}</p>
                 <p>Capital City: {{item.city}}</p>
                </div>
            </div>
          </div>
      </div>
  </div>
</template>
<script>
  import AppLogo from '~/components/AppLogo.vue'
  import {mapState} from 'vuex'
  export default{
    components: {
      AppLogo
    },
    computed: mapState([
      'countries'
    ])
  }
</script>
You can run your Nuxt.js Application and the result will be like the picture above, Running on localhost/3333
- How to use mapActions
We will start using mapActions in our Nuxt.js app, here I will explain how mapActions works. mapActions is used to invoke a function that exists in actions in Vuex. The function we can put on the event in Nuxt.js because Nuxt.js using Vue.js, so we can use the existing events on Vue.js like @change, @click, @submit, @keyup and much more.... We will see how to use it on components like the example below:
Example:
<form>
  <div class="form-group">
       <label for="country">Country</label>
       <input type="text" class="form-control" id="country" placeholder="Country" v-model="formData.country">
  </div>
  <div class="form-group">
       <label for="city">Password</label>
       <input type="text" class="form-control" id="city" placeholder="City" v-model="formData.city">
   </div>
       <button @click.prevent="add(formData)" class="btn btn-primary">Submit</button>
</form>
- Define
data()
We will create a v-model that we will use to store the input value v-model="formData.country", We will define the variable in the data(), like the following example.
Example:
 data(){
      return{
        formData:{
          country:'',
          city:''
        }
      }
    },
We create an object with the formData name that has two key are country:' ' and city:' '. so to use it in v-model we can call object name first then key from the object that we access.
Example:
v-model="formData.country"
Note : formData is an object and the country is a key of the object.
- Defines the function in
...mapActions()
If we usually we write the function in methods: {}, but if we want to write a function in Vuex actions. We have to register it in ... mapActions (). In this tutorial, I added a @click event in a button.
Example:
<button @click.prevent="add(formData)" class="btn btn-primary">Submit</button>
Note: I added a prevent to prevent the original properties of the submit button ie request to the server.
- I put the
add()function in the on-click event and then we pass the parameter in the form object we have created that is add (formData).
After we create a function we can define the function to be recognized actions in Vuex. Here is how to register it.
Example:
methods:{
      ...mapActions(['add'])
    }
- We can define it in an array because there may be some functions to be defined. It is important to remember if we write it like this
... mapActions (['add']), It means that the function we will use in Vuex also has the same function name that is 'add'. But if you want to use a different function name in Vuex you can do it like this
Example:
... mapActions (add : 'submitData')
Noted: add is a function that is in our component, and submitData is the function name in vuex, submitData is the initialization of the function in the component.
I will do the console.log() on the function in the Vuex action to see if the existing data sent from the component has been received in Vuex.
Function add() in Vuex:
export const actions = {
    async add ({commit}, data){
        console.log(data);
    }
}
as we know {commit} is a mandatory parameter and the data is a parameter that we pass in the component @click.prevent="add(formData)" and then we run our Nuxt.js application to see the result as shown below.
- Submit Data with API
We have created a function that is now connected with Vuex, now we will do is submit data or post data to the API that has been provided by JSON Placeholder.
Example:
async add ({commit}, data){
        const res = await axios.post('country',{name:data.country, city:data.city});
        commit('addData', res.data)
    }
- We accept the
dataparameters that contain the object of the input that is on the component. axios.post()to post via axios and{name:data.country, city:data.city}is the data we will post. We do not need to add ID manually, because Json Placeholder automatically adds it, The following is the key structure of the object we are going to post, the data we post should be the same as this structure.
Structure data:
{
    "id": 0,
    "name": "Argentina",
    "city": "Buenos aires"
}
commit('addData', res.data)as we learned earlieractionscannot change state, which can changestateismutationsso we will commit a mutations that is 'addData'.
- Create
addData()for change data in State
We will make mutations to change state value. We will add new data, so I will use push() to add a new array.
Example:
export const mutations = {
    addData(state, item){
        state.countries.push(item);
    }
}
item parameter is the data we pass when we commit in actions commit('addData',res.data). If there is no mistake to eat should the result will be like the picture below .
Data changes in the frontend
Network
We see the results as above, we managed to post data in Nuxt.js using Axios and process the data using Vuex and we also learn how to use ... mapActions in our Nuxt.js application, Hopefully, this tutorial can help you, thanks.
Curriculum
Learn Nuxt#1 Nuxt structure, Global CSS, Request API
Learn Nuxt#2 Vuex in Nuxt.js, Classic Mode and Modules Mode
Learn Nuxt#3 Create components, Reusable components and Nuxt-link
Learn Nuxt#4 Dynamic components, Props, Transition page, Dynamic pages
Learn Nuxt#5 Create Database API, Request data, Setup Port
Learn Nuxt#6 Create Store in Vuex, Request data in Vuex, Data centralized