Repository
https://github.com/nuxt/nuxt.js
What Will I Learn?
- Create Store in Vuex
- Request data in Vuex
- Making the data centralized
- Using Vuex on component
Resources
- Nuxt.js Website - https://nuxtjs.org/
- Nuxt.js Github. - https://github.com/nuxt/nuxt.js
- Axios- https://github.com/axios/axios
- JSON Placeholder- https://jsonplaceholder.typicode.com/
- Vuex - https://github.com/vuejs/vuex
Difficulty
Intermediated
Tutorial Contents
This tutorial is a tutorial on the continuation of the previous tutorial, we will learn about Vuex in Nuxt.js, for those of you who are familiar with Vue.js, of course, you already know the state management in Vue.js. When we install Nuxt.js then automatically we have also installed Vuex, therefore we do not need to install it again, we will make the state management in the folder store in Nuxt.js, with Vuex we will not process the data of a component but we will process it on the store in Vuex. for more details we just see how to use and best practice.
Data centralization
The idea of using state management (Vuex) is that data can be centralized and can be used or processed in any component. maybe if the data we use is not too big, we do not have to use Vuex, but if your data is large and usage is used massively, then we need a state management that is Vuex.
- Create store in Vuex
We will create a file that will be used to process the data, we can create the default file is index.js in the store folder.
index.js
import axios from '~/plugins/axios'
export const state = () => ({
    countries : []
});
export const mutations = {
    setData(state, items){
        state.countries = items
    }
}
export const actions = {
    async nuxtServerInit ({commit}){
        const res = await axios.get('country')
        commit('setData', res.data)
    }
}
import axios from '~/plugins/axios' we must import axios first to be able to use it.
- State
export const state = () => ({ }); we will create a const with the state name and export it, the state is a data source that we will use in the component. We can create a variable in the form of string, int, array, or object.
- Mutations
export const mutations = { } we will create a const with the mutations name and export it, the usefulness of mutations is to change the data in the state, so that the process of data changes will occur within mutations. We can generate a function in mutations with mandatory parameters ie state and we can also provide additional parameters as usual.
Example:
setData(state, items){ }
state is a mandatory parameter because the task of mutations is to change the data in the state, setData () is a function in mutations that we can call in actions. In this tutorial, on the setData(), we pass additional parameters ie items, items are data that is successfully retrieved from the database and pass on the commit data in the action commit('setData', res.data).
- Actions
export const actions = { } we will create a const with the actions name and export it, actions are useful for processing the data whose results will be committed in mutations, so basically actions can not directly change states, actions will commit in mutations and mutations that will change state. We can write the action function() as usual, but in this tutorial, I use the nuxtServerInit function of nuxt.js to run the first time when our nuxt.js app is rendered.
Example:
async nuxtServerInit ({commit}){
        const res = await axios.get('country')
        commit('setData', res.data)
    }
}
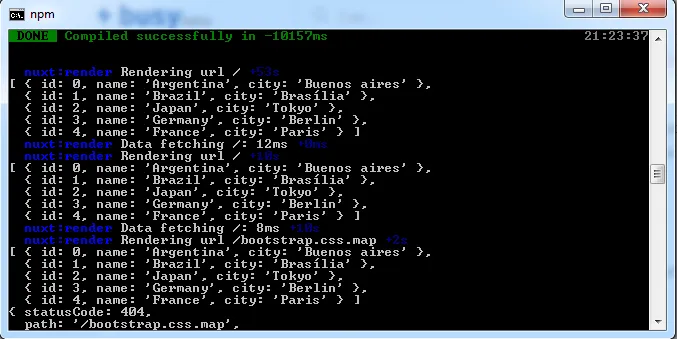
There is a mandatory parameter that exists in every action function that is commit, this parameter serves to commit to function in mutations. In this tutorial, we will commit to setData() function. const data = await axios.get('country') This is the endpoint of the API we have created in the previous tutorial, we have set BaseURL localhost:3000 and the location of the data is on localhost: 3000/country. so we just need to add 'country' on request axios.
We can see the data is successfully retrieved from the API, in the existing command prompt running in our Nuxt.js application.
- Use Vuex in Component
We have learned how to the concept on Store, now we will use State part of the component. We will compare the index.vue that uses Vuex and which do not use Vuex.
- Before
<template>
<div>
<div style="text-align: center;">
<app-logo/>
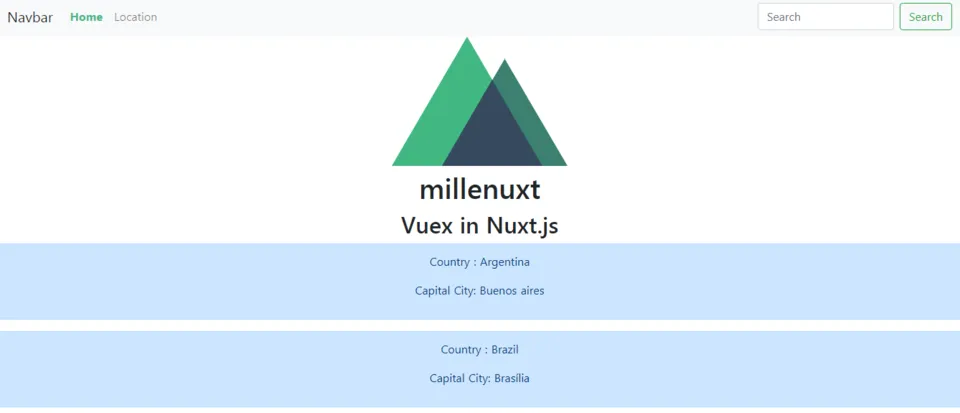
<h1 class="title">
millenuxt
</h1>
<h2 class="subtitle">
Vuex in Nuxt.js
</h2>
<div class="alert alert-primary" role="alert" v-for="item in countries" :key="item.id">
<p>Country : {{item.name}}</p>
<p>Capital City: {{item.city}}</p>
</div>
</div>
</div>
</template>
<script>
import AppLogo from '~/components/AppLogo.vue'
export default{
components: {
AppLogo
},
asyncData(){
return axios.get('country').then(res=>({
countries: res.data
}))
}
}
</script>
- After:
<template>
  <div>
    <div style="text-align: center;">
      <app-logo/>
      <h1 class="title">
        millenuxt
      </h1>
      <h2 class="subtitle">
        Vuex in Nuxt.js
      </h2>
      <div class="alert alert-primary" role="alert" v-for="item in countries" :key="item.id">
         <p>Country : {{item.name}}</p>
         <p>Capital City: {{item.city}}</p>
      </div>
    </div>
  </div>
</template>
<script>
  import AppLogo from '~/components/AppLogo.vue'
  import {mapState} from 'vuex'
  export default{
    components: {
      AppLogo
    },
    computed: mapState([
      'countries'
    ])
  }
</script>
We can see that before we use Vuex we do the async request process on the component part and if we use Vuex we separate the API request process in the Actions section in Store/index.js.
Using Vuex means we must first import mapState from vuex
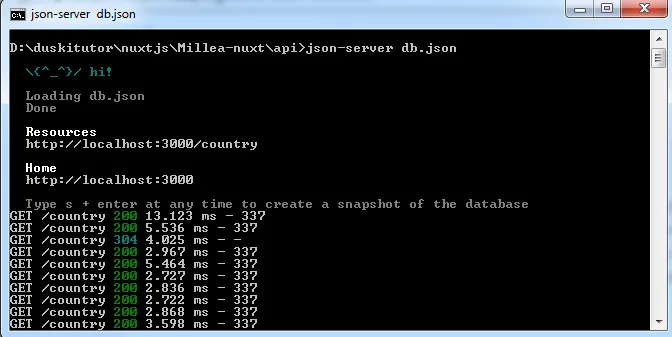
import {mapState} from 'vuex'and we put the mapState value on thecomputed:{}property so that data changes can automatically.The result will not be different, the difference is only in the data process, although the use of state management is more complicated, this will greatly help us when the data in need a lot. we do not need to run the process in every component but only once data processing can be used in every component. to test the application we have created, do not forget to run the database API.
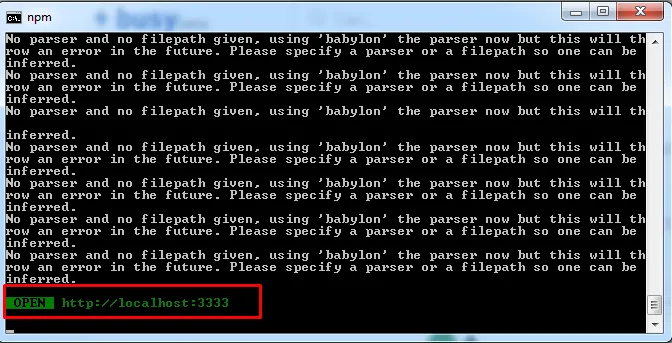
database localhost:3000
Nuxt.js app on localhost:3333
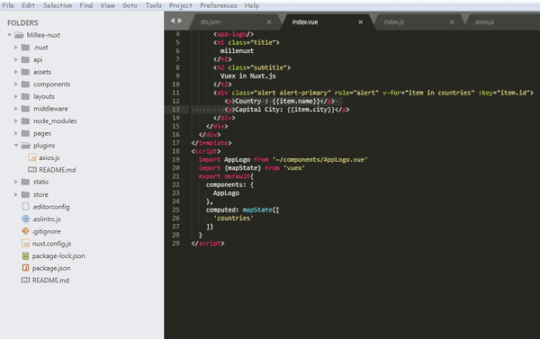
We can see the result as the picture above we succeeded in moving the previous process in the component, now we have changed using Vuex and the data we can be centralized, so if the data is changed then all components using the data will also change. just so much my tutorial about the state management of VUE. hopefully, this tutorial helps you thank you.
Curriculum
Learn Nuxt#1 Nuxt structure, Global CSS, Request API
Learn Nuxt#2 Vuex in Nuxt.js, Classic Mode and Modules Mode
Learn Nuxt#3 Create components, Reusable components and Nuxt-link
Learn Nuxt#4 Dynamic components, Props, Transition page, Dynamic pages
Learn Nuxt#5 Create Database API, Request data, Setup Port