What Will I Learn?
- You will learn java programming language
- You will learn how to create a GUI app using AWT
- You will learn how to create a GUI application using Swing
- You will learn the difference between components and containers
Requirements
- You need an understanding of java programming
- You need a basic GUI app
- You need basic AWT and Swing
Difficulty
- Intermediate
Tutorial Contents
On this occasion I will give tutorial to you all how to make GUI application using java programming language similar like login form page and will be in compiler, either just direct on the discussion in the process of making as below steps:
The first step is to create a file in your text editor and the author makes the file named AWT.java and AWT.html
Fill it with the syntax that the author gives and each syntax will be explained in detail so that you understand:
In the syntax below serves as a call to the creation declaration GUI on the command pront
import java.awt.*;
public class AWT extends java.applet.Applet
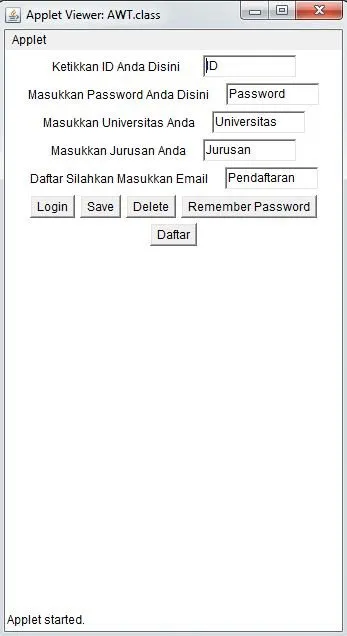
In this syntax describes the process of making buttons that will exist on the GUI page and the buttons are available such as Login, Save, Delete, Remember Password and List and syntax that make it happen in syntax
add
@Override public void init()
 {
    setLayout(new FlowLayout());
    add(new Button("Login"));
    add(new Button("Save"));
    add(new Button("Delete"));
    add(new Button("Remember Password"));
    add(new Button("Daftar"));
 }
in syntax this time is the creation of columns that will be attached to the GUI to syntax
add(new Label("ketik ID Anda Disini"));is the syntax naming the column andadd(new TextField("ID",10));is the field or character constraint that must be filled or in the database language is varchar and for syntax under the same as well.
{
    setLayout(new FlowLayout());
    add(new Label("ketik ID Anda Disini"));
    add(new TextField("ID",10));
    add(new Label(Masukkan Password Anda Disini""));
    add(new TextField("Password",10));
 }
In this syntax just as well as making the label just this syntax as a label pointer and for syntax as well as the previous explanation of the first line as the manufacturer of the label and under it in the label field.
{
    setLayout(new GridLayout(3,2));
    add(new Label("Masukkan Universitas Anda"));
    add(new TextField("Universitas",10));
    add(new Label("Masukkan Jurusan Anda"));
    add(new TextField("Jurusan",10));
 }
In syntax this time serves as the maker of border or other word dalah header.
{
    setLayout(new BorderLayout());
    add(new Label("Daftar Silahkan Masukkan Email"))
    add(new TextField("Pendaftaran",10));
 }
- The next step is creating AWT.html file and syntax as follows:
This syntax is the basic framework in the creation of an application or a website, and created separately with the AWT.java file
<html>
<head>
<title> AWT </title>
</head>
<body>
<p><applet code = "AWT.class" width=300 height=300>
</applet>
</body>
</html>
- Next step read your command prompt then choose the folder where you save it and you will see the results as shown below:
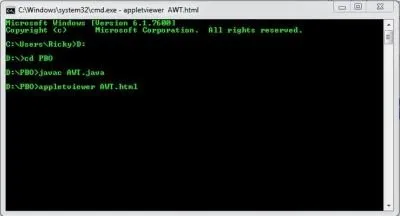
And result GUI
- All syntax for AWT.java Here:
import java.awt.*;
public class AWT extends java.applet.Applet
{
 @Override public void init()
 {
    setLayout(new FlowLayout());
    add(new Button("Login"));
    add(new Button("Save"));
    add(new Button("Delete"));
    add(new Button("Remember Password"));
    add(new Button("Daftar"));
 }

 {
    setLayout(new FlowLayout());
    add(new Label("ketik ID Anda Disini"));
    add(new TextField("ID",10));
    add(new Label(Masukkan Password Anda Disini""));
    add(new TextField("Password",10));
 }

 {
    setLayout(new GridLayout(3,2));
    add(new Label("Masukkan Universitas Anda"));
    add(new TextField("Universitas",10));
    add(new Label("Masukkan Jurusan Anda"));
    add(new TextField("Jurusan",10));
 }

 {
    setLayout(new BorderLayout());
    add(new Label("Daftar Silahkan Masukkan Email"))
    add(new TextField("Pendaftaran",10));
 }

}
- All Syntax For AWT.html Here:
<html>
<head>
<title> AWT </title>
</head>
<body>
<p><applet code = "AWT.class" width=300 height=300>
</applet>
</body>
</html>
Thank You For Visiting My Blog And Hopefully Useful
Posted on Utopian.io - Rewarding Open Source Contributors