
In this post I will show you how to install steem-python, the official STEEM library for Python! I've mainly written this post as I spent a lot of time trying to install steem-python using other tutorials, but it was never as straightforward as they made it seem. Especially trying to install it on Windows is a complete hassle, as I will explain below.
Step 1 - Installing Ubuntu 16.04
Unfortunately installing steem-python on Windows is incredibly hard because it requires Python 3.6. The problem with this is that steem-python requires another package called scrypt, and this package is only available in a pre-compiled form for Windows when using Python 3.5 or below. This means that scrypt is near impossible to install on Windows when using Python 3.6, but don't worry, there is a solution to this problem! You can either download a virtual machine like VMware and install Ubuntu 16.04 on it (like I have done for the sake of this tutorial) or purchase one of the many available Ubuntu servers out there, like DigitalOcean's droplet. There are plenty of tutorials online on how to install Ubuntu on a virtual machine, or how to get an Ubuntu server up and running, so I won't be going over that here.
Step 2 - Installing Python 3.6
Ubuntu 16.04 comes with Python 2.7 and Python 3.5 already installed, but not with Python 3.6. There are multiple ways of installing Python 3.6, but in my opinion a very convenient way is by installing Anaconda. To do this you must do the following:
- Open a terminal with
CTRL + ALT + Tand navigate to the/tmpfolder
$ cd /tmp - Find the latest version of
Anacondaon their download page and usecurl(installcurlwithsudo apt-get install curlif needed) to download it
$ curl -O https://repo.continuum.io/archive/Anaconda3-5.0.1-Linux-x86_64.sh - Once it is downloaded run the script (just keep pressing
ENTERand typeyes) to installAnaconda(this could take a while)
$ bash Anaconda3-5.0.1-Linux-x86_64.sh
Once it has finished installing it will ask the following:
Do you wish the installer to prepend the Anaconda3 install location to PATH in your /home/amos/.bashrc ? [yes|no]
Make sure you typeyes, this makes it possible to use thecondacommand to see ifAnacondawas installed correctly - Source your
~/.bashrcfile and make sureAnacondawas installed correctly
$ source ~/.bashrc
$ conda --version
If this shows the version then it was installed correctly, otherwise follow step 5. - (Optional) if you didn't add the
Anaconda3install location toPATHin step 3, or something else went wrong, then do the following:
$ nano ~/.bashrc
then addexport PATH="/home/user/anaconda3/bin:$PATH"(where user is your username) to the end of the file, press^X(CTRL + X) to save the changes and source~./bashrcagain.
Congratulations, typing python --version should now show Python 3.6.3 :: Anaconda, Inc!
Step 3 - Installing steem-python
- Before we install
steem-pythonwe need to first install an Ubuntu package that is needed by thePythonpackagescrypt
$ sudo apt-get install libssl-dev - Once this is installed you can simply install
steem-pythonusingpip
$ pip install -U steem - Type
pythonin your terminal to enter thePythoninterpreter and see ifsteem-pythonwas installed correctly by doing the following
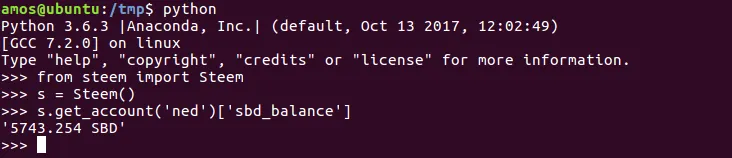
If you see something like the above image then you have installed steem-python correctly!
Step 4 - Fixing steempy CLI
If you try and import your account via the steempy CLI for example, you will see the following error:
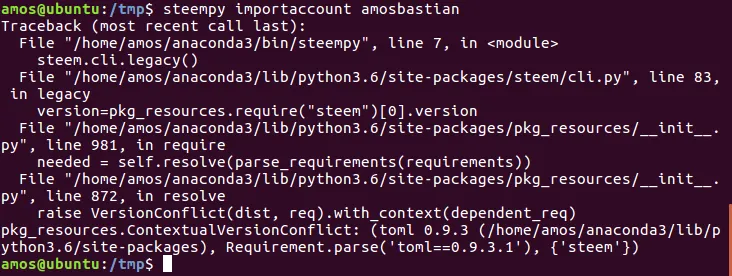
Thankfully this is an easy fix. We simply need to edit steem-python's METADATA file and change the following line
Requires-Dist: toml (==0.9.3.1)
to
Requires-Dist: toml (==0.9.3)
You can open the METADATA file in an editor with the following command
$ nano /home/user/anaconda3/lib/python3.6/site-packages/steem-0.18.103.dist-info/METADATA
where user is once again your username.

Once you have changed that line everything should be working! Congratulations! When you try to import your account now you should see the following:

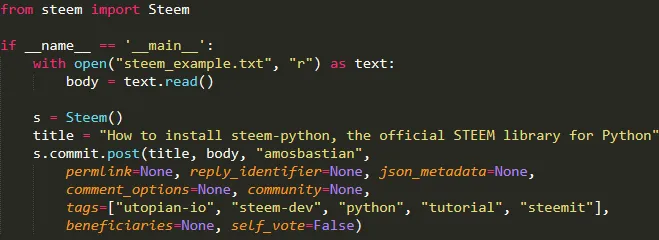
Step 5 - Create!
Now you've installed steem-python correctly, the next step is creating any program you want! An example of code I could've used to post this post on steemit (inception) can be seen below:
Read more about the library here!
Posted on Utopian.io - Rewarding Open Source Contributors