Installation
Open Terminal or use SSH to connect to your Terminal remotely
Notes: in my case i'll be using putty to connect to my VPS remotely
Install Squid3 and Apache tools.
apt-get updateapt-get install squid3 apache2-utilsapt-get install nano
Backup and replace Squid3 Configuration
Backup current Squid3 settings.
cp /etc/squid3/squid.conf /etc/squid3/squid.conf.bak
Open and replace the content in /etc/squid3/squid.conf with the following:
http_port 3128
auth_param basic program /usr/lib/squid3/basic_ncsa_auth /etc/squid3/.passwd
auth_param basic children 1
auth_param basic credentialsttl 1 minute
auth_param basic casesensitive off
acl auth proxy_auth REQUIRED
acl localhost src 127.0.0.0/8
http_access allow auth
http_access allow localhost
http_access deny all
cache deny all
forwarded_for delete
request_header_access Via deny all
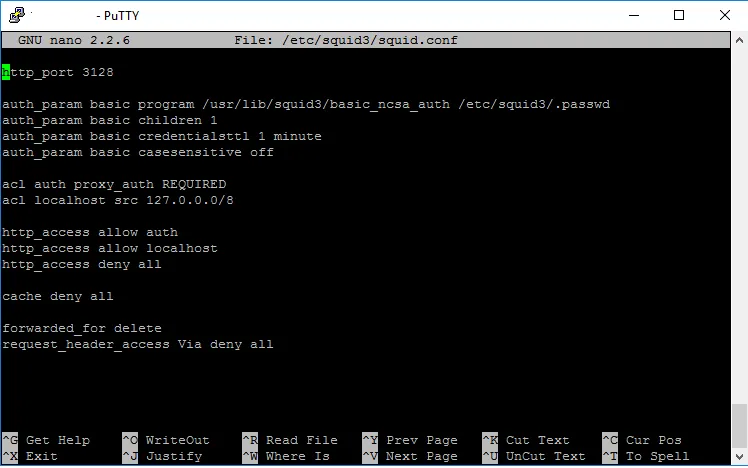
Notes: The default port for Squid is 3128, change it to another port for better security.
Notes: You can use nano or your favorite text editor to change squid.conf
Notes: nano /etc/squid3/squid.conf
Create Squid3 User
Create a new user to login to the Squid3 server.
htpasswd -c /etc/squid3/.passwd YOUR_USER_NAME

use perl to create your authentication. You can also use Apache tools to create your authentication
echo -e "YOUR_USERNAME:perl -le 'print crypt("YOUR_PASSWORD","salt")'" > /etc/squid3/.passwd

Notes: you should rename salt to a random string. if you don't know what a salt is, you can read up on this wikipage: link to salt(cryptography) wikipedia!
Restart your Squid3 service
/etc/init.d/squid3 restart

Notes: If everything went right, you should have a functioning proxy server now.
Activating and Configuring your internet properties for windows 10
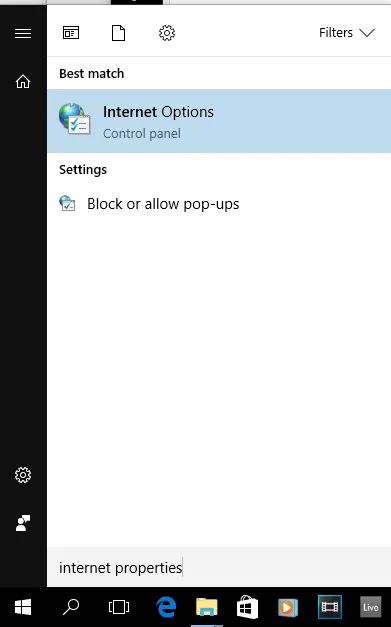
Press the windows start menu and type: internet options
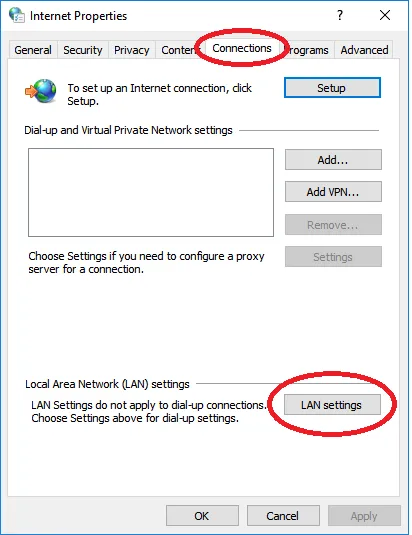
Press the Connections tab and press the Lan settings button
Press the Advanced button

Change The HTTP proxy address, i'll be using a IPV6 instead of a IPV4 in my case
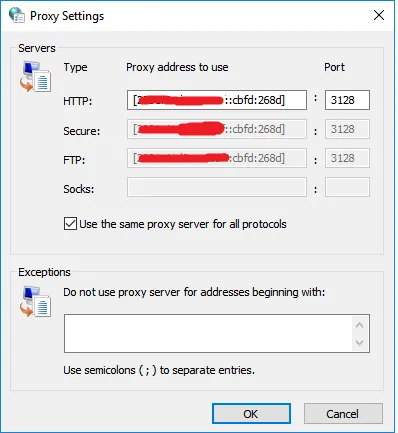
Notes: IPV6 needs brackets around it's address [IPV6-ADDRESS]
Open you favorite browser, you should now be prompted for username and login we made earlier during the installation

Congratulations, you have now fully installed and setup a proxy server that is ready for use.