Linux Volume Group /Logical Volume Management

Description:
When dealing with Linux Enterprise servers, storage is handled a little differently then by the conventional single disk -> Multiple Partition model. Linux can use a function called Volume Manger to efficiently take multiple disks, and /or multiple partitions combined into a single pool or Volume Group (VolGroup00) from which Logical Partitions (LogVol00..etc) can be created. This model allows linux administrators to very easily expand volumes on the fly in the event that disk space on a mount, or even the root file system becomes full.
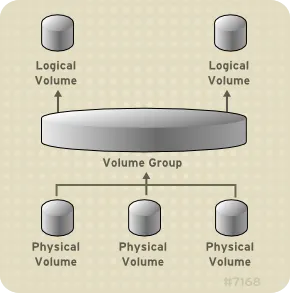
Note that in this depiction (taken from the docs.redhat.com Volume Manager Administration Guide), shows multiple physical volumes all utilized as a single pool. This means that when building the server you can take multiple physical disks, or multiple partitions from a disk, or a combination of both and add it all to the Logical Group, or Storage pool. From that single Logical or virtual pool, you can create logical or virtual partitions.
So the simplified break down is as follows.
Multiple Physical Disks and/or Volumes --> Single Logical or Virtual Disk --> Multiple Logical or Virtual Partitions of the Logical or Virtual Disk.
Pre-Requisites:
None
Configuration:
1. Add New Physical Storage:
Add a new hard disk (if the server is bare metal machine) or expand the Virtual disk (if the server is a virtual machine).
NOTICE:
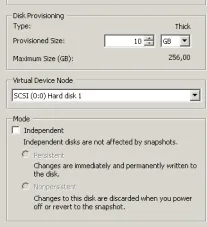
A virtual disk can be expanded in ESX by right clicking on the machine, choosing '''Edit Settings''', then clicking on the Hard Disk, and increasing the size of the disk using the up/down arrows in the ''Disk Provisioning'' section of the fat client, or under the Hard disk settings of the edit menu under the Web UI.
2. Log onto the server:
NOTICE:
A reboot may be required if you have added a physical disk, as opposed to just expanding the existing one
3. Examine the Disk:
Examine the current disk via the df utility
df -h
[root@SVR ~]# df -h
Filesystem            Size  Used Avail Use% Mounted on
/dev/mapper/VolGroup00-LogVol00
                      4.3G  2.1G  2.0G  51% /
/dev/sda1              99M   26M   68M  28% /boot
tmpfs                 250M     0  250M   0% /dev/shm
4. Display Layout:
- pvdisplay is the ''Physical Volume'' display. (This displays all physical partitions that make up the VolGroup)
- lvdisplay is the ''Logical Volume'' display or volume display (This will display all logical volumes added from the Volume Group)
Note in the layout below I have one physical disk (sda) with 2 partitions. One of the partitions is used as boot, and is not accessible to the file system (sda1). The other partition makes up Volume Group 00 (sda2). From the Volume group I have 2 Logical Volumes, 1 of the logical volumes is mounted as the root file system, the other is mounted as swap.
pvdisplay
[root@SVR ~]# pvdisplay
  /dev/hdc: open failed: No medium found
  --- Physical volume ---
  PV Name               /dev/sda2
  VG Name               VolGroup00
  PV Size               4.89 GB / not usable 20.47 MB
  Allocatable           yes (but full)
  PE Size (KByte)       32768
  Total PE              156
  Free PE               0
  Allocated PE          156
  PV UUID               vmmZvj-XAMa-YMHd-SKIq-uMVP-GlBv-6o905A
lvdisplay
[root@SVR ~]# lvdisplay
  /dev/hdc: open failed: No medium found
  --- Logical volume ---
  LV Name                /dev/VolGroup00/LogVol00
  VG Name                VolGroup00
  LV UUID                DXqKO2-gsKY-VN2w-L1om-Qxs7-8TF6-Xfk2RS
  LV Write Access        read/write
  LV Status              available
  # open                 1
  LV Size                4.38 GB
  Current LE             140
  Segments               1
  Allocation             inherit
  Read ahead sectors     auto
  - currently set to     256
  Block device           253:0

  --- Logical volume ---
  LV Name                /dev/VolGroup00/LogVol01
  VG Name                VolGroup00
  LV UUID                hkTS2c-m0Ma-ijSc-sHDn-O16M-r6KA-DqirNX
  LV Write Access        read/write
  LV Status              available
  # open                      1
  LV Size                512.00 MB
  Current LE             16
  Segments               1
  Allocation             inherit
  Read ahead sectors     auto
  - currently set to     256
  Block device           253:1
Create Partition:
1. FDisk the Drive:
Create a partition for the newly expanded space (Gparted and other partitioning tools currently don't work well, if at all with logical volumes, otherwise we would use such a utility to expand the existing partition).
- Note below that I know the disk is sda because it is the only physical disk detected by the ''ls'' command below
[root@SVR ~]# ls /dev | grep sd
sda  --> Root Disk
sda1 --> Boot Partition (1)
sda2 --> Root File System Partition (2)
fdisk /dev/sda
2. Print current partition scheme:
In the fdisk utility print your current partition table for your physical disk
- Here you will notice that the physical disk installed now shows up (after expanding) as a 20GB disk.
- At any point you can type '''m''' within the fdisk utility to see a list of all available commands
- Use the '''p''' command to ''Print'' the current partition table.
p
Command (m for help): p

Disk /dev/sda: 21.4 GB, 21474836480 bytes
255 heads, 63 sectors/track, 2610 cylinders
Units = cylinders of 16065 * 512 = 8225280 bytes

   Device Boot      Start         End      Blocks   Id  System
/dev/sda1   *           1          13      104391   83  Linux
/dev/sda2              14         652     5132767+  8e  Linux LVM
3. Create new partition:
Create a new partition using the disks free space
- Use the '''n''' command to create a ''New'' partition
- Choose the '''p''' option to create a ''Primary'' partition
- Choose the '''3''' option to create the ''Third'' partition on the disk.
- Note that you can only create a maximum of 4 Primary Partitions on a single physical disk.
n
p
3
Command (m for help): n
Command action
   e   extended
   p   primary partition (1-4)
p
Partition number (1-4): 3
First cylinder (653-2610, default 653):
Using default value 653
Last cylinder or +size or +sizeM or +sizeK (653-2610, default 2610):
Using default value 2610
4. Print new partition scheme:
Once the partition has been created, reprint the partition table to verify the new partition.
- Use the '''p''' command to ''Print'' the current partition table.
p
Command (m for help): p

Disk /dev/sda: 21.4 GB, 21474836480 bytes
255 heads, 63 sectors/track, 2610 cylinders
Units = cylinders of 16065 * 512 = 8225280 bytes

   Device Boot      Start         End      Blocks   Id  System
/dev/sda1   *           1          13      104391   83  Linux
/dev/sda2              14         652     5132767+  8e  Linux LVM
/dev/sda3             653        2610    15727635   83  Linux
5. Write the changes to disk:
- Use the '''w''' command to ''Write'' the partition changes.
w
Command (m for help): w
The partition table has been altered!

Calling ioctl() to re-read partition table.

WARNING: Re-reading the partition table failed with error 16: Device or resource busy.
The kernel still uses the old table.
The new table will be used at the next reboot.
Syncing disks.
6. View available Disks:
List the devices in the /dev directory to view your current disks
- sda is the physical disk
- sda1 is the first partition on the sda physical disk (boot)
- sda2 is the second partition on the sda physical disk (/)
ls /dev | grep sd
[root@SVR ~]# ls /dev | grep sd
sda
sda1
sda2
7. Reboot:
Reboot the server, so that the OS will see the new partition
reboot
Add Partition to VG:
1. List available disks:
After the server has completed it's reboot process, relist the /dev directory to verify that the new partition is now seen by the OS.
- sda is the physical disk
- sda1 is the first partition on the sda physical disk (boot)
- sda2 is the second partition on the sda physical disk (/)
- sda3 is the new third partition we just created. At this point there is no filesystem on the partition, nor is it mounted anywhere.
ls /dev | grep sd
[root@SVR ~]# ls /dev | grep sd
sda
sda1
sda2
sda3
2. Add physical disk:
Now that we can see the new partition we want to add the partition to the system as a physical disk, so that it can be later added to the Volume Group.
- Once the physical volume has been created use the pvdisplay command to verify that the partition appears and is acknowledged as a physical volume.
pvcreate /dev/sda3
[root@SVR ~]# pvdisplay
  /dev/hdc: open failed: No medium found
  --- Physical volume ---
  PV Name               /dev/sda2
  VG Name               VolGroup00
  PV Size               4.89 GB / not usable 20.47 MB
  Allocatable           yes (but full)
  PE Size (KByte)       32768
  Total PE              156
  Free PE               0
  Allocated PE          156
  PV UUID               vmmZvj-XAMa-YMHd-SKIq-uMVP-GlBv-6o905A

  --- Physical volume ---
  PV Name               /dev/sda3
  VG Name
  PV Size               15.00 GB / not usable 31.02 MB
  Allocatable           yes
  PE Size (KByte)       32768
  Total PE              479
  Free PE               479
  Allocated PE          0
  PV UUID               Nf3hny-4Iad-cbkZ-8xSS-tvPW-2g2i-TSu2U8
3. Extend the Logical Volume Group:
Next we want to add the physical volume to the Logical Volume Group
- Use the '''ls /dev | grep Vol''' command to list the Volume Group Name
- Here we are effectively adding the new partition/physical volume we have created to the Volume Group container
vgextend VolGroup00 /dev/sda3
[root@SVR ~]# ls /dev | grep Vol
VolGroup00

[root@SVR ~]# vgextend VolGroup00 /dev/sda3
  /dev/hdc: open failed: No medium found
  No physical volume label read from /dev/sda3
  Physical volume "/dev/sda3" successfully created
  Volume group "VolGroup00" successfully extended
Issue the Physical Device Display command to verify that the Physical Volume (Partition) has been added to the Volume Group
pvdisplay
[root@SVR ~]# pvdisplay
  /dev/hdc: open failed: No medium found
  --- Physical volume ---
  PV Name               /dev/sda2
  VG Name               VolGroup00
  PV Size               4.89 GB / not usable 20.47 MB
  Allocatable           yes (but full)
  PE Size (KByte)       32768
  Total PE              156
  Free PE               0
  Allocated PE          156
  PV UUID               vmmZvj-XAMa-YMHd-SKIq-uMVP-GlBv-6o905A

  --- Physical volume ---
  PV Name               /dev/sda3
  VG Name               VolGroup00
  PV Size               15.00 GB / not usable 31.02 MB
  Allocatable           yes
  PE Size (KByte)       32768
  Total PE              479
  Free PE               479
  Allocated PE          0
  PV UUID               Nf3hny-4Iad-cbkZ-8xSS-tvPW-2g2i-TSu2U8
Add Partition to LV:
1. View Logical Volume:
At this point issuing a ''lvdisplay'' command should yield the same results as before, as we have not yet created or extended any logical volumes.
- Note the size of the First Logical Volume (LogVol00) is still at 5GB
lgdisplay
[root@SVR ~]# lvdisplay
  /dev/hdc: open failed: No medium found
  --- Logical volume ---
  LV Name                /dev/VolGroup00/LogVol00
  VG Name                VolGroup00
  LV UUID                DXqKO2-gsKY-VN2w-L1om-Qxs7-8TF6-Xfk2RS
  LV Write Access        read/write
  LV Status              available
  # open                 1
  LV Size                4.38 GB
  Current LE             140
  Segments               1
  Allocation             inherit
  Read ahead sectors     auto
  - currently set to     256
  Block device           253:0

  --- Logical volume ---
  LV Name                /dev/VolGroup00/LogVol01
  VG Name                VolGroup00
  LV UUID                hkTS2c-m0Ma-ijSc-sHDn-O16M-r6KA-DqirNX
  LV Write Access        read/write
  LV Status              available
  # open                 1
  LV Size                512.00 MB
  Current LE             16
  Segments               1
  Allocation             inherit
  Read ahead sectors     auto
  - currently set to     256
  Block device           253:1
2. Extend the Logical Volume:
Extend the Logical Volume to utilize the new 15GB partition that we have created.
lvextend -L+15GB /dev/VolGroup00/LogVol00
[root@SVR ~]# lvextend -L+15GB /dev/VolGroup00/LogVol00
 /dev/hdc: open failed: No medium found
  Extending logical volume LogVol00 to 19.34 GB
  Logical volume LogVol00 successfully resized
Note if you receive an error message such as the following it simply means there is not a full 15GB of space available on the free partition to use. To correct this error lower your size by 1GB and then slowly grow the LogVol by MB until you have used up your free space
  [root@SVR ~]# lvextend -L+15GB /dev/VolGroup00/LogVol00
  /dev/hdc: open failed: No medium found
  Extending logical volume LogVol00 to 19.41 GB
  Insufficient free space: 480 extents needed, but only 478 available
[root@SVR ~]# lvextend -L+14GB /dev/VolGroup00/LogVol00
  /dev/hdc: open failed: No medium found
  Extending logical volume LogVol00 to 18.41 GB
  Logical volume LogVol00 successfully resized

[root@SVR ~]# lvextend -L+500 /dev/VolGroup00/LogVol00
  /dev/hdc: open failed: No medium found
  Rounding up size to full physical extent 512.00 MB
  Extending logical volume LogVol00 to 18.91 GB
  Logical volume LogVol00 successfully resized

[root@SVR ~]# lvextend -L+500 /dev/VolGroup00/LogVol00
  /dev/hdc: open failed: No medium found
  Rounding up size to full physical extent 512.00 MB
  Extending logical volume LogVol00 to 19.41 GB
  Insufficient free space: 16 extents needed, but only 14 available

[root@SVR ~]# lvextend -L+300 /dev/VolGroup00/LogVol00
  /dev/hdc: open failed: No medium found
  Rounding up size to full physical extent 320.00 MB
  Extending logical volume LogVol00 to 19.22 GB
  Logical volume LogVol00 successfully resized

[root@SVR ~]# lvextend -L+100 /dev/VolGroup00/LogVol00
  /dev/hdc: open failed: No medium found
  Rounding up size to full physical extent 128.00 MB
  Extending logical volume LogVol00 to 19.34 GB
  Logical volume LogVol00 successfully resized

[root@SVR ~]# lvextend -L+50 /dev/VolGroup00/LogVol00
  /dev/hdc: open failed: No medium found
  Rounding up size to full physical extent 64.00 MB
  Extending logical volume LogVol00 to 19.41 GB
  Insufficient free space: 2 extents needed, but only 0 available
3. Verify extended Logical Volume:
Redisplay your Logical Volumes and now note the size of the root volume LogVol00
- At this point we have successfully extended the volume size from 5GB to almost 20GB !
lvdisplay
 [root@SVR ~]# lvdisplay
  /dev/hdc: open failed: No medium found
  --- Logical volume ---
  LV Name                /dev/VolGroup00/LogVol00
  VG Name                VolGroup00
  LV UUID                DXqKO2-gsKY-VN2w-L1om-Qxs7-8TF6-Xfk2RS
  LV Write Access        read/write
  LV Status              available
  # open                 1
  LV Size                19.34 GB
  Current LE             619
  Segments               2
  Allocation             inherit
  Read ahead sectors     auto
  - currently set to     256
  Block device           253:0

  --- Logical volume ---
  LV Name                /dev/VolGroup00/LogVol01
  VG Name                VolGroup00
  LV UUID                hkTS2c-m0Ma-ijSc-sHDn-O16M-r6KA-DqirNX
  LV Write Access        read/write
  LV Status              available
  # open                 1
  LV Size                512.00 MB
  Current LE             16
  Segments               1
  Allocation             inherit
  Read ahead sectors     auto
  - currently set to     256
  Block device           253:1
Resize the LV:
1. View current Volume Size:
Again issue a '''df -h''' command to look at our free space on the server.
- Notice that the 5GB disk has not yet changed, meaning that the extra space is not accessible to the file system.
df -h
[root@SVR ~]# df -h
Filesystem            Size  Used Avail Use% Mounted on
/dev/mapper/VolGroup00-LogVol00
                      4.3G  2.1G  2.0G  51% /
/dev/sda1              99M   26M   68M  28% /boot
tmpfs                 250M     0  250M   0% /dev/shm
2. Expand FileSystem:
Expand the file system of the Logical Volume to acknowledge the unused space.
resize2fs /dev/VolGroup00/LogVol00
[root@SVR ~]# resize2fs /dev/VolGroup00/LogVol00
resize2fs 1.39 (29-May-2006)
Filesystem at /dev/VolGroup00/LogVol00 is mounted on /; on-line resizing required
Performing an on-line resize of /dev/VolGroup00/LogVol00 to 5070848 (4k) blocks.
The filesystem on /dev/VolGroup00/LogVol00 is now 5070848 blocks long.
3. Verify extended FileSystem:
Once more issue a '''df -h''' command to look at our free space on the server.
- Notice now that the disk has changed to reflect the Volume extension.
df -h
[root@SVR ~]# df -h
Filesystem            Size  Used Avail Use% Mounted on
/dev/mapper/VolGroup00-LogVol00
                       19G  2.1G   16G  12% /
/dev/sda1              99M   26M   68M  28% /boot
tmpfs                 250M     0  250M   0% /dev/shm
You are now ready to use the free space as desired !
Post Requisites:
None