This is a short tutorial to help you get the python steem python client working on Linux.
The instructions should probably work fine on OSX too. I tested everything on:
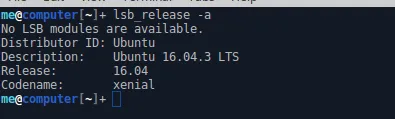
See the output of:
$ lsb_release -a
Before moving on in the article I would just like to mention that this article is not the first of its kind, there was an excellent article written on this topic some time ago which you can find here:
https://steemit.com/utopian-io/@amosbastian/how-to-install-steem-python-the-official-steem-library-for-python
My article will differ slightly and take a different angle on the topic, I would like my article to complement the work of
@amosbastian, maybe if there is something in my article that you have trouble understanding then I would recommend that you have a look at the above mentioned article. The biggest major difference in my article would be that I make use of pip as opposed to anaconda and that I make use of a virtualenv. I also excluded covering the install of the steempy client as I think the above mentioned article covers it very well. Something to think of is whether or not you
would like to install the steempy CLI tool in a virtualenv or globally. If it is installed in a virtualenv then you will need to activate the virtualenv everytime that you would like to invoke steempy.
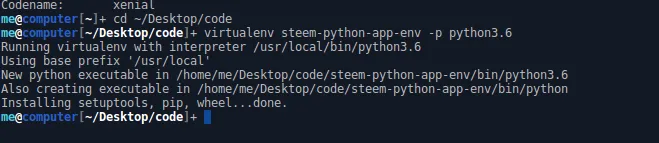
First we need to create a virtualenv for python3.6 and then we continue to install everything we need without the use of root privileges. You will need root priviledges to install virtualenv though. Here below you can see my navigate to my coding directory and then creating the virtualenv. We are going to activate the virtualenv and then work in another directory where our code will be stored. This is just a personal preference. You can exclude the virtualenv directory with a .gitignore file if you wanted to have the virtualenv in the same directory as your code.
$ cd ~/Desktop/code
$  virtualenv steem-python-app-env -p python3.6
Here is a screenshot showing the output of the commands:
Now we activate the virtualenv and navigate to the directory where we will be writing our code in.
$ source steem-python-app-env/bin/activate
$ mkdir steem-app
$ cd steem-app

Btw I have a very short attention span, which just reminded me you are probably wondering how to I get my terminal to look this sexy. I got this from a guy I used to talk to on xmpp. You can use it on your side if you also would like a super sexy terminal. You can use it this way:
$ export PS1="\[\033[1;36m\]\u\[\033[01;37m\]@\[\033[01;34m\]\h\[\033[01;30m\][\[\033[01;37m\]\w\[\033[01;30m\]]\[\033[01;32m\]\[\033[00m\]+ "
If you wanna make this change permanent on Ubuntu Linux then you can just add that line somewhere in your ~/.bashrc
file. You can add it with vim like this:
$ ~/.bashrc
Before we get sidetracked let's move back to what we were busy with. We are going to install the steem python client
in our virtualenv using pip:
venv) $ pip3 install steem
This is the output see the screenshot:
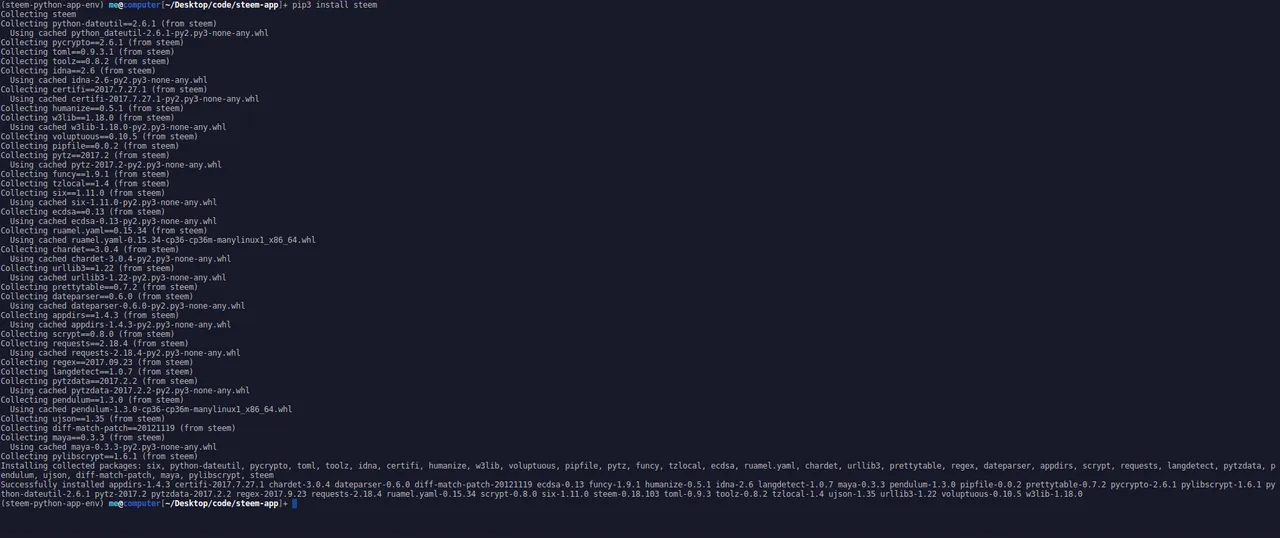
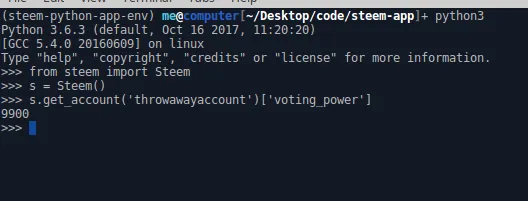
Great we have steem's python client installed. I guess we should try running some very basic example code and see what happens. The nice thing about the python interpreter is that you can use it interactively:
venv) $ python3
>>> from steem import Steem
>>> s = Steem()
>>> s.get_account('throwawayaccount')['voting_power']
9900
>>>
...
On an image this might make more sense:
Great everything works, if everything doesn't work and you get some issues regarding connection then please have a look at this github issue:
https://github.com/steemit/steem-python/issues/143
You might need to point the steem python client to an API endpoint in this way:
venv) $ python3
>>> from steem import Steem
>>> s = Steem(nodes=['https://api.steemit.com'])
>>> s.get_account('throwawayaccount')['voting_power']
9900
>>>
Here is a screenshot:

Please leave me a comment, good or bad, I can take it. Let me know if this post needs any updating.Thanks for reading.