Good morning Splinterfriends and Soulkeepers!!
After a month of playing Soulkeep, I routinely find myself on top of the Tournament Leaderboard.
I enjoy Tower Defense games. I've been playing strategy games since I was 4. That's not hyperbole. My dad taught me Chess as a little kid... then Checkers... yes, in that order.

He stopped playing with me as much around 6 or 7... not because of the divorce... because he got tired of losing to a child. Yes he let me win a few when I was younger... but I started actually beating him (and mom)... and they were frustrated.
After those games dad decided to teach me other games he enjoyed... like Stratego at 8... Risk at 10...
He stopped enjoying them as much when I started whooping his ass at 10-11... and I don't mean kinda winning barely, by luck, occasionally... I mean beating the brakes off the poor fellow.
Anyways... Soulkeep has a number of glitches that still need to be ironed out.
As many of us have just found out, one glitch is where a Spell will "persist" and continue to be used after the round in which you play it. Furthermore... some people are saying they STACK...

I have known Stew of Doom and Venus Fiendtrap would do this and had posted about it in the Discord... HOWEVER... apparently some people figured out that others would do that as well:
Soulful
Mana Mania
Gear Grease (crazy machine gun towers)
Higher Ground (Quad Killer with STUPID range)
That leads me to today... where I decided to give y'all a walkthrough and show you how I routinely crush the leaderboard, winning tournaments and earning lots of SPS!
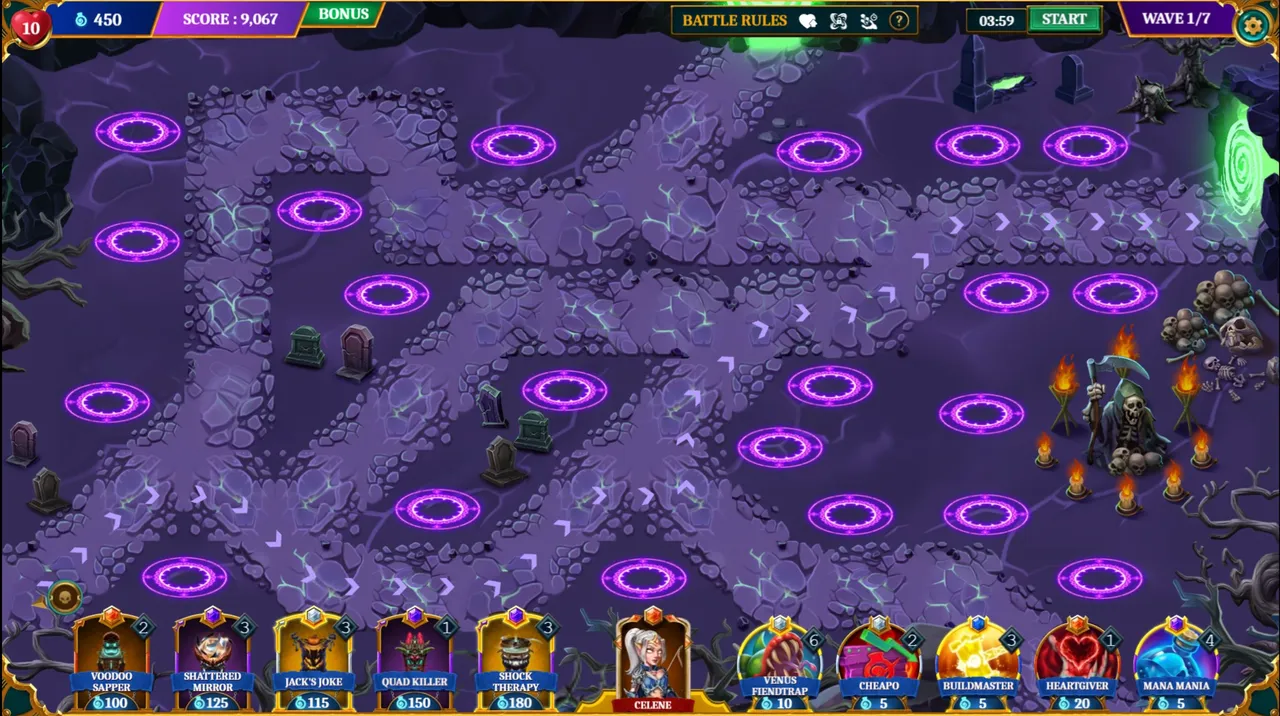
Let's look at the Towers I selected for this run:
Voodoo Sapper: You need these. They boost you Mana AND your SCORE. When they kill a Fiend, you get more Mana/Points than if anything else kills a fiend...
How to use them: PLACE THEM UP FRONT. Duh. They don't work unless you put them where they can KILL the most enemies!!! DUH.

Shattered Mirror: This is my favorite all around badass tower for dispatching Fiends with extreme prejudice. It'll throw down the hurt against ground units and light up the skies like Baghdad

Jack's Joke: I like this tower over Charnel Pit for three reasons - it's 5 mana cheaper, you get 3 of them vs 2 and it does Magic Damage which is great at killing those stupid Green Cauldrons.
Quad Killer: If you don't know why this tower is awesome... Rent one, play with it and you'll understand.
Shock Therapy: In the base configuration, they lay down the hurt against multiple targets... Upgrades to Dmg are significant AND you can upgrade the Chain Multiplier so they mow down swaths of Fiends like a Khorne Berserker!!

Venus Fiendtrap: My favorite anti-fiend spell because they trigger if ONE fiend gets in range unlike Raining Kittys (although that sucks sometimes) AND they are usually potent enough to kill most fiends with their hit.
10 Mana is a good value here and they can prevent you from losing Hearts at the Gates if your defenses fail to stop them all!!
Cheapo: It's Cheapo! It makes your Tower(s) cheaper! One use in Leagues 1-4 and 2 uses in Leagues 5-6! THREE uses in Leagues 9-10!!
If you want the most BANG for your BUCK... Cheapo is the way to go!
Buildmaster: It's like Cheapo! But for upgrades. Obviously SUPER useful...
Heartgiver: Gives you extra Hearts... duh. Who cares about extra Hearts... If my defenses are good enough... I shouldn't need them, right???
Pay attention... YOUR SCORE IS AFFECTED BY HOW MANY HEARTS YOU HAVE...
More Hearts = More Score!! More score = MORE WINNING!!
Mana Mania: Place this spell where enemies die in groups and it multiplies the Mana earned from each Fiend that dies in the Spell Ring... More Mana = More Score!! More score = More... WINNING!!!

Hero: If you haven't figured it out... Celene is usually a MUST... if you want to place well on the Leaderboard. No use whining about it... Go rent one, learn to use her properly and she'll carry you to victory. Sweet, sweet victory.
Please note: Celene is actually pretty optional on this particular map!!
Second note: This loadout is usually what I run each time, with small variation depending on map/fiends
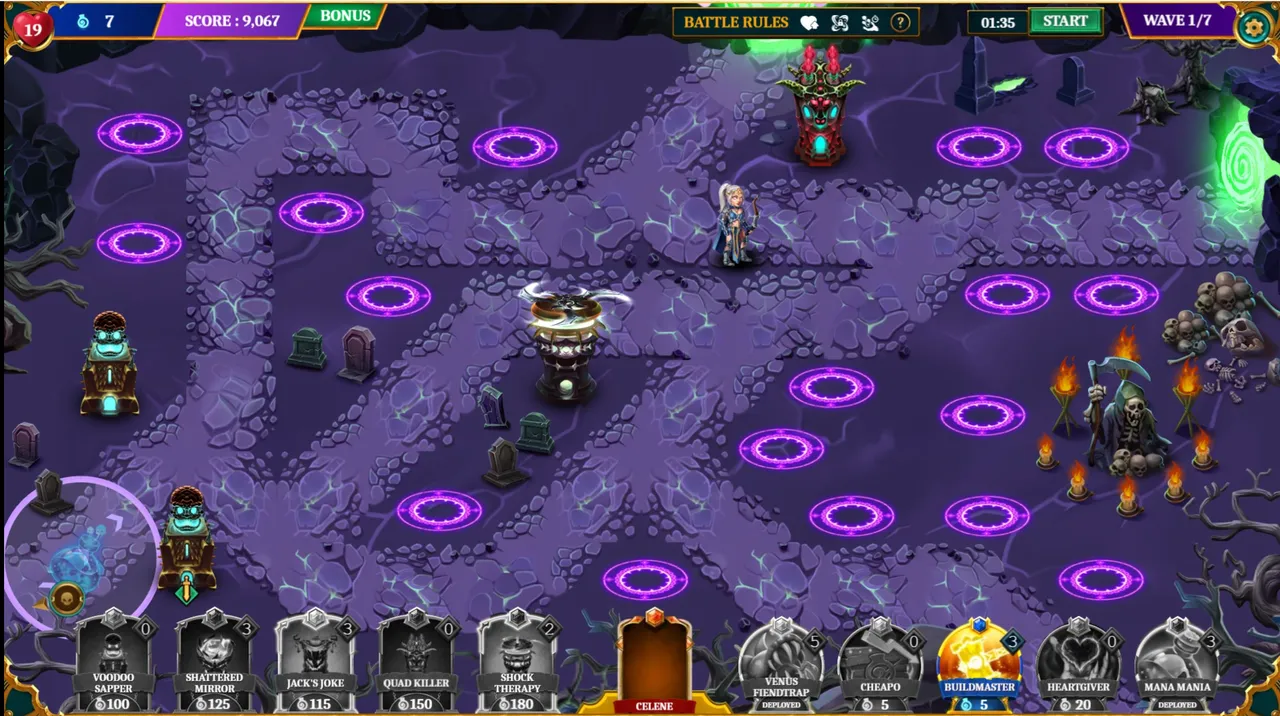
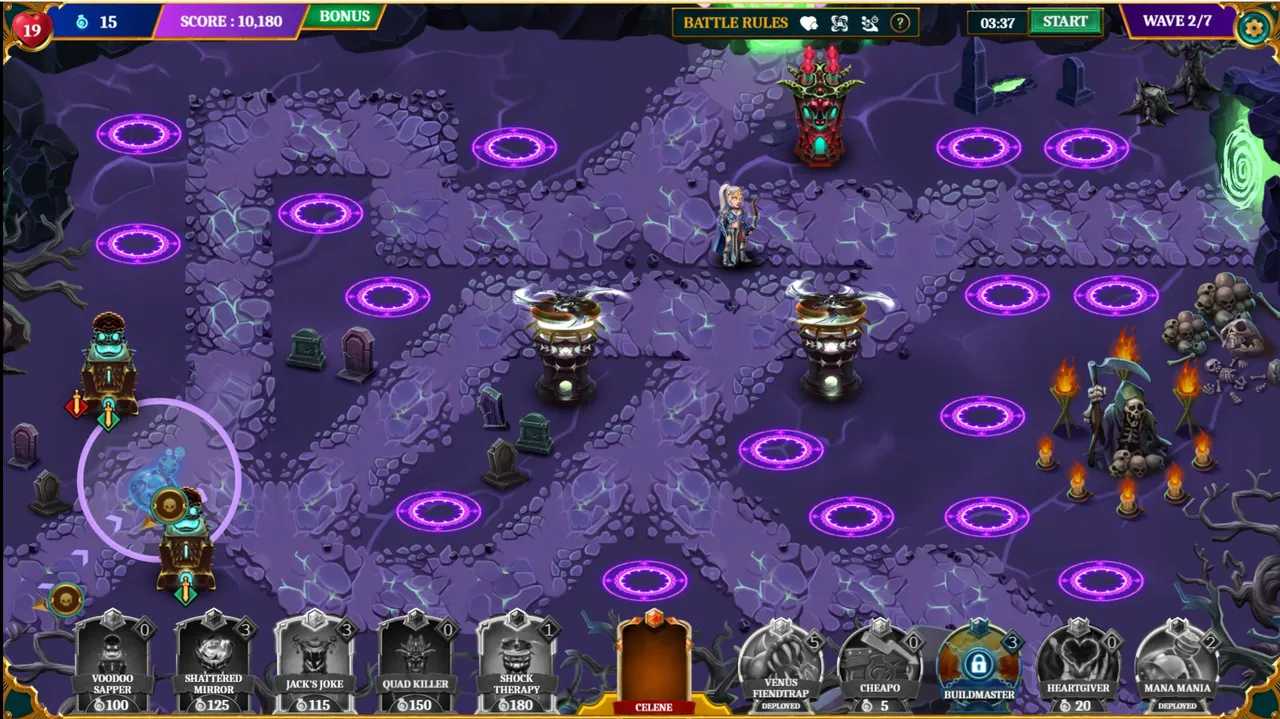
Use Heartgiver to boost your Hearts (and score at the end of each wave).
Cheapo the Quad Killer into place. Notice that I placed it where it could cover the lanes to BOTH Portals.
Cheapo the Shock Therapy into place. Notice it covers a TON of Lanes to provide maximum Fiend destruction!! PURE CARNAGE!!! MUAHAHAHAH... errhem... apologies.
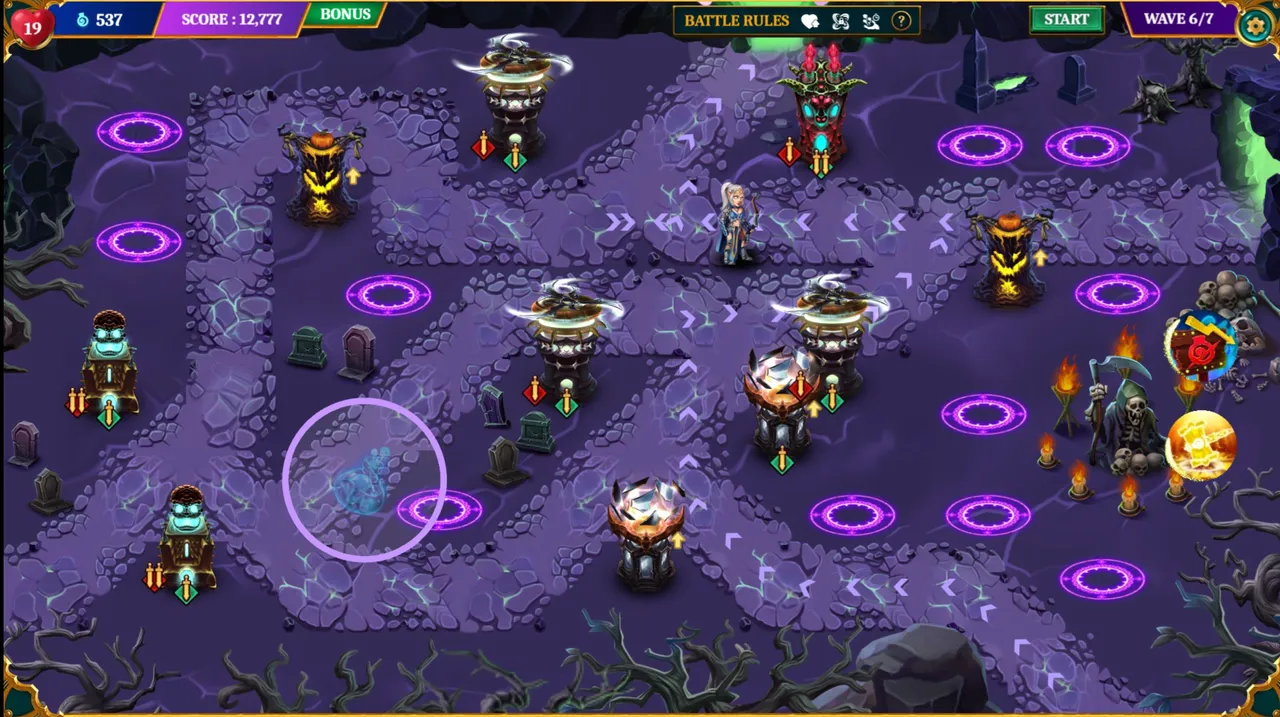
Voodoo Sappers! Front and CENTER!! Look, the Voodoo Sappers are BOTH covering the PRIMARY entrance to the map AND I upgraded the rate of fire on the lower one.
Mana Mania - I actually placed this a bit too low on the map as many fiends died a little after this location. It was a sub-optimal placement.
Celene: I placed her where her bow can cover both lanes to the portals, should any stragglers make it by my towers.
You can't see it well but in the upper portal I placed the Venus Fiendtrap as my last line of defense. I didn't think I'd need it... but just in case!
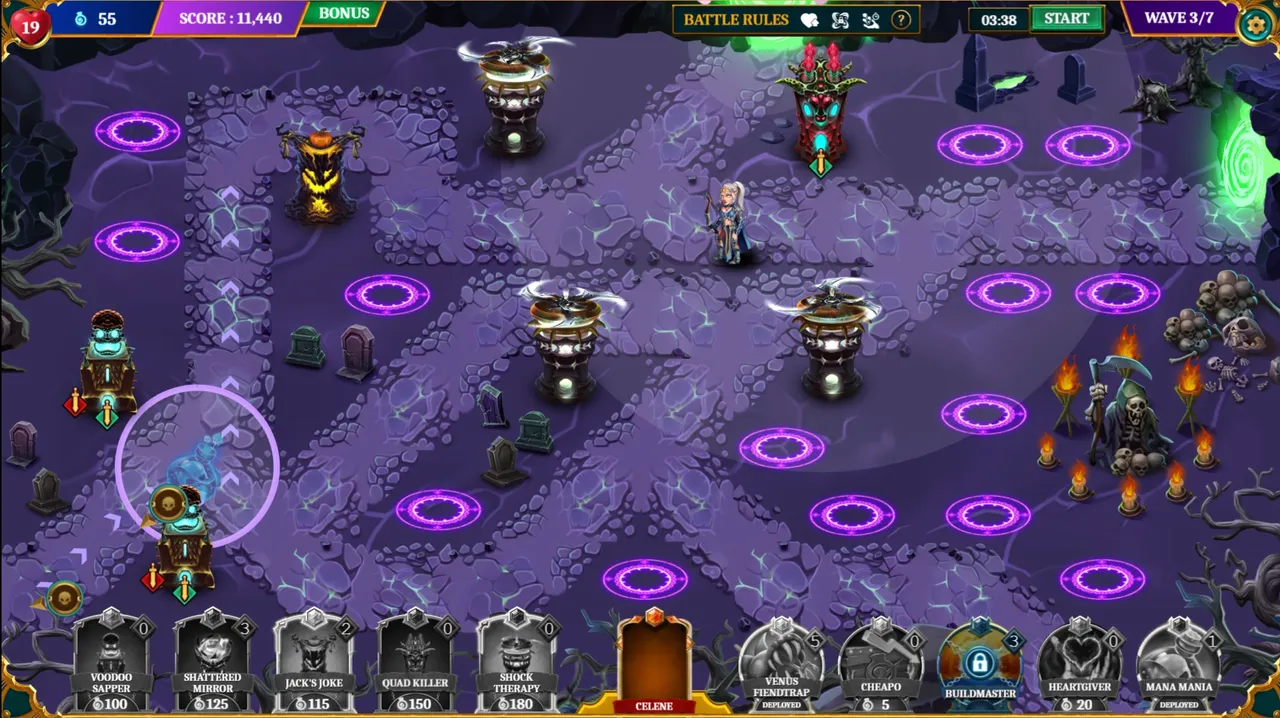
Using the mana I earned from Wave 1 I placed a second Shock Therapy to cover the right side. They have a HUGE range and lay out the hurt. I felt confident in my placement.
I placed Mana Mania again this time, moving it back where most of the Fiends died in Wave 1. (Note: I am not certain if they still have the persist glitch we found out about yesterday but if they do, this will work to our advantage as well)
I upgraded the top Voodoo Sapper's Fire Rate and Damage Output.
That's it... That's all I did lol.
I placed my final Shock Tower at the top left to cover that Portal lane.
I placed a Jack's Joke to also cover the top left lane.
Placement is especially key with towers like Jack's Joke because I could have placed it on the left... but by placing it in the center slot, it can fire on the Fiends for the MAXIMUM AMOUNT OF TIME... thus maximizing damage, death and reducing the fiends that make it past the tower!
Upgraded the Range of my Quad Killer. It's only 50 mana and a great value!
Upgraded the Damage Output of the lower Voodoo Sapper
Mana Mania in the same spot as before because that's where they were being killed!
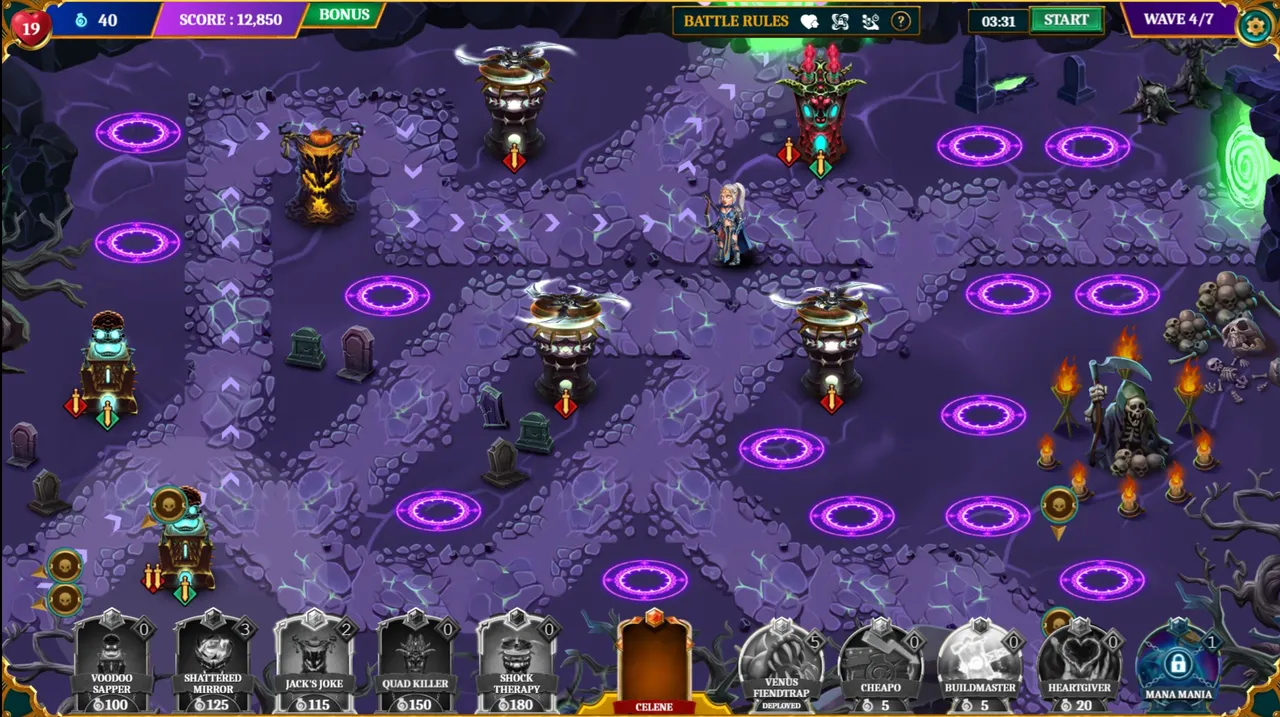
So I kinda messed this up but it wasn't a HUGE mistake... just not optimal.
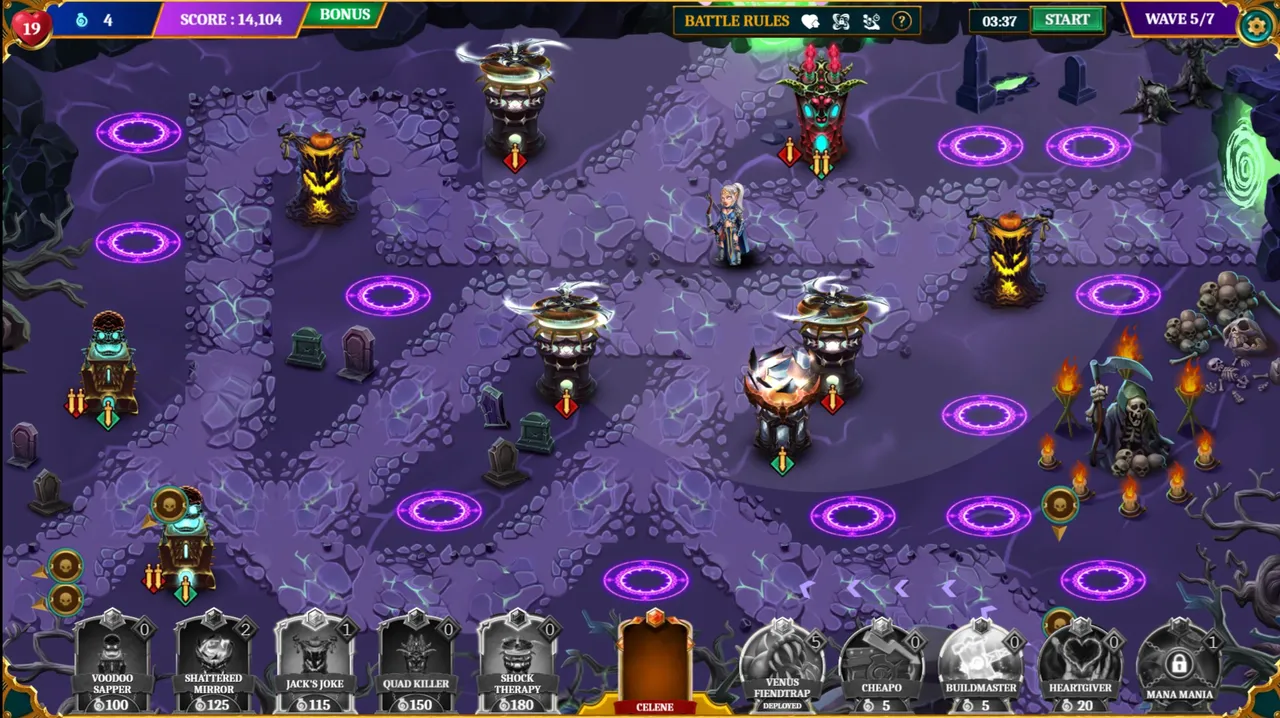
I used Buildmaster since it was finally "un-locked" due to map ruleset...
Using Buildmaster, I upgraded all three of my Shock Therapy's Damage Output.
Upgraded Quad Killers Damage Output
Upgraded lower Voodoo Sapper's Damage Output to Level 2 (this is what I should have used Buildmaster on 😬)
Mana Mania was "locked" this round so I couldn't place it...
This is where things get a little less tricky... the above setup is STOUT. It will lay down a well spread out BEATDOWN on any fiends that show up... from here out, choices matter less... unless the ruleset is crazy!
Upgraded upper Voodoo Sapper's Damage Output
Placed 2nd Jack's Joke to cover the far right Portal lane, again ensuring maximum coverage from it's placement.
Upgraded QK's range to level 2. For 75 Mana, it's not a terrible investment.
Placed a Shattered Mirror to cover the right flank
Upgraded range on Shattered Mirror and for 25 Mana, THIS IS A BARGAIN.
That's all I did... and Mana Mania is still locked lol
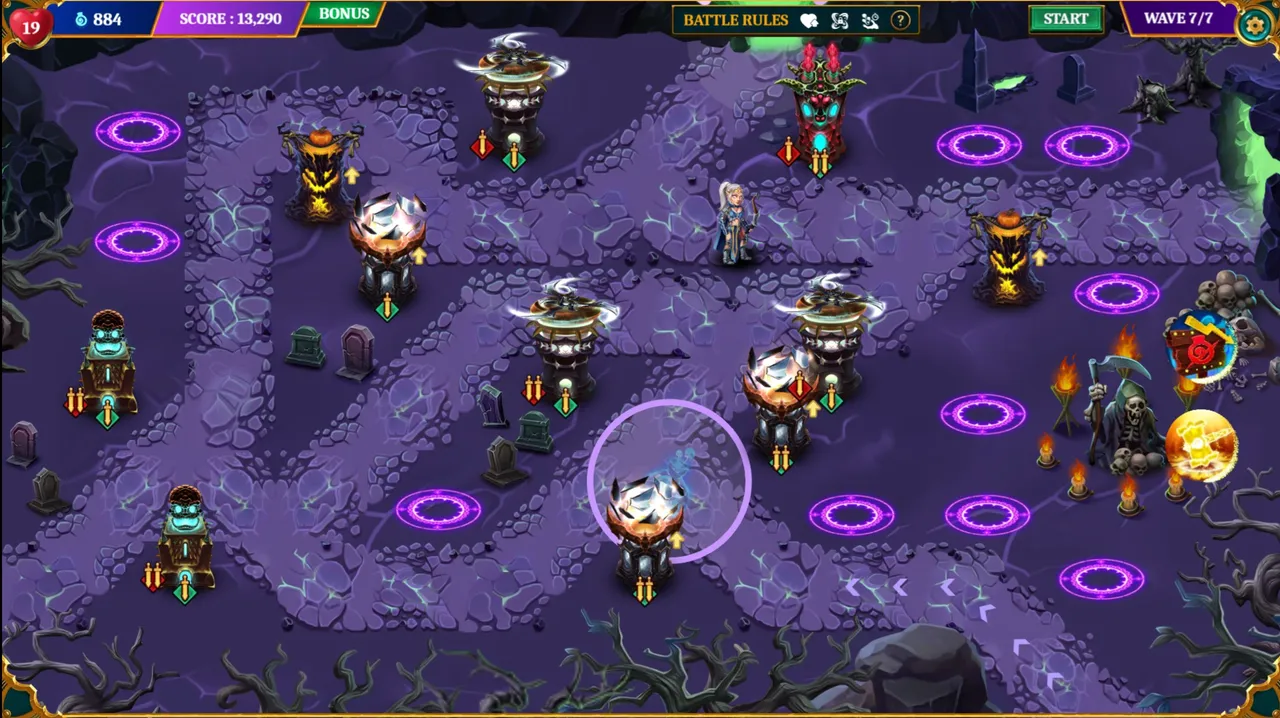
Wave 6... I got a little carried away and forgot to screencap the map on my run... so I had to go back and use the Battle Log to get them from the Replay. Unfortunately, the Replay doesn't have your Loadout at the bottom. Sorry gang... ADHD brain at work.
You can see on the replay it's a bit glitchy and says I have Cheapo and Buildmaster active on the right side and my score is lower, even though I am on a later Wave lol 🤷♂
Anyway... Here's what I did to prepare for Wave 6!
I upgraded all three of my Shock Towers "Chain Multiplier"
I placed another Shattered Mirror to cover the lower entrance AND the right escape route of any fiends that got by the Voodoo Sappers
I placed Mana Mania in an absolutely TERRIBLE location but got lucky lol NO ONE DIED IN THE MANA MANIA... HAHAHA oops.

For the final wave, I made my last few upgrades and moved Mana Mania to what I thought would be a better location. I got lucky it didn't trigger, so I could reposition it!
Same issue as Wave 6... I was "in the zone" and completely forgot to Screencap for y'all... 🤦♂
Placed final Shattered Mirror to help cover the top left lane and upgraded the range of it.
Upgraded Center Shock Therapy's Damage Output to level 2.
Upgraded the bottom Shattered Mirror's range TWICE, making it level 2.
Upgraded the Range of the Shattered Mirror above that one to level 2 as well.
Repositioned Mana Mania to a "hopefully" better location
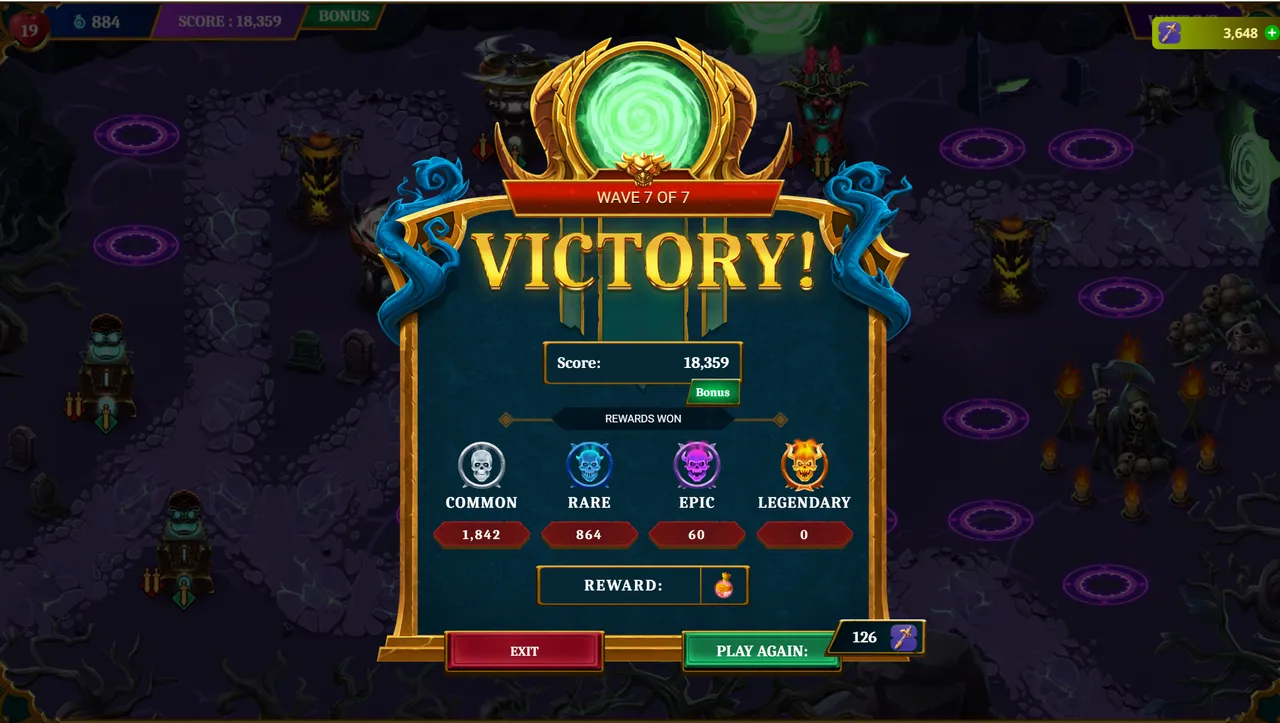
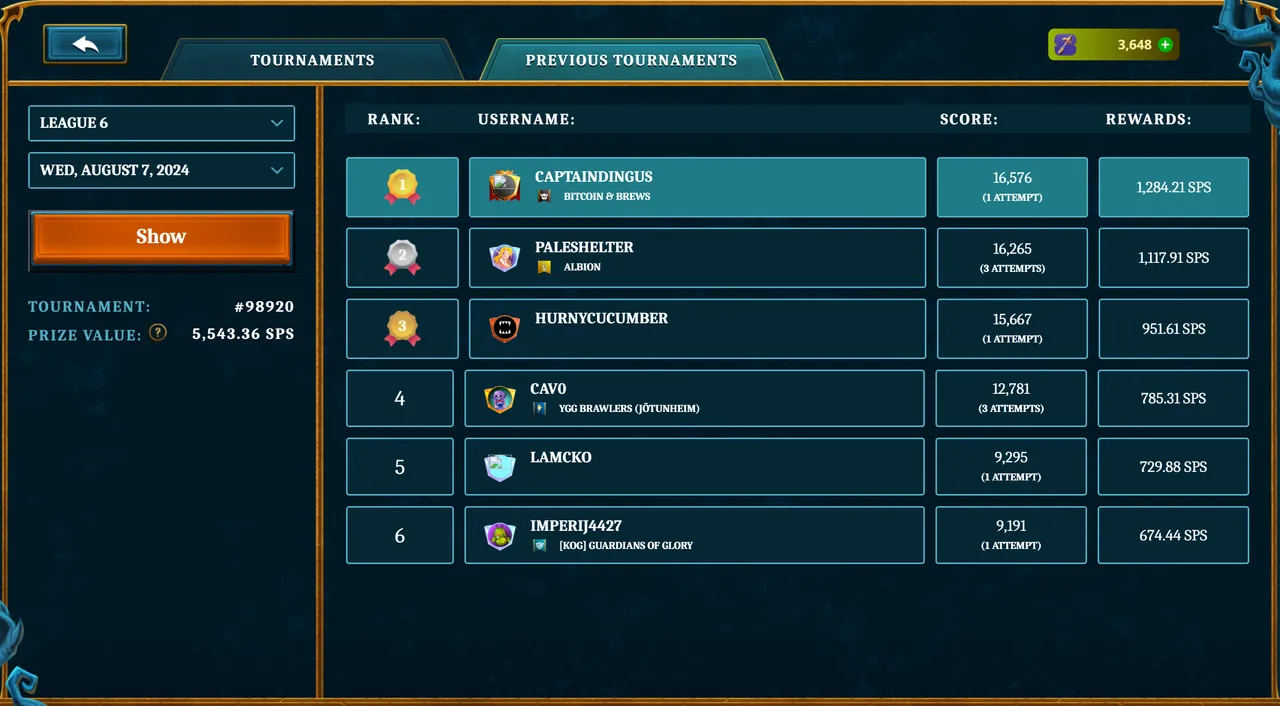
Apparently, right at the same time I was playing so was @hurnycucumber and even though I beat out the current 1st and 2nd... he beat my score by 1,000 points!!
Nice work Hurny, that's impressive!!
I genuinely hope that helps you guys, it took me well over an hour to write this and I used my entire mornings "free time" to write it for y'all.
Please throw a max upvote on this to show your appreciation. There are many other things I could have done with that time but I genuinely want to help you guys get better.
Without upvotes though... I'd rather use my time to earn Crypto, instead of wasting it writing articles that help others only to receive a total of .84 Hive Power in votes... which gives me .42 Hive Power at the end.
.42 Hive Power is like $.075 right now... would you trade an hour+ of your time for SEVEN PENNIES?!? No. I wouldn't expect you to.
I'm not "vote begging"... at least, I don't feel like I am...
I'm just asking for fair compensation... otherwise... I can't really justify writing detailed walkthroughs like this any more.

That's all I have for you today folks!! Thank you for reading and I would LOVE for you to join me in game!!
Naturally, after everything leading up to this moment, I do think Splinterlands and Soulkeep are some of the BEST web3 games out there!
They bring the #play2earn feature to the forefront of development as well as many opportunities for people to earn rewards - whether Player or Investor!!
If you're interested in the future of gaming, it's worth checking out!
You can sign up here: Splinterlands
Cheers 🍻,
- CaptainDingus
#Splinterlands #Soulkeep #play2earn #web3 #NFTGaming #Rebellion #Conflicts #TowerDefense