Creating Typographic Face Effect With Photoshop
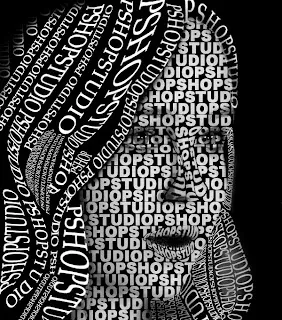
Typography is a science in choosing and arranging letters with its spreading arrangements in the available spaces, to create a certain impression, so that it can help the reader to get the comfort of reading as much as possible Also known as typography, the work or design that uses the arrangement of letters as the main element . In the art of typography, the notion of a letter as a symbol of sound can be ignored. Well that's a glimpse of typography, and now I will try to apply it into the art of Digital Graphic Design using Photoshop. here I will make a typography or composition of letters to create a face shape. maybe a lot of lovers of photoshop digital photo editing lovers who have not understood with this Facial Typography technique. okay we just try to practice. The result of Typography Face Effect that we will make is like above Here are the steps of making:
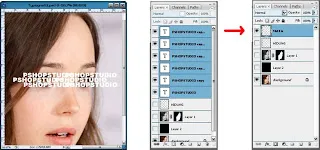
Open the face object then duplicate the Layer premises pressing "Ctrl + J" on the keyboard. then on the Layer duplicate made into black and white by pressing Ctrl + Shift + U on the keyboard.
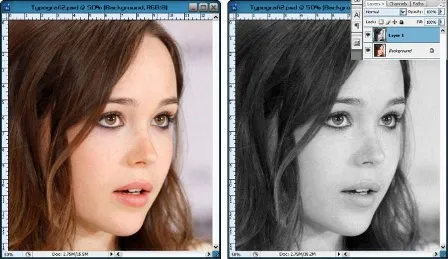
Create a new Layer give black color and place it between the two layers. then on the black-and-white "Layer 1" enter the Layer Mask. and with Brush Tool brush on the hair and background image so it becomes like this:

(In using Brush Tool make sure the foreground color and background is Black and White) Then we go in the Typography for the face. on the face first we make the arrangement of letters on the eyes, nose and lip first because the part of the face is a part that has a contour and we must highlight so that in the end result will appear contour and its 3D impression. and for that we create a different arrangement of letters in all three parts.
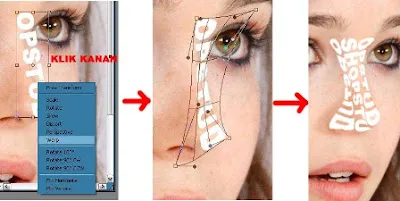
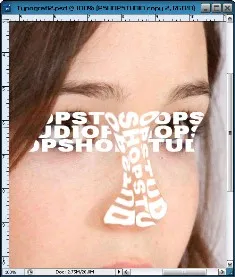
- We begin on the Nose first remove the eye icon on the thumbnail "Layer 1" and "Layer 2" for easy compilation of the text. Select the Horizontal Type Tool and create a Text (the text content is up to you). for the text type as you see fit. here I type the text PSHOPSTUDIO, I delete some letters to fit on the nose, adjust the size to the object of the nose. check "Show Transform Controls" to rotate the text to vertical. Then make the text becomes "Type" because later we will edit the text form to follow the shape of the nose. how on the menu bar select Layer> Rasterize> Type
![]()
Then edit the text form to follow the shape of the nose by pressing Ctrl + T on the keyboard then right click the mouse on the text and select "Warp" then slide the grid lines so that the text follows the shape of the nose. Rebuild the text and repeat the above steps so that the text covers the nose like this:
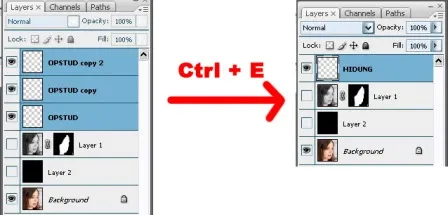
Make a Text Layer by holding down the Shift key and then clicking on the Layer 3 Text, then press Ctrl + E on the keyboard. Then rename the Layer text with the name "NOSE"
- then we move to the eye. make again a text, the size should not be too large to adjust the eye so that the contours of the eyes will be more clearly visible later, and also because in other parts we will make the text with a larger size so it will look the difference with the other faces. Before making the text on the eyes, remove the first eye icon on Layer "Nose" and arrange the text on the eye. the arrangement of texts should cross each other between the text and the text below and so on. unless the text of each arrangement is different from the words. because if the composition of the text is flat will look a vertical line that is less good.

After that just copy 3 layer text to the other eye. then combine all the text layers in the eye by holding down the Shift key and selecting all the Text Layers and press Ctrl + E on the Keyboard. Then rename the Layer "Eyes"
Show the eye mark on the "NOS" layer then erase it with the Erase Tool text section of the "EYE" layer exposed to the text "NOS" as well as missing text on the hair background. So it looks like this:
For the lips enter the text again and then edit the text form to follow the shape of the lips. (for how to look back at step 3). Rejoin the Text Layer on the lips (see the bottom way in step No.3) then rename the Layer to "Lips". it looks like this:

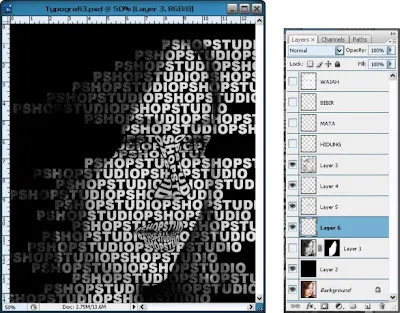
For the rest of the face the way it stays the same enter Text, give a larger size of the text in the "EYE" Layer. then arrange the text randomly so that no vertical line appears because here I only use only 1 word "PSHOPSTUDIO" repeated. here the layer will be very much, so after finished compiling the text combine all the Layer text as in step no.3 above, then change the name of the Layer becomes "FACE". and the composition is like this:
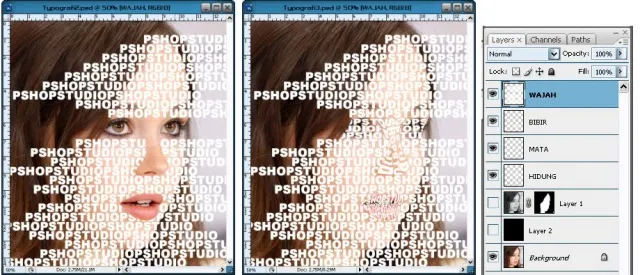
Well now we make Typography of all the text. previously raised the eye icon on "Layer 1" (Black and White Image) and also "Layer 2" (Black Background). otherwise remove the eye icon on Layer "Lips", "EYE" and "NOSE". then back to Layer "FACE". Hold down the "Ctrl" key on the keyboard and click on the "FACE Layer" thumbnail then the text on the "FACE" Layer will be selected (the blinking selection flag).
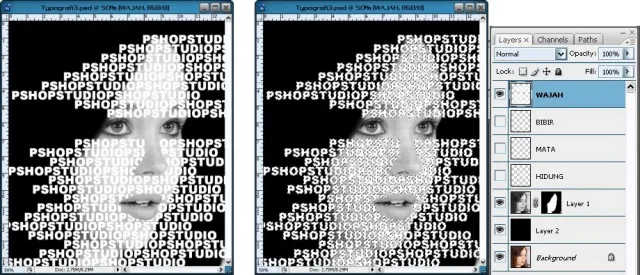
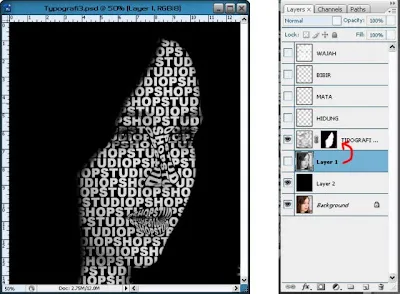
Let it be selected like that, then click "Layer 1" then press "Ctrl + C" then "Ctrl + V". it will show a new Layer that is "Layer 3". Layer this is the typography. to see the result remove eye icon on Layer "FACE" and "Layer 1". it will look the effect of typography.

Repeat step 7 above for the Eye, Nose and Lip section. (for the selected eye is the "EYE" Layer as well as the nose or lips, selection according to the Layer). the result would be like this:
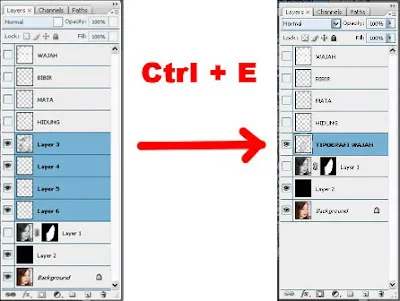
Merge "Layer 3" "Layer 4" "Layer 5" "Layer 6"
(see the way at the bottom of step No.3) and rename the layer to "FACE TYPOGRAPHY"
Then we delete the missing text on the face by returning to "Layer 1" click Layer Mask on Layer 1 then slide up on "FACE TYPOGRAPHY" Layer then Layer Mask on Layer 1 will move and enter in Layer " FACIAL TYPOGRAPHY ". automatic text that is missed on the face will be erased.
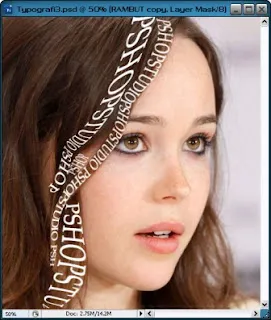
then we go into the hair section, in this section we will use the Pen Tool to make the text to easily follow the hair flow. just first remove all the eye icons on the thumbnail layer except Layer "Background" then select Pen Tool and make a line following the flow of hair like this.

then select "Horizontal Type Tool" then point the cursor at the beginning of the beginning we make a line with the Pen Tool before, nnti Cursor icon "Horizontal Type Tool" will change iconnya. just click and start typing text, automatic text that we type will follow Pen Pen line. press "Esc" on the keyboard to remove the Pen Tool line. then slide the text position according to the hair.

(here I use another typeface with the typeface text on the face) then edit the text form following the hair shape, the way like Step No.3 above. Change the text to "Type", press Ctrl + T and then slide the grid so that the text form follows the hair shape (See Step No.3).

here I change the shape of the lowered letters at the bottom, of course you can change the form of text according to your imagination, because this is a work of art, so you are free to experiment. like the example here I will make some more text again (use Pen Tool for the text flow) and I change the shape differently like this:
Repeat this step No. 9 until the text covers all parts of the hair

(in changing the shape of the text in this hair use your imagination, change the shape to be as unique as possible)
When finished, combine all of the Hair Text Layer and change the layer name to "TYPOGRAPHY HAIR" (see step no.3 below). to see the results come back "Layer 2", "FACIAL TYPOGRAPHY" and "TYPOGRAPHY HAIR"
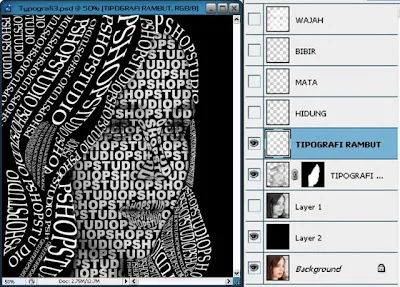
For Finishing, enter "New Layer". then select the Brush Tool ", set with 0% Hardness and 50% Opacity brush on the part that I show in the picture below, to more out the 3D impression.
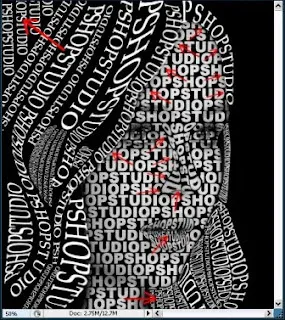
The result will be like this

Can also if you want to change the color of hair and face, how to click 2 times on thumbnail layer "TYPOGRAPHY HAIR" and select "Color Overlay" change the color up to you, reduce "Opacity" to 20%, so the color is not too over.
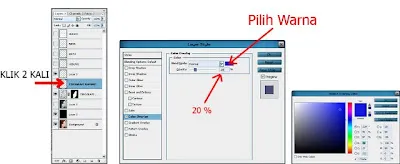
Do also on the layer "FACIAL TYPOGRAPHY" with different colors. the result is like this:
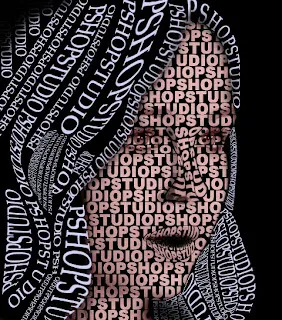
Or you can also use the staining technique with the Gradient Tool. using 2 different colors or more.