Intro to Music Production Lesson 6: Tips on Frequency Modulation Synthesis
This lesson will present to you a few great features of Ableton Live’s primary built-in synthesizer, Operator. Operator is a powerful synthesizer with many musical applications. You can create a very diverse range of sounds by adjusting various parameters. With Operator, we are making use of functions that demand additional study and experimentation. Our main focus will be utilizing the algorithm feature for frequency modulation synthesis.
Frequency Modulation Synthesis
A massive amount of different sounds can be made with FM Synthesis. The timbre of a simple waveform, such as a square, triangle, sine, or sawtooth, is changed by modulating the frequency with a frequency modulator that is within the audible range. If the frequency modulator’s signal is harmonic with the oscillator, this results in a more complex waveform that has more harmonics. Harmonics are integer multiples of the fundamental frequency. Inharmonic frequencies are non-integer multiples, which can sometimes create a bell-like or percussive sound.
So basically, you’re just creating a more complex waveform that is harmonic or disharmonic. You’re creating a brighter timbre. Even a modulated sine wave can have very full harmonics and a gritty sound.
The technical definition of Frequency Modulation Synthesis is as follows (From Wikipedia):
"In audio and music, frequency modulation synthesis (or FM synthesis) is a form of audio synthesis where the timbre of a simple waveform (such as a square, triangle, or sawtooth) is changed by modulating its frequency with a modulator frequency that is also in the same or similar audio range, resulting in a more complex waveform and a different-sounding tone that can also be described as "gritty" if it is a thick and dark timbre. The frequency of an oscillator is altered or distorted, "in accordance with the amplitude of a modulating signal.""
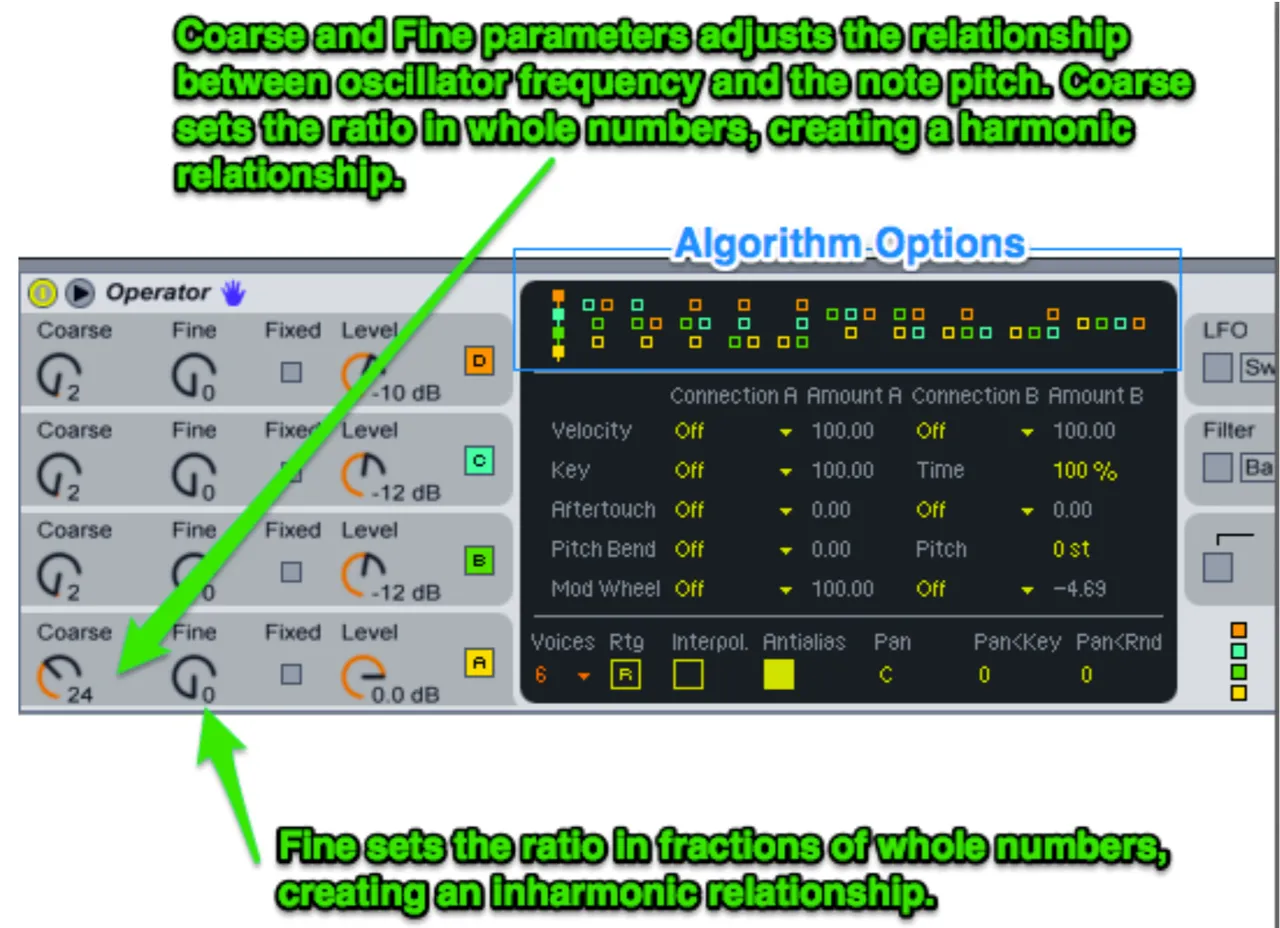
Coarse and Fine Adjustment
Operator has two main parameters with which to adjust the oscillator. These parameters are Coarse and Fine.
Coarse is a frequency multiplier. The frequency will be multiplied by its coarse parameter. For example, if Coarse is at 1, an A4 note will be 440Hz; if the Coarse is at 2, the frequency will be 880Hz (an octave higher: A5); if Coarse is set to 3, the frequency is 1320Hz - E5. The Coarse knob makes octaves only in powers of 2. By contrast, the Fine “knob” is like adjusting a guitar tuner – you can get very small increments that will result in inharmonic waveforms.
Algorithm Adjustment
Operator has four oscillators that can each create different waveforms. These can be combined together to create a richer sound. By experimenting with different preset combinations of how these four oscillators are combined, you can create vastly different sounds. For example, a horizontal line would mean that none of the oscillators are modulating each other – none of the oscillators are routing through another one. Try changing that to a Vertical line, which means Oscillator D modulates C, then B, then finally A. By experimenting with various waveforms, frequencies, and amplitude levels, you can create an extremely wide variety of sounds.
Manual and Automatic Automation
By creating a Group (Ctrl+G) and creating a Macro control for a function of Operator, you can turn that parameter into a “knob” that can be manually controlled. In this case, let’s try it for the Algorithm setting:
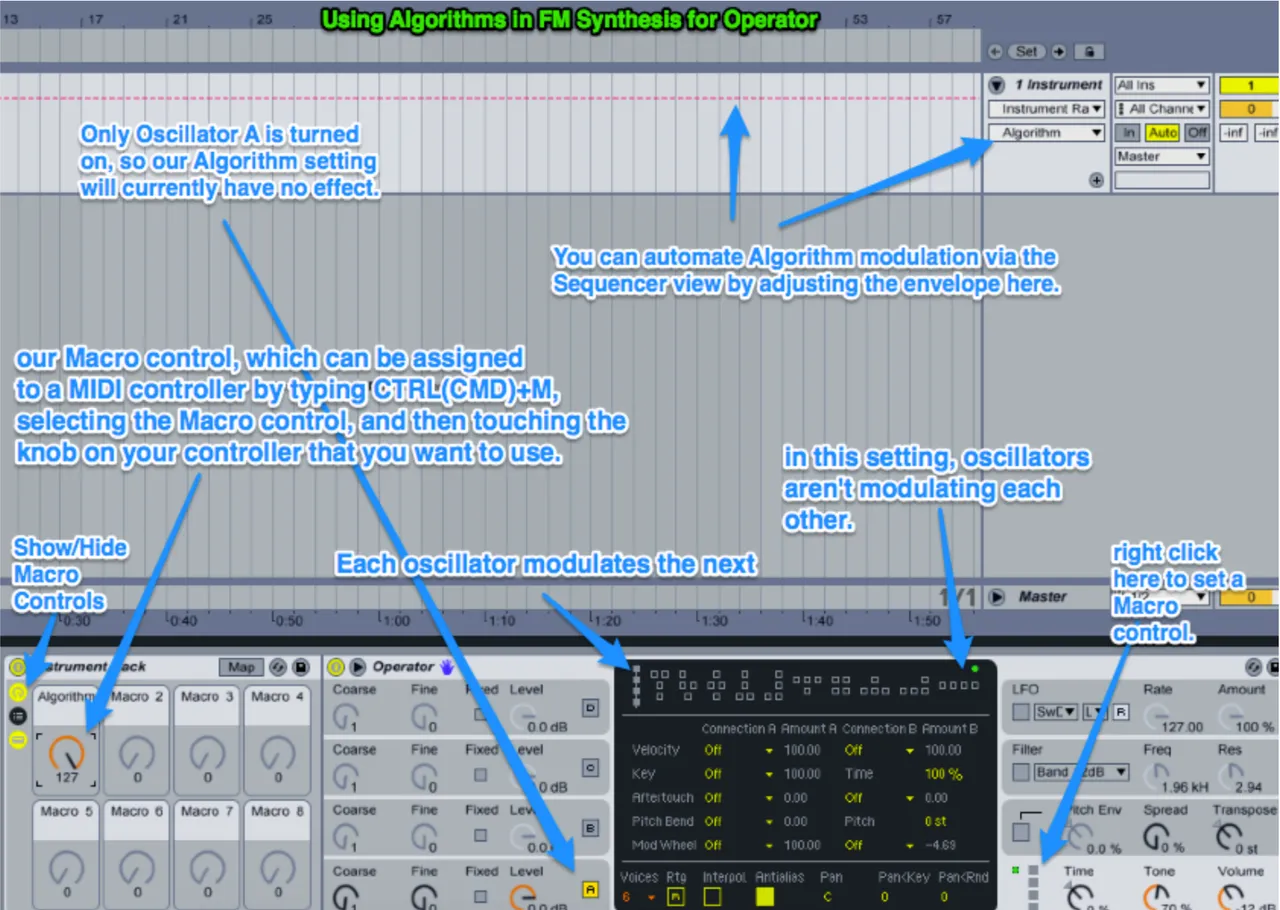
Macro Controls allow for real-time adjustment of parameters, allowing for more intuitive experimentation and creative control when utilizing a MIDI controller. Using macro controls are also a simple way to create a “shortcut” knob to a chosen parameter. You can adjust Macros with your curser/mouse – you do not necessarily need a MIDI controller.
Feedback
Another cool thing you can do is to make an oscillator modulate itself via the feedback option. This affects the pitch. Higher feedback creates a more complex waveform.
Remember these few important tips to help you get started with some basic applications of the Operator synthesizer. FM Synthesis is a deep topic that should be further researched in order to have a better understanding of how we are shaping our waveforms. It may be useful to have a greater understanding of the physics of waveforms in order to develop your skills with waveform creation.
The following resource may prove valuable in deepening your appreciation of harmonics:
http://www.physicsclassroom.com/class/sound/Lesson- 4/Fundamental-Frequency-and-Harmonics
And most importantly, remember to let go and experiment with all of these settings and have fun and create all manner of sounds, from the pleasant and musical to the bizarre and wacky. Have a nice day. ☺