
Monoeci Masternode Setup Guide
Update History MM/DD/YYYY
10/21/2019 - Caution
09/05/2019 - Updated Format and Added Commands
09/04/2019 - Initial Doc
Caution: XMCC does not currently have active development
Do you need to install Monoeci Masternode on Ubuntu 16.04? Here
Ubuntu 18.04 LTS
The following guide assumes that you have a fresh installation of a Linux operating system with root access, or an account with sudo permissions.
DO NOT INSTALL AND RUN A MASTERNODE UNDER THE ROOT USER. The guide details how to add a non-root user, under which the necessary processes will run.
Server Setup:
1. Non-root User Setup
Do not replace fields starting with $, like the following; it is meant to be copied and pasted without edits
sudo su
USERNAME=xmccops
useradd -m -s /bin/bash -G adm,systemd-journal,sudo $USERNAME && passwd $USERNAME
su $USERNAME
cd
If you fail to enter the same password for the confirmation, use the following command to update your password
passwd $USERNAME
2. Swap Setup:
Configure the server to have at least 4GB of memory (System RAM + SWAP = 4GB).
Set up a SWAP file:
We can see if the system has any configured swap by typing:
sudo swapon -s

If you only get back the header of the table, as I've shown above, you do not currently have any swap space enabled.
You can also use command:
free -m
If swap is 0 then it's not configured
Check available space on the hard drive partition:
df -h
If enough space is available create the swap file:
Generally, an amount equal to or double the amount of RAM on your system is a good starting point.
Command:
sudo fallocate -l 2048M /swapfile
We can see that 2GB have been allocated by typing:
ls -lh /swapfile
sudo chmod 600 /swapfile
Verify it has the correct permissions:
ls -lh /swapfile
Set up the swap space:
sudo mkswap /swapfile
Enable the swap space:
sudo swapon /swapfile
We can verify that the procedure was successful by checking whether our system reports swap space now:
sudo swapon -s
If the server is rebooted it will lose the swap space, make it permanent:
cat /etc/fstab
echo -e "/swapfile\tnone\tswap\tsw\t0\t0" | sudo tee -a /etc/fstab
cat /etc/fstab
The swappiness parameter configures how often your system swaps data out of RAM to the swap space. This is a value between 0 and 100 that represents a percentage.
cat /proc/sys/vm/swappiness
For a Desktop, a swappiness setting of 60 is not a bad value. For a VPS system, we'd probably want to move it closer to 0.
sudo sysctl vm.swappiness=10
cat /proc/sys/vm/swappiness
Persist the setting through reboot:
sudo cat /etc/sysctl.conf
echo "vm.swappiness=10" | sudo tee -a /etc/sysctl.conf
sudo cat /etc/sysctl.conf
Another related value that you might want to modify is the vfs_cache_pressure. This setting configures how much the system will choose to cache inode and dentry information over other data.
cat /proc/sys/vm/vfs_cache_pressure
As it is currently configured, our system removes inode information from the cache too quickly. We can set this to a more conservative setting like 50 by typing:
sudo sysctl vm.vfs_cache_pressure=50
cat /proc/sys/vm/vfs_cache_pressure
Persist the setting through reboot:
cat /etc/sysctl.conf
echo "vm.vfs_cache_pressure = 50" | sudo tee -a /etc/sysctl.conf
cat /etc/sysctl.conf
sudo sysctl -p
3. Monoeci Installation:
Update and install prerequisites
Run the following command:
sudo apt-get update && sudo apt-get upgrade -y && sudo apt-get dist-upgrade -y && \
sudo apt-get -y install \
software-properties-common libzmq3-dev pwgen \
git libboost-system-dev libboost-filesystem-dev \
libboost-chrono-dev libboost-program-options-dev libboost-test-dev \
libboost-thread-dev libboost-all-dev unzip \
libminiupnpc-dev python-virtualenv build-essential \
libtool autotools-dev automake \
pkg-config libssl-dev libevent-dev \
bsdmainutils && \
sudo add-apt-repository ppa:bitcoin/bitcoin -y && \
sudo apt-get update && \
sudo apt-get -y install \
libdb4.8-dev libdb4.8++-dev
Download, compile, and install Monoeci Core:
Ensure you are logged in as the user you created in Step 1
whoami
Run the following commands:
cd
git clone https://github.com/monacocoin-net/monoeci-core.git
cd monoeci-core
./autogen.sh && ./configure && sudo make install
cd
sudo rm -R monoeci-core
Perform an initial start to create folders and configuration
monoecid --daemon && sleep 30 && monoeci-cli stop
cd .monoeciCore
rm -R blocks chainstate peers.dat
Copy and paste all of the following (changing the values of URMASTERNODEPRIVKEY and URMNEXTERNALIP to yours):
USERNAME=$(pwgen -s 16 1)
PASSWORD=$(pwgen -s 64 1)
MNPRIVKEY=URMASTERNODEPRIVKEY
MNEXTERNALIP=URMNEXTERNALIP
cat << EOF > ~/.monoeciCore/monoeci.conf
rpcuser=$USERNAME
rpcpassword=$PASSWORD
rpcallowip=127.0.0.1
server=1
listen=1
daemon=1
maxconnections=24
masternode=1
masternodeprivkey=$MNPRIVKEY
externalip=$MNEXTERNALIP
addnode=62.113.206.96
addnode=91.92.128.17
addnode=185.111.216.79
addnode=195.114.96.57
addnode=85.25.51.55
addnode=62.75.211.196
addnode=51.15.74.190
addnode=159.69.89.202
addnode=62.14.46.139
EOF
Start Monoeci
monoecid
monoeci-cli getinfo
Verify that your server is syncing with the blockchain, type:
monoeci-cli getblockchaininfo
Ensure that "Headers" is increasing. Once this reaches the block height, it will begin syncing blocks.
Use the following command to watch the headers increase over time (it will automatically refresh after 30 seconds)
watch -n 30 "monoeci-cli getblockchaininfo | grep headers"
When the headers stop increasing use the following command to watch the blocks increase over time (it will automatically refresh after 30 seconds)
watch -n 30 monoeci-cli getblockcount
Verify that your server is operational and synchronized, type:
monoeci-cli mnsync status
If your server is synchronized you should see:
{
"AssetID": 999,
"AssetName": "MASTERNODE_SYNC_FINISHED",
"Attempt": 0,
"IsBlockchainSynced": true,
"IsMasternodeListSynced": true,
"IsWinnersListSynced": true,
"IsSynced": true,
"IsFailed": false
}
If the assetID, is not 999, your server did not finish its synchronization and your masternode will not work! Keep waiting
Use the following command to watch it until it does (it will automatically refresh after 30 seconds)
watch -n 30 monoeci-cli mnsync status
Create a systemd unit file for monoecid, copy and paste the entire block of text
echo \
"[Unit]
Description=Monoeci daemon

[Service]
User=$USER
Type=forking
ExecStart=/usr/local/bin/monoecid -daemon -pid=$HOME/.monoeciCore/monoecid.pid
PIDFile=$HOME/.monoeciCore/monoecid.pid
Restart=always
RestartSec=10

[Install]
WantedBy=multi-user.target" | sudo tee /lib/systemd/system/monoecid.service
Stop monoecid and apply ownership to the non-root user of all files created:
monoeci-cli stop && sleep 30 && sudo chown -R $USER:$USER ~/
Test the unit file:
sudo systemctl start monoecid
Check the status of monoecid, it should return active (running). If the status doesn't send you back to a command prompt, exit the status details by pressing CTRL + c
sudo systemctl status -n 0 monoecid
If the systemd unit file works correctly (showing active and running) enable it at boot:
sudo systemctl enable monoecid
Configure your firewall:
sudo ufw allow 24157/tcp
sudo ufw allow ssh
sudo ufw -f enable
sudo systemctl enable ufw
4. Sentinel Installation:
Download Sentinel:
cd && git clone https://github.com/monacocoin-net/sentinel.git && cd sentinel
Customize configuration file:
Ensure USERNAME variable is set
echo $USERNAME
If it's not set then use the following command (change URUSR with the username used in Step 1)
USERNAME=URUSR
sudo sed -i "/#monoeci_conf/c\monoeci_conf=/home/$USERNAME/.monoeciCore/monoeci.conf" sentinel.conf
Check that the config was set properly:
cat sentinel.conf
You should see the following at the top (for URUSR you should see your username set in Step 1):
# specify path to monoeci.conf or leave blank
# default is the same as monoeciCore
monoeci_conf=/home/URUSR/.monoeciCore/monoeci.conf
Run commands:
virtualenv ./venv
./venv/bin/pip install -r requirements.txt
./venv/bin/py.test ./test
Make sure you receive a successful test:
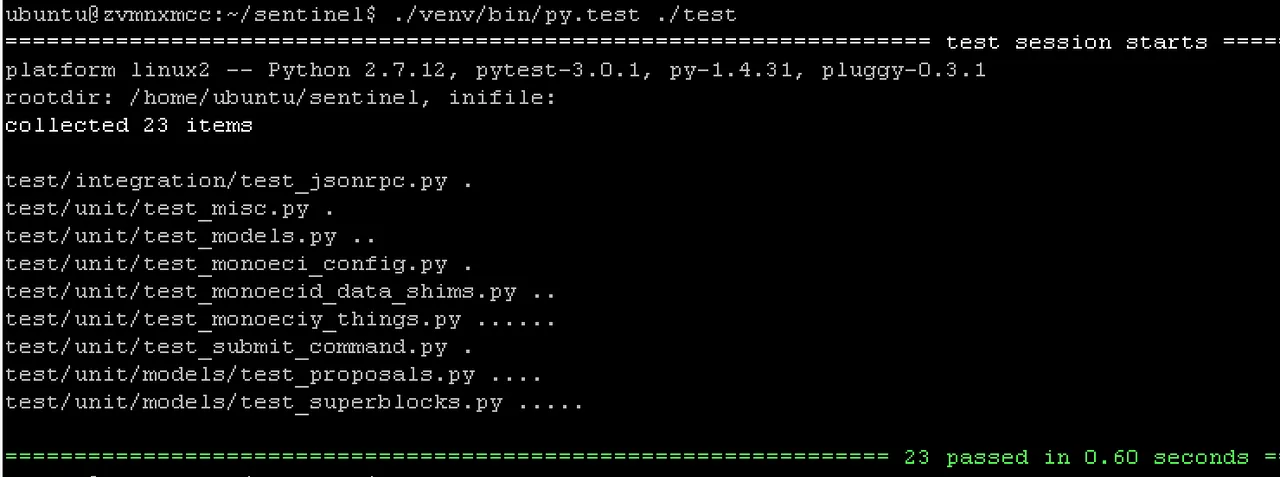
Add an entry to your crontab:
crontab -e
Add the following (change URUSR with the username used in Step 1):
* * * * * cd /home/URUSR/sentinel && ./venv/bin/python bin/sentinel.py >/dev/null 2>&1
Reboot your node to ensure all services start at boot
sudo reboot
After your node is back up, log into the node and su to your user created in Step 1
su URUSR
sudo systemctl status -n 0 monoecid
Congratulations! Your masternode is now configured and running!
If you have any problems, suggestions, or questions please let me know in the comments!