Fortunately beginning with Zcash mining is extremely straightforward. You don't have to download the full Zcash blockchain or oversee cumbersome order line mineworkers with manual guidelines; you can mine specifically to a trade or to an equipment wallet, for example, Trezor or Ledger Nano S. Obviously, you ought to dependably do your due ingenuity to guarantee your coins will be appropriately bolstered before sending them anyplace.
With the end goal of this guide, we will do an itemized stroll through of setting up and utilizing the extremely prevalent Nvidia EWBF Miner. On the off chance that you have AMD cards, mining Ethereum is generally your most productive alternative.
Nonetheless, on the off chance that you have Nvidia cards, or in case you're in the market to purchase new cards and can't locate any all around valued AMD cards, at that point mining Zcash on Nvidia GPUs is still extremely beneficial with the EWBF Miner, which is exceptionally advanced to get the most extreme execution out of Nvidia's Cuda centers.
The entire procedure of getting set up, downloading your excavator, designing Windows, and setting up your cluster document to run should take under 20 minutes. Take after alongside the means in the video control beneath, or read on for a full content guide.
The Full Zcash Mining Text Guide:
Here are some great motivations to mine Zcash:
Mining can be an awesome approach to finance the buy of another, top of the line GPU (or two, or three… ).
Since Zcash is effectively exchanged for bitcoins (BTC), it's a modest approach to gradually develop a holding position in Bitcoin. Numerous powerful individuals are exceptionally bullish on Bitcoin's future prospects.
BTC can without much of a stretch be sold for money, so mining ZEC can be a decent approach to in a roundabout way fill your financial balance or win money. ZEC can likewise be sold specifically on some real trades.
Mining can be a shabby section ticket to the Zcash markets, which are adored by dealers for their high instability. In case you're a decent as well as fortunate dealer, you can expand your benefits.
As far back as ZEC hit the market, it's been one of the most elevated evaluated altcoins in the market, engaging with Ethereum to be the most astounding estimated altcoin and cresting at over $400 in June 2017.
Building a huge ZEC position through mining now may enable you to exploit value gratefulness later on with less hazard than you'd confront by simply purchasing ZEC. How about we separate this thought somewhat further.
Mining and holding crypto is like the familiar proverb of purchasing low and offering high, aside from the way that most purchasers don't know how to do specialized examination, so they purchase and offer at the wrong circumstances. They purchase high amid explanatory cost increments and offer low amid what could be typical value redresses on proceeded with upward patterns.
Purchasing rigging and mining cryptographic money with it enables you to claim a pay delivering resource in the apparatus itself, with secondary selling resale esteem holding up exceptionally well and notwithstanding increasing in value. GPUs bought for mining in 2015 and 2016 were regularly sold at a benefit in 2017 because of popularity in the market!
Enabling your apparatus to win cash and offering that rigging when you achieve your objective can enable you to profit back on the rigging and pocket the crypto produced as benefit.
How Zcash's Blockchain Differs from Bitcoin's
Zcash utilizes an alternate hashing calculation than Bitcoin's, making it incongruent with the unique hashing equipment (ASICs) created for Bitcoin mining. Zcash's calculation is known as Equihash. It's a memory-hard calculation; it's intended to oppose the advancement of Zcash-mining ASICs. Rather, Equihash is intentionally most appropriate for GPU mining.
Zcash likewise varies on the grounds that it has a worked in security convention called zk-SNARKS, which is intended to make it the main protection based crypto in the market (contending with other security coins, for example, Dash and Monero).
Zcash has a 2.5-minute piece time, contrasted with Bitcoin's 10-minute squares, and it delivers a square reward of 10 coins for each explained square.
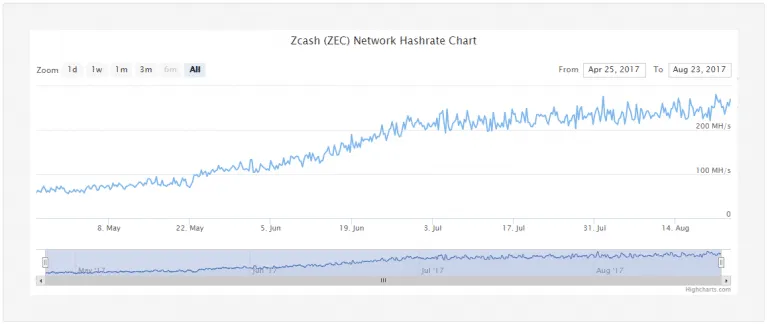
So if the amount of hardware dedicated to Zcash mining is rising, why aren’t blocks being mined more and more rapidly to decrease the average 2.5-minute block time?
The answer? Difficulty. By automatically adjusting the computational difficulty of solving a block, the Zcash blockchain is able to maintain 2.5-minute intervals. You’ll notice that difficulty closely tracks hashrate, and it, too, has seen exponential growth this year:
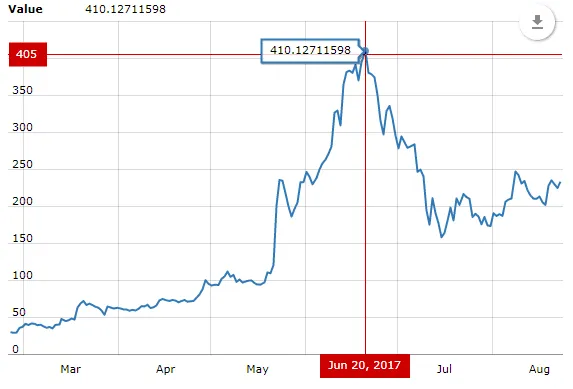
The takeaway here is that the hashrate has taken after the value blast, which truly took off in May and June 2017. What an astonishing bull run! Up to over $400 USD from under $50 USD in a couple of short months.
Computing Zcash Mining Profitability
Since we have a clearer comprehension of the Zcash blockchain and critical ideas, for example, trouble, it's an ideal opportunity to play out some monetary counts.
To start with, go to whattomine.com, which gives state-of-the-art figures to current costs, piece times, and system hashrates (as measured in megahashes every second, or MH/s, indicating a great many computations for each second).
Module your card at the best and tap on the model number (the red square beneath), and the hashing and productivity data will be shown underneath (click Equihash to influence it to blue so it will ascertain).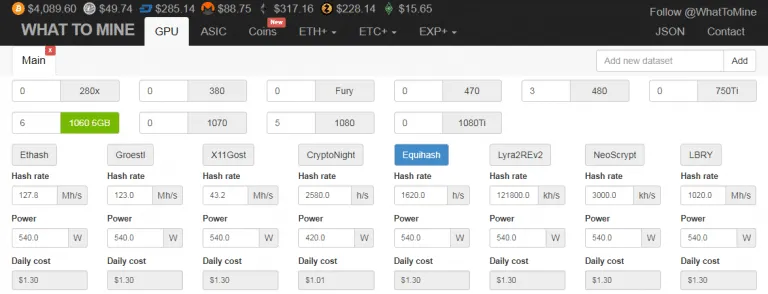
Choosing Your GPU Hardware
Experimentation with various GPU selections in the calculator will reveal a card with the best price-to-performance-to-power consumption combination (expressed as MH/s per currency unit). Keep in mind that AMD cards outperform Nvidia cards for Ethereum mining purposes on the EthashAlgo, but AMD doesn’t beat Nvidia when it comes to the Equihash algorithm using the EWBF Miner.
The card should have at least 1 GB of RAM, or it won’t be able to properly mine Zcash. This is a correction from the video, as EWBF supports GPUs with just 1 GB of RAM, compared to Ethereum’s 3 GB requirement. However, many older cards may not be energy efficient enough to turn a profit, so check on whattomine.com by entering your card’s info.
Pro tip: check out the following GPUs: Nvidia’s GTX 1060-6GB/1070/1080 Series; AMD’s RX 470/480, RX 570/580, R9 Series, or HD 7990/7950 (if used cards are available, try to get them from a gamer instead of a miner, with a warranty if possible). As with everything, do your own due diligence to evaluate GPUs based on their hashrates, power requirements, availability, and price.
For a solid budget card, the Nvidia 1060 with 6 GB of RAM is recommended (when in stock and not ridiculously overpriced due to the card shortages we’ve been seeing in summer 2017). This GPU will beat the AMD 480s when it comes to mining Zcash!
Mining Zcash on your PC (Windows)
If you’re reading the newbie’s guide to Ethereum mining and have a GPU that’s powerful enough to make it worthwhile, we’re going to assume you’re running Windows, so we’ll focus on mining Zcash on that platform.
- Get Your Video Card Drivers Installed
AMD GPUs: Head over to amd.com to download your GPU drivers. Go to amd.com, choose Support & Drivers, enter your GPU information, and click Display Results.
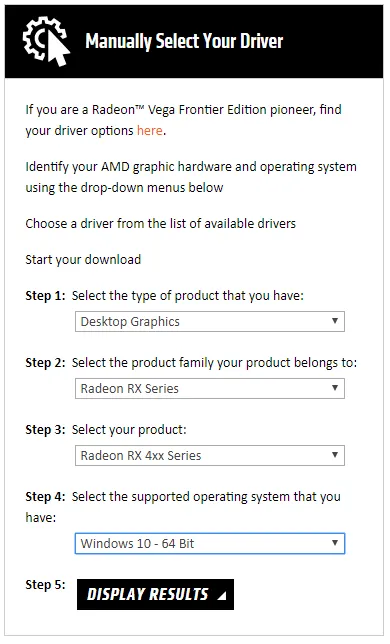
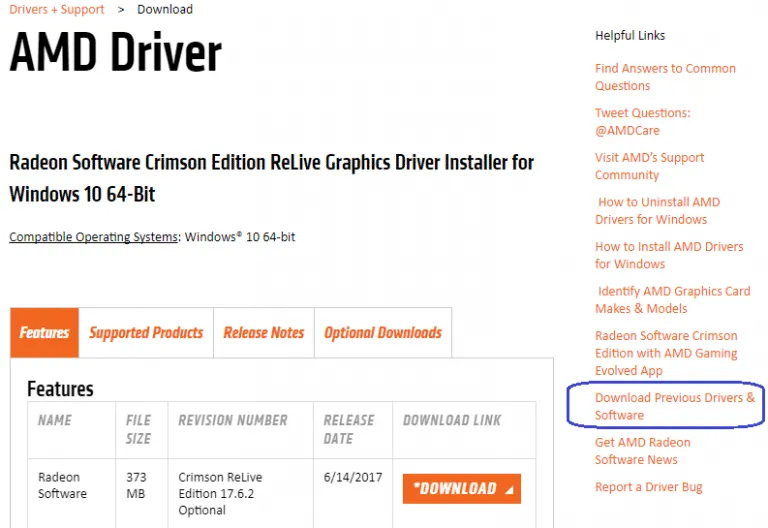
You can click the Download button for the current driver or choose Download Previous Drivers & Software on the right-hand side. This will allow you to choose an older version that will be a great driver for mining based on your card:
R9 and older: use 15.12
RX 400 Series: use 16.9.2 or 16.10.3
RX 500 Series: because these are newer, I’d recommend going with current driver for now
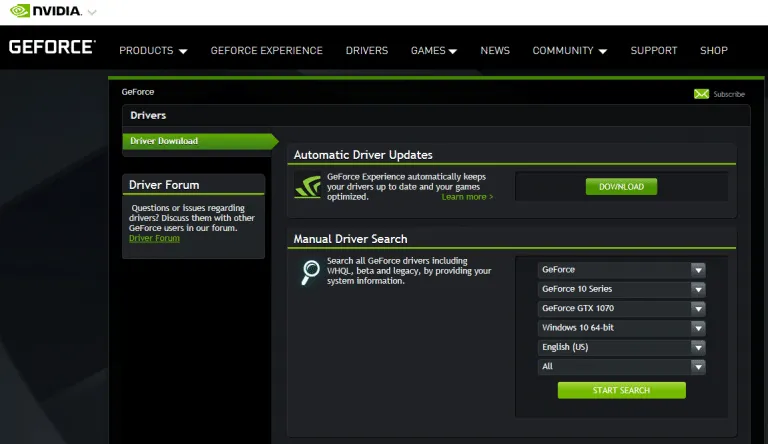
Nvidia GPUs: To get the latest Nvidia GeForce drivers, go to https://www.geforce.com/drivers. Enter your card info, and click Start Search. Download the current version from the results.
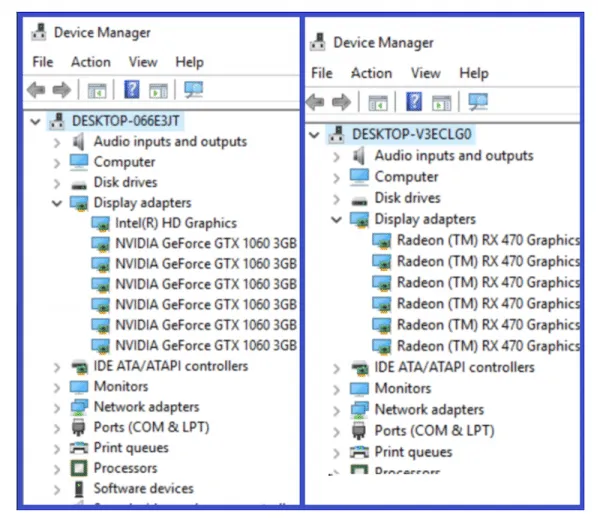
nstall your GPU drivers as you normally would and reboot. You’ll know your GPU has been recognized correctly if you go to Device Manager (search it in Windows search bar) and you don’t see any warning marks on your GPUs. They should look like this:
Troubleshooting tip: Some miners have had success installing all GPUs at once, then installing the drivers. Others prefer to install only one card, install the drivers, shut down the system, and then install the rest of the GPUs.
I’ve had success both ways, so if you run into an issue with one method, delete the drivers and try the other method. If you need to remove your drivers, use the DDU (Display Driver Uninstaller) program from Guru3d.com to remove everything cleanly, then start over.
- Get a Zcash Wallet Address
In order for you to have a place to send the coins you mine, you’ll need a Zcash wallet address. Go to Z.cash, the official Zcash website, and download the Zcash client.
You can also use a hardware wallet such as Trezor, Ledger Nano S, or Jaxx, a popular supported web wallet. You can even mine directly to exchanges that have support, which is primarily what I’ve been doing since November 2016 (I’ve been mining to Bittrex).
- Download the EWBF Zcash Miner
The next step is to download the EWBF Miner. Only download miners from the official threads in BitcoinTalk. If you scroll down, you’ll see a couple of different download options. We’re going to use the Mega download link.
Locate the most recent version of the miner and download the zip file. Let that run (it doesn’t take long), and once you have it downloaded, extract it to your desktop so that you can work with it.
Note that when you download self-contained miner files, Windows may provide a warning. If you’ve used EWBF’s official download links, you can ignore this.
- Tweak Some Windows Settings before Mining
Some settings should be modified in Windows to get you ready for mining. First, you don’t want your computer to go into Sleep mode, as it will interrupt your mining. Go to your Power Settings and set Turn Off/Sleep to Never.
Next, you’ll want to modify your system page file and manually set it to 16384 MB (16GB). Right click “This PC” from Windows Explorer and choose “Properties”. Click on “Advanced system settings”. On the Advanced tab, click “Settings” (under Performance).
Click on the Advanced tab and click “Change” under Virtual Memory. Uncheck “Automatically manage paging file”. Click the radio button for Custom Size and enter 16384 for the Initial size and Maximum size. Then click OK, Apply, OK.
To minimize the disruptions to your mining and settings, you may also want to disable Windows Updates. If you feel more secure leaving updates on, you can do so, but keep in mind there are frequent updates that will reboot your system and stop your mining.
Finally, If you’re running Windows Defender or some other antivirus program, add an exclusion to it so that it doesn’t flag the entire EWBF folder.
- Join a Mining Pool and Configure Your Mining Bat File
The next step is to set up pool mining. Solo mining is unlikely to make you any Zcash unless you have a warehouse full of GPUs.
Your first step will be to choose a Zcash mining pool. There are plenty to choose from, but we recommend Flypool. The home page or help section of a mining pool site will likely contain instructions on how to mine on its pool using the popular EWBF Miner.
On zcash.flypool.org, you’ll see a section called Windows – Nvidia. The EWBF Miner is in this first section. You’ll need to copy the miner script example, as shown below:
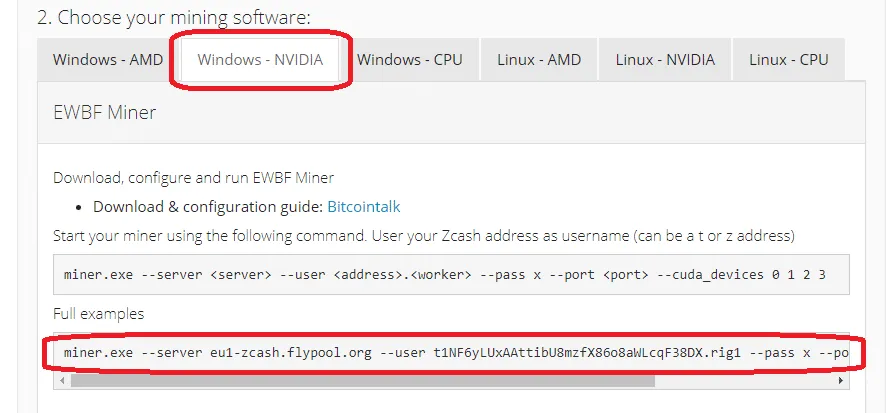
We’re going to paste this string into the flypool bat file inside the EWBF Miner folder we extracted earlier. The bat file is a batch file that gives the commands to run the miner application.
Right click on the bat file called “flypool” and hit Edit. The file will open in Notepad. Paste what you’ve copied from the flypool website. I’m going to update my server to “us1” instead of “eu1,” and I’m also going to remove the “—cuda_devices” language at the end. This language is used if you want to designate mining only to certain devices (for example, if you want to game with one GPU and mine with the other two). If you want to mine with all devices, you can delete the —cuda_devices designation.
Next, copy your Zcash wallet address. Inside the bat file paste your own Zcash address (in the example above replace the address that starts with “t” and ends with “DX”). After replacing the address you can also change the worker name. In this case it’s .rig1, but you can call it .miningRig1 for example.
Now save your file as a batch file with the .bat extension:
Choose File > Save As and type “.bat” after the name. In the Save As type box, make sure you select All Files, then click Save.
Congrats—you now have a batch file ready to mine! Create a shortcut for the new bat file and send it to your desktop. You can then delete the text version of the file.
- Start Your Miner!
Double-click your bat file to start the miner. The miner will start, initialize each of your GPUs, and hash away.
To monitor your earnings, go back to zcash.flypool.org and paste your wallet address into the Address window at the top. Then click Check Status:
That’s it for the beginner’s guide on mining Zcash on your PC!
I hope you’ve found this guide useful! In the video, I quickly cover overclocking and turning down your power consumption via MSI Afterburner, so make sure to watch it as well. If you run into any issues or have any questions, comment here in the blog or in the video comments, and I’ll try to help as much as I can.
If you’re interested in taking your crypto mining to the next level, sign up at Crypto Mining Academy, where I go massively in-depth, detailing every step of this process in a comprehensive course. Happy mining!
source https://99bitcoins.com
imag google https://99bitcoins.com