I decided to write this article because I believe that newbies, like myself, may benefit from a more comprehensive bios mod guide for the latest Polaris GPUs. I want to also thank all the people who have posted on the internet which allowed me to self learn and come to this point in my altcoins mining hobby!
Disclaimer: The content of this article is purely based on what I have read in multiple forums and tested on GPUs I have full accountability for. This article in no way represents the best practice or method nor provide any implied guarantees so please use at your own risk.
System Configuration:
- Intel Core 2 Duo E6600 system
- MB w/1 PCI-E slot
- 2GB RAM
- SATA III 240GB SSD
- 1x to 16x USB riser
- Operating System: (dual boot)
- Ethos 1.2.1 (buy from GPUShack)
- Windows 10 Professional (buy from MS)
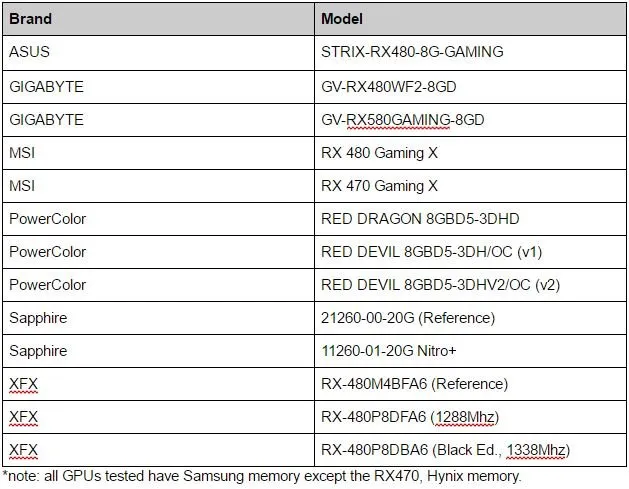
GPUs tested (sorted by brand):
Software Tools used:
- AMD Crimson Drivers: For 400 series, use 16.11.5. For 500 series use 17.4.3. Some of you might asked, why did I not use the latest drivers? Those were selected because they are the latest version that supports modded bios without patching. (windows only, ethos works with all cards out of the box)
- Atiflash 2.74: for saving original rom & flashing modded rom to the GPUs (windows only).
- Polaris Bios Editor 1.4.1 - modifying and saving to custom rom (windows only)
- GPU-Z v1.20.0 - optional: but good for looking at the card sensor information during mining (windows only)
- Display Driver Uninstaller 17.0.6.4 - used to wipe drivers and disable windows automatic driver installation. (extracted to c:\temp\ddu)
- Open Hardware Monitor 0.8.0 Beta - optional: used to monitor the core and mem speeds and GPU temperature. Also used to manually set fan speeds. (windows only)
- Claymore Dual Miner v9.3 - my personal favorite miner! Works for both Ethos and Windows. Bear in mind there is a 1% developer fee which I am happy to pay! (windows and ethos)
OS Prep:
- Ethos 1.2.1: I love this... pretty much a no brainer. Boot it up and it just works! Well, to be fair, you should follow their KB to set up the miner with your wallet, at a minimal. (Ethos Knowledge Base)
- Windows 10:
- Install it
- After first boot, restart into Safe Mode
- Run DDU to clean and restart
- Stop and disable Windows Update service (optional: I do this because I don’t want countless, you need to be updated, reboot now!)
- Install the appropriate drivers for the 400 or 500 series. Note: if you plan to only test mining with Ethos, you can skip this step. Bios rom modding and flashing does not require AMD drivers
- Download and extract tools:
- Atiflash -- I used c:\temp\atiflash
- Polaris Bios Editor -- Only the exe file is needed. I used c:\temp
- GPU-Z -- I used c:\temp
- Open Hardware Monitor -- I used c:\temp\ohm
- Claymore Dual Miner -- I used c:\temp\cdm. For this, you would need to configure the miner start.bat. Instructions in the same page as linked
Modding & Testing (all done via Windows and assuming the basic setup was done):
- Unbox GPU and install it! ( :-p )
- Start mining with the unmodded GPU.
- 470/570 - You should see ~22 MH/s for each GPU
- 480/580 - You should see ~24+ MH/s for each GPU
- Note: For those that want to mine with Ethos, reboot to Ethos directly instead of Windows 10. You may see the numbers dip below 24 and 22 respectively in Ethos. I attributed this to Ethos using a generic AMD driver that is not as optimized as the AMD Crimson Windows drivers.
- Stop mining. For those using Ethos, reboot to Windows 10.
- Open a Command Prompt (CMD) as administrator, navigate to c:\temp\atiflash
- Save the bios to a rom file using the following command:
- “atiflash.exe -s 0 “STRIX-RX480-8G-GAMING_original.rom”
- Note: I like to name the rom files with a meaningful name so that I will NOT confuse myself when I have a ton of copies of rom files later.
- Launch Polaris Bios Editor. Open the rom file that was just saved.
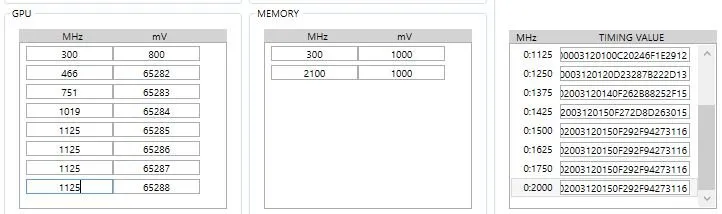
- Change VRAM timing values
- Expected effect: should bring the hash rate up by about 4mh/s
- 470/570 - Copy the 1500 timing to 1625, 1750, and 2000
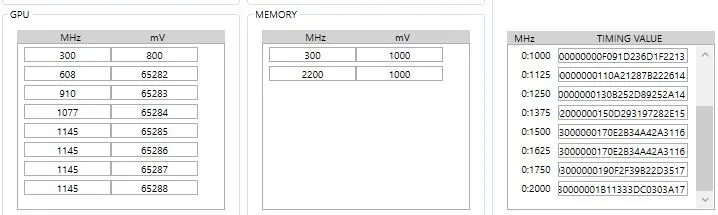
- 480/580 - Copy 1750 to 2000, 1625 to 1750, and 1500 to 1625
- Change the MEMORY frequency
- Expected effect: should bring the hash rate up by 2-3mh/s
- 470/570 - Change 1650 to 2100, which is the default max. While it is possible to push these memory up higher speeds, I generally do not attempt it for it will likely require more power and I have friends who have burned out their memory pushing the limits.
- 480/580 - Change 2000 to the range of 2150 to 2250. This largely depends on the quality of the memory. Most of the GPUs tested were stable at around 2200. Start by setting at 2200. When mining, if the hashrate slowly declines but never recovers, lower it by increments of 5. If it is stable, you could up it by increments of 5. Repeat this until you find the most stable setting for your GPU.
- Change the GPU frequency
- Expected effect: reduce hash rate by ~1mh/s but big drop in power consumption. You could measure the GPU consumption by using GPU-Z, sensor tab.
- Set the frequency between the range of 1050 to 1200.
- Find a sweet spot where each increment in frequency contributes the least increase in hashrate then set it back to the previous frequency.
- The lower your GPU frequency, the less power the card will consume.
- After performing the modifications in the 3 "Change" steps above, save the modded rom file by clicking "save" in the Polaris Bios Editor. Remember to use a verbose name to keep things less confusing.
- Example name: “STRIX-RX480-8G-GAMING_mod_v1.rom”
- Now comes the scary part! Flashing the modded rom back to the card. This really isn't too bad. I normally refrain from using the "-f" force option so that the flash executable self checks are all in place. Flash the bios back by using the following command:
- “atiflash.exe -p 0 “STRIX-RX480-8G-GAMING_mod_v1.rom”
- Test mining and repeat the "Change" steps as needed.
Snapshot of rx470/570 changes:
Snapshot of rx480/580 changes:
I did perform testing around with the mV (for GPU and VRAM), POWERPLAY, and POWERTUNE numbers but I did not find any “generally applicable” methods that works with all cards. Perhaps when I find out more, I will update this article with the information.
Results:
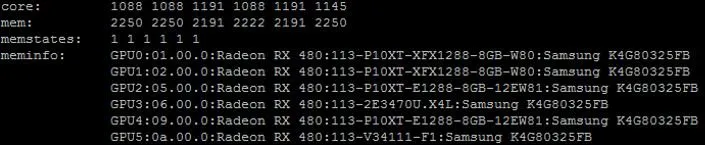
- Here is a snapshot of one of my rigs running 6 GPUs. You could see the running core and mem frequencies as well as the type of GPU. I kept the core frequencies low to be more power efficient.
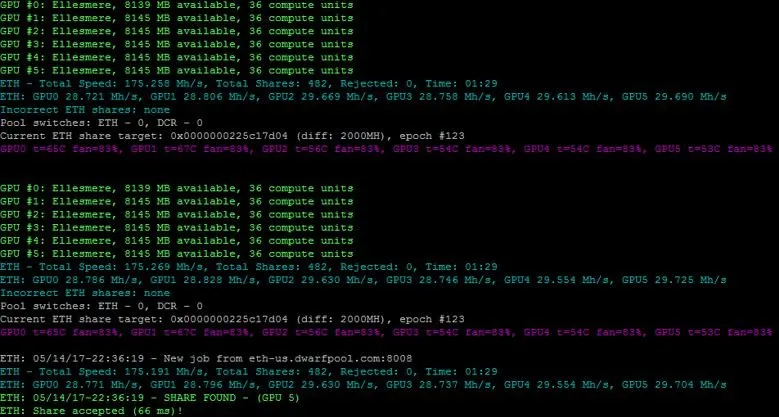
- Snapshot of the Claymore Dual Miner status. Watch for rejected shares, if that number is higher than 0.1% over a longer period, such as days, should consider being less aggressive with the VRAM frequencies.
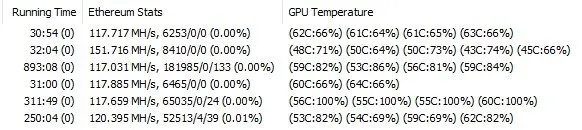
- Snapshot of Claymore’s miner manager of more rigs... showing the stability
By adopting this guide, it will likely reduce the power consumption of each card as compared to out of the box due to the lowering of GPU frequency from stock and overclocking the VRAM. Each card should also gain 4-6Mh/s depending on the frequencies. Be sure to test mining for at least 24 hours before making the assumption that the current settings are stable.
Happy mining!.