오늘도 달립니다! 오늘은 드디어 Rinkeby 테스트넷에 DreamFactory 컨트랙트를 배포하게 됩니다!
이전글 - [DreamChain DApp] #13 Rinkeby 테스트 네트워크 Deploy 스크립트 만들기 1
본 내용은 Ethereum and Solidity: The Complete Developer's Guide을 참고해서 작성되었습니다.
이전글을 통해서 Rinkeby 테스트넷에 컨트랙트를 배포하기 위한 준비를 모두 마쳤습니다. 그럼 이제 배포하기 위한 스크립트를 작성해 보겠습니다. 사실 스크립트 없이 Remix를 이용하면 테스트넷에 컨트랙트 배포가 가능합니다만, 여기서는 그 과정을 스크립트로 좀 파헤쳐 보겠습니다. 스크립트로 배포후에 배포 주소를 이용해서 Remix로 접근하는 것도 해보겠습니다.
준비사항
먼저 Node.js를 최신버전으로 업데이트 합니다.
$ sudo npm install -g n
$ sudo n latest
참고: https://stackoverflow.com/questions/41195952/updating-nodejs-on-ubuntu-16-04
deploy.js 스크립트 만들기
아래와 같이 compile.js가 존재하는 디렉터리에 deploy.js라는 파일 이름으로 스크립트를 만듭니다. 각 라인마다 주석을 달아서 세부적인 내용은 주석을 참고해 주세요.
// wallet provider module
const HDWalletProvider= require( 'truffle-hdwallet-provider' );
// Web3 constructor function
const Web3= require( 'web3' );
// get the compiled contract of DreamFactory, which will be deployed
const factory_contract= require( './build/DreamFactory.json' );
// create a provider
const provider= new HDWalletProvider(
  // put your seed words from metamask
  'social universe put your seed words slush salmon trade dynamic runway other',
  // put your infura api key for rinkeby
  'https://rinkeby.infura.io/v3/your_api_key'
);
// get the web3 instance using the provider
const web3= new Web3( provider );
// to use async functionality, it should be inside a function
// async function means the function runs asynchronously.
// like it runs separately from the main event loop. no sync with the main event loop.
// sync function means the function holds the event loop to sync
const deploy= async () => {
  // get all accounts generated from the seed words
  // await means it waits for the result since the handling smart contract takes time.
  const accounts= await web3.eth.getAccounts();

  console.log( 'balance of accounts[0]: ', await web3.eth.getBalance( accounts[0] ) );

  // console log for deployment. use use the first account to deploy the contract
  console.log( 'Attempting to deploy from account', accounts[0] );
  // create a new contract instance and deploy it
  // web3 does know not about json file but javascript object, so need to parse the json file
  const deployed_factory= await new web3.eth.Contract(
    JSON.parse( factory_contract.interface )
  )
    // deploy the contract using the bytecode
    .deploy( { data: '0x' + factory_contract.bytecode } )
    // use the accounts[0] to execute the deployment
    .send( { from: accounts[0] } );
  // consonle log for the deployed contract address
  console.log( 'DreamFactory contract deployed to', deployed_factory.options.address );
};

// now call the deploy function to deploy the contract
deploy();
여기서 여러분들의 내용을 채워 넣어야 하는 부분이 2가지 있습니다.
- Metamask에서 생성한 Seed words
- Infura API key
// create a provider
const provider= new HDWalletProvider(
  // put your seed words from metamask
  'social universe put your seed words slush salmon trade dynamic runway other',
  // put your infura api key for rinkeby
  'https://rinkeby.infura.io/v3/your_api_key'
);
위 두 가지를 여러분의 내용으로 하셔야 provider가 제대로 생성됩니다. 제것은 비공개로 처리하였습니다. 또 한가지 주의할 점은 provider 설정할 때, seed words와 api key 사이에 , 넣는 걸 잊지 마세요.
위 deploy.js 스크립트가 하는 것을 간단히 요약하면 다음과 같습니다.
- 필요한 패키지들을 import
- 접속하고자 하는 네트워크에 맞는 provider 설정 (매우중요!)
- 컴파일된 DreamFactory 컨트랙트 파일로부터 bytecode를 추출하여 배포
- async 기능을 사용하기 위해 deploy라는 함수를 만들어서 호출
배포하는 것은 이전에 Unit Test 코드 작성할 때 많이 사용했던 코드입니다. 그런데 한가지 주의가 필요합니다.
deploy.js 스크립트 주의점
지금까지 컨트랙트 배포를 위해 Unit Test에서는 아래와 같은 코드를 사용했었습니다.
  dream_story= await new web3.eth.Contract( JSON.parse( compiled_contract.interface ) )
    .deploy({ data: compiled_contract.bytecode, arguments: [INIT_MIN_DONW_PRICE] })
    .send( { from: accounts[0], gas: '1000000' } )
그런데 이렇게 deploy.js 파일을 작성하고 배포하려고 하니 다음과 같이 에러가 발생합니다!
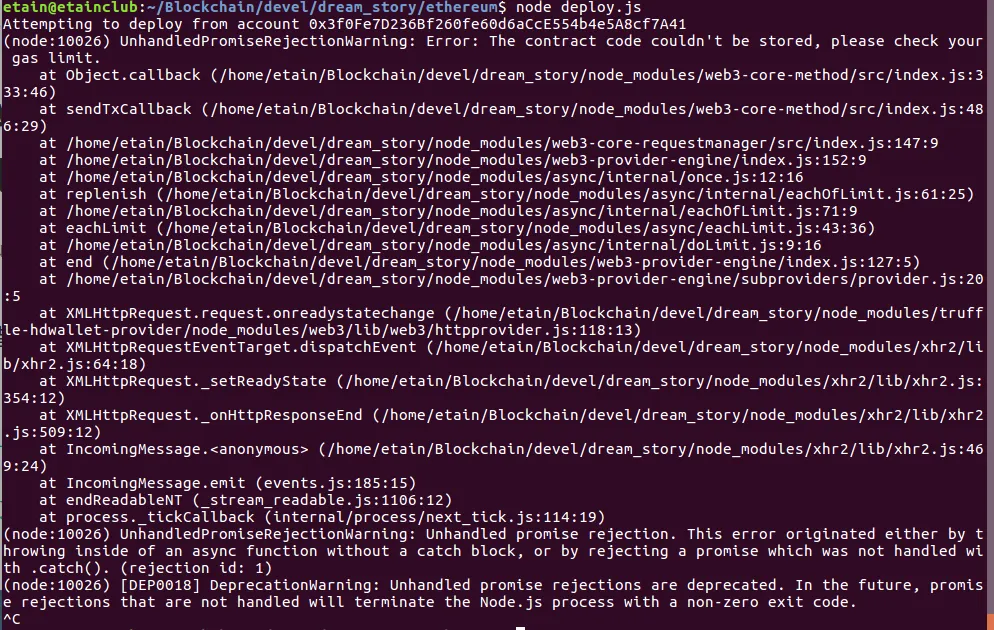
UnhandledPromiseRejectionWarning: Error: The contract code couldn't be stored, please check your gas limit. 이라는 메시지가 보입니다. 그래서 gas 값이 더 커야 하나 하고 2000000으로 해봐도 똑같은 에러가 납니다. 그래서 왕창 크게 했더니 이번에는 Error: exceeds block gas limit block gas limit을 넘었다는 에러가 발생합니다.
혹시나 하고 Remix에 가서 Inject Web3 (Rinkeby)를 선택하고 Deploy하니 또 잘됩니다. 헐

역시 로컬 네트워크에서 잘되는 것들이 비록 테스트 네트워크지만 공개적 네트워크에 오니깐 안됩니다. 여기 저기 찾아보니 원인은 truffle-hdwallet-provider 버전에 있었습니다!
먼저 여러분의 truffle-hdwallet-provider 버전을 확인해보세요. 프로젝트 root 디렉터리로 이동하여 아래와 같이 실행합니다.
$ npm list truffle-hdwallet-provider

아마 제 강좌를 따라오신 분들은 위와 같이 버전이 0.0.5 일 것입니다. 이게 바로 문제입니다. 문제를 해결하는 방법은 두가지입니다.
- truffle-hdwallet-provider 버전을 0.0.3으로 다운그레이드
- deploy 함수 수정
왠지 이미 깔려 있는 패키지를 다운그레이드 하는 것은 좀 아쉽죠? 그래서 2번 deploy 함수를 수정하는 방법을 택합니다. 아래와 같이 deploy 함수를 약간 수정하면 됩니다.
const deployed_factory= await new web3.eth.Contract(
    JSON.parse( factory_contract.interface )
  )
    // deploy the contract using the bytecode
    .deploy( { data: '0x' + factory_contract.bytecode } )
    // use the accounts[0] to execute the deployment
    .send( { from: accounts[0] } );
바뀐 부분을 알아차리셨나요? 바로 deploy 함수 인자에 '0x' +가 추가되었습니다. 그리고, send함수 인자에 gas 부분이 빠졌습니다. 두 개 다 수정하셔야 합니다. 하나라도 수정안하면 또 다른 에러가 발생합니다!
deploy.js 실행
자 드디어, deploy.js를 이용하여 Rinkeby 테스트넷에 DreamFactory 컨트랙트를 배포할 차례입니다. 두둥! 그렇습니다. 우리가 배포할 것은 DreamFactory 뿐입니다. DreamStory 컨트랙트는 사용자가 요청하면 DreamFactory 컨트랙트가 알아서 배포할 것입니다.

테스트넷이지만 컨트랙트가 배포되는데 꽤 오랜 시간이 걸립니다. 1-2분 정도. 인내를 가지고 기다려 보세요. 저같은 경우는 프롬프트 리턴이 안돼서 Ctrl-C로 종료시켰습니다. 별 문제는 없습니다. 컨트랙트 배포 주소를 복사합니다.
rinkeby.etherscan.io
테스트넷이지만 아주 훌륭한 웹페이지를 제공합니다.
http://rinkeby.etherscan.io
위 사이트에 접속한 후 우측 상단에 복사한 컨트랙트 주소를 붙여 넣습니다.
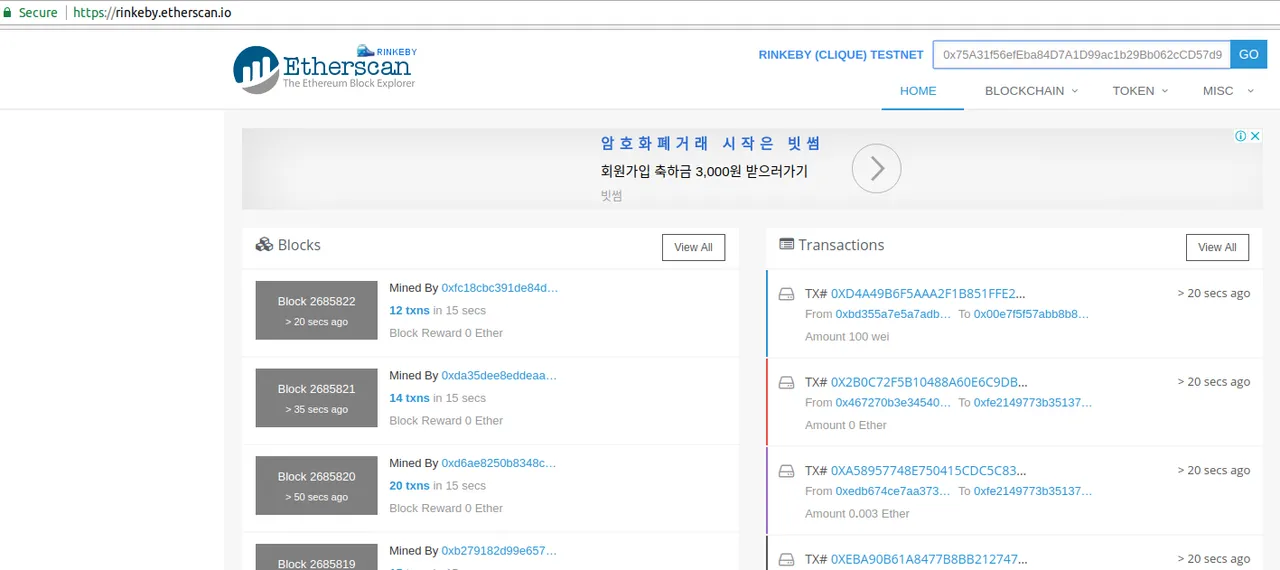
그러면, 배포된 컨트랙트에 어떤 트랜잭션들이 일어나는지 리스트로 볼 수 있습니다. 와우!
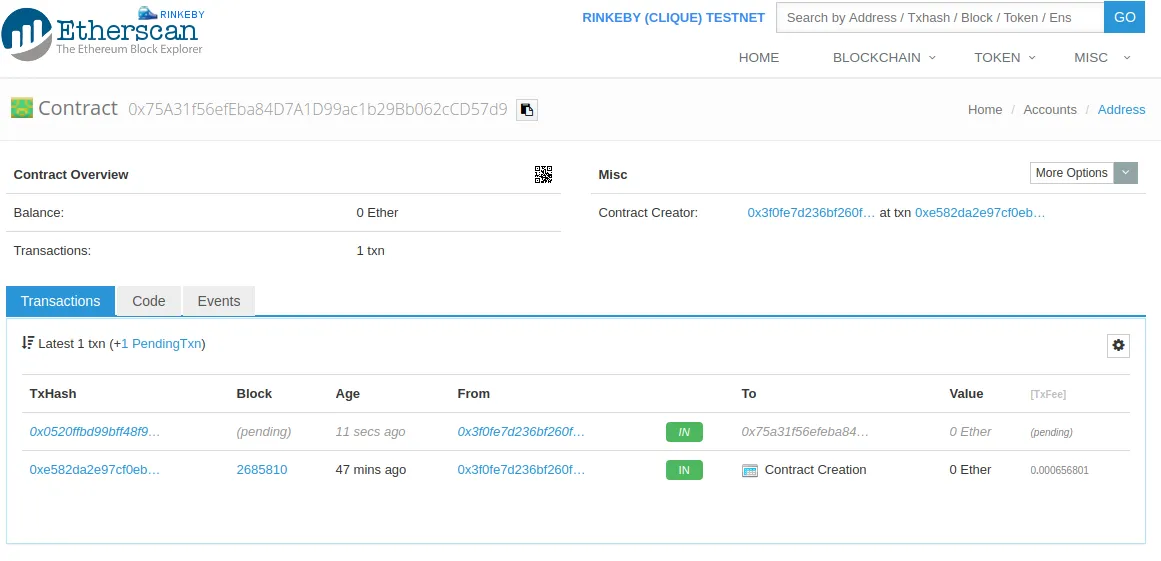
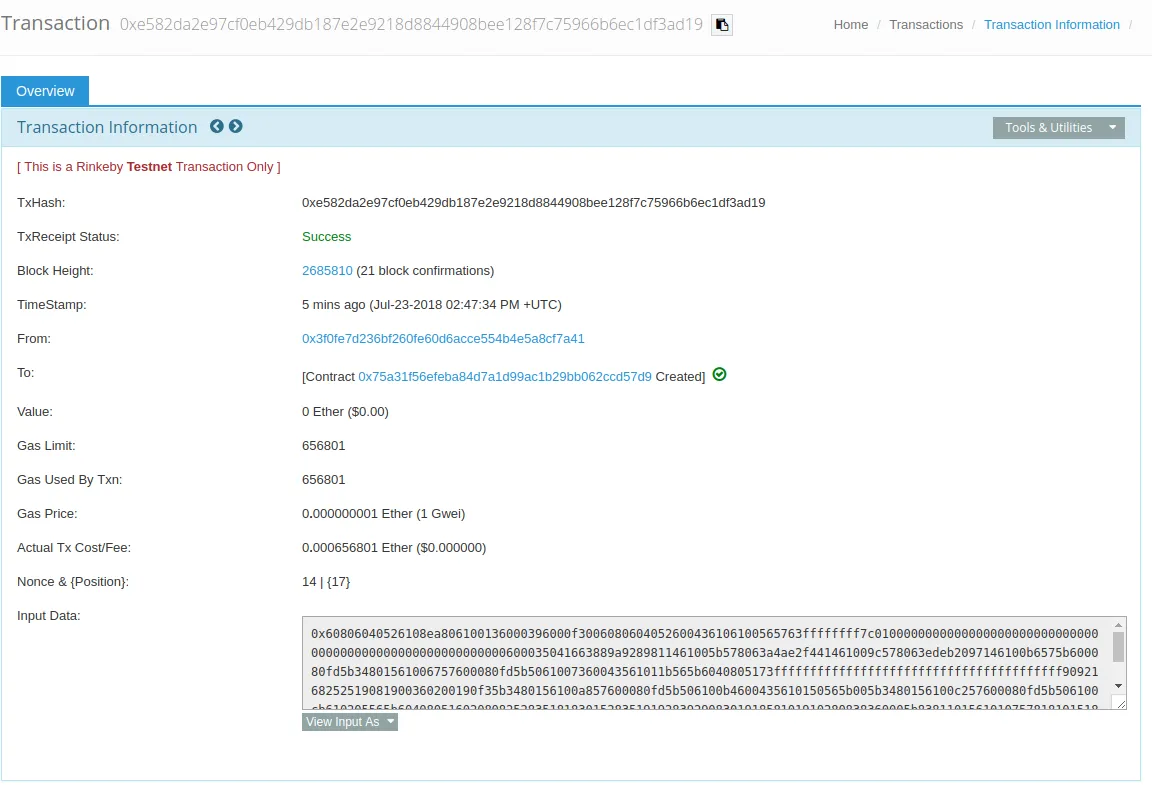
또 각 트랜잭션의 상세 내역도 볼 수가 있구요.
이번에는 Remix에 아래와 같이 Injected Web3 (rinkeby)를 선택한 후 At Address에 복사한 컨트랙트 주소를 입력합니다. 그리고 At Address를 클릭하면, 아래와 같이 배포된 DreamFactory 컨트랙트에 접근할 수가 있습니다!
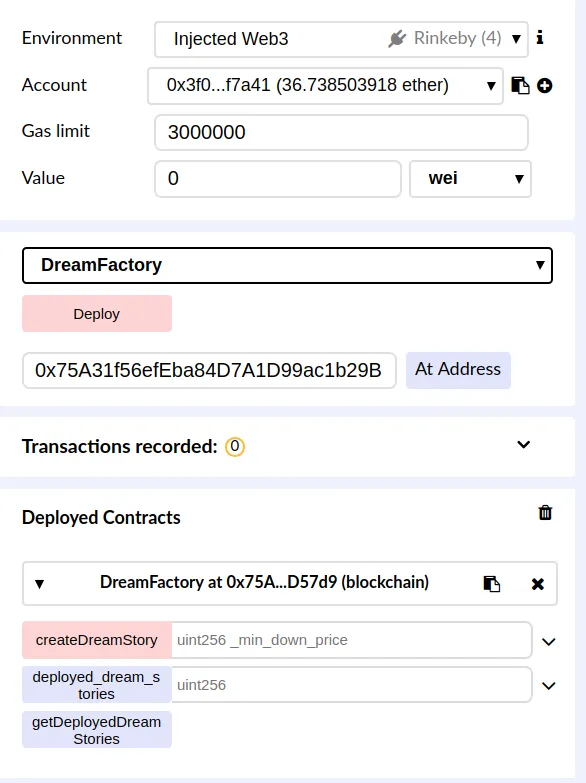
실제로 테스테넷에서 돌고 있는 컨트랙트로 위 주소로 접속하여 저와 같은 인터페이스를 보실 수 있습니다.
배포된 컨트랙트 주소는 별도의 파일에 저장해서 보관해 놓으면 좋습니다. 테스트넷에 매번 배포하는 것보다 배포된 컨트랙트를 재사용하면 좋겠죠?!
파일 이름은 적당히 FACTORY_ADDRESS라고 하고 내용은 컨트랙트 주소를 넣습니다.
0x75A31f56efEba84D7A1D99ac1b29Bb062cCD57d9
스마트 컨트랙트 코딩 자체는 얼마 되지 않지만, 이를 위한 배경 지식, 테스트, 스크립드 등 많은 부분이 필요했습니다. 앞으로 웹페이지 작성에는 더욱 많은 노력이 들어가겠죠.
이것으로 DreamStory, DreamFactory 스마트 컨트랙트 코딩, Unit Test, 컴파일 스크립트, 배포 스크립트, Rinkeby 테스트넷에 배포까지 해봤습니다. 휴~ 고생했습니다.
다음글은 수정된 내용을 모두 반영하여 소스 코드를 정리하여 공개하고, 내용도 간단히 정리해 보겠습니다.
오늘의 실습: Rinkeby테스트넷에 대해서 알아보세요. 또 어떤 테스트 네트워크가 있는지도 알아보세요.