This is a quick how-to, written to show you how to add a dreamy effect to your pictures, using Photoshop.
Years ago, I read about these couple of steps online somewhere. They taught me how to create a dreamy effect on my pictures. To this day, I still use this effect from time to time, to add a little finishing touch to my pictures.
The example
First off, I'll show you a little example of what I'm talking about. This was a picture that needed some spicing up, so I added the dreamy effect.
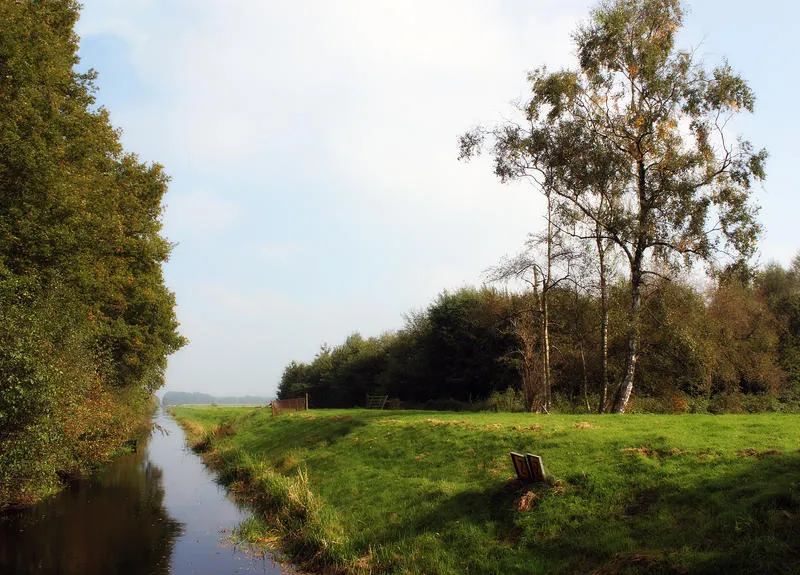
You'll see some blurring going on and there's also a bit of extra contrast here.
How to create this effect
Let's talk about how you can create this effect yourself! Now I like to use it combined with some sharpening, but it will take away some of the dreamy effect. Just play around with this yourself to see what you prefer.
- Open up your picture in Photoshop and edit it like you normally do. (Optionally: Leave the sharpening for later.)
- Now you'll need your end product on one, duplicate layer. For this, you'll want your other layers merged, so if you're using seperate layers, you might want to save a copy of your file for safe keeping.
- Merge your existing layers into one by using ctrl + shift + e.
- Duplicate your layer by using ctrl + j.
- Now go to Filter > Blur > Gaussian Blur.
- You'll want your top layer very blurry, like a radius of 40 pixels or so.
- Once you've blurred your top layer, go to the Layers section and tone down the Opacity to 25% or so. This should already give a soft and dreamy feel to your image.
- Next, we'll pick a blending option. You can play around with them a bit, but most of the time, Overlay will give a nice and dreamy feel, as well as bring out some extra contrast.
- Depending on how dreamy you want, you can play with this layer's Opacity a bit more. Just keep in mind that the higher the opacity is, the less detailed your image will be.
- Optionally: Once you're satisfied, merge the two layers (ctrl + e) and sharpen your image like you usually do (I like to use Unsharp Mask for this).
Done!
You can use the effect on any picture, but I feel it's most effective on landscape pictures.
| Photo shop | Foodblog | Photo gallery | Twitter | Twitch | YouTube |

Want to satisfy your creative needs? Join the Marvelous Tales Contest!
Become my patron and earn yourself a mention or permanent place in my blog posts!
As always, this picture is made and owned by me and is not to be used without my permission. If you would like to use it in any way, please contact me or visit my Deviantart or Photography shop for a purchase.


Fair warning: Copy/paste comment and obvious bot comments will get flagged.