Would you like to learn how to do a Kinsta WordPress installation with me because this will show you how easy it is with Kinsta and get you started immediately after reading this post?

Kinsta WordPress Installation Tutorial — Add Site, DNS @ Record, HTTPS, and Admin Dashboard
Here's how to install and set up a WordPress installation from scratch on Kinsta WordPress hosting, which is what I use because it's on the Google Cloud Platform.
I'll walk you through every step you need to get it actually from idea in your head to creating the blank WordPress website to mapping the domain, and then being ready to log in and use the website.
To begin, we go to Kinsta and go into the site's interface. You sign in, click on "Sites," click on "Add site" up here in the top right. Then, you want to install WordPress, assuming you are starting from zero.

If you've already got another WordPress website, you just want to talk to Kinsta and they'll migrate it for you. This is if you just want to make a blank website from zero. The first thing you do is put in your domain name.
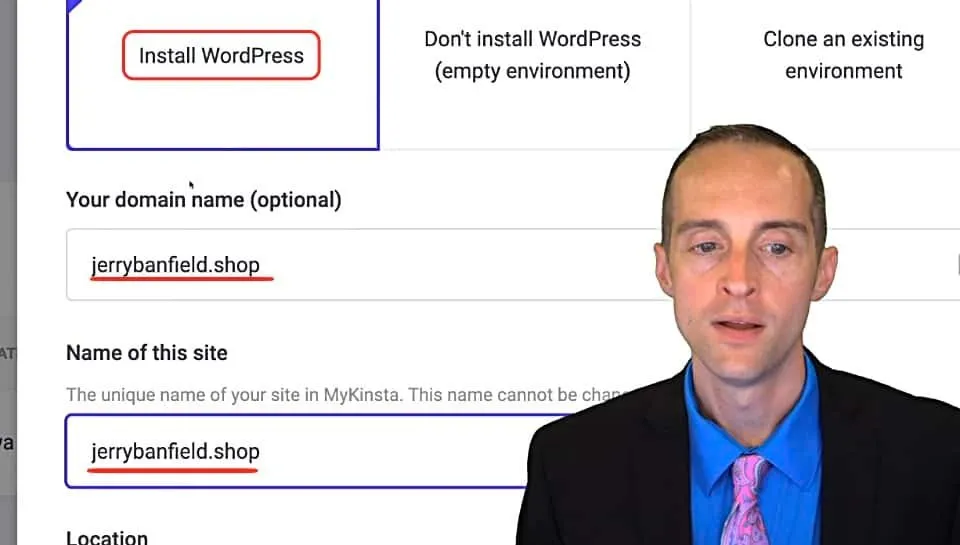
I'm using jerrybanfield.shop as my test case domain for this. I put this in the domain name and the name of the site.
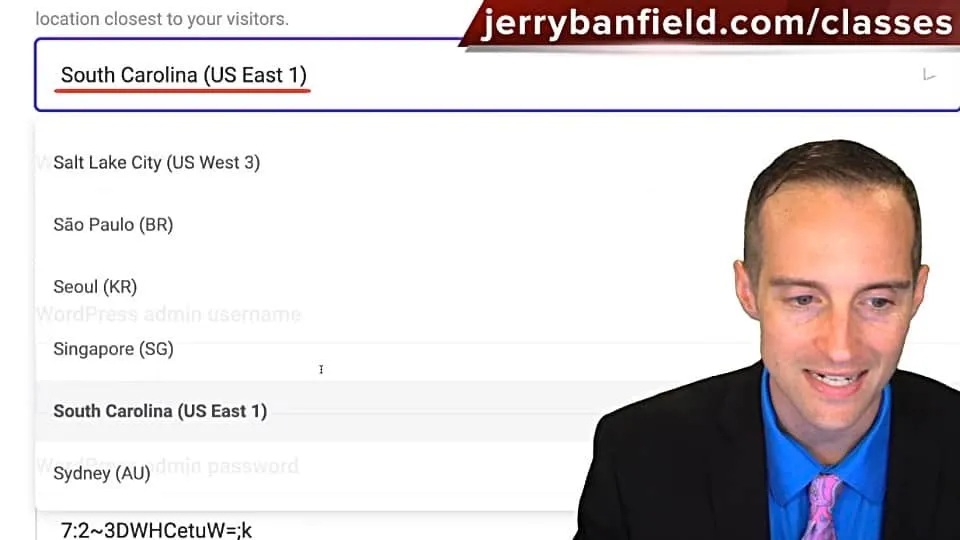
For the data center, I pick a data center that's likely to be close and accessible to the largest percentage of my audience. This means, if you are located in, for example, the USA where I am and the largest percentage of the traffic you think that will come to your website will be from that country. It's ideal to pick a data center this close to that.
If you're in Germany, you think a lot of the traffic will be German, you'd pick the Frankfurt center. If you're in London, you'd pick the London center. For me, there are several in the US and I'll pick the South Carolina data center here.
I'll put the WordPress site title. I'll keep all my titles the same, I'll just call it "Jerry Banfield Shop," and "jerrybanfield" for the WordPress admin username.
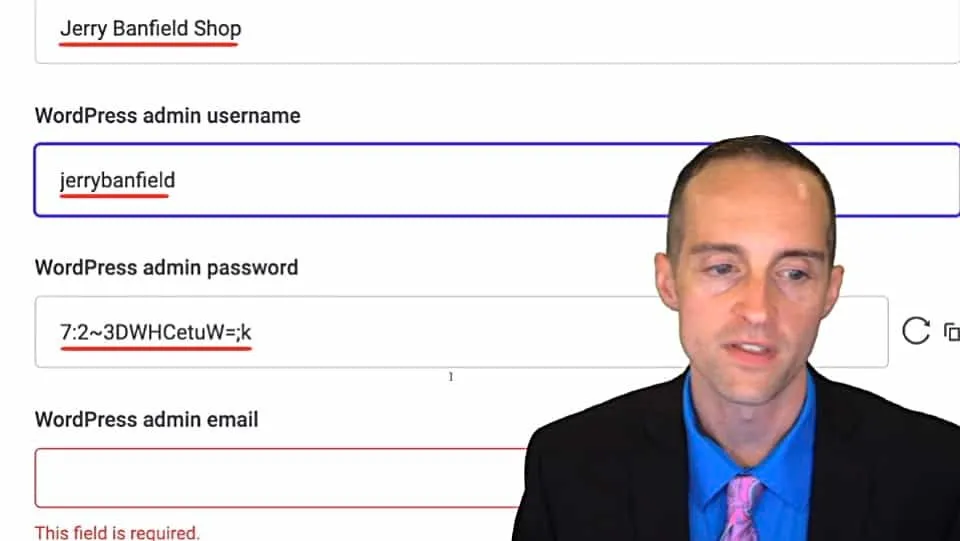
I'll pick an admin username that is not something that is just "admin" like that. It has to be at least eight characters. I can just put "jerrybanfield" for this. For the admin password, you can generate secure passwords. Make sure to use a password that you would copy and have down somewhere in a password manager to make a difficult to hack your website.
You put your admin email you want to sign in with here. Then, you've picked your language. You have the options to install WordPress multisite, WooCommerce, or Yoast SEO.

I recommend installing each of these separately when you need them. Plugins can slow your website down significantly. There's no reason to put something in until you're ready for it.
Once you're finished, you click on "Add site." Then, you're ready to get the IP address in the next step. Expect this process to take about five minutes once you click "Add site."
Once Kinsta is showing that your new website is up, then here's how we get started. Click on the name of the website under "Sites" here in the Kinsta dashboard.
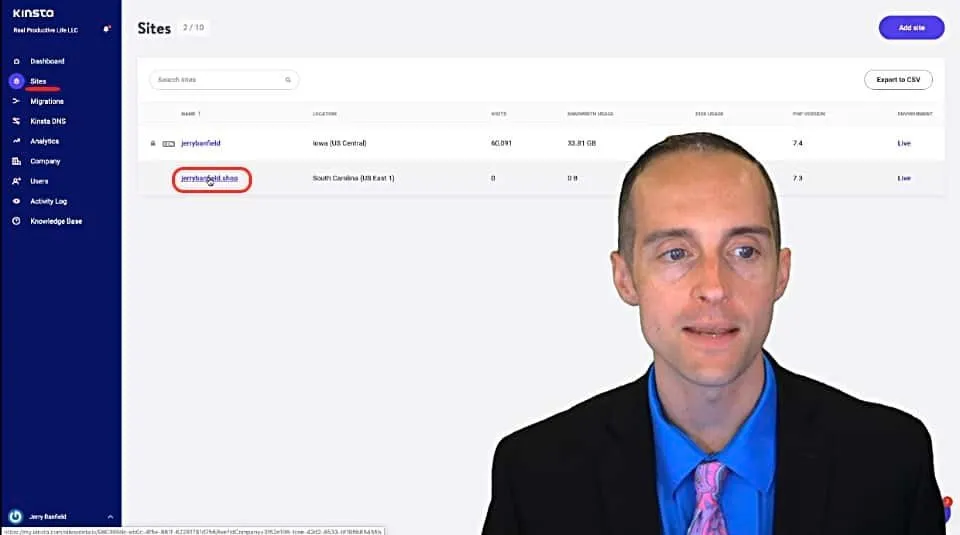
Go over to your site and click on it. Now you'll get all the essential information that you need to actually use it. The number one thing you need to do first is get the site IP address and map it to the domain. I'll show you how to do that in GoDaddy.
Copy the IP address here for the domain.
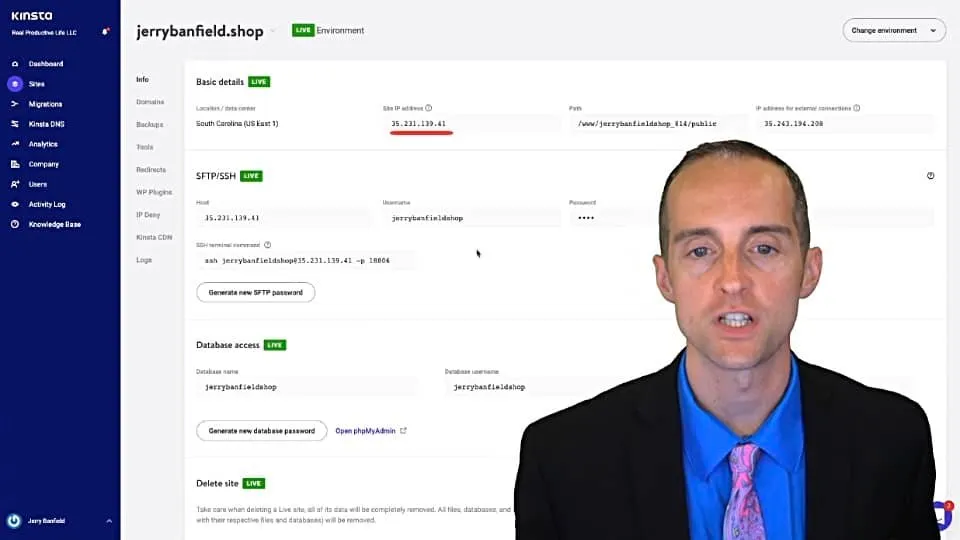
Go over into GoDaddy or wherever you've got your domain. You need to go into DNS to modify this. I go into my domain DNS management for jerrybanfield.shop. What I need to modify is the A record.
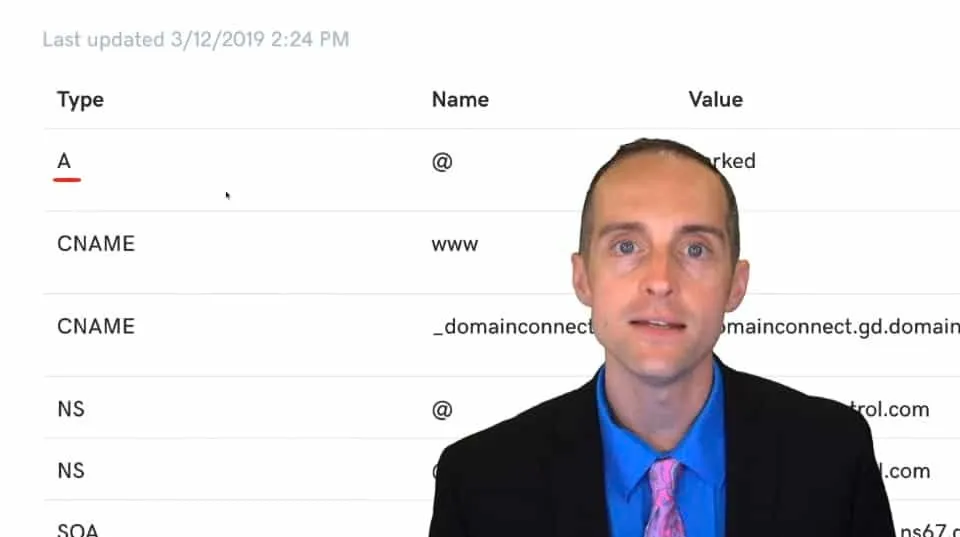
The A record sends the naked domain, no subdomain or www in front of it, sends it directly to the IP address it needs to go to.
What I do to modify this in GoDaddy is I click on this little pencil icon. This is the host. It's an A record. This means if there's nothing else typed in before the website, this is where it goes to.
Next, I want the IP address in here. I'll leave this the same. Click "Save." This will take a few minutes to take effect. Sometimes the next key thing to do is have a CNAME record for www mapped in here.
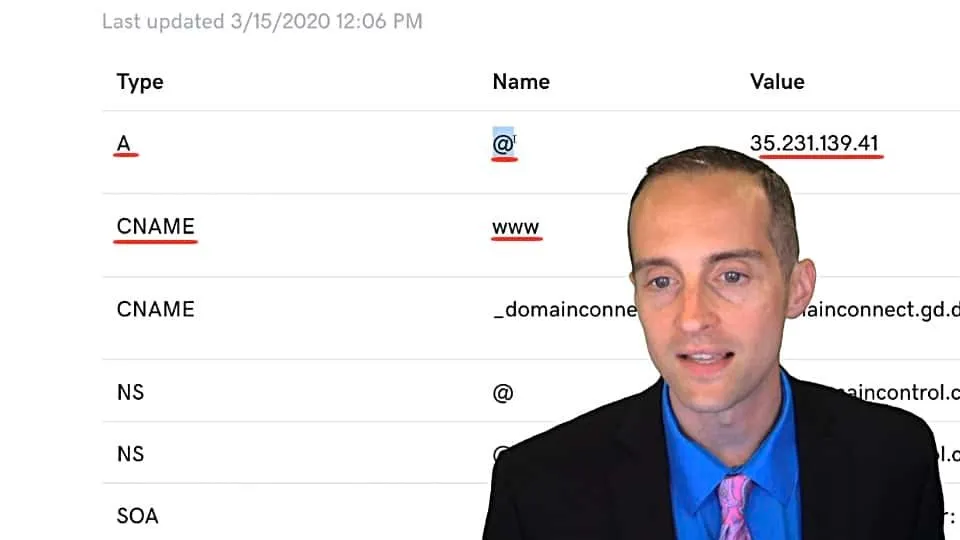
That way when someone puts in www.yourdomain.com, it'll go to the A record, and that A record will tell it here to go back to the IP and that's how people actually get to your WordPress website on their devices.
Inside your Kinsta interface, you will find lots of other information that is helpful. Note that in order to actually access the WordPress admin dashboard, the domain will need to be mapped for everything to work smoothly.
Technically you can access it otherwise, practically you just want to use it like this. What this will do is send you to the WordPress admin section of your website.
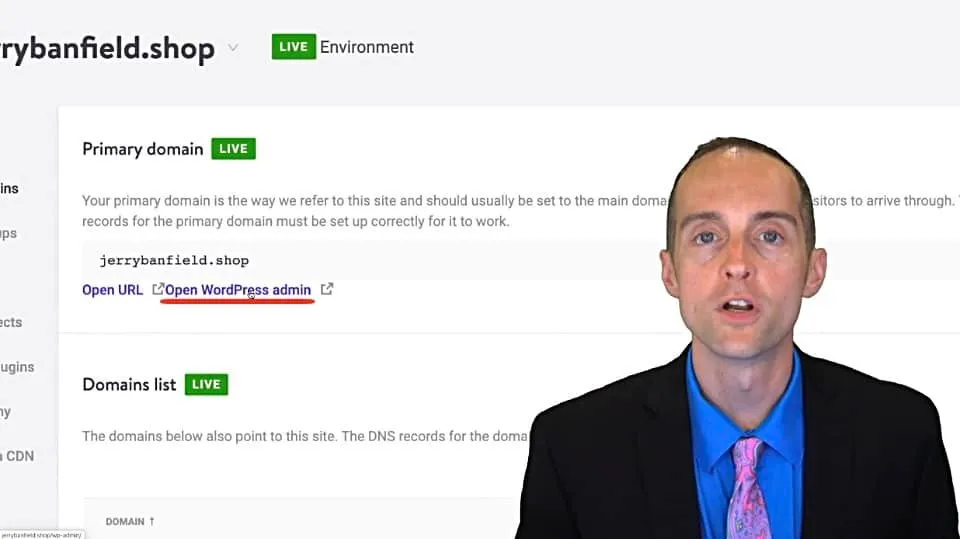
Therefore, you may need to wait as long as 24 hours between when you map the domain here and when you can access it. You can see I just did it a few seconds ago. If I click on open "WordPress admin," it is working right now, which is awesome.
Before I log in, there are some other key actions to take.
First you go over to "Tools."
I click on "Tools," then I get into some essential services here.

"Site cache" is enabled by default. This makes your site load fast. You definitely want this on.
"Restart PHP." If your site starts moving really slow, especially in the dashboard, you can try restarting the PHP and that will fix it sometimes.
You can use "WordPress debugging" if you need to debug, you can also use "Search and replace" if you need to, to get something in your database.
I don't use a password protection or the "New Relic Monitoring," although you can do that if needed for diagnostics. You can upgrade the PHP version with "PHP engine." I will not do that now on this test site.
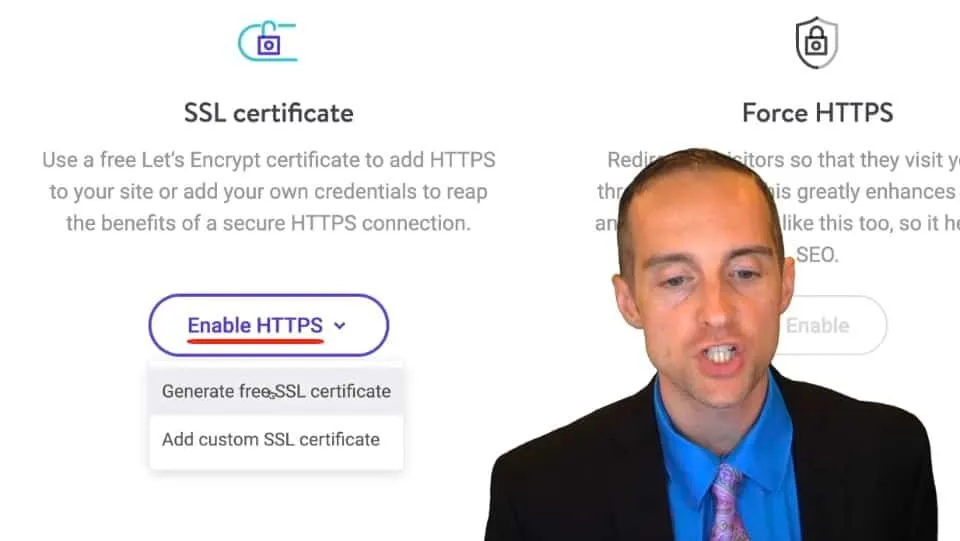
What I do want to do is go over to the "SSL certificate" and hit "Enable HTTPS" because this is a ranking factor from Google. This is essential for user trust. What I do is click on "Generate free SSL certificate."
I hit "jerrybanfield.shop" over here to generate, and then I click "Generate certificate."
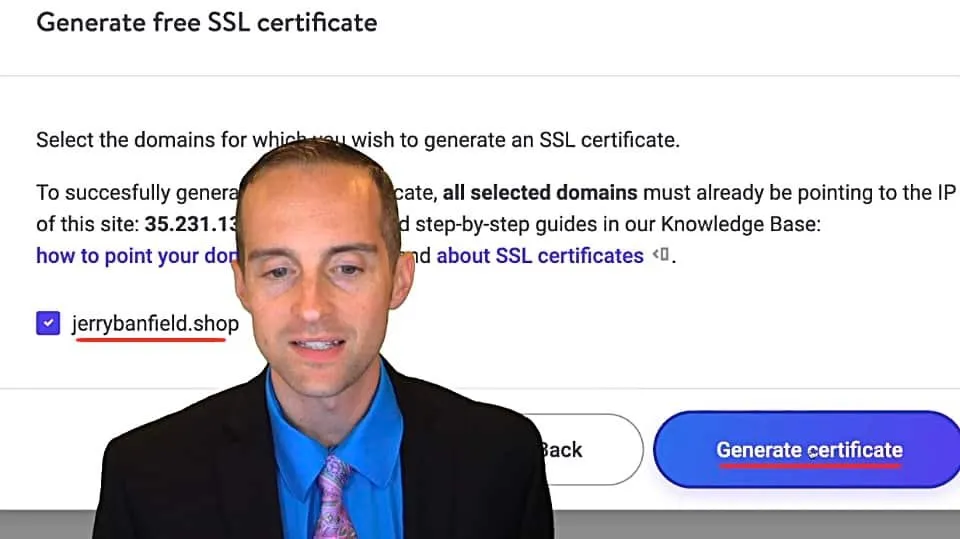
It has to be pointing right there in order to generate the certificate, which I took care of that when I mapped the domain. You want to make sure that you wait a little bit, preferably I actually waited 24 hours between setting this up and generating the SSL certificate to make sure the DNS is fully converted over.
Once I've got this SSL certificate, then I am able to force HTTPS on the site. If anyone goes to the non HTTPS version of the site, it will put that on and that's exactly what we want. It will take a minute as we can see to generate the certificate, then we will be ready to continue.
Once the installation is finished, which took a couple more minutes. You see on "SSL certificates," it says, "Let's encrypt."
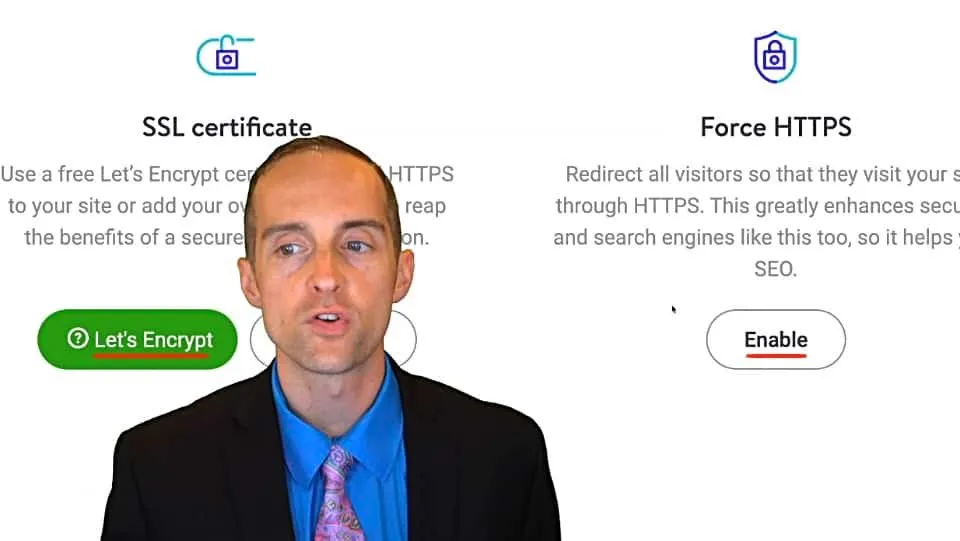
Now we go over to "Force HTTPS." This will make all the visitors go through HTTPS. We click "Enable" and we do the primary domain here. This way everybody goes to https://jerrybanfield.shop. Click on that. You could also do a subdomain, but you don't want to do that.
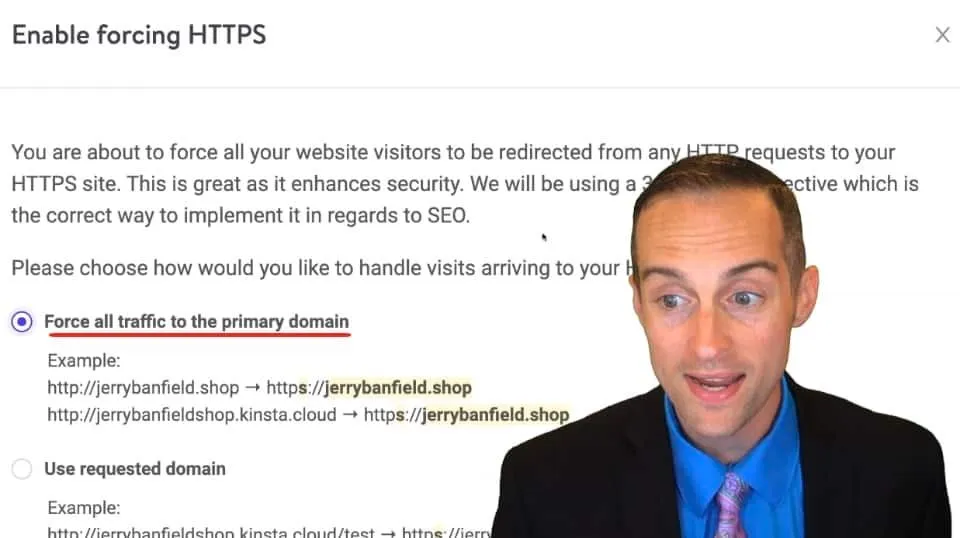
It is a great way to do this for search engine optimization, we go over and click "Force HTTPS."
Now, this is the primary domain. Everything will be disabled on the page while this is being set. These are the essential things you need to do on your website before you even sign in to the dashboard.
Now that I've got the "SSL certificate" and "Force HTTPS" in place, what I can do is look at the backups. Backups are very important on your website. Kinsta creates automatic backups every day and keeps them for up to 14 days.
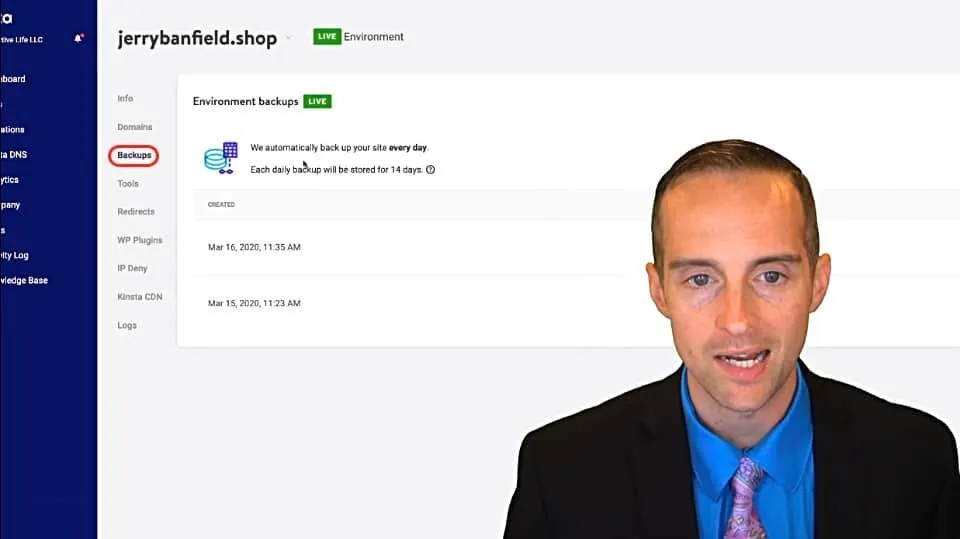
You also can manually back up, which I highly recommend before you put on any new plugins or make any significant changes. You can do a manual backup that way if you mess something up, as I've done before, I manually backed my site up. I updated a plugin.
The plugin broke the whole website. It broke the dashboard, it broke the interface, the front end that users see, it broke all of it. If I hadn't updated or had a backup, I would have at that point lost my entire website with thousands of posts on it and tens of thousands of hours of work put into it by me and people I work with.
Always make sure you have a backup. Not only just a backup, but you want a downloadable backup. That way, if for some reason all the Kinsta data gets wiped, you have a copy of your website that you can have on your own hard drive.
You can only make one of those once a week. I highly recommend to have a downloadable backup created every week for your website. You've got what is essentially a hard copy of your website that you can take anywhere.
That could be useful, for example, if you weren't able to host your site on Kinsta for some reason, you could use that and put it over on any other website.
We've now covered all of the essentials for getting your website set up. I do highly recommend to get your CDN enabled as well. This is a Content Delivery Network.
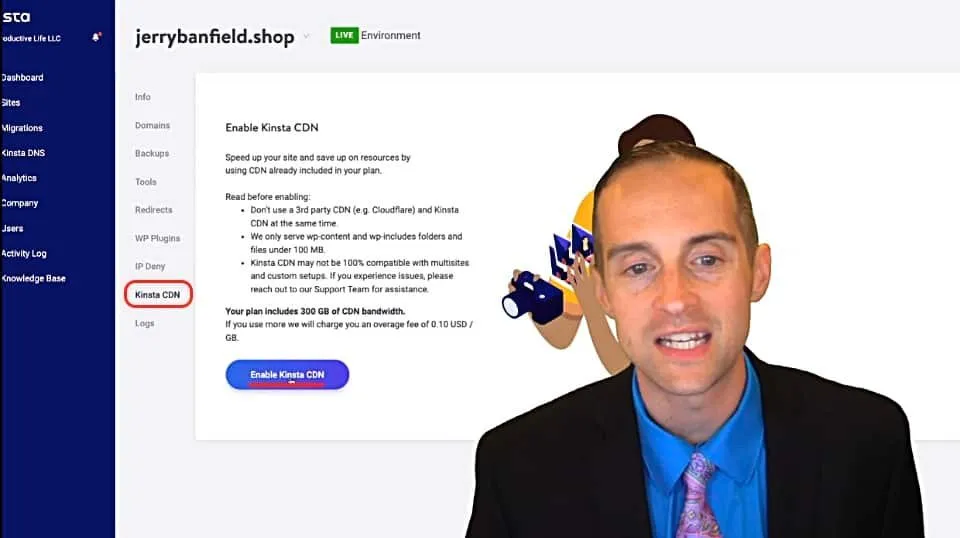
The Content Delivery Network on Kinsta allows you to have your files served from local servers near the user instead of serving them all from your server. This is essential for speeding up your website.
Thus, I highly recommend to enable the CDN. I'm not going to go through and do that here because I don't need that on my website and it will do more. It's very easy to enable the CDN. You just click on "Enable Kinsta CDN."
Then, based on whatever set up you're using, you put that CDN into appropriate plugins or whatever set up you have on your website, so that your WordPress website knows exactly where the CDN is. Then you are able to serve across your whole website and speed it up.
What happens when you've got a CDN enabled?
If your server as mine is in South Carolina for this website, if someone in South Carolina goes to it, it's super fast. However, when someone in India goes to it and they're connecting to South Carolina, that's going to be a slower experience.
A Content Delivery Network puts it on servers around the world. That way, when a user from India goes to the website, they only need to get a little bit of information from the South Carolina server. Then, the Content Delivery Network has something more than likely, much closer to them, which may be in India and greatly speed up the load time for that local user.
Therefore, you definitely want to use CDN on your website.
The other options you have here, you can see what plugins you have installed and maybe if they need to be updated. You can add redirects in. However, you can also do this with Yoast SEO.
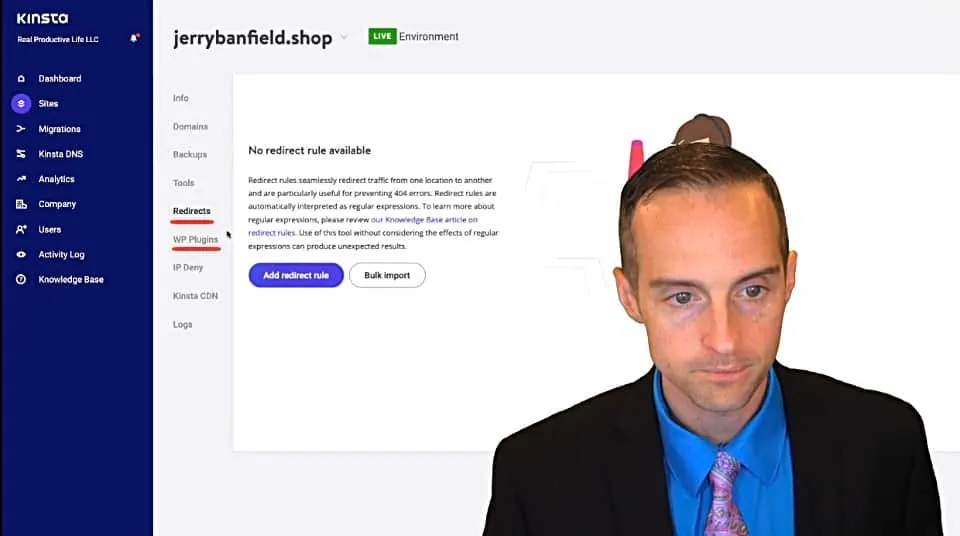
You've got additional tools that we went over, backups, your different domains, and now you are completely ready to go.
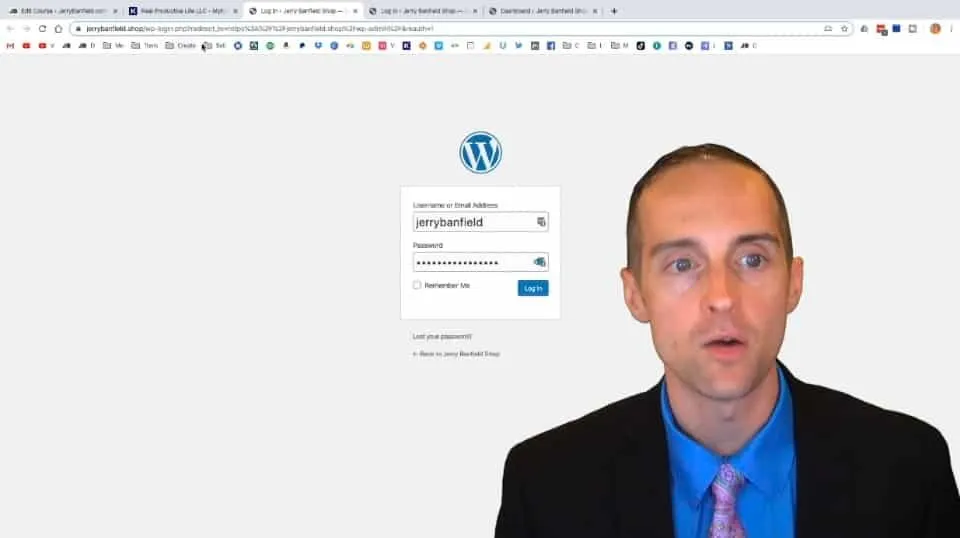
To get into the WordPress interface, all you need to do is go to yourwebsite/wp-admin, which you can get to directly if you click on "Domains," then you click on "Open WordPress admin."
This will take you right to your login page where you will be able to log in.
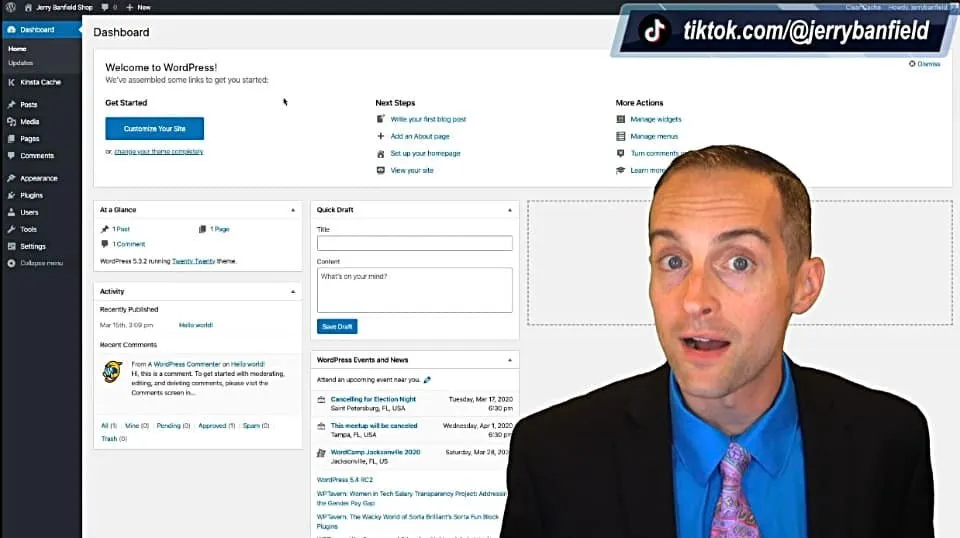
Once you log in, then you'll be able to see the WordPress dashboard.
This is where you go customize every different thing on your website. The first key thing to do more than likely, assuming you know your way around WordPress, is to put whatever theme you want on.
If you don't know your way around WordPress, then it's helpful to learn the basics of WordPress. Learn how to select a theme, and then put the theme you want on your website. You can see what the website looks like by default, without anything done. This is what it looks like without anything done.
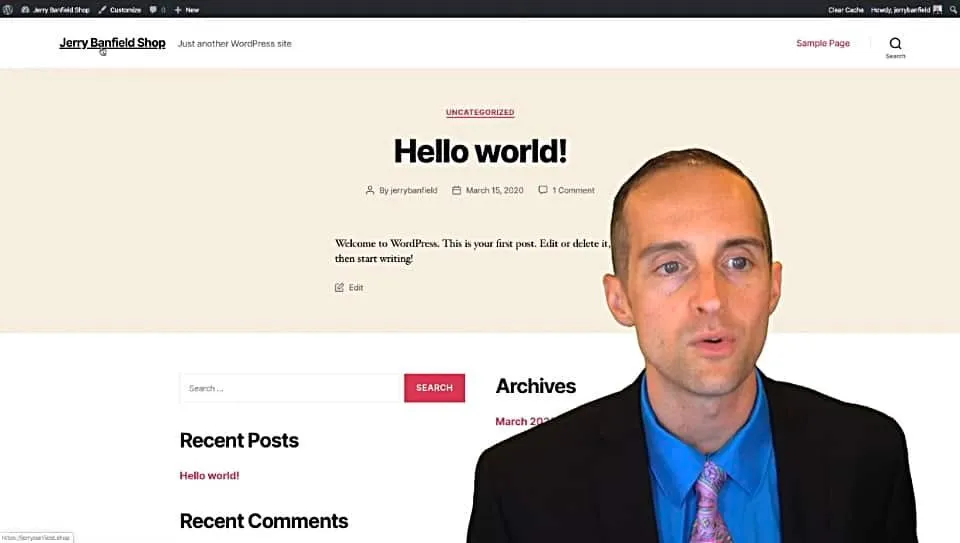
It has the default, "Just another WordPress website" text up here. It has "Hello world" on it. It has one post on here and it has a comment on it like this. If you click over here, it goes back to the website. This has a sample page. This is the starter website, and you can easily get rid of all this when you go on the dashboard.
You can get back to the dashboard when you're on the website by going up to this and clicking on "Dashboard."
I recommend to bookmark the log in, that way you don't have to go to Kinsta every time and click on "Open WordPress admin."
Just bookmark the page that you land on and if you're not signed in, if you don't see that bar up there, it will make you sign in, then you get back to the dashboard here.
Final Words
Yes, you watched all the way to the end. I appreciate the chance to help you master digital marketing today.
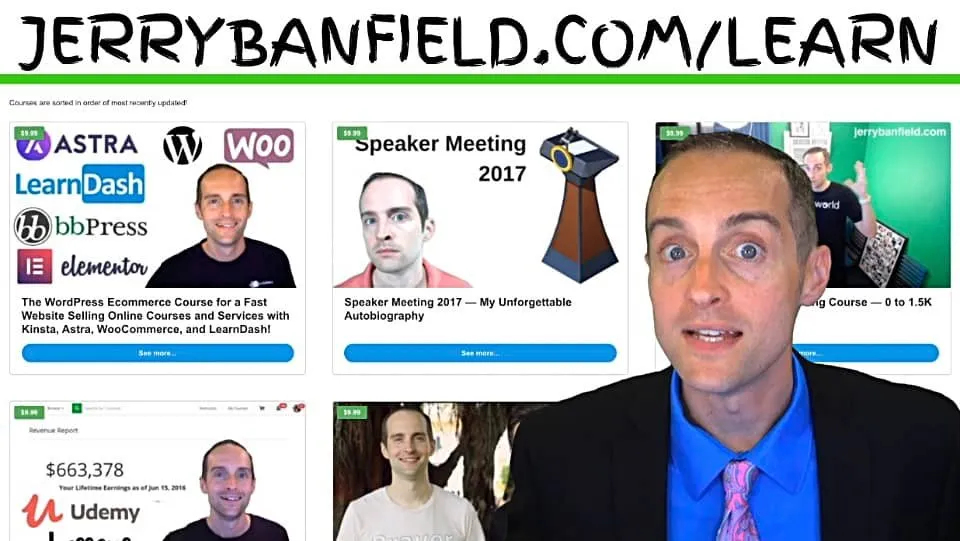
The video you just watched is a free preview from my WordPress course available at Jerrybanfield.com/learn. It is a course showing how I build my whole website the way I do. You can click on the course, it's only $9.99, and you can see all of the critical videos that show the plugins I use, that show how I set everything up and compare other options.
When you click on "Take this course," you'll find a very simple and easy checkout. You put your name, email, and your card information here. As soon as you complete checkout, you'll get immediate access to lifetime answers from questions.
Anything you want to know, just ask me via email, via text, or post it in the forums. I'll give you all my information as soon as you take the course on my website.
You'll find a lot of other courses that'll be really helpful for you to master digital marketing and to experience divine love, all at Jerrybanfield.com/learn.
I appreciate everything you do to help me have a business online and I'll see you in the course.
I love you.
You’re awesome.
I appreciate the chance to serve you today and I will see you again soon.
Love,
Jerry Banfield
Edits from video transcript by Michel Gerard.
Posted from my blog with SteemPress : https://jerrybanfield.com/kinsta-wordpress-installation/