Hello friends of light.
Today we have the promised 2nd part "Refraction of light with a prism" here on #Hive. If you missed the first part, no problem.
Here is the link to part 1: 🔽 🔽
Refraction of light with prism - Light Painting Photography
In the first part I explain and show my procedure and how I used a prism in light painting.
Hallo Freunde des Lichts.
Heute gibt es hier auf #Hive den versprochenen 2. Teil "Lichtbrechung mit einem Prisma". Wer den ersten Teil verpasst hat, kein Problem. Hier der Link zu Teil 1: 🔽 🔽
Refraction of light with prism - Light Painting Photography
Im ersten Teil erkläre und zeige ich meine Vorgehensweise und wie ich ein Prisma im Light Painting eingesetzt habe.

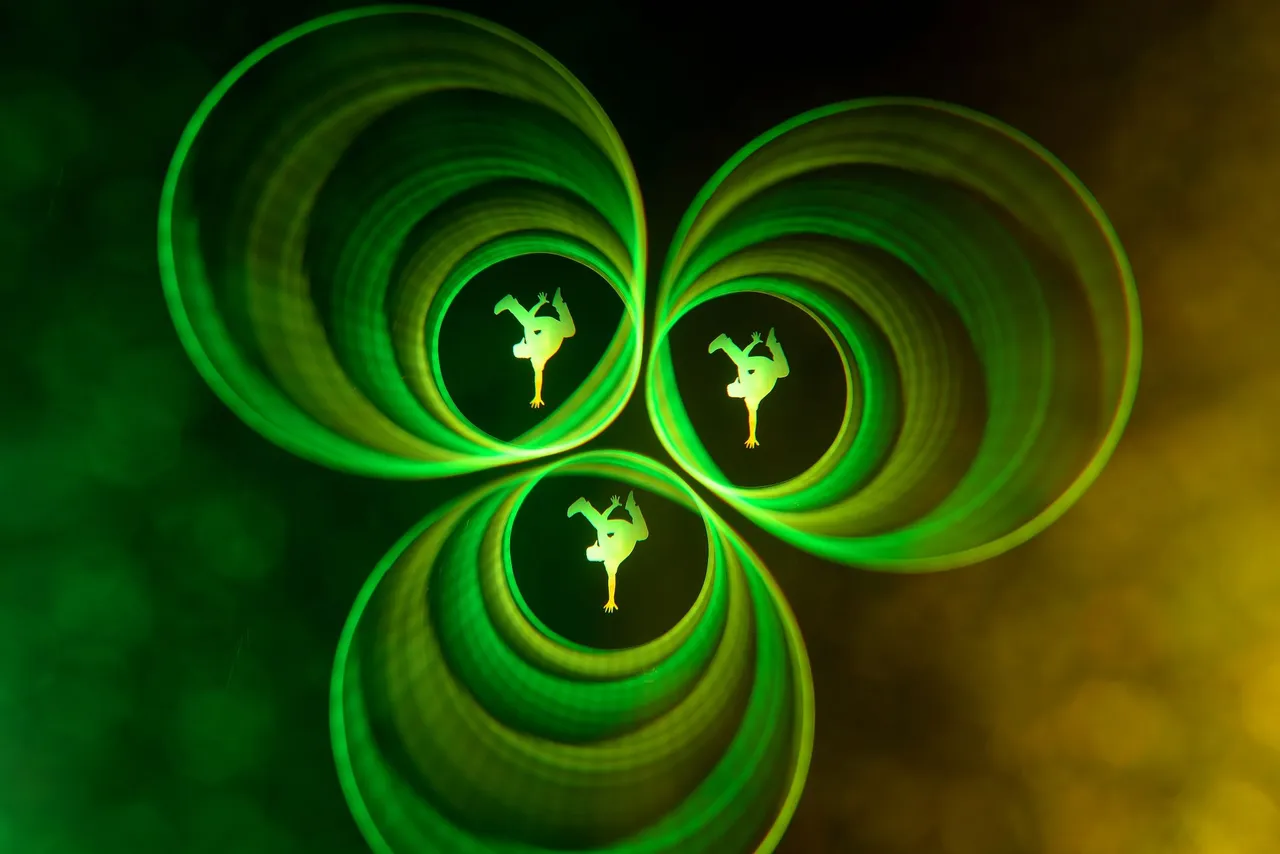
Nikon D750 | ISO 100 | Sigma 28-70 mm ( mid-exposure lens swap )
Laowa 12 mm | 750 sec. exposure time
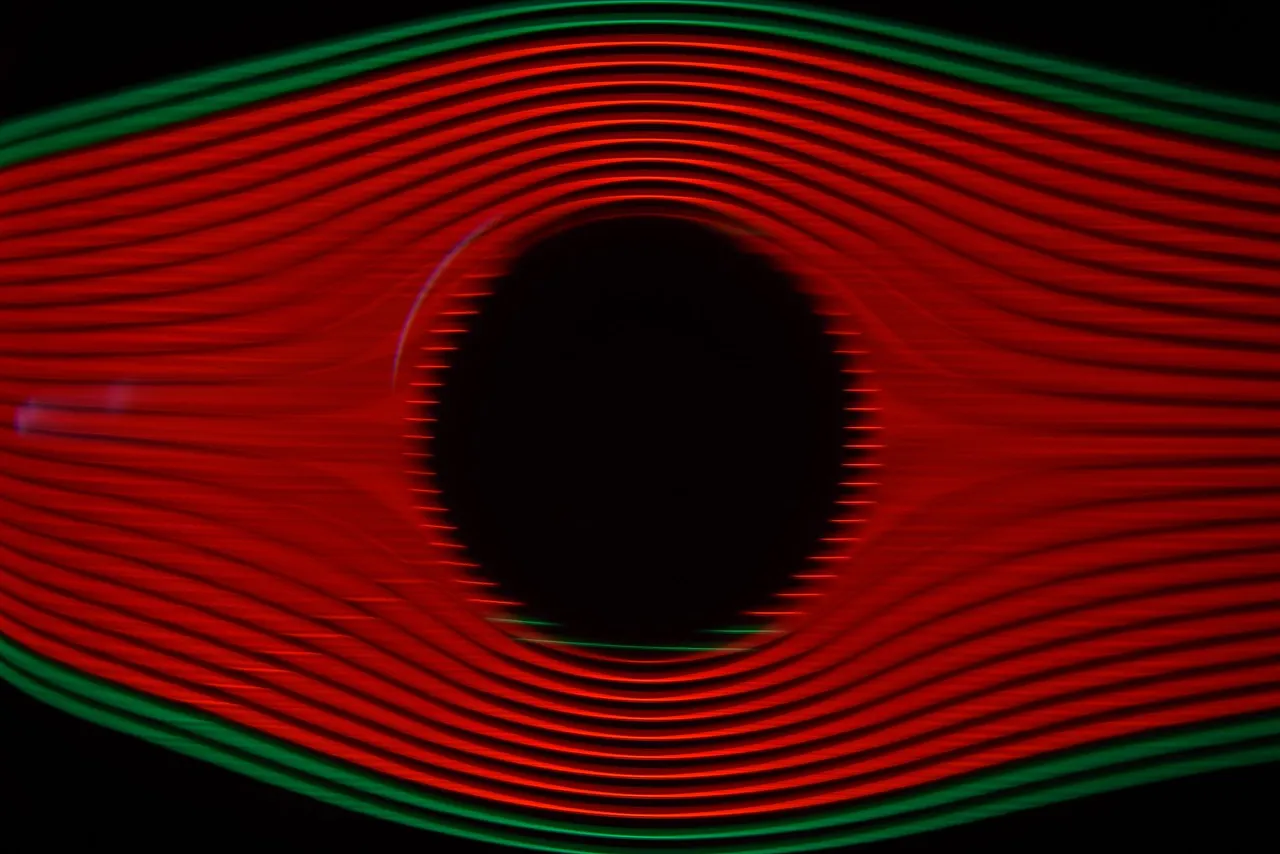
In this blog post, I would like to give you a little insight into my working methods.
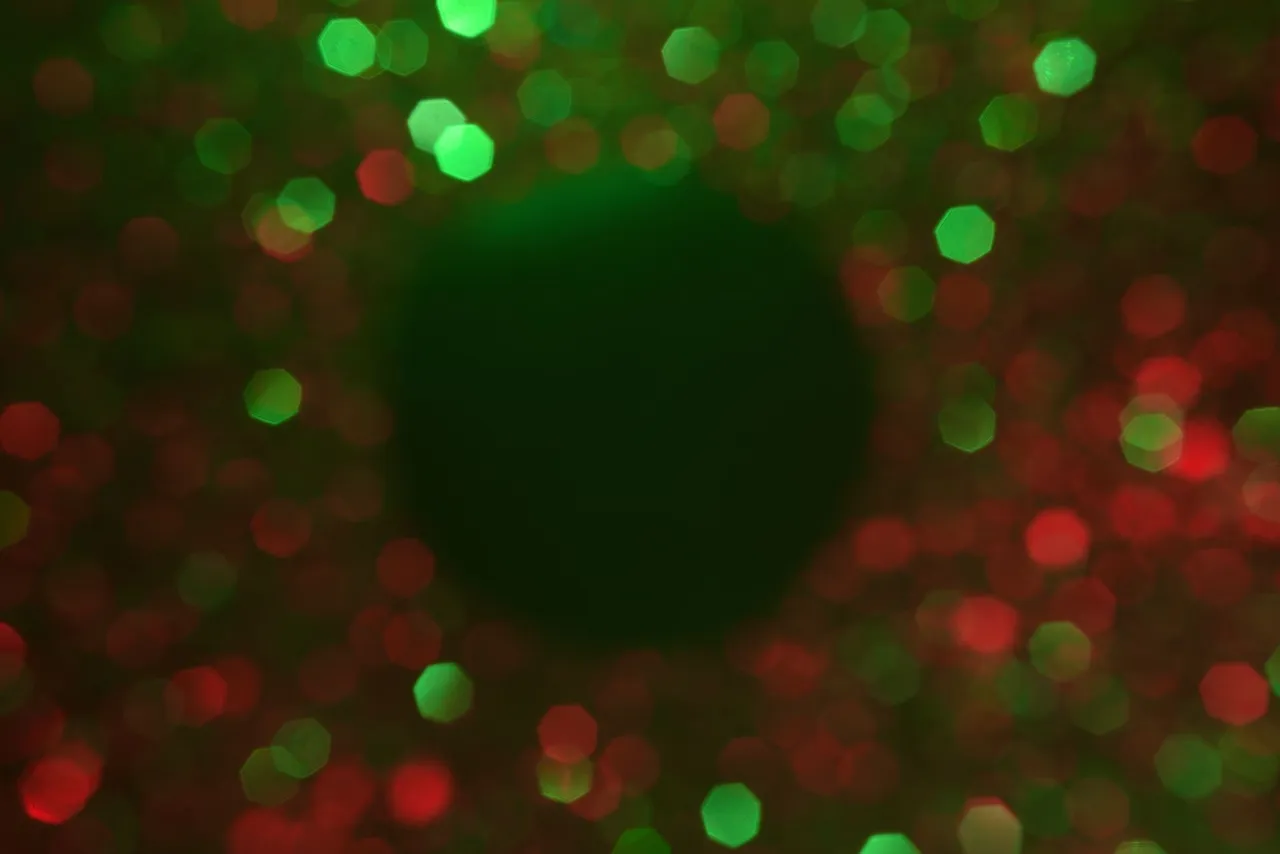
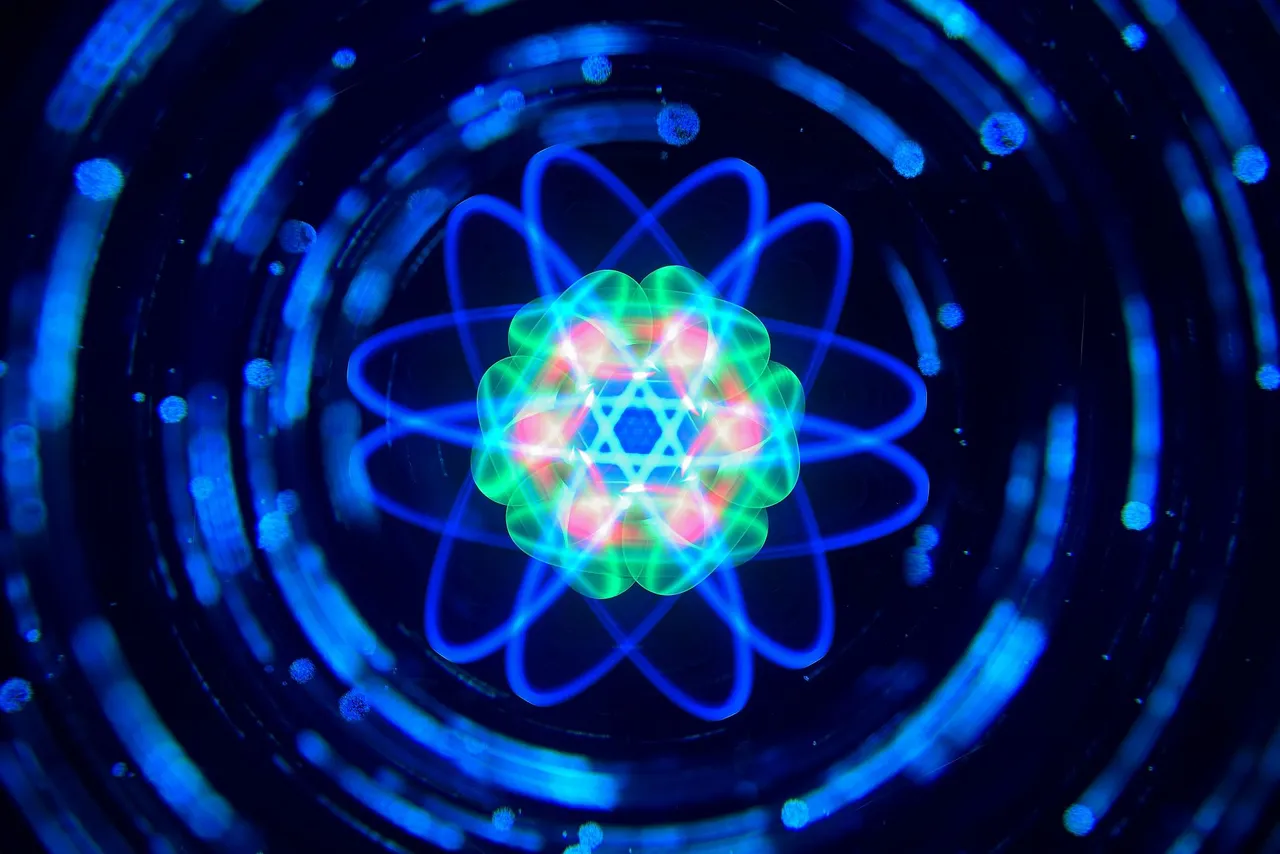
Let's start with the cover picture. In addition to the "halo prism", various other tools, materials and techniques were used in this picture.
But much more important than a lighting tool or expensive camera equipment is the idea and the planning of a picture.
This type of picture requires a lot of planning in advance, without which the cover picture, for example, would not have been possible. If I had left everything to luck, I would never have got close to the idea in my head and the result would have been something.
A painter knows where the house by the lake should be in the finished picture even before the first brushstroke.
Once I have the idea in my head, I start to plan the realisation. I "break down" the picture into individual "parts" and think about which lighting tools I can use to realise them in a long exposure in front of the camera.
In diesem Beitrag möchte ich einen kleinen Einblick in meine Arbeitsweise geben.
Beginnen wir mit dem Titelbild. Neben dem "Halo-Prisma" kamen in diesem Bild noch diverse andere Tools, Materialen und Techniken zum Einsatz.
Aber viel wichtiger als ein Lichtwerkzeug oder teure Kameratechnik, ist die Idee und die anschließende Planung eines Bildes.
Diese Art der Bilder benötigen im Vorfeld einiges an Planung, ohne diese wäre z. B. das Titelbild nicht möglich gewesen. Hätte ich alles dem Zufall überlassen, wäre ich meiner Idee in meinem Kopf niemals nahe gekommen und das Ergebnis wäre irgendetwas.
Ein Maler weiß schon vor dem ersten Pinselstrich, wo das Haus am See im fertigen Bild sein soll.
Nach der Idee im Kopf, fange ich an die Umsetzung zu planen. Ich "zerlege" das Bild in einzelne "Bildteile" und überlege mir, mit welchen Lichtwerkzeugen ich diese, in einer Langzeitbelichtung vor der Kamera umsetzen kann.
Nikon D750 | "Behind the scenes"
by @stepko
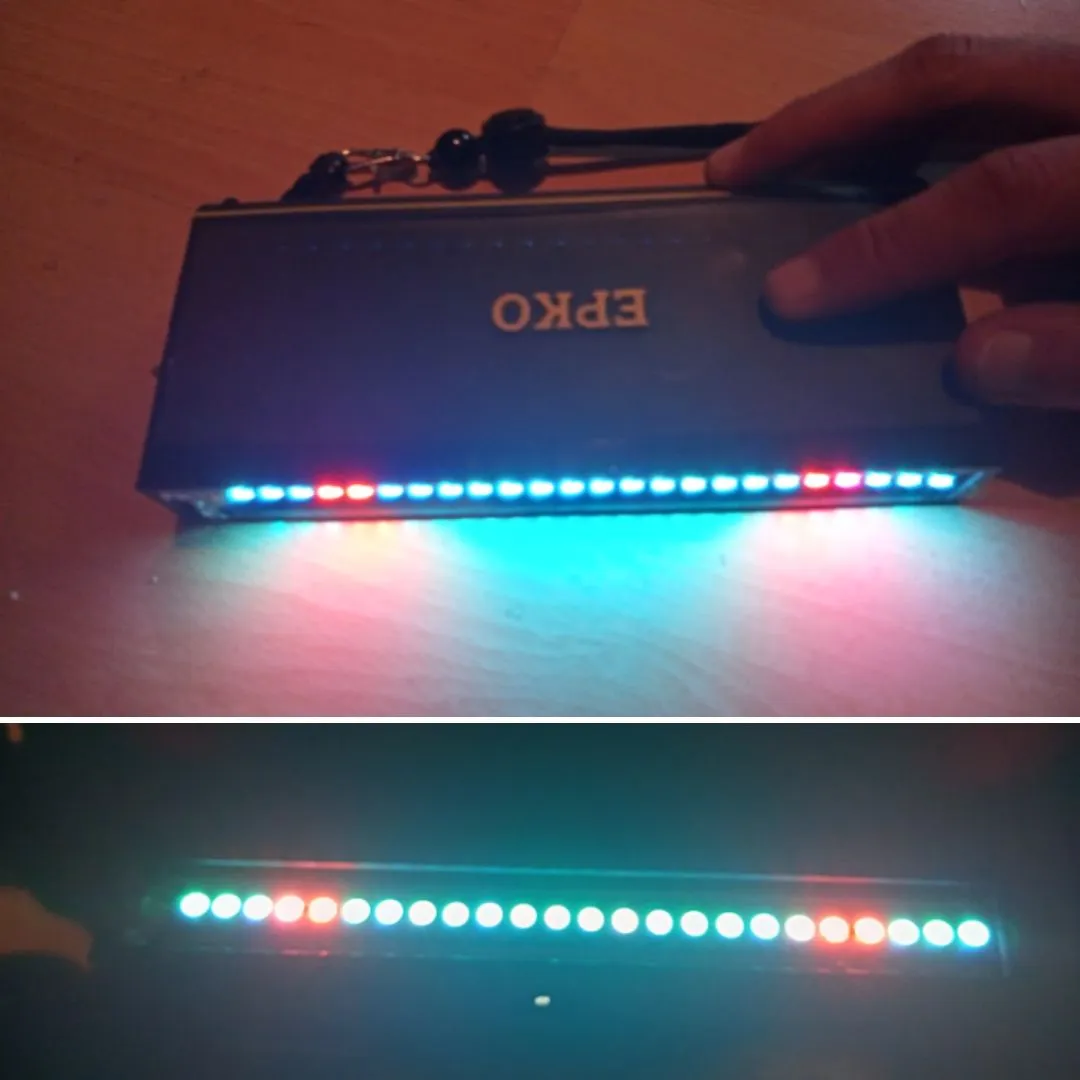
I started my image composition by aligning the halo prism in front of the lens. The idea was to paint light trails that would create an "arc" around the later light figure in the centre due to the effect of the prism. You can see what the prism looks like in the first part. Fortunately, my honoured colleague @lichtkunstfoto made me a calligraphy tool some time ago that was perfect for the job. The small distances between the LEDs made a fine light trail and you can freely program the colour. (Thanks Sven!)
Ich startete in meiner Bildgestaltung mit der Ausrichtung des Halo-Prisma vor dem Objektiv. Die Idee war, Lichtspuren zu malen, die durch den Effekt des Prisma, einen "Bogen" um die spätere Lichtfigur in der Mitte machen. Wie das Prisma aussieht, kannst du im ersten Teil sehen. Zum Glück hat mir der geschätzte Kollege @lichtkunstfoto vor einiger Zeit ein Kaligrafie-Tool gebaut, das perfekt geeignet war. Die kleinen Abstände der LEDs machten eine feine Lichtspur und man kann die Farbe frei programmieren. (Danke Sven!)
Behind the scenes by @stepko
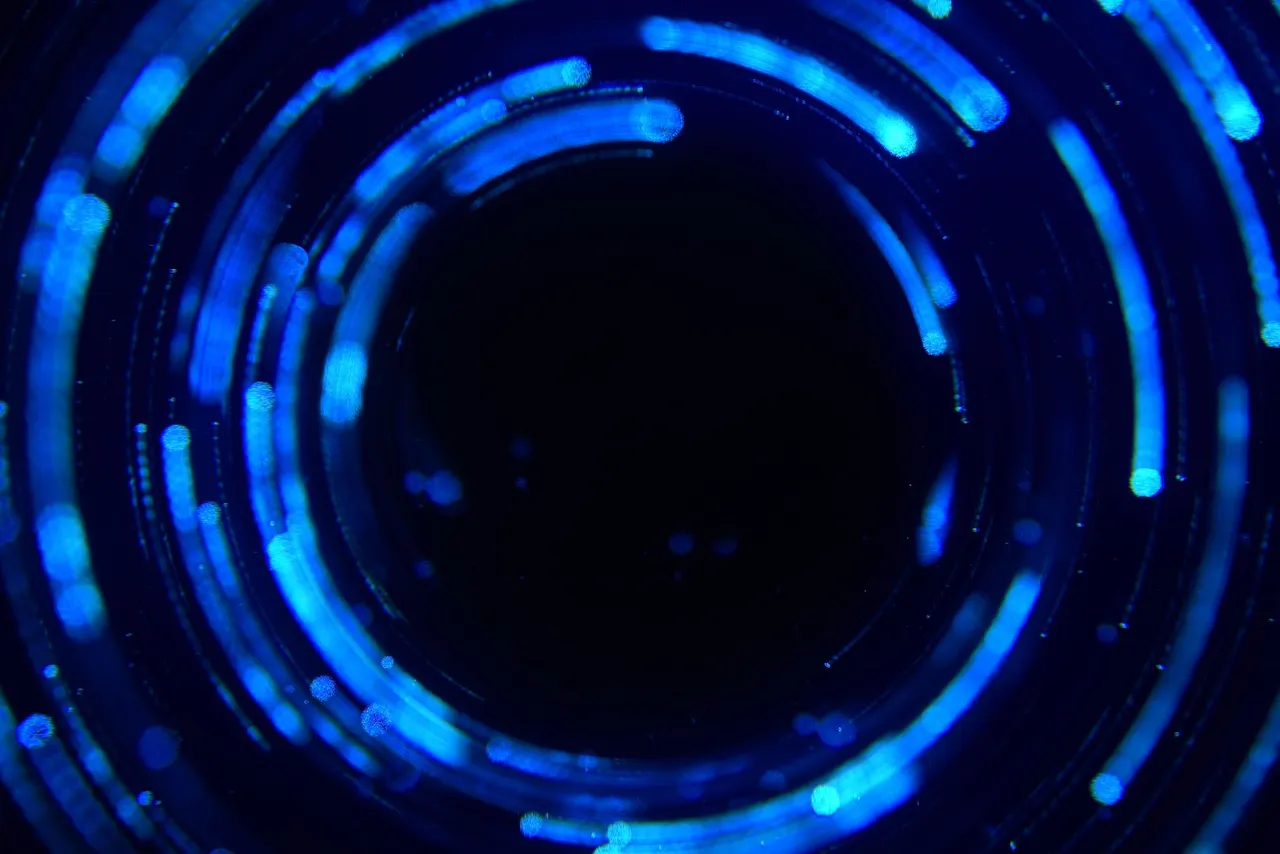
I fixed the calligraphy tool in a clamp and mounted it on a tripod. After I had aligned everything, I took a test image to check whether the set aperture, focus and alignment were correct or whether there were other errors that needed to be eliminated. In the test image above, for example, there are still some unpleasant reflections.
If everything fits, I memorise the settings and mount the camera on a second tripod. For very complex shots, I make a note of a few key points and settings. Especially when you change parameters in the individual parts of the picture in "fine tuning", you quickly get confused. What aperture was that again? 😲
Das Kaligrafie-Tool spannte ich in einer Klemme ein und montierte diese auf einem Stativ. Nachdem ich alles ausgerichtet habe, machte ich ein Testbild, um zu überprüfen, ob die eingestellte Blende, Schärfe und Ausrichtung passen oder sonstige Fehler vorhanden sind, die eleminiert werden müssen. Im Testbild oben zum Beispiel, gibt es noch unliebsame Reflektionen.
Wenn alles passt, merke ich mir die Einstellungen und montiere die Kamera auf einem zweiten Stativ. Bei sehr komplexen Bildern notiere ich mir ein paar Stichpunkte und Einstellungen. Gerade wenn man in den einzelnen Bildteilen im "Feintuning" Parameter verändert, kommt man schnell durcheinander. Welche Blende war das jetzt nochmal? 😲
Nikon D750 | "Behind the scenes"
by @stepko
The 2nd set was about the light figure in the centre, which I painted using the camera rotation technique. This was not only to be placed exactly in the middle, in the "black hole", but also to match the colour. The light was moved in front of the camera on an old bicycle wheel rim. After each round, I capped the lens and rotated the camera around the optical axis (6x60°). However, I had the problem that my studio is too small and the light figure with the Sigma 28-70 mm was too big, which didn't look so good overall. So I was forced to change lenses during the exposure (in total darkness). I used the Laowa 12 mm for the rotation.
Im 2. Set ging es um die Lichtfigur in der Mitte, die ich mit Kamerarotations-Technik gemalt habe. Diese sollte nicht nur genau in der Mitte, im "schwarzen Loch" platziert werden, sondern auch farblich passen. Das Licht wurde vor der Kamera, auf einer alten Fahrradfelge bewegt. Nach jeder Runde habe ich das Objektiv abgedeckt und die Kamera um die optische Achse gedreht ( 6x60° ). Allerdings hatte ich das Problem, dass mein Studio zu klein ist und die Lichtfigur mit dem Sigma 28-70 mm zu groß wurde, was im Gesamtergbnis nicht so toll aussah. Also war ich gezwungen, während der Belichtung (in absoluter Dunkelheit) das Objektiv zu wechseln. Für die Rotation nutzte ich das Laowa 12 mm.
Behind the scenes by @stepko
When I was satisfied with the result of the test image and had memorised / noted the settings, I took the camera to tripod no. 3.
Als ich mit dem Ergebnis des Testbildes zufrieden war und ich mir die Einstellungen gemerkt / notiert hatte, ging es mit der Kamera zu Stativ Nr. 3.
Nikon D750 | "Behind the scenes"
by @stepko
In the 3rd and final set, I tried to integrate the bokeh into the picture. I used "glitter paper", which I illuminated from the left and right with green and red light. However, I first had to get a feel for the angle and how long to light the paper. You can see in the test image that I didn't manage this very well. The exposure time, brightness of the torch or the set aperture are then ways to improve the result. I simply shortened the exposure time. But I don't mean the exposure time or shutter speed of the camera (light painting = long exposure), but the time that the light from the torch shines on the glitter paper.
Im 3. und letzten Set versuchte ich das Bokeh im Bild einzubauen. Dafür nutzte ich "Glitzerpapier", dass ich von links und rechts mit grünem und rotem Licht beleuchtete. Allerdings musste ich erstmal ein Gefühl dafür bekommen, in welchem Winkel und wie lange ich das Papier beleuchte. Im Testbild kann man erkennen, dass mir das nicht so gut gelungen ist. Die Belichtungszeit, Helligkeit der Taschenlampe oder die eingestellte Blende sind dann Möglichkeiten, um das Ergbnis zu verbessern. Ich habe einfach die Belichtungszeit verkürzt. Aber damit meine ich nicht die Belichtungszeit oder Verschlußzeit der Kamera (Lightpainting = Langzeitbelichtung), sondern die Zeit, die das Licht der Taschenlampen auf das Glitzerpapier leuchtet.
Behind the scenes by @stepko
When all three sets are "ready" and the settings are clear, it gets serious. If possible, I start with the most difficult part. For the cover picture, I started with the prism. The smallest deviations can have a big impact here. However, I have changed the order of the sets so that I don't have to swap the lens twice. I did the camera rotation with the Laowa 12 mm last.
SET 1
When the aperture and focus are set for set 1, the exposure is started. Pan the caligraphy tool once through the image in front of the prism. Cap the camera and mount it on tripod 2.
SET 2
Change aperture and focus! Switch on the light and uncap the lens, expose for 3 seconds and cap again. Switch off all lights and swap lenses.
**SET 3
Set the aperture and focus on the new lens (Laowa 12 mm). Switch on the light on the rotating unit and rotate, uncap the lens and cap it again after one round. Rotate the camera by 60° and repeat the process a total of 6 times (= 360°).
If no mistakes have been made and I haven't forgotten anything, the picture is in the box and ready.
However, I forgot to change the focus and aperture on the cover picture once, which is why I needed a second attempt. Incidentally, I only use manual lenses with an aperture ring. Very convenient if you want to use light sources with different brightness in the picture.
Wenn alle drei Sets "fertig" sind und die Einstellungen klar sind, wird es ernst. Wenn möglich, starte ich mit dem schwierigsten Teil. Für das Titelbild habe ich mit dem Prisma angefangen. Kleinste Abweichungen können hier große Auswirkungen haben. Allerdings habe ich die Reihenfolge der Sets geändert, damit ich das Objektiv nicht zweimal wechseln muss. Die Kamerarotation mit dem Laowa 12 mm habe ich als letztes gemacht.
SET 1
Wenn Blende und Fokus für Set 1 eingestellt sind, wird die Belichtung gestartet. Das Kaligrafie-Tool einmal vor dem Prisma durchs Bild schwenken. Kamera abdecken und auf Stativ 2 montieren.
SET 2
Blende und Fokus ändern! Licht einschalten und Objektiv aufdecken, 3 Sekunden belichten und wieder abdecken. Alle Lichter abschalten und das Objektiv wechseln.
SET 3
Blende und Fokus am neuen Objektiv (Laowa 12 mm ) einstellen. Licht an der Drehhilfe einschalten und drehen, Objektiv aufdecken und nach einer Runde wieder abdecken. Kamera um 60° drehen und den Vorgang insgesamt 6x durchführen ( = 360° ).
Wenn keine Fehler passiert sind und ich nichts vergessen habe, ist das Bild dann im Kasten und fertig.
Ich habe bei dem Titelbild allerdings einmal vergessen den Fokus und die Blende zu ändern, weshalb ich einen zweiten Versuch brauchte. Ich nutze im übrigen ausschließlich manuelle Objektive mit einem Blendenring. Sehr komfortabel wenn man Lichtquellen mit unterschiedlicher Helligkeit im Bild nutzen möchte.
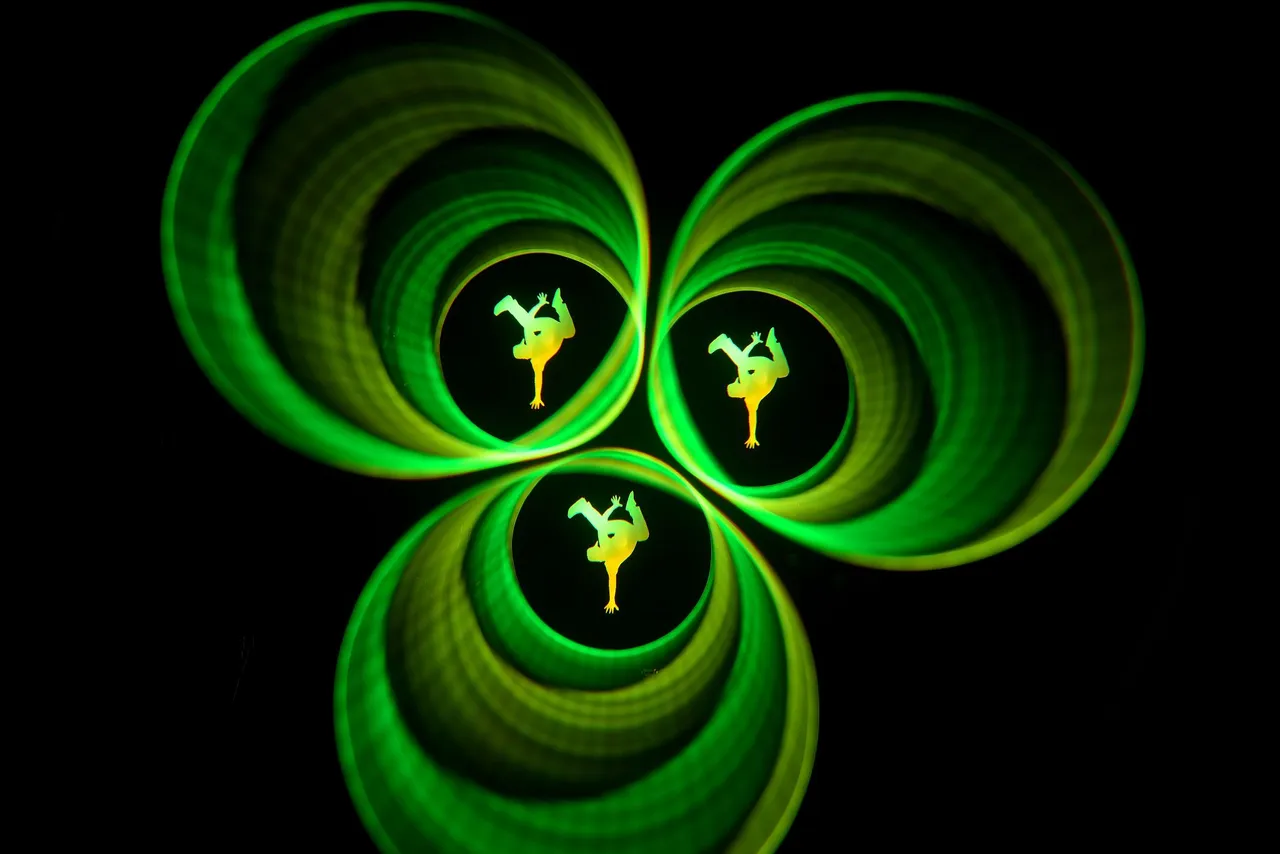
Nikon D750 | ISO 100 | Sigma 28-70 mm | 70 sec. exposure time
I'll try to be a little shorter for the next few images.
The process is always similar in principle:
- picture idea
- planning / picture parts
- setting up the sets
- exposure
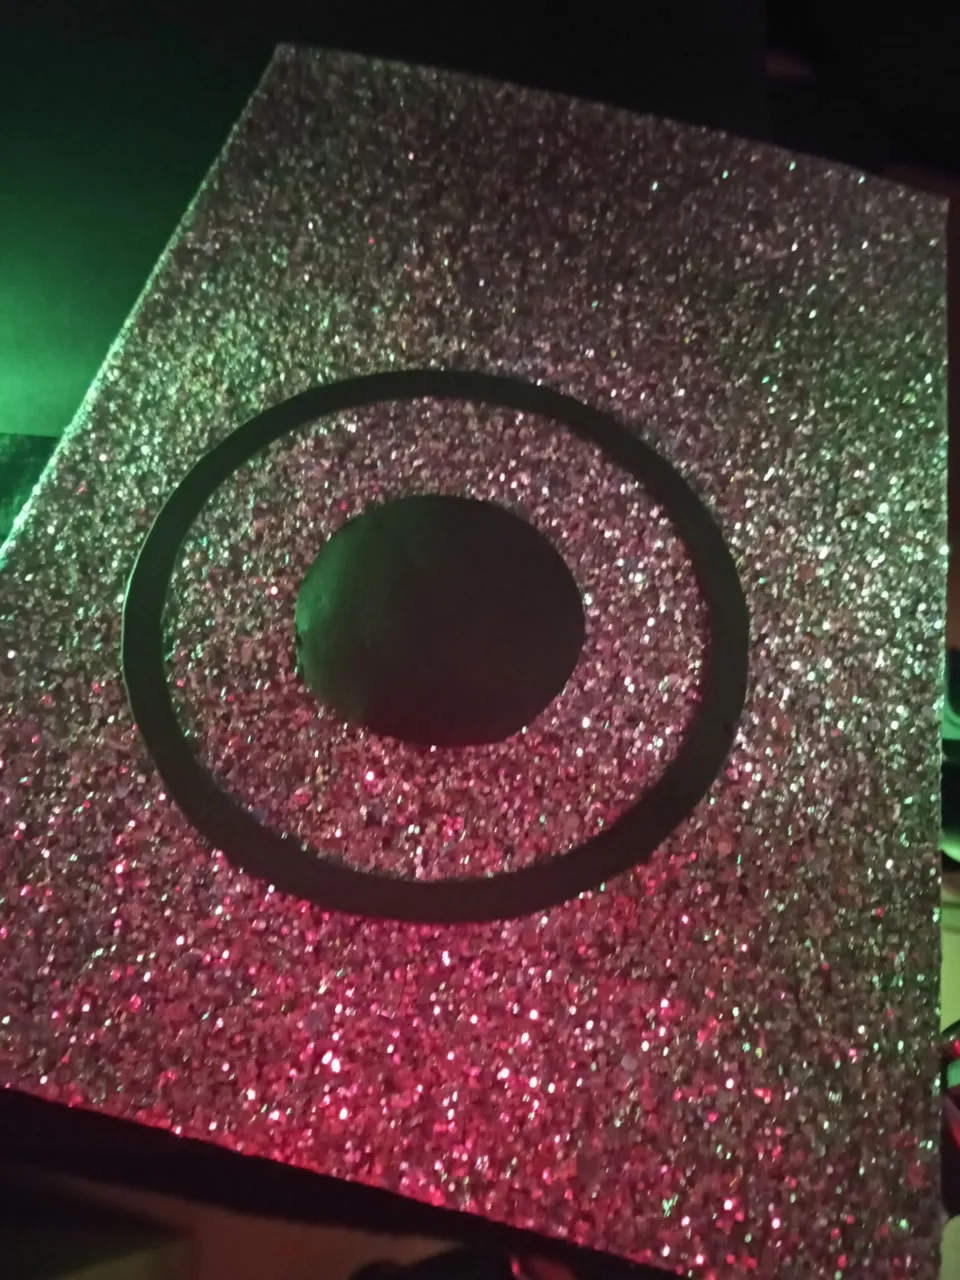
Compared to the cover picture, this picture was quite simple and easy to realise.
A tripod, an LED ring with different colour patterns, an angel stencil and, of course, a prism.
Für die nächsten Bilder versuche ich mich etwas kürzer zu fassen.
Der Ablauf ist vom Prinzip immer ähnlich:
- Bildidee
- Planung / Bildteile
- Einrichten der Sets
- Belichtung
Im Vergleich zum Titelbild, ist dieses Bild recht simpel und einfach umzusetzen gewesen.
Ein Stativ, ein LED-Ring mit verschiedenen Farbmustern, eine Engels-Schablone und natürlich ein Prisma.
Behind the scenes by @stepko
In the example image you can see the effect of the prism used. The torch is displayed 5 times. Nothing else happens in my picture with the LED ring. After I had selected a light effect and aligned everything (align camera with prism and LED ring), I started the exposure and zoomed through the prism. This turned the LED ring into a "tube". The angel stencil was positioned behind the LED ring and was only illuminated from behind after zooming in.
In dem Beispielbild kann man den Effekt des verwendeten Prisma erkennen. Die Taschenlampe wird 5 mal dargestellt. Nichts anderes passiert in meinem Bild mit dem LED-Ring. Nachdem ich einen Lichteffekt ausgewählt und alles ausgerichtet hatte ( Kamera mit Prisma und LED-Ring ausrichten), startete ich die Belichtung und zommte durch das Prisma. Dadurch wurde der LED-Ring zu einer "Röhre". Die Engelsschablone war hinter dem LED-Ring positioniert und wurde erst nach dem Zoomen von hinten beleuchtet.
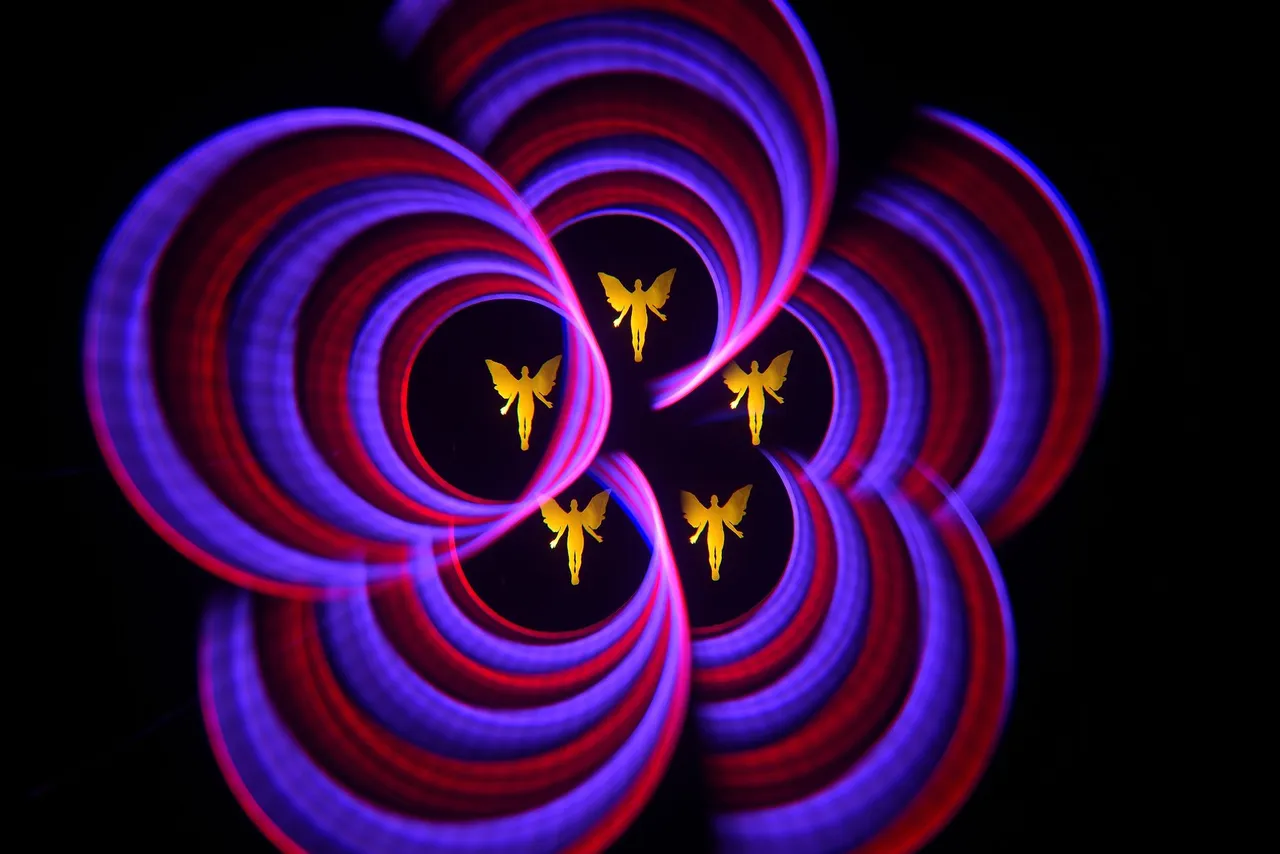
Nikon D750 | ISO 100 | Sigma 28-70 mm | 166 sec. exposure time
The procedure for this image is very similar. I just changed the stencil and the prism and adjusted the colours.
Die Vorgehensweise für dieses Bild ist sehr ähnlich. Ich habe lediglich die Schablone und das Prisma ausgetauscht, sowie die Farben angepasst.
Nikon D750 | "Behind the scenes"
by @stepko
As I'm not a fan of too many black areas, I set up a second set to add some bokeh to the dark areas. It also gives the image a little more depth.
Da ich überhaupt kein Freund von zu vielen schwarzen Bildbereichen bin, habe ich ein zweites Set eingerichtet, um noch etwas Bokeh in die dunklen Bereiche zu bringen. Zusätzlich gibt es noch etwas mehr Tiefe im Bild.

Nikon D750 | "Behind the scenes"
by @stepko
As described in the post above, I also tested the individual parts of the image beforehand to determine the exposure, aperture and focus. I then started the exposure again and after 166 seconds and without any errors, the final image was in the box.
Wie oben im Beitrag beschrieben, habe ich auch bei diesem Bild vorher die einzelnen Bildteile getestet, um Belichtung, Blende und Fokus zu ermitteln. Danach habe ich wieder die Belichtung gestartet und nach 166 Sekunden und ohne Fehler, war das Bild dann auch im Kasten.
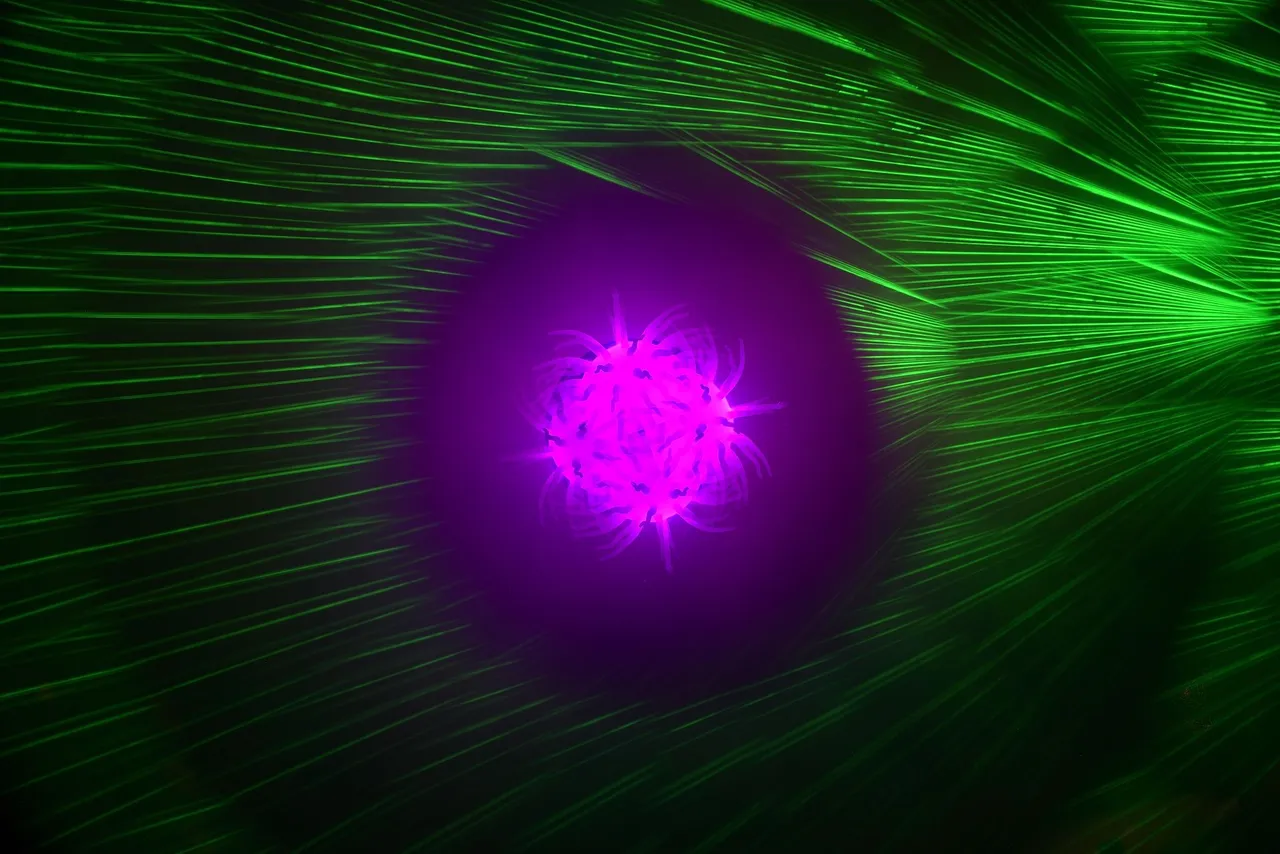
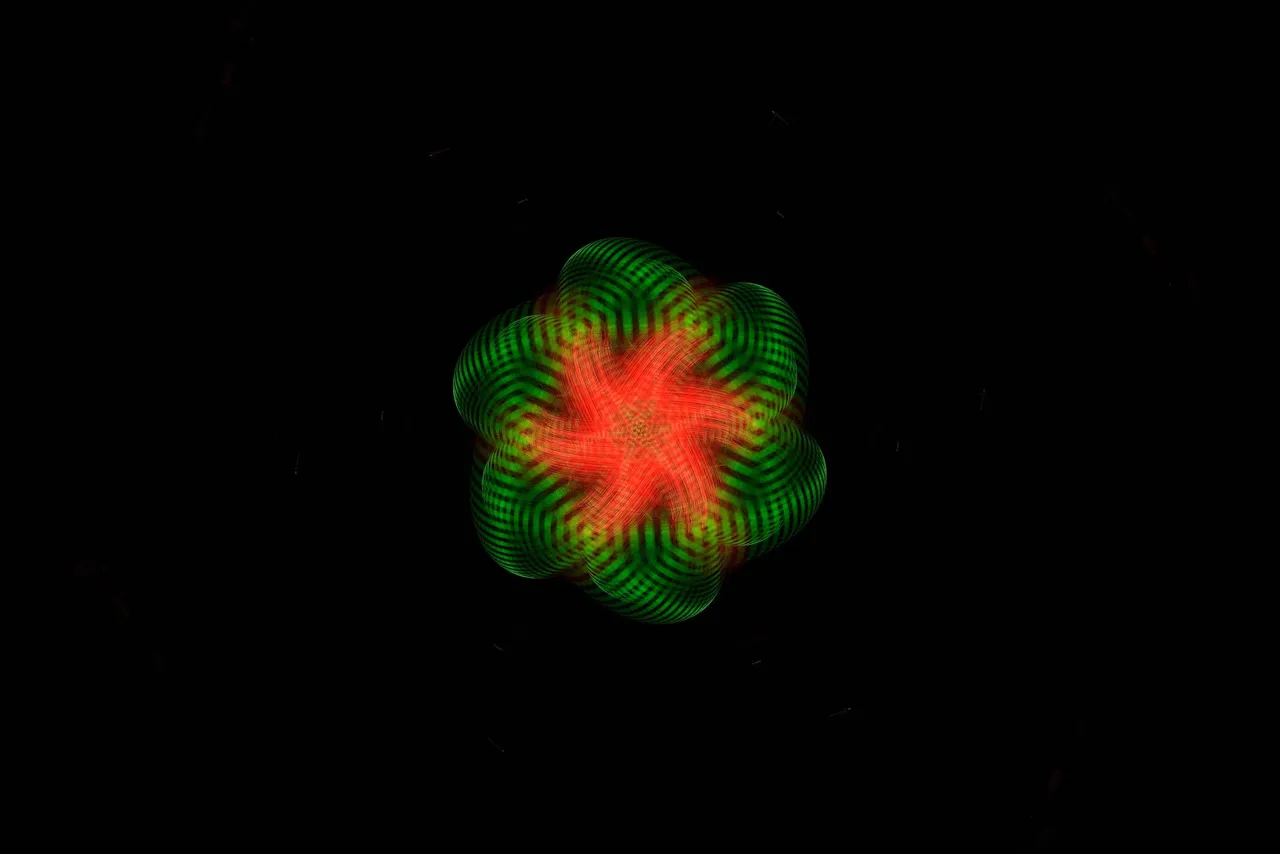
Nikon D750 | ISO 100 | Sigma 28-70 mm | 300 sec. exposure time
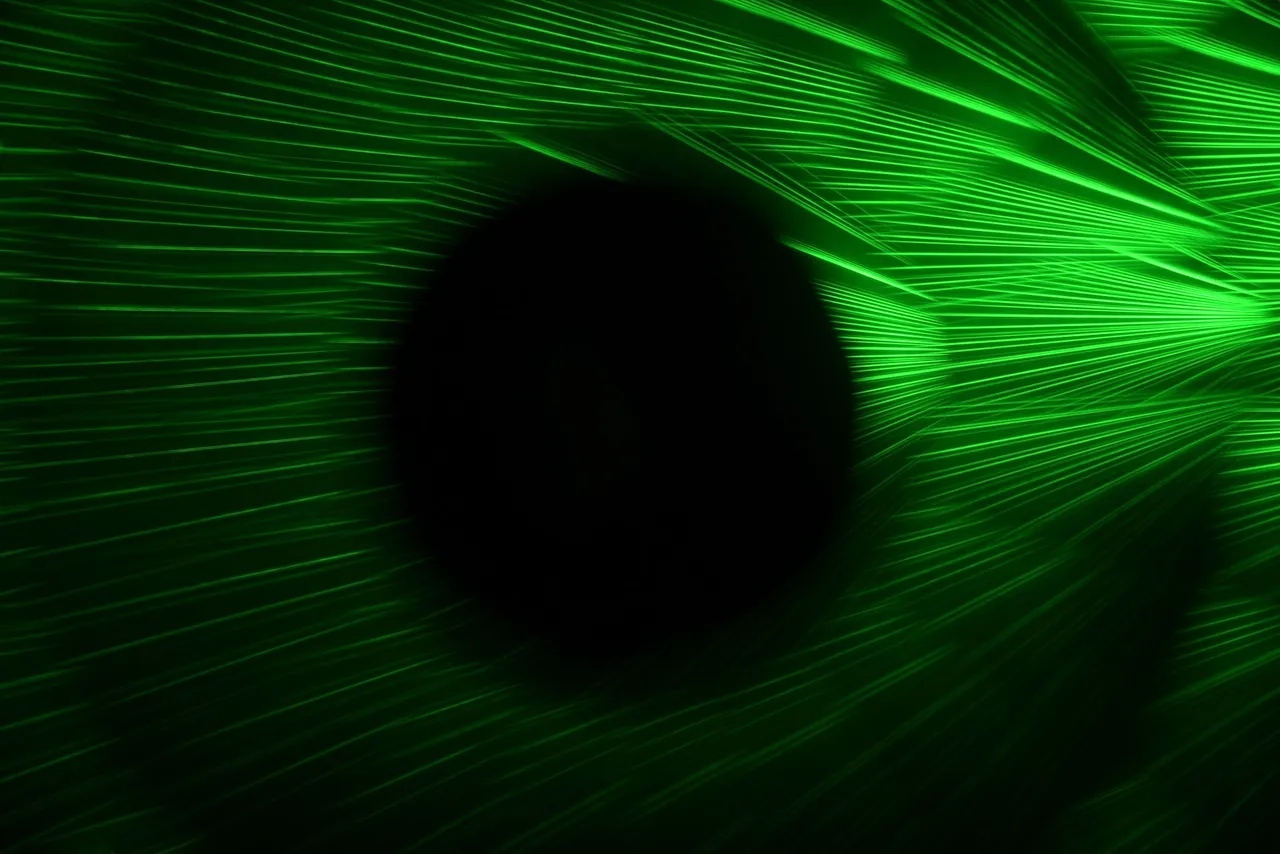
Another image with a prism. This time a kaleidoscope prism, which creates funny effects in combination with a laser.
Ein weiteres Bild mit einem Prisma. Dieses Mal ein Kaleidoskop-Prisma, welches in Verbindung mit einem Laser lustige Effekte erzeugt.
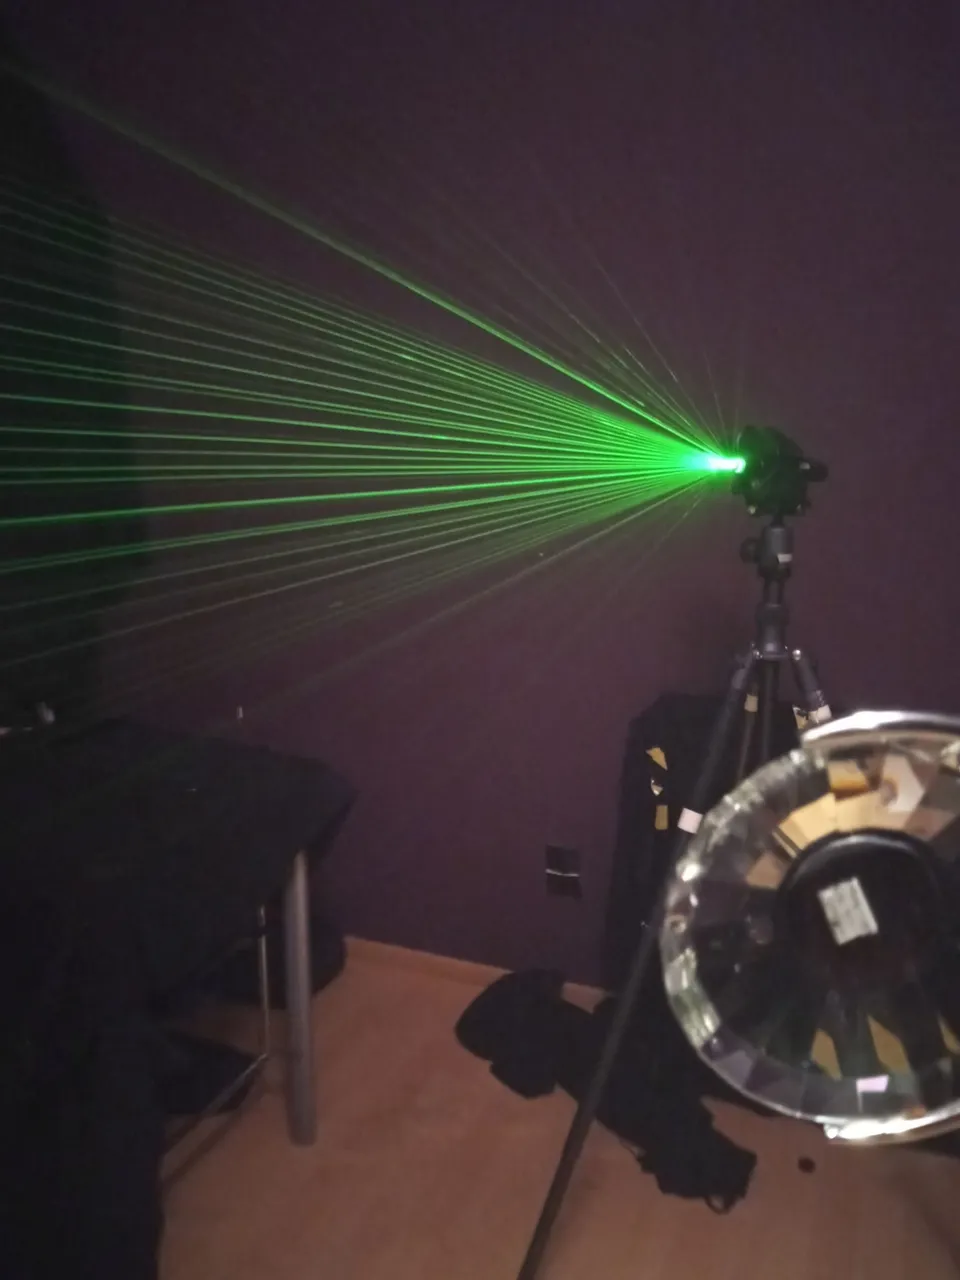
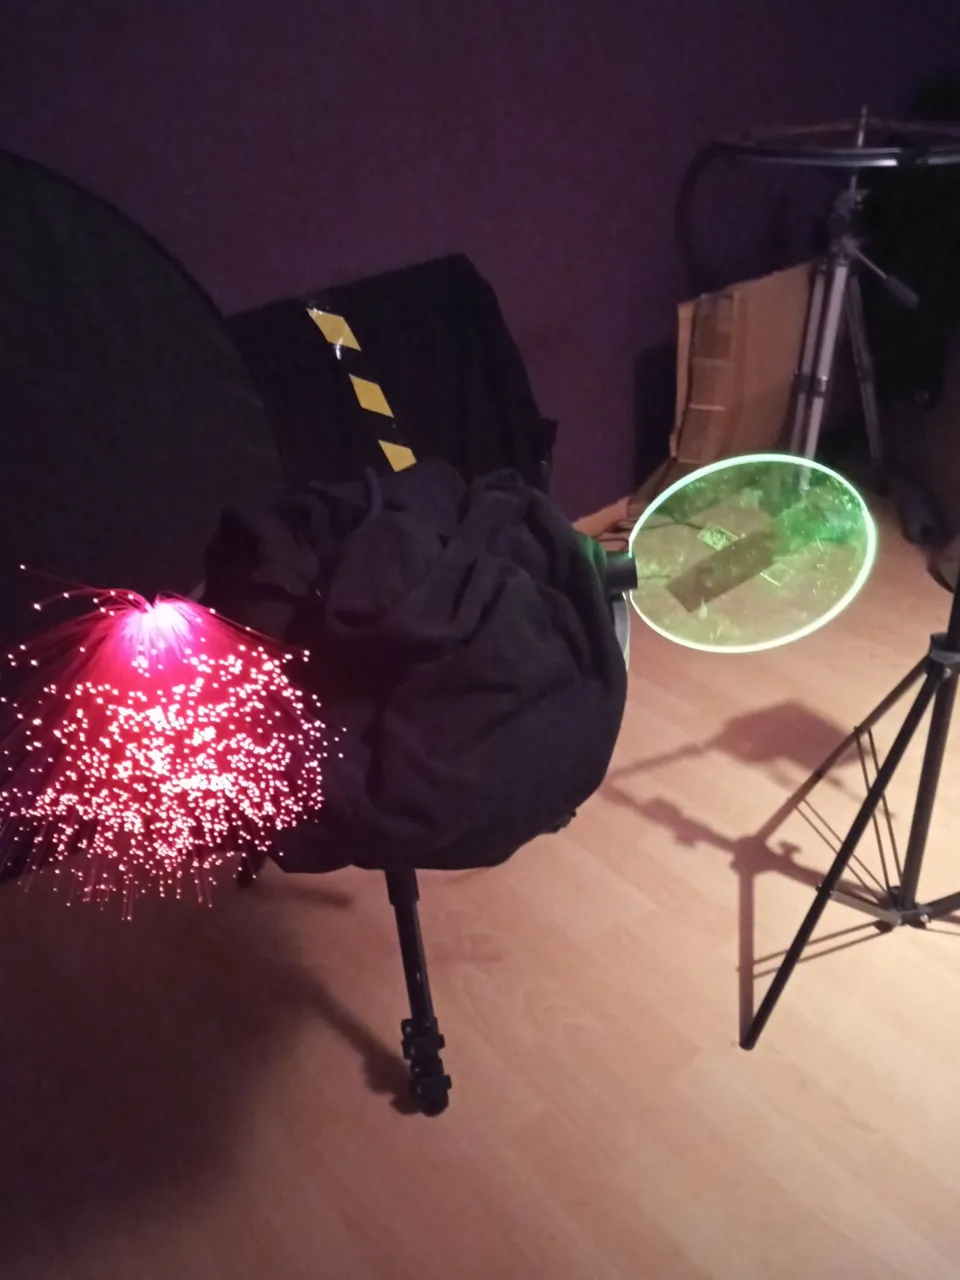
Behind the scenes by @stepko " green Laser & Kaleidoskop-Prisma "
I made the laser visible with some fog, and I covered the prism in the centre, as this is where the light figure is created in the second set.
Den Laser habe ich mit etwas Nebel sichbar gemacht, das Prisma habe ich in der Mitte zugeklebt, da dort die Lichtfigur im zweiten Set erstellt wird.
Nikon D750 | "Behind the scenes"
by @stepko
A short test shot was also helpful here to determine the aperture and exposure time. In the test shot you can see that the laser (coming from the right) appears too bright in the right part of the frame. I then capped the lens a little earlier in the later exposure to correct the problem.
Auch hier war ein kurzes Testbild hilfreich, um die Blende und Belichtungzeit zu ermitteln. Im Testbild sieht man, dass im rechten Bildteil der Laser (kommt von rechts) zu hell erscheint. Ich habe dann das Objektiv in der späteren Belichtung etwas früher abgedeckt, um das Problem zu beheben.
Behind the scenes by @stepko
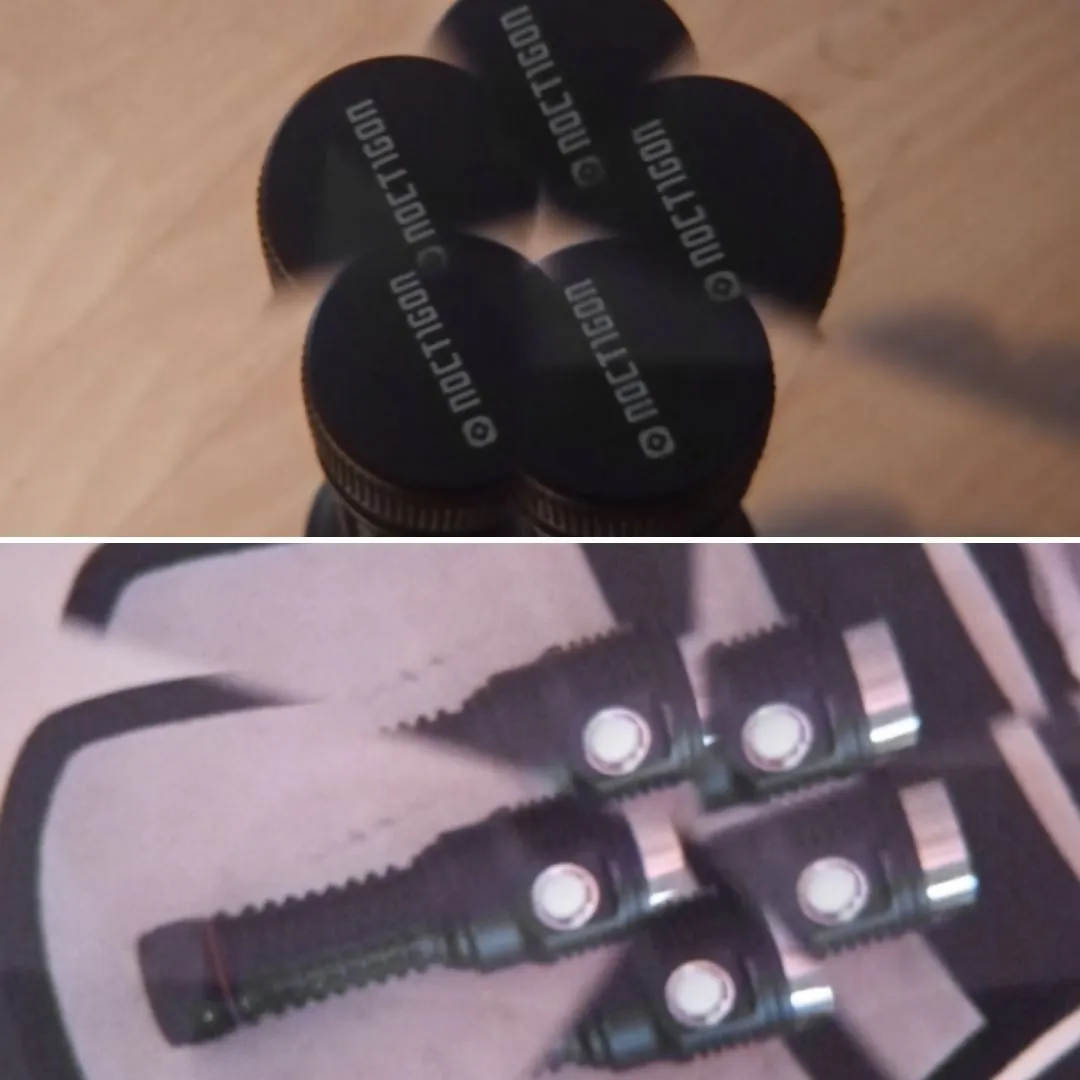
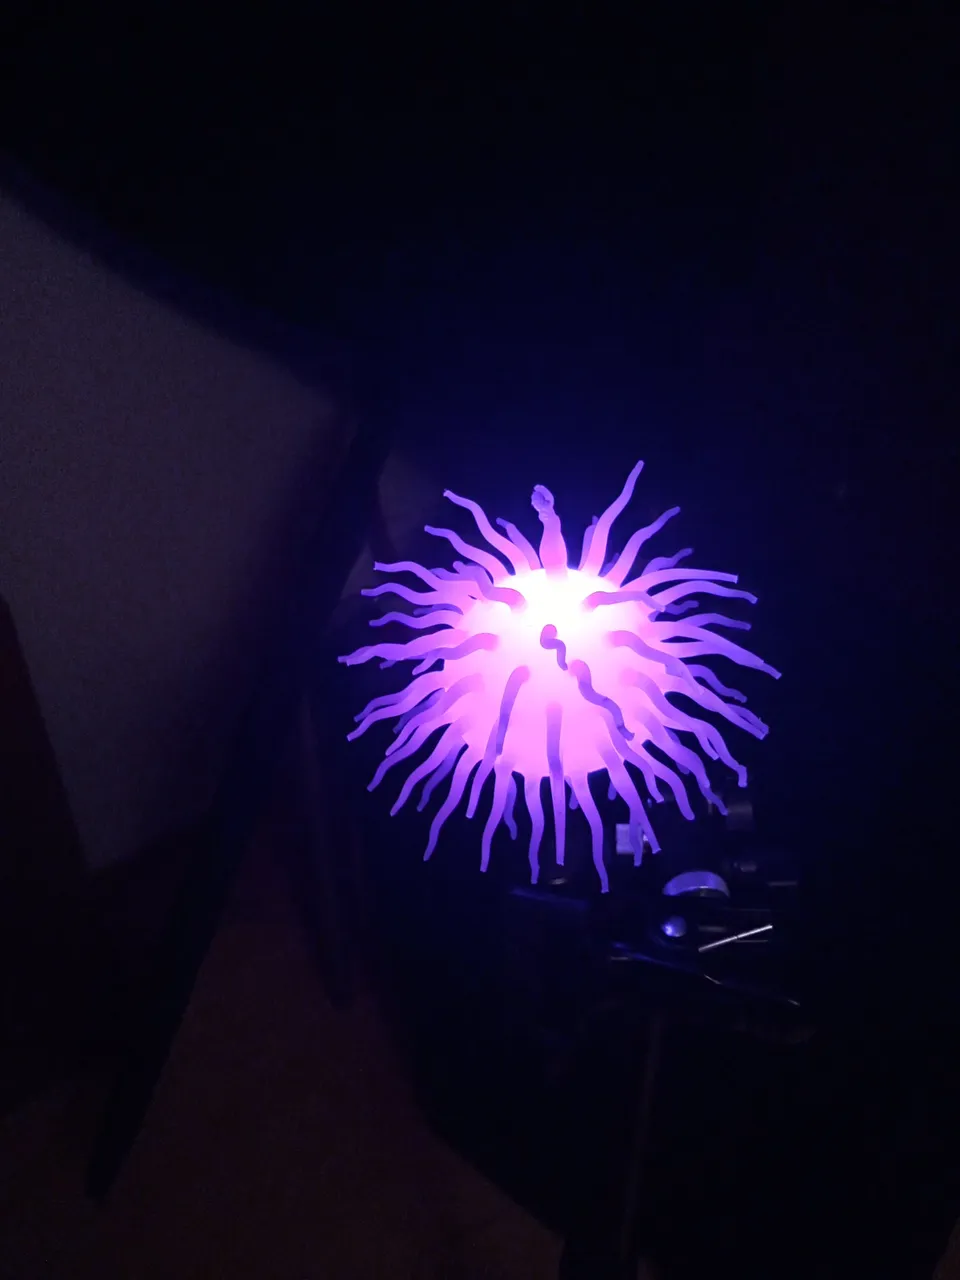
With this funny dog toy from the 1-euro shop around the corner, I then made the light figure in the centre. Camera rotation (4x 90°) and lit from the inside with a Convoy S2 in violet.
Mit diesem lustigen Hundespielzeug aus dem 1-Euro-Laden um die Ecke, habe ich dann die Lichtfigur in der Mitte gemacht. Kamerarotation ( 4x 90° ) und von innen beleuchtet mit einer Convoy S2 in violett.
Nikon D750 | "Behind the scenes"
by @stepko
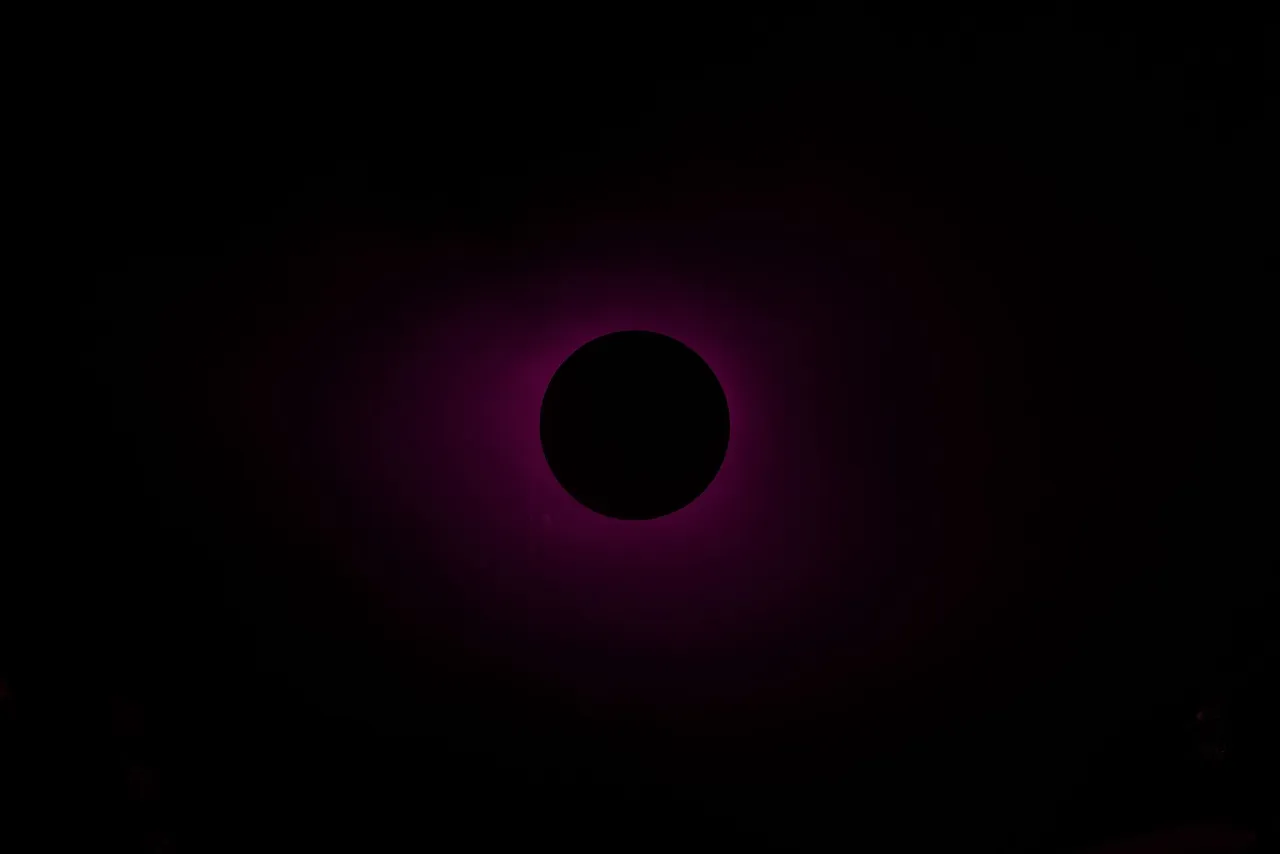
I didn't really like the area between the green laser and the purple light figure. Somehow the whole thing looked strange to me. So I spontaneously decided ( artistic freedom ) to integrate a ring of diffuse light around the light figure, as you can see in the test shot above.
Der Bereich zwischen grünem Laser und violetter Lichtfigur gefiel mir nicht so wirklich. Irgendwie wirkte das ganze seltsam auf mich. Also habe ich mich spontan ( künstlerische Freiheit ) entschlossen noch einen Ring aus diffusem Licht um die Lichtfigur zu integrieren, wie oben auf dem Testbild zu sehen.
Behind the scenes by @stepko
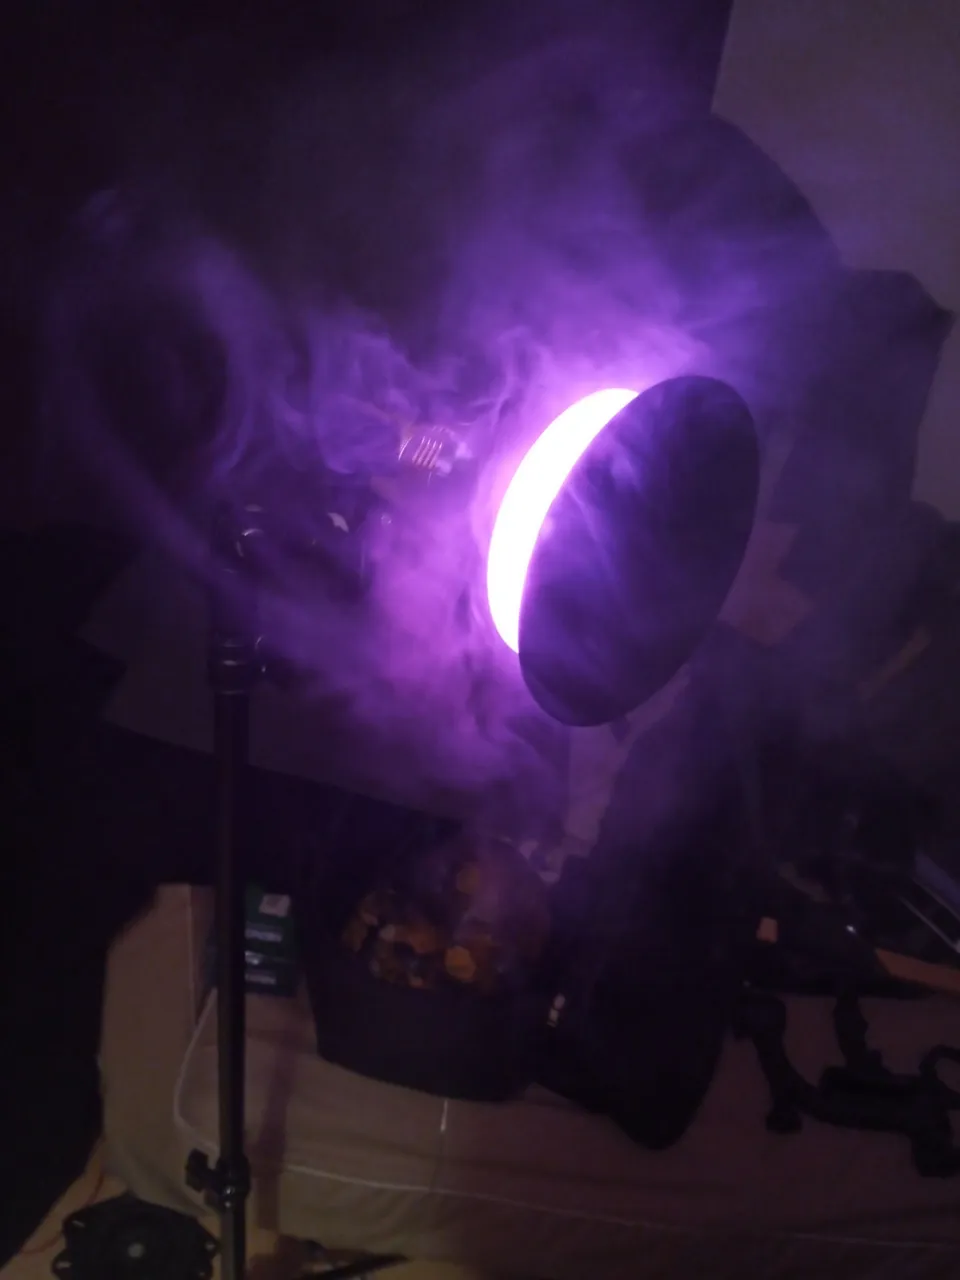
I like to use a backlight scanner to create a ring of diffuse light in the image. This emits the light evenly in a circle in all directions.
My fellow artists and friends @lichtkunstfoto and @candelart have described exactly what a backlight scanner is and what you can do with it in light painting here in their hive blogs. Feel free to take a look.
I also blew some fog from my e-cigarette around the backlight scanner to diffuse the light. After 6 seconds of exposure time at f/11, the ring was ready and the settings were noted. Now I could start the exposure and combine all three parts of the image into one exposure.
Um einen Ring aus diffusem Licht ins Bild zu basteln, nutze ich gerne einen Backlight-Scanner. Dieser strahlt das Licht kreisförmig in alle Richtungen gleichmäßig ab.
Was genau ein Backlight-Scanner ist und was man damit im Lightpainting so anstellen kann, dass haben die geschätzten Künstler-Kollegen und Freunde @lichtkunstfoto und @candelart hier in Ihren Hive-Blogs beschrieben. Schaut gerne mal vorbei.
Um den Backlight-Scanner habe ich zusätzlich etwas Nebel aus meiner E-Zigarette gepustet, damit das Licht diffus wird. Nach 6 Sekunden Belichtungszeit bei Blende f/11 war auch der Ring fertig und die Einstellungen notiert. Nun konnte ich die Belichtung starten und alle drei Bildteile in einer Belichtung vereinen.
Nikon D750 | ISO 100 | Sigma 28-70 mm | 334 sec. exposure time
The last image in today's post was taken with two sets / tripods.
Set 1 for the light figure in the centre, which was created with moving light on a rotating device and camera rotation technique.
Das letzte Bild des heutigen Beitrags entstand mit zwei Sets / Stativen.
Set 1 für die Lichtfigur in der Mitte, die mit bewegtem Licht auf einer Drehhilfe und Kamerarotations - Technik entstanden ist.
Nikon D750 | "Behind the scenes"
by @stepko
In set 2, I used a kaleidoscope prism and black cardboard with fluorescent blue colour blobs. I found the black cardboard by chance on the shelf. The colour blobs came from another experiment. The effect of the prism made the colour dots visible several times and distributed them throughout the image. I then used a UV lamp (Convoy S2 UV) to make the dots glow and turned the camera by about 40°.
In Set 2 habe ich ein Kaleidoskop-Prisma und schwarzen Fotokarton mit fluorezierenden Farbkleksen genutzt. Den schwarzen Fotokarton habe ich zufällig im Regal gefunden. Die Farbklekse stammten von einem anderen Experiment. Der Effekt des Prisma machte die Farbpunkte mehrfach sichbar und verteilte sie im Bild. Mit einer UV-Lampe (Convoy S2 UV) habe ich die Punkte dann zum leuchten gebracht und dabei die Kamera um cirka 40° gedreht.

And that brings us to the end of a very long article. Many thanks to everyone who has read this so far!
I hope you enjoyed this trip behind the scenes of my lightpaintings and that it shows you what you can do with light in a long exposure.
See you next time
Stepko
Und damit sind wir auch am Ende eines sehr langen Beitrags. Vielen Dank wer bis hier gelesen hat!
Ich hoffe der Ausflug hinter die Kulissen meiner Lightpaintings hat euch gefallen und verdeutlich was man alles mit Licht in einer Langzeitbelichtung anstellen kann.
Bis zum nächsten Mal
Stepko
All my images were taken in several steps, during a longexposure. Nothing is added or removed in post processing. Only light in real time in front of the camera. #nophotoshop #AIfree
Stepko Light Painting Photography
My Name is Stefan aka Stepko, I am a Lightpainting Artist, currently based in Hannover, Germany.
Darkness is my canvas and I love to create artworks out of light.
If you like my art you can join me on
Facebook , Flickr and Twitter for more Light Painting Photography.
NEVER STOP LIGHTPAINTING !
You like the art of light painting and want to see more amazing shots, then visit these Artists, they will blow your mind: @fadetoblack @martbarras @fastchrisuk @lichtkunstfoto @dawnoner @oddballgraphics @gunnarheilmann @candelart @marlasinger666 @ryuslightworks @maxpateau @yo-hoho @lacelight @maximepateau @neilru75 and follow them and/or give them an upvote.
We are Light Painters

To help and support the LightPainters community here on Hive I would appreciate your delegation of HivePower. Any amount is appreciated. It does not require much to get started, we are happy for any gesture.
How to delegate?
Delegate 50HivePower, [50HP]
Delegate 250HivePower, [250HP]
Delegate 500HivePower, [500HP]
Delegate 1000HivePower, [1000HP]
All the Hive Power will help to upvote the artist's contribution as part of the LightPainters community.