
"Jean de la Lune"
Watercolor on Paper
425gsm, 40cm x 30cm (15¾" x 11⅞")
After last week's oil pastel fiasko with just "slightly" overcranked sunset colors I found it necessary to repaint this pretty sail ship with a medium I'm much more comfortable with. It was more fun and I hope you can agree, it looks much better, too, especially since I set the scene in daylight with bright but much more realistic colors. (Hey, @w74, I'm keeping my promises.)
After a brief discussion with @leaky20 about my method to get the proportions of a painting right every single time, I tried especially hard to make an exakt copy of the first sketch to prove a point about the value of a proportional divider in painting. If you're painting and you don't know what a proportional divider is, I'm republishing a detailed explanation from 2020 below. Have a look!
As always, the painting is based on a reference photo found on one of the many free stock photo sites like Pixabay. Thanks for looking, and please don't forget to upvote and reblog if you liked my art. Until next time!
Nach dem Ölpastell-Fiasko von letzter Woche mit "leicht" überdrehten Sonnenuntergangsfarben fand ich es notwendig, dieses hübsche Segelschiff mit einem Medium neu zu malen, mit dem ich viel besser zurechtkomme. Es hat mehr Spaß gemacht, und ich hoffe, ihr stimmt mir zu, dass es auch viel besser aussieht, vor allem, weil ich die Szene bei Tageslicht mit hellen, aber viel realistischeren Farben gemalt habe. (@w74: Wann ma was versprecht muss ma's aa halle. So Meischda, jetzt wääschde beschääd!)
Nach einer kurzen Diskussion mit @leaky20 über meine Methode, die Proportionen eines Gemäldes jedes Mal richtig hinzubekommen, habe ich mich besonders bemüht, eine exakte Kopie der ersten Skizze anzufertigen, um zu beweisen, was für ein großartiges Hilfsmittel ein Proportionalzirkel beim Malen ist. Wenn Du auch malst und nicht weißt, was ein Proportionalzirkel ist, hänge ich unten erneut eine ausführliche Erklärung aus dem Jahr 2020 an. Schau' mal rein!
Wie immer ist das Bild nach einem Referenzfoto von einer der vielen freien Foto-Websites wie Pixabay gemalt. Danke fürs Anschauen, und vergesst bitte nicht das Upvoten und Rebloggen, wenn euch mein Beitrag gefallen hat. Bis zum nächsten Mal!
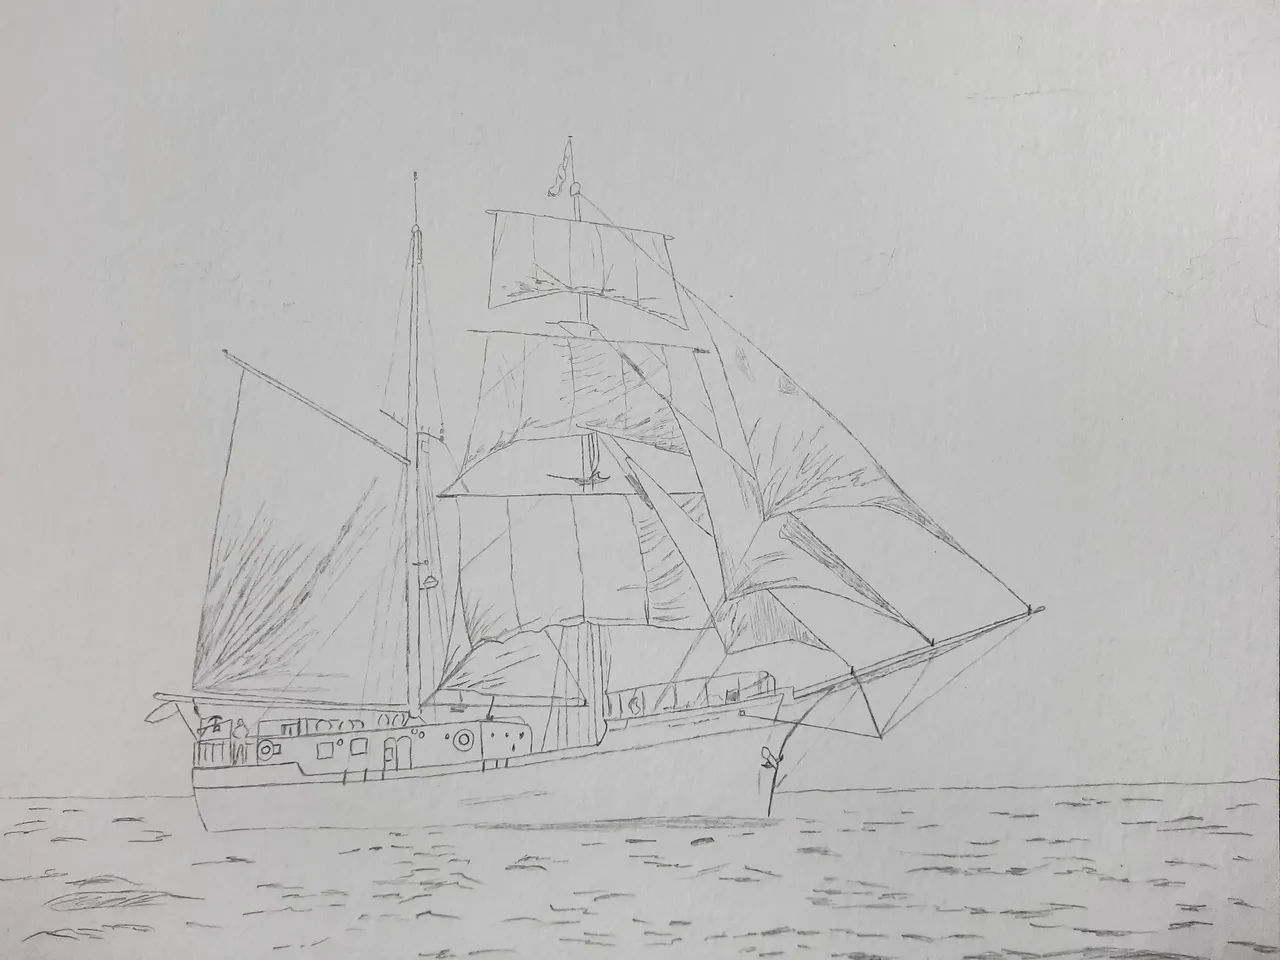
Original pencil sketch (proof of creative ownership)
Original Bleistiftskizze (Schöpfungsnachweis)
BONUS Painting Hack: The Proportional Divider
(From a 2020 post / updated) There is a very simple tool which will help you get the proportions of a drawing or painting right every time: the proportional divider. I had never heard of this before in conjunction with art, so I'm mentioning it to you today. Maybe I'm not alone?
The proportional divider is over 400 years old and purportedly even the great Leonardo da Vinci used it in his work. If it's good enough for Leonardo, it ought to be good enough for the rest of us, right?
The following video by Stefan Baumann explains in detail what a proportional divider ("Prospek") is, and how it's used, much better than I ever could:
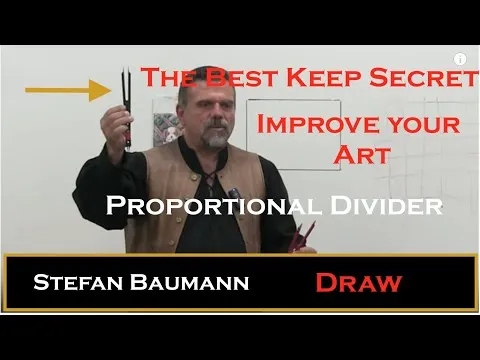 (Video with detailed explanations in English. Video in DEUTSCHER Sprache weiter unten! )
BONUS-Maltipp: Der Proportionalzirkel
(Aus einem Post von 2020 / aktualisiert) Es gibt ein sehr einfaches Werkzeug, das euch helfen wird, die Proportionen einer Zeichnung oder eines Gemäldes jedes Mal absolut richtig zu treffen: den Proportionalzirkel. Ich hatte noch nie im Zusammenhang mit Kunst davon gehört, deshalb erwähne ich es heute für euch. Vielleicht bin ich ja nicht alleine?
Der Proportionalzirkel ist über 400 Jahre alt, und wie man sagt, hat ihn sogar der große Leonardo da Vinci in seinem Wirken verwendet. Wenn das Ding gut genug für Leonardo ist, dann sollte es auch gut genug für den Rest von uns sein, oder?
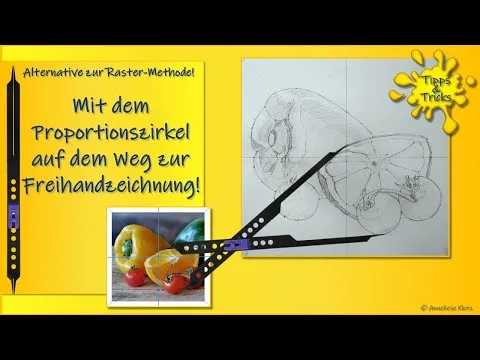
Das folgende Video von Anneliese Klotz erklärt im Detail, was ein Proportionalzirkel ("Prospek") ist und wie er verwendet wird, viel besser als ich es je könnte:
There is a number of metal proportional dividers that can be had at a reasonable price, but they're mostly Asian knock-offs of antique nautical navigation gear. They can work, but the problem with those is, that their hinges are slotted, so they tend to slip and ruin the scale if you're not careful.
What Baumann shows in his video has a set of holes, so once set, the scale remains fixed regardless of how often one opens and closes the arms. Those of you shopping Amazon.com without major shipping charges can simply order one from there; just search for "proportional divider". Alas, they're cheap, and they look flimsy.
Since absolute scale is not really important in art, I made one myself. It's lightweight, sturdy, and works just fine - for under 3.00 EUR and less than an hour of work.
Es gibt ein paar Proportionalteiler aus Metall, die zu einem vernünftigen Preis erhältlich sind, aber es handelt sich dabei meist um asiatische Imitate antiker nautischer Navigationsausrüstung. An sich funktionieren sie, aber das Problem ist, dass ihre Scharniere geschlitzt sind, so dass sie dazu neigen, zu verrutschen und den Maßstab zu ruinieren, wenn man nicht aufpasst.
Was Baumann in seinem Video zeigt, hat eine Reihe von Löchern, so dass der Maßstab - einmal eingestellt - fixiert bleibt, unabhängig davon, wie häufig man die Schenkel öffnet und schließt. Man kann so ein Teil bei Amazon.de bestellen; sucht einfach nach "Proportionalteiler". Mehr Auswahl gibt's bei Amazon.com ("proportional divider") mit entsprechenden Versandkosten. Die Dinger sind billig, und so sehen sie auch aus. Haltbarkeit Fehlanzeige.
Da der absolute Maßstab in der Kunst nicht wirklich wichtig ist, habe ich mir einfach einen selbst gebastelt. Er ist leicht, stabil und funktioniert klasse - für unter 3,00 EUR und weniger als eine Stunde Arbeit:
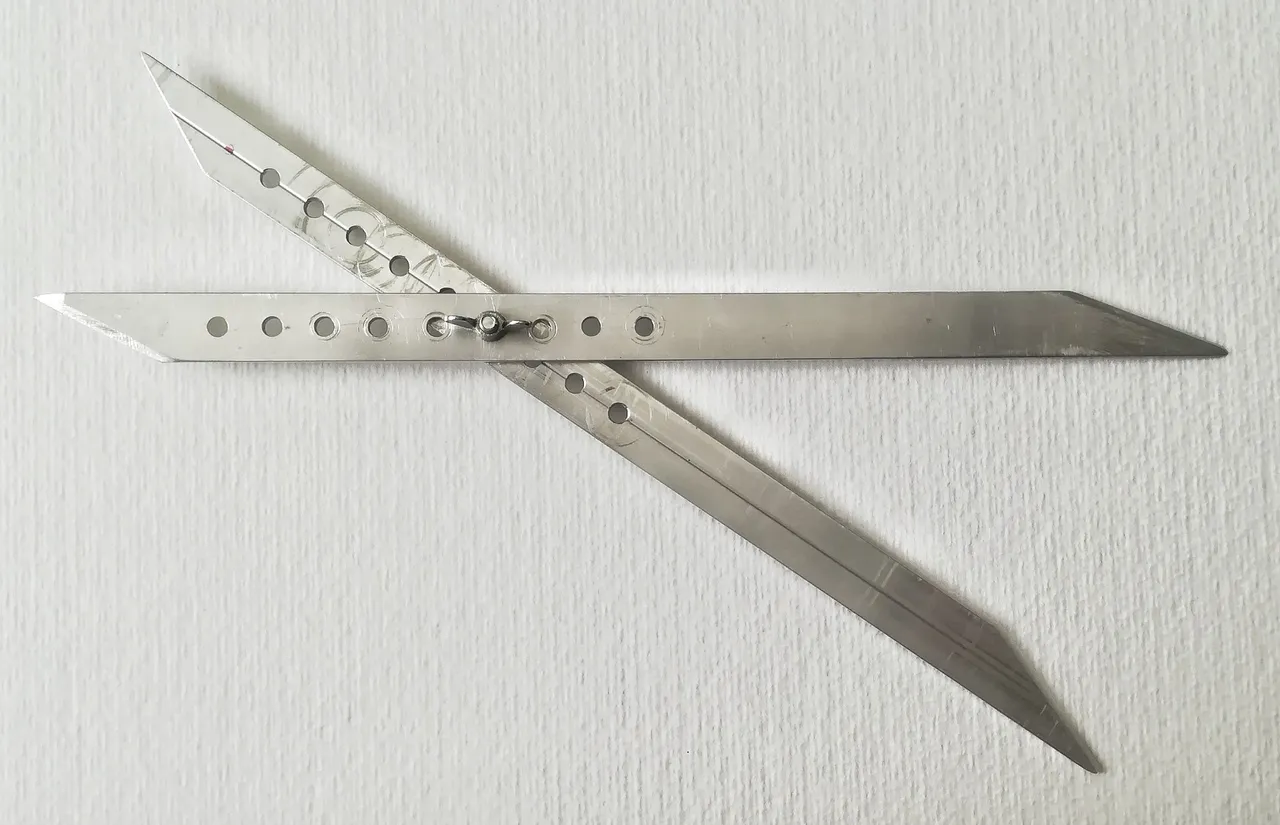
I made this thing from 10 mm x 1 mm (⅜" x .040") aluminum stock I purchased at my local hardware store. The arms are 270 mm (10 ¾") from point to point. This is perfect for my preferred painting format of 40 x 30 cm and my computer screen, where I display my reference photos. If you're painting different formats, you need to experiment a little with the length. I used a plain old M4 (8-32 UNC) screw with a wing nut as a hinge.
I cut the stock to length and taped the two pieces tightly together. Then I drilled 4.2 mm holes to have as little play as possible. The only important thing to remember is, the first hole goes dead center, and then add more holes towards one of the points as needed. The more holes, the more possible scales.
Lastly, I simply cut the ends in a triangular shape and filed them to a point, not too sharp, as I don't intend to use the instrument as a weapon (and I don't want to ruin my computer screen). That's all there is to it. Remember, we're doing this for the art, not as a precision engineering tool. While the proportional divider will give you certainty for key points in your drawing, you still have to eyeball and fill in all the lines and shapes inbetween.
Good luck, thanks for looking, and please don't forget to upvote and reblog if you liked my art. Until next time!
Ich habe das Ding aus 10 mm x 1 mm Band-Aluminium aus meinem Baumarkt gebastelt. Die Arme sind von Spitze zu Spitze 270 mm lang. Das ist perfekt für mein bevorzugtes Malformat von 40 x 30 cm und meinen Computerbildschirm, auf dem ich beim Malen meine Referenzfotos habe. Für andere Formate müsst ihr ein wenig mit der Länge experimentieren. Als Scharnier habe ich einfach eine M4 Schraube und eine Flügelmutter verwendet.
Ich habe die beiden Arme auf Länge geschnitten und sie dann fest mit Klebeband aufeinander fixiert. Um so wenig Spiel wie möglich zu haben, bohrte ich 4,2 mm Löcher. Wichtig ist nur, dass das erste Loch genau durch die Mitte geht und dann je nach Bedarf weitere Löcher in Richtung einer der Spitzen gebohrt werden. Je mehr Löcher, desto mehr verschiedene Maßstäbe.
Zuletzt habe ich die Enden einfach dreieckig zugeschnitten und dann nicht allzu spitz zugefeilt. Ich will das Ding ja schließlich nicht als Waffe benutzen (und ich will meinen Bildschirm auch nicht ruinieren). Mehr gibt es dazu nicht zu sagen. Denkt dran, wir machen das für die Kunst und nicht als Präzisionsmeßzeug! Der Proportionalteiler gibt euch zwar Gewissheit über wichtige Punkte in eurer Zeichnung, aber die Linien und Formen dazwischen müsst ihr immer noch selber abschätzen und einfügen.
Wer es richtig schön wissenschaftlich mag, mit mathematisch exakten Maßstäben, dem sei das Bastelvideo von Anneliese Klotz ans Herz gelegt. Sie verwendet preiswerte fertige Stahllineale aus dem Baumarkt für die Schenkel ihres Proportionalteilers. Eine gute Idee, finde ich:

Viel Spaß mit eurem Proportionalzirkel, Danke fürs Anschauen, und vergesst bitte nicht das Upvoten und Rebloggen, wenn euch mein Beitrag gefallen hat. Bis zum nächsten Mal!