🇬🇧🇬🇧🇬🇧ENGLISH🇬🇧🇬🇧🇬🇧
Hello community of creators:
This is my entry to this month's teapot initiative.
When I read the proposal for this month's entry I found it a bit difficult, as I had no idea what to do to share with you. Then I searched for some information and pictures about teapots and it took me on a journey back to my childhood.
I remember, especially in winter time, that my grandmother used to drink tea in very nice porcelain cups and not only tea, she also drank coffee with milk and hot chocolate.
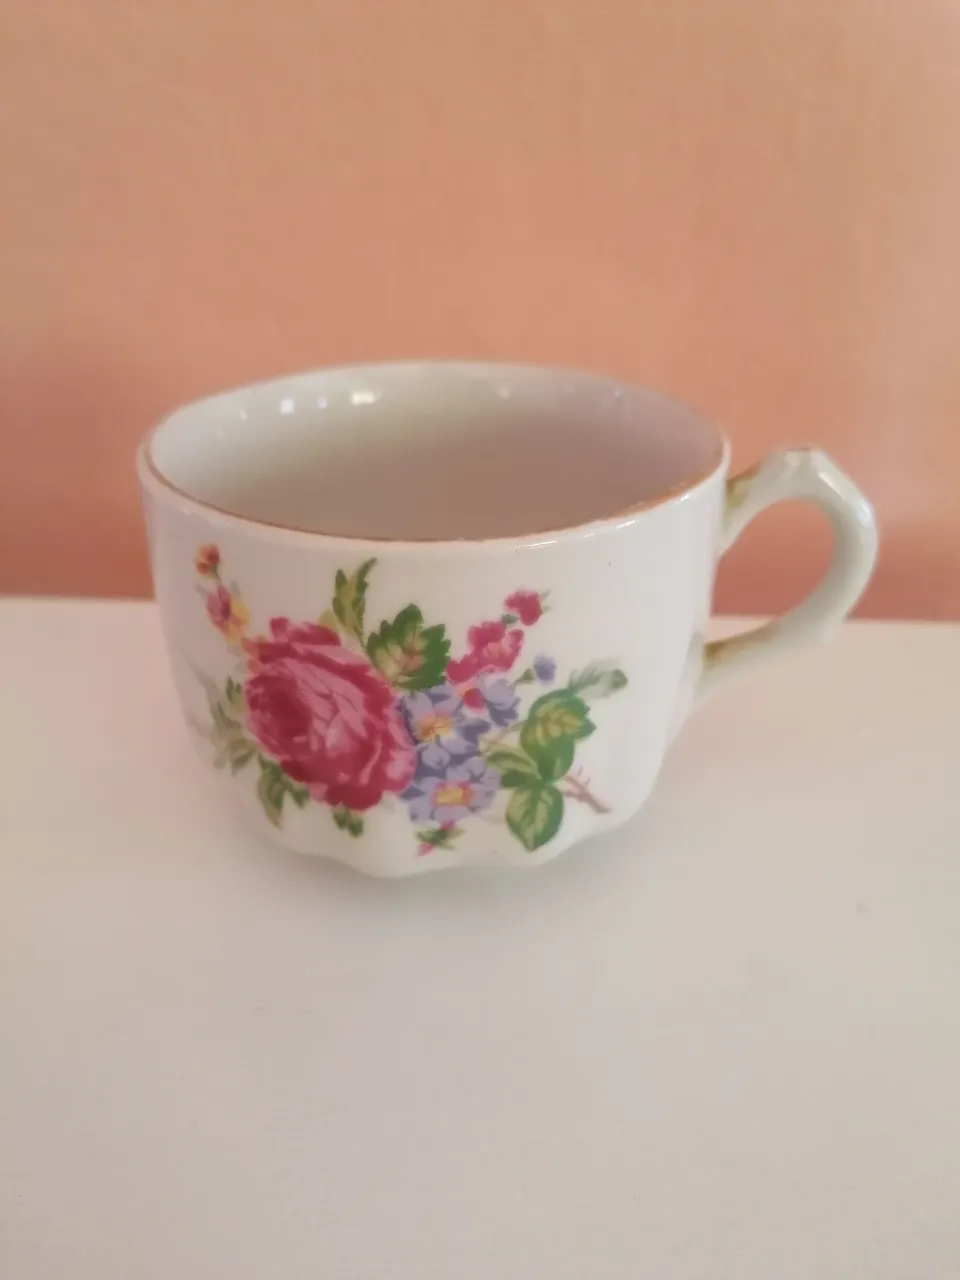
It was then that I started to look for the only remaining cup from that time, which is kept in a special place as a souvenir that belonged to my grandmother and previously to my great-grandmother, whom I did not have the joy of knowing.
My grandfather, who was my grandmother's faithful companion and who indulged her every possible wish she had, was a carpenter by trade. With all the dedication and patience that characterised him, he spent hours immersed in his work and almost all the furniture in my house was made by him.
Today I wish to make a fusion and pay homage to my grandparents, these two beings who were so important in my life. I don't know if I'm up to their level, but the work was made from the deep love and affection I have for them. Today I am sharing a teapot in cardboard to hang cups.
I will show you step by step the materials, tools and activities that I did until I reached the final result.
Materials and tools:
A pencil
A piece of recycled cardboard (40*40cm)
A polishing machine with a disc for cutting wood
rasp
20cm wire
Cutting pliers
A awl
Hammer
Enamel paint (white, pink and green)
A paintbrush
Procedure:
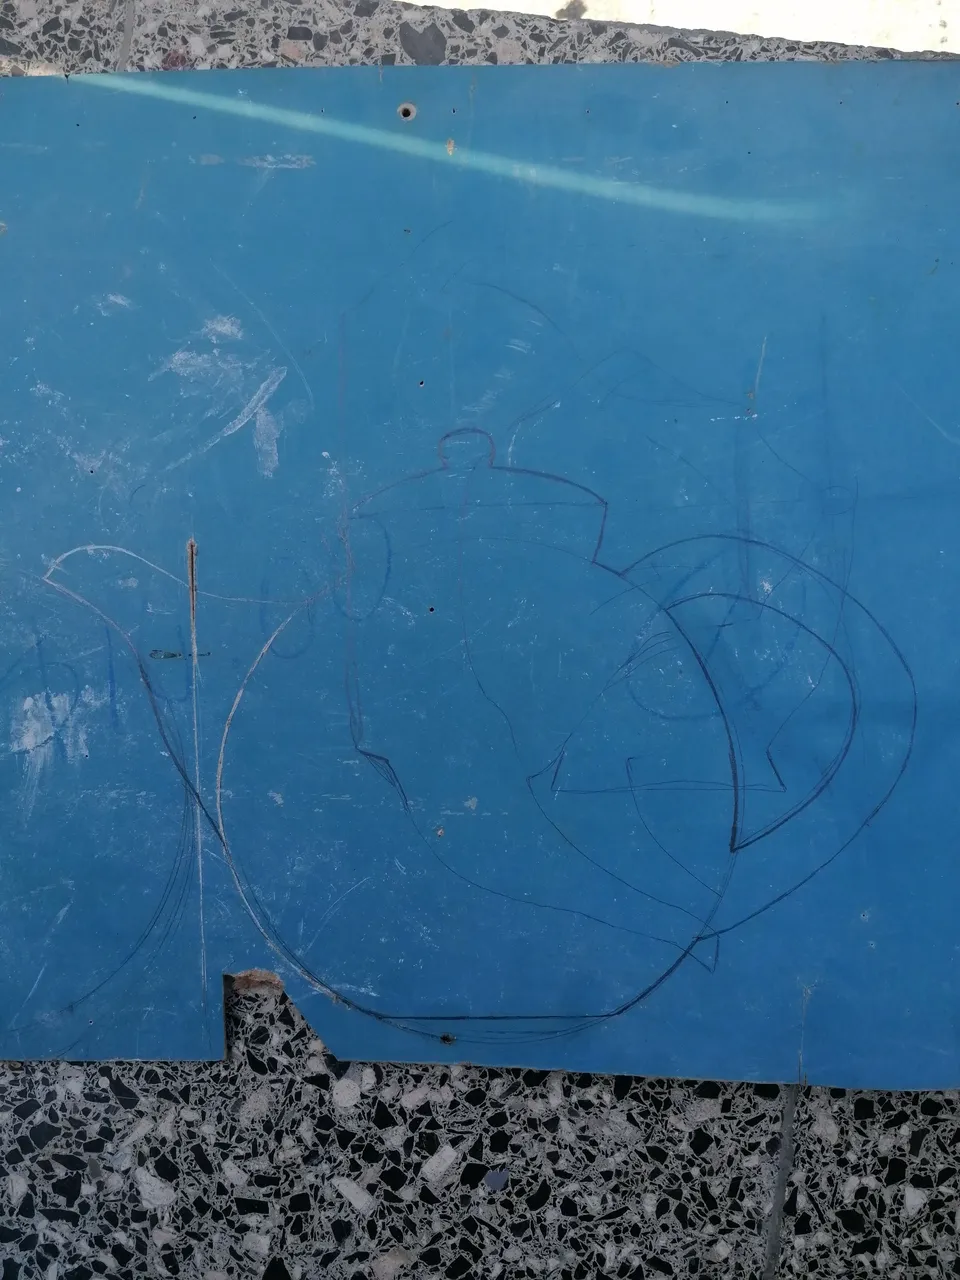
I drew a silhouette of a teapot on the cardboard. I found the teapot from the Disney cartoon Beauty and the Beast very pretty, so I took its model and made something similar.
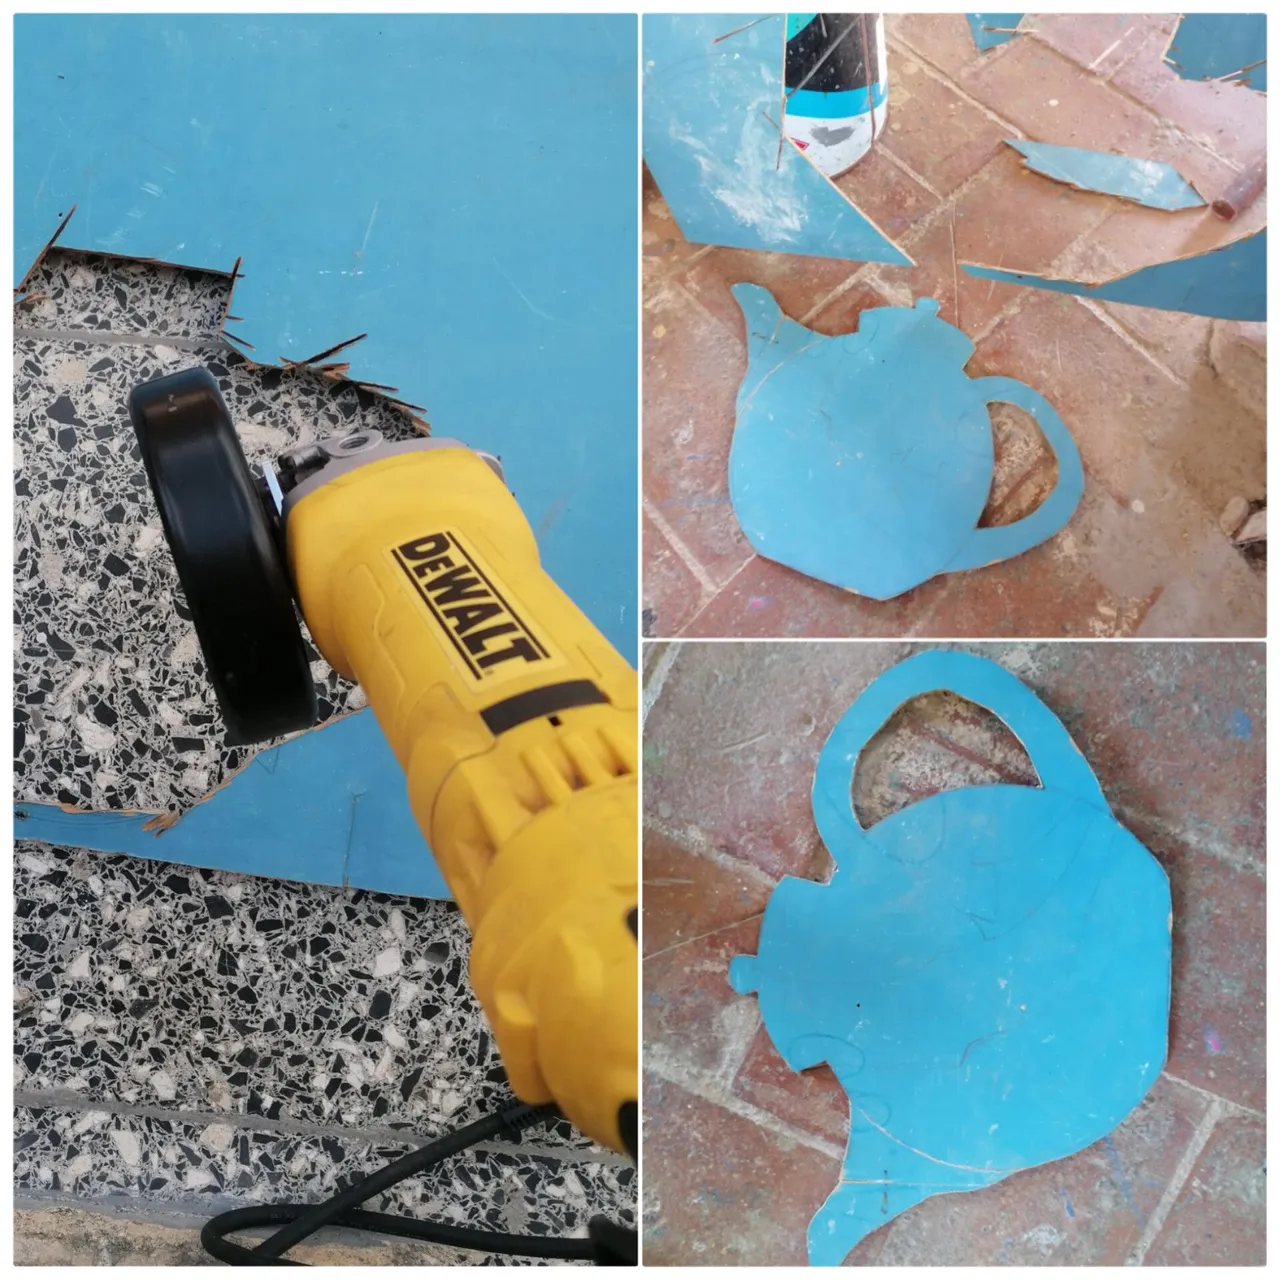
With the polishing machine I made the cuts on the cardboard. Here I required the help of my husband @newnow497, as I am not very skilled in the use of this tool.
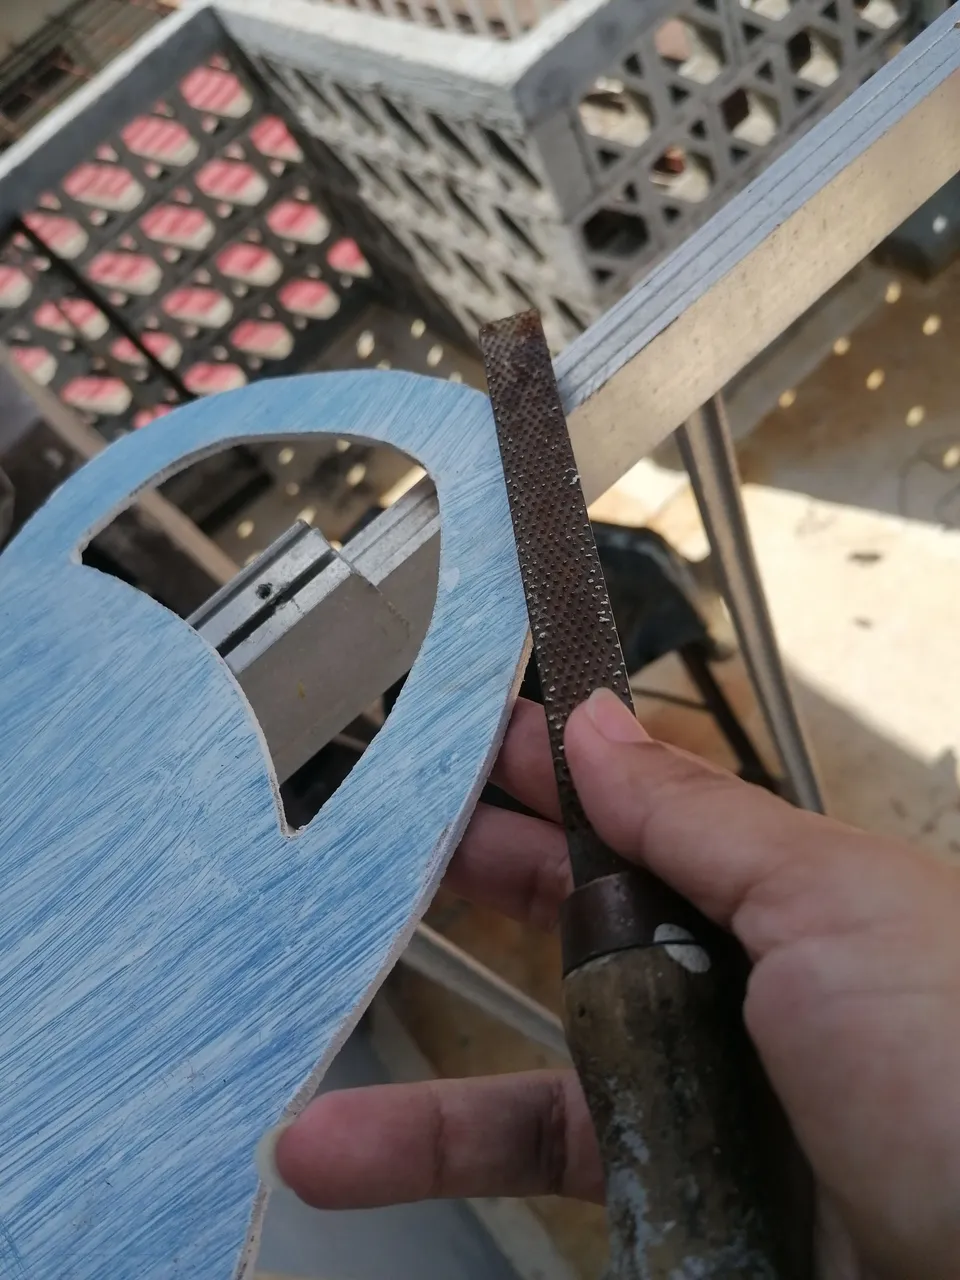
Then, with the rasp I filed the roughness of the straight cuts made by the polisher.
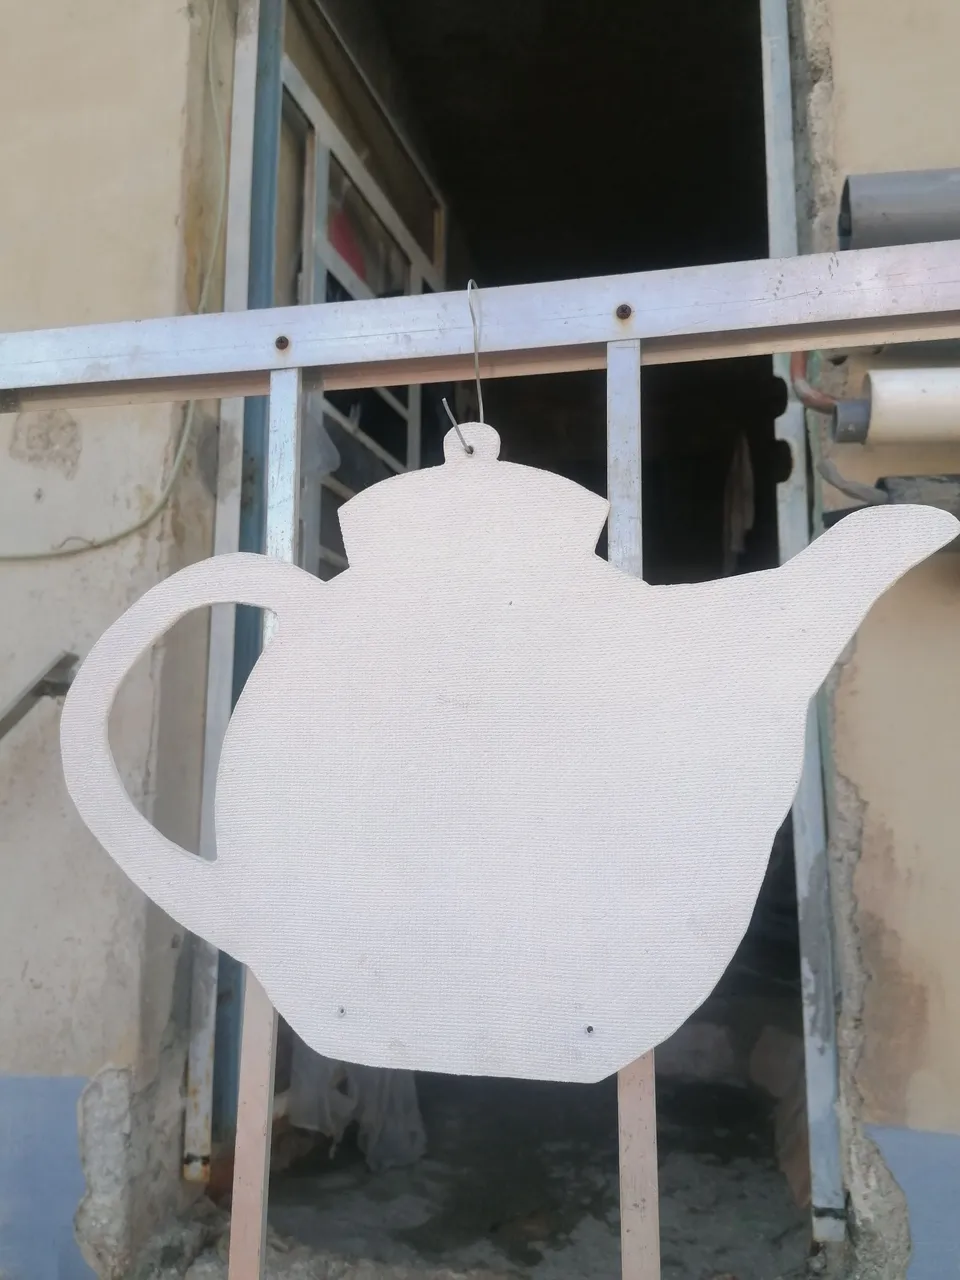
With the help of the hammer and the hammer I made a hole in what would be the lid of the teapot to fix it to the wall and two holes in its base to hang two cups from it. Then I applied two coats of white paint and let it dry.
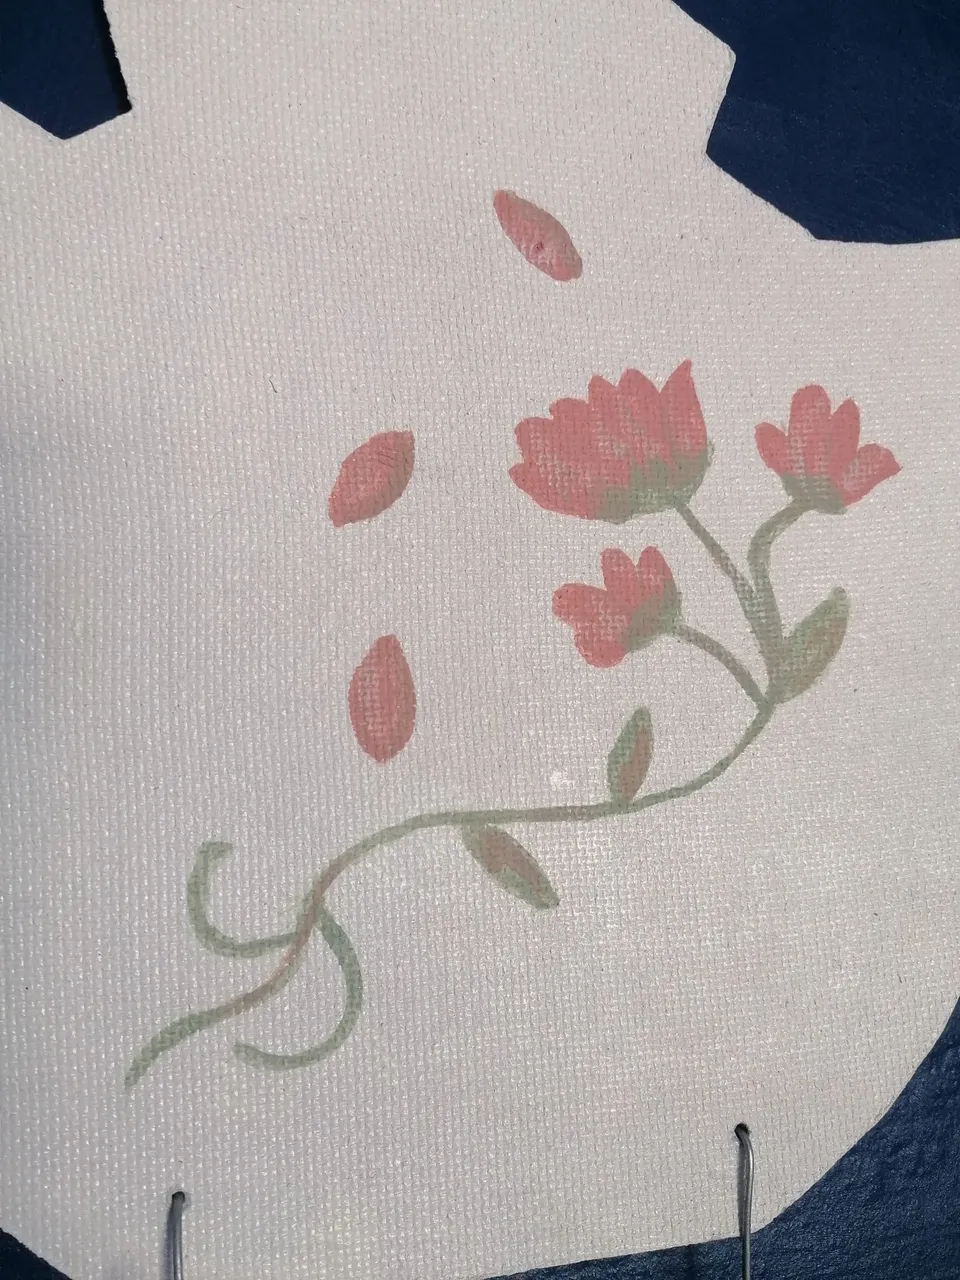
When the paint was dry I made a flower design, not exactly the same as the one on my grandmother's cup, but I liked the idea of flowers. For this I used the colours pink and green. Then I mixed these colours and made details with this resulting brown and a few flashes of white to give a bit of shine.
I thought it would be interesting to give a texture to the piece, so the part I chose for the finishing was the back of the cardboard, I didn't use the smooth side.
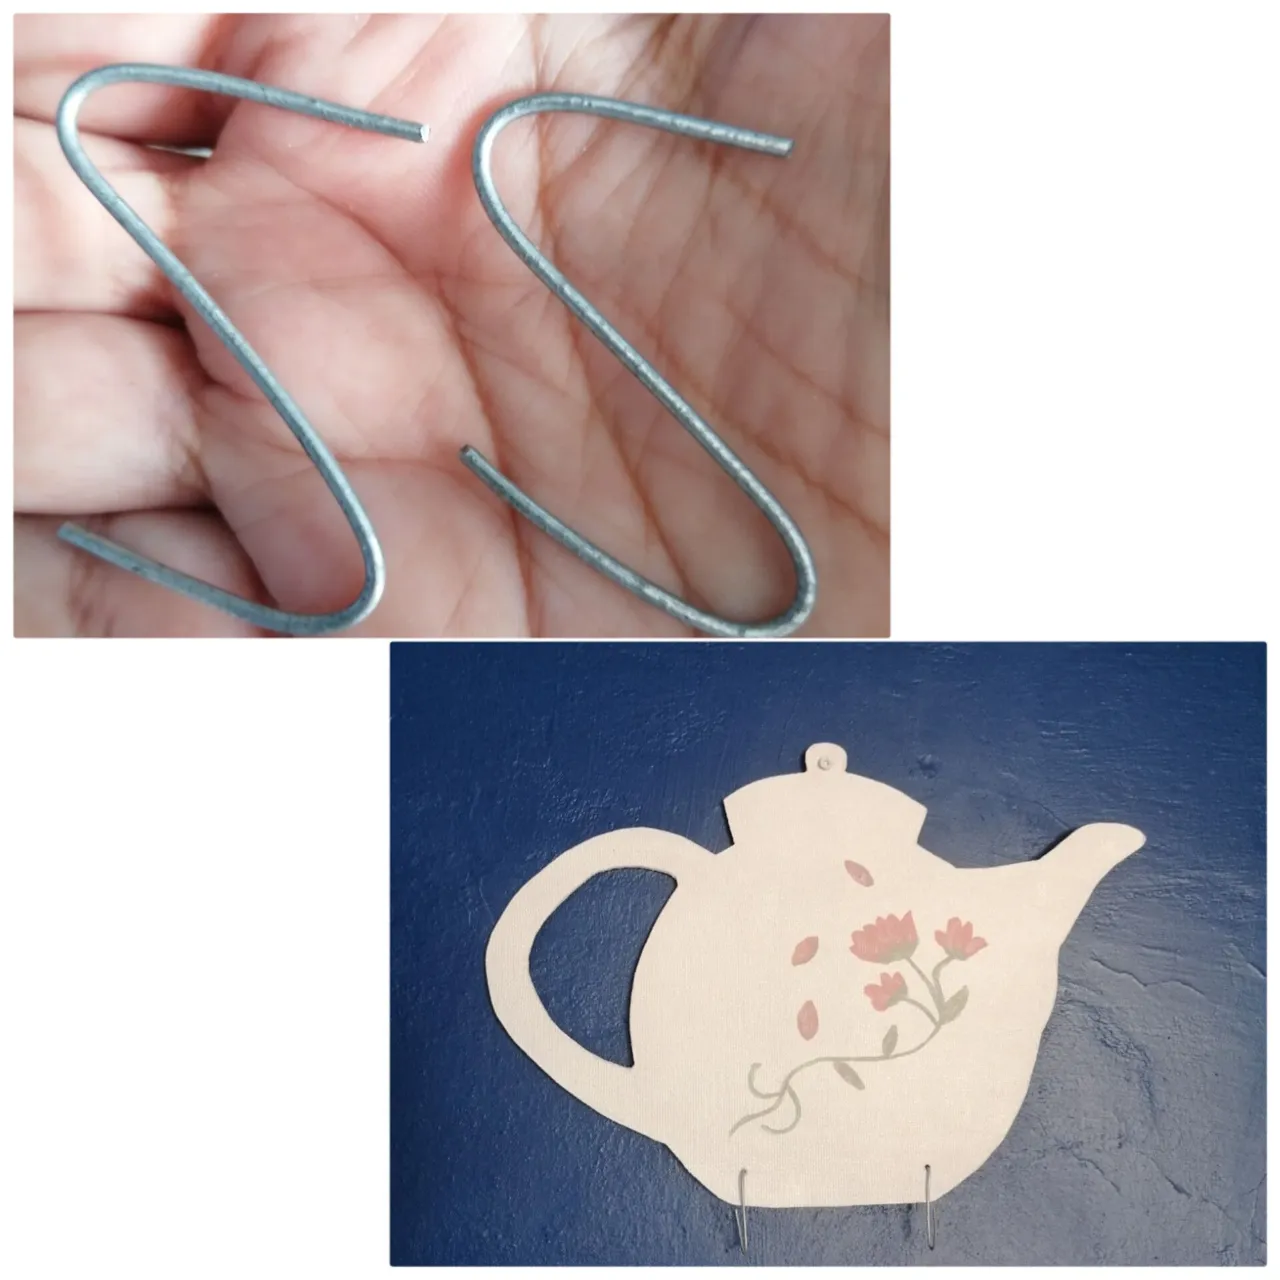
With the wire I made two "S" hooks. Once everything was dry I put the hooks in the holes at the bottom and then I put them in a special place and hung two cups on it.
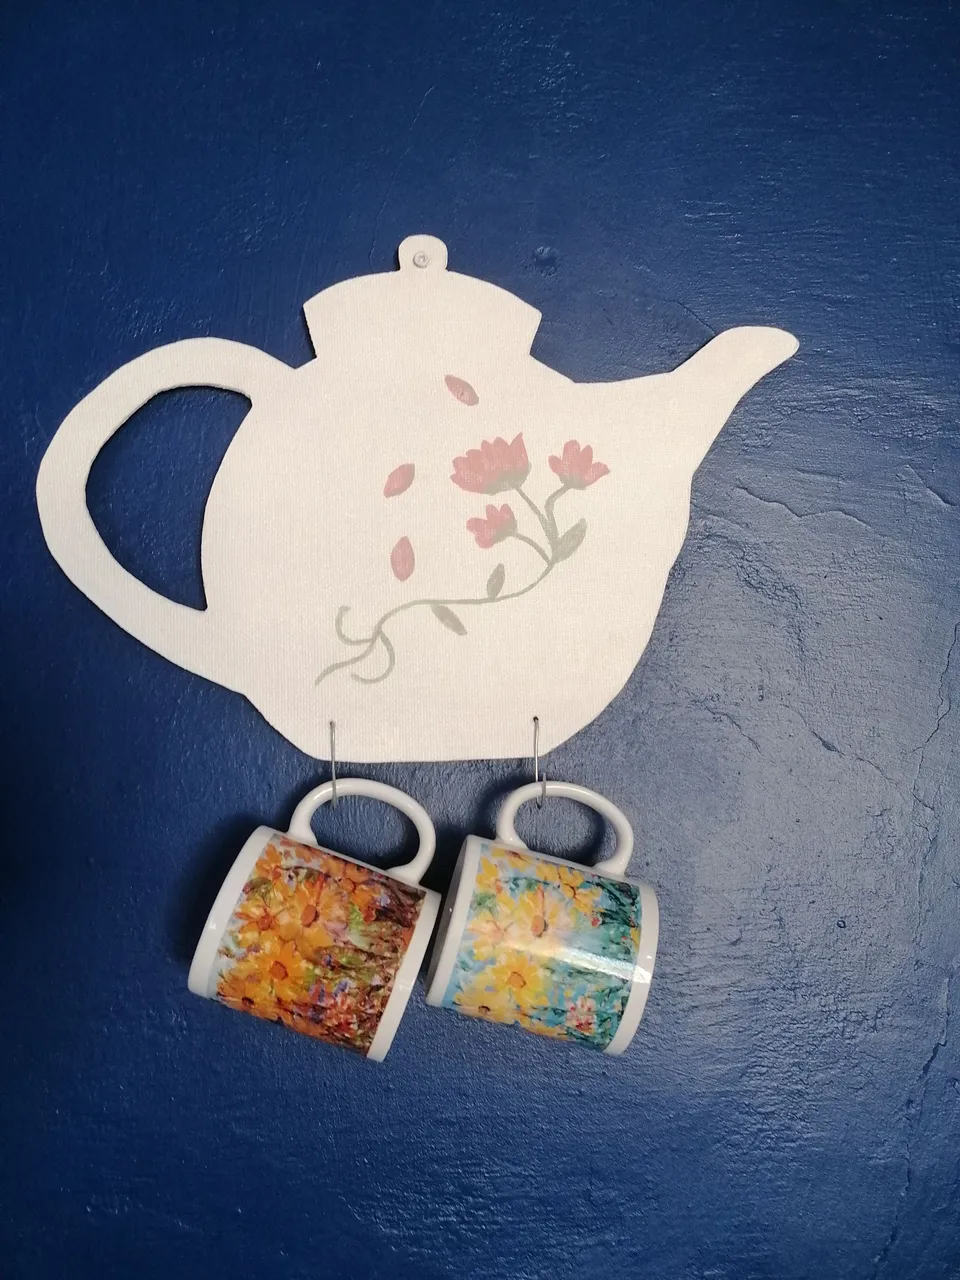
This is the final result of the work that I am sharing with you today and I hope you like it and that it will be useful. It is my first experience working with carpentry, but I aspire to continue improving myself so as not to disappoint the memory of my grandfather.
In the meantime I invite you to this tea for two and let's enjoy the delights that these tasty beverages offer us.
It has been a pleasure to have shared with you this new experience using recycled material and giving it a decorative use. See you soon.
Advice:
Use work clothes and carry out these activities in large areas and away from any objects that can get dirty or broken.
Wear work clothes and carry out these activities in large areas and away from any objects that can get dirty or broken. Be extremely careful when using the polisher as it is a very powerful cutting tool.
Thank you for taking the time to read this information.
🇪🇸🇪🇸🇪🇸ESPAÑOL🇪🇸🇪🇸🇪🇸
Hola comunidad de creadores:
Esta es mi entrada a la iniciativa de este mes relacionada con las teteras.
Cuando leí la propuesta de participación de este mes me pareció algo difícil, pues no tenía idea de qué hacer para compartir con ustedes. Luego busqué un poco de información y fotografías sobre las teteras y me llevó en un viaje en retrospectiva hacia mi niñez.
Recuerdo, sobre todo en tiempo de invierno, que mi abuela tomaba té en unas tazas de porcelana muy bonitas y no sólo el té, pues también tomaba café con leche y chocolate caliente.
Fue entonces que me dio por buscar la única taza que queda de aquella época que está guardada en un lugar especial como recuerdo que fuera de mi abuela y que anteriormente fue de mi bisabuela, a quien no tuve la dicha de conocer.
Mi abuelo, quien fuera el acompañante fiel de mi abuela y quien le complaciera en cuanto deseo posible ella tuviese, era carpintero de oficio. Con toda la dedicación y paciencia que le caracterizaba pasaba horas sumergido en sus trabajos y casi todos los muebles de mi casa fueron confeccionados por él.
Hoy deseo hacer una fusión y rendir homenaje a mis abuelos, estos dos seres que tan importantes fueron en mi vida. No sé si esté a su altura, pero el trabajo fue realizado desde el amor profundo y cariño que guardo por ellos. Comparto hoy una tetera en cartón tabla para colgar tasas.
Les indicaré paso a paso los materiales, utensilios y actividades que fui realizando hasta llegar al resultado final.
Materiales y herramientas:
Un Lápiz
Un pedazo de cartón tabla reciclado (40*40)cm
Pulidora con disco para cortar madera
Escofina
20cm de alambre
Pinza de corte
Una puntilla
Martillo
Pintura esmalte (blanca, rosada y verde)
Un pincel
Procedimiento:
Dibujé sobre el cartón una silueta de tetera. Me apareció muy bonita la tetera de los dibujos animados de Disney en la película de La Bella y la Bestia, así que tomé su modelo e hice algo similar.
Con la pulidora realicé los cortes sobre el cartón. Aquí requerí la ayuda de mi esposo @newnow497, pues no estoy muy ducha en el uso de esta herramienta.
Luego, con la escofina fui limando las asperezas de los cortes rectos que hace la pulidora.
Con la ayuda de la puntilla y el martillo realicé un hoyo en lo que sería la tapa de la tetera para fijarla a la pared y dos hoyos en su base para colgar dos tazas de ella. Después apliqué dos manos de pintura blanca y dejé secar.
Cuando estuvo bien seca la pintura hice un diseño de flores, no exactamente igual a la de la taza de mi abuela, pero me gustó la idea de unas flores. Para ello utilicé los colores rosado y verde. Luego mezclé estos colores e hice detalles con este marrón resultante y unos destellos de blanco para dar un poco de brillo.
Me pareció interesante darle una textura a la pieza, por lo que la parte que escogí para el acabado fue el reverso del cartón, no utilicé su lado liso.
Con el alambre realicé dos ganchos en forma de "S". Una vez todo seco le coloqué los ganchos en los hoyos de la parte inferior y luego coloqué en un sitio especial y le colgué dos tazas.
Este es el resultado final del trabajo que les comparto hoy y espero sea de su agrado y utilidad. Es mi primera experiencia trabajando la carpintería, pero aspiro a continuar perfeccionándome para no defraudar la memoria de mi abuelo.
Mientras tanto a usted le invito a este té para dos y disfrutemos de las delicias que nos ofrecen estas sabrosas bebidas.
Ha sido un placer haber compartido con ustedes esta nueva experiencia utilizando material reciclado y de forma decorativa darle una utilidad. Nos encontraremos próximamente.
Consejos:
Utilice ropa de trabajo y realice estas actividades en lugares amplios y alejado de cualquier objeto que se pueda ensuciar o romper. Tenga sumo cuidado al utilizar la pulidora, ya que es una herramienta de corte muy potente.
Gracias por su tiempo de lectura.

Own text, translated into English via DeepL. Photos by me, from my HUAWEI P30 LITE phone, edited in InShot.
Texto propio, traducido al inglés mediante DeepL. Fotos de mi autoría, desde mi teléfono HUAWEI P30 LITE, editado en InShot.
Twitter: @ylaffittep
Facebook: @ylaffittep