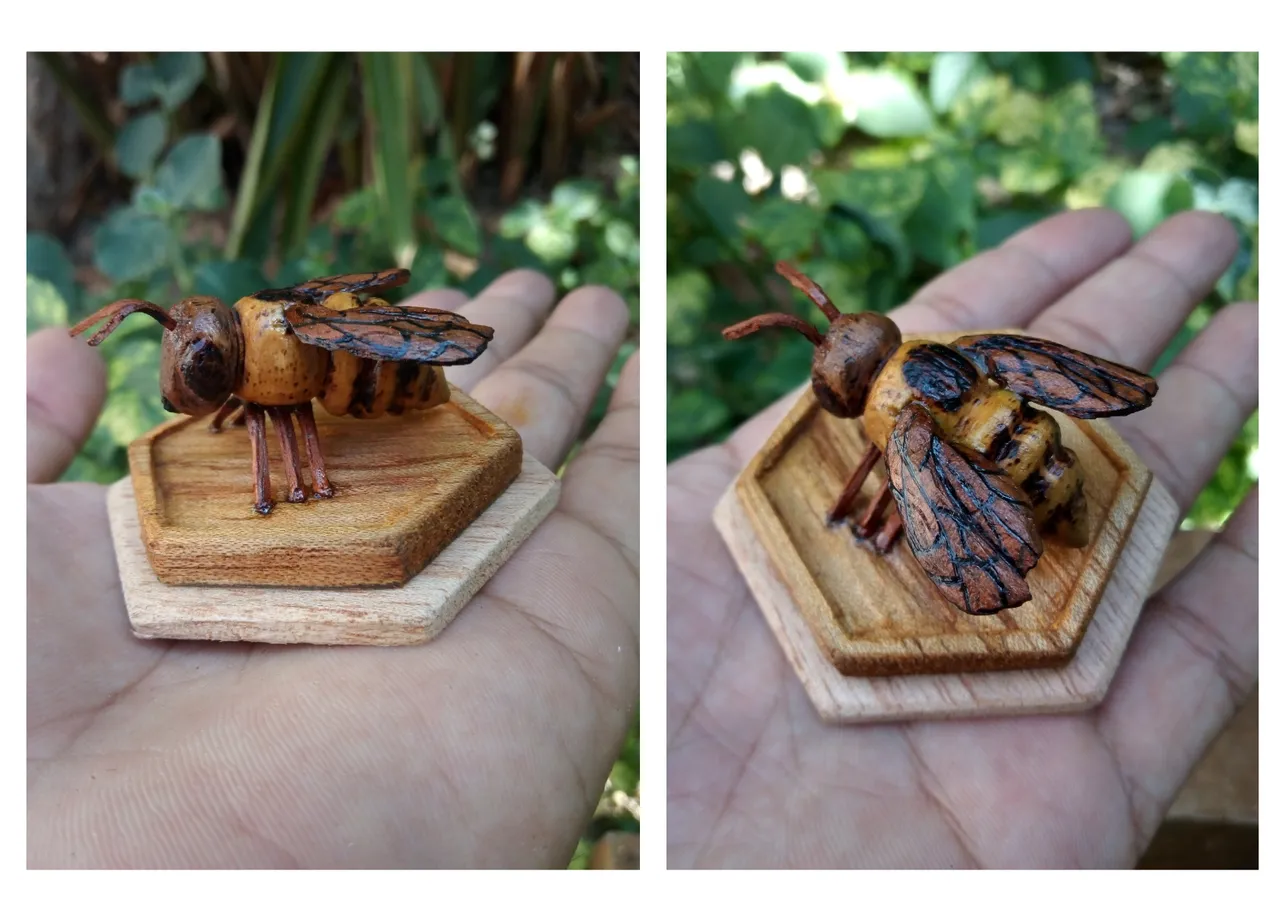
Greetings friends creators of Diy hub on this occasion I share with you this tutorial on the carving of a bee in wood in small format, in addition to sharing this tutorial I make my entry to participate in the contest of the month, in tribute to these special, magical and healing beings.
The bee shares a very interesting symbolic value and one of this is the synergy, which brings us absolutely to the essence of this organic platform, ie the growth of it is given by the pollen that each of us bring to hive, expanding the growth of the community and bringing the approach to life through the experience of art, aesthetics, philosophy and knowledge according to the area that each of us handle, thus being an integral community and niches with very good honey ...

- low density wood block (soft)
- blade
- sandpaper 80, 120, 220
- cyanoacrylate
- manual arc jigsaw
- soldering iron
- pyrographer
- cold paints
- varnish
Preliminary
To face this practice we must dare to start first, wood carving requires mainly the management of volume and proportions, we must be careful when handling edge tools, the advice I share is not to carve against our body, in the case of small format, be careful with your fingers or use gloves to avoid hurting your fingers with the edge, if you have not done any carving and you have the intention to do it, go ahead! I will be sharing some data, so, volmaderitasy more will, be sure to have good edge craftsman and craftswoman!!!
Step 1
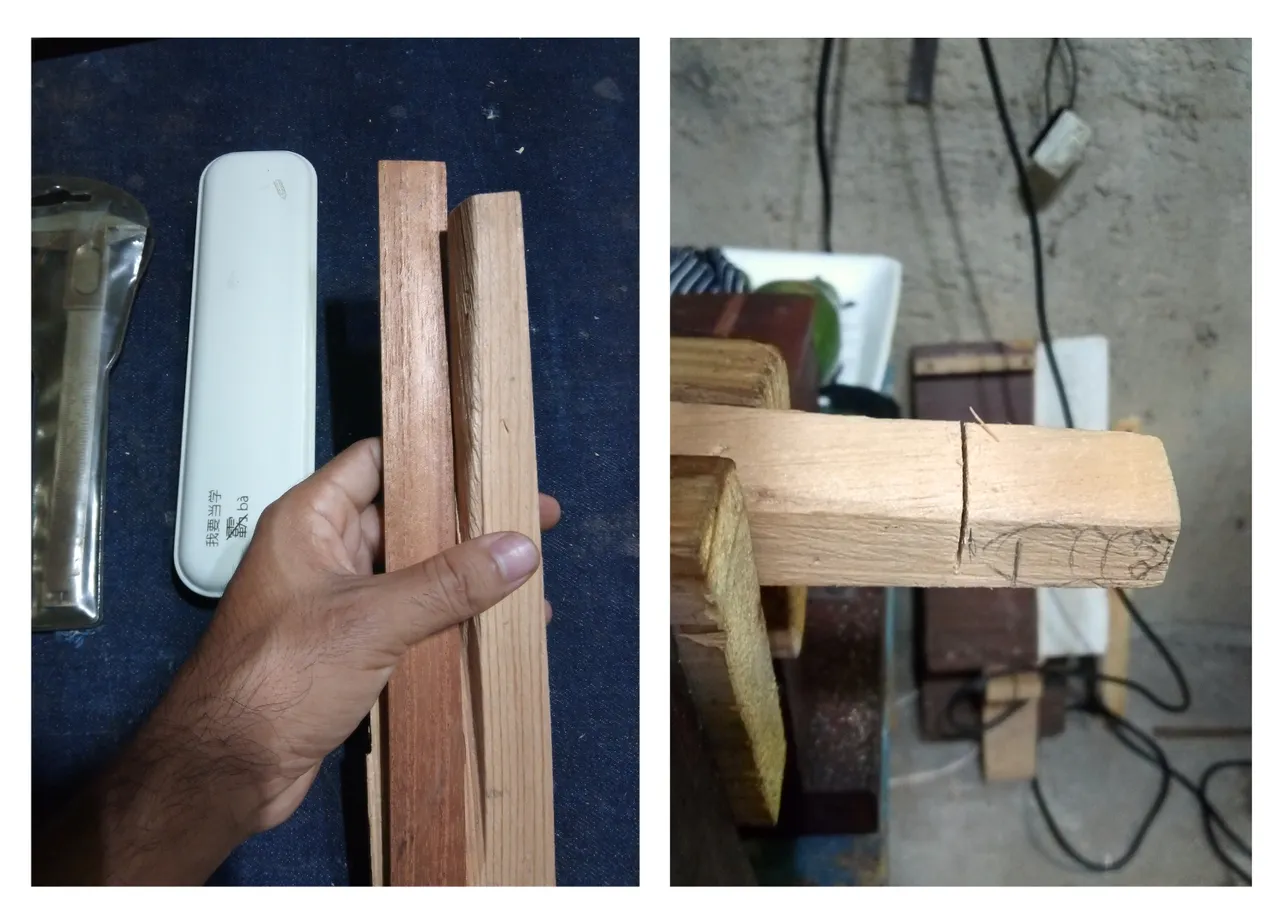
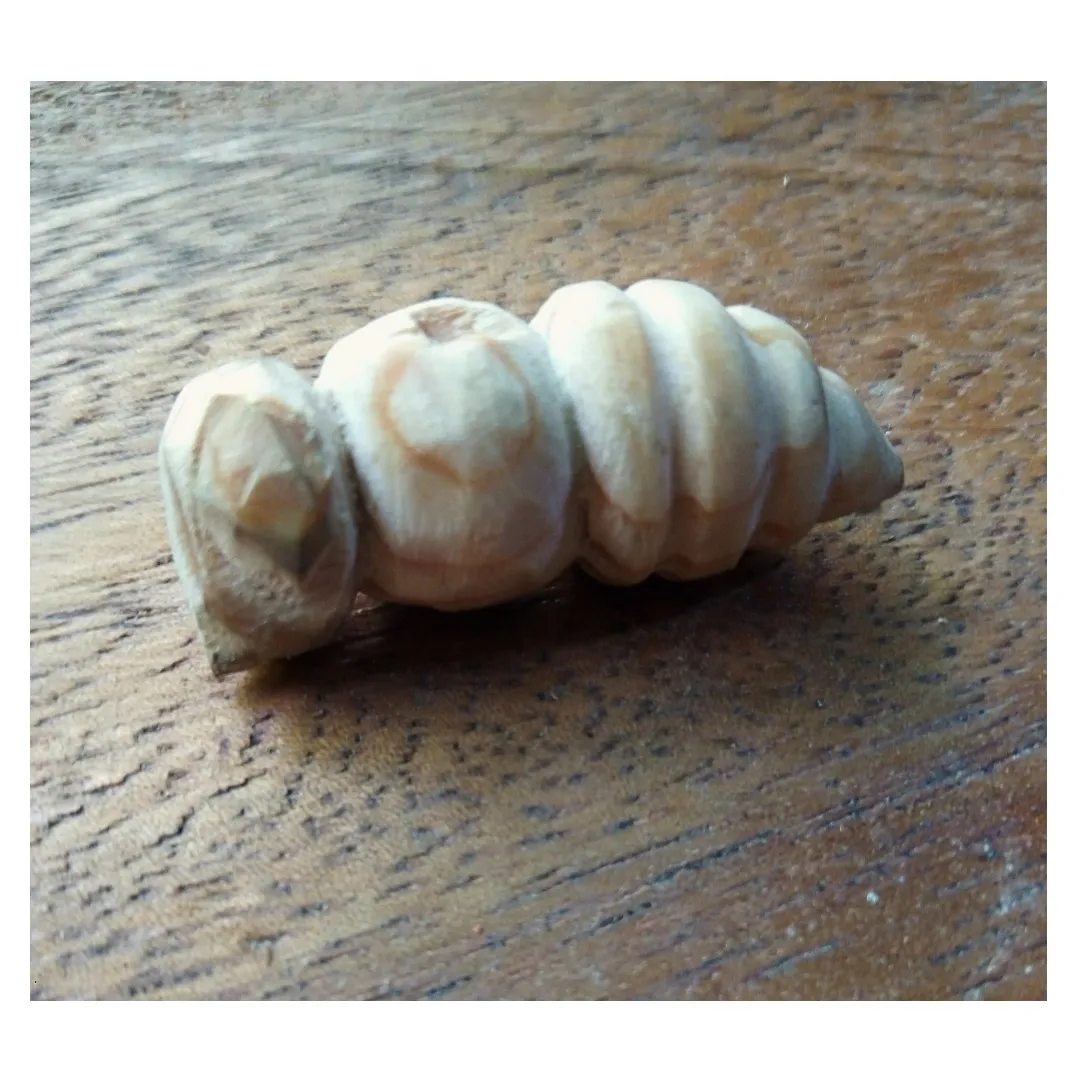
In this case I will choose a very soft pine for the body of the bee and a 4 mm cedar sheet for the wings, here we will focus on developing the body first, so let's cut the corresponding dimension.
Step 2
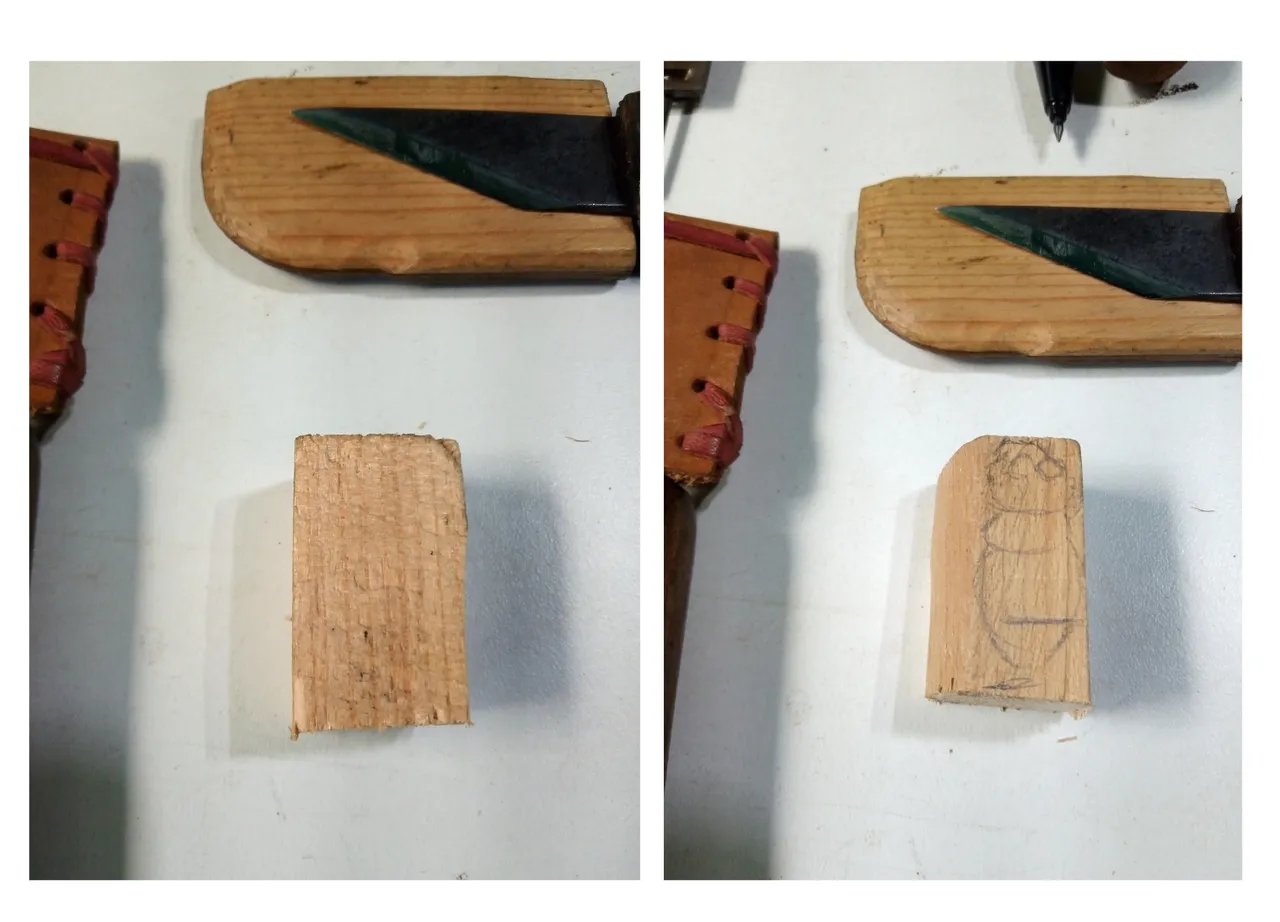
When we have the heel cut we begin to sketch the outline, I here I made it little defined, but in this step let's focus on providing the drawing because as we go removing material we must go grating, it is good to have images or drawings of all parts.
| Note: if it is your first time, practice making some replica of an object, sculpture or toy, as here you can take measurements and visualize the proportions also practice with clay or plasticine, this is very important because we will have a three-dimensional guide, in my case I start from two-dimensional sketch, it is a tip. |
Step 3
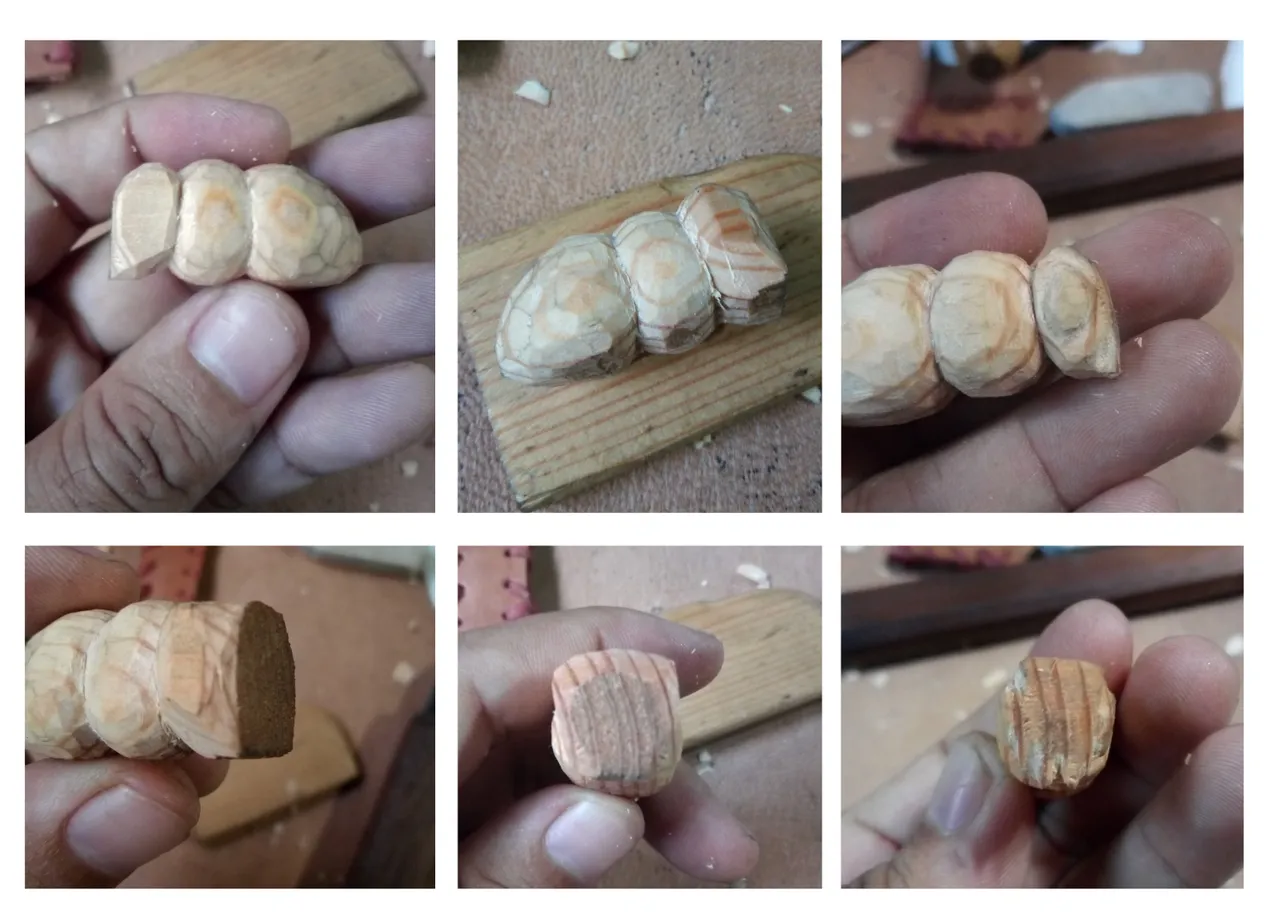
Let's start by shaping the abdomen, here we will be removing in the widest part of it about 3% of material, let's not worry too much in this step that here we are starting to shape.
Step 4
Once started the process of the abdomen, let's trace again the thorax and we are carving marking the divisions with the blade, this division we do it like when we cut a tree and we must cut a trunk and we take out pieces in v, something like this you can imagine in the same way the piece will teach you at the time, besides that intuition helps us a lot in these processes.
Step 5

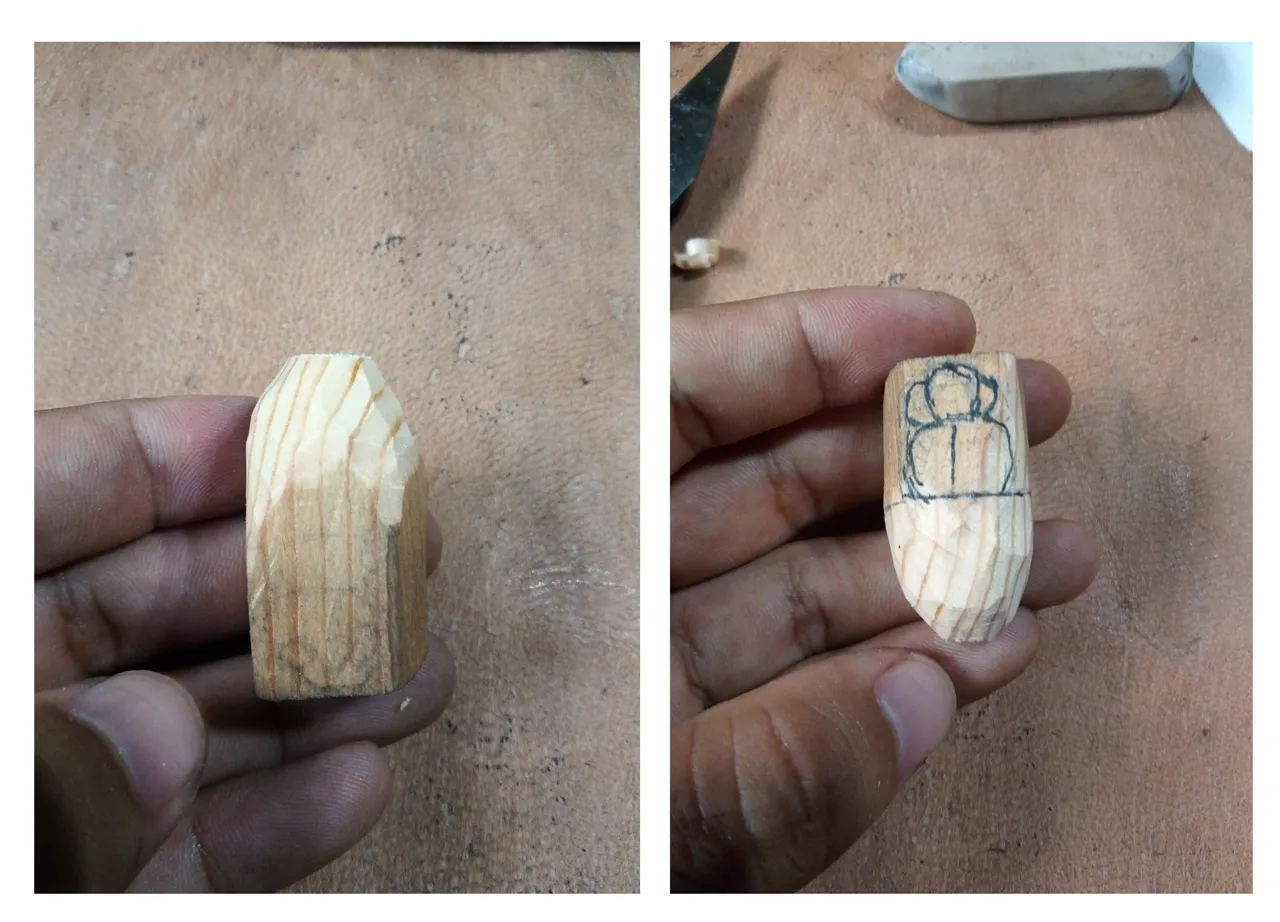
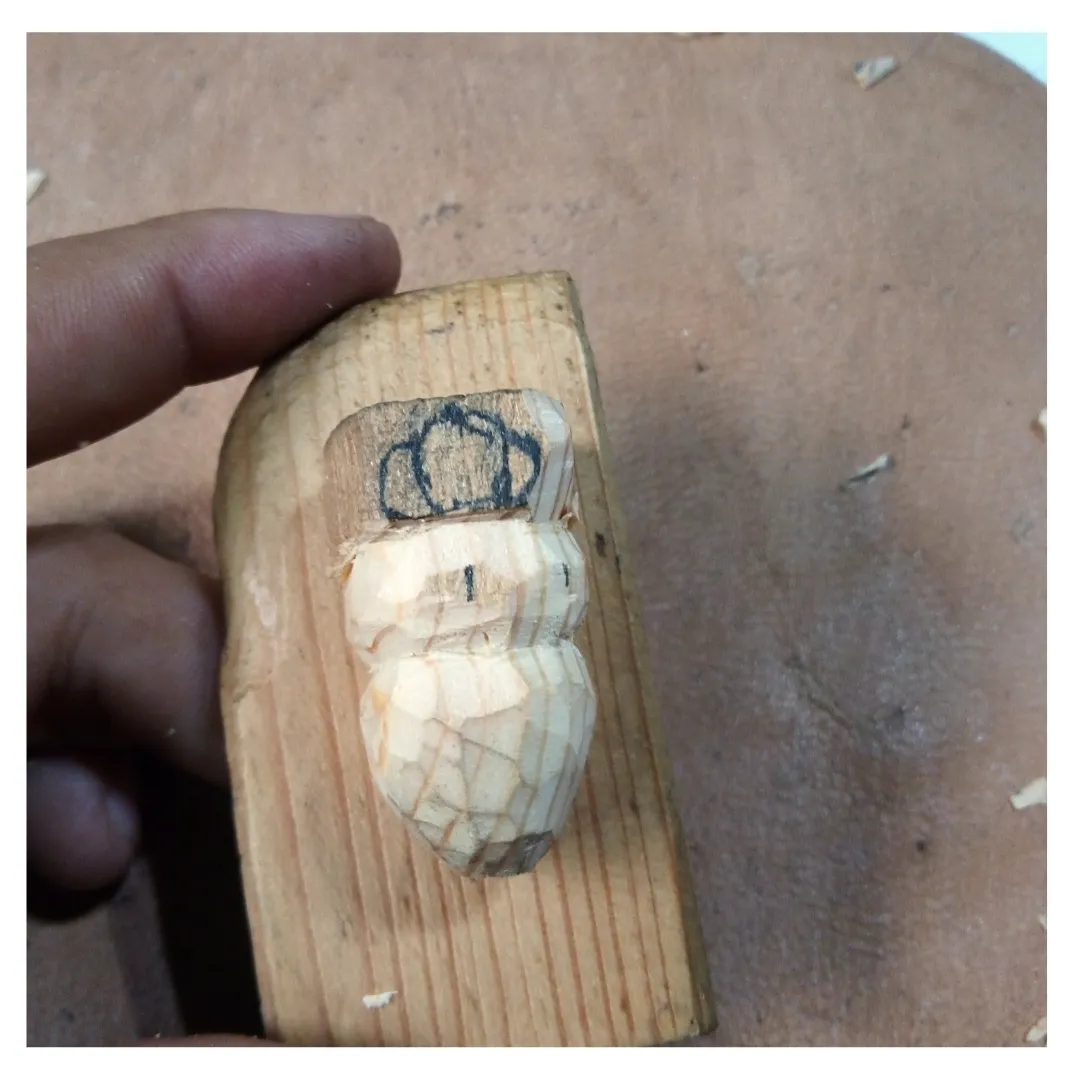
We must now move on to the head and in turn repeat the above processes on the underside of the piece to give uniformity.
Step 6
Once we have the piece provided, in this step I was giving a little more identity to the head making the eyes and jaws, it is important to know that we should not stay in one step, it is important to go carving in each area according to our reference image in this way we are seeing the changes.
Step 7
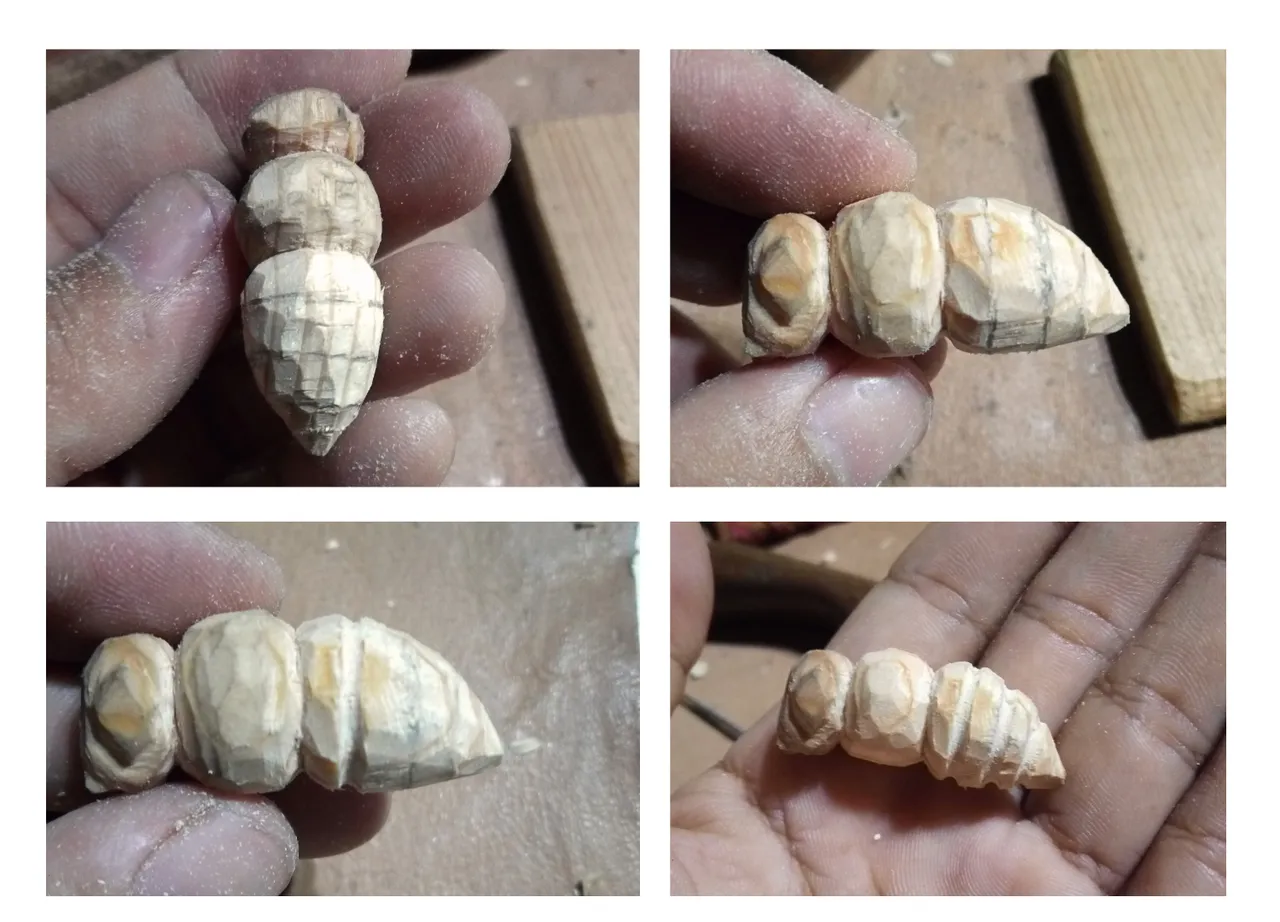
I continued stylizing the abdomen a little more and I made some lines that later I would rough which gives it that particularity of the bee, these lines later will go in black.
Step 8
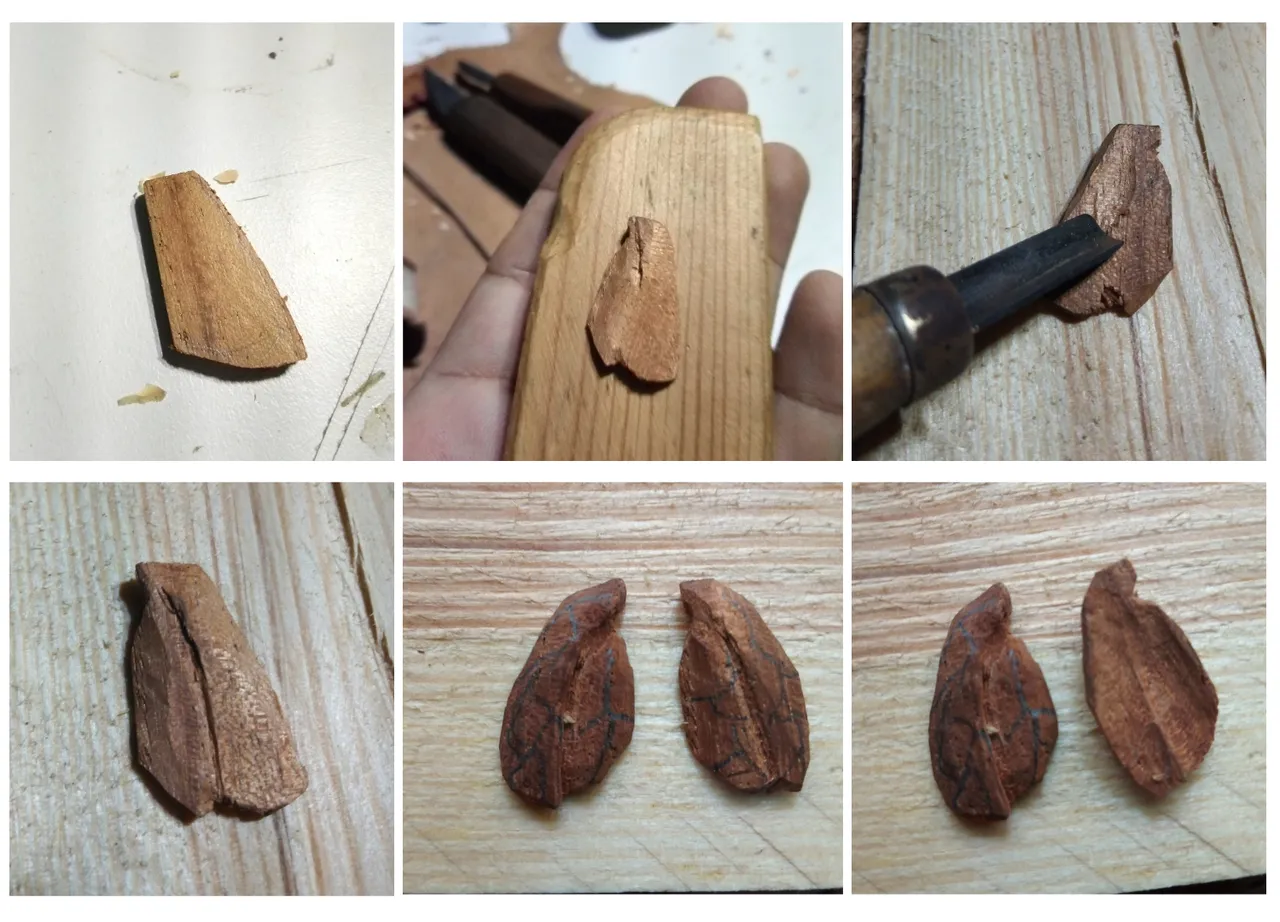
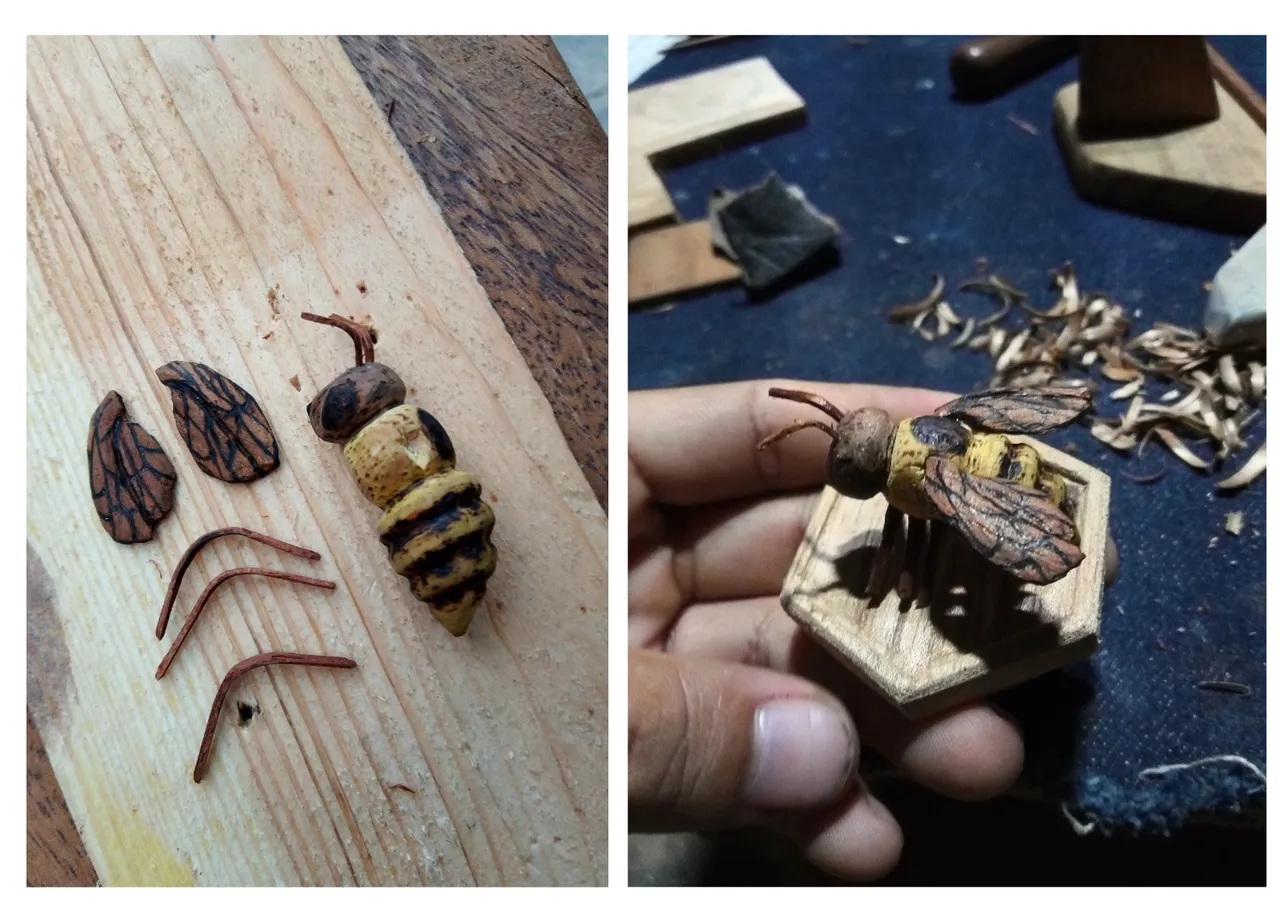
With the 4 mm wood cut the wings and give it a little volume to give it that organic look and with the half-round gouge we give concavity to the bottom.
Step 9
Sand the piece a little and make some openings in the thorax where the wings will be assembled later.
Step 10
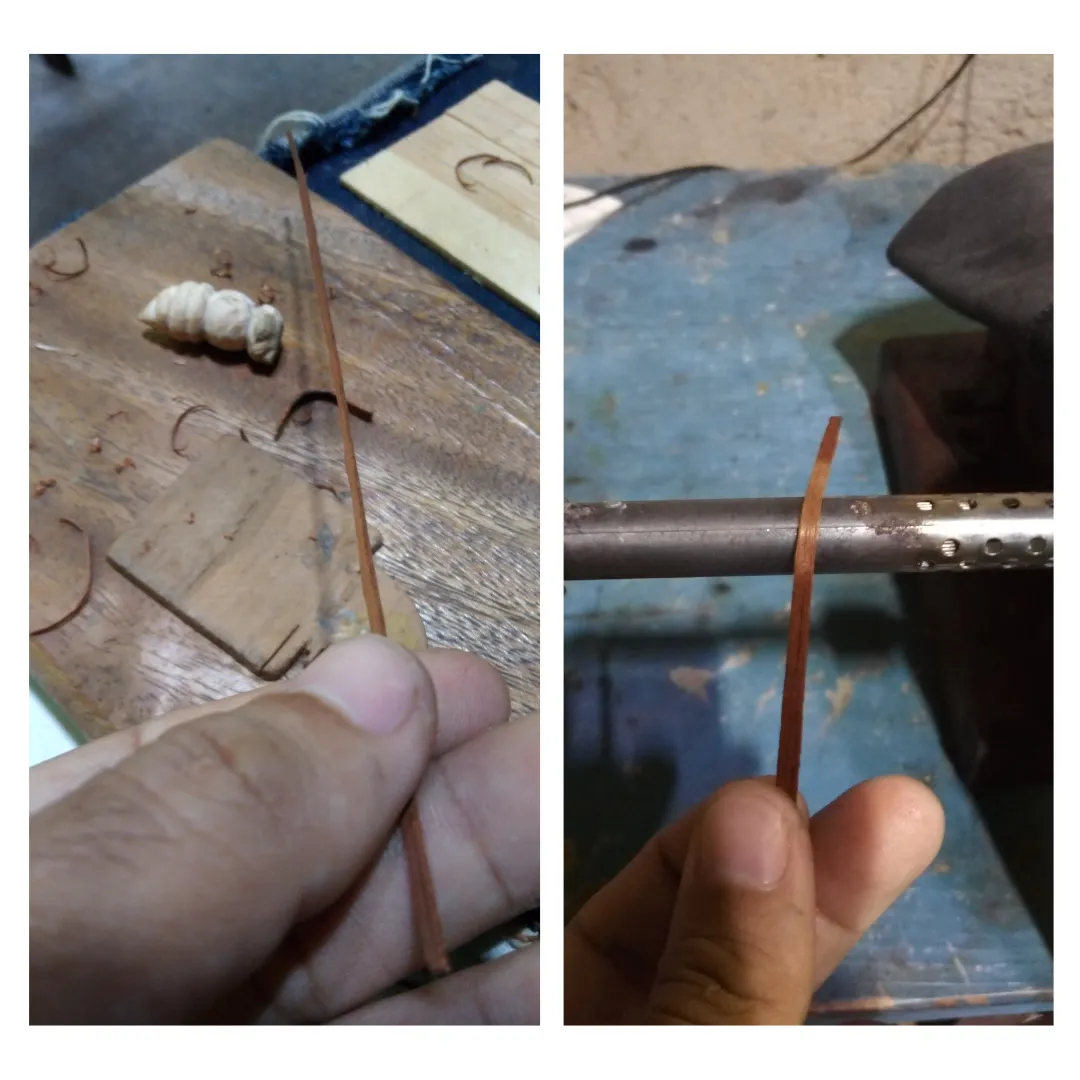
With a small piece of wood or sheet of 1 mm we will make the legs and antennae, this was one of the ways in which I could solve, soak the strips in water for a few minutes and make use of the soldering iron to bend the sheets in the form of a "U".
Step 11
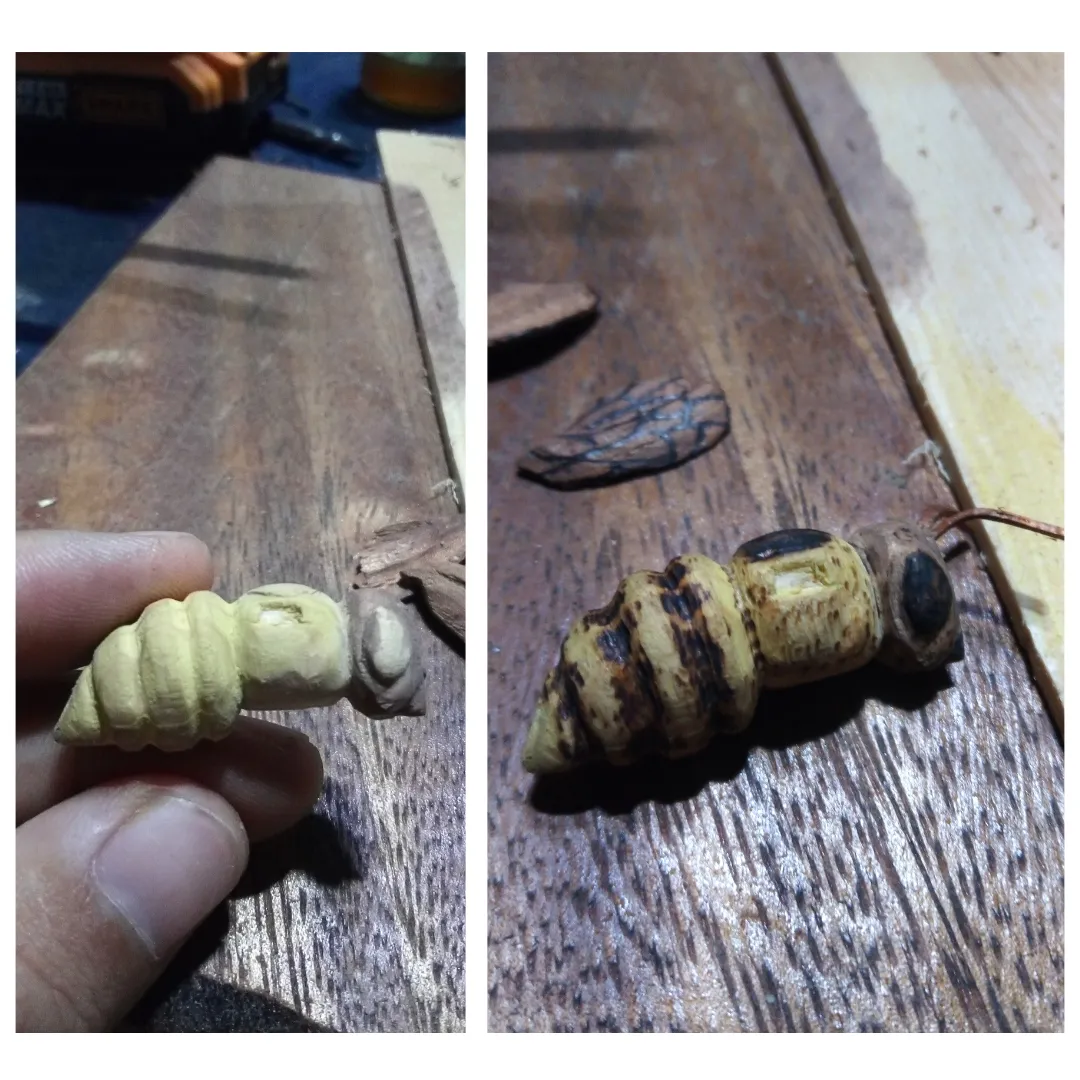
Polychrome step, I gave him a pass of yellow paint very diluted, this to give him a little color and also with a little brown on the head, then I intervened with the pyrograph because the burning would highlight the volume of the sculpture also I made the lines of the wings.
Step 12
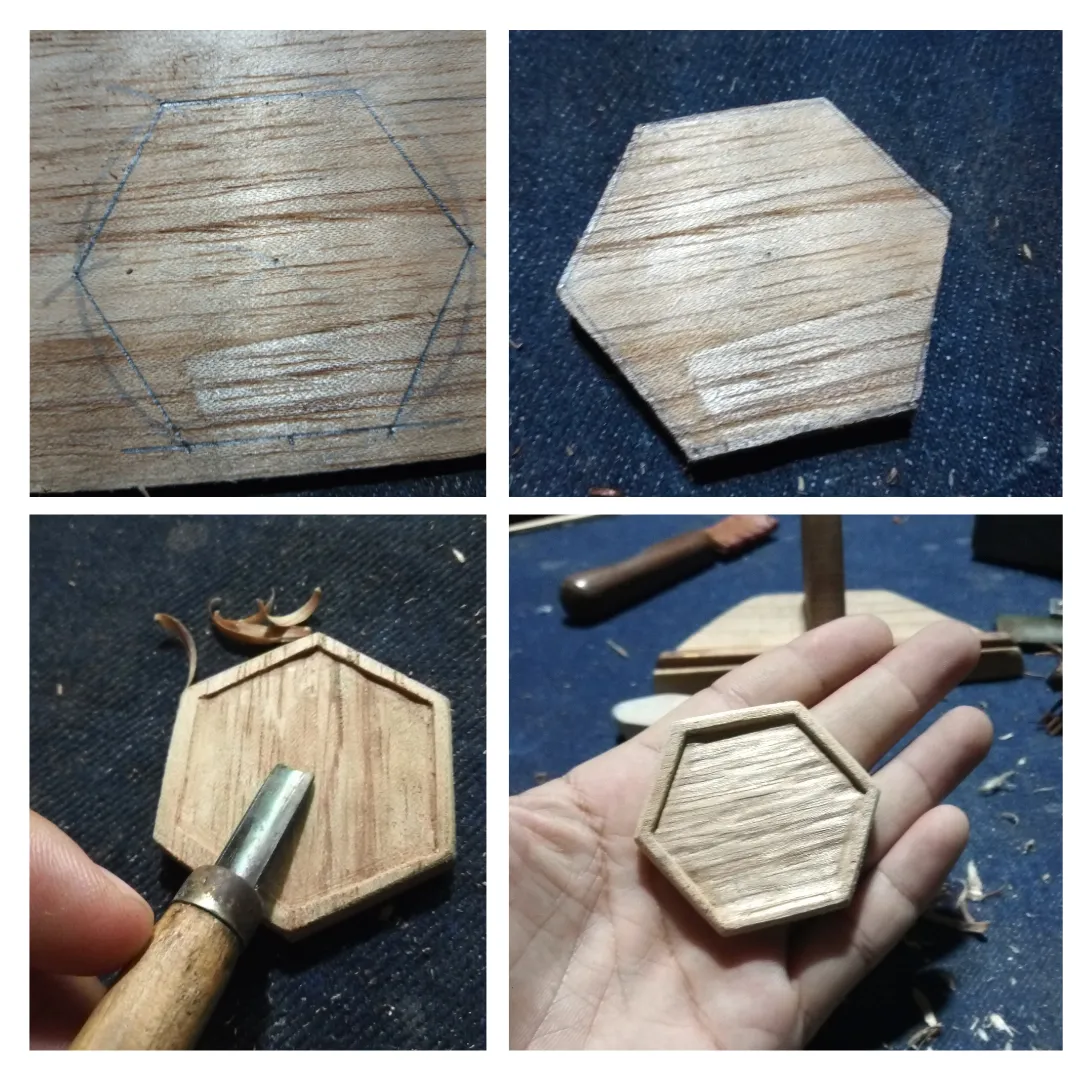
We are almost getting to the end if we see we have to make the pedestal, I made it with a hexagon as if it were in a beehive producing honey, so I made the line and cut with the manual jigsaw a 5 mm wood and then I made a 2 mm edge to give it a little depth using the half-round gouge.
Step 13
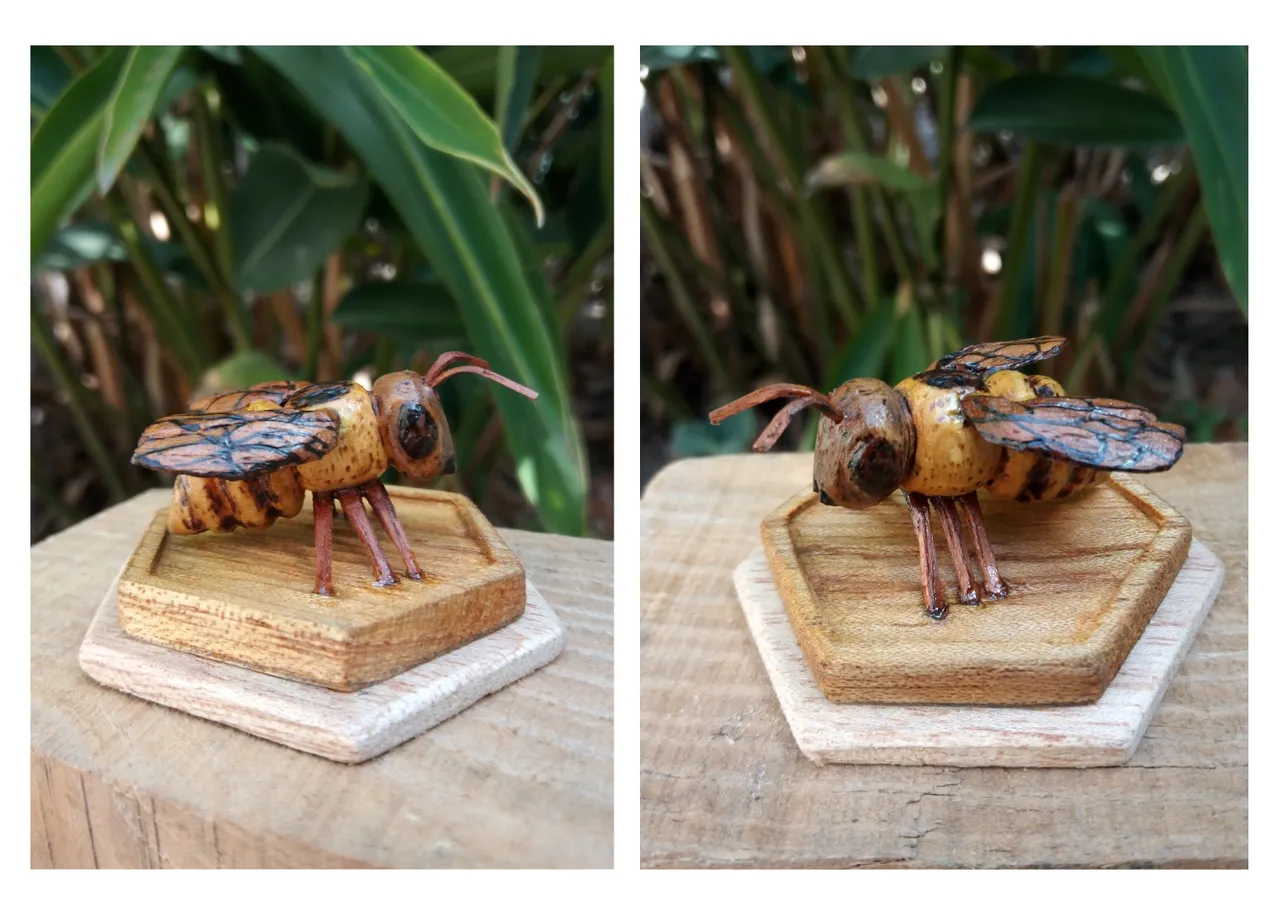
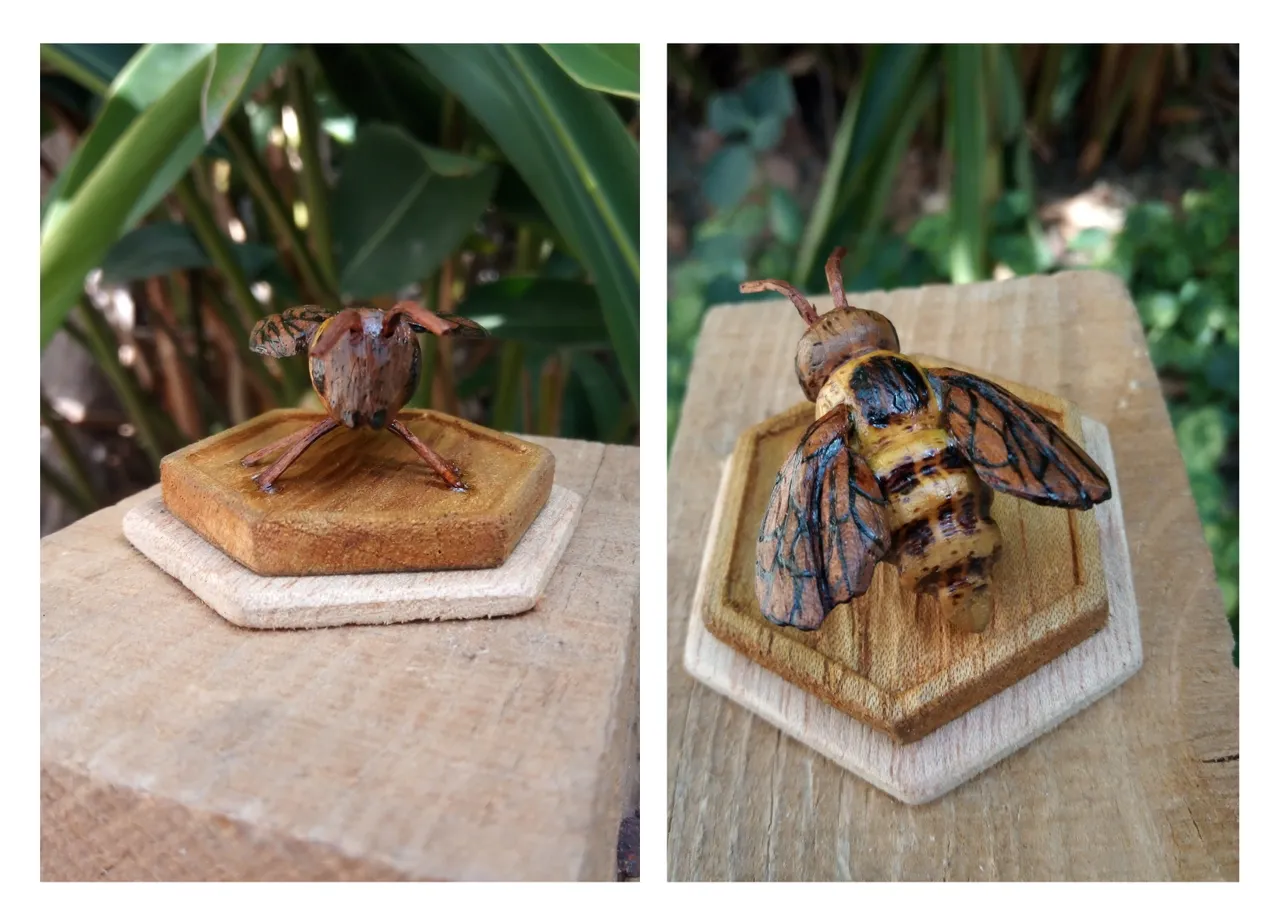
Assembly and presentation on the pedestal, here we must glue with cyanoacrylate without doubt, it is quite strong and sticks very fast, we give a few points in the places of support and let dry.
Step 14
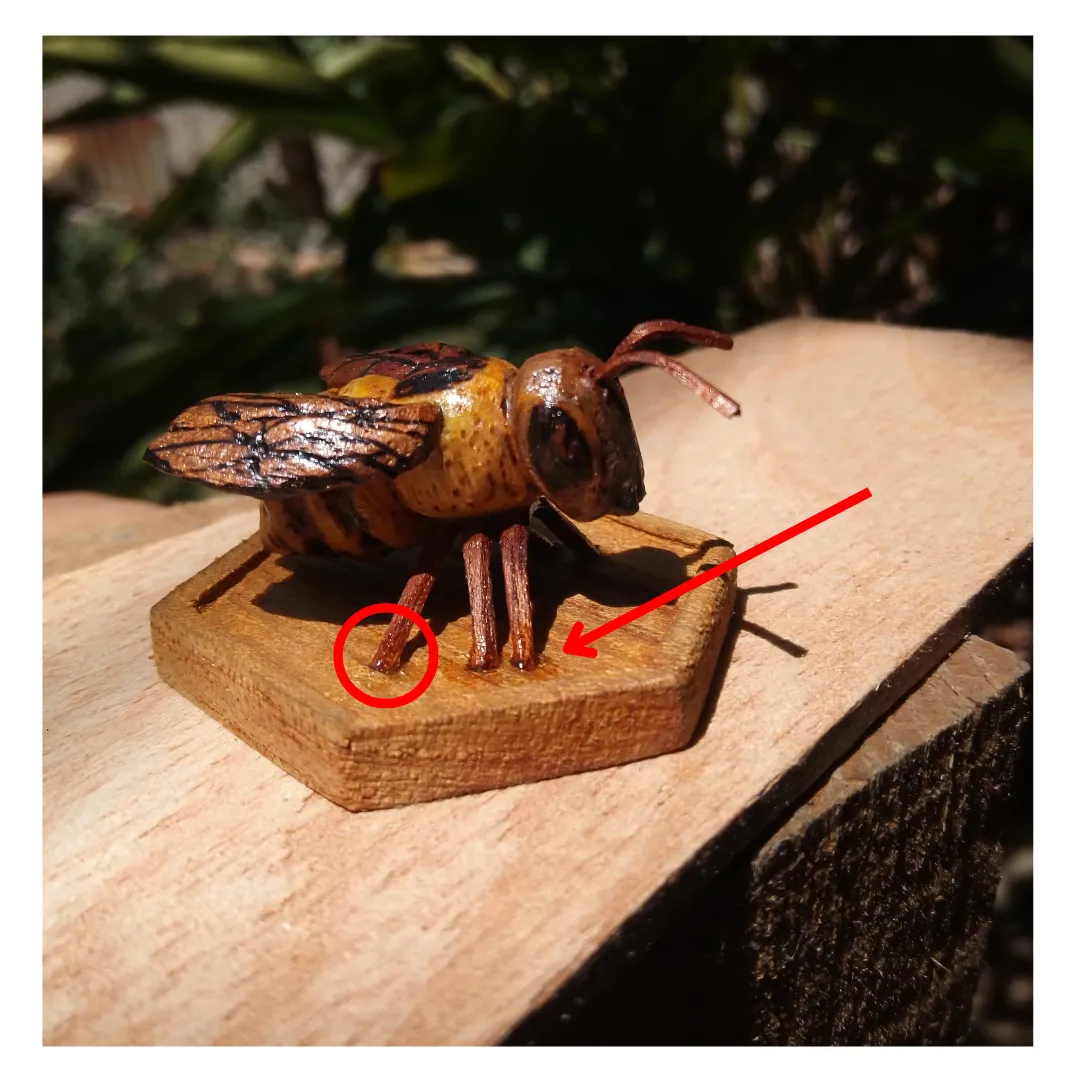
Gluing the bee on the pedestal and varnishing, as we can see, I opened three very minimal holes in the base so that the legs could be supported and thus stick with much more support then I gave three coats of varnish this time I used a little shellac generating a satin look and quite artisanal.
In this way we consider this small and laborious project finished, although it is a little complex technique to describe it in a single post, but it can be of help and inspiration to develop a practical idea as I said at the beginning, no matter how the first one comes out, we all had a start, I am not a consecrated, just friends, I try to do the best I can every time I dare to make a carving, in this one I took an afternoon more or less and in one morning I made several experiments to achieve the legs, which of course I split many, the hands are a little tired, the result makes us change our mind, it was certainly quite edifying, so I took advantage of the initiative of the hive as an excuse to carve, since I had days without doing it.
I say goodbye and I hope this content is of benefit, thank you very much for reading, if you have any suggestions or questions I am attentive to the comments, until a next publication.
- Photographs taken from my cell phone
- Text translated in deelp
- Image editing in canva
Versión en Español
Escultura de una abeja en miniatura, talla en madera noble
Saludos amigos creadores de Diy hub en esta ocasión les comparto el presente tutorial sobre la talla de una abeja en madera a pequeño formato, además de compartir dicho tutorial hago mi entrada de participación al concurso del mes, en homenaje a estos seres tan especiales, mágicos y sanadores.
La abeja comparte un valor simbólico muy interesante y una de esta es la sinergia, lo cual nos conlleva absolutamente a la esencia de esta plataforma orgánica, es decir el crecimiento de la misma está dada por el polen que cada uno de nosotros traemos a hive, expandiendo el crecimiento de la comunidad y trayendo el planteamiento de vida a través de la experiencia del arte, la estética, la filosofía y el conocimiento según el área que manejemos cada uno de nosotros, siendo así una comunidad integral y nichos con muy buena miel...
- Taco de madera de baja densidad (blanda)
- cuchilla
- lijas 80, 120, 220
- cianocrilato
- caladora de arco manual
- cautín
- pirograbador
- pinturas al frío
- barniz
Preliminar
Para encarar esta práctica debemos de atrevernos a comenzar primeramente, la talla en madera requiere principalmente del manejo del volumen y las proporciones, debemos de tener prudencia a la hora de manejar herramientas de filo el consejo que comparto es no tallar en contra de nuestro cuerpo, en el caso de hacer pequeño formato, tener cuidado con los dedos o usar guates para no lastimar los dedos con el filo, si no has hecho ninguna talla y tienes las intenciones de hacerlo ¡adelante!, estaré compartiendo algunos datos, así que, voluntad y más voluntad, asegúrate de tener buen filo artesano y artesana!!
Paso 1
En este caso voy a elegir un pino muy suave para el cuerpo de la abeja y una lámina de cedro de 4 mm para las alas, acá nos centraremos en desarrollar primero el cuerpo, así que a cortar la dimensión correspondida.
Paso 2
Al tener el taco cortado comenzamos a esbozar el boceto, yo aquí lo realicé poco definido, pero en este paso centrémonos en proporcionar el dibujo porque a medida que vamos quitando material debemos ir rallando, es bueno tener imágenes o dibujos de todas las partes.
| Nota: si es tu primera vez, práctica haciendo algunas replica de un objeto, escultura o juguete, ya que aquí puedes tomar medidas y visualizar la proporciones también practica con arcilla o plastilina, esto es muy importante porque tendremos una guía tridimensional, en mi caso parto de boceto bidimensional, es un consejo. |
Paso 3
Comencemos por dar forma al abdomen, acá estaremos quitando en la parte más ancha del mismo un 3% aprox. de material, no nos afanemos mucho en este paso que aquí estamos comenzando a dar forma.
Paso 4
Una vez iniciado el proceso del abdomen, pasemos a trazar de nuevo el tórax y vamos tallando marcando las divisiones con la cuchilla, esta división la hacemos como cuando podamos un árbol y debemos de cortar algún tronco y sacamos pedazos en v, algo así podrán imaginar de igual forma la pieza te va enseñando en el momento, además de que la intuición nos ayuda mucho en estos procesos.
Paso 5
Debemos ahora pasar a la cabeza y a su vez a repetir los procesos anteriores en la parte de debajo de la pieza para ir dando uniformidad.
Paso 6
Una vez teniendo la pieza proporcionada, en este paso fui dándole un poco más de identidad a la cabeza haciéndole los ojos y mandíbulas, es importante saber que no debemos quedarnos en un solo paso, es importante ir tallando en cada área según nuestra imagen de referencia de esta manera le vamos viendo los cambios.
Paso 7
Seguí estilizando el abdomen un poco más y le hice unas líneas que luego desbastaría la cual le da esa particularidad de la abeja, estas líneas posteriormente irá en negra.
Paso 8
Con la maderita de 4 mmm cortemos las alas y le vamos dando un poco de volumen para darle ese aspecto orgánico y con la gubia de media caña le damos concavidad a la parte debajo.
Paso 9
Lijemos un poco la pieza y hagamos unas aberturas en el tórax donde se ensamblaran luego las alas.
Paso 10
Con una maderita o chapa de 1 mm vamos a hacer las patas y las antenas, esta fue unas de las formas en la que pude resolver, remojamos las tiritas en agua por unos minutos y hacemos uso del cautín para doblar las chapitas en forma de una “U”.
Paso 11
Paso de la policromía, le di una pasada de pintura amarilla muy diluida, esta para que le diera un poco de color y también con un poco de marrón en la cabeza, luego la intervine con el pirógrafo porque el quemado resaltaría el volumen de la escultura también le hice las líneas de las alas.
Paso 12
Ya casi estamos llegando al final si vemos tenemos que hacer el pedestal, lo realice con un hexágono como si estuviera en una colmena produciendo miel, así que hice el trazo y corte con la caladora manual una madera de 5 mm y luego le hice un borde de 2 mm para darle un poco de profundidad usando la gubia de media caña.
Paso 13
Ensamble y presentación en el pedestal, acá debemos de pegar con cianocrilato sin duda, es bastante resistente y pega muy rápido, le damos unos puntos en los lugares de apoyo y dejamos secar.
Paso 14
Pegado de la abeja en el pedestal y barnizado, como podemos ver, a la base le abrí tres agujeros muy mínimos para que las patas se pudieran apoyar y así pegar con mucho más apoyo luego le di tres manos de barniz en esta ocasión use un poco de goma laca generándome un aspecto satinado y bastante artesanal.
De esta manera damos por culminado este pequeño y laborioso proyecto, aunque es una técnica un poco compleja para describirla en un solo post, pero puede ser de ayuda e inspiración para desarrollar una idea practica como comente al principio, no importa como salga la primera, todos tuvimos un inicio tampoco soy un consagrado, solo amigos, trato de hacer lo mejor que puedo cada vez que me atrevo a hacer una talla, en esta me tarde una tarde más o menos y en una mañana realice varios experimento para lograr las patas, que por supuesto partí muchas, las manos quedan un poco cansadas, el resultado nos hace cambiar de parecer, sin duda fue bastante edificante, así que aproveche la iniciativa de la colmena como excusa para tallar, ya que tenía días sin hacerlo.
Me despido y espero que sea de provecho este contenido, muchas gracias por leer, si tienen alguna sugerencia o duda estoy atento a los comentarios, hasta una próxima publicación.
- Fotografías tomadas desde mi celular
- texto traducido en deelp
- Edición de imágenes en canva