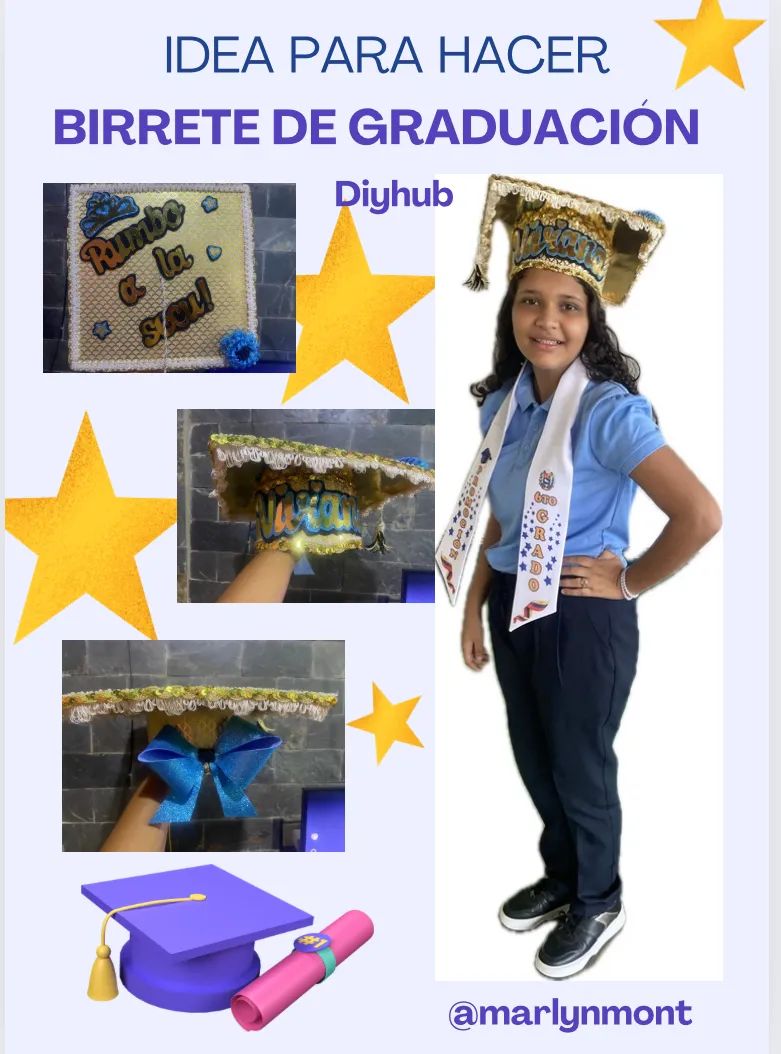
Saludos queridos amigos de DIYHUB, es un gusto compartir en esta querida comunidad, espero tengan un excelente día 🥰
Hoy en día todos los chicos en sus graduaciones desean llevar un hermoso birrete decorado, comprarlo ya hecho sale bastante costoso así que me puse manos a la obra y le hice un hermoso birrete a mi hija para su graduación de sexto grado, aquí te dejo esta idea para que hagas Tus propios birrete, acompáñame y te muestro cómo lo hice:
Greetings dear friends of DIYHUB, it is a pleasure to share in this dear community, I hope you have a great day 🥰
Nowadays all the kids at their graduations want to wear a beautiful decorated cap, buying it already made is quite expensive so I got to work and made a beautiful cap for my daughter for her sixth grade graduation, here I leave you this idea for you to make your own cap, come with me and I'll show you how I did it:
➿➿➿➿🎓🎓➿➿➿➿
MATERIALES
MATERIALS
Mi hija llegó al final de la primaria y tendría un lindo acto de grado, por supuesto yo no podía dejar pasar esta ocasión sin hacerle un hermoso birrete de graduación, todas sus compañeritas llevarían hermosos birrete así que me puse manos a la obra y decidí reunir algo de dinero para adquirir todos los materiales necesarios para hacerle el birrete a mi hija.
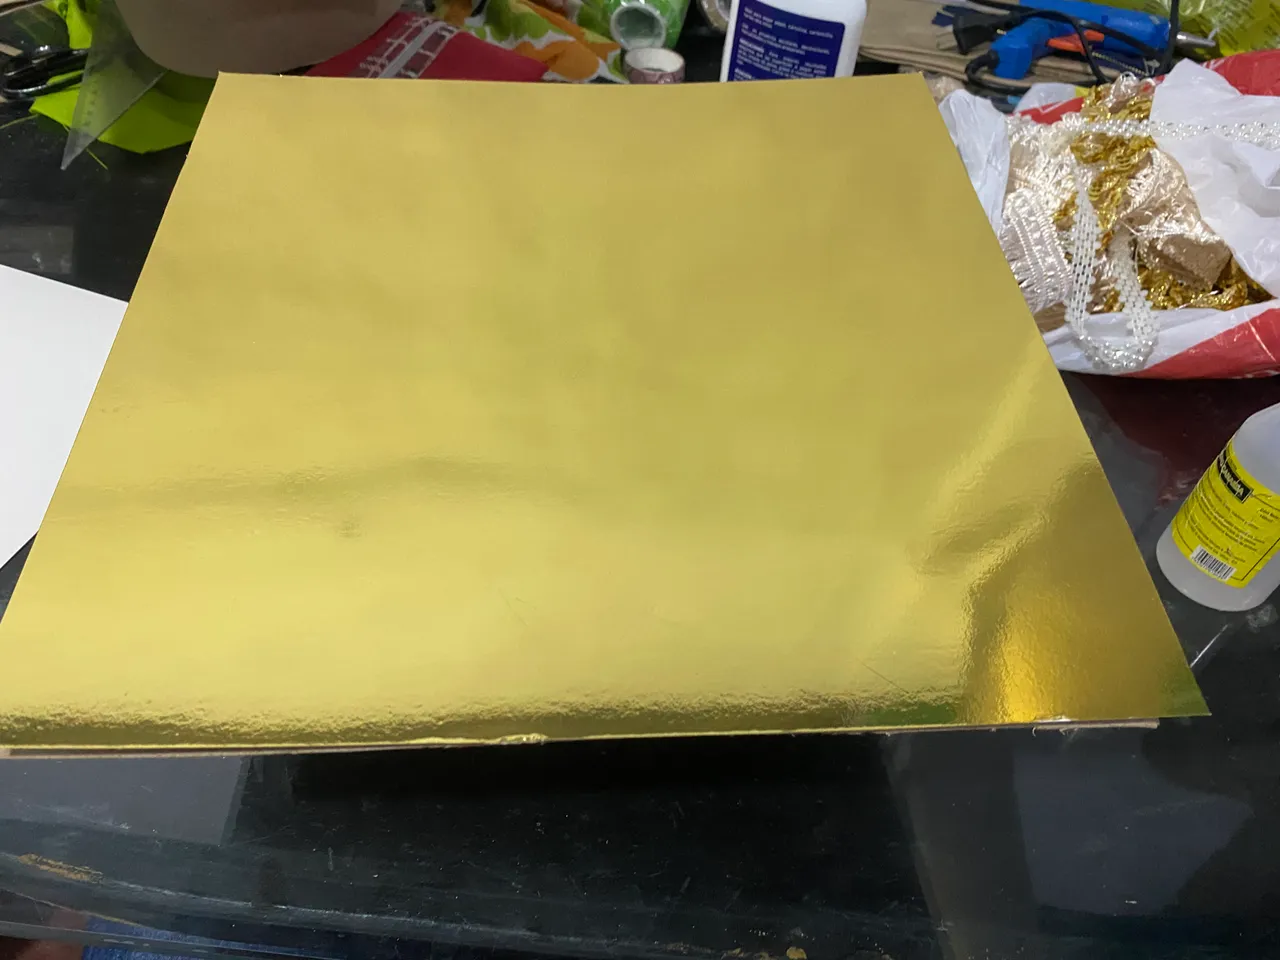
Ella lo único que me expresó es que no quería un color común , Ella deseaba algo diferente ya que las niñas siempre utilizan el color rosado, así que la lleve conmigo a comprar los materiales y ellas cogió unas hermosas cartulinas en color dorado, luego nos fuimos a la tienda de mercería y allí adquirimos varios encajes de diferentes tonos y diseños para combinarlo, aquí te dejo la lista de los materiales que utilicé:
- Carton en kilo
- cartulina del color de tu preferencia en mi caso compre dorada y estampada dorada
- foami
- pega blanca
- tijeras
- regla
- silicone liquido
- silicone caliente
- exacto de precisión
- lapiz
- compas para hacer círculos
- encajes a tu gusto
My daughter arrived at the end of primary school and would have a nice graduation ceremony, of course I couldn't let this occasion pass without giving her a beautiful graduation cap, all her classmates would be wearing beautiful caps, so I got to work and decided gather some money to acquire all the necessary materials and make a beautiful cap.
The only thing my daughter expressed to me was that she didn't want a common color. She wanted something different since girls always use pink, so I took her with me to buy the materials and they chose some beautiful cardboard in gold, then We went to the haberdashery and there we acquired several lace of different shades and designs to combine it, here is the list of the materials I used:
- Cardboard in kilo
- cardboard of the color of your preference, in my case I bought gold and gold print
- foam
- white glue
- scissors
- ruler
- liquid silicone
- hot silicone
- exact precision
- pencil
- compasses to make circles
- lace to your liking
 |  |
|---|
➿➿➿➿🎓🎓➿➿➿➿
PASO A PASO
STEP BY STEP
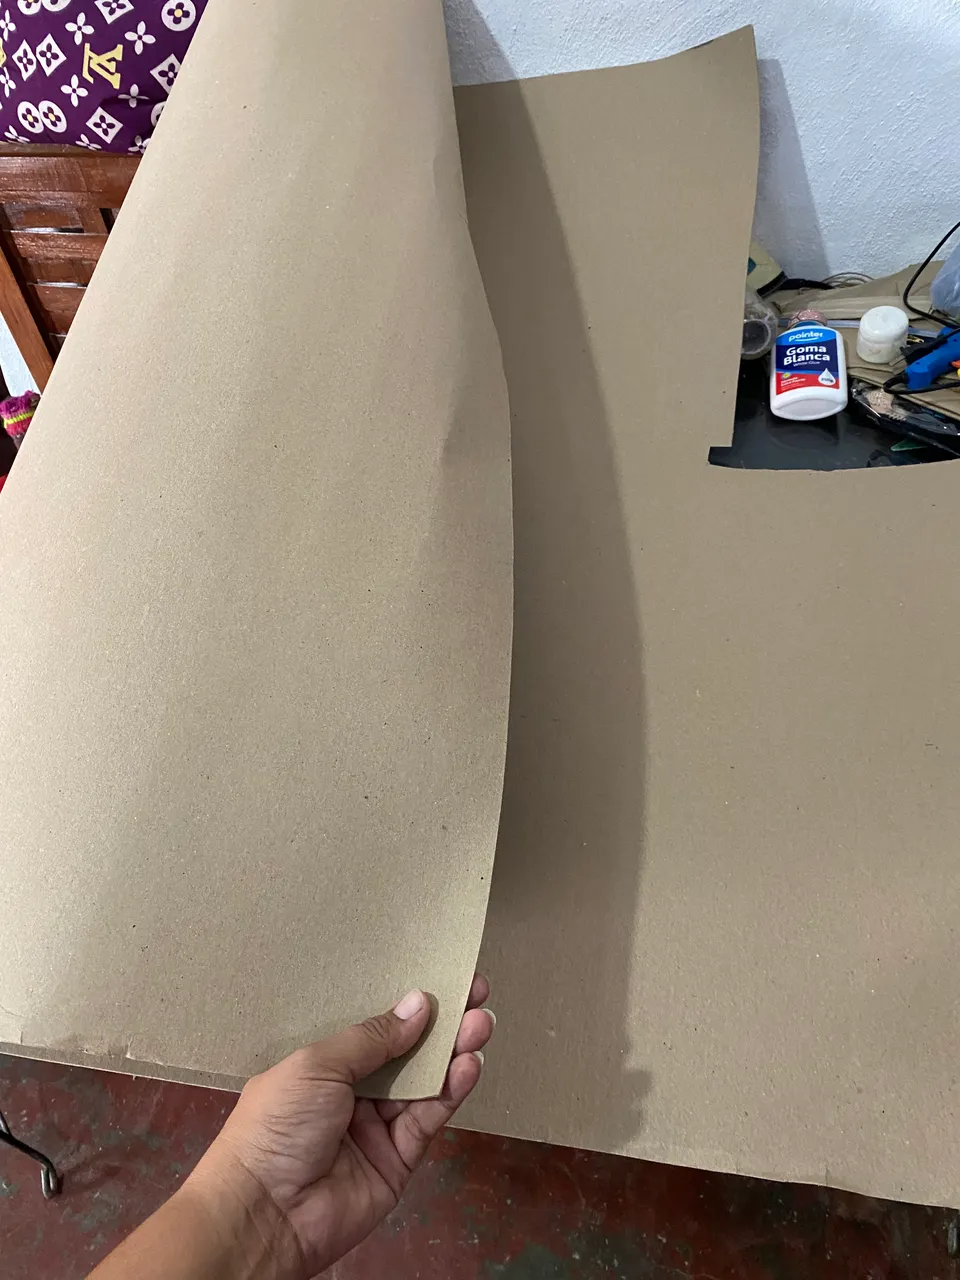
Comenzaremos haciendo la base del birrete en cartón, vamos a cortar 2 cuadrado de 30 cm por cada lado, O un rectángulo de 60 cm y luego doblar a la mitad, mi hija es alta y estas medidas son personalizadas para ella, si el niño es más pequeño puedes disminuirle algunos centímetros.
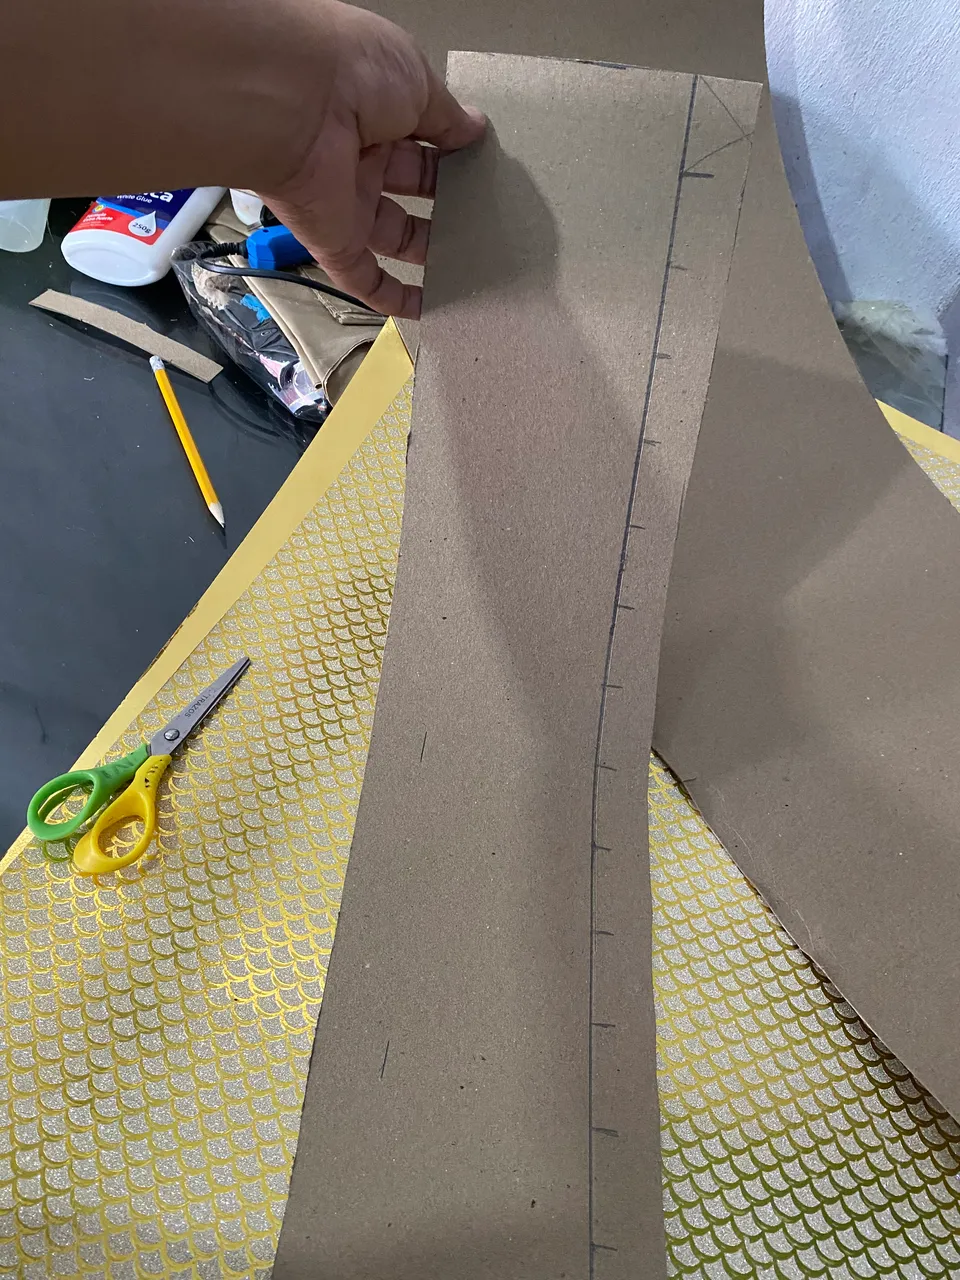
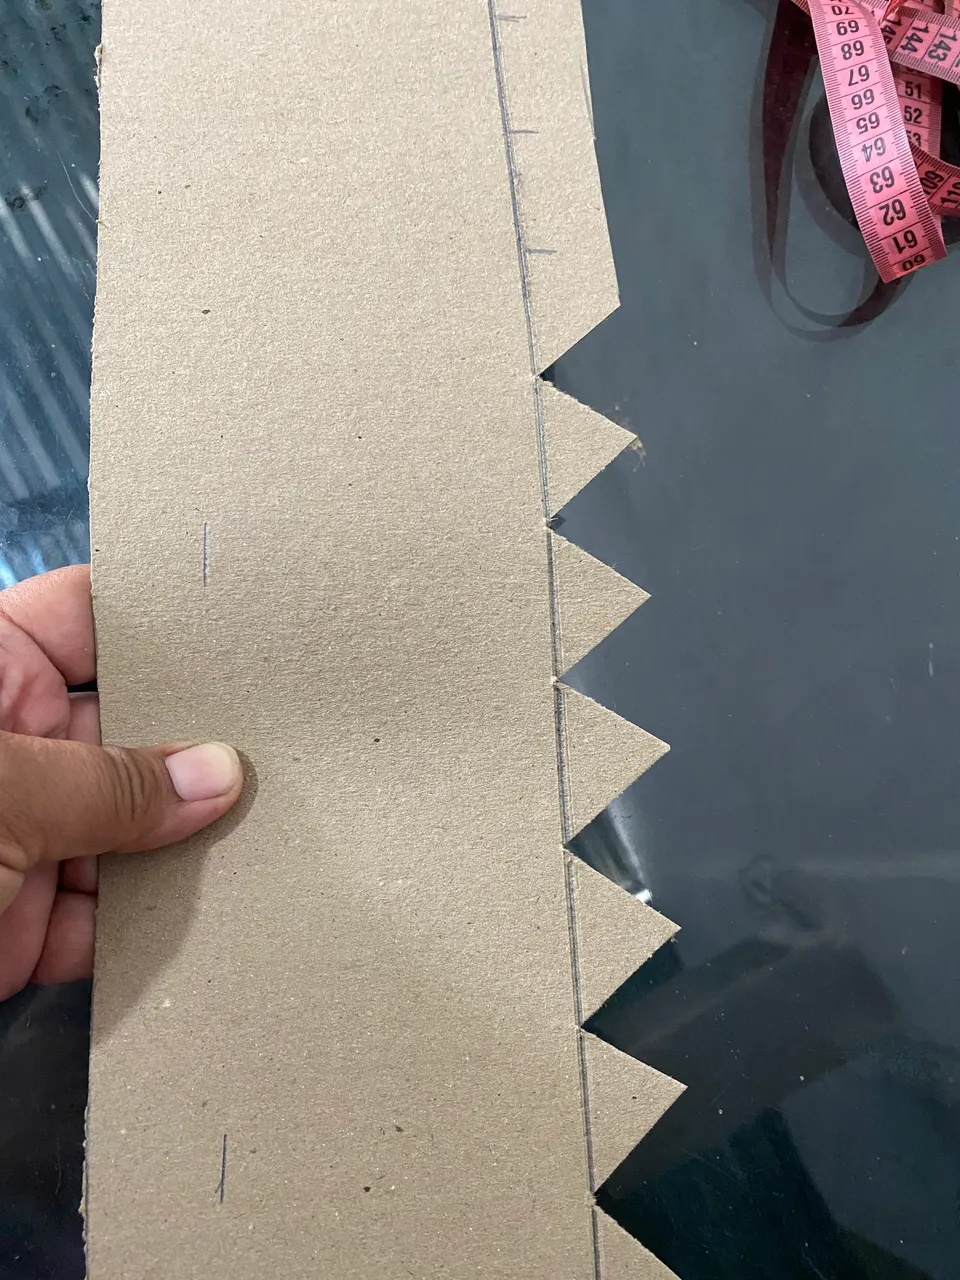
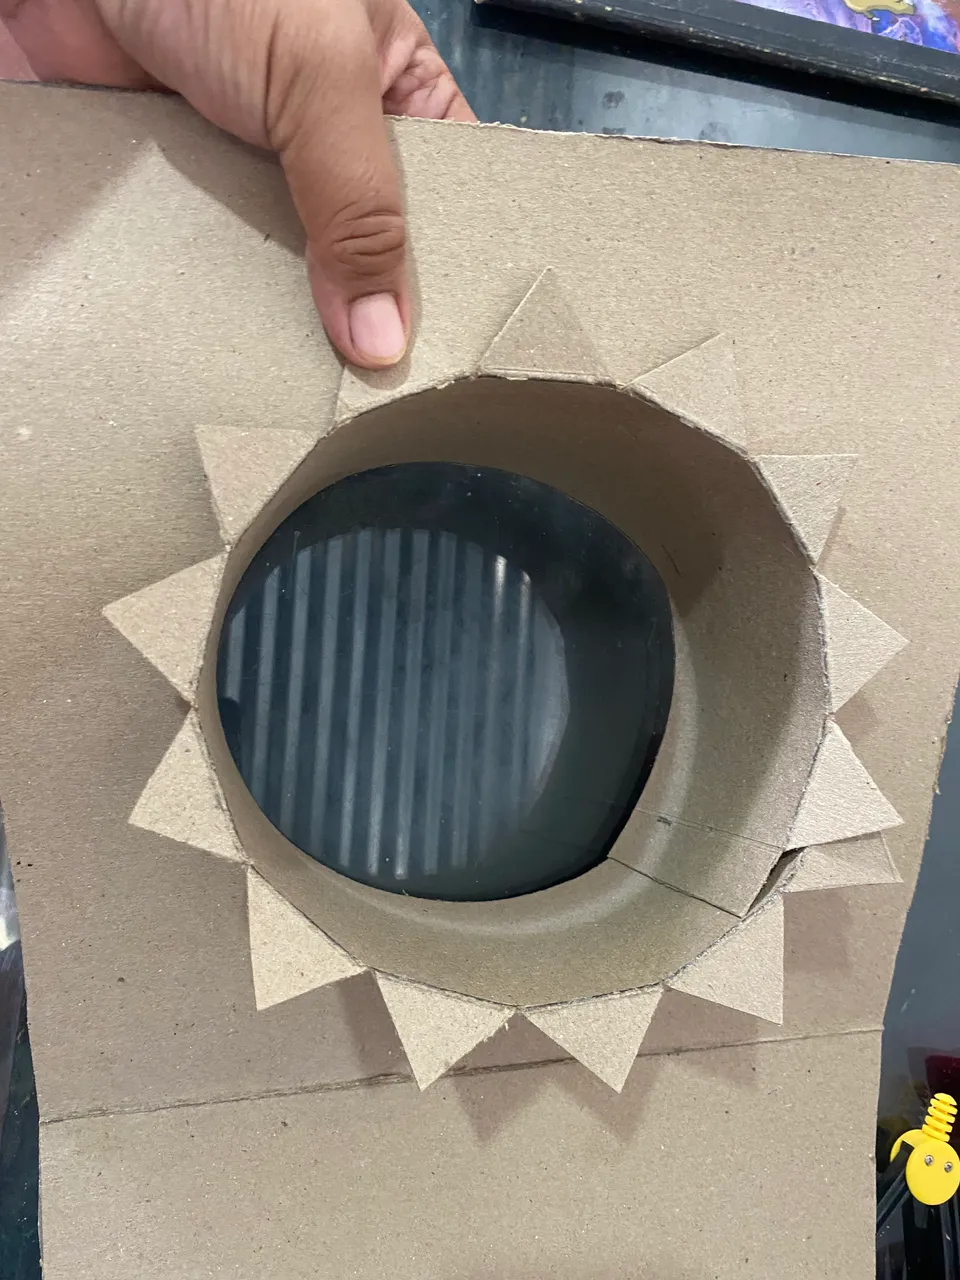
Cortaremos un rectángulo de 58 cm por 14 cm de alto, Al rectángulo le vamos a marcar 11 cm de alto y vamos a atrasar una línea, en este espacio que sobra vamos a marcar cada 4 cm de punta a punta, le vamos a dibujar pequeños triángulos, luego recortamos, en mis imágenes muestro como debe quedar.
We will start by making the base of the cap in cardboard, we are going to cut 2 squares of 30 cm on each side, OR a 60 cm rectangle and then fold in half, my daughter is tall and these measurements are personalized for her, if the child is smaller you can decrease a few centimeters.
We will cut a rectangle measuring 58 cm by 14 cm high. We are going to mark the rectangle 11 cm high and we are going to draw a line, in this leftover space we are going to mark every 4 cm from end to end, we are going to draw small triangles, then we cut out, in my images I show how it should look.
 |  |
|---|---|
 |  |
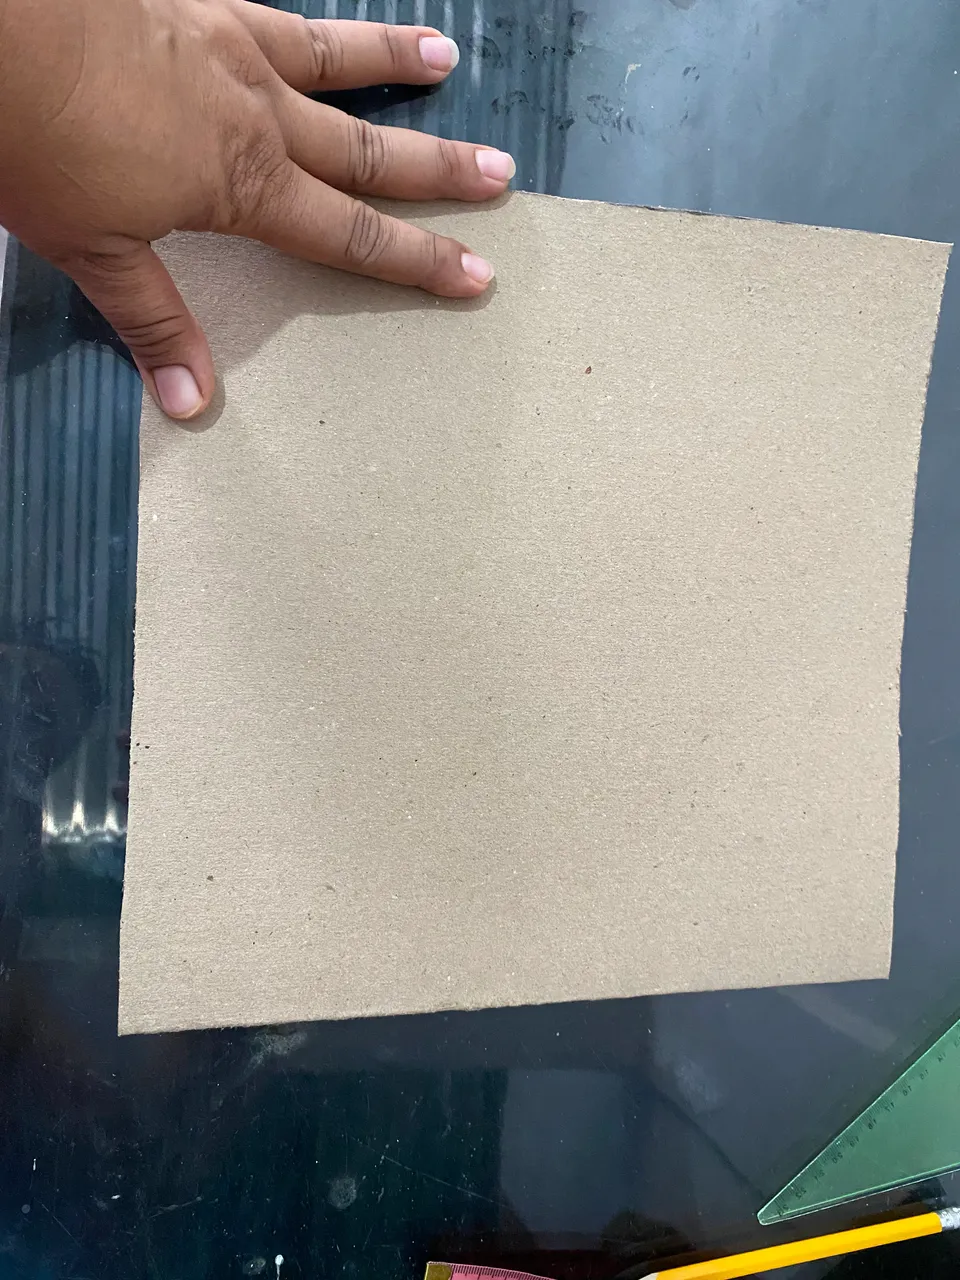
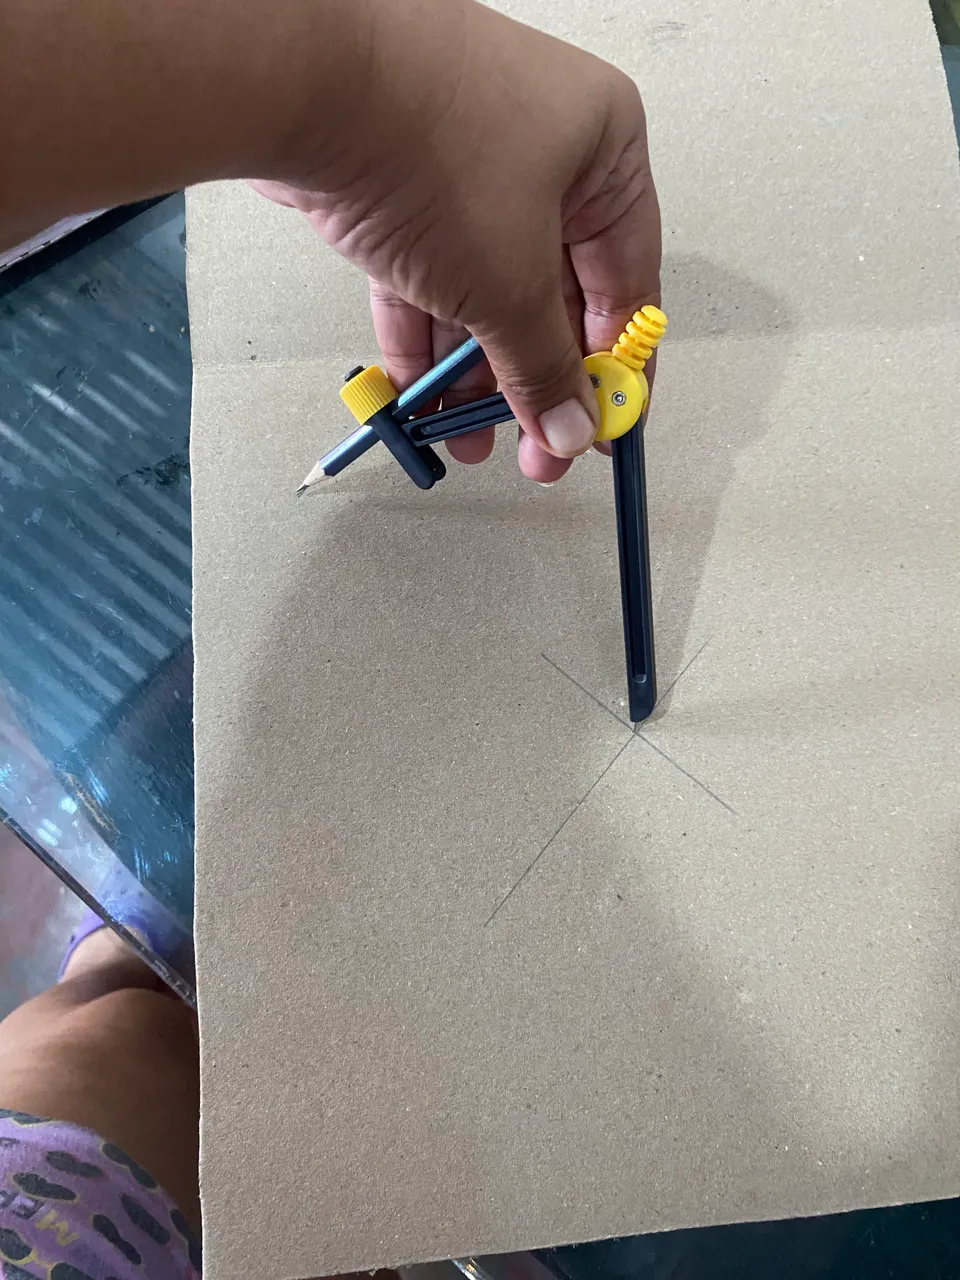
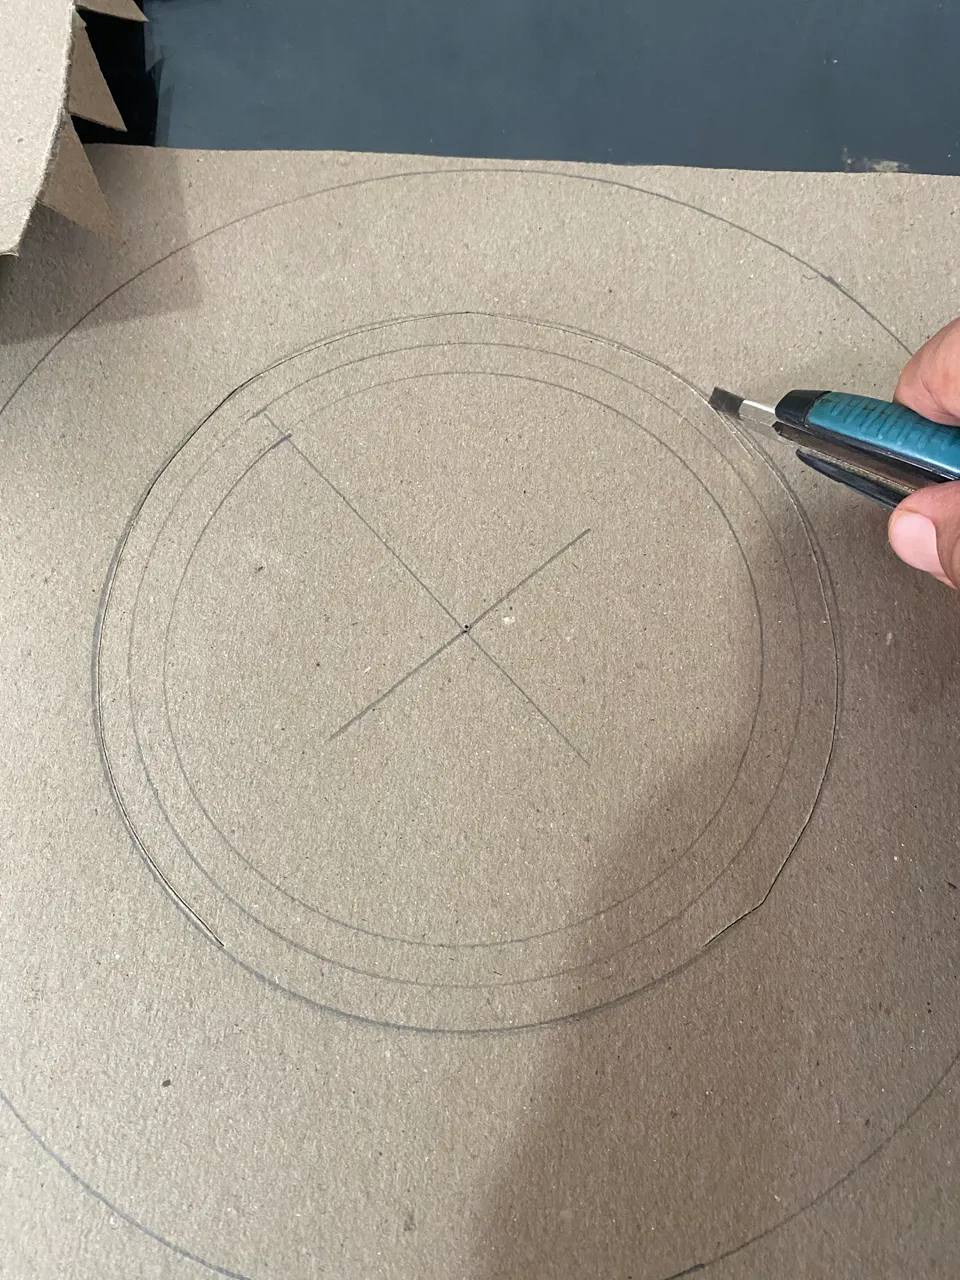
En uno de los cuadrados de cartón vamos a sacar la circunferencia acorde al rectángulo, vamos a hacer dos líneas diagonales y desde el centro con la ayuda de un compás vamos a hacer la circunferencia, en mi caso la medida para el compás fue de 9 cm.
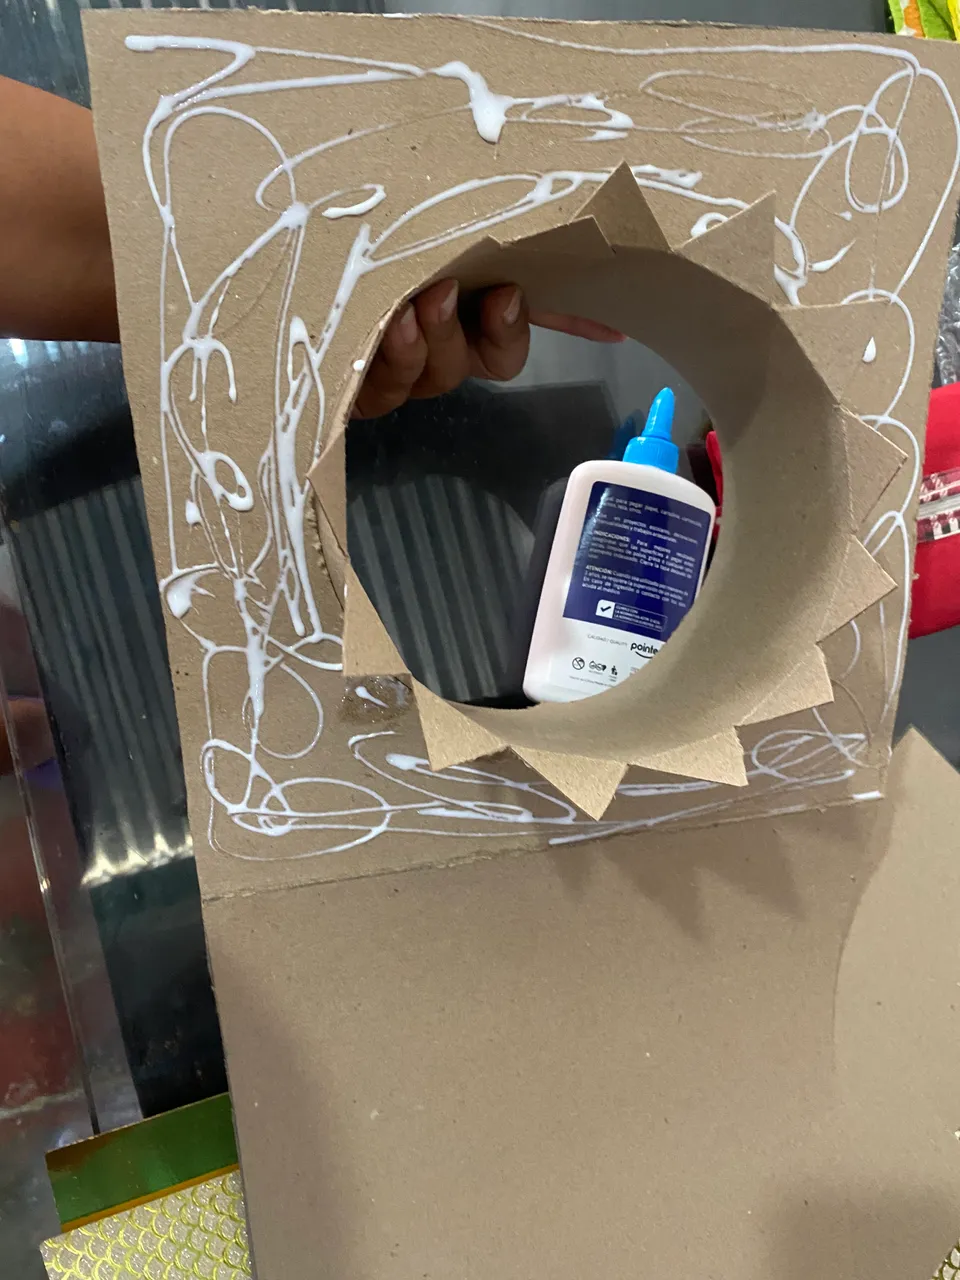
Luego recortamos y vamos a pegar el rectángulo metiendo hacia adentro los cortes triángulares que le hicimos, le ponemos suficiente pega blanca y le colocamos el otro cartón cuadrado encima para tapar Y así está lista la base para nuestro birrete.
In one of the cardboard squares we are going to take out the circumference according to the rectangle, we are going to make two diagonal lines and from the center with the help of a compass we are going to make the circumference, in my case the measurement for the compass was 9 cm .
Then we cut out and we are going to glue the rectangle, inserting the triangular cuts that we made inward, we put enough white glue on it and we place the other square cardboard on top to cover it. And thus the base for our cap is ready.
 |  |
|---|---|
 |  |
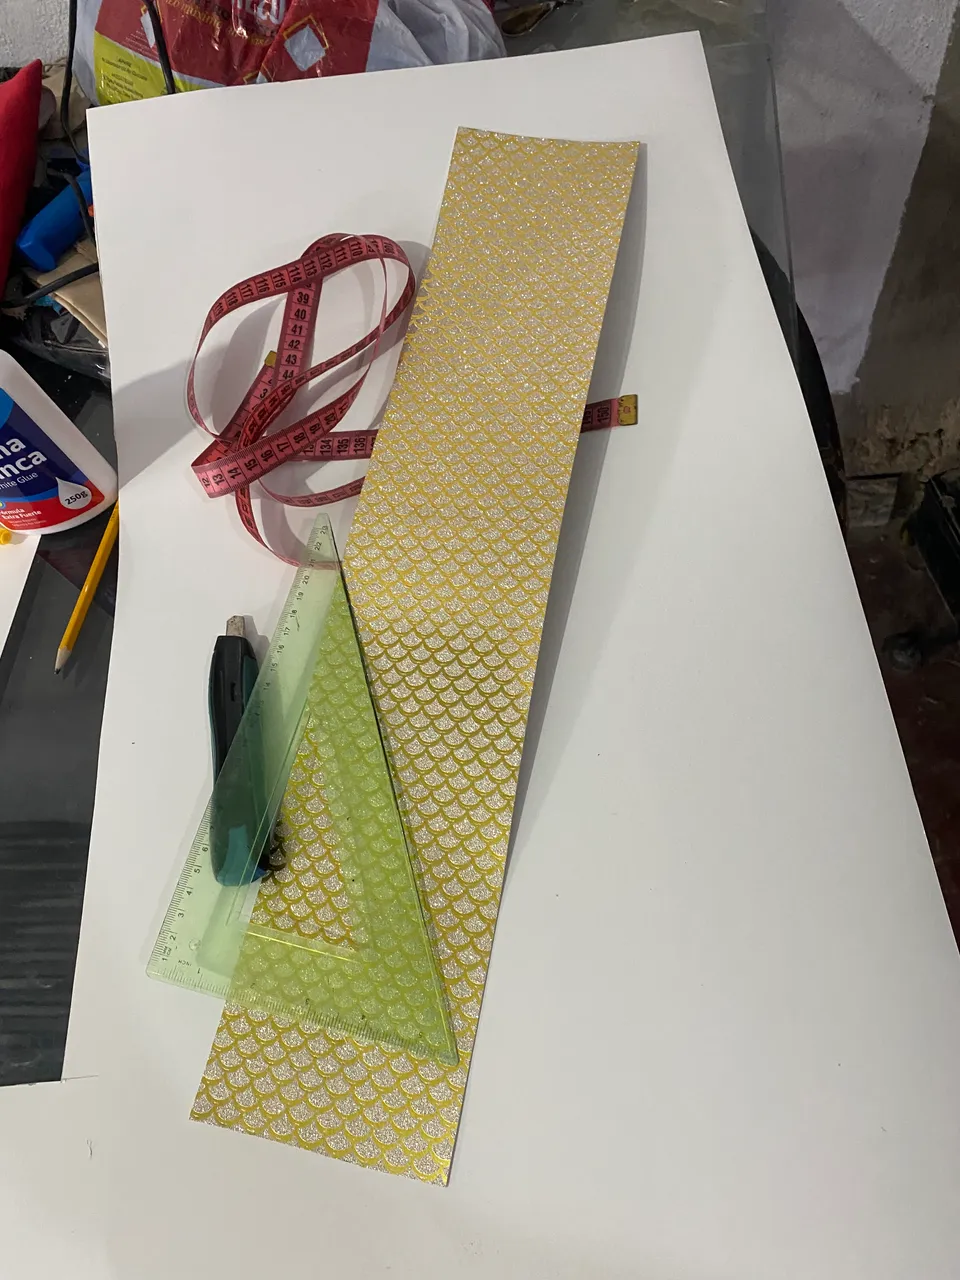
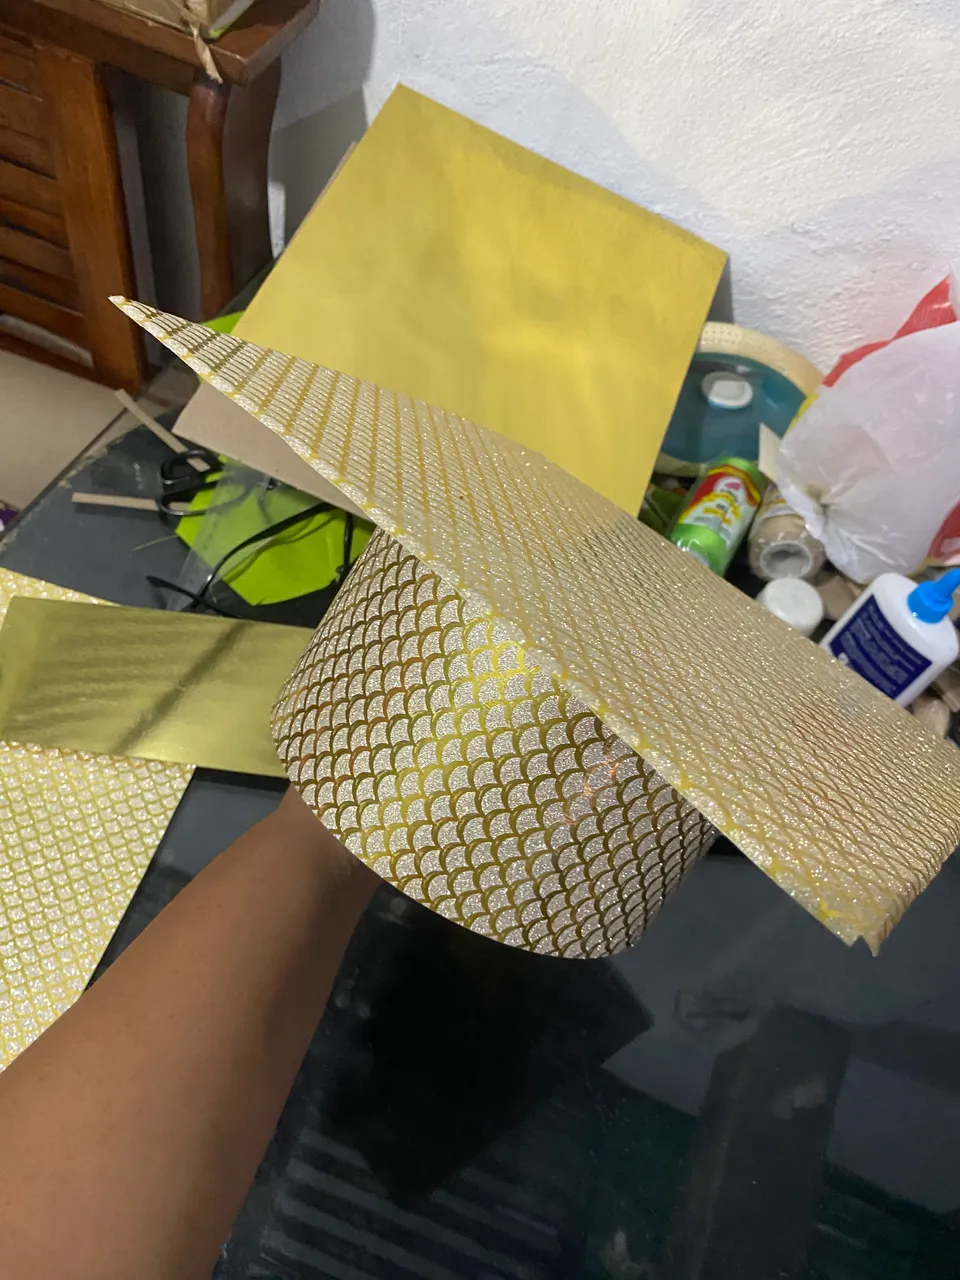
Ahora comenzaremos con las decoraciones, con la cartulina estampada voy a cortar un cuadrado de 30cm por 30cm, este lo voy a pegar en la parte superior del birrete, también córtate el rectángulo para cubrir toda la base del birrete, para la parte interna del cuadrado lo voy a cortar en cartulina dorada, a esta le haré el hueco de la circunferencia y pegaré al birrete.
Now we will start with the decorations, with the printed cardboard I am going to cut a 30cm by 30cm square, I am going to glue this on the top of the cap, also cut the rectangle to cover the entire base of the cap, for the inside of the square I'm going to cut it out of gold cardboard, I'll make a hole in the circumference and glue it to the cap.
 |  |
|---|---|
 |  |
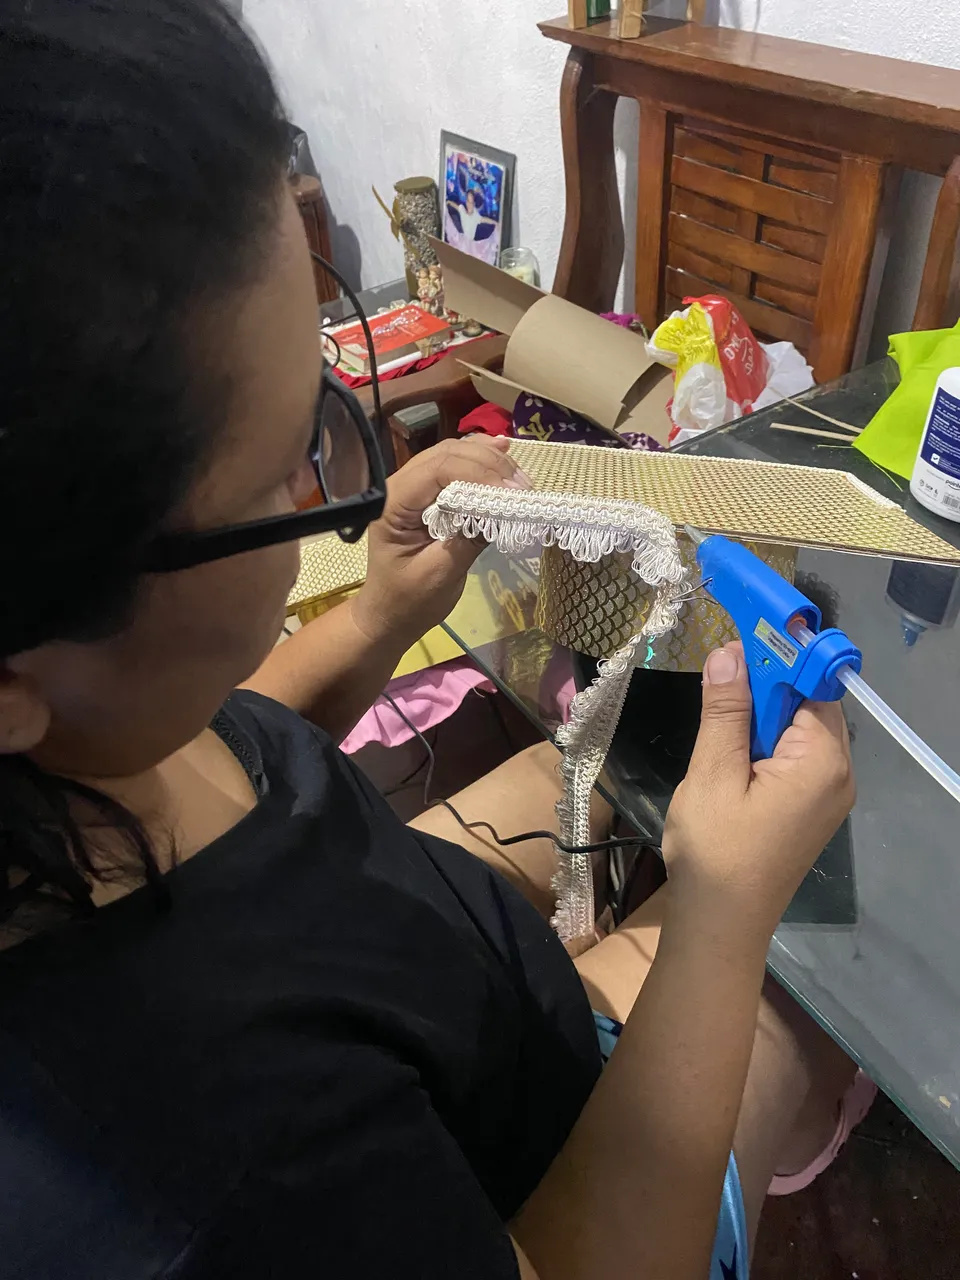
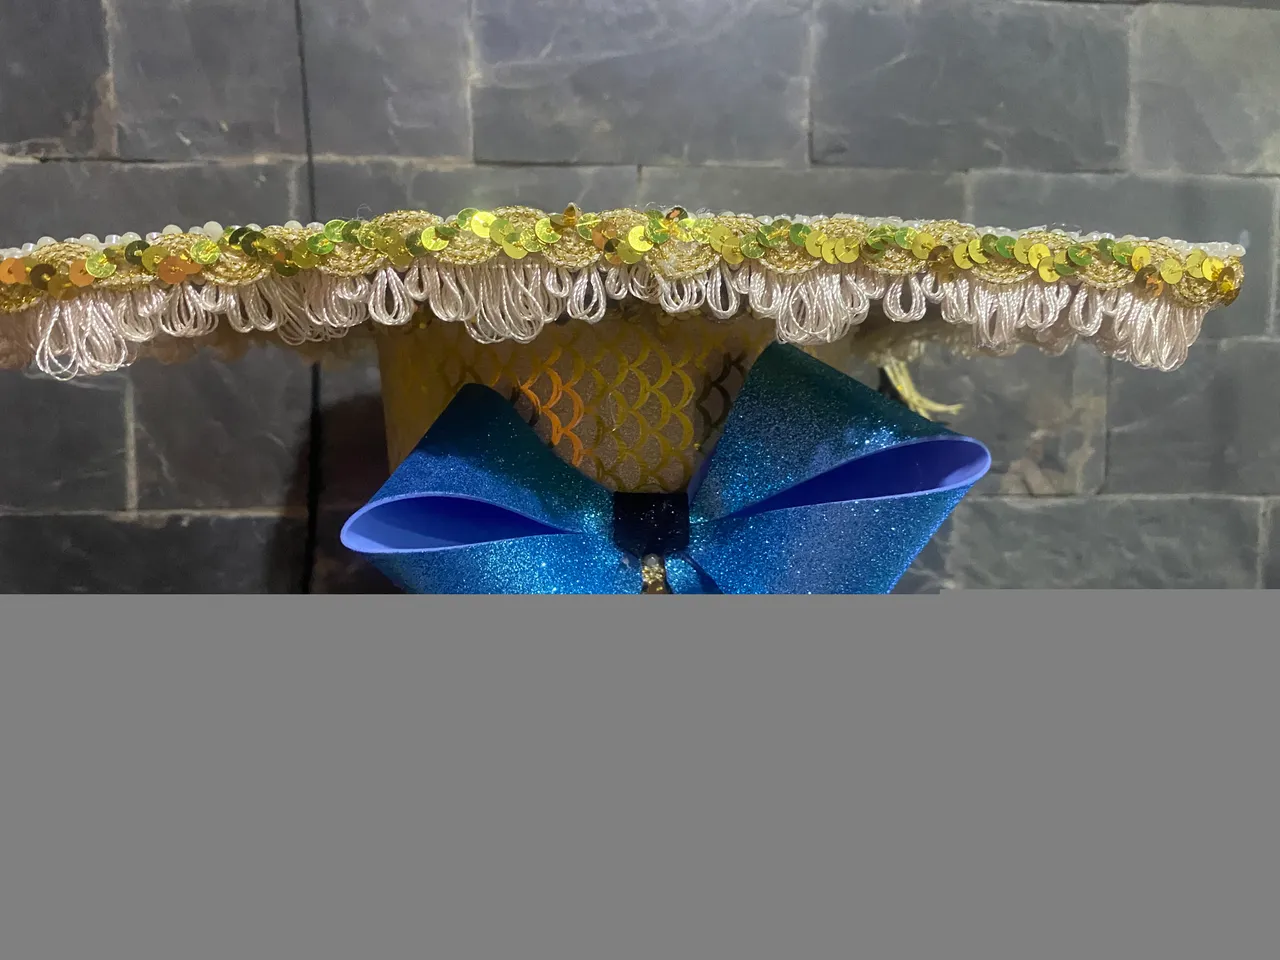
Luego de tener el birrete completamente forrado con la cartulina decorativa vamos a comenzar a pegarle los encajes, en toda la orilla de arriba le voy a colocar un encaje tejido con flecos este lo pegaré con Silicon caliente para que el pegado sea más firme y más rápido.
Por todo el alrededor del cuadrado en la parte superior le voy a colocar un hermoso encaje de perlas corridas con diamantes, éste tiene cuatro filas corté a la medida y pegué igual con Silicon caliente.
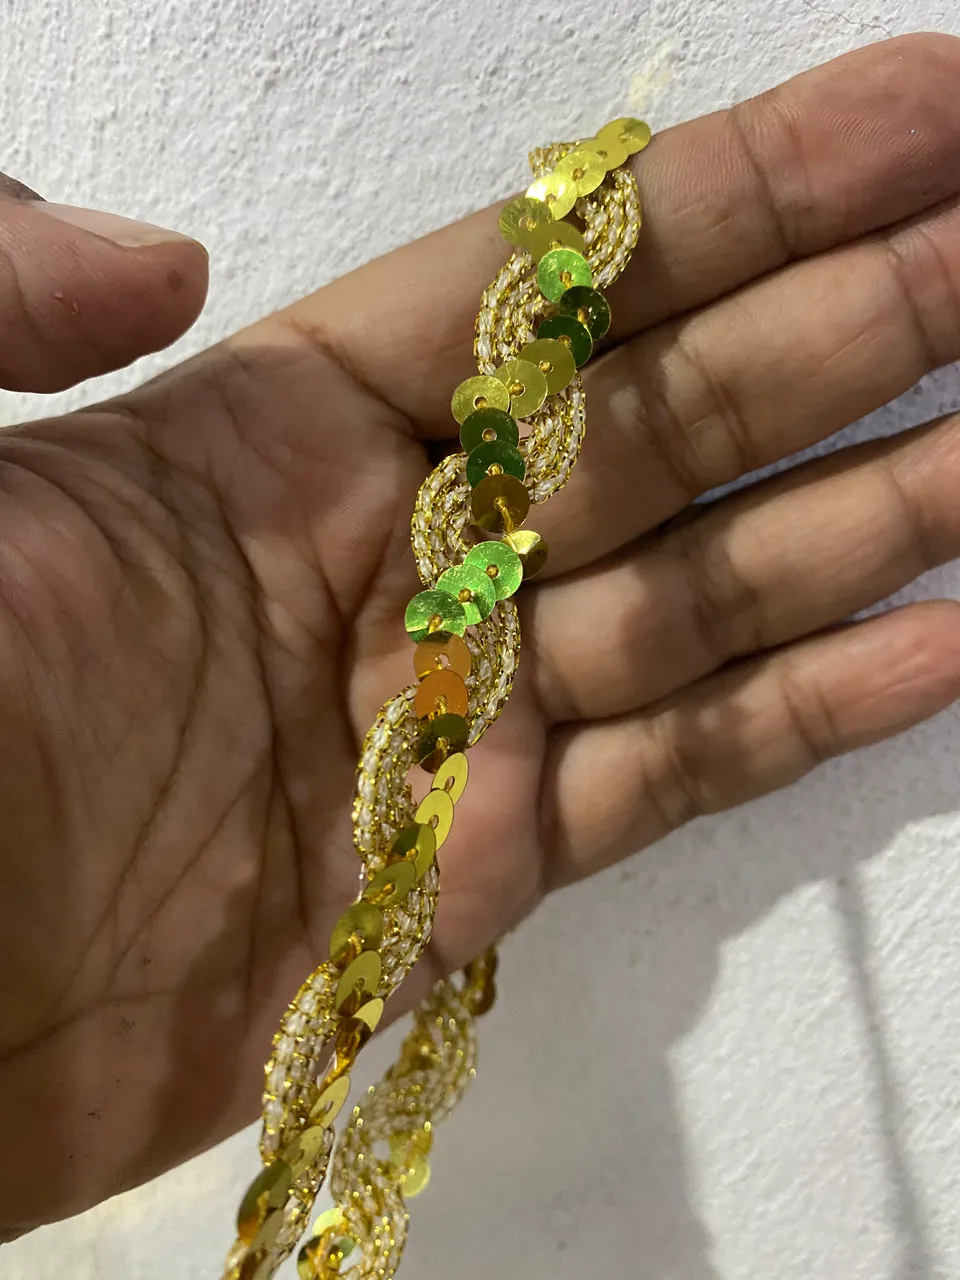
Para las orillas de la base del birrete le voy a colocar un lindo encaje dorado con lentejuelas, todos estos encajes los conseguí en una mercería muy famosa de mi ciudad la cual vende bastante económico y son muy hermosos.
After having the cap completely lined with the decorative cardboard we are going to start gluing the lace, on the entire top edge I am going to place a woven lace with fringes, this I will glue with hot Silicon so that the gluing is firmer and faster .
All around the square at the top I am going to place a beautiful lace of pearls with diamonds, this one has four rows that I cut to size and glued the same with hot Silicon.
For the edges of the base of the cap I am going to place a pretty golden lace with sequins. I got all of these laces at a very famous haberdashery store in my city which sells them quite cheaply and they are very beautiful.
 |  |
|---|---|
 |  |
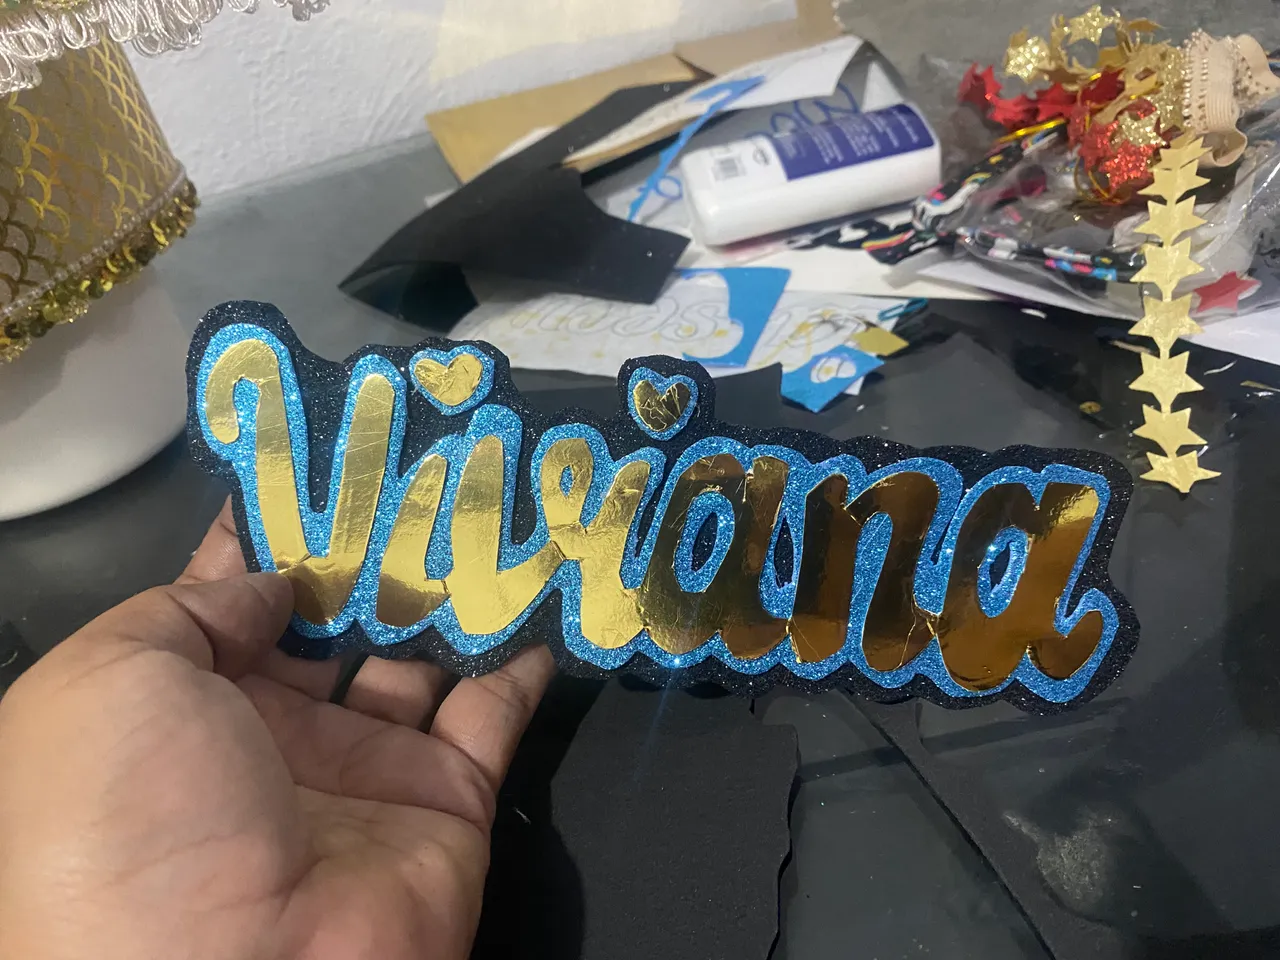
Para continuar con la decoración le voy a hacer el nombre de mi hija y una frase Escogida por ella en la parte de arriba del birrete, las letras las conseguí en Canva, las imprimí y luego dibujé con ayuda de un papel carbón, para pasar a la cartulina hay que dibujarlas al revés.
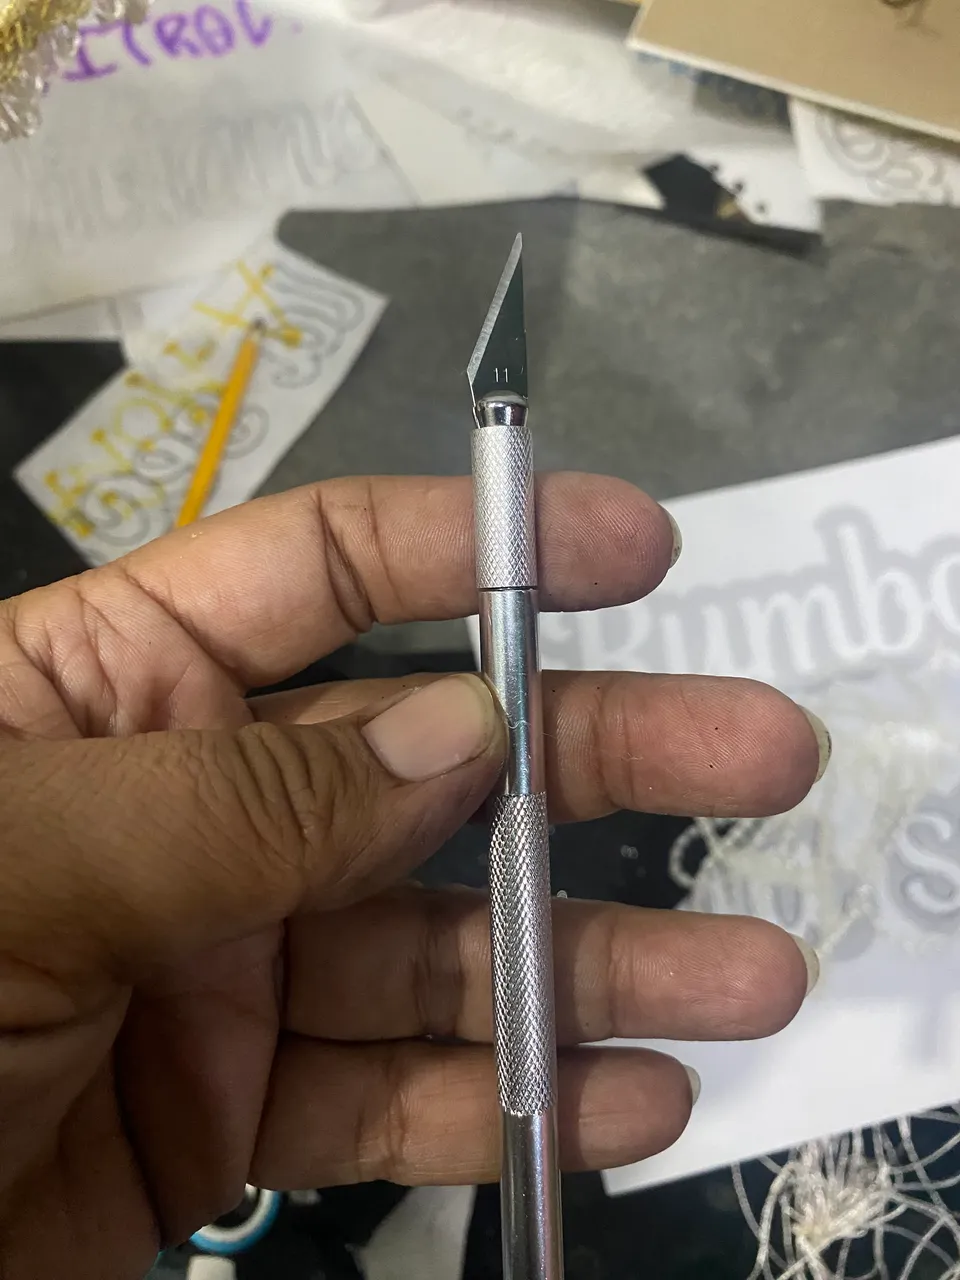
Luego recortaremos con un exacto de precisión, este proceso es un poco delicado y difícil al principio, pero poco a poco se le va agarrando la técnica y ya luego será más fácil, Las letras las recorté en cartulina dorada, las que van arriba las pegué sobre Foamy negro y luego Recorté dejando un sobresaliente para que resalten las letras
Para las letras del nombre de mi hija Viviana también las recorté en cartulina dorada, estas las pegué sobre Foam escarchado azul claro, luego De Recortar las pegué sobre Foamy negro.
To continue with the decoration, I am going to make my daughter's name and a phrase chosen by her on the top of the cap, I got the letters in Canva, printed them and then drew with the help of carbon paper, to move on to the cardboard must be drawn upside down.
Then we will cut out with an exact precision, this process is a little delicate and difficult at first, but little by little you will get the hang of the technique and then it will be easier. I cut the letters out of gold cardboard, I glued the ones at the top on black Foamy and then I cut out leaving a protrusion so that the letters stand out
For the letters of my daughter Viviana's name I also cut them out of gold cardboard, I glued these on light blue frosted Foam, after Cutting I glued them on black Foamy
 |  |
|---|---|
 |  |
| --- | --- |
 |  |
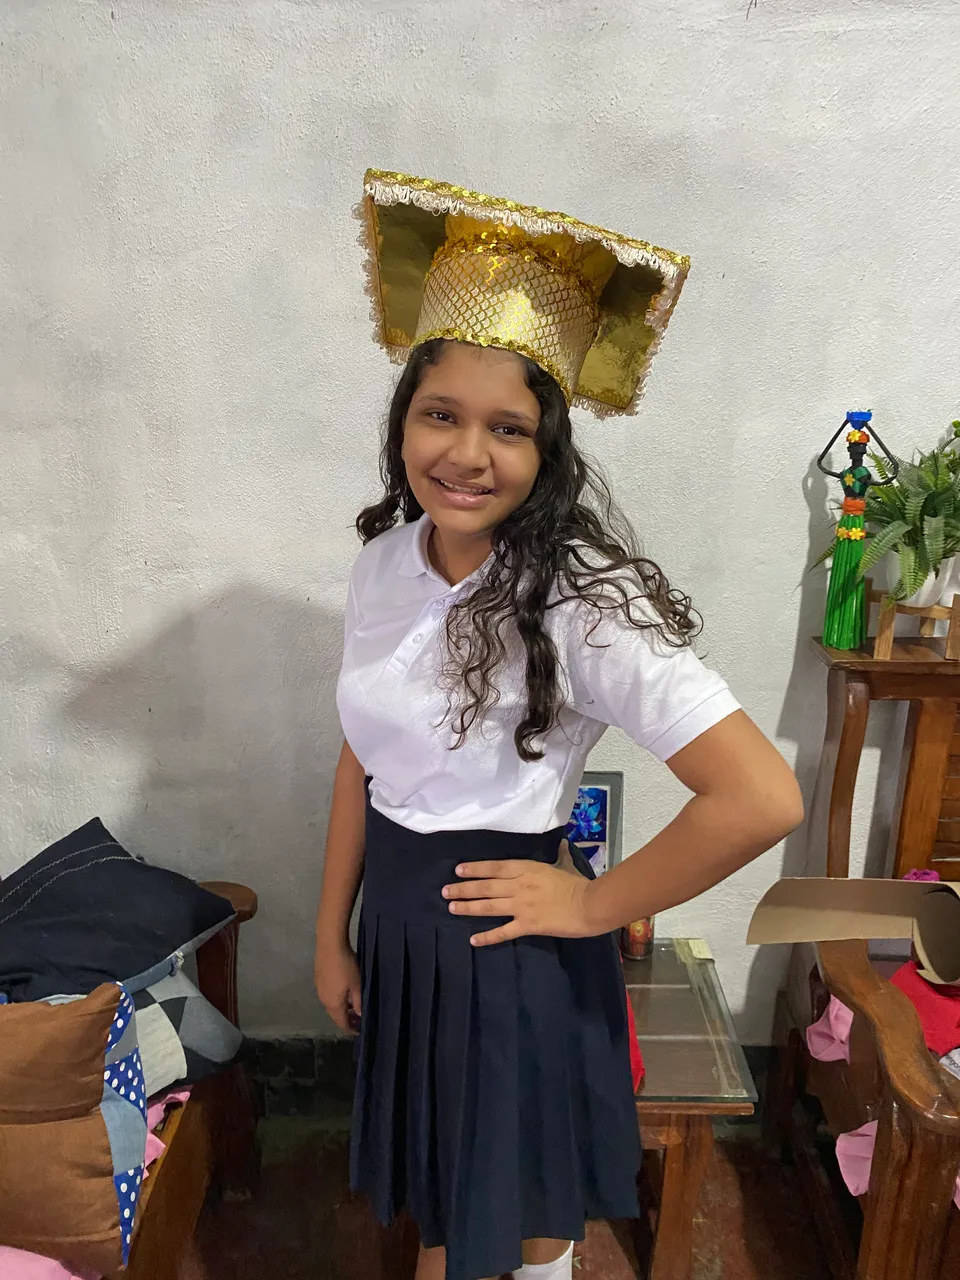
Para culminar con la realización de este lindo birrete le hice otros detallitos para la parte superior dibujé una pequeña corona, unas pequeñas estrellas, un corazoncito, también le hice una linda flor en Foamy, y un lazo grande para la parte de atrás.
Todas estas de Decoraciones las hice con el mismo procedimiento como el de las letras, pegué con Silicon caliente al birrete, abrí con mucho cuidado un orificio en el centro de arriba del birrete y le coloqué una pequeña borla y aquí les muestro el resultado de este hermoso birrete para graduación:
To finish with the creation of this beautiful cap, I made other details for the top part, I drew a small crown, some small stars, a little heart, I also made a nice flower in Foamy, and a large bow for the back part.
I made all of these Decorations with the same procedure as the letters, I glued hot Silicon to the cap, I carefully opened a hole in the top center of the cap and placed a small tassel on it and here I show you the result of this beautiful cap for graduation:
 |  |
|---|---|
 |
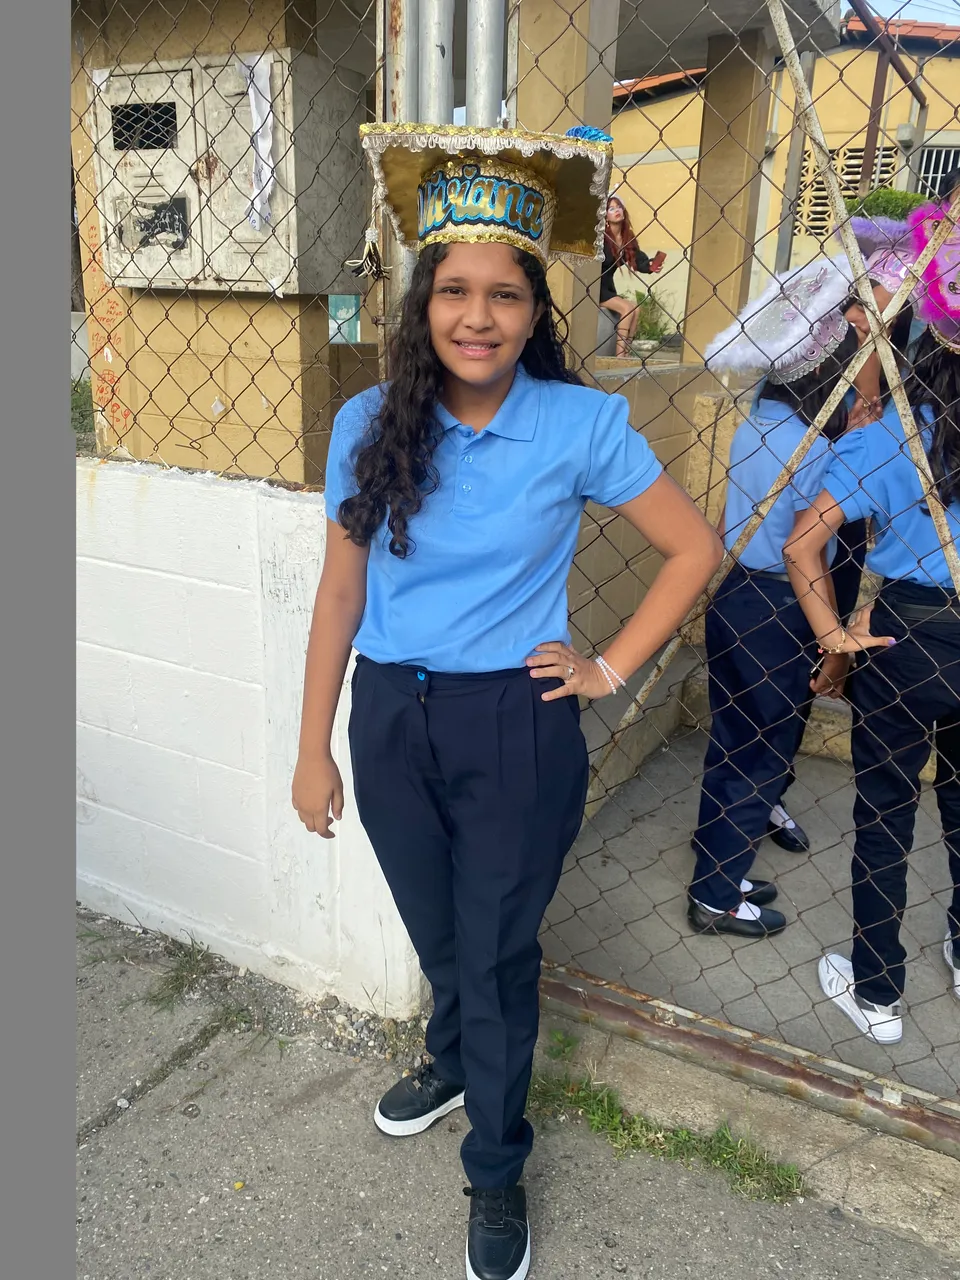
Lo que mas amo de hacer manualidades es que puedo darle gustos a mis hijos y con el orgullo de saber que lo hice con mis propias manos, mi hija quedó encantada con su hermoso birrete y yo con el corazón muy feliz de verla a ella súper contenta, espero les haya gustado esta hermosa idea para hacer hermosos birretes, me despido deseándoles muchos éxitos y bendiciones, hasta otra oportunidad
What I love most about making crafts is that I can give pleasure to my children and with the pride of knowing that I made it with my own hands, my daughter was delighted with her beautiful cap and I was very happy to see her super happy. I hope you liked this beautiful idea to make beautiful mortarboards, I say goodbye wishing you many successes and blessings, until another opportunity

➿➿➿➿🎓🎓➿➿➿➿