Saludos, hoy les vengo a mostrar otro de mis proyectos de engaste de joyería, este tipo de trabajo suelo hacerlos muy poco, aunque sé que debería emplearme más en trabajar con piedras y cristales, ya que gustan mucho, así que este año agarraré ánimos y haré más engastes.
Antes de empezar quiero comentarles que esta pieza la realicé el año pasado y básicamente tengo la idea de mostrar el proceso o evolución de la misma desde su fase inicial hasta que ya ha sido acabada, describiendo los procesos de una manera básica, más algún comentario que considere relevante.
El cristal es el protagonista en este trabajo de joyería, me lo dio una clienta que quería una montura sencilla, pero que resaltara la belleza del el cristal, que de por sí es bastante grande para lo uno regularmente puede conseguir, sobre todo en mi ciudad Caracas, a continuación le daré alguno de los materiales y herramientas usados:
- Soplete, soldadura de plata y bórax para el proceso de soldadura, incluyendo el ácido para el proceso de decapado que permite remover la oxidación o manchas que deja la aplicación del fuego sobre la plata.
- Cinta de plata de aprox. 0,7 mm de espesor y 3 mm de ancho, cinta o hilo de plata de 0,7 mm de espesor 1,2 mm de ancho. Hilo de plata, lámina de plata.
- Pinzas de joyería.
- limas y lija número 240, 360 y 400
- Dremel.
- Motor de banco, disco de tela para pulir y cera de pulir.
- otros elementos que nombrar en la descripción del proceso de ser necesario.
PROCESO

Este es el cristal antes de hacer la montura

Con el uso de la pinza plana hice los dobleces de la cinta de plata de 3 mm de ancho, con la intención contornear la plata al cristal y e hice el corte, como el metal estaba algo duro o templado, lo pase por fuego para ablandar y después corte justo a la medida, ajustándose perfectamente a la silueta del cristal para avanzar a la aplicación de la soldadura con el soplete, con el uso del bórax como fundente y soldadura de plata.

Así quedo después de soldado, como ven ajustado al cristal.
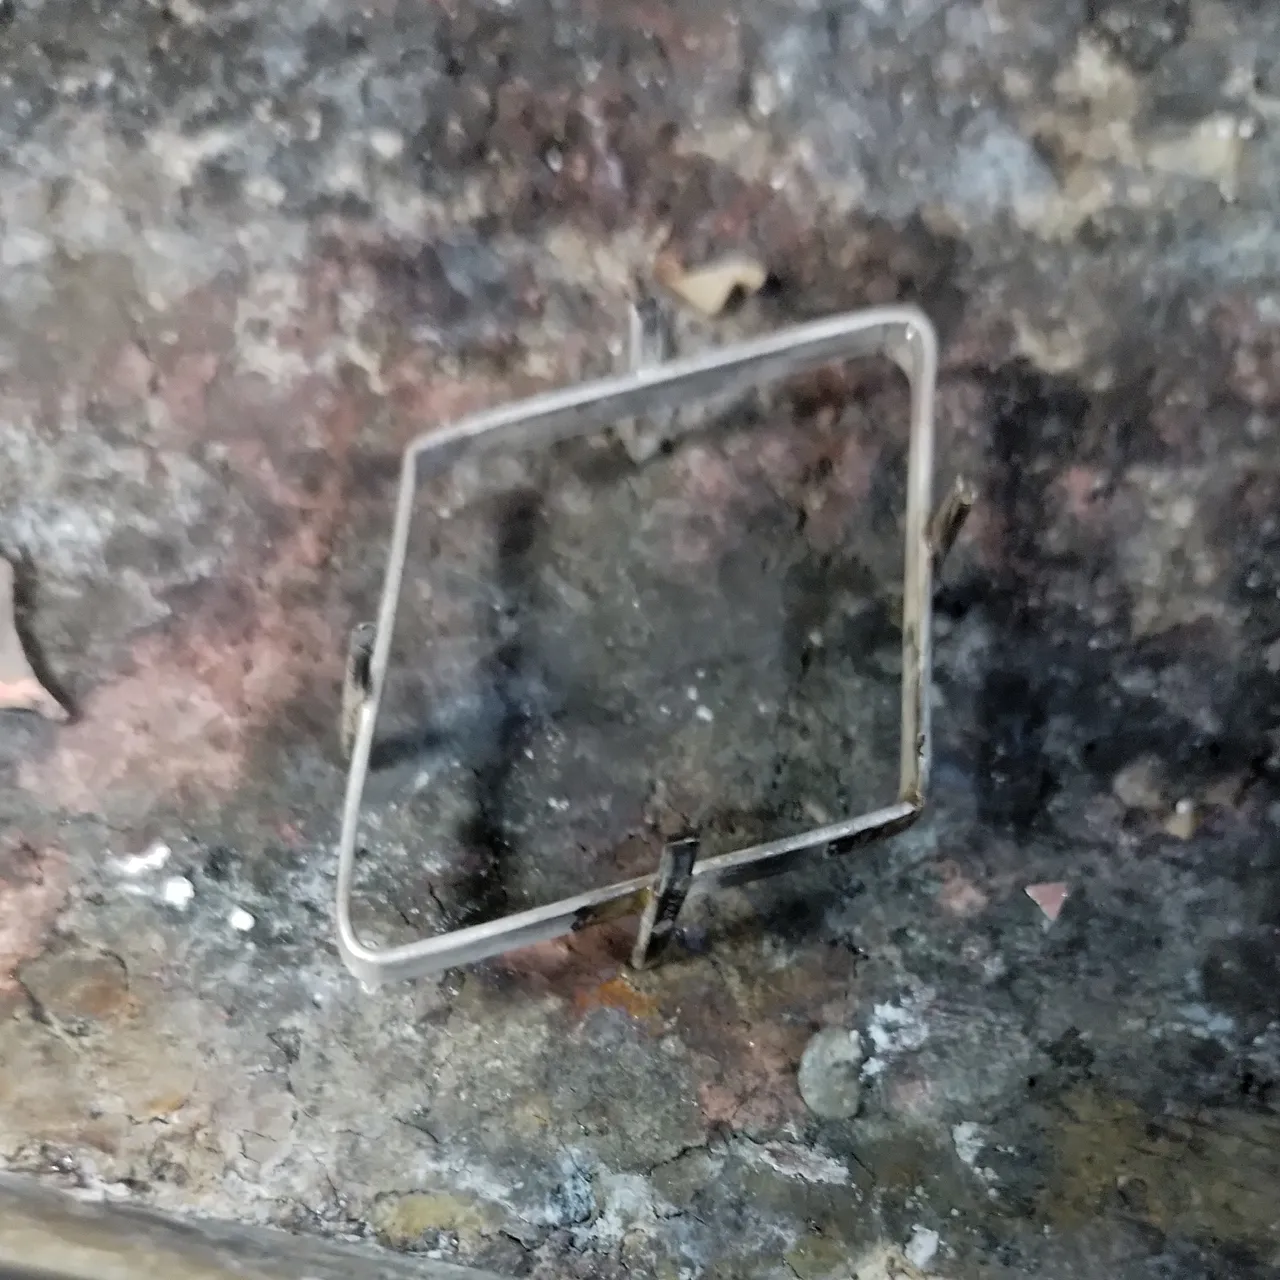
Después soldé 4 garras para agarrar el cristal, aquí tuve que emplear unas pinzas que se usan para el proceso de soldadura para agarrar la pieza e ir soldando cada garra una por una, después de esto se lanza al ácido para que la plata se aclare.

Probando que el cristal calzara en la estructura.
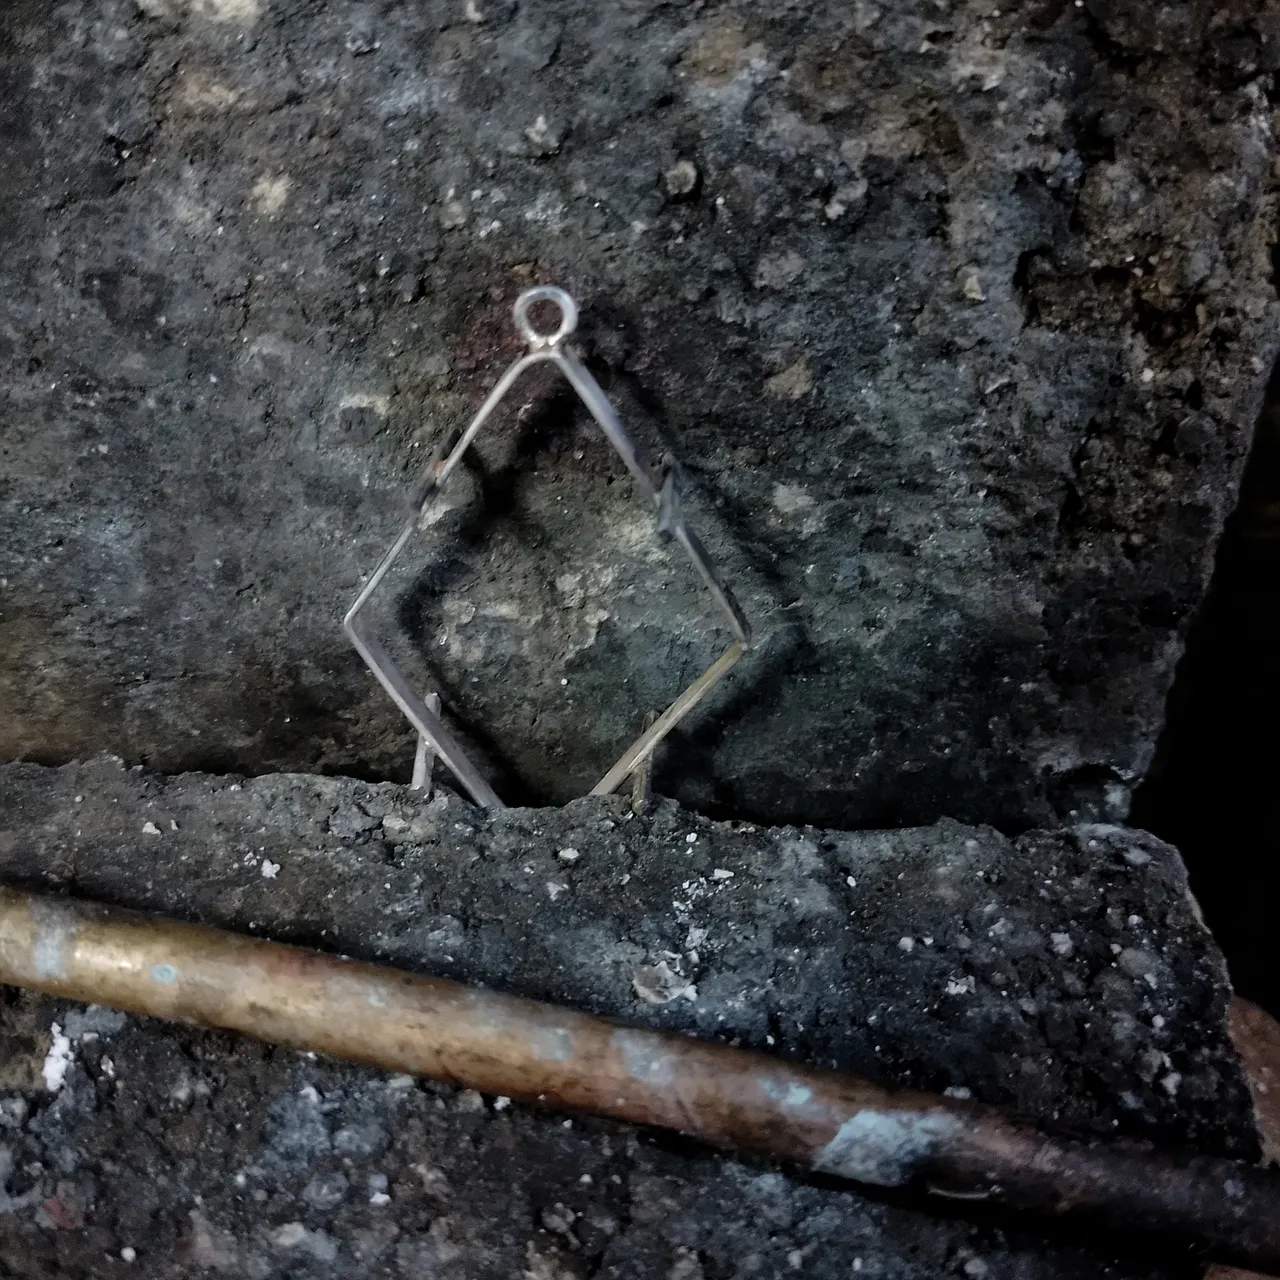
Tocó soldar el aro, en la imagen están viendo la piedra que uso como base para hacer el proceso de soldadura, el aro lo tome de unos que a había hecho previamente.

Así queda la estructura de plata antes del el engastado, pero con anterioridad con unas limas redondeé las puntas de las garras, él engaste, lo cerré con la misma pinza plana, poco a poco.
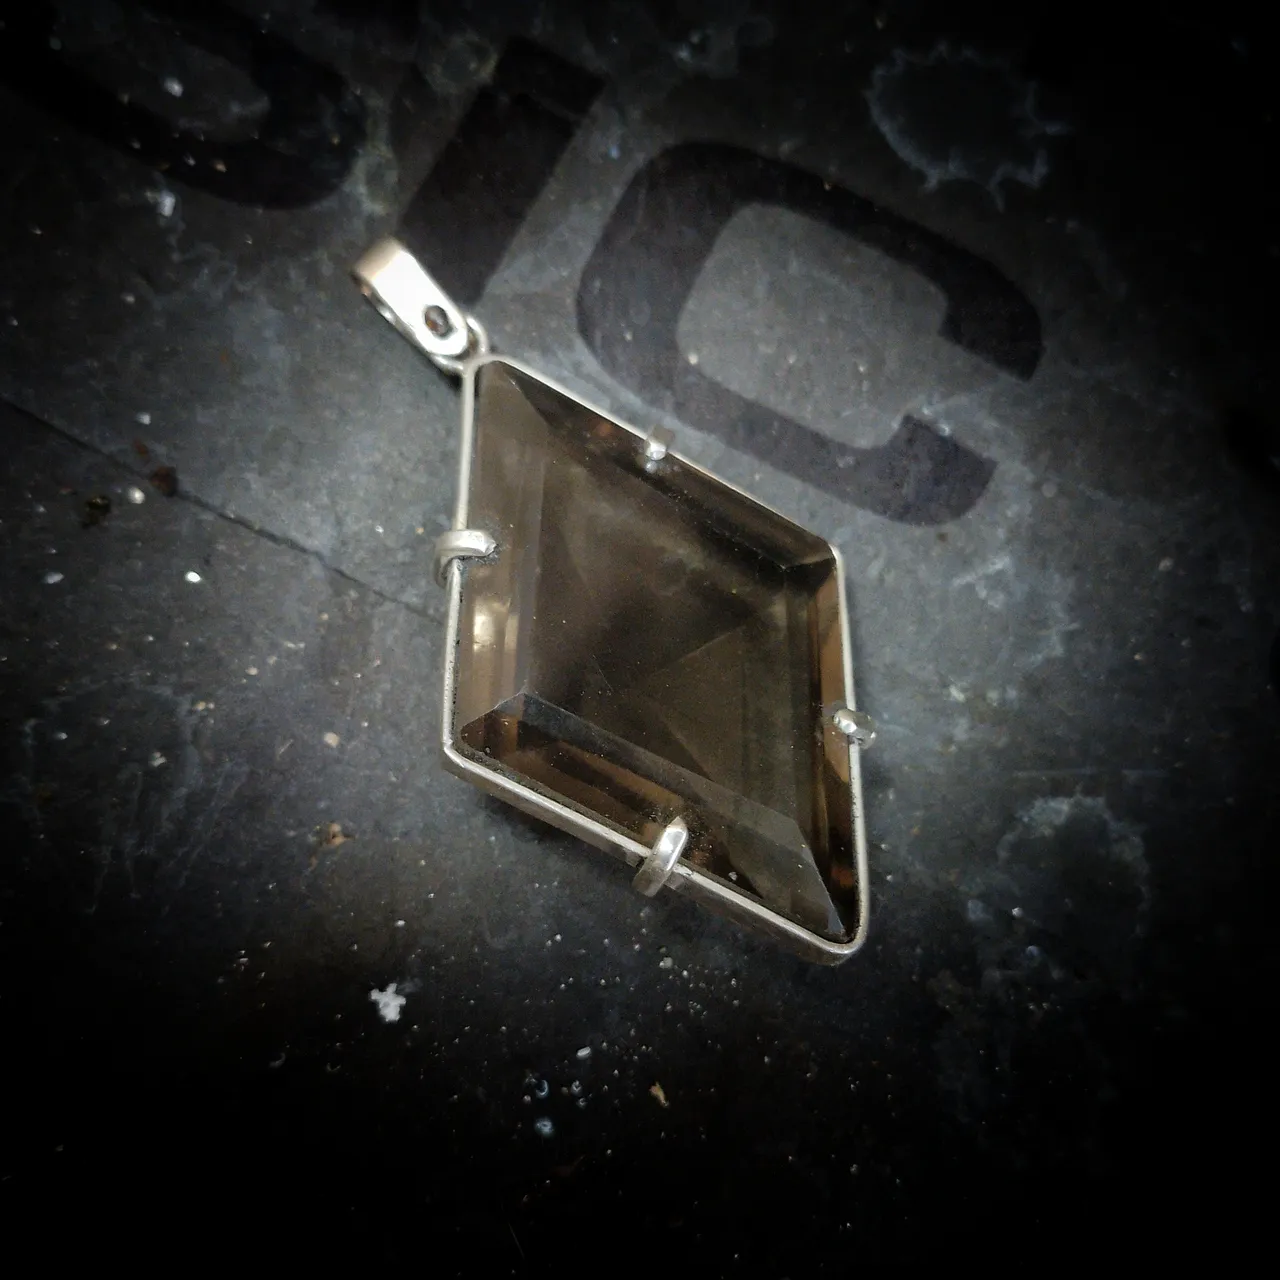
El pasador de la cadena lo hice con un recorte de plata que tenía cerca y abrí un hueco en cada extremo, agarre un hilo de plata delgado, supongo de 0.8 mm y con el soplete hice la bolita, doble el pasador con la pinza redonda, después junte con la pieza del pasador y la piedra engastada, posteriormente lije con el papel de lija con los números 240,360 y 400, para por último pulir en el motor de banco usando el disco de tela y la cera de pulir. ¡Espero haberme explicado, igual viendo la imagen se pueden hacer una idea!

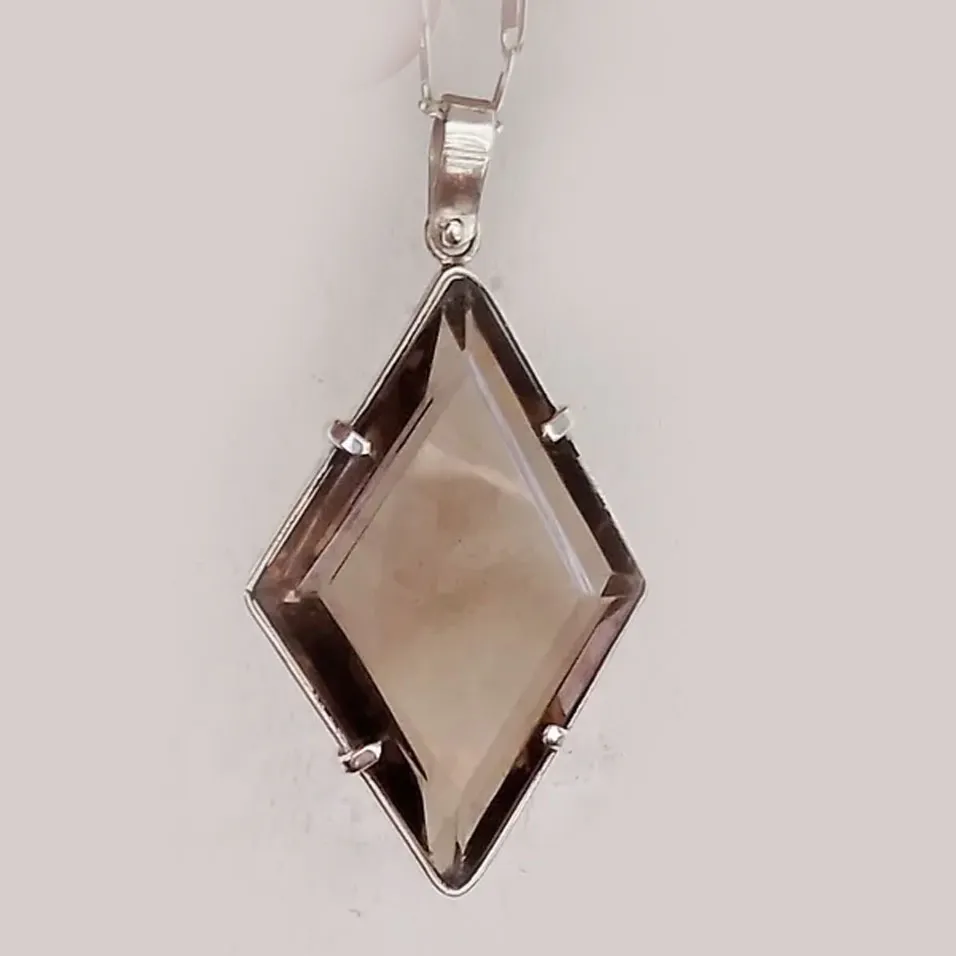
Este es el resultado final, para mí una pieza bastante linda, cuando la publique todo el mundo quedo encantado, igual que la clienta, también espero saber que les pareció, también me gustaría saber si la explicación de los procesos o el recorrido de fabricación de esta pieza les llamo la atención.
Si gustan me pueden seguir en:
https://www.instagram.com/m16ueljoyas!
ENGLISH - GOOGLE TRANSLATOR
Greetings, today I am here to show you another of my jewelry setting projects. I usually do very little of this type of work, although I know that I should spend more time working with stones and crystals, since they are very popular, so this year I will take heart and I will make more settings.
Before starting I want to tell you that I made this piece last year and basically I have the idea of showing the process or evolution of it from its initial phase until it has been finished, describing the processes in a basic way, plus some comments that consider relevant.
The crystal is the protagonist in this jewelry work, it was given to me by a client who wanted a simple frame, but that would highlight the beauty of the crystal, which in itself is quite large for what one can regularly get, especially in my city Caracas, below I will give you some of the materials and tools used:
- Torch, silver solder and borax for the soldering process, including acid for the pickling process that allows removing the oxidation or stains left by the application of fire on the silver.
- Silver ribbon of approx. 0.7mm thick and 3mm wide, 0.7mm thick silver ribbon or thread 1.2mm wide. Silver thread, silver sheet.
- Jewelry tweezers.
- files and sandpaper number 240, 360 and 400
- Dremel.
- Bench motor, polishing cloth disc and polishing wax.
- other elements to name in the process description if necessary.
PROCESS
This is the glass before making the frame
With the use of the flat tweezers I made the folds of the 3 mm wide silver ribbon, with the intention of contouring the silver to the glass and made the cut, as the metal was somewhat hard or tempered, I passed it through fire to soften and then cut exactly to size, perfectly adjusting to the silhouette of the glass to advance to the application of solder with the torch, with the use of borax as a flux and silver solder.
This is how it looked after welding, as you can see, adjusted to the glass.
Then I soldered 4 claws to grab the glass, here I had to use tweezers that are used for the soldering process to grab the piece and solder each claw one by one, after this it is thrown into the acid so that the silver lightens.
Testing that the glass would fit the structure.
I had to weld the ring, in the image you can see the stone that I used as a base to do the welding process, I took the ring from one that I had previously made.
This is how the silver structure looks before the setting, but previously with some files I rounded the tips of the claws, the setting, I closed it with the same flat tweezers, little by little.
I made the chain pin with a silver clipping that I had nearby and I opened a hole at each end, I grabbed a thin silver thread, I guess 0.8 mm and with the torch I made the ball, bend the pin with the round tweezers, then join with the pin piece and the set stone, then sand with sandpaper with numbers 240,360 and 400, and finally polish on the bench motor using the cloth disc and polishing wax. I hope I have explained myself, maybe by looking at the image you can get an idea!
This is the final result, for me a quite nice piece, when I published it everyone was delighted, as was the client, I also hope to know what you thought, I would also like to know if the explanation of the processes or the manufacturing process of This piece caught your attention.
If you like you can follow me on: