(ENG)
Hello everyone, I hope this is a great day full of many good things. I am pleased once again to be, in this beautiful and creative community, showing my most recent creative project. This time it is a Beautiful Pot of Eternal flowers, made using the crochet technique, ideal for decorating a table, dresser, among others. For this reason I invite you to follow me until the end and I show you how easy it is to make, since I will use the basic points of

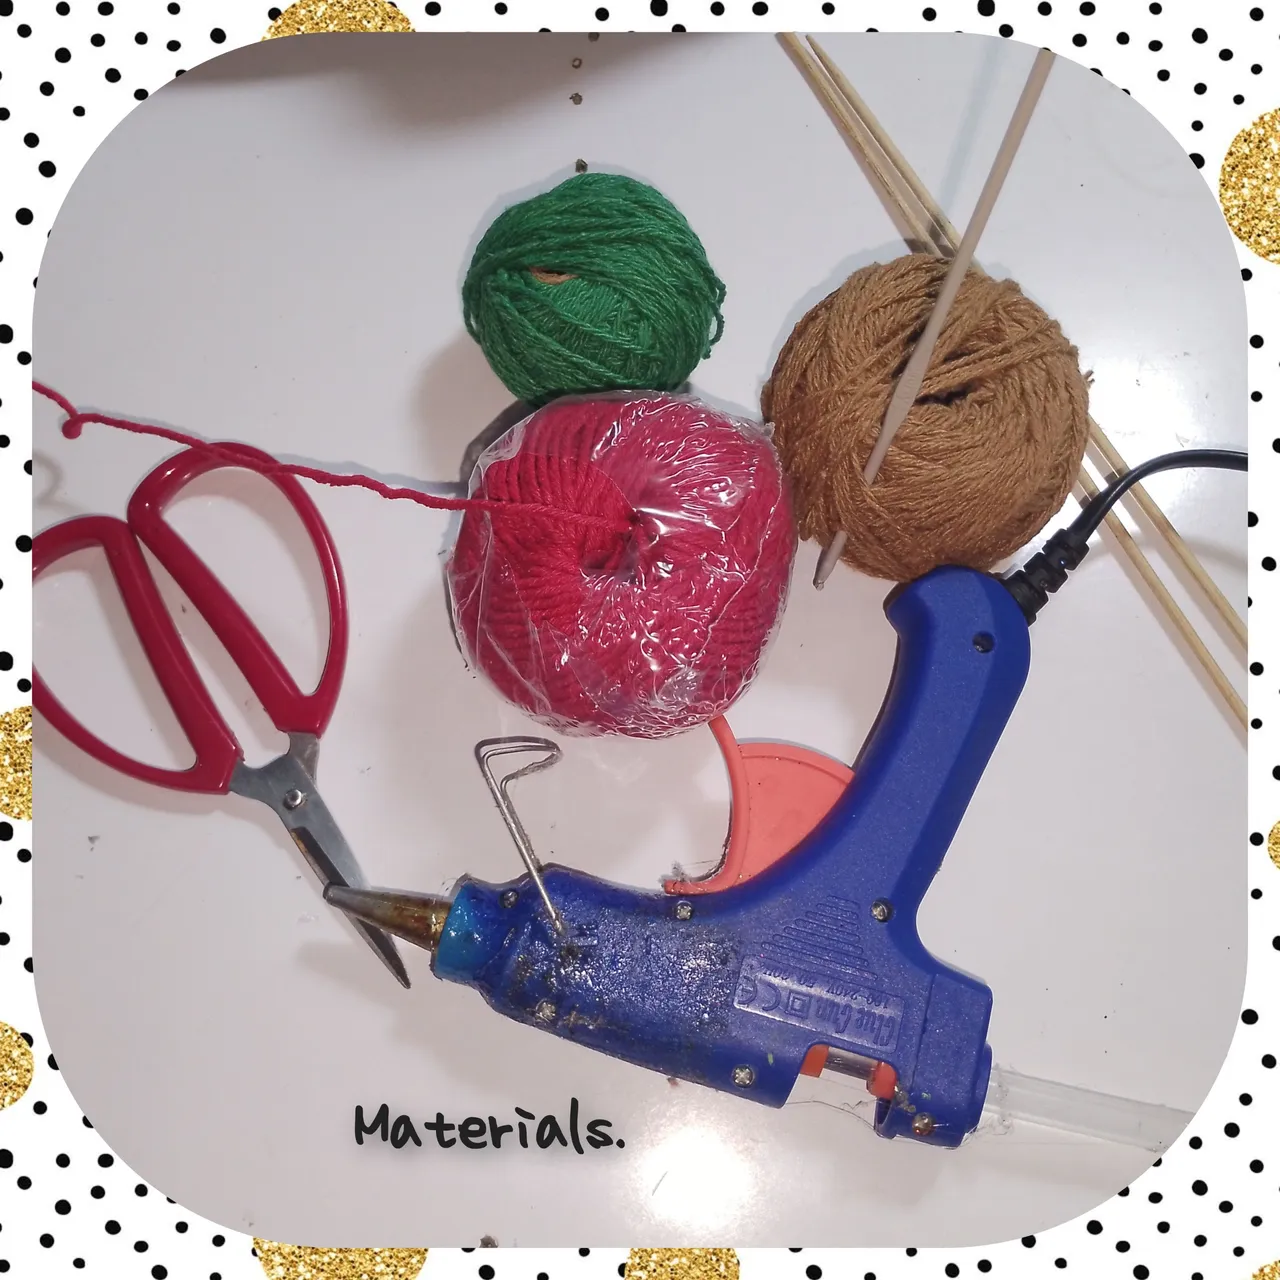
Materials:
. Threads for knitting, with cores (green brown and red).
. Knitting needle.
. Tall sticks.
. Hot silicone.
. Scissors.
Steps to Follow:
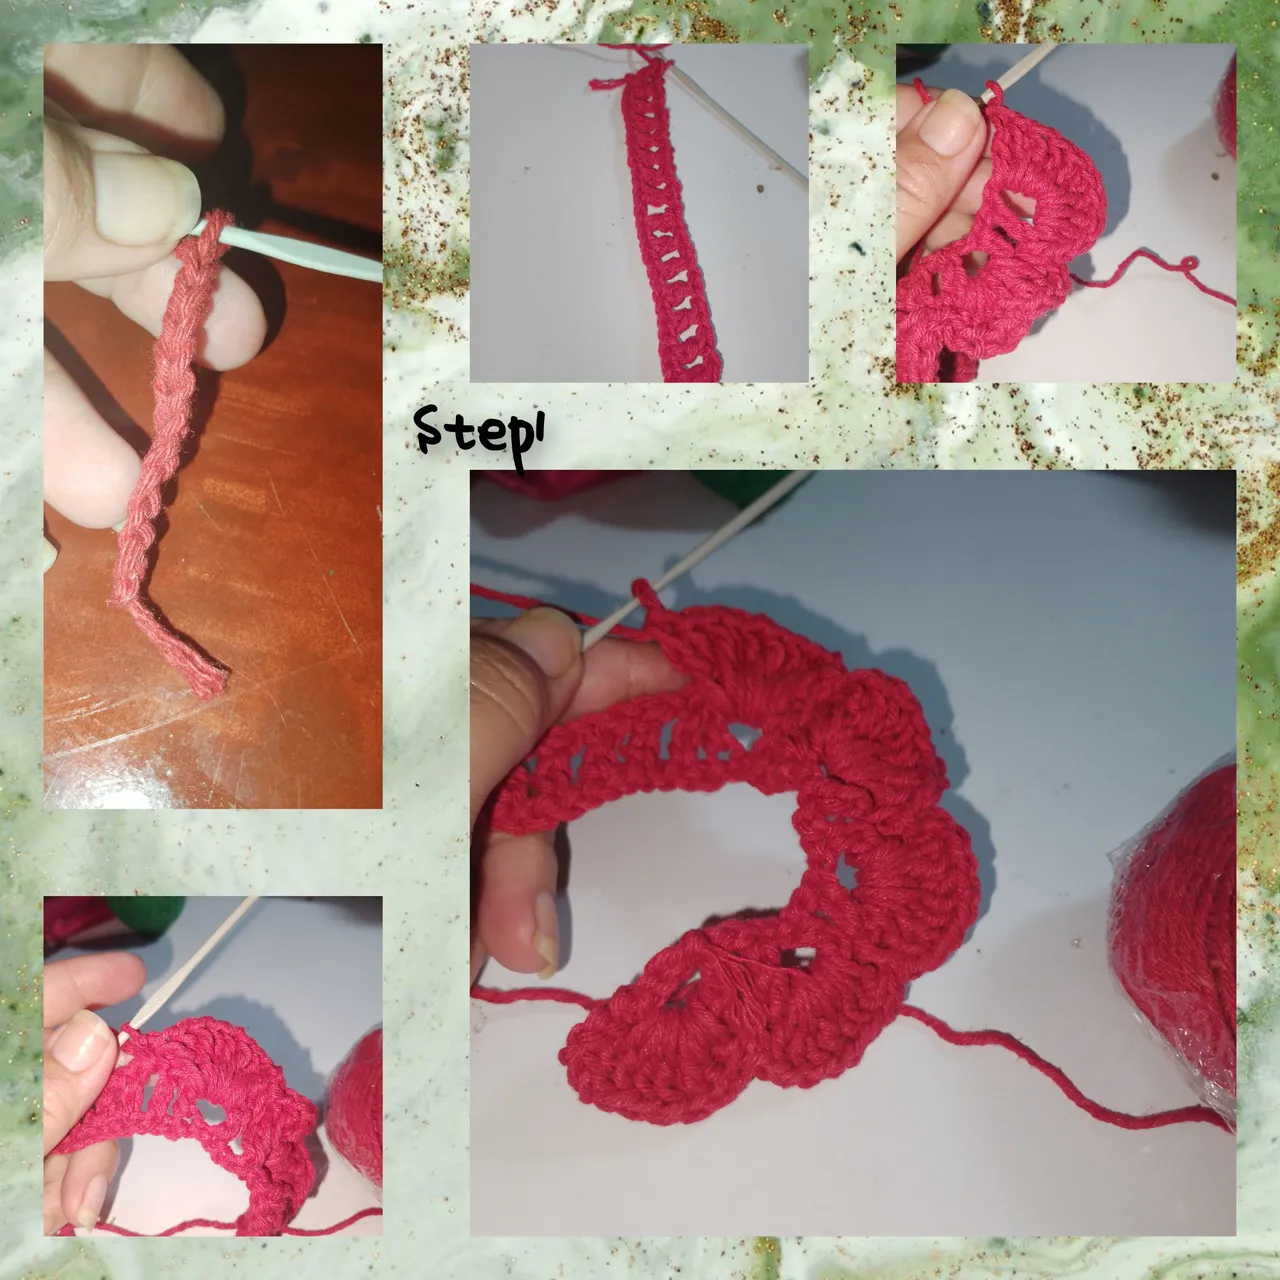
1.) Initially, I knit twenty chain stitches, I pick up two more chain stitches, I turn the fabric, I leave a chain stitch and I lift a double crochet stitch, in this way, the route passes, I turn the fabric again, and I lift ten double crochet stitches in each of the spaces. Locating me in the next, space with slipped stitch.
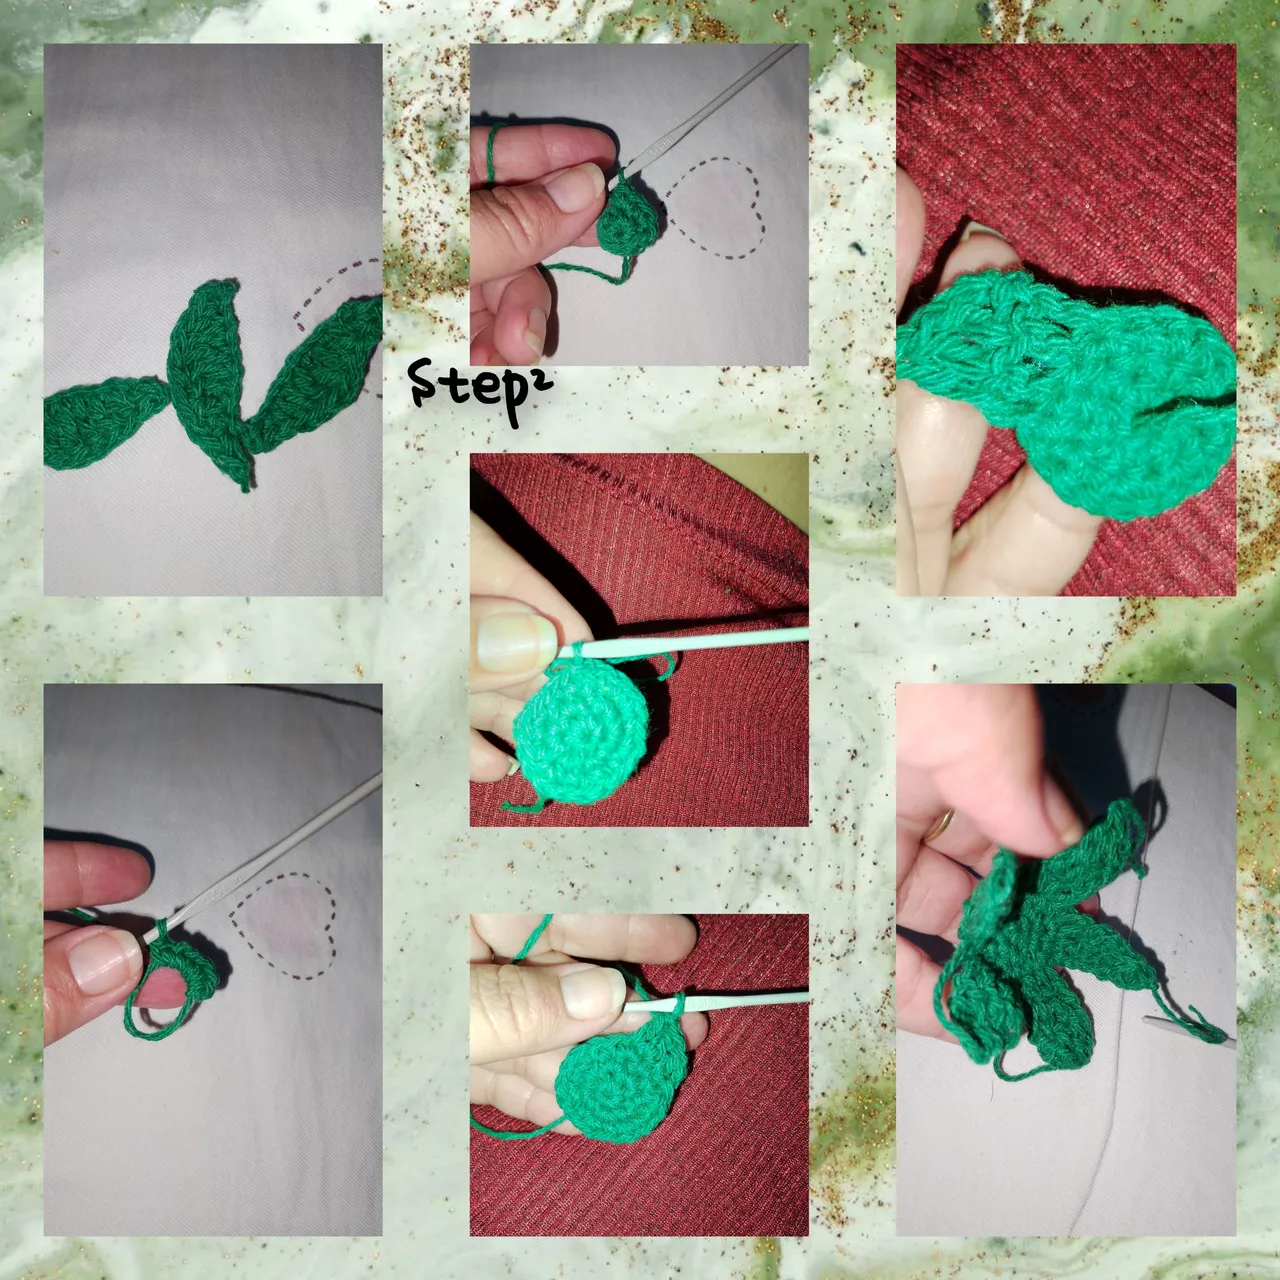
2.) I knit ten chain stitches, I return to point number eight, I knit half a crochet, in the next one a double crochet stitch and in the one that follows it, I knit in the next two double stitches, two double crochet stitches and a half stitch, of In this way, the small one is formed, for the receptacle, I make a magic ring and inside it I knit six half stitches, I close the magic ring, for the next row, I knit six increases, I make a new route, knitting one increase, after half points, and I have a total of eighteen, points, I divide by five spaces. I start by picking up one stitch, double crochet and the next one in the same space, and I knit three more double crochet stitches, one in each half crochet. I turn the fabric, and I knit a new double crochet stitch in each double crochet stitch, I turn the fabric and now I will knit five double crochet stitches closed together, cut the thread, and in this way I repeat the following ones.
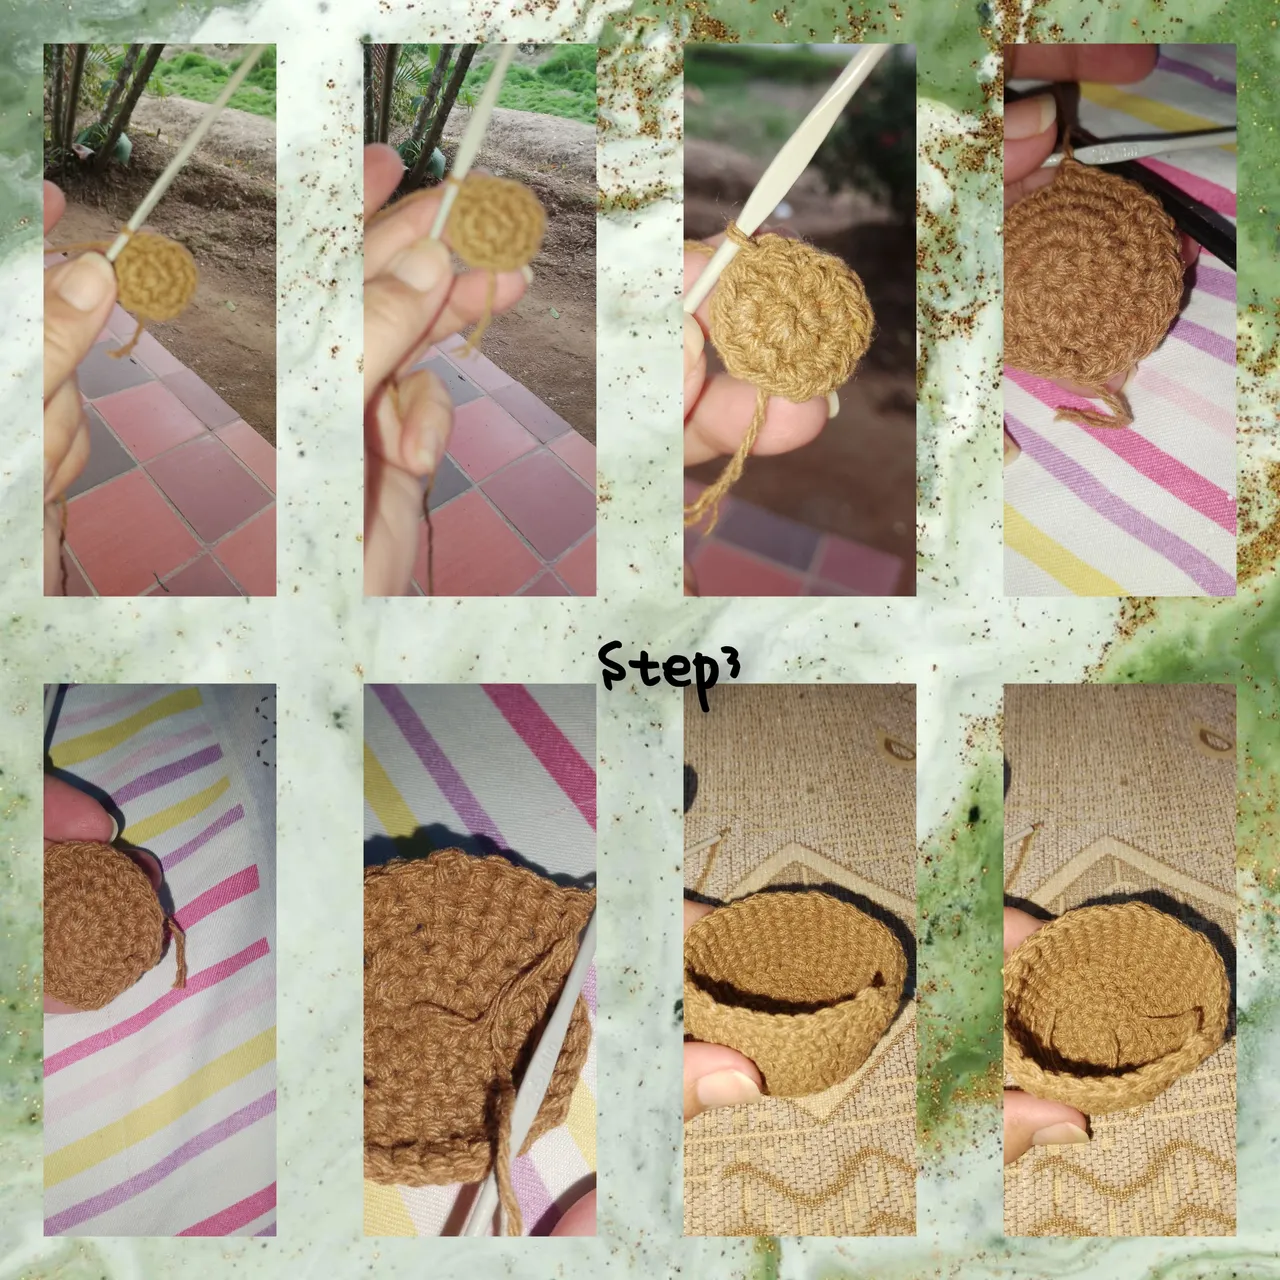
3.) For the pot, I make a magic ring, followed by six, half crochets, then six increases, a third round of an increase after half crochets, for a total of 18 half crochets, in the next pass, after four stitches I will increase, and in this round I will take the strand of the lower thread, from the previous round to make a break, and shape the pot. She continued weaving, seven consecutive rounds, and in this way she reached the height of the flower pot.
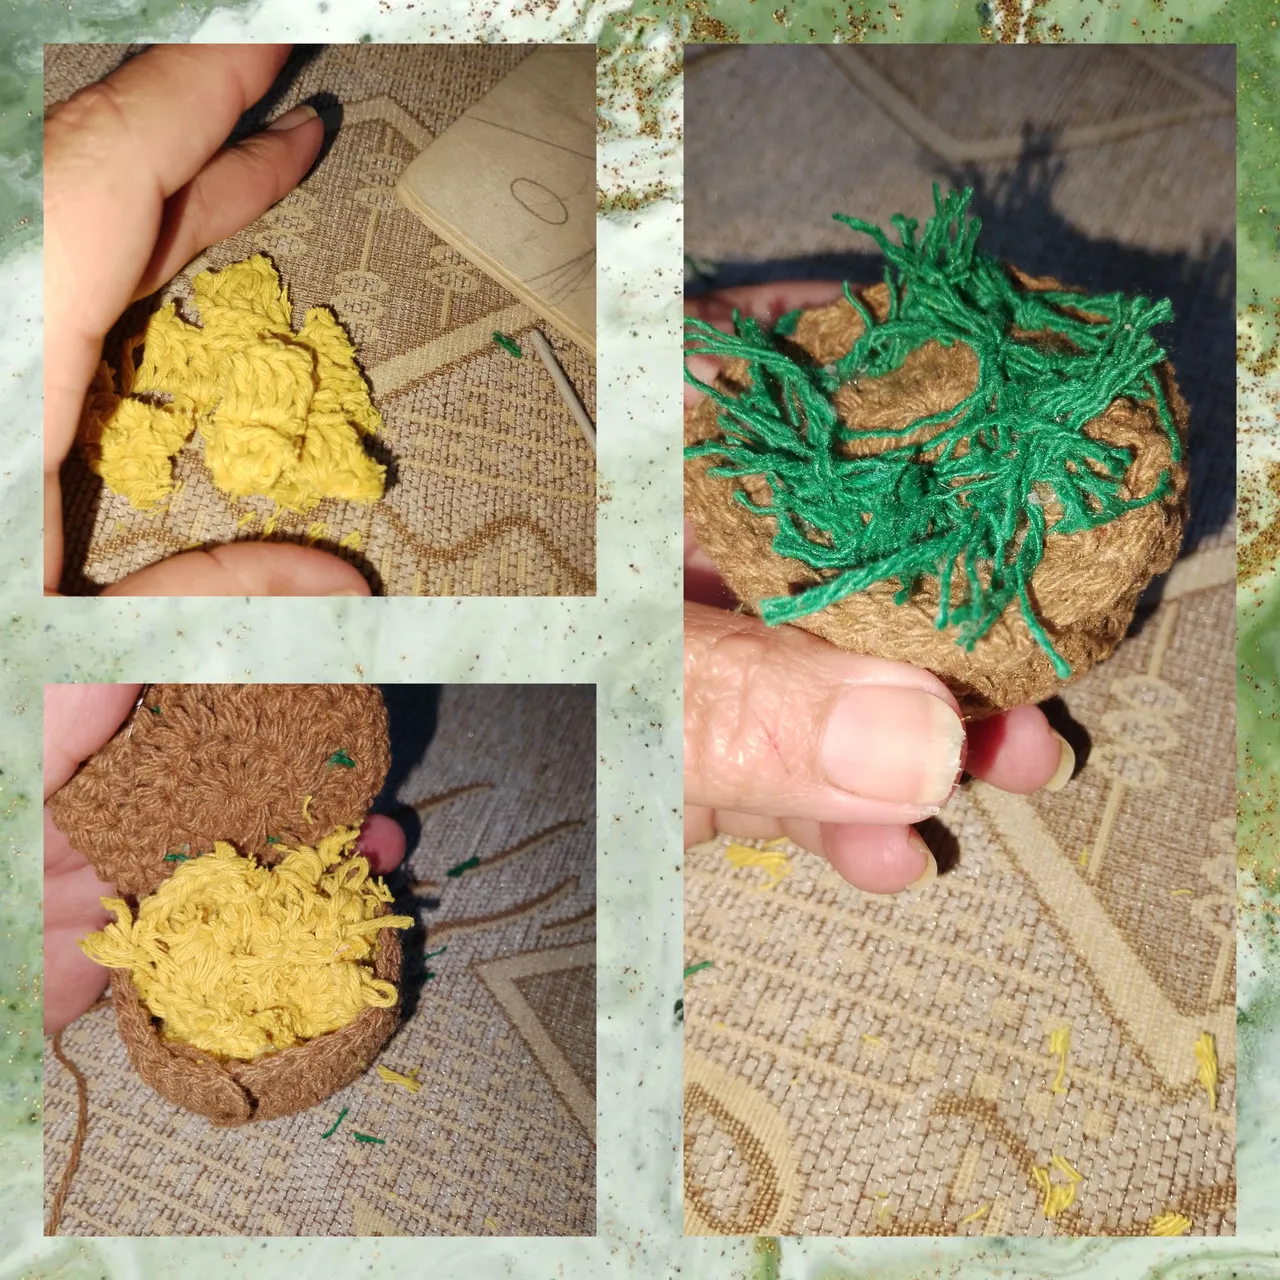
4/5.) I fill the pot with thread waste from previous projects. For the lid of the pot, I knit a circle, just like the beginning of the pot, then I tie small strands of green thread on the lid, to simulate some herbs, and glue the lid with slipped stitches.
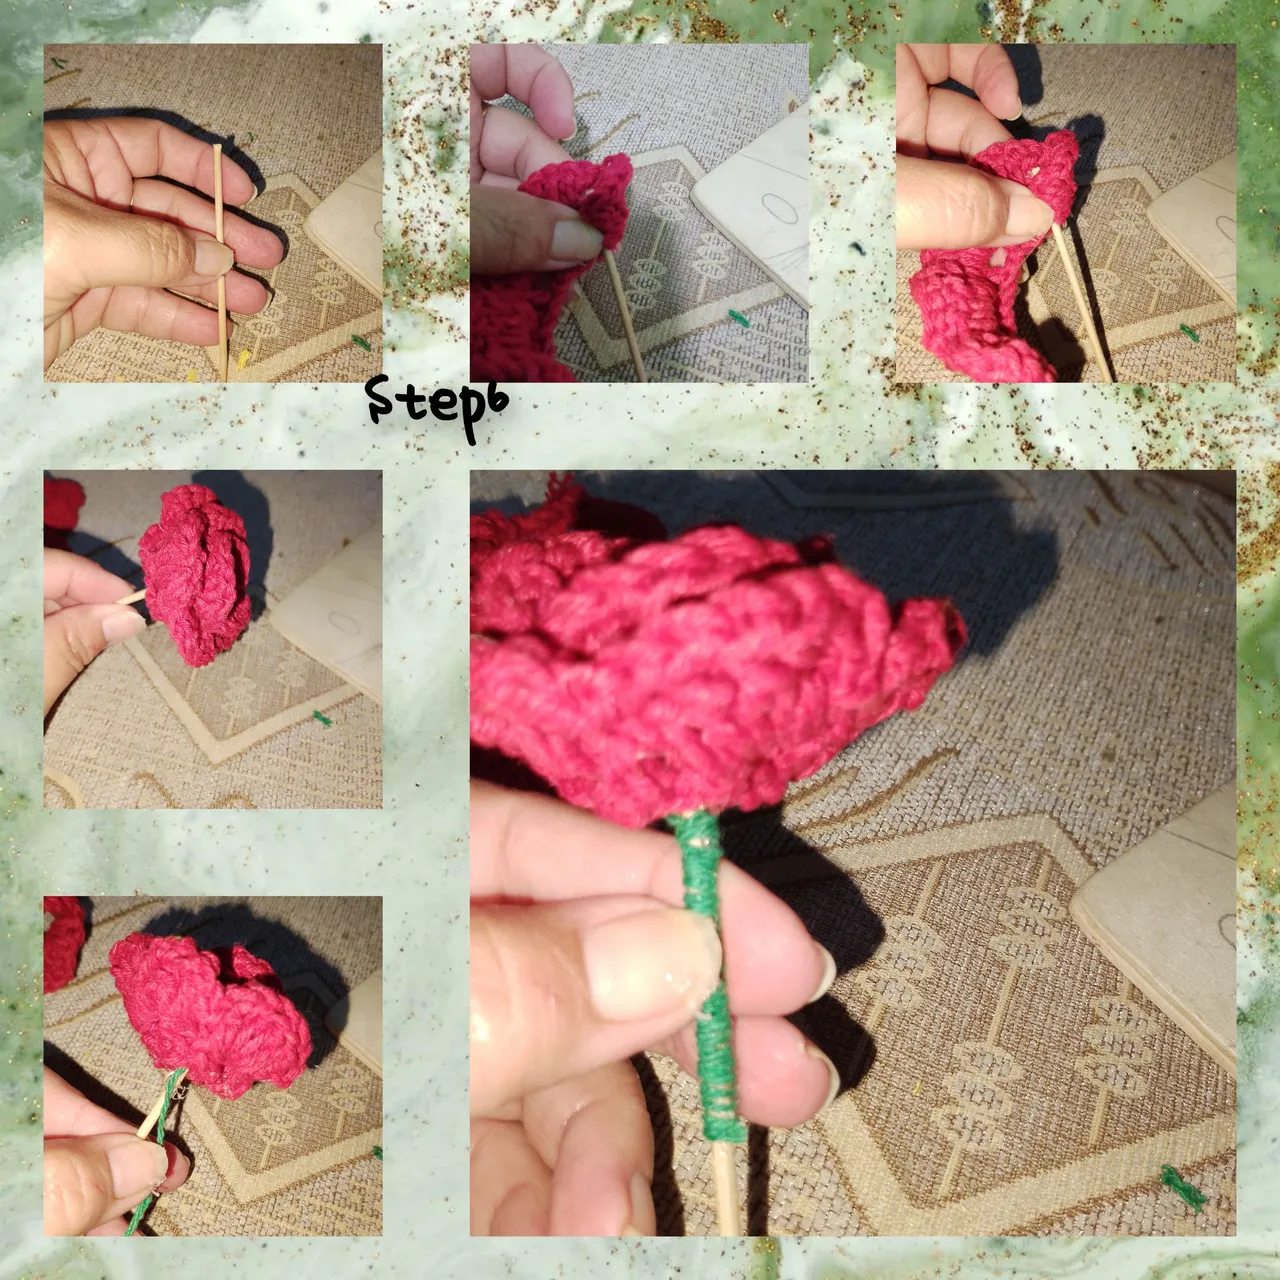
6.) I cut a tall piece of stick, start by applying glue and gluing the strip made in step one, until it forms an eternal flower. Then I glue and cover the stick with green thread.height.
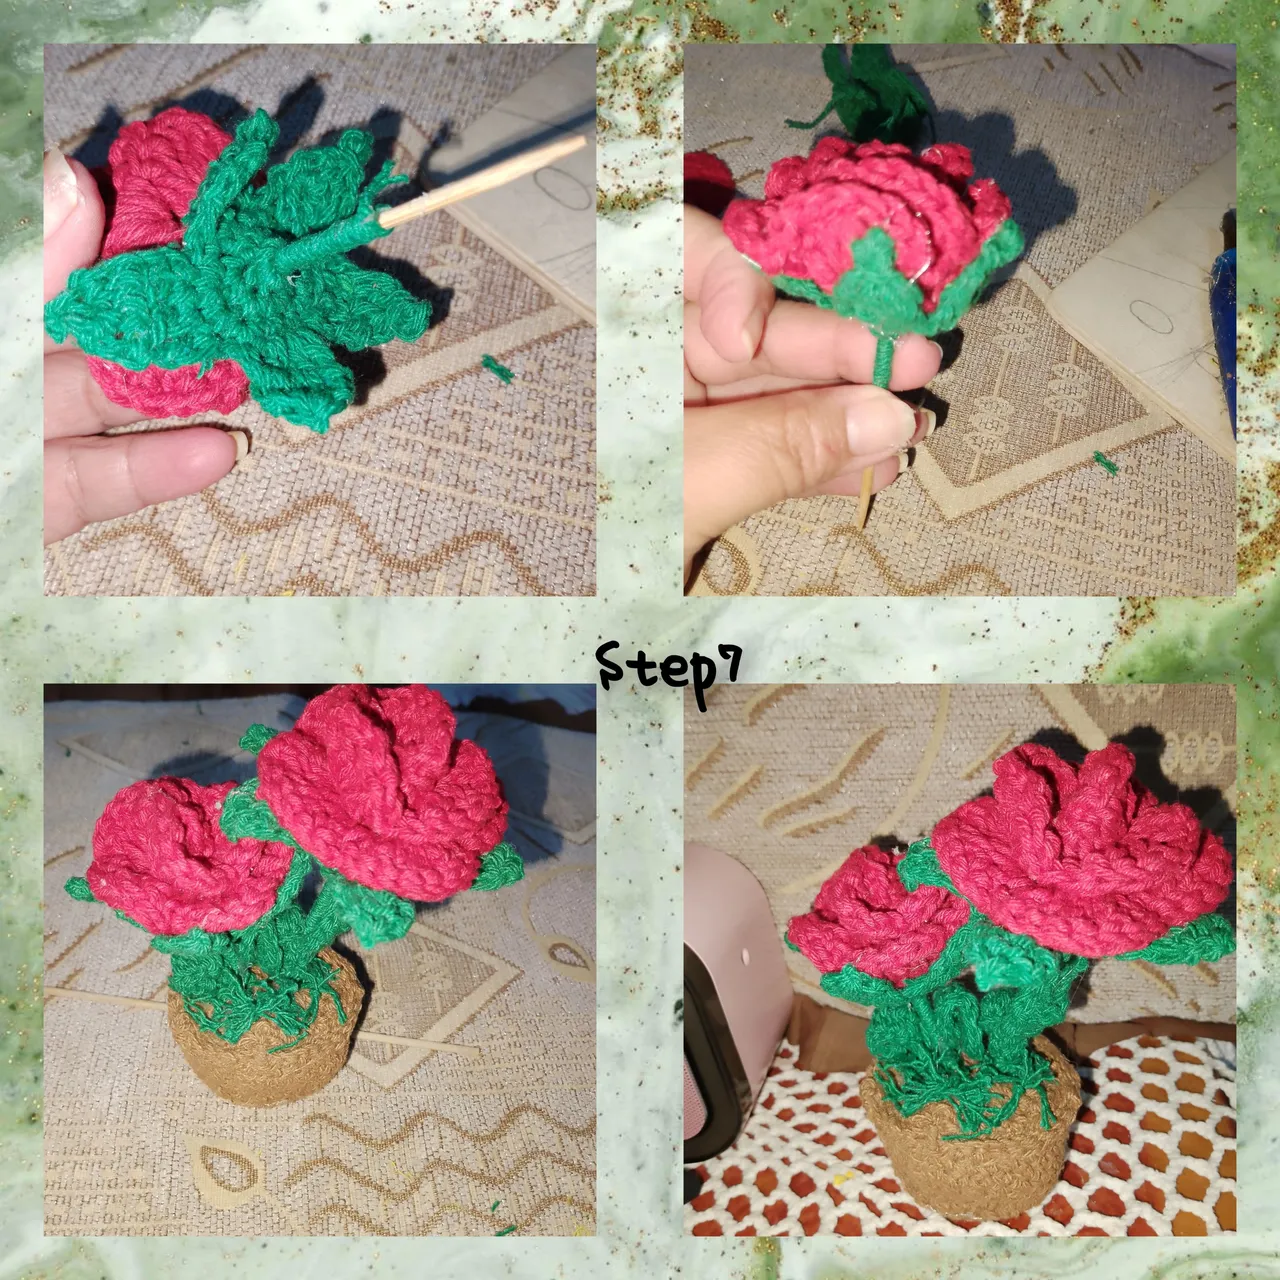
7.) I insert the covered stick into the receptacle, glue the leaves, apply silicone to the top of the tall stick and insert it into the pot.
In this way, I conclude with today's project, hoping it was to your liking.
. All photos are my property.
.use incollage to show, the steps. .Use language translator.
See you soon.
( ESP)
Hola a todos, deseo este sea un gran día lleno de muchas, cosas buenas. Me complace una vez más estar, en esta hermosa y creativa comunidad, mostrando mí más, reciente proyecto creativo. En esta oportunidad se trata de un,a, Hermosa Maceta, de flores Eternas, hechas usando la técnica de crochet, ideal para decorar, alguna mesa, peinadora, entre otras. Por esta razón los invito, a seguirme hasta el final y les muestro, lo fácil de su elaboración, ya que usaré, los puntos básicos de
Materiales:
. Hilos para tejer, con cores (verde marrón y rojo).
. Aguja para tejer.
. Palitos de altura.
. Silicón caliente.
. Tijeras.
Pasos a Seguir:
1.) Inicialmente, tejo veinte puntos cadenas, levanto dos puntos cadenas más, doy vueltas a el tejido,dejo un punto cadena y levanto, un punto vareta, de esta forma,transcurre el recorrido, doy nuevamente la vuelta, a el tejido, y levanto diez puntos varetas en cada uno de los espacios. Ubicando me en el siguiente, espacio con punto deslizado.
2.) Tejo diez puntos cadenas, me devuelto a el punto número ocho, tejo medio punto, en el siguiente un punto vareta y en el que le sigue, tejo en los dos siguientes puntos dobles, dos puntos varetas y un medio puntos, de esta manera, queda formada la pequeña, para el receptáculo, hago un anillo mágico y dentro de el tejo seis medios puntos, cierro el anillo mágico, para la siguiente pasada, tejo seis aumentos, doy un nuevo recorrido, tejiendo un aumento, luego de medio puntos, y tengo un total de dieciocho, puntos, divido para cinco espacios. Comienzo levantando un punto, vareta y en el mismo espacio el siguiente,y tejo tres puntos varetas más, uno en cada medio punto. Doy vuelta a el tejido, y tejo en cada puntos varetas uno nuevo, doy vuelta a el tejido y ahora tejere cinco puntos varetas cerrados juntos, corto el hilo, y de esta manera repito las siguientes.
3.) Para la maceta, hago un anillo mágico, seguido de seis, medios puntos, luego seis aumento, una tercera vuelta de un aumento luego de medio punto, par un total de 18 medios puntos, en la siguiente pasada, luego de cuatro puntos haré un aumento, y en esta vuelta tomaré la hebra de el hilo inferior,de la vuelta anterior para hacer un quiebre, y dar forma a la maceta. Continuo tejiendo, siete vueltas consecutivas,y de esta manera alcanzó la altura de la maceta.
4/5.) relleno la maceta, con residuos de hilos de, proyectos anteriores. Para la tapa de la maceta, tejo un círculo, tal cual el inicio de la maceta, luego ato, pequeñas hebras de hilo de color verde, sobre la tapa, para simular, algunas hiervas, y pego la tapa, con, puntos deslizados.
6.) Corto un trozo de palito de altura, comienzo aplicando pegamento y pegando la tira hecha en paso uno, hasta formar una flor eterna. Luego pego y cubro con hilo de color verde el palito de altura.
7.) Introduzco a el palo cubierto, el receptáculo, pego las hojas, aplicó silicón el la parte superior de el palito de altura e introduzco en la maceta.
De esta manera, concluyo con el proyecto de el día de hoy, deseando hay sido de su agrado.
. Todas las fotos son de mí propiedad.
.use incollage para mostrar, los pasos.
Use traductor lenguaje.
Hasta una pronta oportunidad.