(ENG)
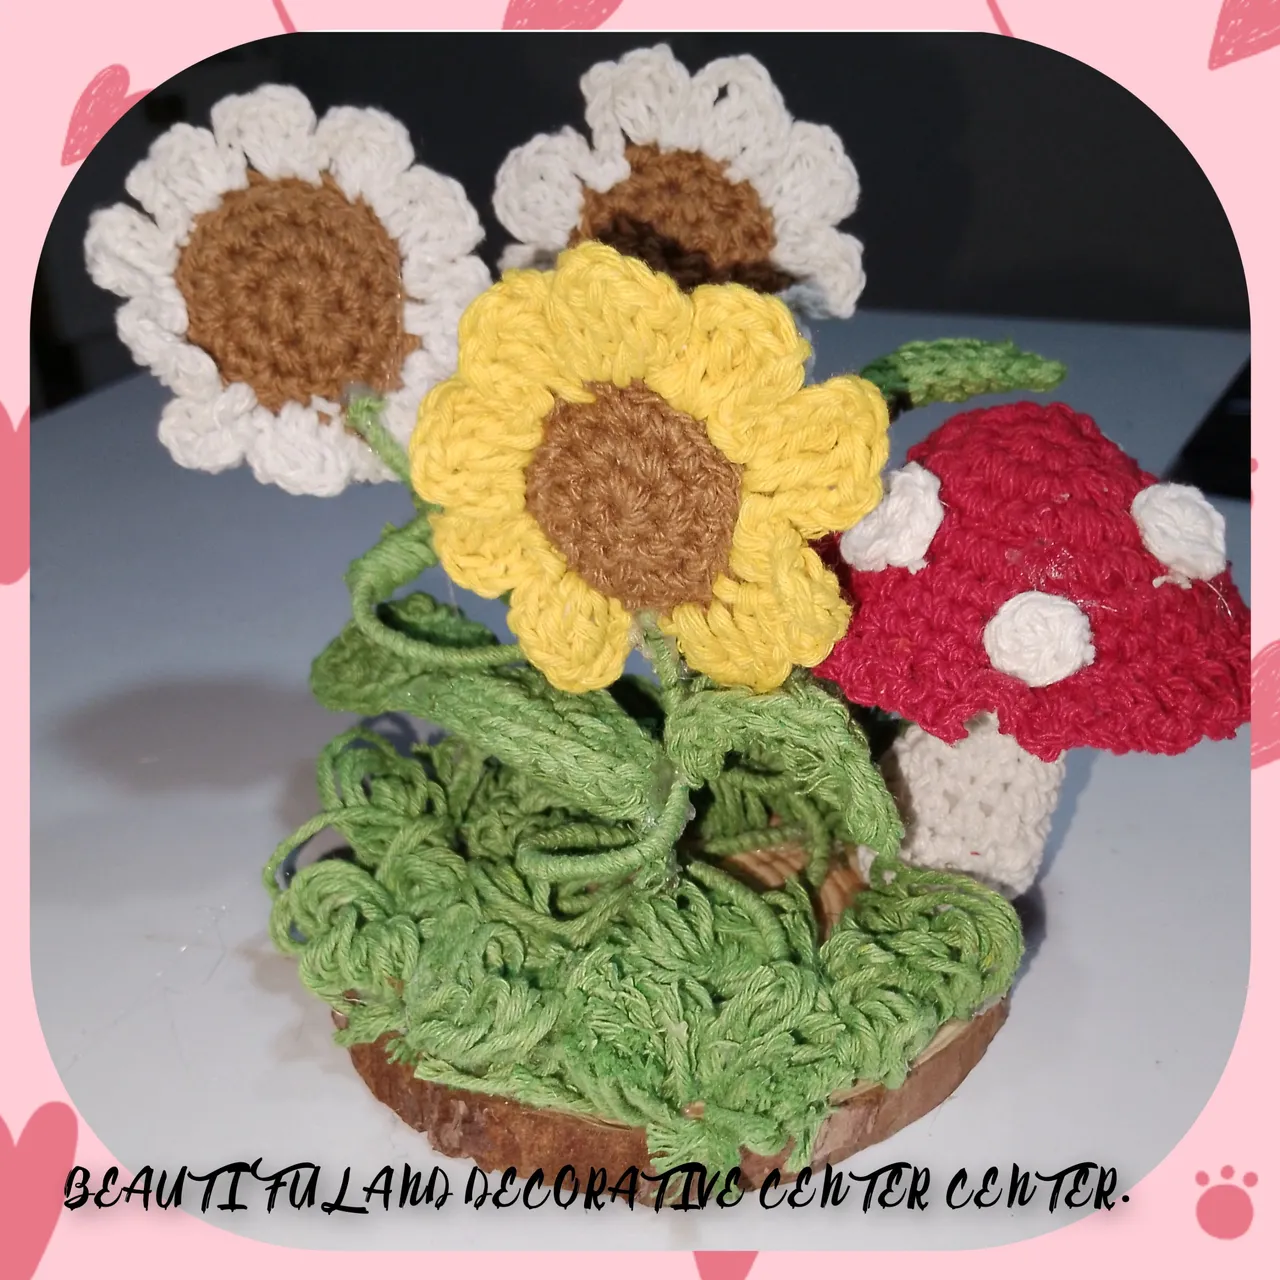
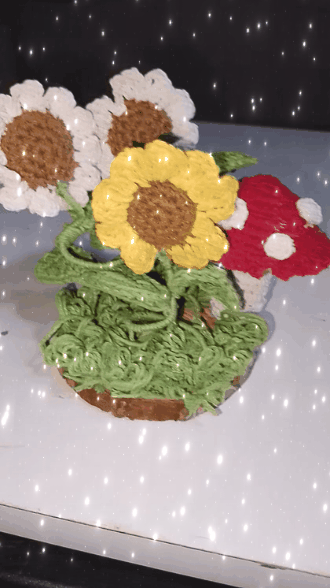
Hello everyone, lovers of DIY and great ideas, my best wishes for well-being to you. I feel pleased to be with you once again, on this occasion, I have created, for my entire beautiful @diyhub community, a beautiful and decorative centerpiece, ideal to decorate any space in the home. This has been created the crochet and recycling technique. I invite you to follow me, until the end. I hope you enjoy it.
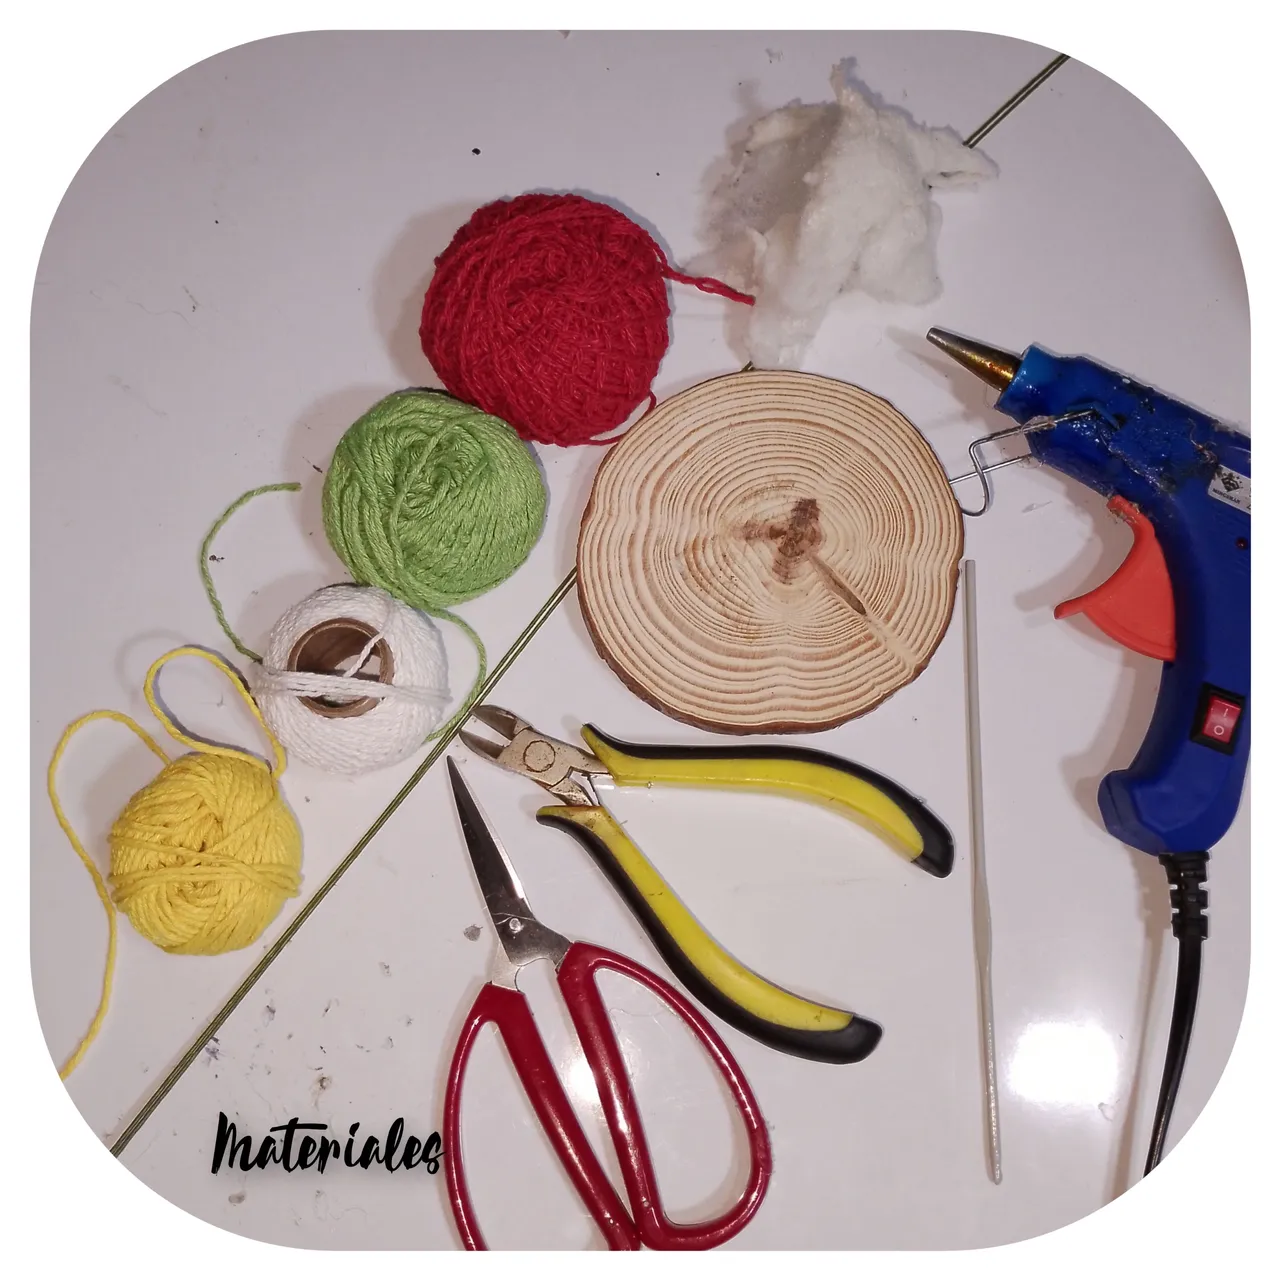
Materials:
.Wick threads for knitting, colors (yellow, white, green, red, brown.) . Knitting needle.
. Stuffed.
. Florist wire.
. Piece of wood.
. Hot silicone.
. Cardboard tube.
. Scissors.
STEPS:
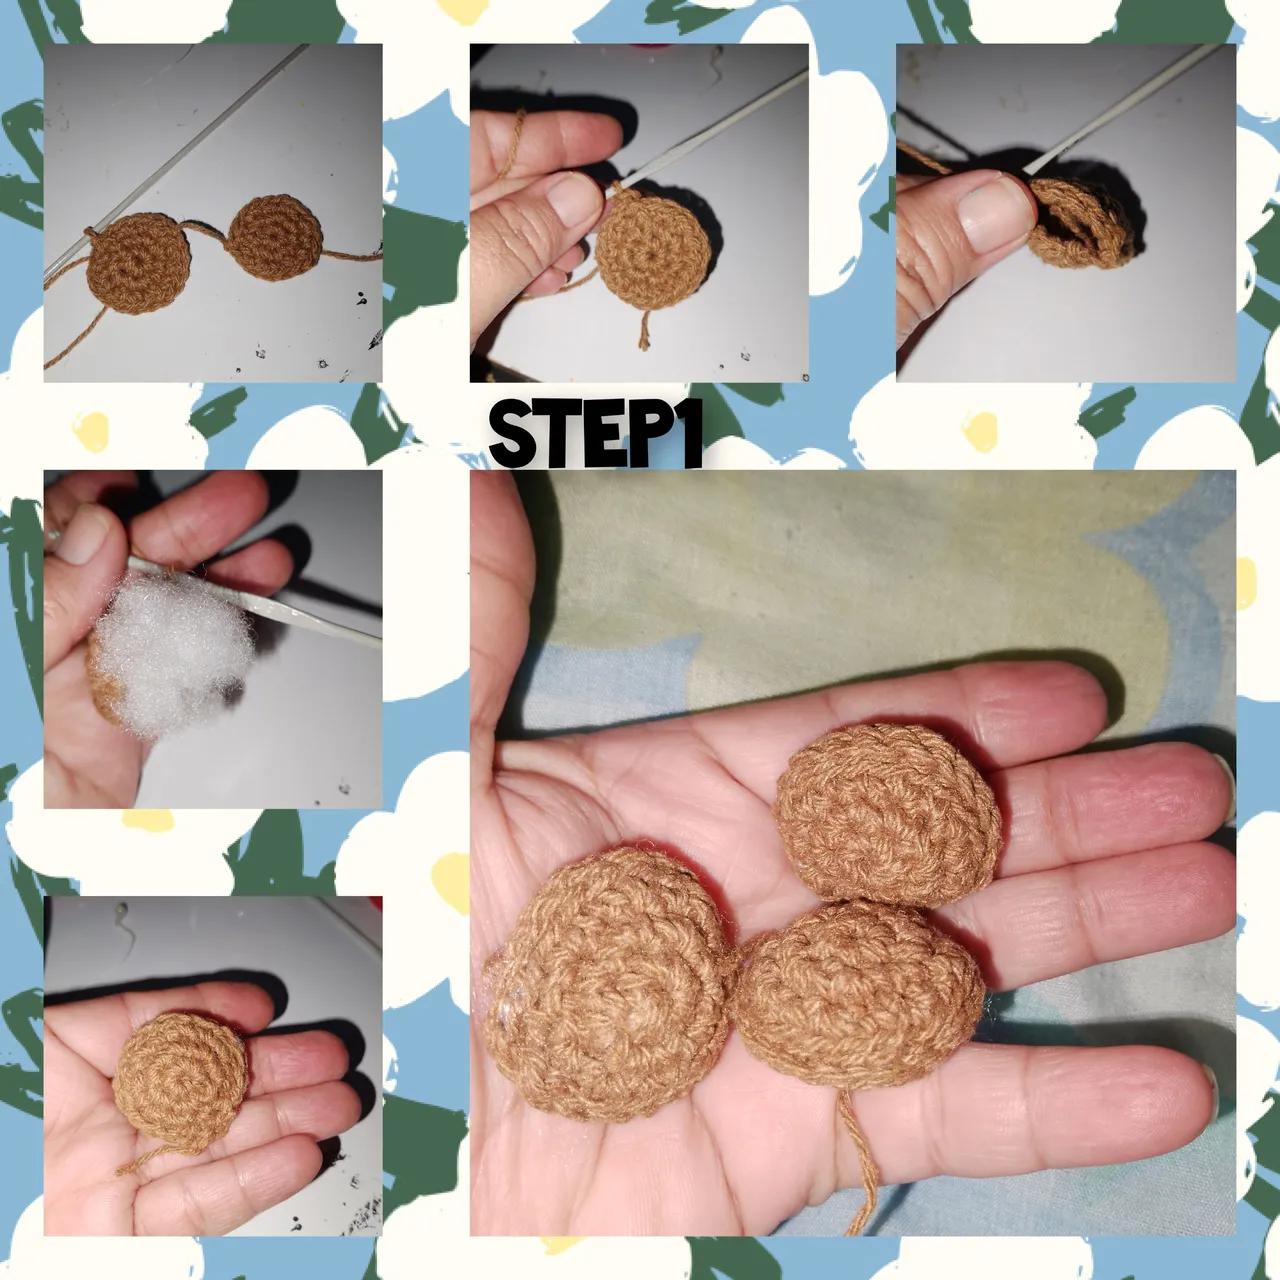
1.) Start, knitting with the brown thread, a small circle with three loops. I start with six half points in a magic ring, a second pass of six increases, for twelve half points, and the next, one increase, then half points, for (18 sc). Using the same color of thread and procedure, I knit a new circle, this one without cutting the thread yet, I begin to knit, next to the first circle, without completely closing it, I introduce the filling, continuing like this until it is completely closed. I repeat the procedure, knit and sew two more buttons.
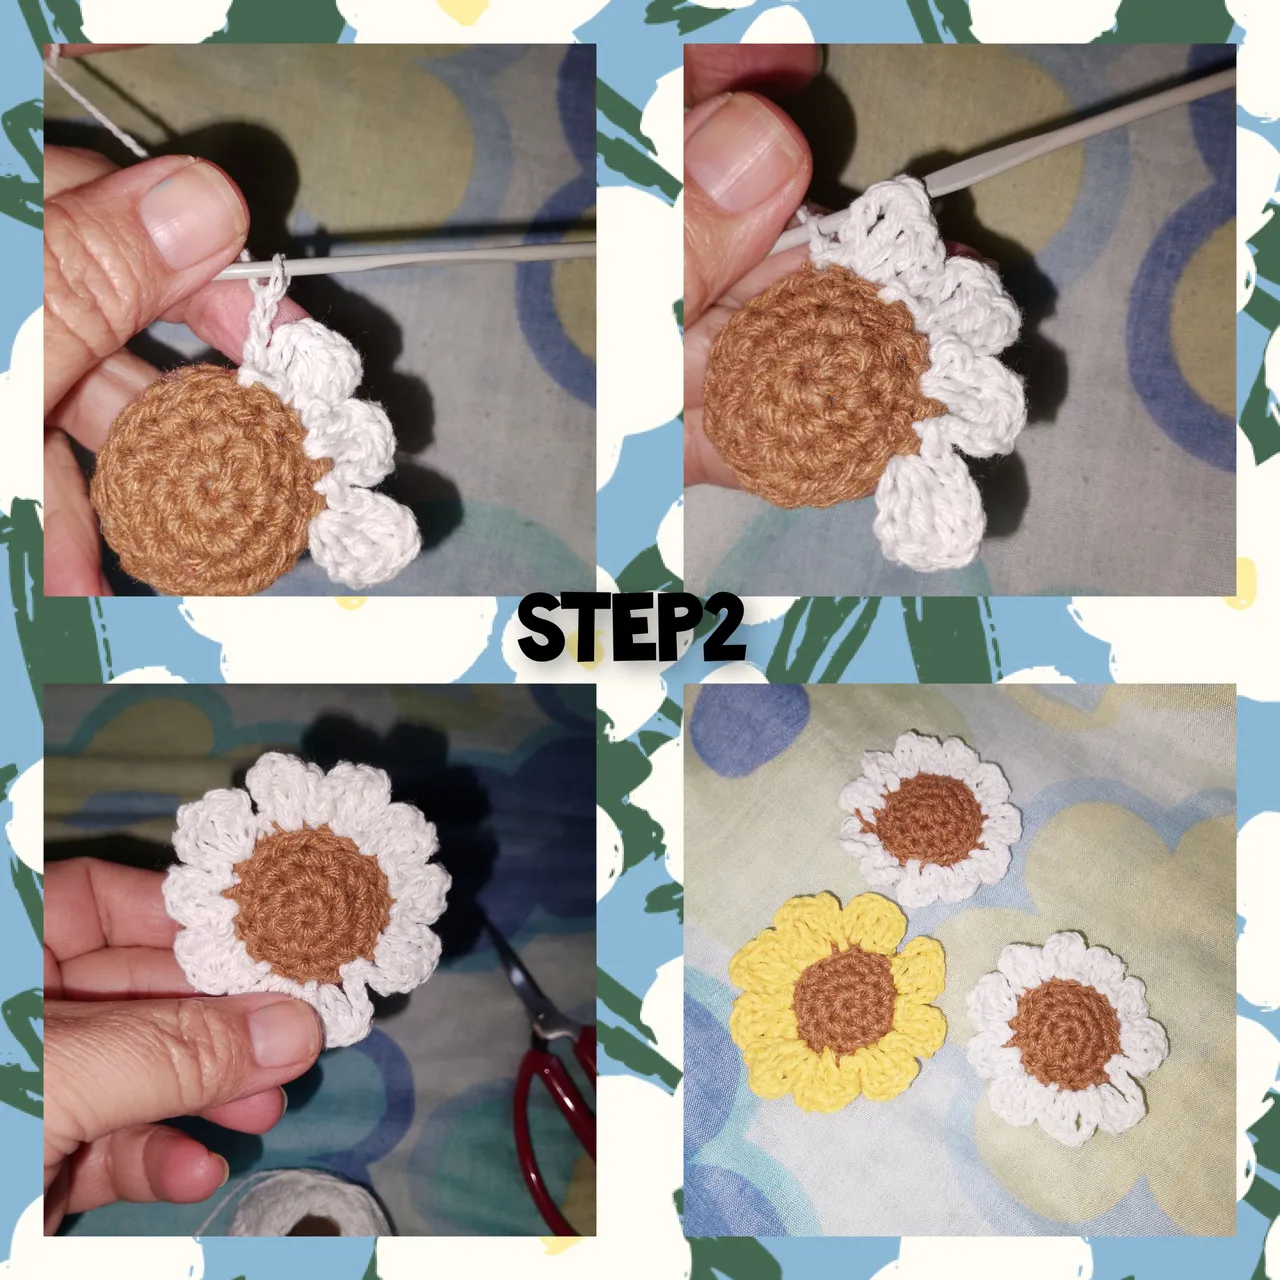
2.) I tie, with a knot, the white thread to a first button, I knit three chain stitches, in the same space I knit two double crochets, I lift three chain stitches and in the next half-point space, I knit a slipped point. In this way, I continue, weaving and repeat nine more times, to form a delicate flower. Following this process, I knit, two white and one yellow.
3.) For the leaves, I pick up nine chain stitches, I return to chain number eight, I knit half a crochet, in the next half crochet, in the next two chains I knit two double crochets, I continue with two double crochets and two half crochets, In the same order, I repeat on the other side. I cut a piece of wire that is larger than the size of the leaf and with sliding stitches I begin to hug the entire wire, until I reach the bottom of the leaf, where I make several turns at both ends of the wires. Once this is done, I cover the wire with the residual thread.

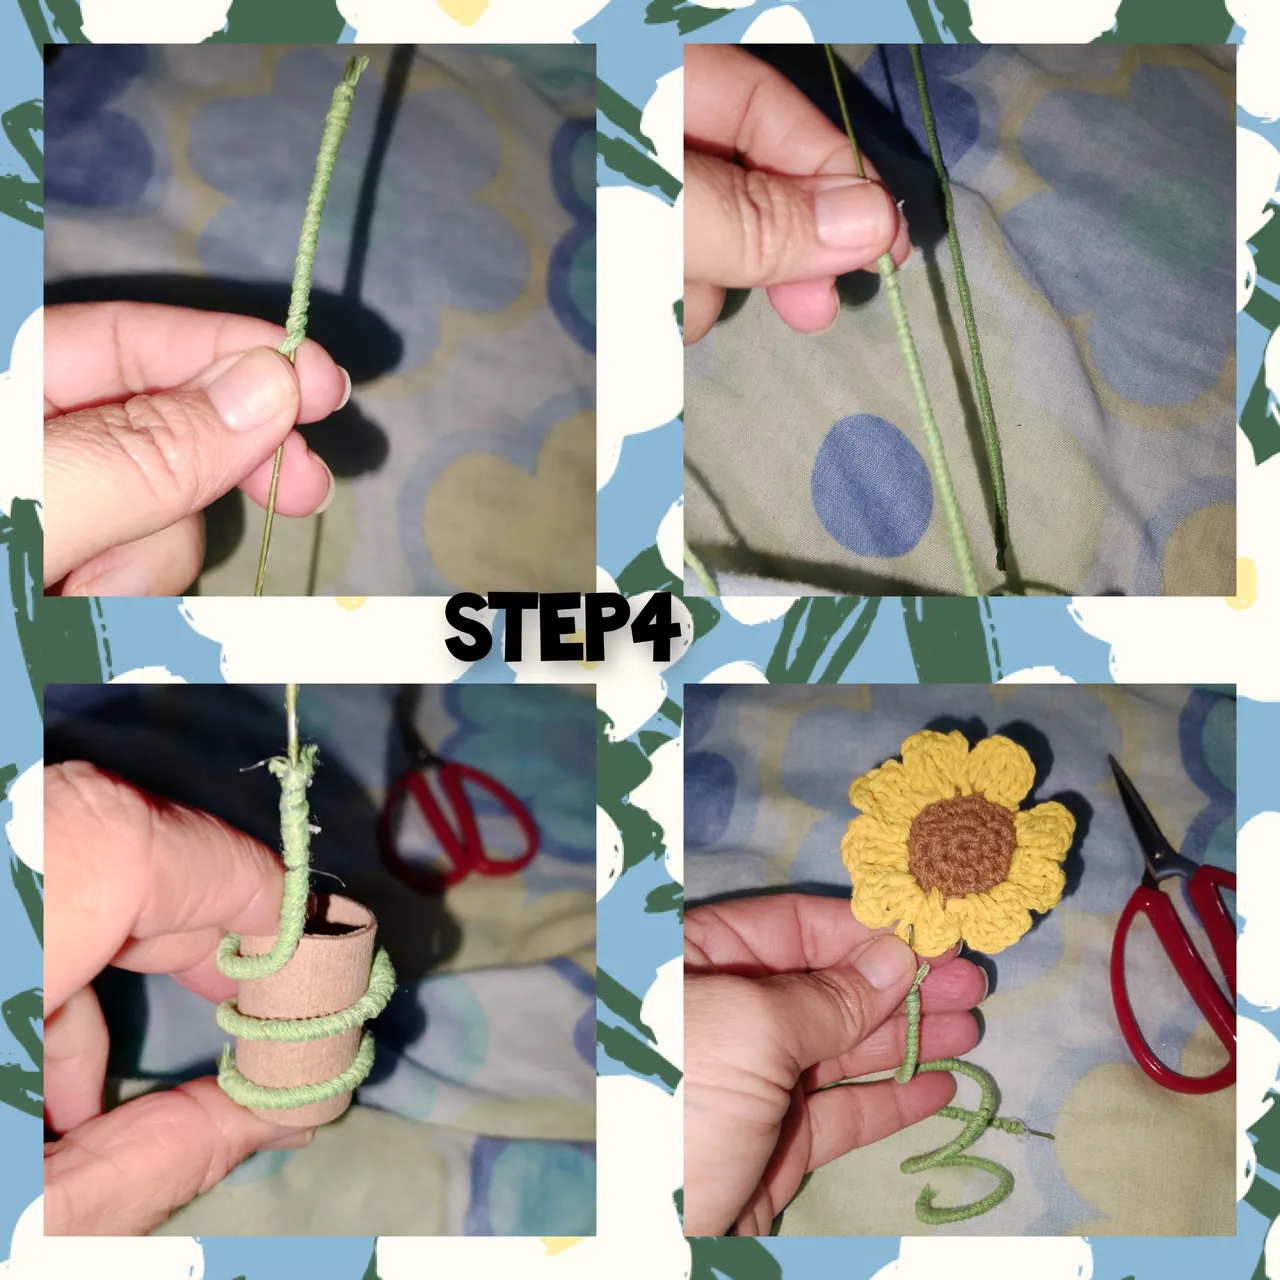
4.) cut a piece of wire and cover it with green thread. After lining, I turn the cardboard tube around. And I make a spiral, I put glue to fix the thread, and at the end of the straightest wire I put plenty of glue and insert the wire somewhere in the flower. The flower is thus fixed.
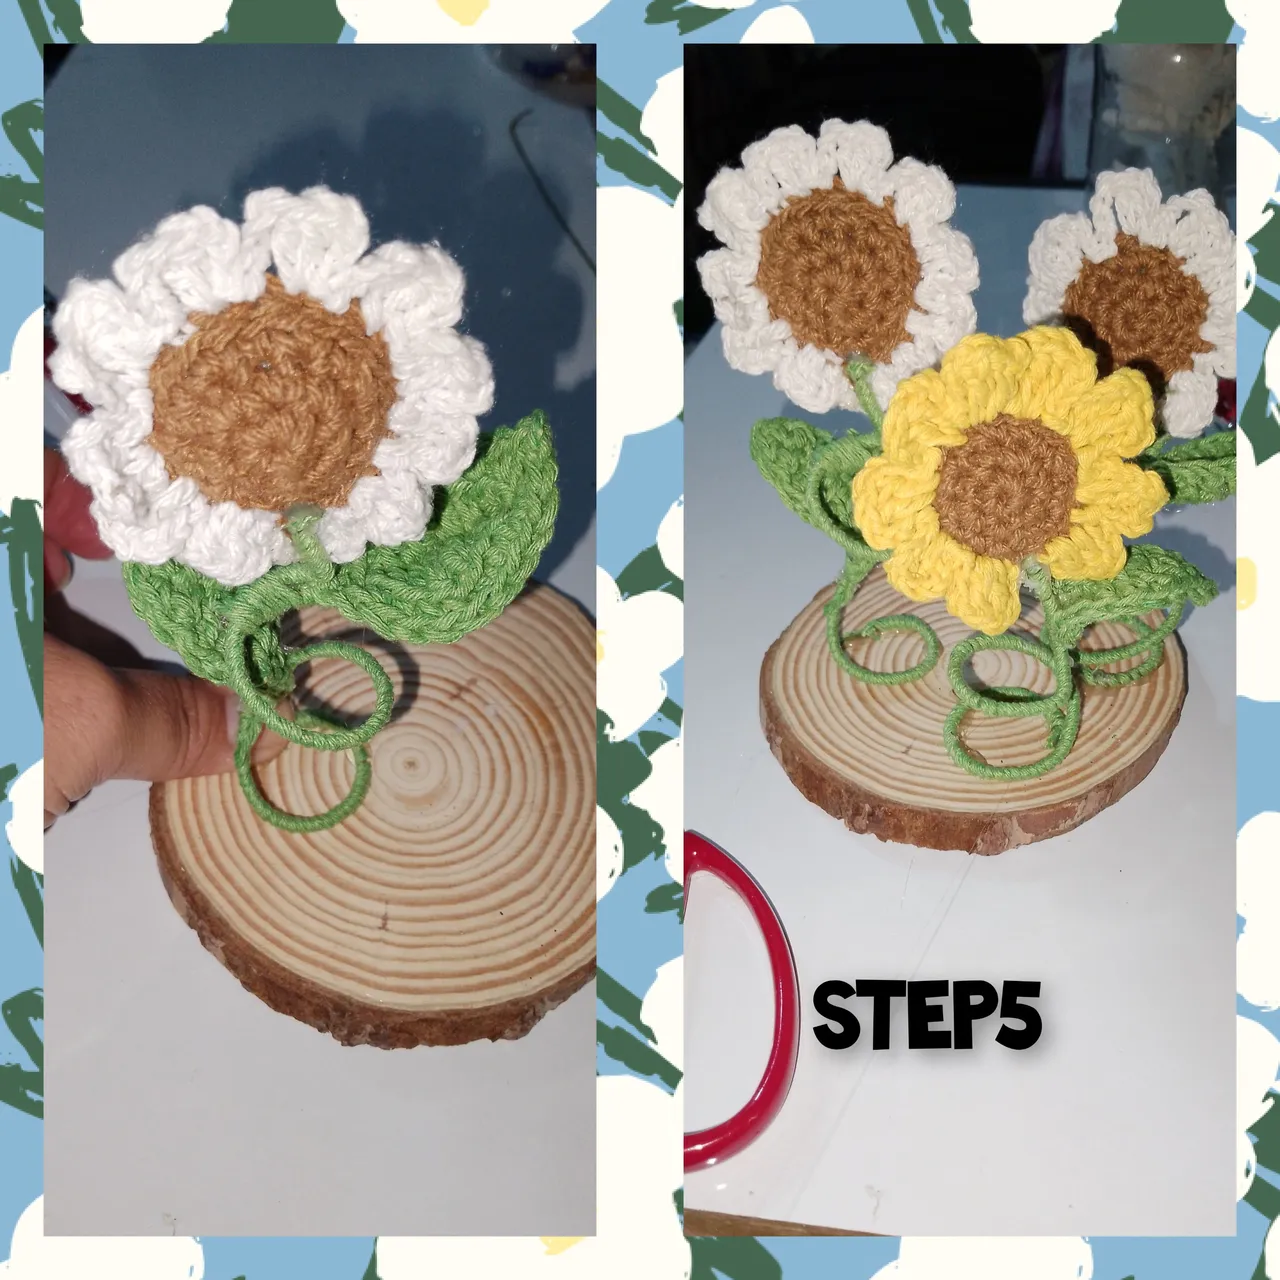
5.) I begin to glue the flowers to the small wooden trunk, and I also glue the leaves.
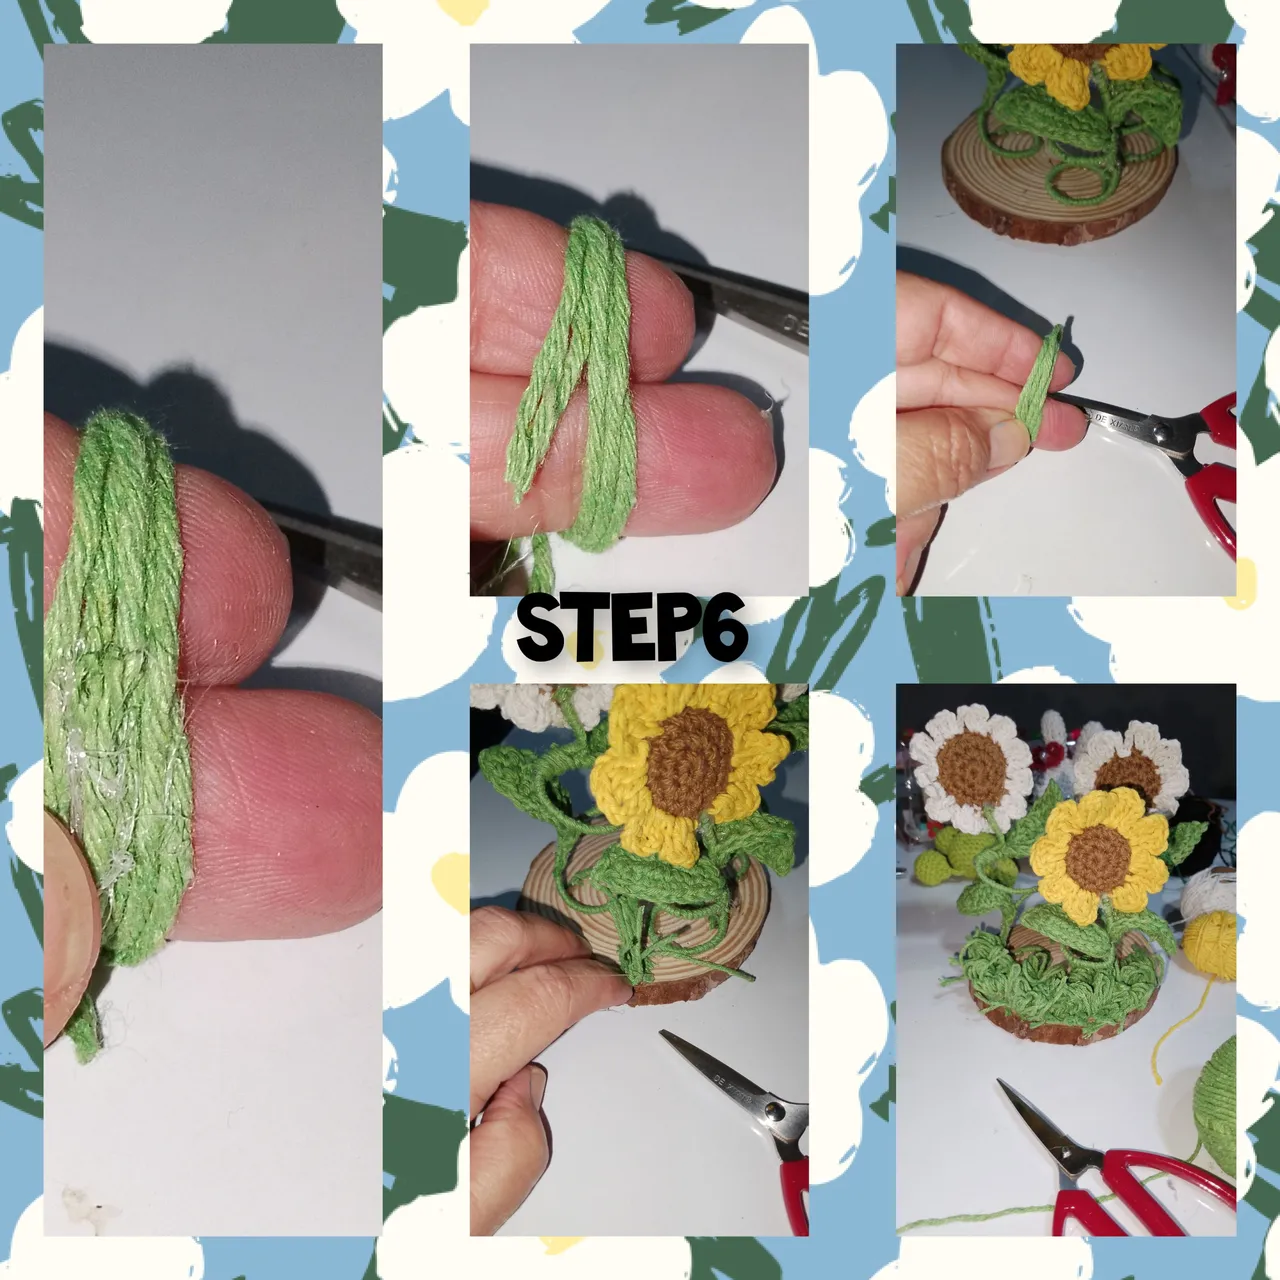
6.) Joining the index and middle fingers, I make ten turns with the short, green thread, and begin to glue it on the trunk, to simulate grasses. This way I paste how muchas necessary, on both sides.
7.) with the red thread, in a magic ring, I knit, eight half stitches and close the glitter, then I make eight increases, for 16 half stitches. The next round will be to make an increase after a half point, for 26 sc, then one more round. Two half points and an increase for 34mp. To finish, I will knit three chain stitches, leave a space and knit half a stitch. I knit the rest, a small lid of the same red color, I place it on the first piece, fill it and sew the lid to secure the filling.
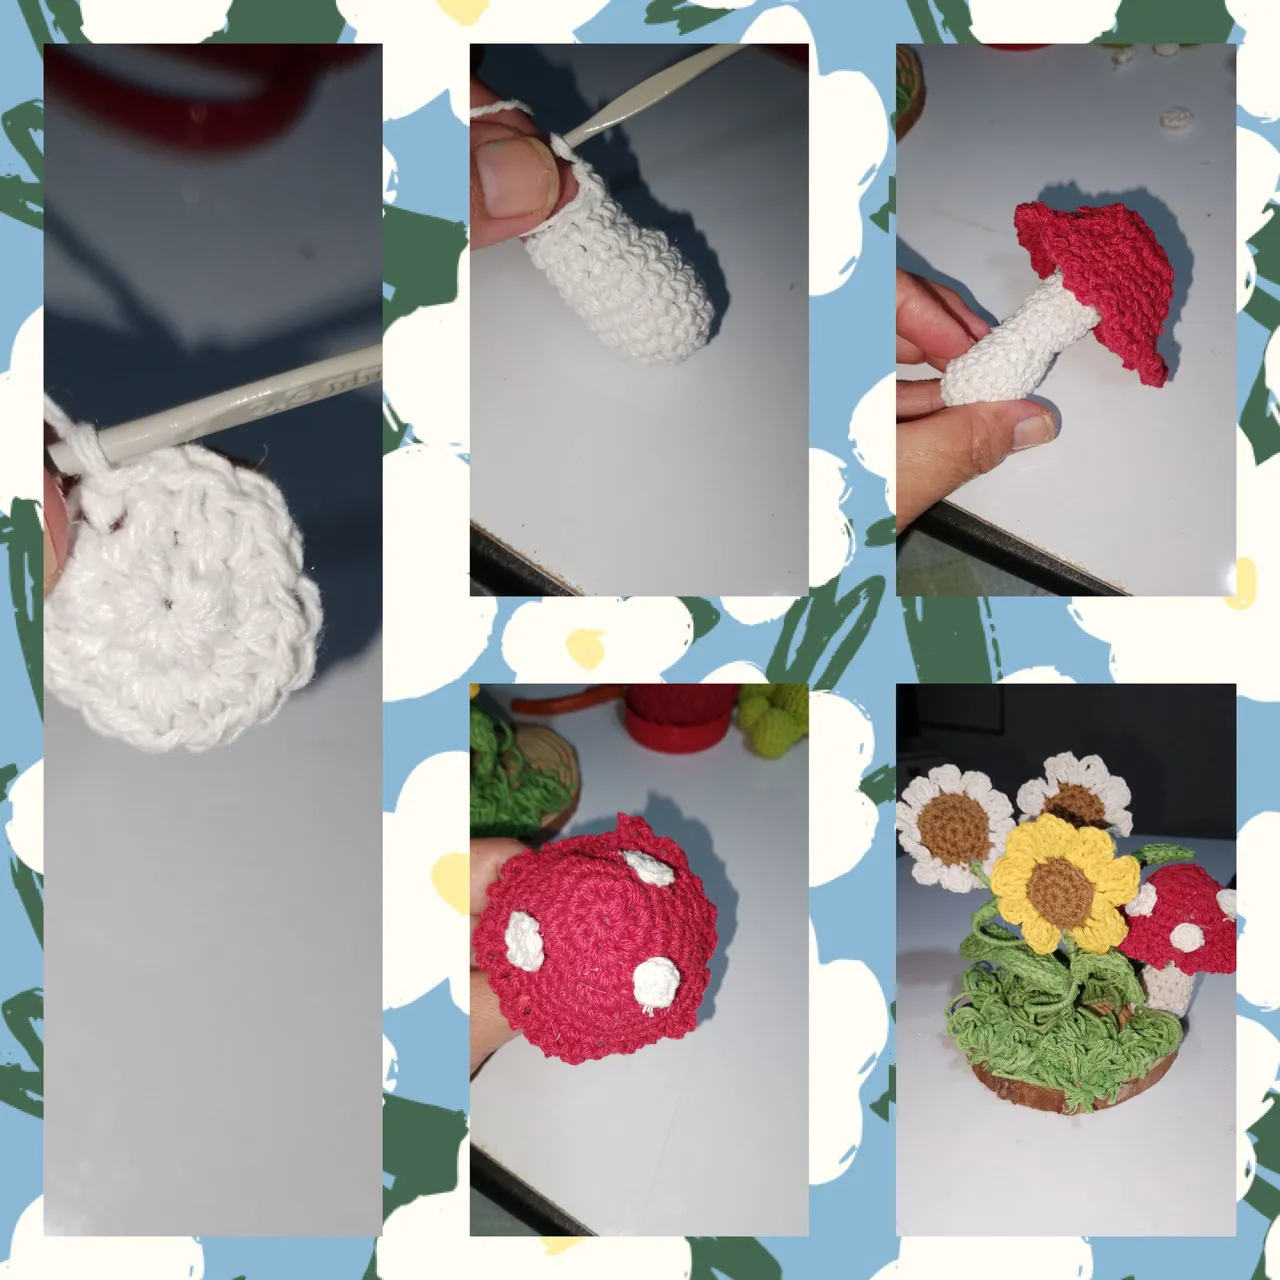
8.) with the white thread, in a magic ring, I knit six half stitches then, six increases, in the next one I will knit after a half stitch an increase, for 18 sc, I repeat five rounds of 18 half stitches, next wing I make decreases for 12mp. I knit eight rows of 12 sc. Filling and closing. With a little glue, I attached the hat to the mushroom. I glue on the wood, and glue some semicircular circles to the hat.
In this way, I am finished with today's project.
. All photos are my property, taken with my smartphone.
. Use incollage to show the steps.
. Use language translator.
. Use gif videos.
For demonstration. Grateful for following me to the end. It will be see you soon. Hugs.
( ESP)
Hola a todos, amantes de el bricolage y de las grandes ideas, para ustedes mis mejores deseos de bienestar. Me siento complacida, en estar una vez más con ustedes, en esta oportunidad, he creado, para toda mi linda comunidad de @diyhub, un hermoso y decorativo, centro de mesa, ideal para ambientar cualquier espacio en el hogar, Este ha Sido creando la técnica de crochet y reciclaje. Les Invito a seguirme, hasta el final. Espero lo disfruten.
Materiales:
.Hilos pabilos para tejer, colores (amarillo, blanco, verde, rojo, marrón.)
. Aguja para tejer.
. Relleno.
. Alambre de floristería.
. Trozo de madera.
. Silicón caliente.
. Tubo de cartón.
. Tijeras.
PASOS:
1.) Inicio, tejiendo con el hilo de color marrón, un pequeño círculo de tres vueltas. Comienzo con seis medios puntos en un anillo mágico, una segunda pasada de seis aumentos, para doce medios puntos, y la siguiente, un aumento, luego de medio puntos, para (18mp). Usando el mismo color de hilo y procedimiento, tejo un nuevo círculo, este sin cortar aún el hilo, comienzo a tejer, junto, a el primer círculo, sin cerrar completamente, introduzco el relleno, así continuo hasta cerrar completamente. Repito el procedimiento, tejo y ramos dos botones más.
2.) Ato, con un nudo, el hilo de color blanco, a un primer botón, tejo tres puntos cadenas, en el mismo espacio tejo, dos puntos altos, levanto tres puntos cadenas y en el siguiente espacio de medio punto, tejo un punto deslizados. De esta manera, continuo, tejiendo y repito nueve veces más, para formar una delicada flor. Siguiendo este proceso, tejo, dos de color blanca y una amarilla.
3.) Para las hojas, levanto nueve puntos cadenas, me devuelvo a la cadena número ocho, tejo medio punto, en la siguiente medios puntosas, en las dos cadenas siguientes tejo dos puntos altos, continuo con dos puntos altos y dos medios puntos, en el mismo orden, repito en el otro lado. Corto un trozo de alambre que sobre pase el tamaño de la hoja y con puntos deslizados comienzo a abrazar, todo el alambre, hasta llegar a la parte inferior de la hoja, dónde doy varias vueltas a ambos extremos de los alambres. Hecho esto, cubro el alambre con el hilo residual.
4.) corto un trozo de alambre y cubro con hilo de color verde. Luego de forrado, doy vueltas en el tubo de cartón. Y hago un espiral, coloco pegamento para fijar el hilo, y en el extremo de el alambre más recto coloco abundante pegamento e introduzco el alambre, por algún lugar de la flor. Quedando así fijada la flor.
5.) Comienzo a pegar en el pequeño tronco de madera las flores, así mismo pego las hojas.
6.) Uniendo los dedos índices y medio, doy diez vueltas con el hilo de color verde, corto, y comienzo a pegar sobre el tronco, para simular gramas. De esta manera pego cuánto sean necesario, en ambos lados.
7.) con el hilo de color rojo, en un anillo mágico, tejo, ocho medios puntos y cierro el brillo, luego hago ocho aumentos, para 16 medios puntos. La siguiente vuelta, será, hacer un aumento después de un medio punto, para 26mp, luego una vuelta más. Dos medios puntos y un aumento para para 34mp. Para finalizar, tejere tres puntos cadenas, dejo un espacio y tejo medio punto. Tejo demás, una pequeña tapa de mismo color rojo, coloco en la primera pieza, relleno y coso la tapa para asegurar el relleno.
8.) con el hilo de color blanco, en un anillo mágico, tejo seis medios puntos luego, seis aumentos, en la siguiente tejere luego de un medio punto un aumento, para 18 mp, repito cinco vueltas de 18 medios puntos, ala siguiente hago disminuciones para 12mp. Tejo ocho vueltas de 12mp. Relleno y cierro. Con un poco de pegamento, pego el sonbrer.o de el hongo. Pego sobre la madera, y pego a el sombrero algunos círculos de medios puntos.
De esta manera, soy por concluido, con el proyecto de el día de hoy.
. Todas las fotos, son de mí propiedad, tomadas con mí teléfono inteligente.
. Use incollage para mostrar los pasos.
. Use traductor lenguaje.
. Use videos gif. Para demostración.
Agradecida me hayas seguido hasta el final. Será hasta pronto. Abrazos.