(ENG)
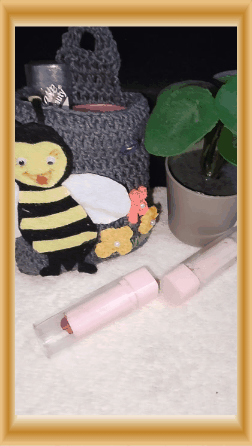
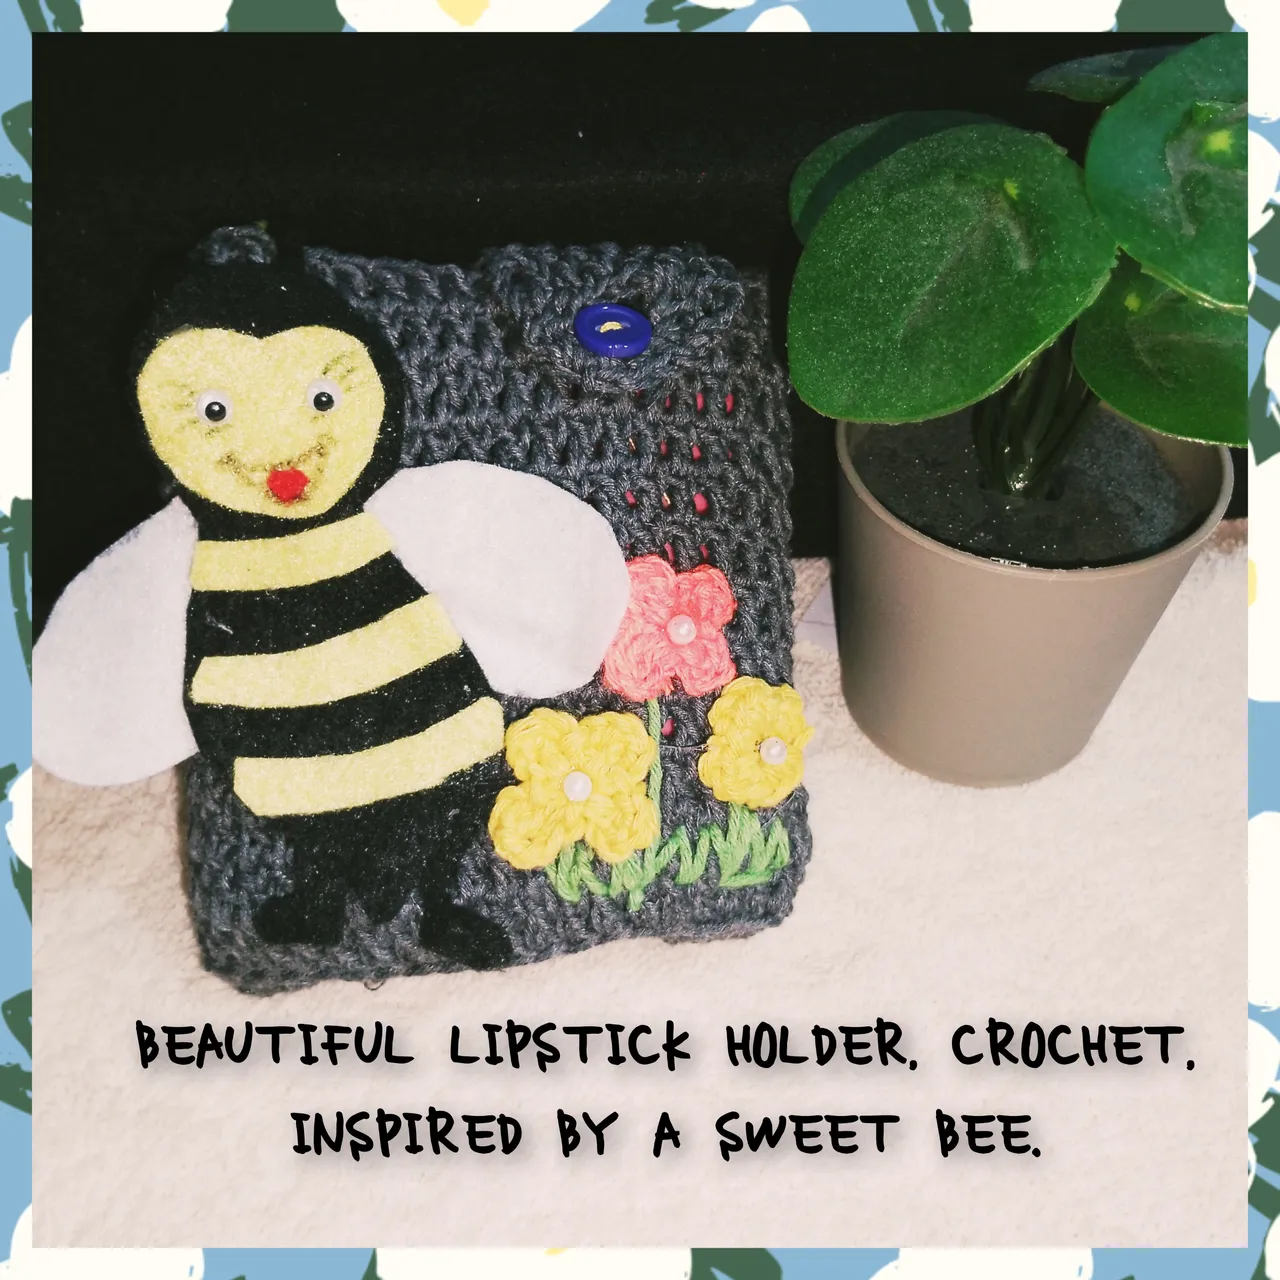
Be very blessed, this weekend that is just beginning, hoping you have fun and rest with your family. Today I am pleased to participate in this beautiful, and very Sweet Initiative, from @diyhub, regarding International Bee Month. To join her, I have made a very cute lipstick holder, ideal for storing my favorite lipsticks and being able to take them easily and calmly anywhere. To do this, I put the crochet technique into practice. Before showing the preparation process, I want to invite my good friends, @agbogo, @paciencia2 and @lupasbra21. I hope to see your participation, there are only a few days left, cheer up. The invitation is to follow me and I show you how easy the process is and how satisfactory the results are.
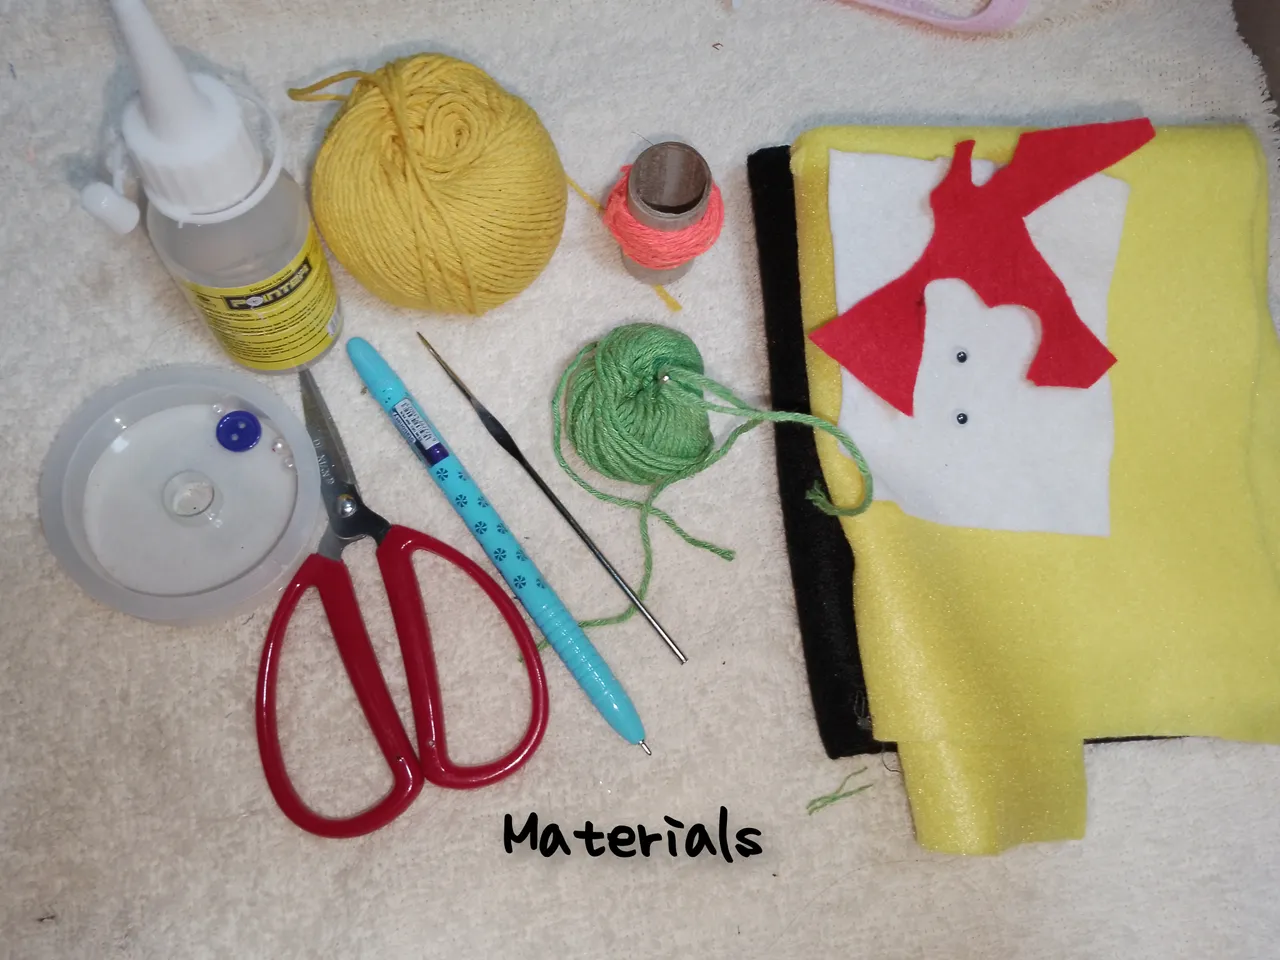
Materials:
. Threads for knitting, colors (orange, yellow, green, lead)
. Felt, colors (white, black, yellow, red)
. Pencil.
. Paper to recycle.
. White pearls.
. Wool needle.
. Knitting needle.
. Glue. . Scissors.
. Googly eyes.
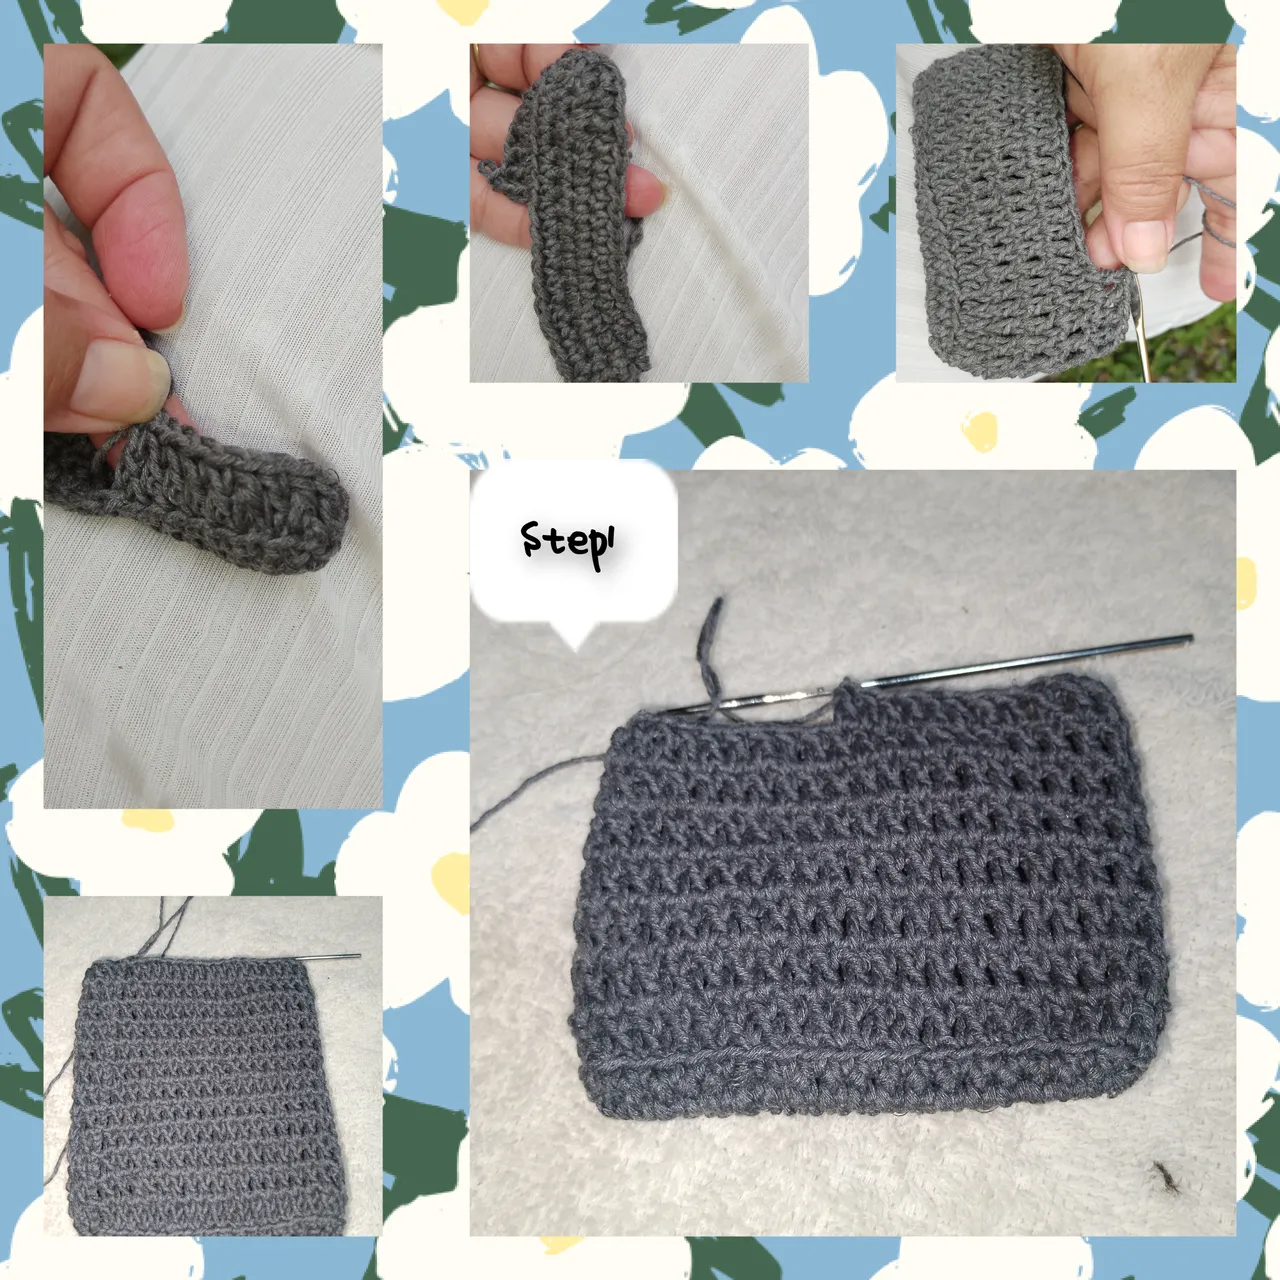
Preparation Steps: 1.) I begin by knitting with the thread, of lead color, twenty-five chain stitches, I make a stitch in the chain stitch, n25, and I begin to go, knitting a half stitch in each chain stitch, when I reach the next end, I make a new increase and repeat on the next side. I take a next tour. For the next twenty rows, I will knit high stitches. And this allows me to achieve the desired size of the lipstick holder.
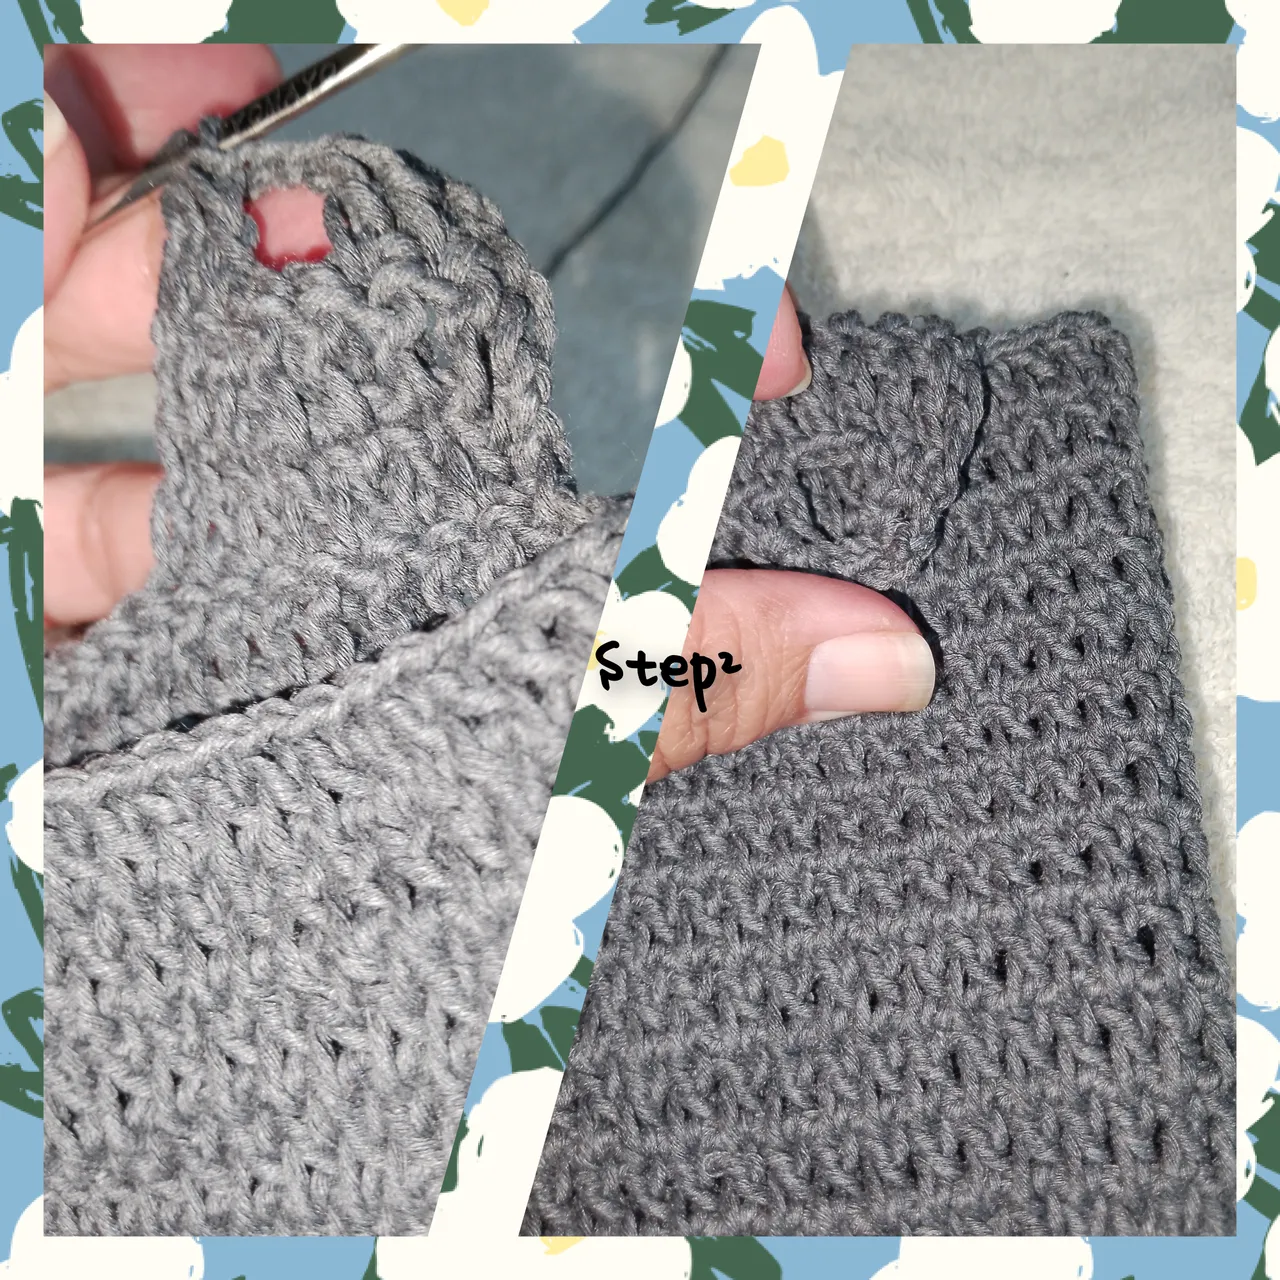
2.) I make a stop on this side of the case or lipstick holder, I knit ten stitches, I pick up two chain stitches, I close three small chains together, I leave four spaces and I close the next three stitches together. The next thing will be to knit half stitches on the previous row. Leaving like this, in the center a small leaf.
3.) Having done the above, I take one of the sides of the lipstick holder, and embroider, with the wool needle, a small bush, I put the rest in a magic ring, four small petals and close the ring, for this, I will use the thread orange and yellow.

4.) On the recycling paper, I draw a small bee, then cut out its parts. 
5.) Continue, marking the pieces of the bee on the corresponding color of felt. He cut out the residual felt, drew a charming little bee's smile and glued the little eyes.
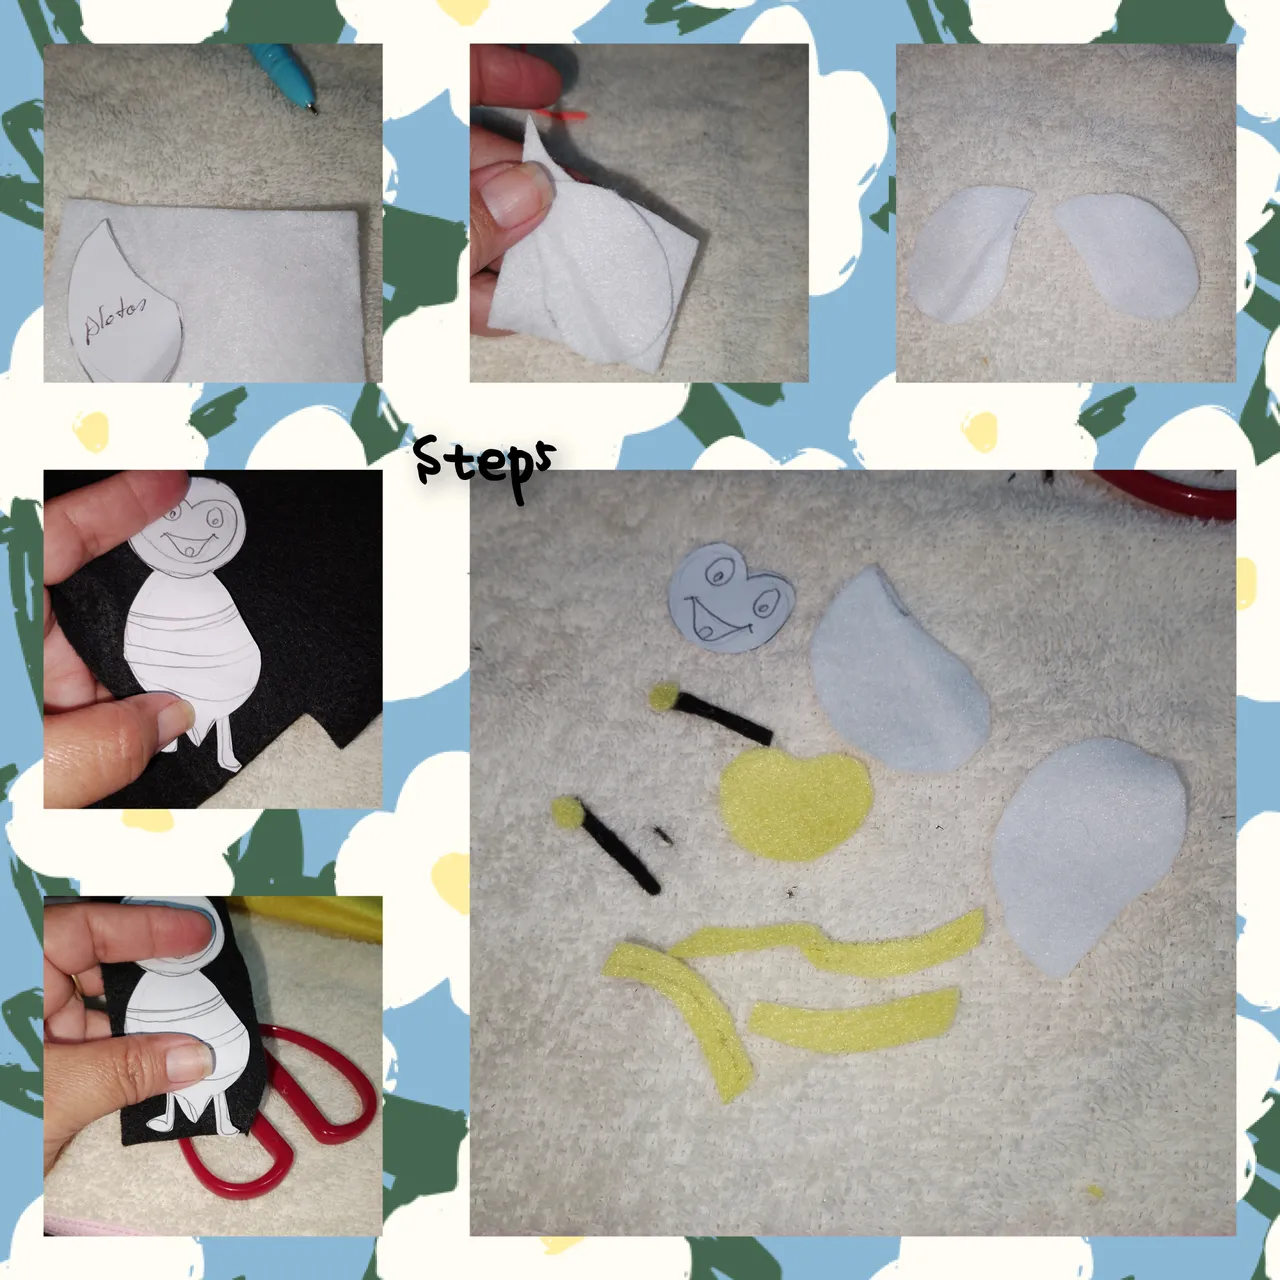
6.) list the pieces, I will assemble the figure of the bee, and with glue, I will place it in the free space of the lipstick holder, I will only apply glue in the center of the body, to create a 3D effect, and it will look like a The bee that flew to the lipstick holder, glued the small flowers and in the center a little pearl, and finally, the button, which would allow the lipsticks to be secured.

. All assets are my property.
. Use gifs videos for the presentation.
. Use incollage to show the process steps.
. Use language translator.
Grateful, you followed me to the end. It was very pleasant to have participated, along with so many talented people and great creators. It will be see you soon.
(ESP)
Muy bendecido sea, este fin de semana que apenas inicia, deseando sea de su diafrute y descanso en familia. Hoy me complace, participar en esta hermosa, y muy Dulce Iniciativa, de @diyhub, a proposito de el mes internacional de las, Abejas. Para unirme a ella, he realizado un luy lindo porta labial, ideal para reguardat mis labiales favoritos y poder llevarlos con facilidad y tranquilidad a cualquier lugar. Para ello, puse wn práctica la tecnica de crochet. Antes de mostrar el proceso de elaboración, quiero invitar a mis buenas amigas, @agbogo, @paciencia2 y @lupasbra21. Espero ver sus participaciones, quedan pocos dias, animo.
La invitacion es a seguirme y les muestro lo fácil de su proceao y lo satisfatorio de los resultados.
Materiales:
. Hilos para tejer, colores ( anarnjdo, amarillo, verde, ploma)
. Fieltro, colores ( blanco, negro, amarillo, rojo)
. Lapiz.
. Papel para reciclar.
. Perlitas blancas.
. Agija lanera.
. Aguj para tejer.
. Pegamento.
. Tijeras.
. Ojitos saltones.
Pasos de Elaboración:
1.) comienzo tejiendo con el hilo, de cooor plomo, veinticinco pubtos cadenas, hago un unmento en el punto cadena, n25, y comienzo a recorrer, tejiendo un medio pujto en cada punto cadena, al llegar a el, siguiente extremo, hago un nuevo aumento y repito en el siguiente lado. Hago un siguiente recorrido. Para ñas siguientes vainte vueltas, tejere pubtos altos. Y esto me permite, alcanzar, el tamaño deseado de el porta labial.
2.) hago un alto en este lado de el estuche o porta labial, tejo diez pubtos añtos, levanto dos puntos cadenas, cierro tres pujtos cadenas juntos, dejo cuatro espacios y losbproximos tres pujtos los cierro juntos. Lo siguiente sera tejer medios puntos, sobre la vuelt alterior. Quedando así, en el centro un prqueño hojal.
3.) Hecho lo anterior, tomo uno de oos lados de el porta labial, y bordo, con la aguja lanera, un pequeño arbusto,btejo demas en un nillo mágico, cuatro pequeños petalos y cierro el nillo, para ello, usare el hilo de color naranja y amarillo.
4.) En el papel para reciclar, dibujo una pequeña abeja, luego recorto sus partes.
5.) Continuo, marcando las piezas, de la abeja, sobre el color de fieltro correspondiente. Recortó el fieltro residual, dibujo pa sonrisa de oa pequeña y encantadora abeja y pego los pequeños ojos.
6.) lista las piezas, armare, la figura de la abeja, y con pegamento, la ubicare en el espacio libre de el porta labial, solo aplicare pegento en el centro de el cuerpo, para probocar efecto 3d, y se vea comi una abeja que voló, hasta el porta labial, pego las pequeñas flores y en eo centro una perlita, y finalmente, el boton, que permitera, asegurar los labiales.
. Todas las fotos, son de mí propiedad.
. Use gifs videos, par la presentacion.
. Use incollage paea mostrar el proceso de los pasos.
. Use traductor lenguaje.
Agradecida, me hayas seguido hasta el final. Fue muy placentero, haber participado, junto a tanta gente talentosa y grandes creadores. Sera hasta pronto.