ENGLISH VERSION
Hello everyone, today I have the pleasure of posting again in this beautiful #DIYHub community and this time I do it with a beautiful fabric rose. Very simple and easy to do.
MATERIALS
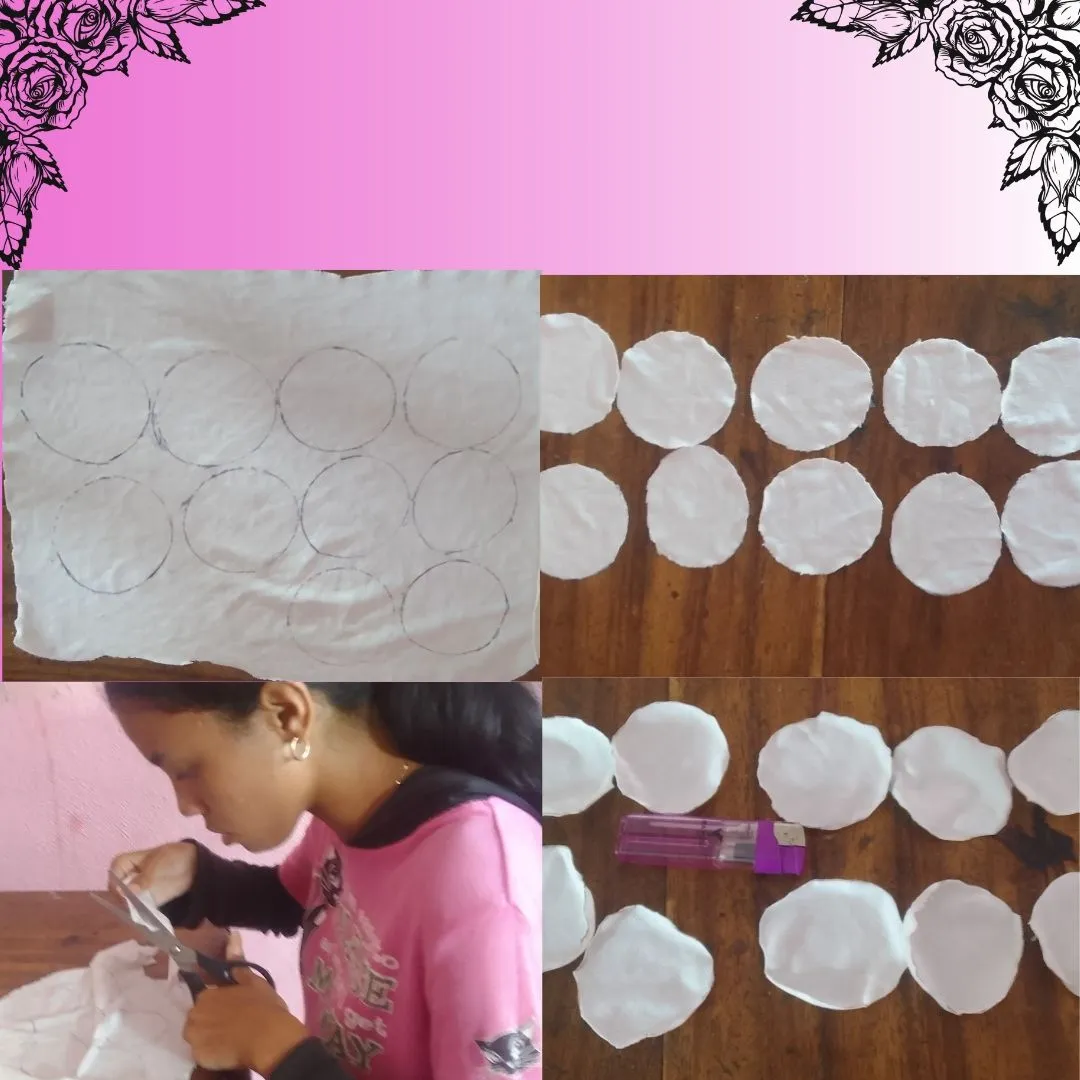
To make it you only need 9 circles of fabric of the color you want. I chose white fabric and a circle of green fabric the same size as the other 9 circles. I also used scissors, a matchbox, thread and needle.
FIRST STEP
The first thing I did was trace the circles on the white fabric and then with the help of scissors I cut them out but to give them the shape of a petal I passed the matchbox to each of the circles.
SECOND STEP
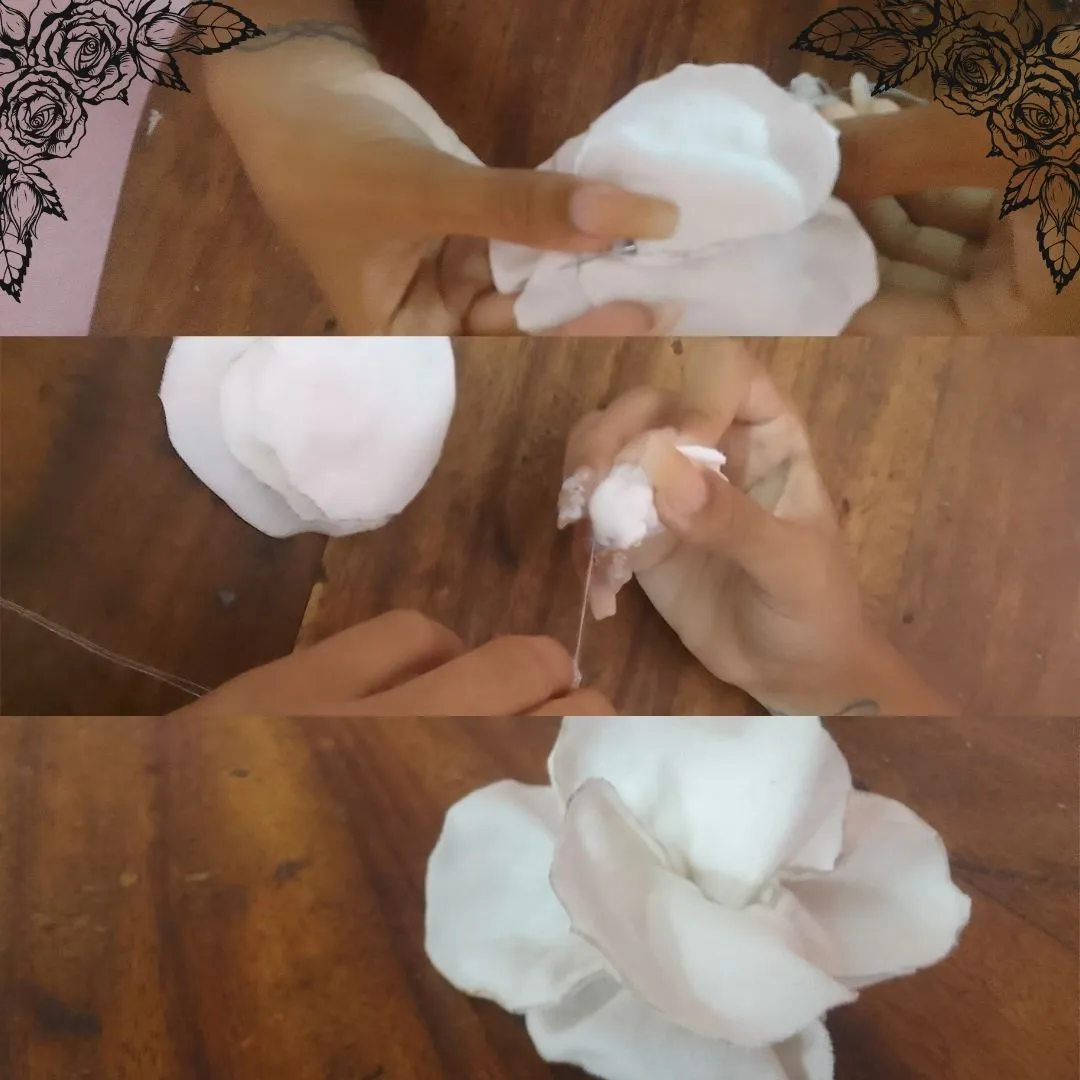
Now with all the petals created we can start making the rose. We will take 5 petals and we will join them all with the help of the thread and needle, at the bottom, always trying to give it the shape of a rose.
THIRD STEP
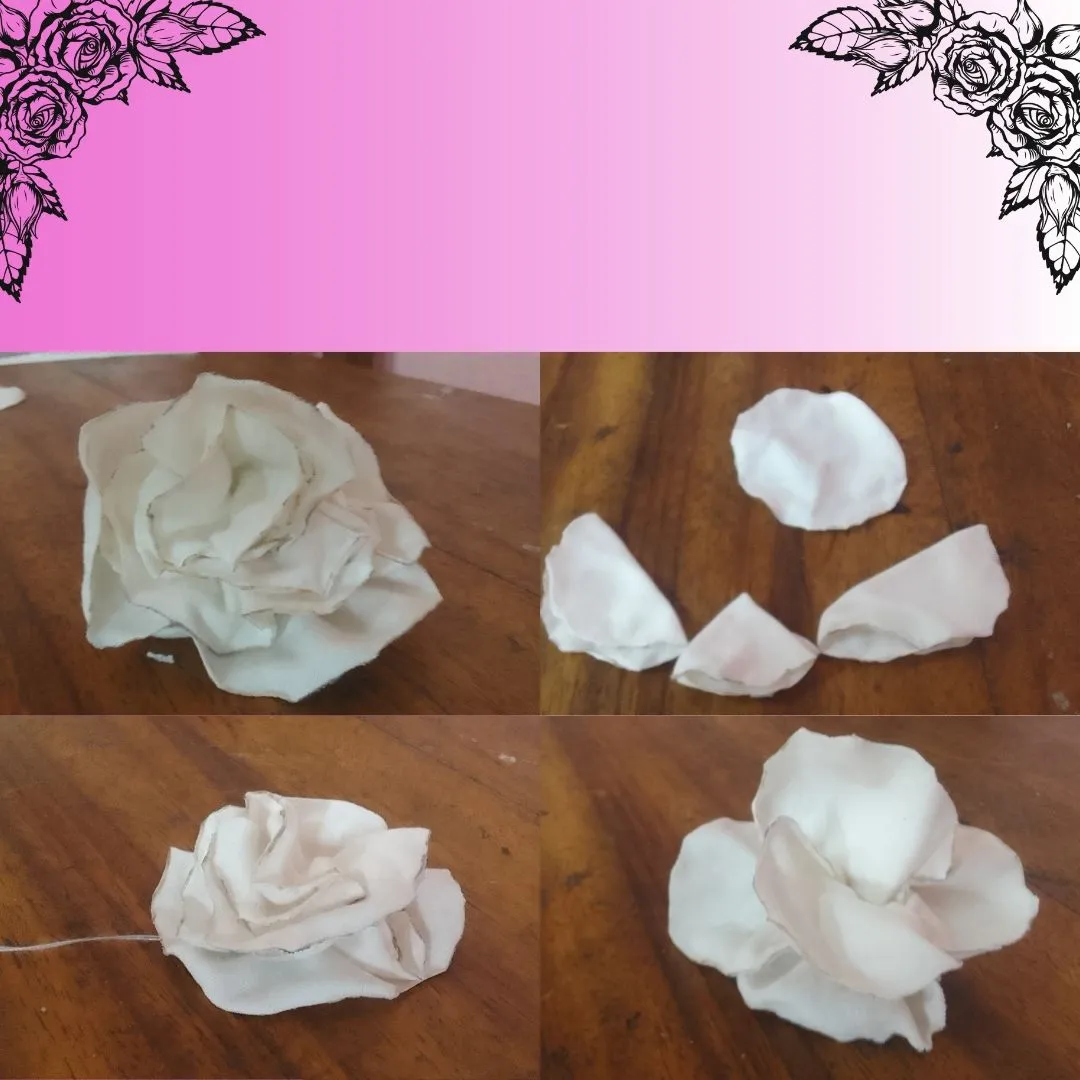
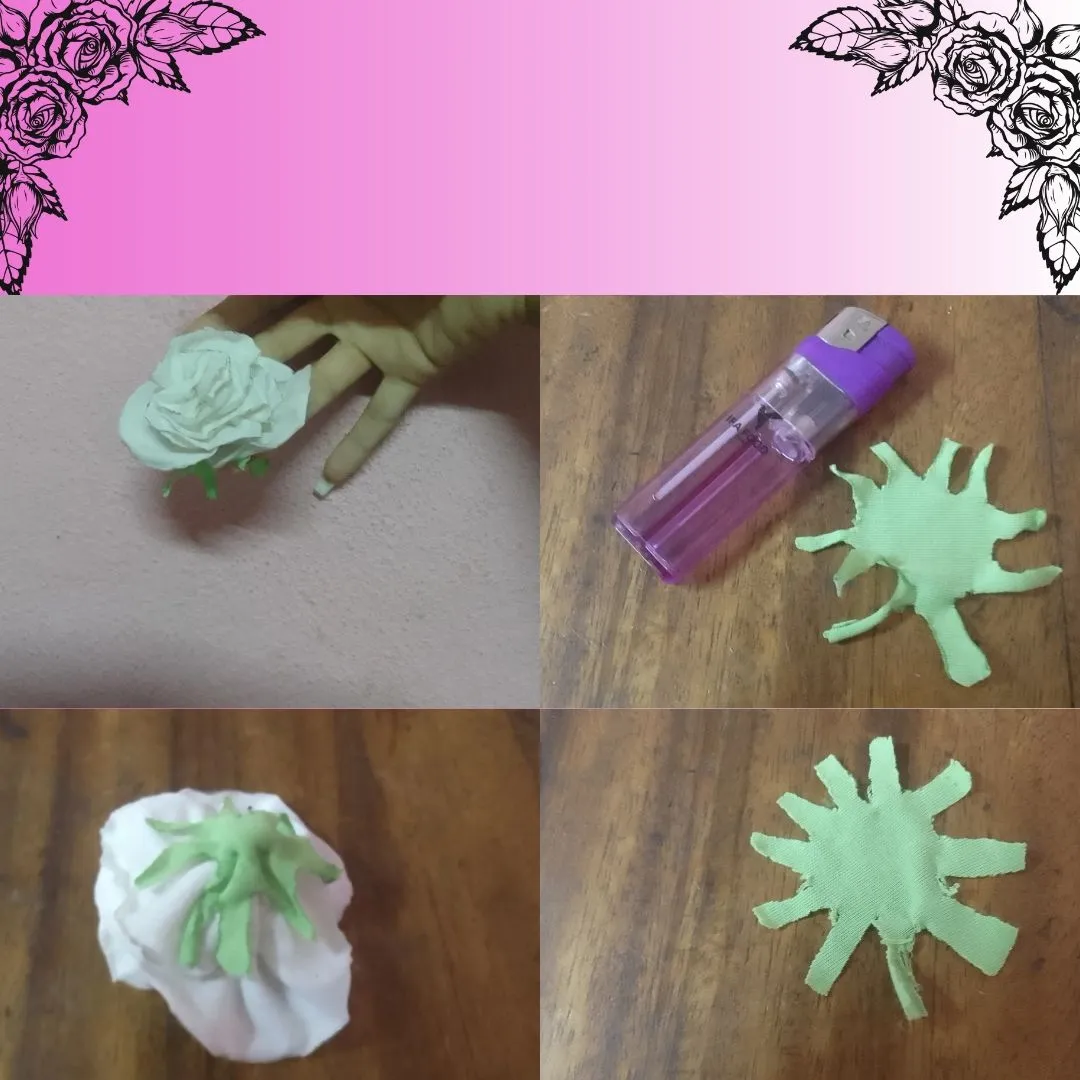
To give our rose a more realistic touch we are going to make the rose bud. For this we will take a petal and we will fold it in 4 in the following way: First in half, and then we will fold that half in half again. We take another 2 petals and fold each one in half and finally we leave the last petal in its circle shape. We are going to take the petal folded in 4 and the two petals folded in half and we are going to join them in the following way: the petal folded in 4 will be the one in the middle and the two folded in half will go to the corners, with the help of We are going to fix the thread and needle so that it stays that way. When it is in that shape, we will fix it to the petal that we left with its original circle shape. And now our button is done, we just need to attach it to the rose, which we will do with the help of the thread and needle.
FOURTH STEP
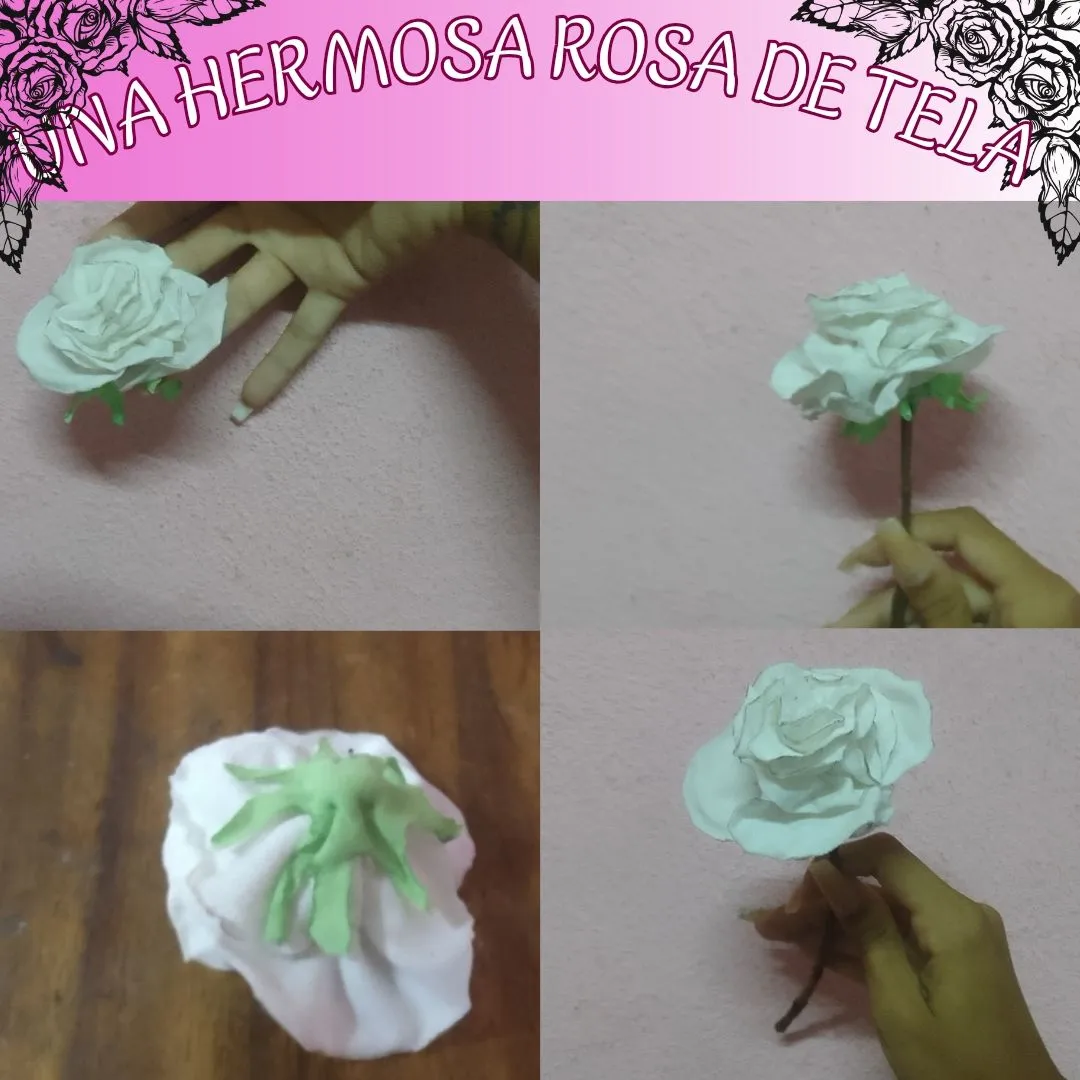
To finish our rose we will make the sepals with the green circle that we cut out at the beginning. We are going to cut it out creating small strips around the circle and then with the help of a match we are going to burn the edges so that they bend outwards. We sew it to the rose and our rose is ready.
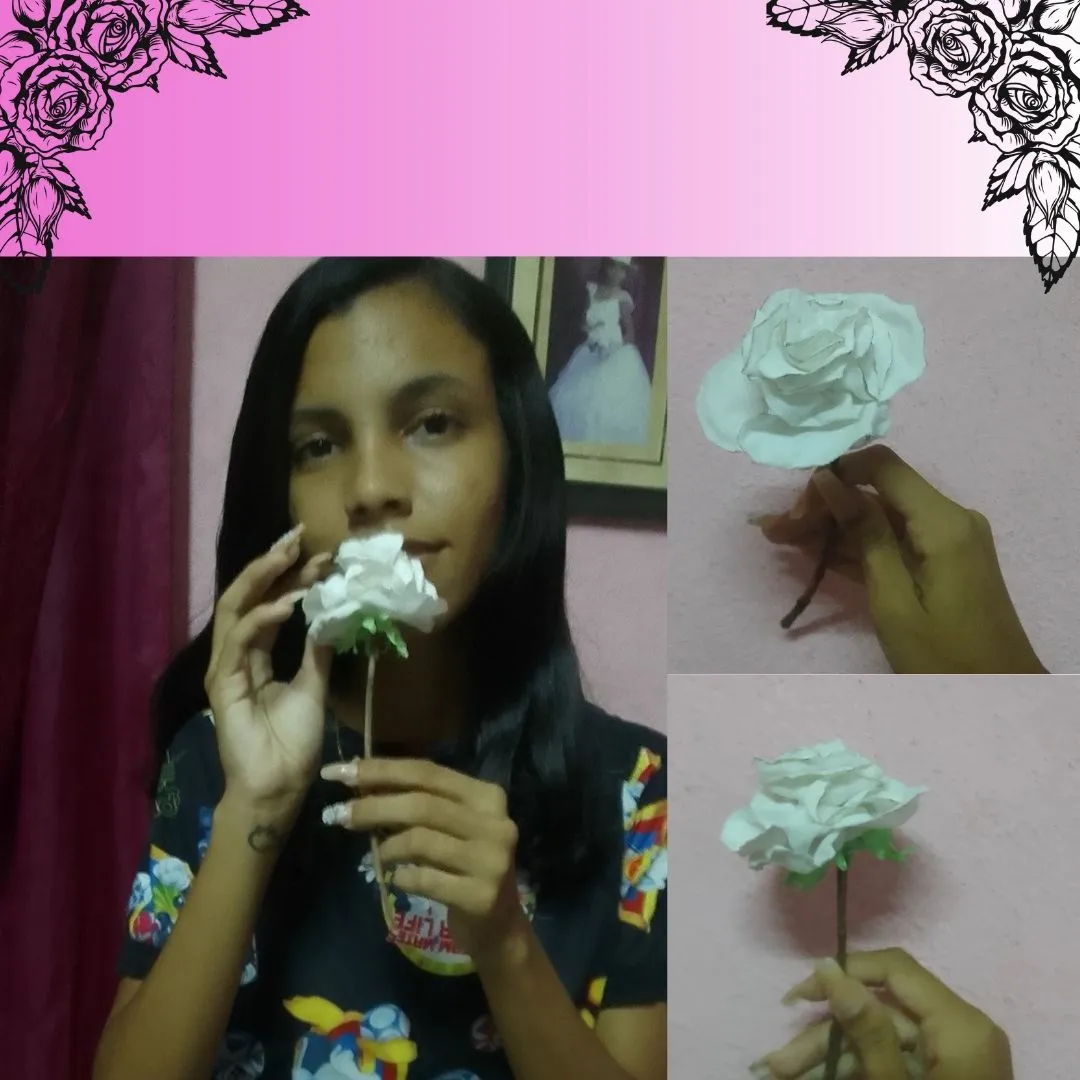
To make the rose look more realistic, he decided to add a stem. And this was the final result of the fabric rose. I hope they like it as much as I do. And if you decide to try it at home I hope you have as much fun as I do. I just have to wish you all a wonderful and happy day.
The photos were taken by my Samsung Galaxy A 03 Core phone and edited in canva
The text was translated by Deepl
VERSIÓN EN ESPAÑOL
Hola a todos hoy tengo el placer de publicar nuevamente en esta hermosa comunidad de #DIYHub y esta vez lo hago con una hermosa rosa de tela. Muy sencilla y fácil de hacer.
MATERIALES
Para hacerla solo se necesita 9 círculos de tela del color que quieras yo elegí tela blanca y un círculo de tela verde del mismo tamaño que los otros 9 círculos también utilicé tijeras,una fosforera, hilo y aguja.
PRIMER PASO
Lo primero que hice fue trazar los círculos en la tela blanca y luego con ayuda de un tijera los recorte pero para darles la forma de pétalo les pase a cada uno de los círculos la fosforera .
SEGUNDO PASO
Ya con todos los pétalos creados podemos comenzar a hacer la rosa. Tomaremos 5 pétalos y lo vamos a unir todos con ayuda del hilo y la aguja, por la parte inferior, siempre tratando de darle la forma de rosa.
TERCER PASO
Para darle a nuestra rosa un toque más realista vamos a hacer el botón de la rosa. Para esto tomaremos un pétalo y lo vamos a doblar en 4 de la siguiente forma: Primero a la mitad, y luego esa mitad la doblamos nuevamente a la mitad. Tomamos otros 2 pétalos y los doblamos cada uno a la mitad y por último el último pétalo lodejamos con su forma de círculo. Vamos a tomar el pétalo doblado en 4 y los dos pétalos doblados a la mitad y lo vamos a unir de la siguiente forma: el pétalo doblado en 4 será el del medio y los dos doblados a la mitad irán a las esquinas, con ayuda de el hilo y la aguja lo vamos a fijar para que se nos quede de esa forma. Cuando esté echa esa forma , lo fijaremos al pétalo que dejamos con su forma original de círculo. Y ya está nuestro botón solo nos falta unirlo a la rosa que lo haremos con ayuda de el hilo y la aguja.
CUARTO PASO
Para terminar nuestra rosa le haremos los sépalos con el círculo verde que recortamos al principio le vamos a recortar creando unas pequeñas tiras al rededor del círculo y luego con ayuda de una fosforera le vamos a quemar los bordes para que se doblen hacia afuera. Lo cosemos a la rosa y ya está lista nuestra rosa.
Para que la rosa paresca más realista decidí colocarle un tallo . Y este fue el resultado final de la rosa de tela . Espero que les guste tanto como a mí . Y si deciden intentarlo en casa espero que se diviertan tanto como yo. Solo me queda desearles a todos un maravilloso y feliz día.
Las fotos fueron tomadas por mi teléfono Samsung Galaxy A 03 Core y editadas en canva
El texto fue traducido por Deepl