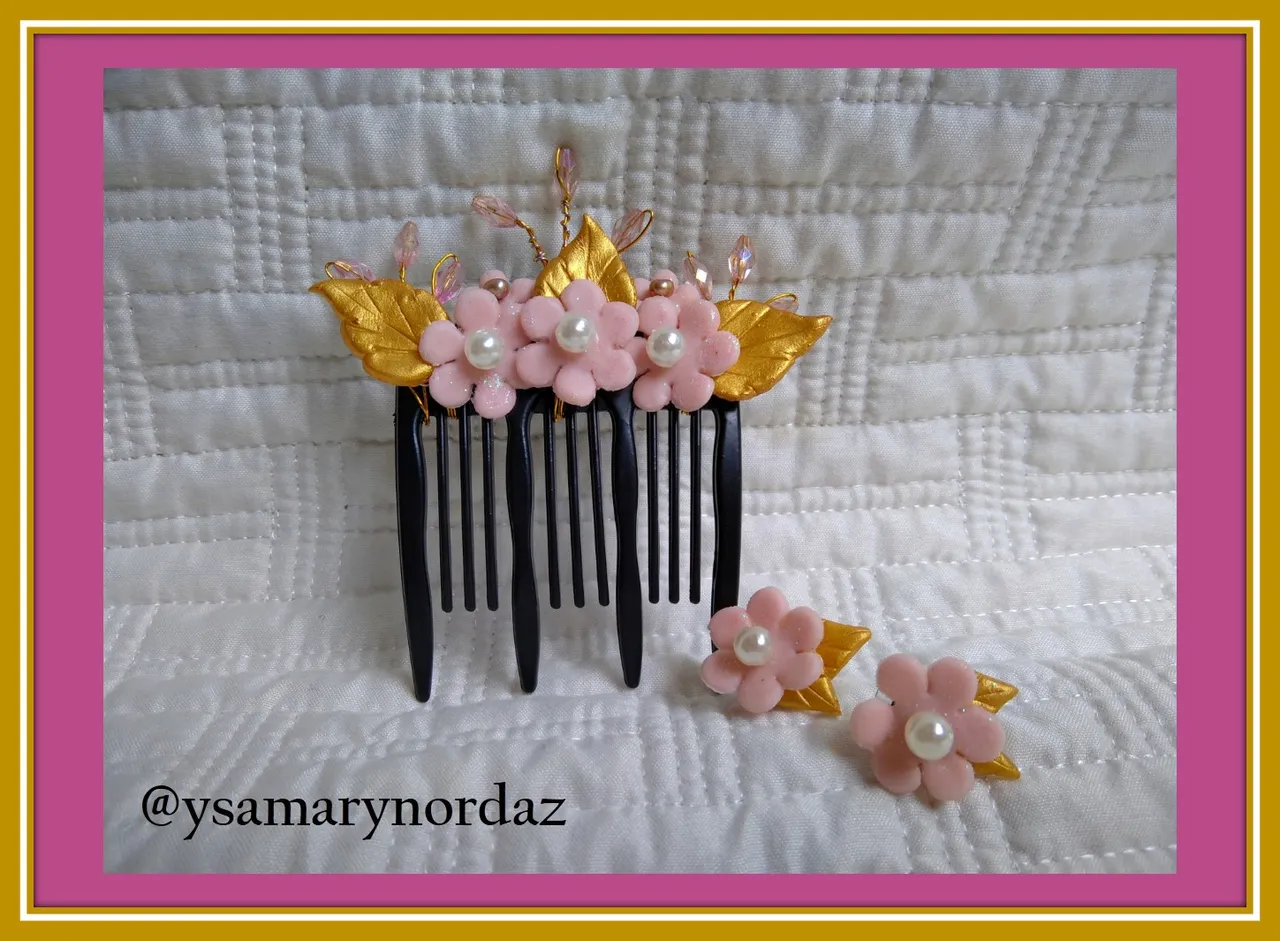
Hola a toda la comunidad de #jewelry. Para mí es un placer compartir con ustedes un paso a paso de dos accesorios: un par de pendientes y una peineta. Las peinetas son un accesorio que siempre se han usado, pero hoy en día es un complemento que está en tendencia y con ella logramos tener un look glamuroso. Por lo tanto, hoy voy a mostrarles como decorar una peineta con masa flexible, esta es una masa maravillosa ya que con ella podrás realizar un sinfín de adornos. El motivo tanto para los pendientes como para la peineta serán flores y hojas con adornos de pedrería. A continuación, les presento el siguiente paso a paso. ¡Vamos a comenzar!
Hello to the entire #jewelry community. For me it is a pleasure to share with you a step by step of two accessories: a pair of earrings and a comb. Combs are an accessory that have always been used, but today it is a trendy accessory and with it we can have a glamorous look. Therefore, today I am going to show you how to decorate a comb with flexible dough, this is a wonderful dough because with it you can make endless decorations. The motif for both the earrings and the comb will be flowers and leaves with gemstone decorations. Then I present the next step by step. Let's get started!
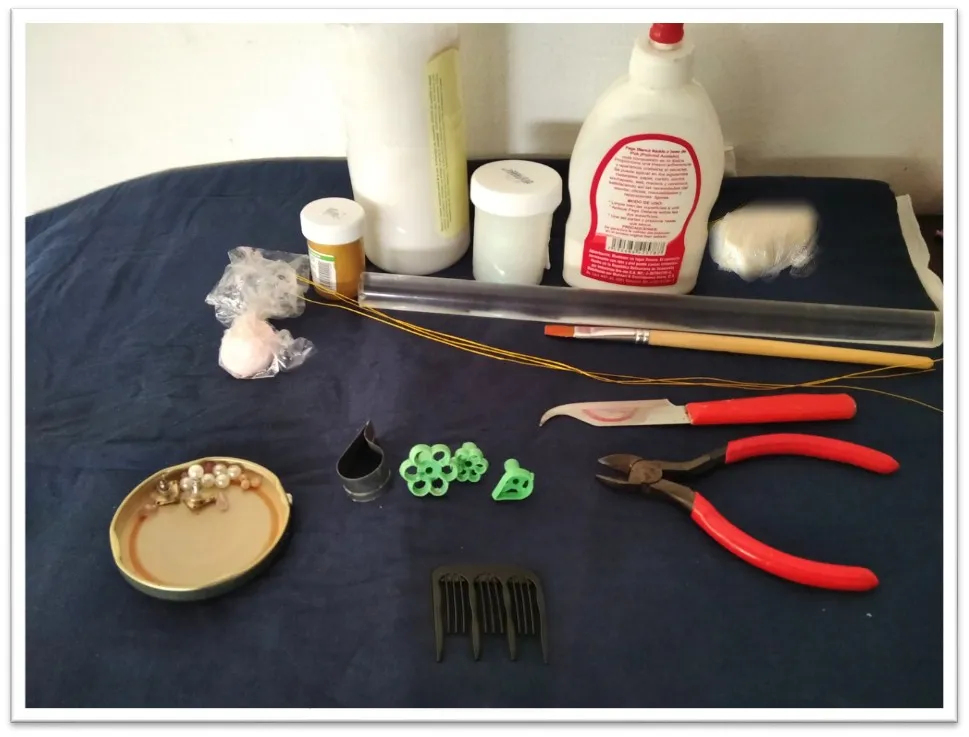
Materiales:
•Masa flexible color rosado
•Crema humectante
•Pega blanca
•Gel escarchado
•Moldes de flor (uno grande y uno pequeño).
•Moldes de hoja (uno grande y uno pequeño).
•Pintura dorada
•Pincel
•Rodillo
•Perlas color blancas, perlitas color dorado y piedras rosadas.
•Esteca de cuchillo
•Alambre dorado
•2 bases de pendientes
•Peineta
•Tenaza
Materials:
•Pink flexible clay
•Moisturizing lotion
• White glue
• Flower molds (one large and one small).
• Sheet molds (one large and one small).
• Gold paint
•Brush
•Roller
•White pearls, golden pearls and pink stones.
• Pottery clay cutter
•Gold wire
• 2 cup post earrings
• Comb
• Plier
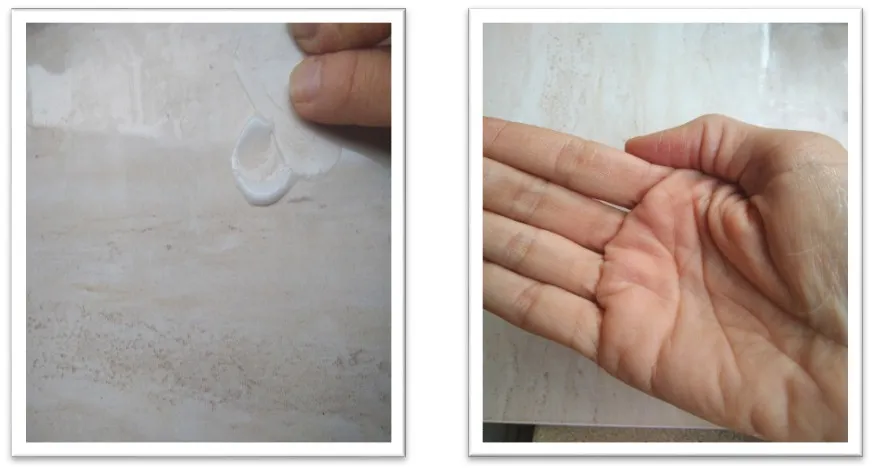
Paso 1
Limpia la superficie donde trabajarás la masa y unta un poco de crema humectante en ella, de esta manera la masa no se pegará. Igualmente, te recomiendo colocar en tus manos para que sea más fácil el amasado.
Step 1
Clean the surface where you will work the dough and spread a little moisturizer on it, this way the dough will not stick. Likewise, I recommend placing it in your hands to make it easier to knead.
Paso 2
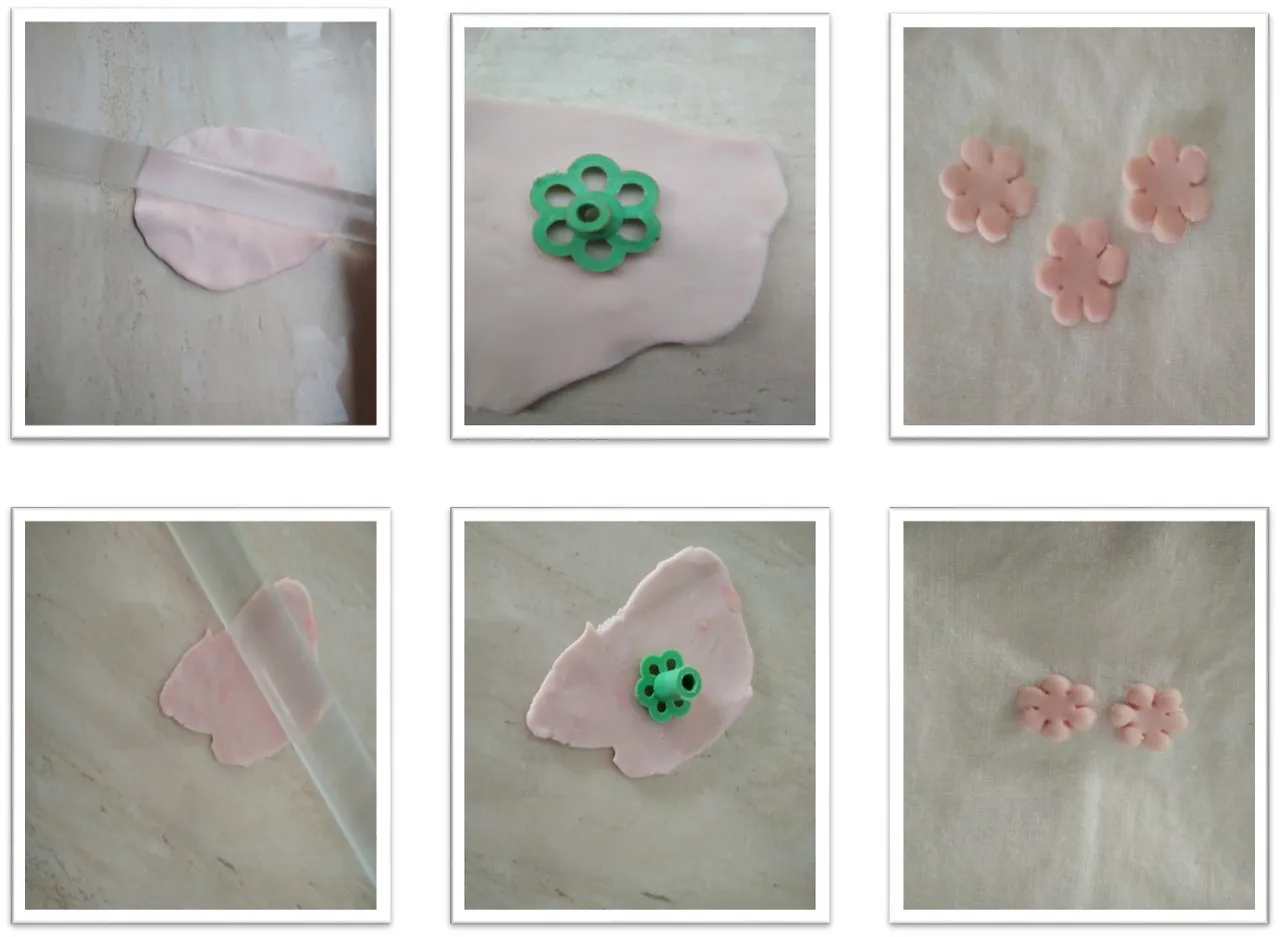
Coloca la masa flexible rosada sobre la superficie y con la ayuda del rodillo extiéndela. Una vez extendida, coloca el cortador de flor grande sobre la masa para así extraer tres flores. Este mismo procedimiento debes realizarlo con el cortador de flor pequeña y extraer dos flores.
Step 2
Place the pink flexible dough on the surface and with the help of the rolling pin spread it out. Once extended, place the large flower cutter on the dough to extract three flowers. This same procedure must be done with the small flower cutter and extract two flowers.
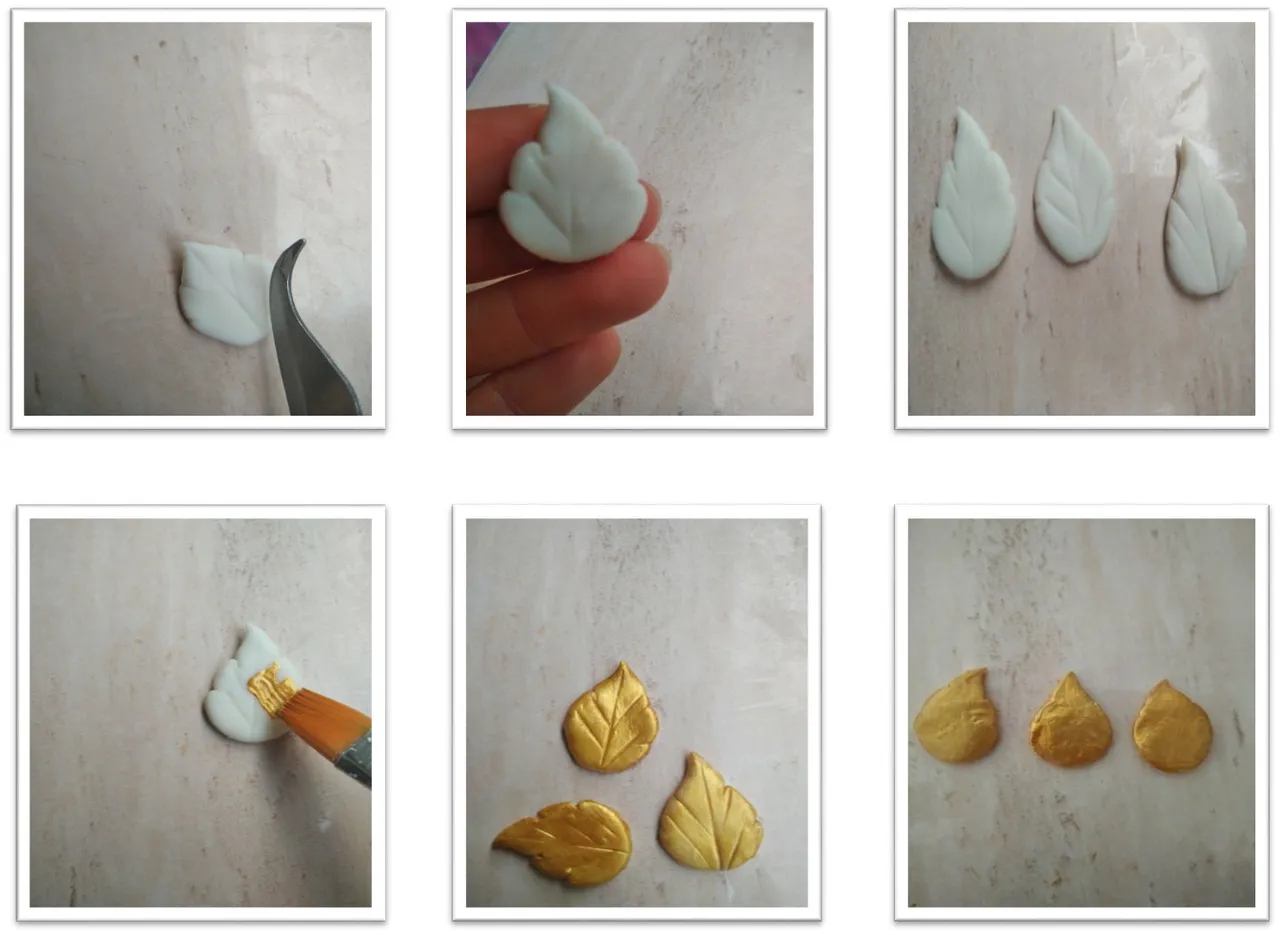
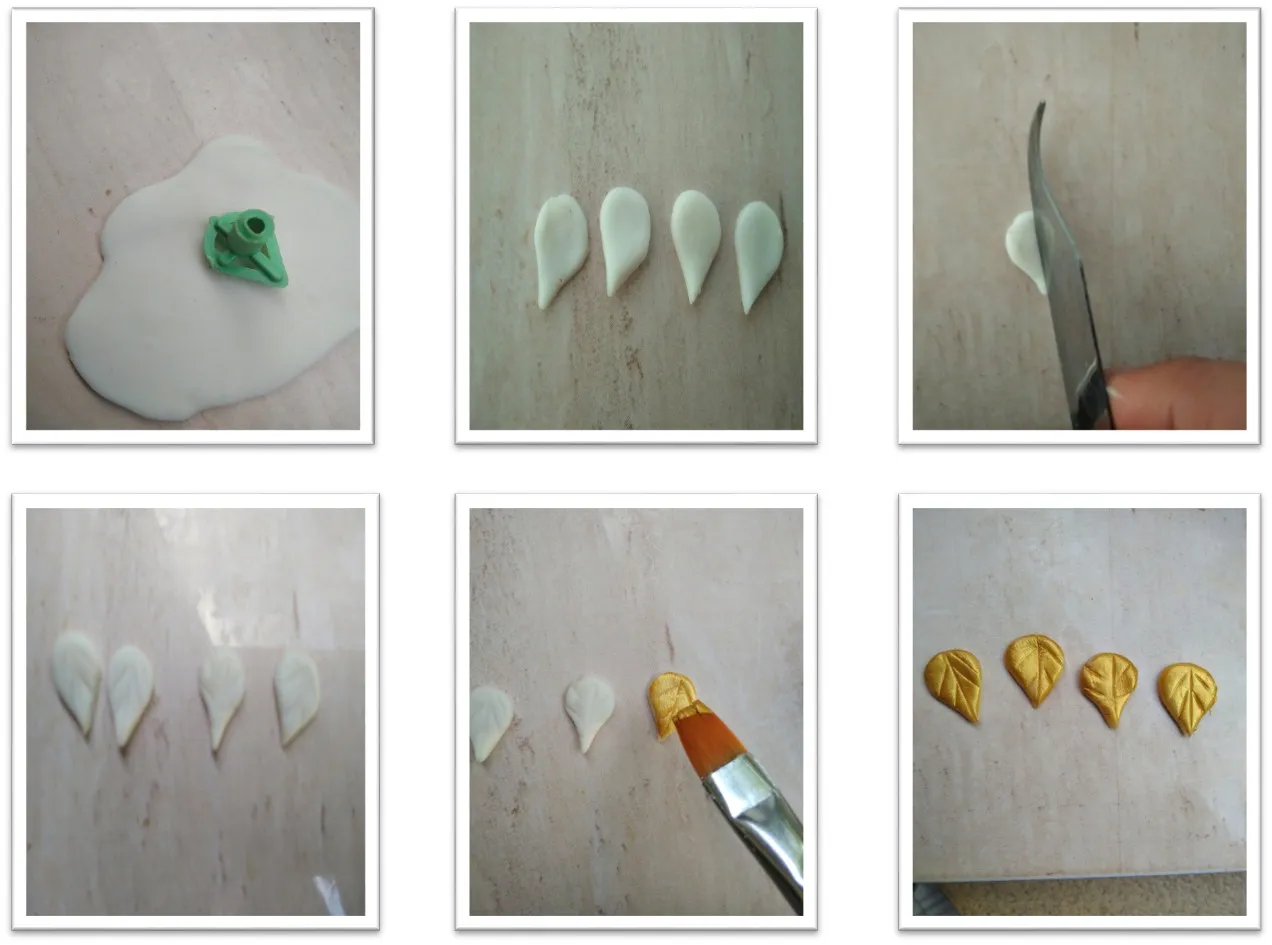
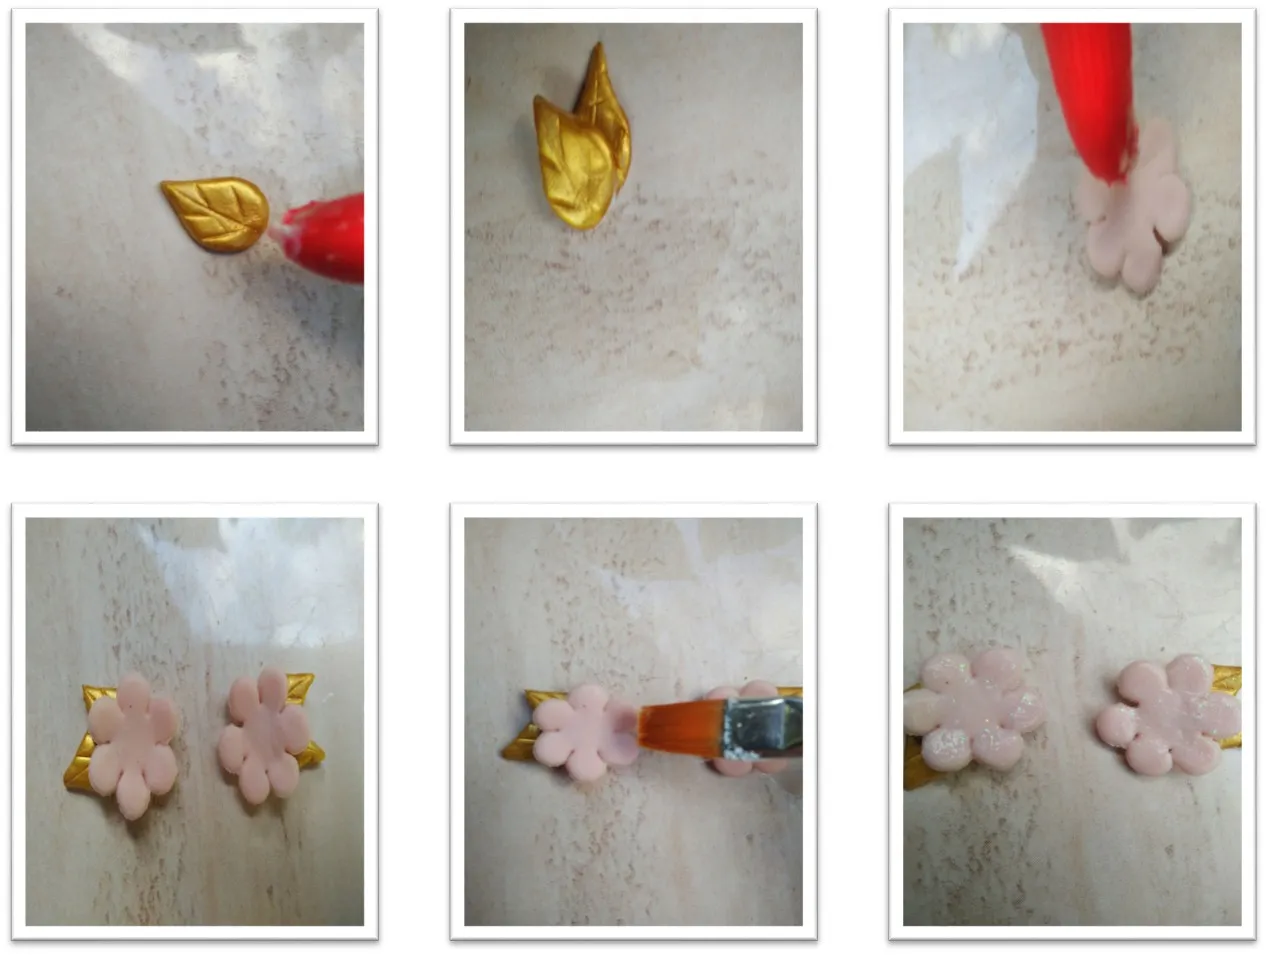
Paso 3
Realiza el mismo procedimiento del paso 2, pero esta vez con la masa flexible blanca; luego, coloca el cortador de hoja grande sobre la masa para así extraer tres hojas. Con la ayuda de la esteca de cuchilla ve realizando dos pequeños cortes por cada lado. Luego, con la misma esteca marca las nervaduras de las hojas. Por último, píntalas de dorado por ambas caras.
Step 3
Carry out the same procedure of step 2, but this time with the white flexible mass; then, place the large blade cutter over the dough to remove three sheets. With the help of the cutter, make two small cuts on each side. Then, with the same cutter, mark the veins of the leaves. Finally, paint them gold on both sides.
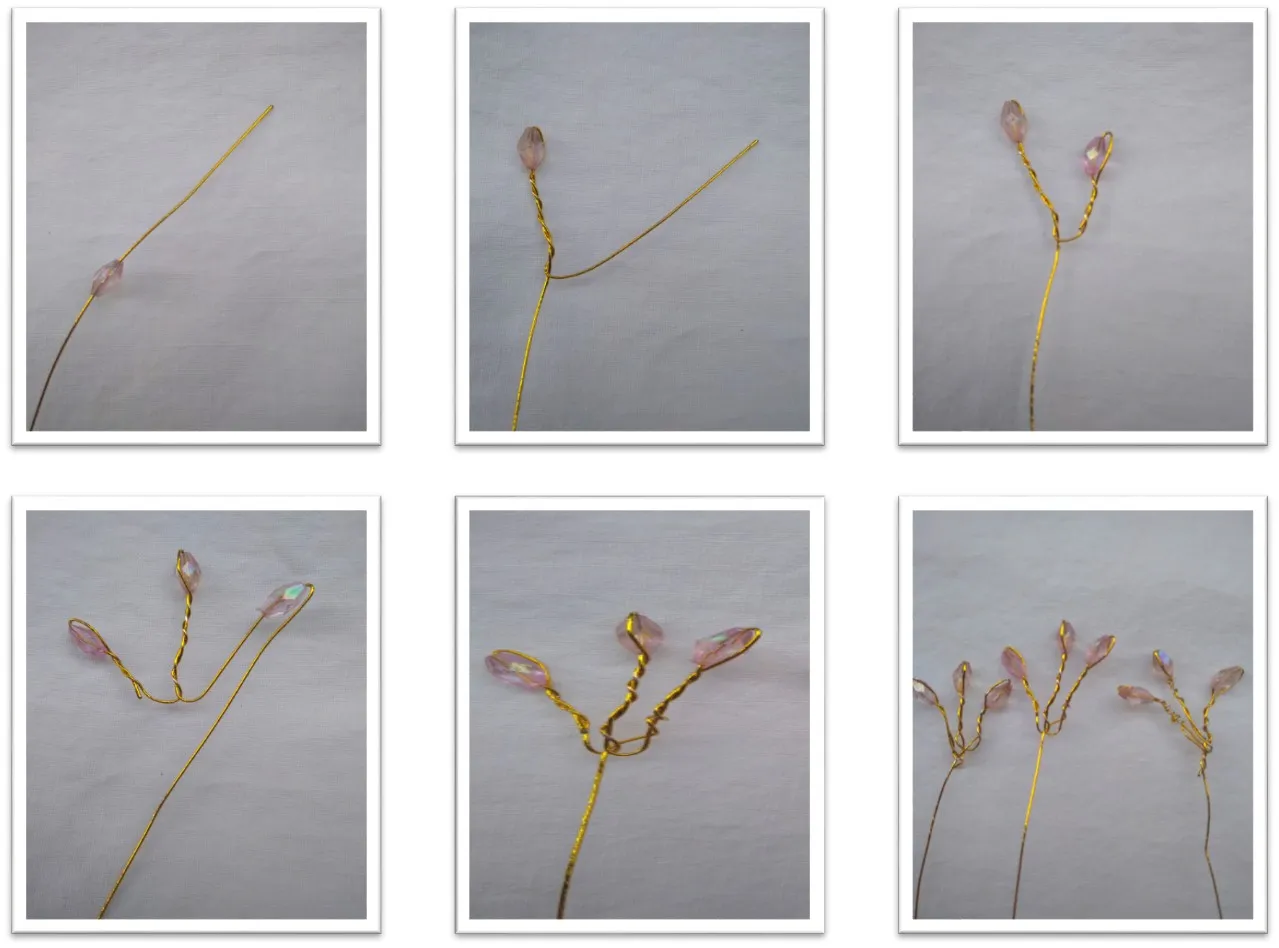
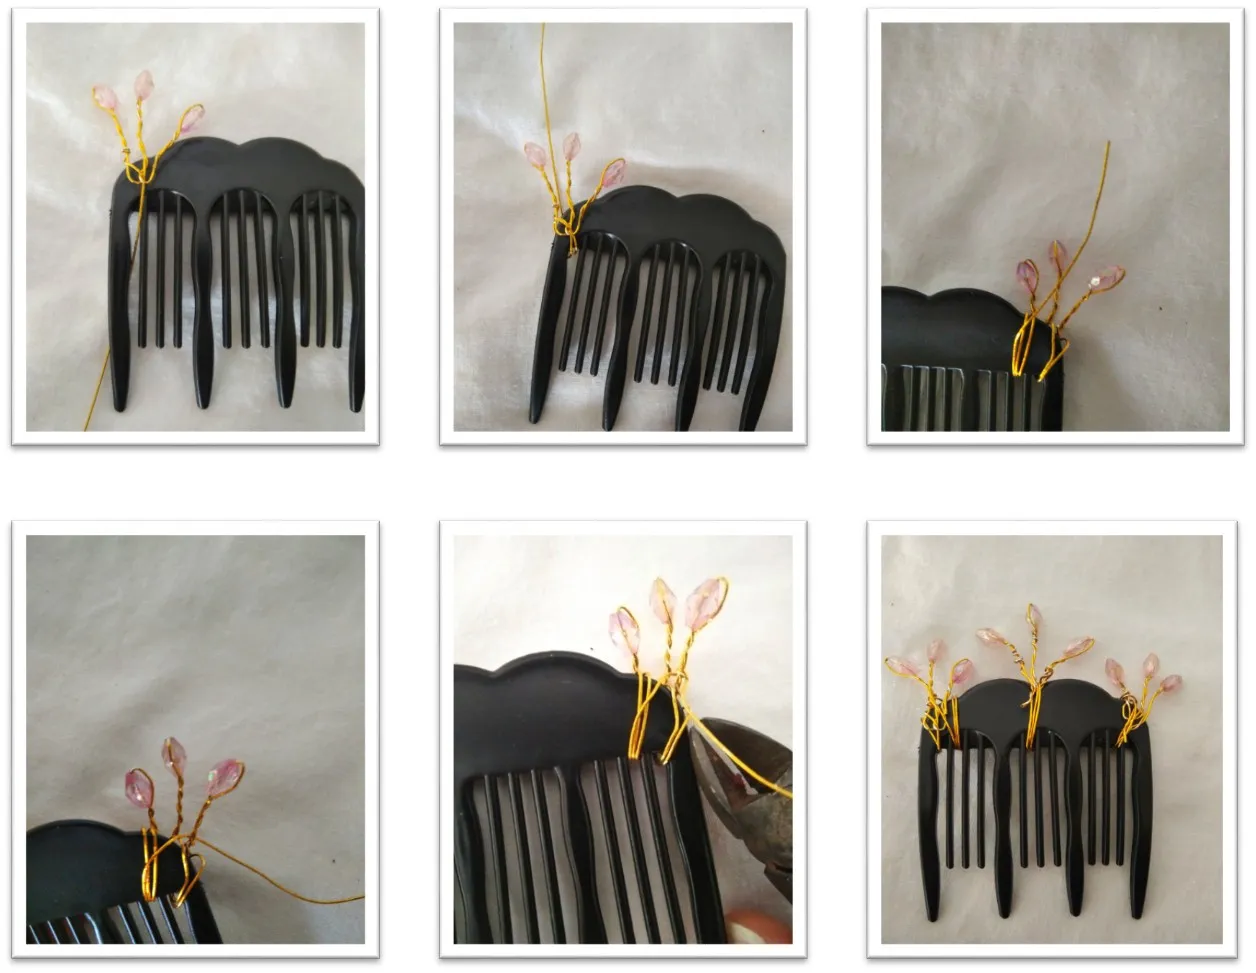
Paso 4
Para realizar las ramitas de cristal, toma el alambre e introdúcele una piedra rosada. Luego dobla el alambre y ve enroscando el mismo. Hasta formar una ramita de tres espigas. (Repite este procedimiento dos veces más).
Step 4
To make the crystal twigs, take the wire and insert a pink stone into it. Then bend the wire and see twisting it. Until it forms a twig with three spikes. (Repeat this procedure two more times).
Paso 5
Toma la ramita de cristal y colócala al principio de la peineta. Luego, ve enrollando el alambre en la misma. Asegura el alambre y corta con la tenaza (repite este procedimiento dos veces más con las ramitas restantes).
Step 5
Take the glass twig and place it at the beginning of the comb. Then, go winding the wire in it. Secure the wire and cut with the plier (repeat this procedure two more times with the remaining twigs).
Paso 6
Coloca pega en las hojas luego, pégalas encima de los alambres para taparlos. Seguidamente, pega en la parte superior las flores pequeñas. Y, luego pega debajo de estas las flores más grandes.
Step 6
Glue the leaves then glue them on top of the wires to cover them. Next, glue the small flowers on top. And then glue the larger flowers under these.
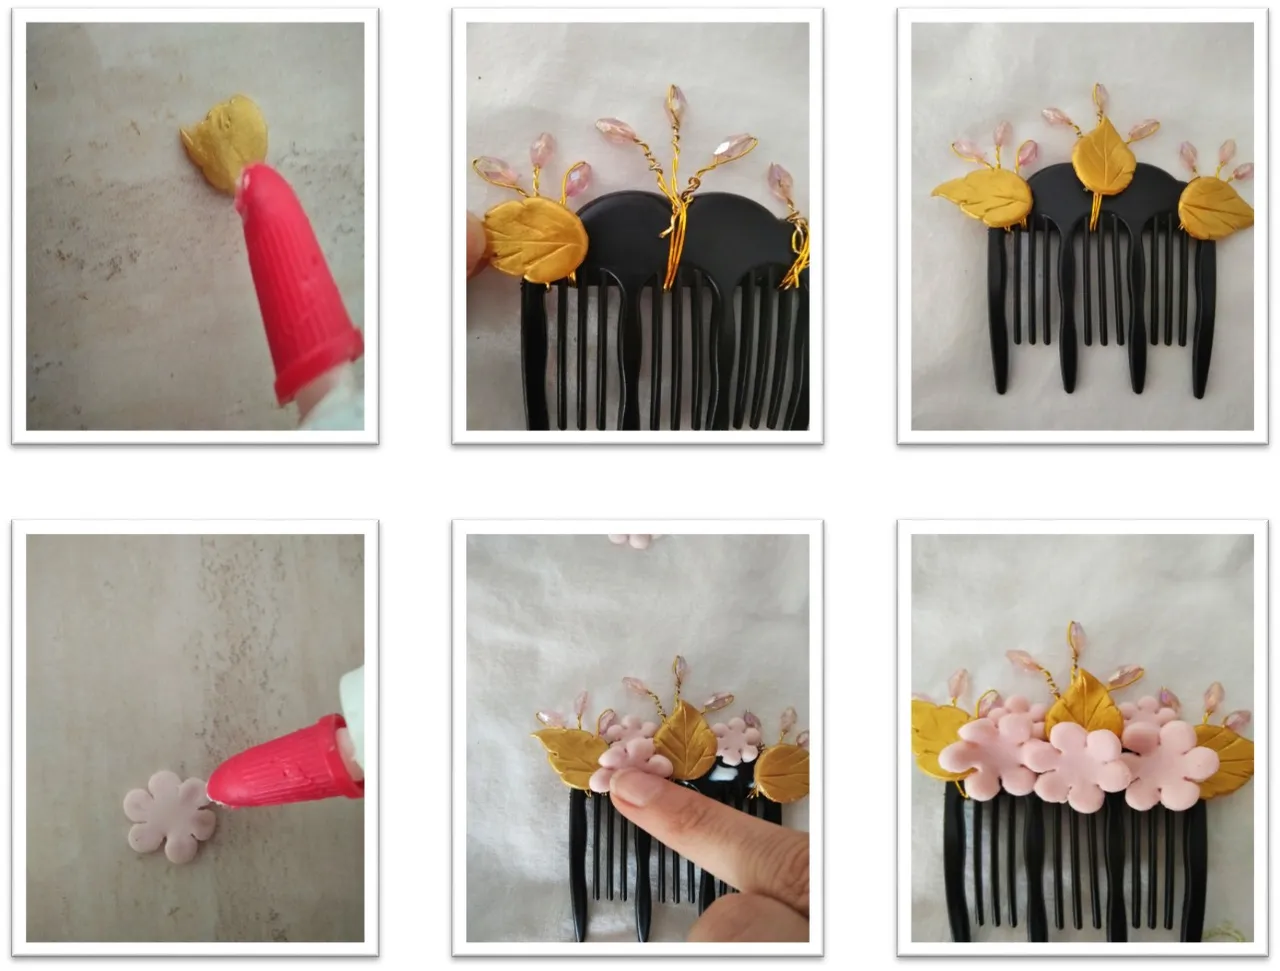
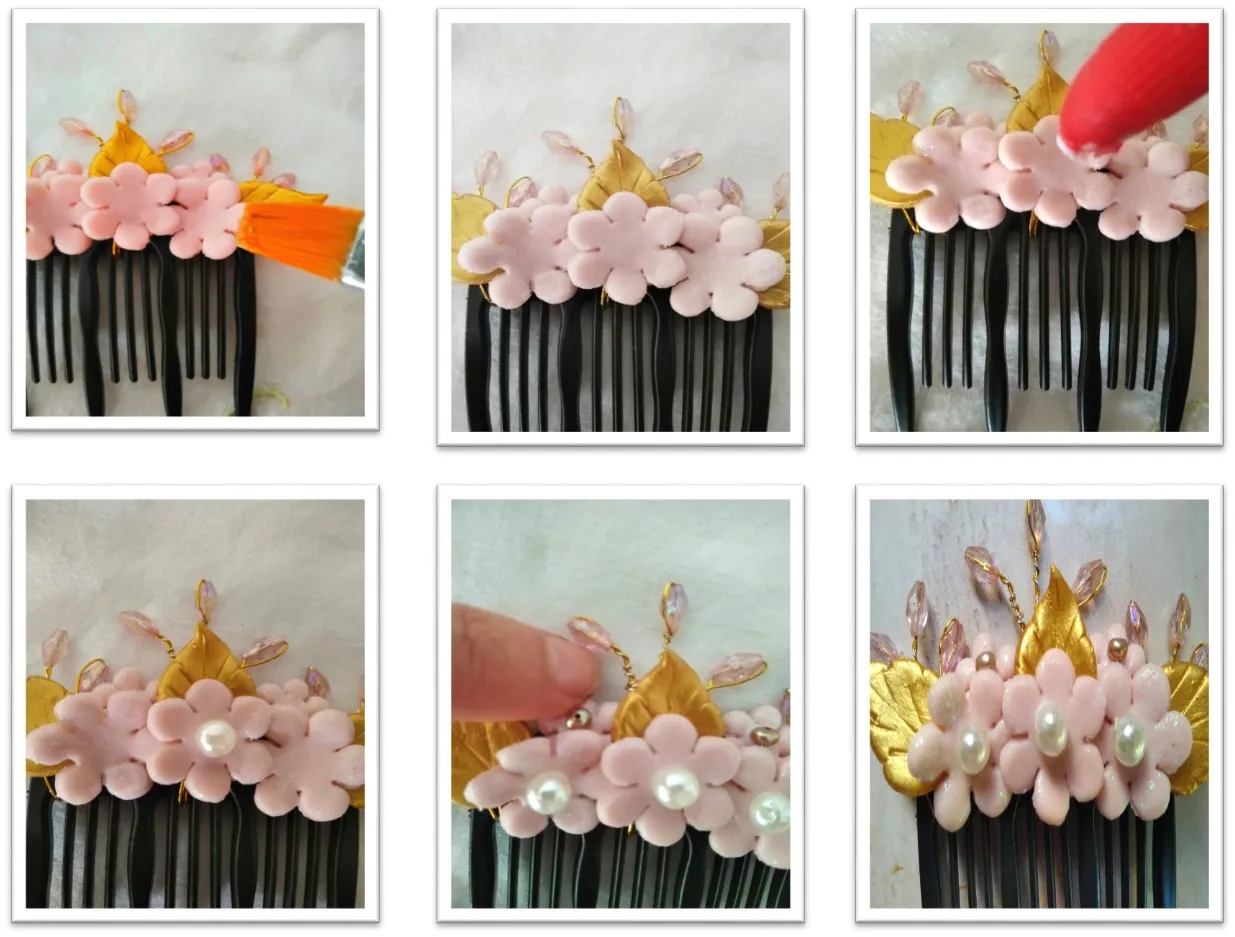
Paso 7
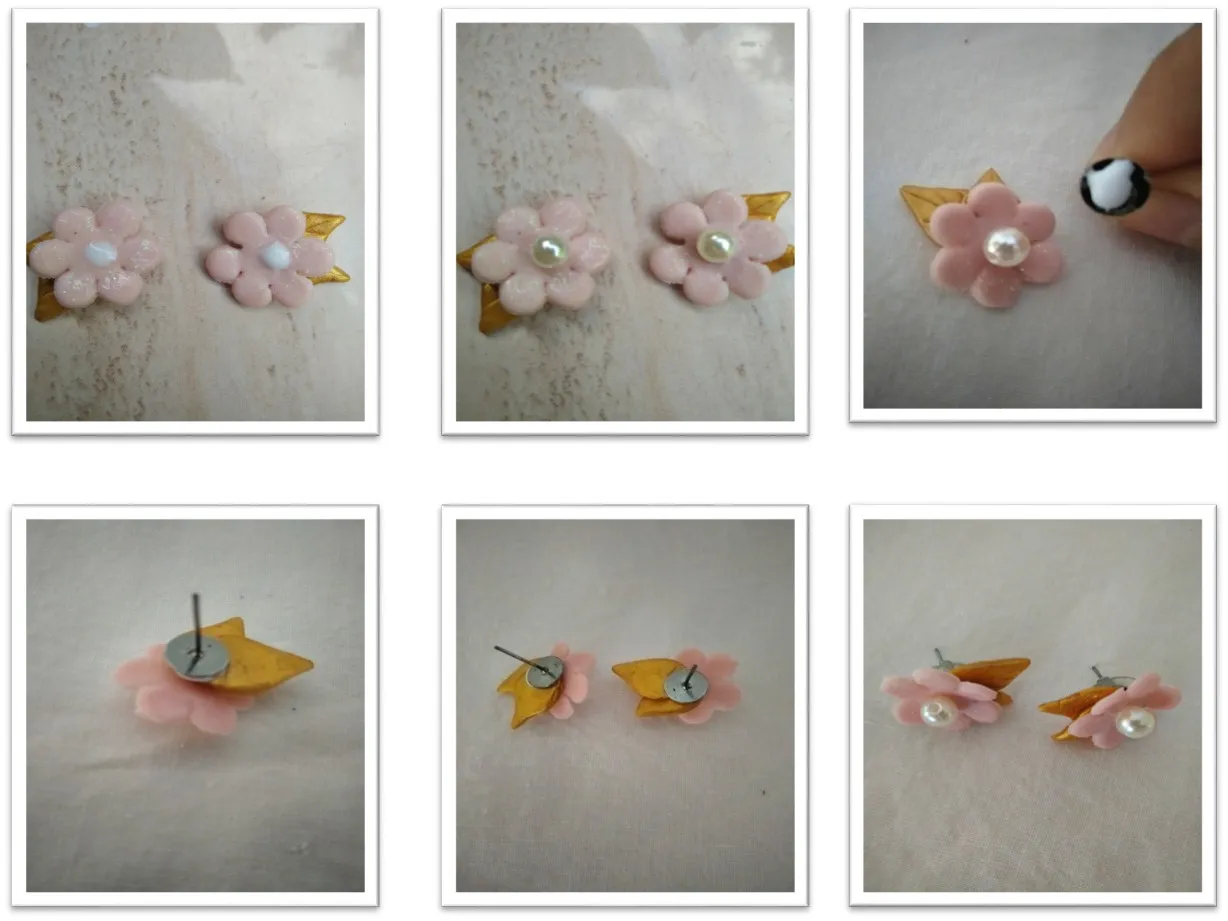
Aplica el gel brillante sobre las flores. Luego, pega las perlas en el centro de las flores grandes y, las perlitas doradas en el centro de las flores pequeñas.
Step 7
Apply the glitter gel on the flowers. Then, glue the pearls in the center of the large flowers and the golden pearls in the center of the small flowers.
Paso 8
Para realizar los pendientes, coloca la masa flexible blanca sobre la superficie y con la ayuda del rodillo extiéndela. Una vez extendida, coloca el cortador de hoja pequeña sobre la masa para así extraer cuatro hojas. Con la ayuda de la esteca forma las nervaduras de las hojas. Por último, píntalas de dorado por ambas caras.
Step 8
To make the earrings, place the white flexible mass on the surface and with the help of the roller spread it out. Once rolled out, place the small blade cutter over the dough to remove four sheets. With the help of the cutter, it forms the veins of the leaves. Finally, paint them gold on both sides.
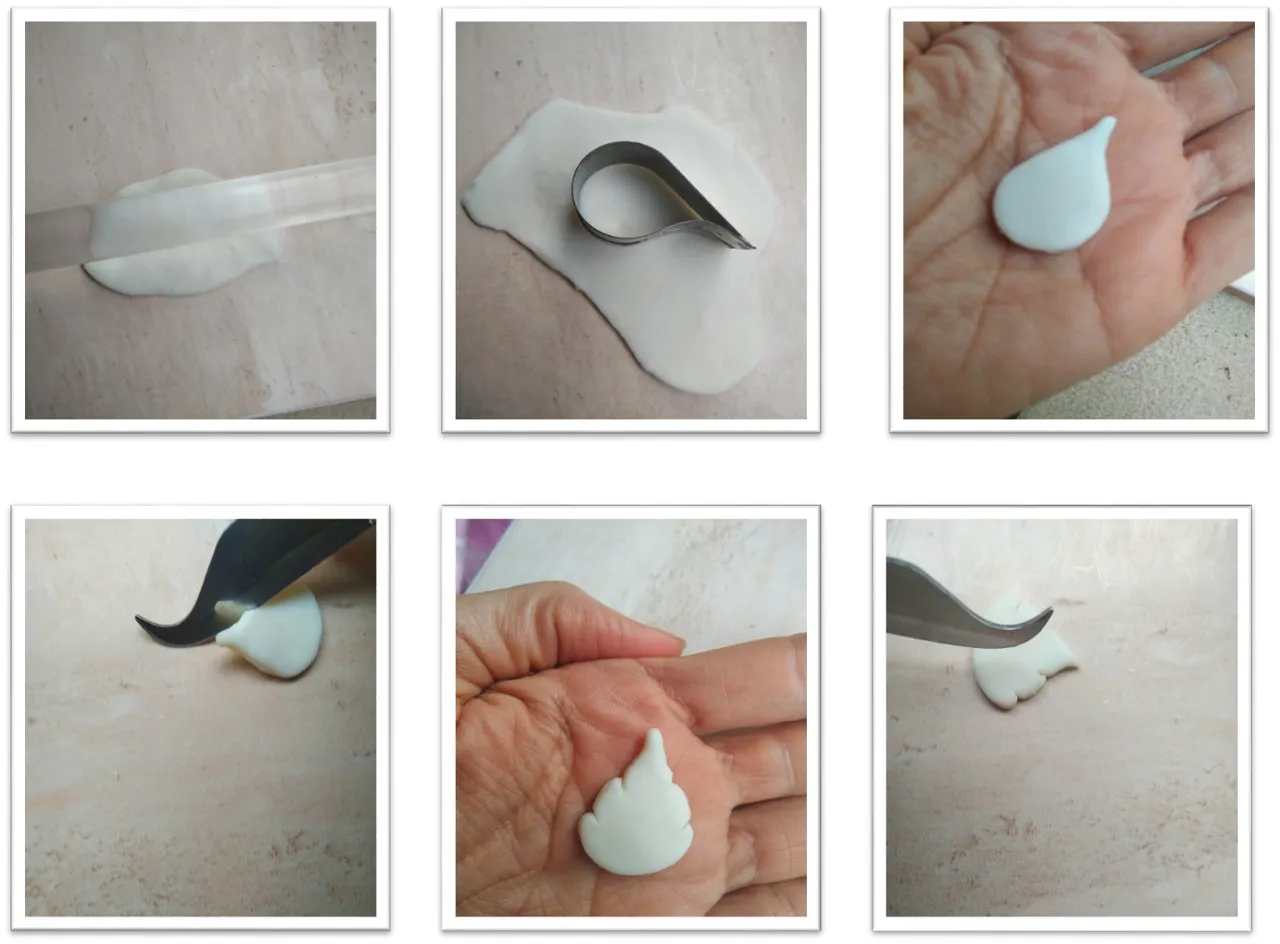
Paso 9
Pega dos hojas y luego pega encima de ellas la flor. Aplica el gel escarchado sobre la flor. Luego, pega la perla en el centro de la misma. Deja secar por completo, una vez seca las piezas procede a pegar la base del pendiente.
Step 9
Paste two leaves and then paste the flower on top of them. Apply the frosty gel on the flower. Then, glue the pearl in the center of it. Let it dry completely, once the pieces are dry, proceed to glue the cup post of the earring.
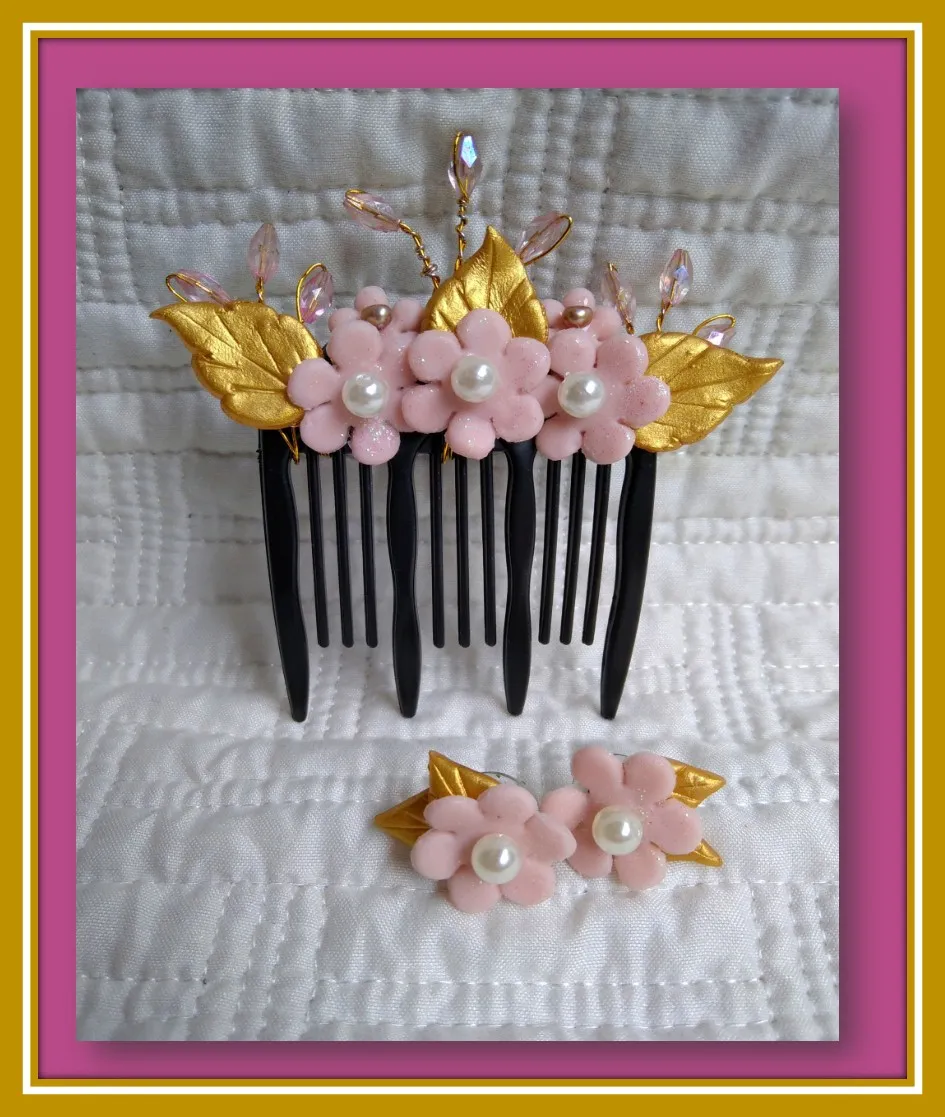

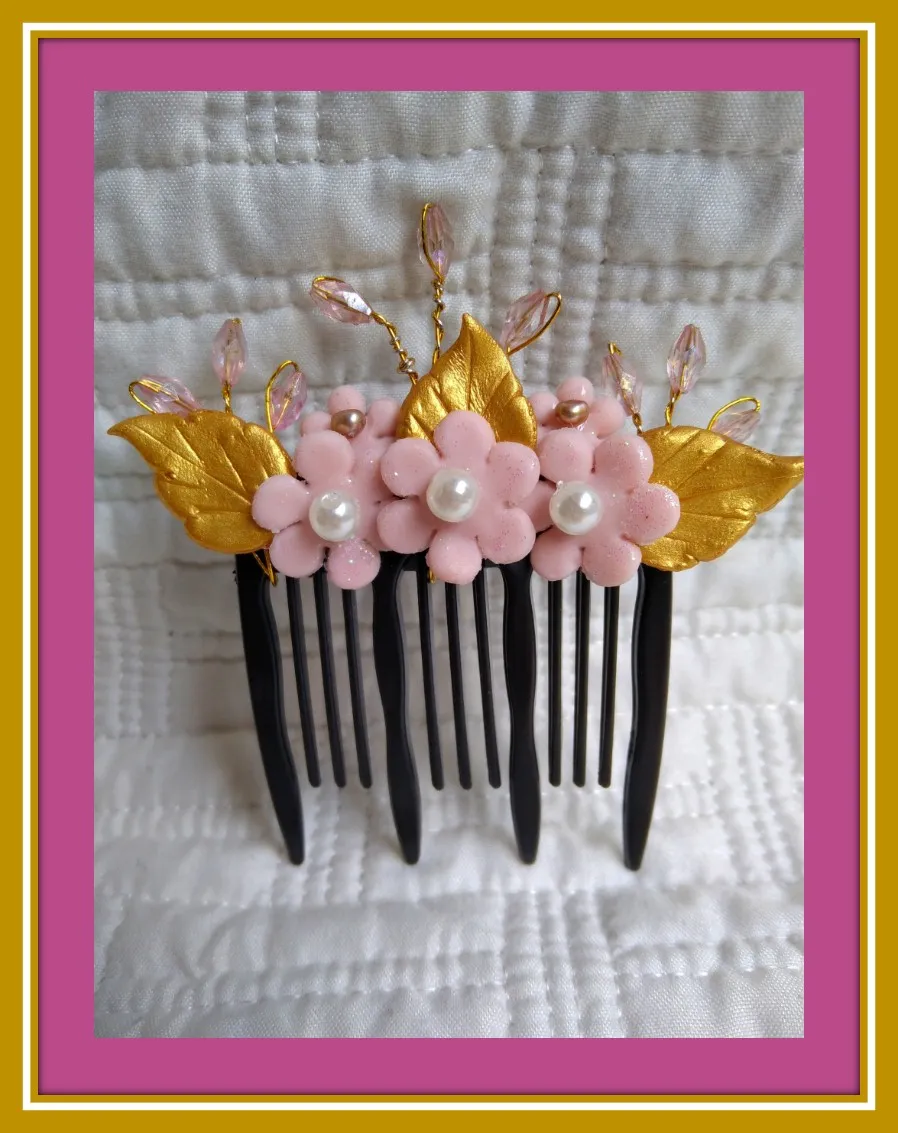
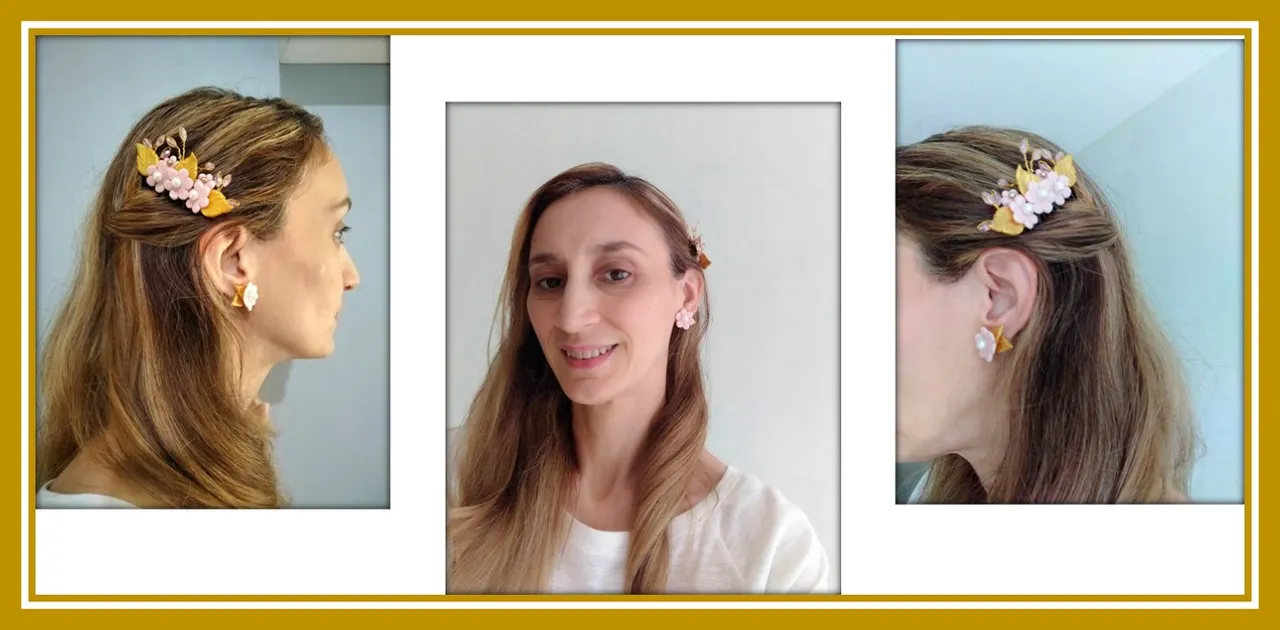
El resultado final es una combinación de pendientes y peineta muy bonitos y delicados, ideal para un peinado semi recogido, medio moño o de costado. Los colores utilizados combinan muy bien con las piedras. Tienes la opción de utilizar los colores de tu preferencia a la hora de realizar este proyecto. Espero se animen a realizar este paso a paso. ¡Hasta una próxima oportunidad!
The end result is a combination of very pretty and delicate earrings and a comb, ideal for a semi-collected hairstyle, a half bun or on the side. The colors used combine very well with the stones. You have the option of using the colors of your preference when carrying out this project. I hope you will be encouraged to carry out this step by step. See you soon!
Las fotografías fueron tomadas por mí con mi teléfono celular Redmi Note 8.
Utilicé el programa Microsoft Power point
Traducción: Google Translation
The images were taken by me with my Redmi Note 8 cell phone.
Translation: Google Translation
I used the program Microsoft Power point