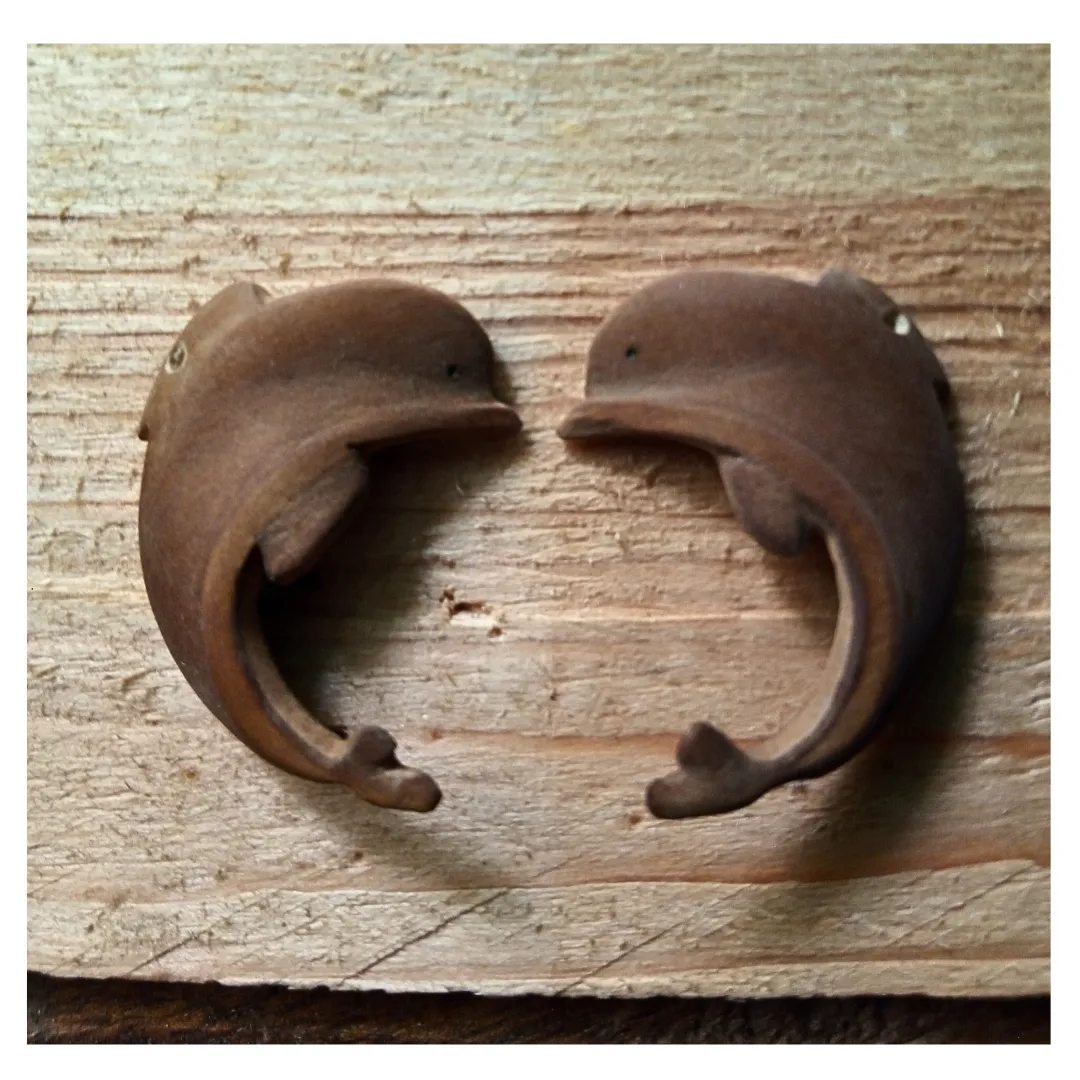
Saludos a la comunidad de artesanos orfebres y creadores de jewelry, por acá mi primera publicación en la comunidad, esta vez vengo con un tutorial de unos zarcillos aplicando un poco la talla en madera serán unos delfines hechos a partir de un fruto de un árbol llamado ceiba blanca o jabillo (Hura crepitans) y a su fruto le llamamos cachitos.
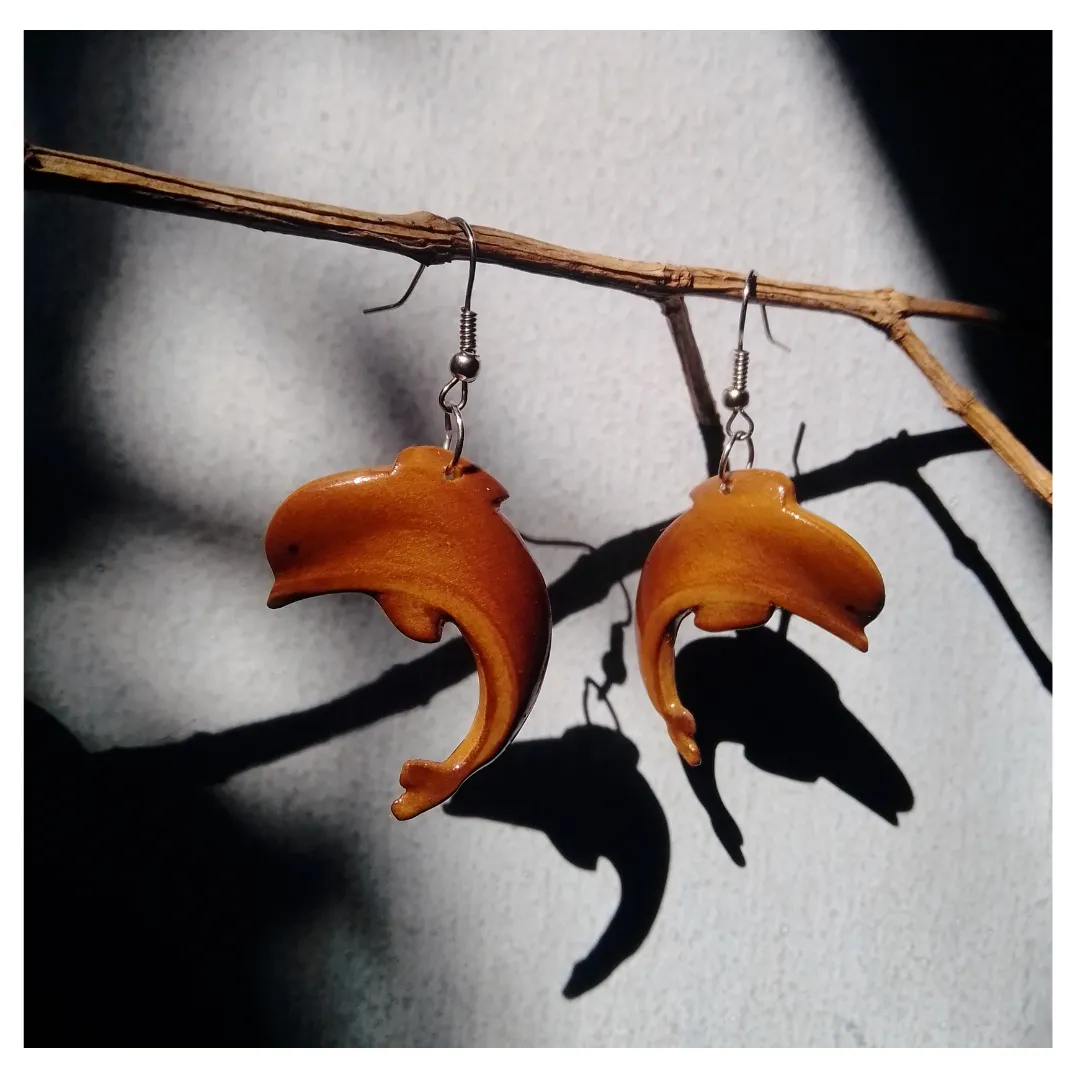
Con estos zarcillos recordé mis inicios en la artesanía los solía recolectar porque frente a la casa tenemos un árbol, tenía en ese entonces unos 13 años de edad y comenzaba a incursionar con el arte manual, su morfología nos regala la imagen de un delfín una luna nueva tal vez, así que la intervención de la misma será en tres puntos para lograr la forma total, debemos de buscar dos cachitos que vayan en diferente dirección para que así puedan lucir de manera equilibrada en ambas orejas.
- 2 Cachitos de jabillo (es necesario tener dos más)
- Lijas 80, 120,220
- Taladro y mecha de 1 mm
- sellador
- Barniz o esmalte de uñas
- cuchilla o cutter.
Paso 1

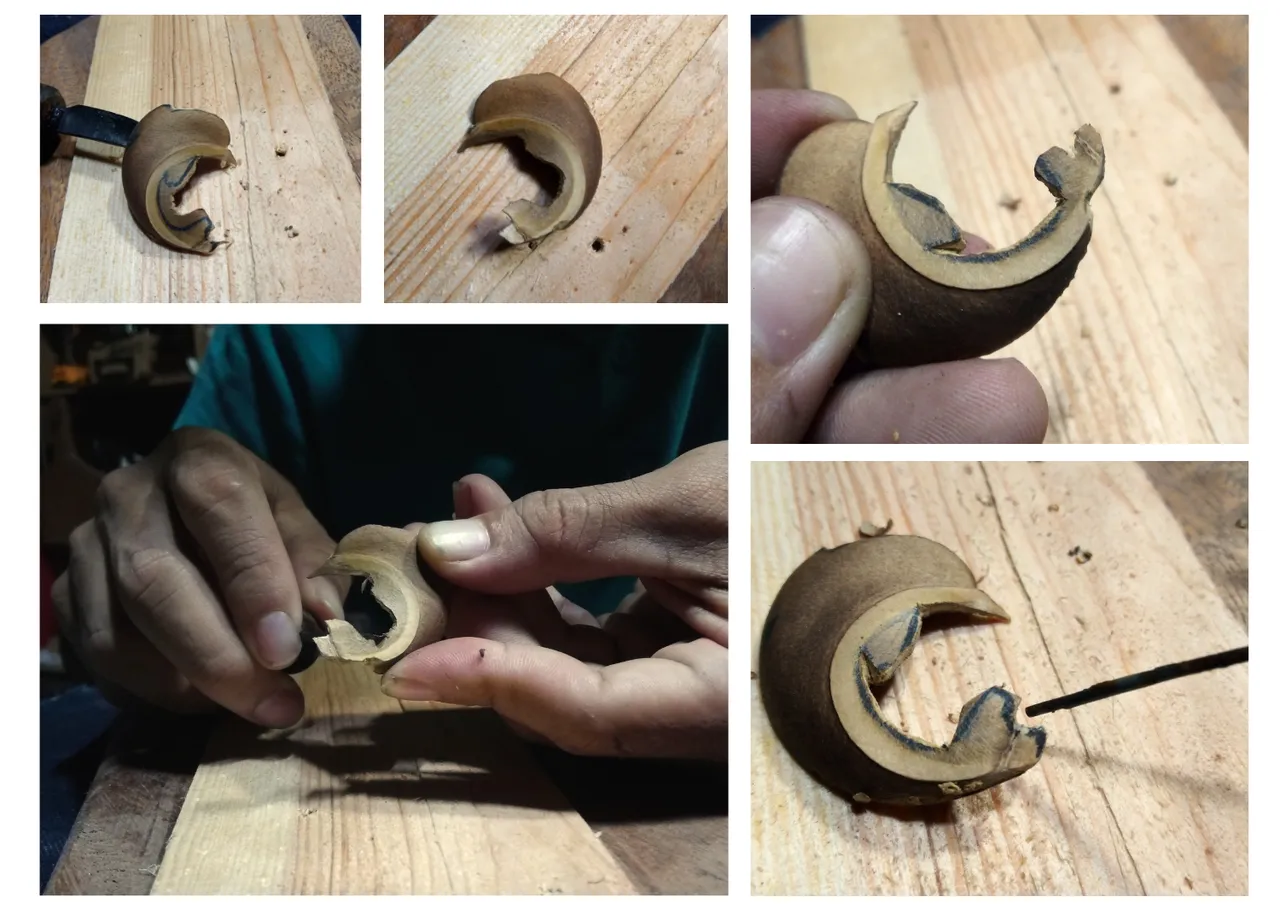
Una vez que tengamos los cachitos en nuestro banco, debemos de cerciorarnos de que estén en distinta dirección, como comentaba al principio, es decir, que queden frena frente las cabezas de ambos.
Paso 2
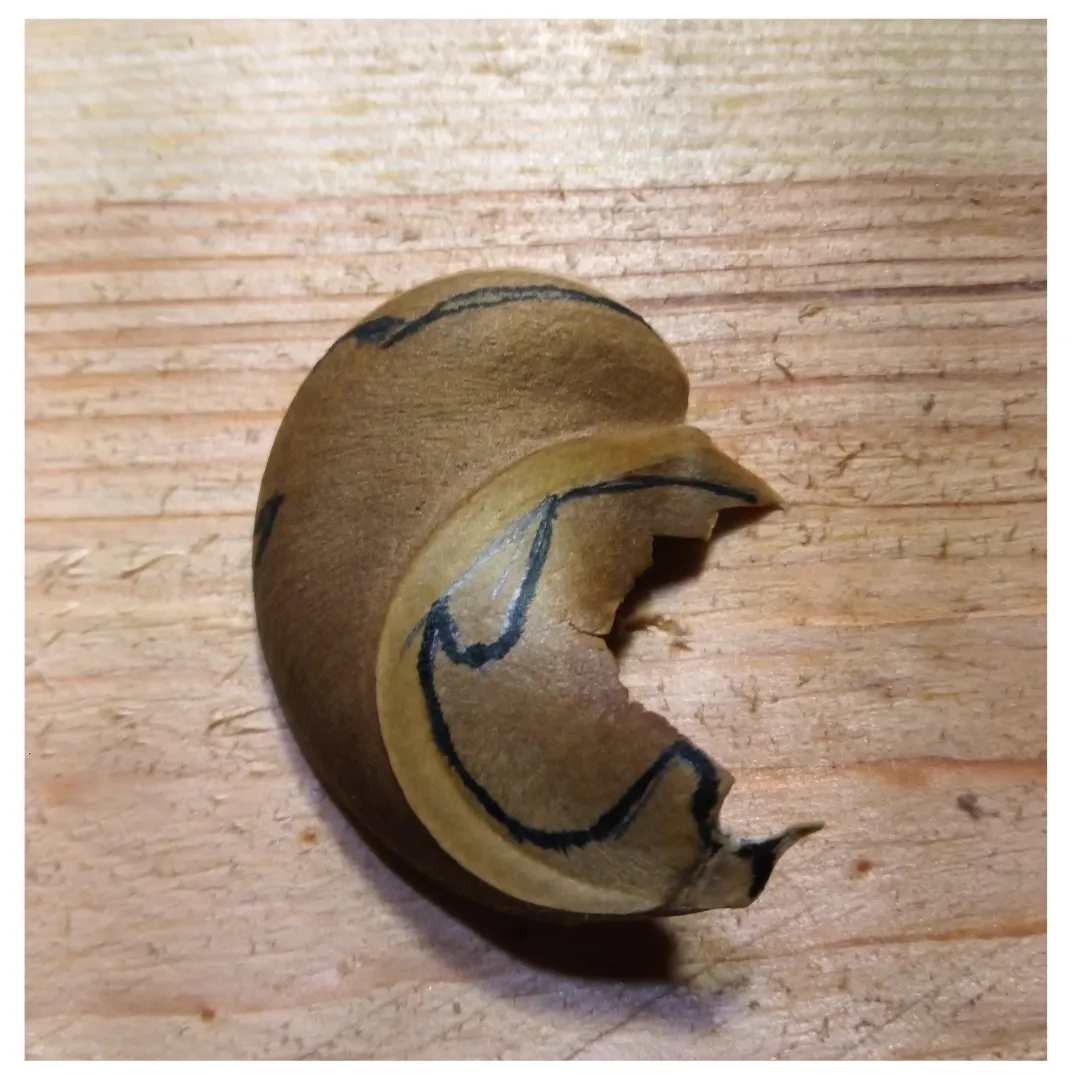
Dibujemos siguiendo la morfología del cachito, la silueta del delfín, es necesario dejar un poco de margen de error, ya que debemos de pensar que la lija va a rebajar un poco el material.
Paso 3
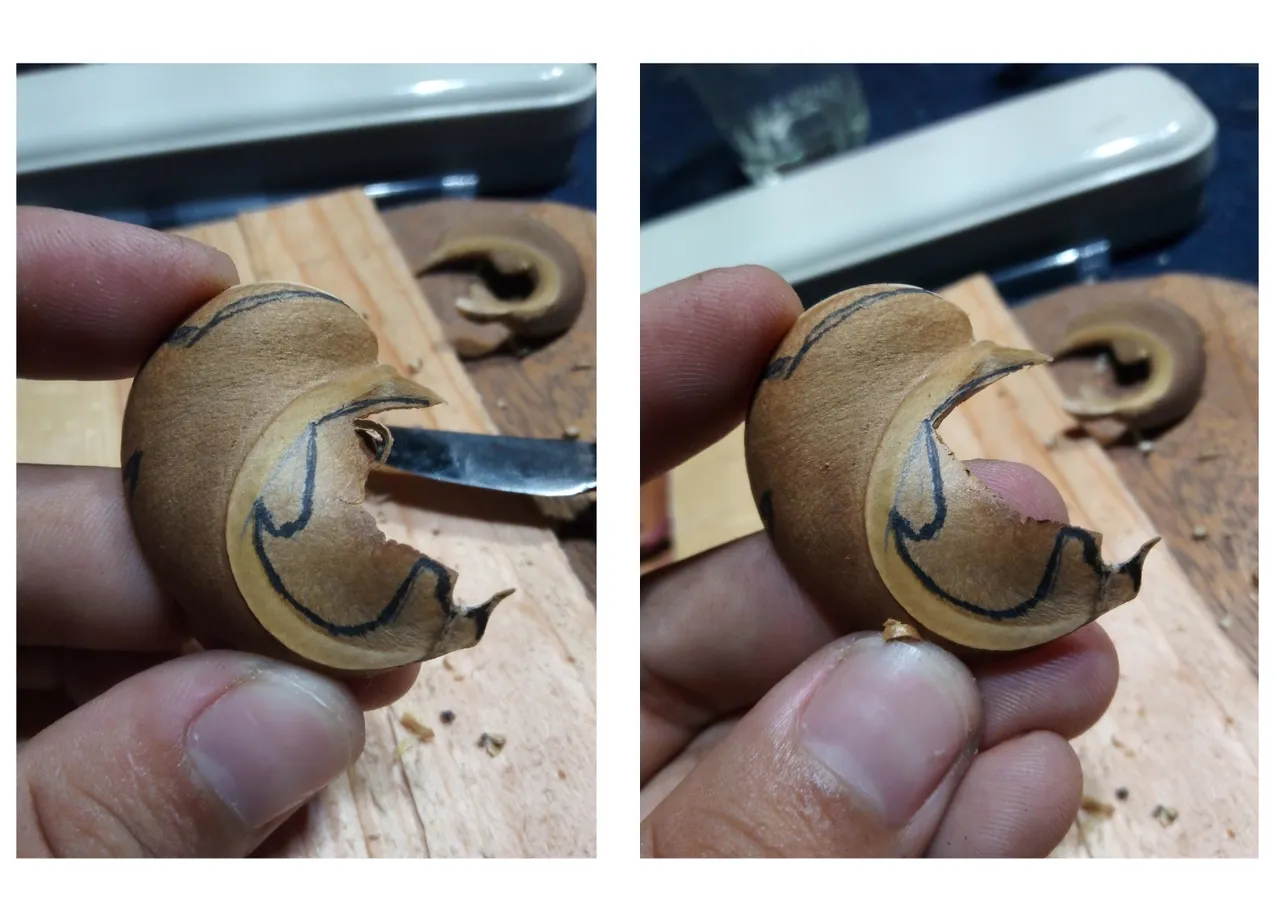
Acá podemos ir comenzando por el pico del delfín yendo siempre por el borde de la línea y con cuidado, con este material debemos de ir con cuidado e ir conociendo las fibras, pues esta parte de la concha es muy fina y frágil.
Paso 4
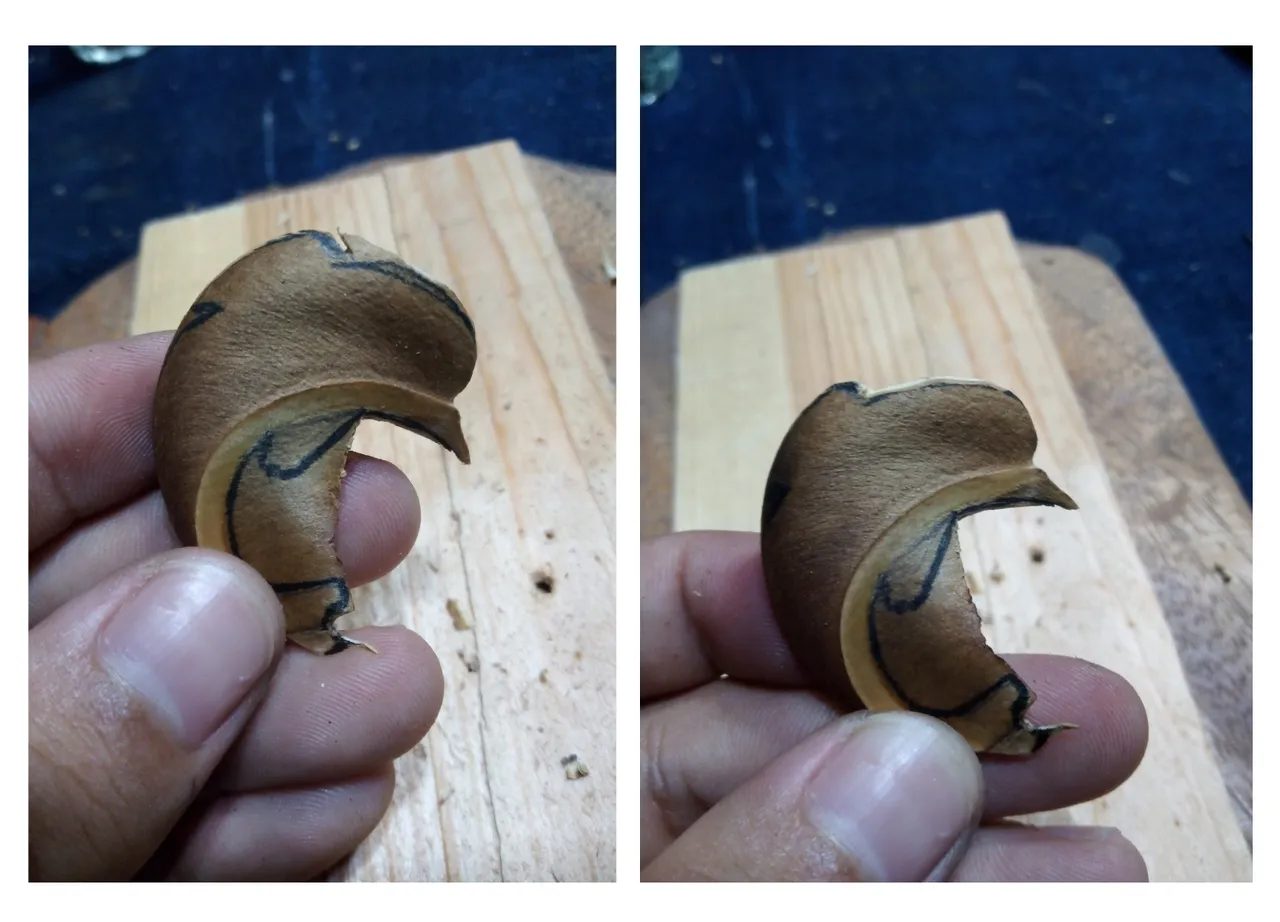
Ahora pasemos a definir la parte superior de la cabeza para ir sacando el volumen de la aleta dorsal, podemos hacer la línea con una cierra fina o segueta para generar la línea.
Paso 5
Regresemos de nuevo a la parte frágil de la pieza, y seguimos tallando esta vez la aleta, ya que esta nos va dando el carácter único del delfín, recuerdo cuando hice los primeros eran sin estas características, al ir tallando seguimos la curva hasta llegar a las aletas traseras (lóbulos caudales)
| Nota: tomen en cuenta el estudio de las fibras, ya que si usamos la cuchilla en contra, esta podría desprenderse fácilmente y de hacerlo no debemos de tallar tan bruscamente a menos que queramos quitar material de manera más rápida. |
Paso 6
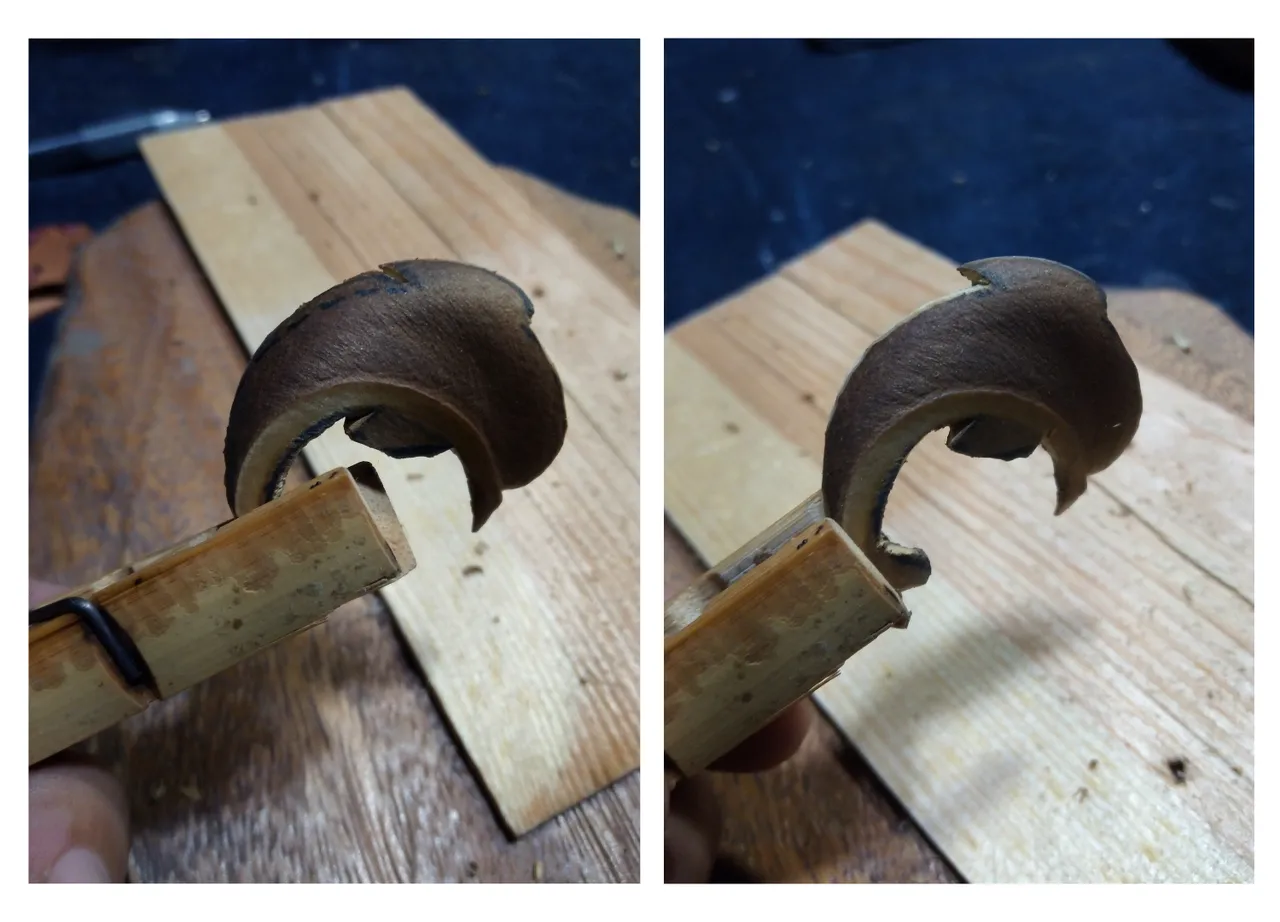
Regresemos a la aleta dorsal, repetimos parte del proceso 4 y vamos tallando, esta parte de la pieza es madera más dura, así que estemos atento, es conveniente tener una buena cuchilla para que así el trabajo sea mucho más limpio y rápido.
Paso 7
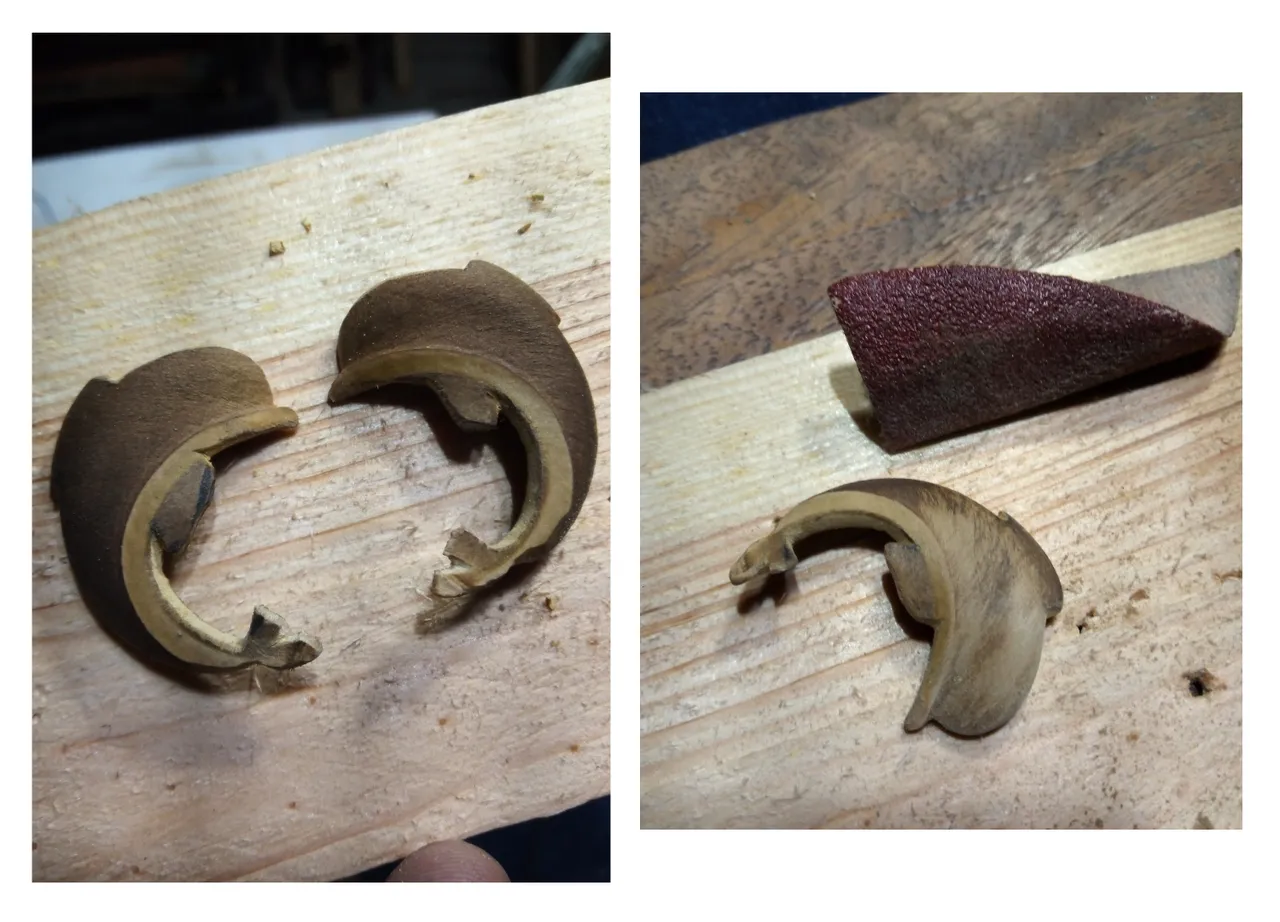
De esta manera logramos esbozar esta figura tan particular, ahora estilicemos los bordes con lija y al igual todo el cuerpo porque los cachitos vienen recubiertos con una materia oscura es algo muy sutil y con pocas pasadas descubrimos la superficie, también podemos saltarnos este paso y dejarla con ese aspecto muy particular y natural.
Paso 8
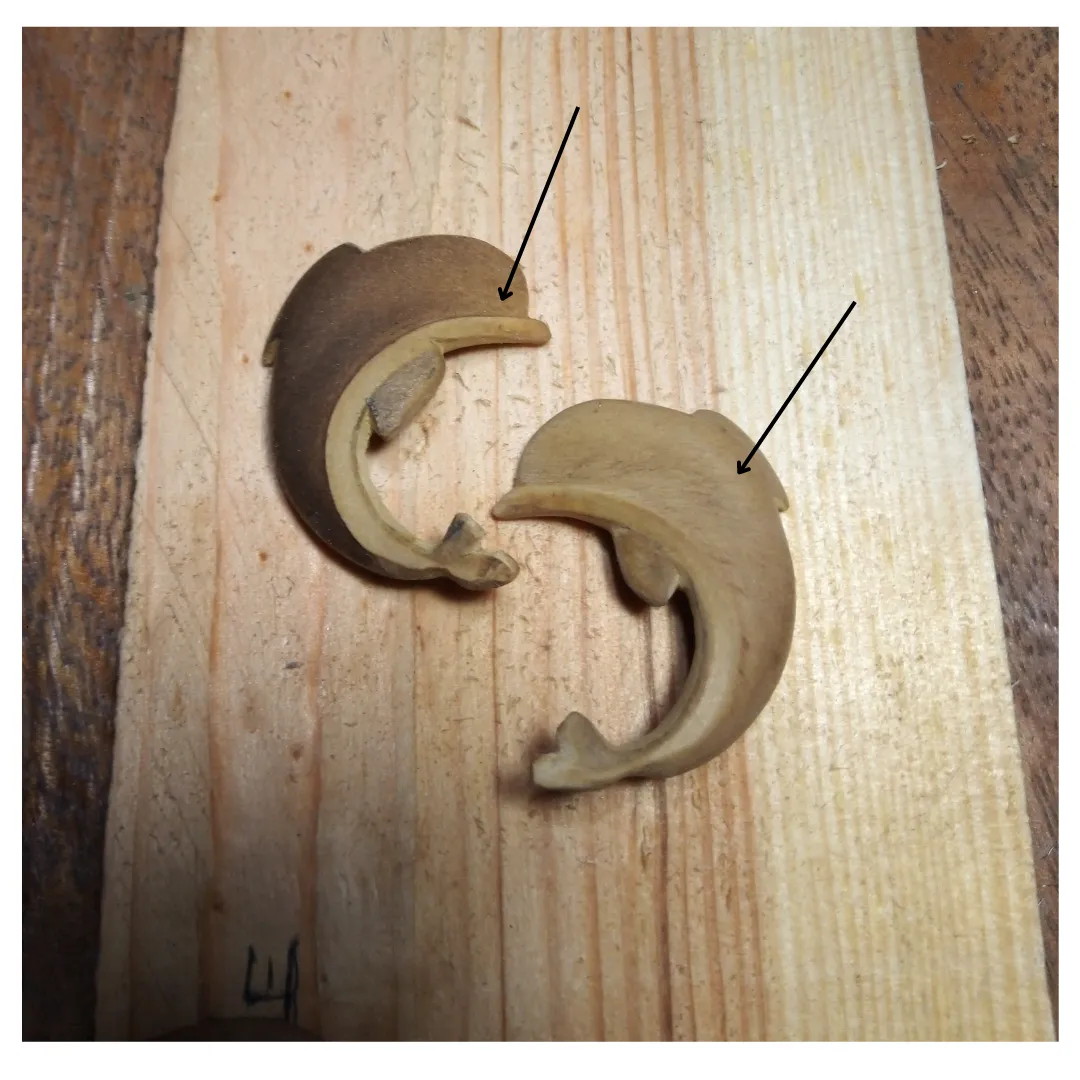
Acá ya estamos culminando, lo que debemos de hacer es calentar un clavo y marcar los ojos del delfín si tienes un cautín mucho mejor y luego abrimos la superficie donde irá la argolla.
Paso 9
Yo suelo usar en múltiples tareas artesanales, bicromato de potasio, este componente químico actúa ante la madera y da un envejecido, así que diluí un poco y lo aplique para oscurecer medio tono, luego le aplique sellador y posterior el barniz.
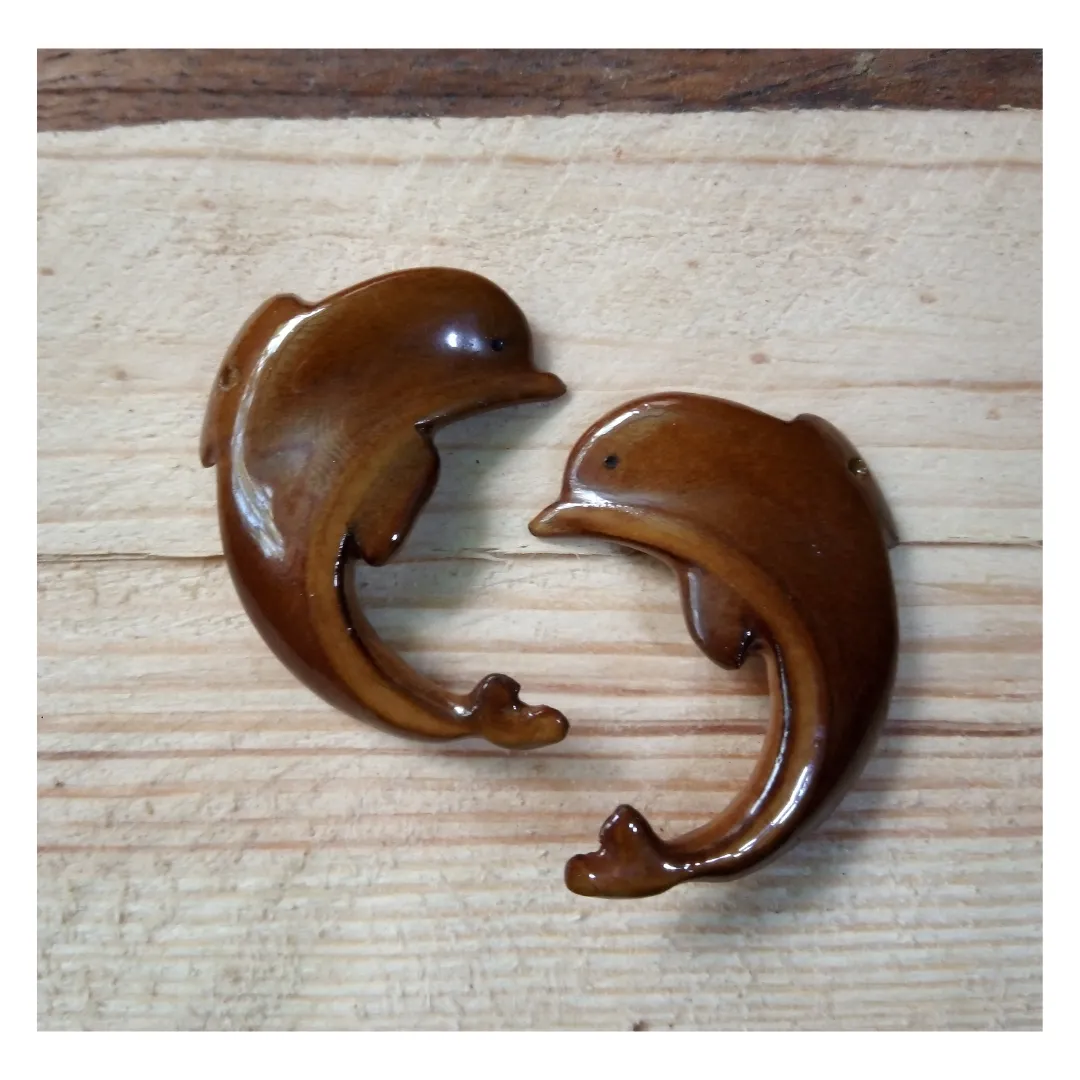
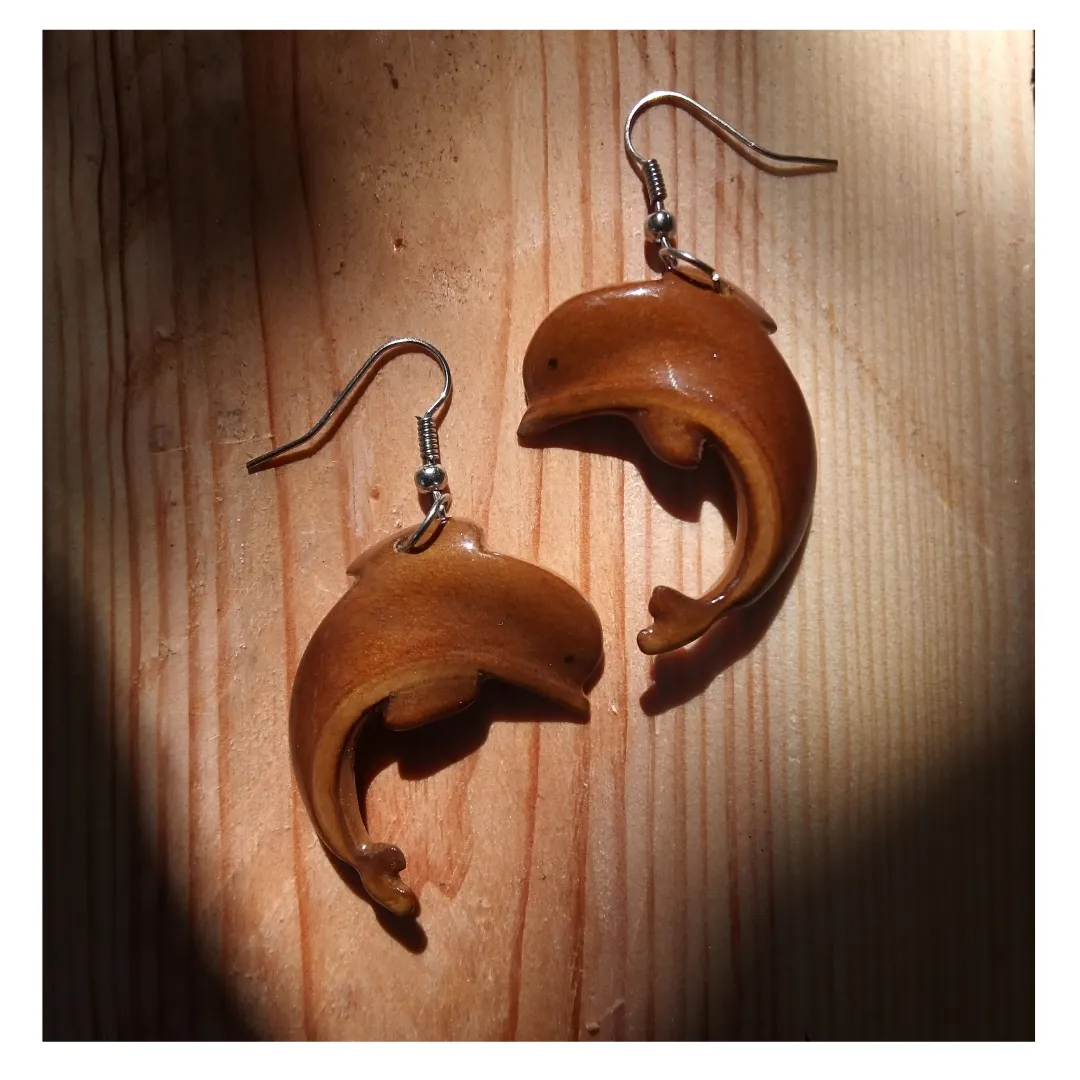
De esta manera se culmina este par de zarcillos playeros y citadinos, más que una talla en madera fue una intervención de un objeto natural, ya el creador transforma con sus manos la materia encontrada, de eso se trata la artesanía, pues sigamos creando y compartiendo buenas ideas.
Me despido y espero que sea de provecho este contenido, muchas gracias por leer, si tienen alguna sugerencia o duda estoy atento a los comentarios y si desean hacer algún pedido o adquirir algún trabajo de los que hago pueden contactarme, hasta una próxima publicación.

- Fotografías tomadas desde mi celular
- texto traducido en deelp
- Edición de imágenes en canva
English version
Greetings to the community of artisans goldsmiths and creators of jewelry, here is my first publication in the community, this time I come with a tutorial of some tendrils applying a little wood carving will be some dolphins made from a fruit of a tree called white ceiba or jabillo (Hura crepitans) and its fruit we call cachitos.
With these tendrils I remembered my beginnings in the craftsmanship I used to collect them because in front of the house we have a tree, at that time I was about 13 years old and I was beginning to dabble with the manual art, its morphology gives us the image of a dolphin a new moon perhaps, so the intervention of the same will be in three points to achieve the total form, we must look for two cachitos that go in different direction so that they can look in a balanced way in both ears.
- 2 Jabillo cubes (it is necessary to have two more)
- Sandpaper 80, 120, 220
- Drill and 1 mm drill bit
- Sealer
- Varnish or nail polish
- blade or cutter.
Step 1
Once we have the pieces in our bench, we must make sure that they are in different directions, as I mentioned at the beginning, that is, that the heads of both are facing each other.
Step 2
Draw the dolphin silhouette following the morphology of the dolphin.
Let's draw following the morphology of the dolphin's silhouette, it is necessary to leave a little margin of error, since we must think that the sandpaper is going to be used to draw the dolphin's silhouette.
Step 3
Draw the dolphin's silhouette.
Here we can start with the dolphin's beak always going along the edge of the line and carefully, with this material we must be careful and get to know the fibers, because this part of the shell is very thin and fragile.
Step 4
Now let's define the top of the head to get the volume of the dorsal fin, we can make the line with a fine scissors to generate the line.
Step 5
Let's go back to the fragile part of the piece, and continue carving this time the fin, as this will give us the unique character of the dolphin, I remember when I made the first ones they were without these characteristics, as we carve we follow the curve until we reach the rear fins (caudal lobes).
| Note: take into account the study of the fibers, because if we use the blade against, this could easily come off and if we do so we should not carve so sharply unless we want to remove material more quickly. |
Step 6
Back to the dorsal fin.
Let's go back to the dorsal fin, repeat part of the process 4 and go carving, this part of the piece is harder wood, so be careful, it is convenient to have a good blade so that the work is much cleaner and faster.
Step 7
In this way we managed to outline this particular figure, now we stylize the edges with sandpaper and the same all the body because the pieces are covered with a dark matter is something very subtle and with a few passes we discover the surface, we can also skip this step and leave it with that very particular and natural look.
Step 8
Here we are finishing, what we must do is to heat a nail and mark the eyes of the dolphin if you have a soldering iron much better and then open the surface where the ring will go.
Step 9
I usually use in multiple crafts, potassium bichromate, this chemical component acts on the wood and gives an aged, so I diluted a little and apply it to darken half a tone, then apply sealer and then the varnish.
This is the end of this pair of beach and city tendrils, more than a wood carving was an intervention of a natural object, and the creator transforms with his hands the material found, that's what craftsmanship is all about, so let's keep creating and sharing good ideas.
I say goodbye and I hope this content is of benefit, thank you very much for reading, if you have any suggestions or questions I am attentive to the comments and if you wish to place an order or purchase any of the work I do you can contact me, until a future publication.
- Photographs taken from my cell phone
- Text translated in deelp
- Image editing in canva