Hello to all HIVE friends especially this community of #JELWERY, it is a great pleasure for me to greet all the artists I hope you are very well with your loved ones, today I will share a beautiful bracelet made with pearls, I made it to my daughter-in-law who told me to make an accessory for a friend who is going to have a birthday and I as I am dedicated to make jewelry to make a bracelet that her friend likes and so I took the opportunity to do the step by step. So I got down to work and started making this model that I had already seen on Facebok and I looked for it but I couldn't find it but I more or less remembered the steps.
MATERIALES A UTILIZAR:
MATERIALS TO BE USED:
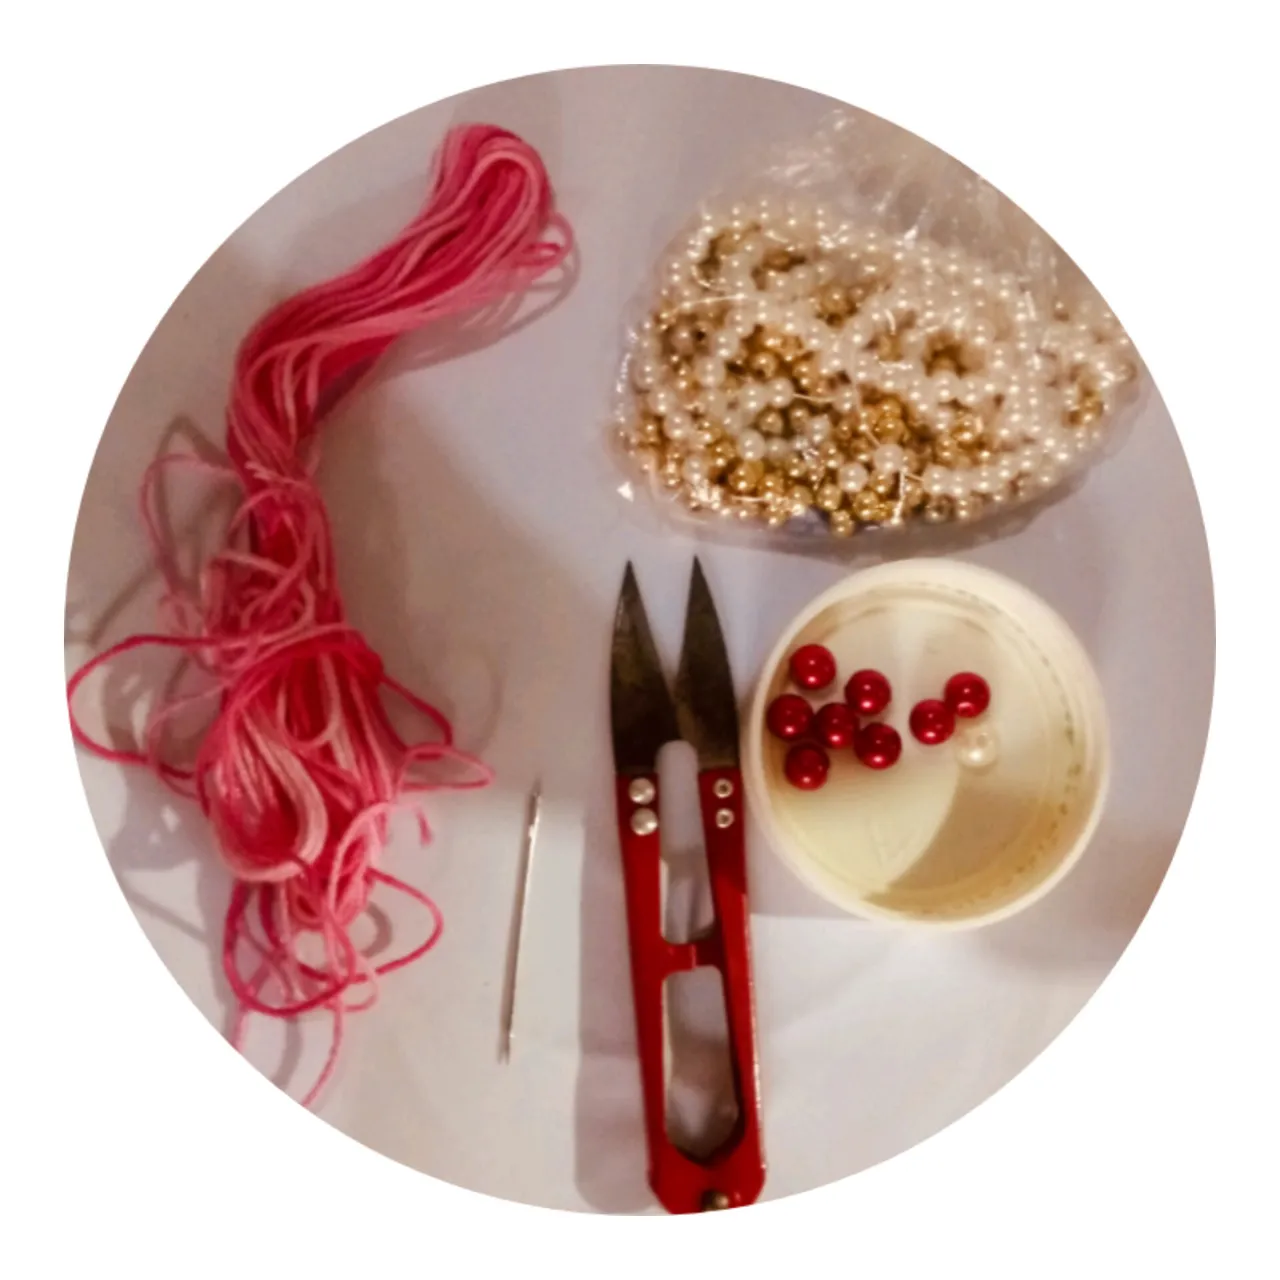
- Madeja de hilo de bordar matizado rosado
- Tijera
- Aguja de coser
- 6 Perlas medianas rojas y una blanca
- 20 perlas pequeñas blancas
- 2 perlas doradas.
- Skein of pink shaded embroidery floss
- Scissors
- Sewing needle
- 6 medium red pearls and one white pearl
- 20 small white pearls
- 2 golden pearls.
PROCEDIMIENTO:
PROCEDURE:
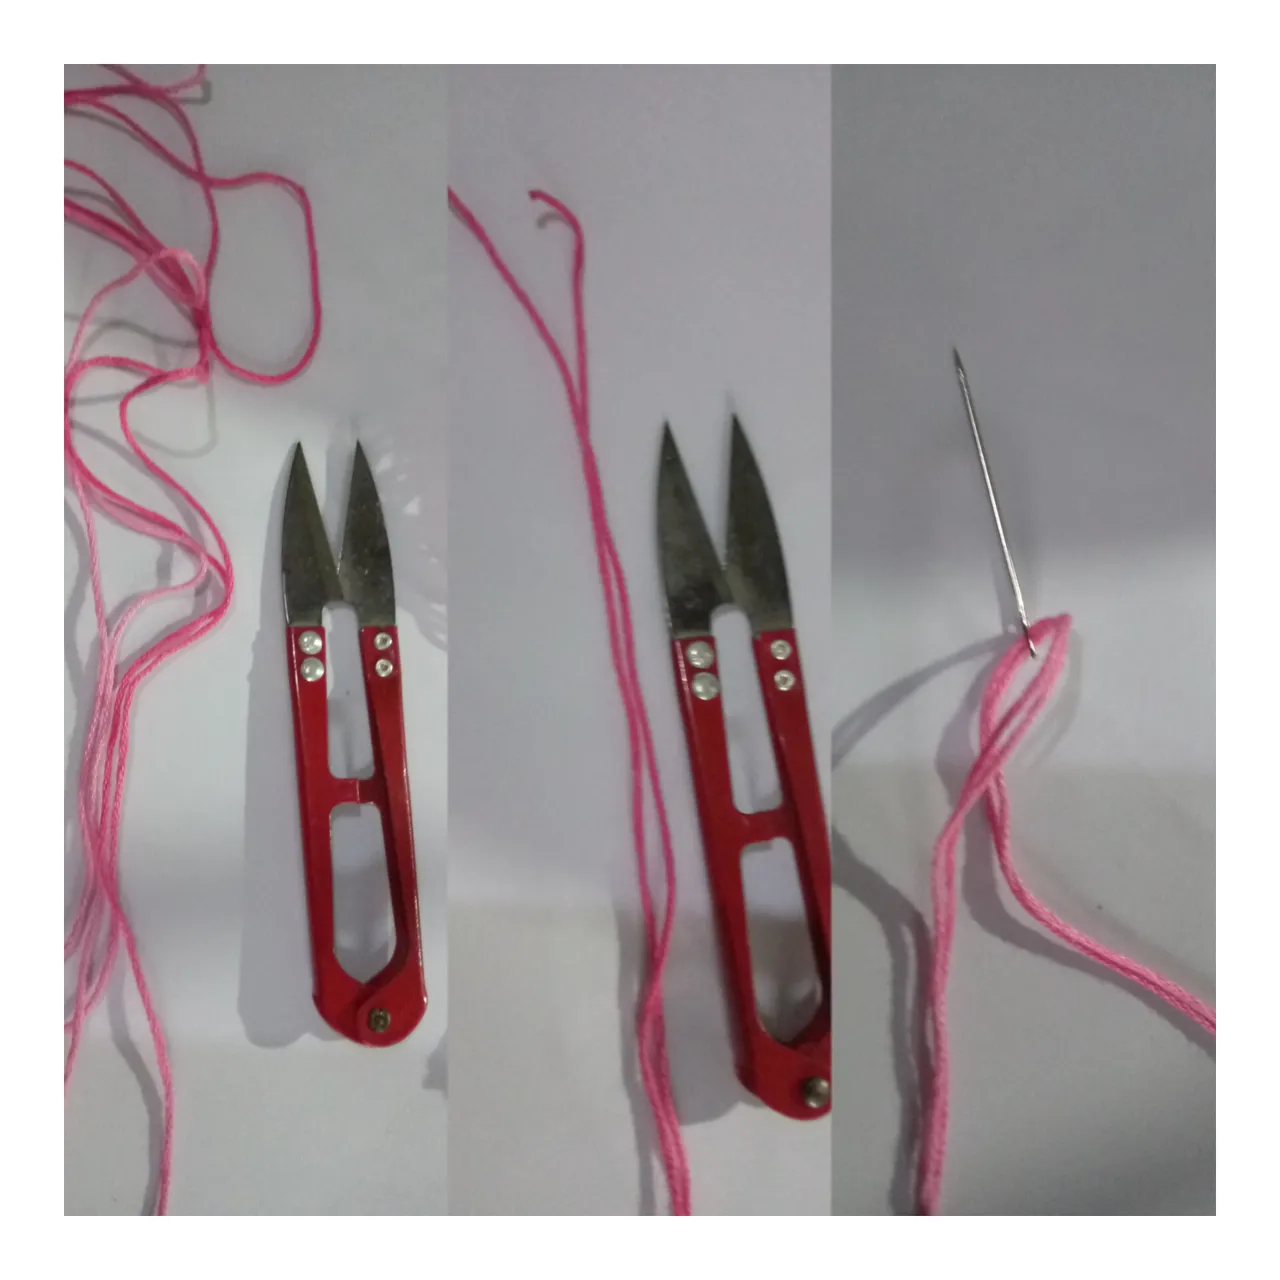
PASO 1:
STEP 1:
Procedo y tomo la madeja de hilo y la tijera y corto 1,40 cms de largo del hilo luego lo mido a la mitad y corto y tomo la aguja y enhebro son dos hilos con los cuales se va a trabajar.
I proceed and take the skein of yarn and the scissors and cut 1.40 cms length of yarn then I measure it in half and cut and take the needle and thread are two threads with which it will work.
PASO 2:
STEP 2:
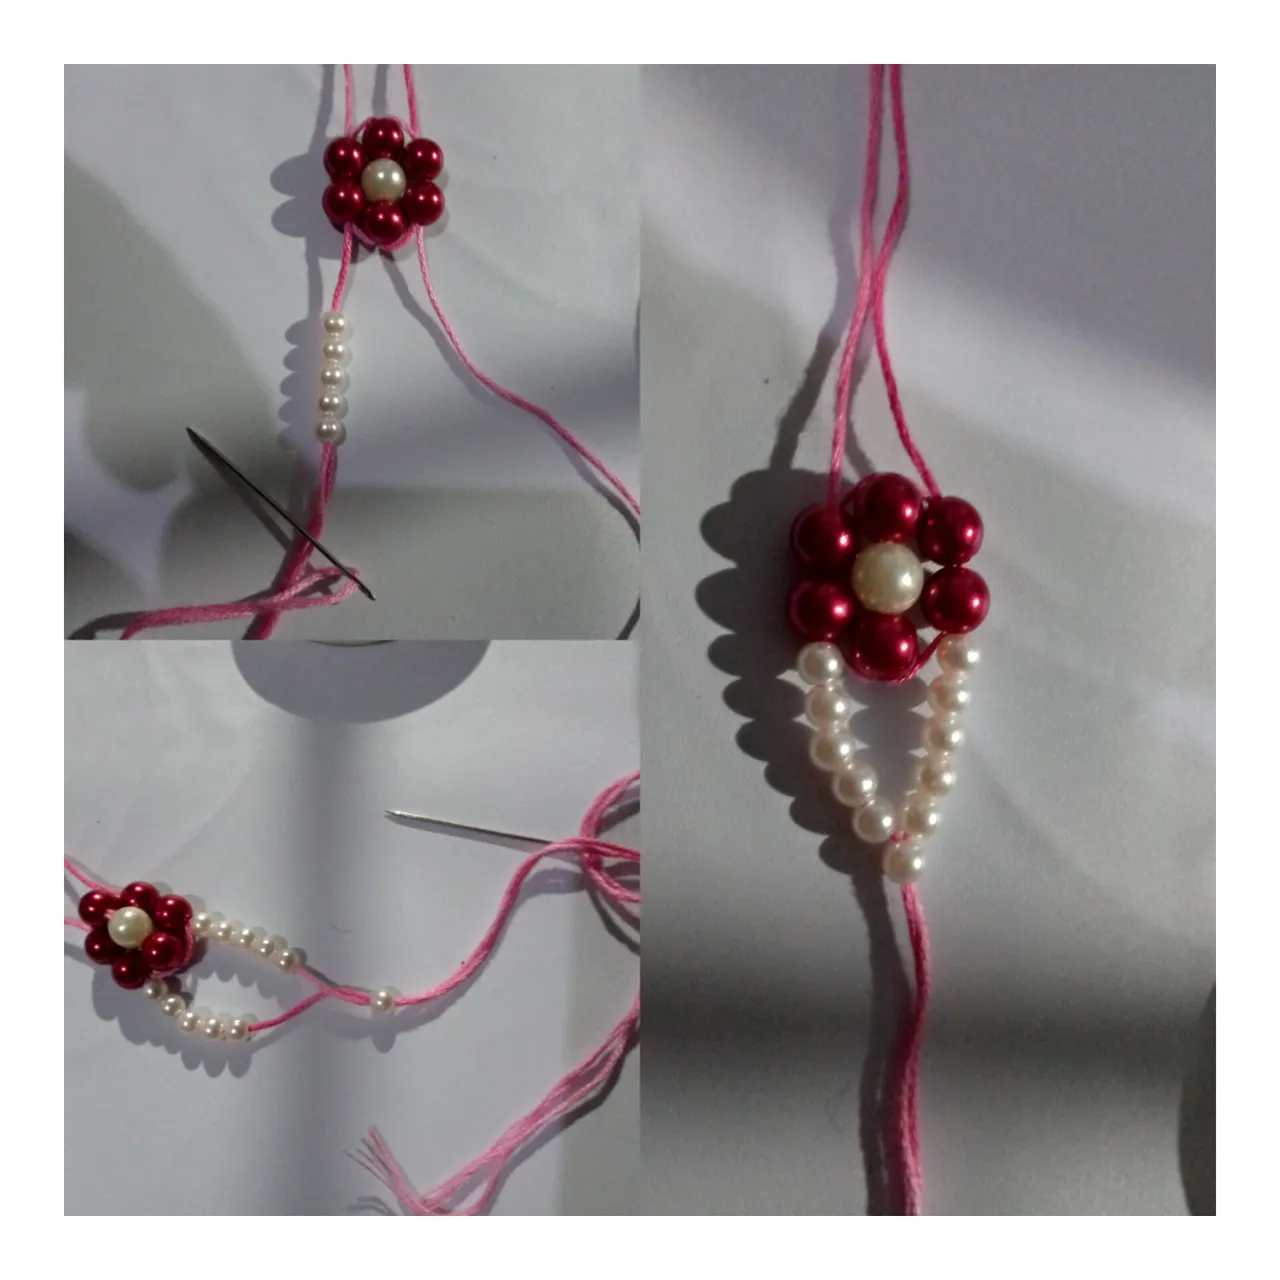
Luego con la aguja paso una perla roja, una blanca y la siguiente roja luego la llevo exactamente al centro de los hilos y después abro los hilos uno de cada lado.
Then with the needle I pass a red bead, a white one and the next red one, then I bring it exactly to the center of the threads and then I open the threads one on each side.
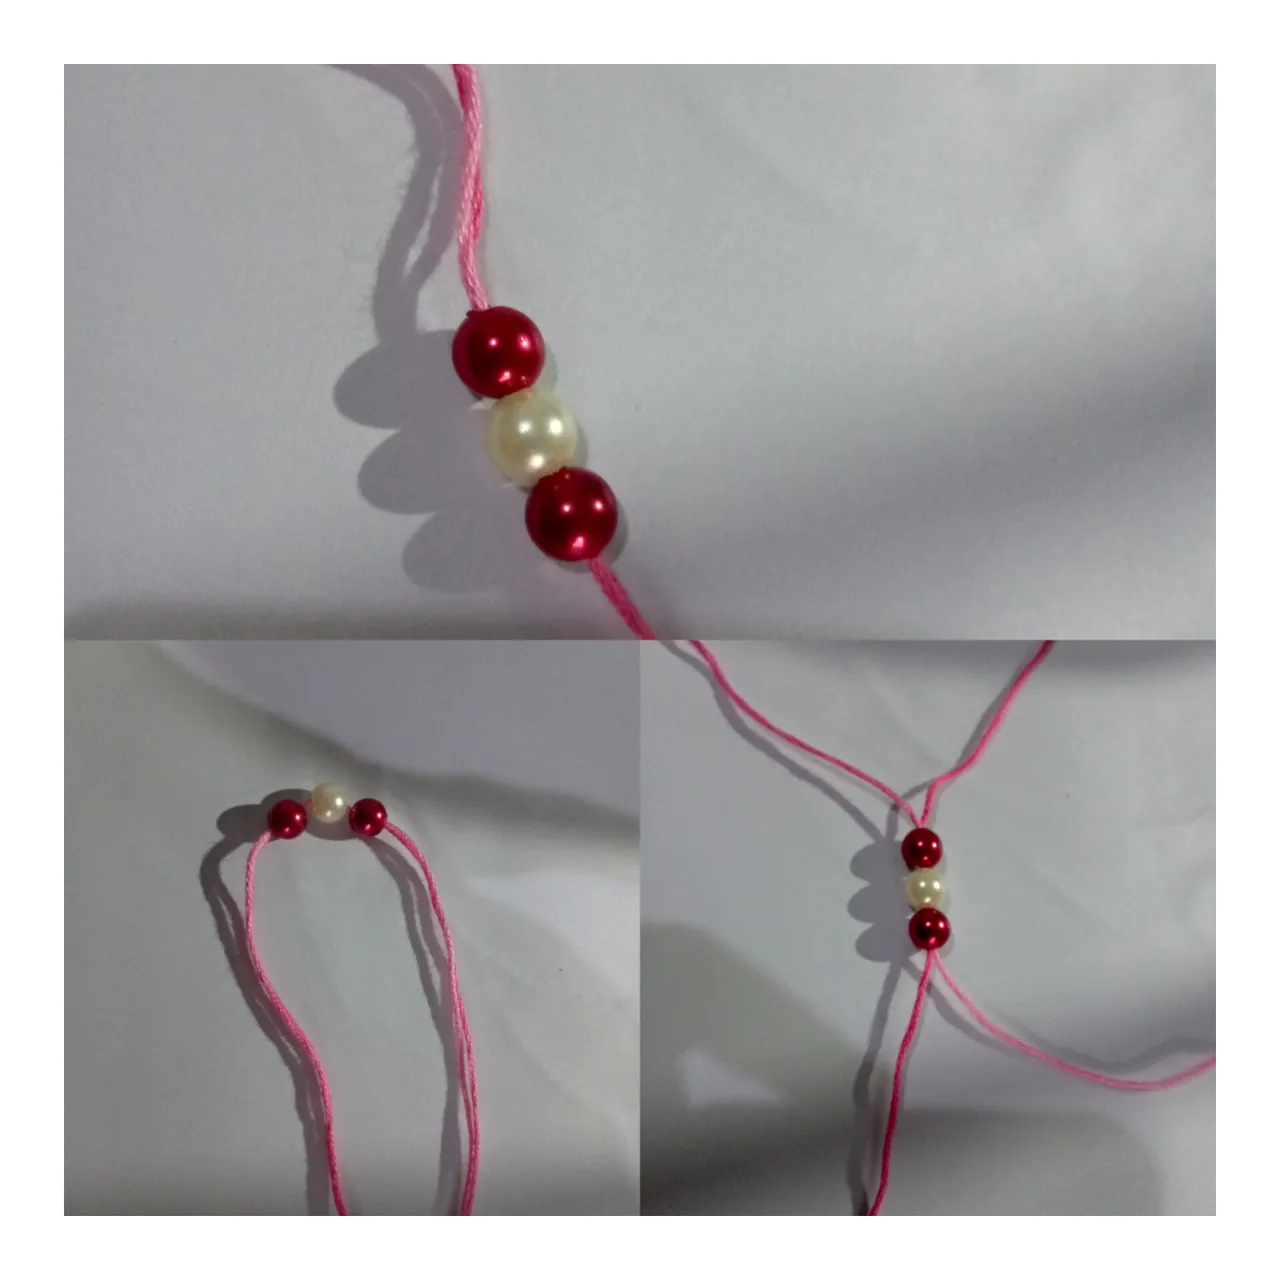
PASO 3:
STEP 3:
Y después voltea las perlas colocandola en fila hacia ti y después enhebra la aguja y toma dos perlas rojas.
And then turn the beads by placing them in a row towards you and then thread the needle and take two red beads.
PASO 4:
STEP 4:
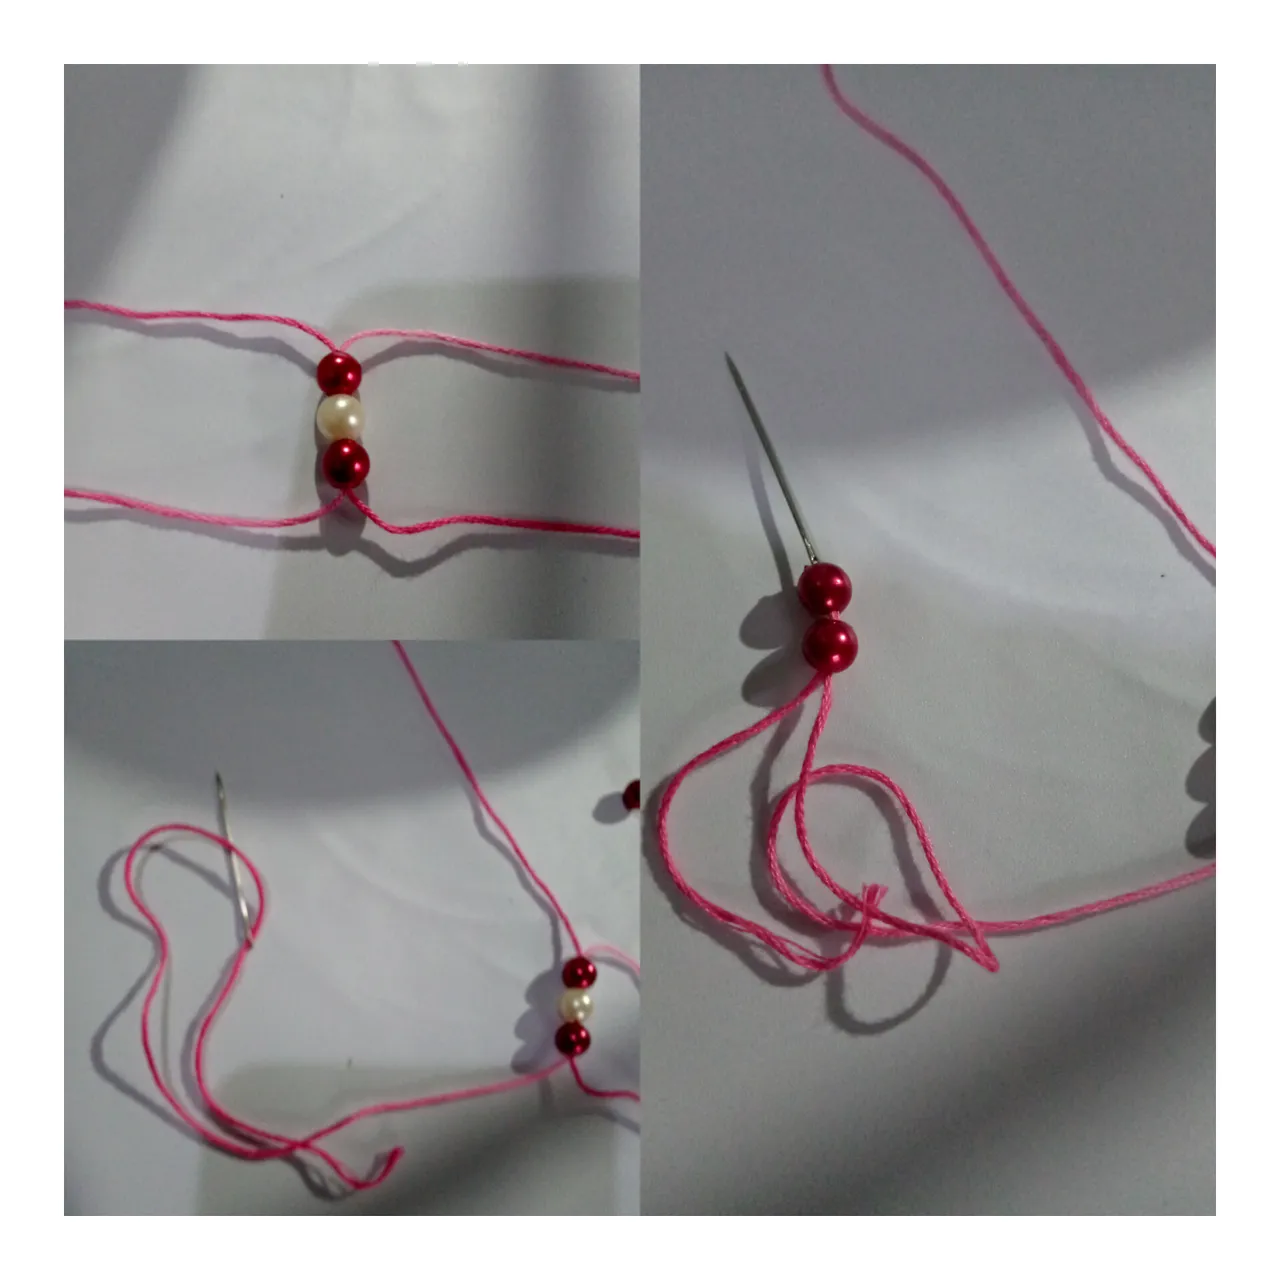
Después lleva las dos perlas rojas hacia el centro donde están las otras y luego vas a enhebrar la aguja con el hilo que te quedó al lado y lo vas pasar por las dos perlas rojas como muestra la imagen es hacer un cruce y jala el hilo y te va quedando de esta manera.
Then bring the two red beads to the center where the others are and then you will thread the needle with the thread that you have left to the side and you will pass it through the two red beads as shown in the image is to make a cross and pull the thread and you will be left in this way.
PASO 5:
STEP 5:
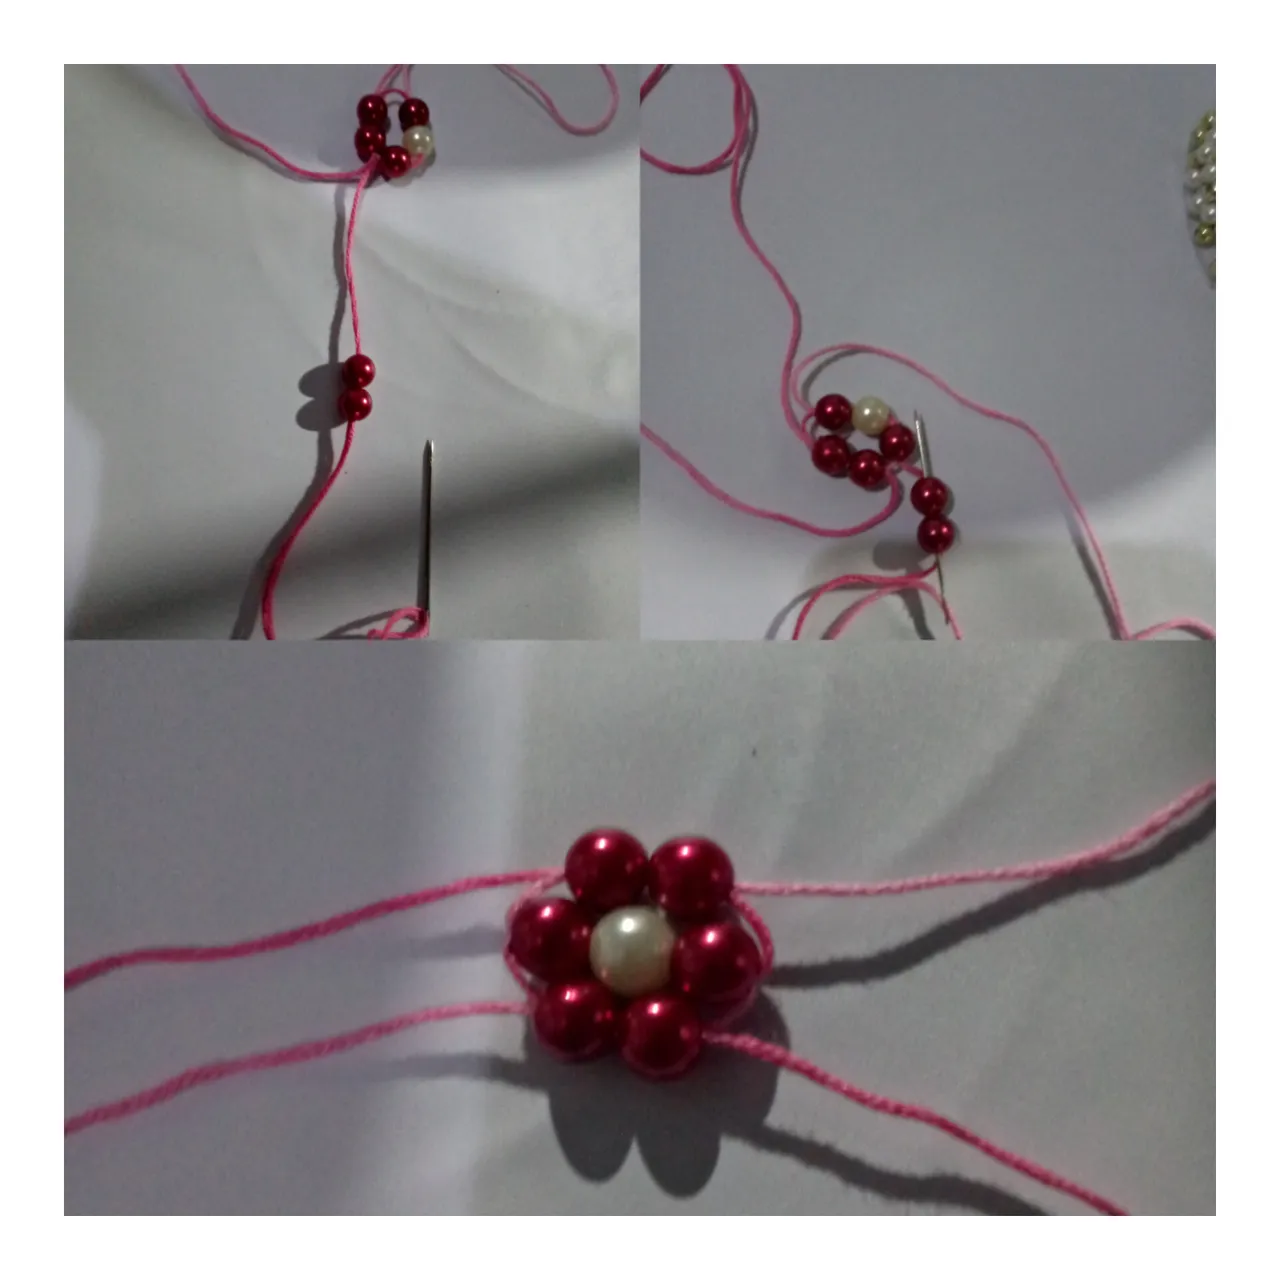
Como ya pasamos por los primeros hilos vamos con los que no hemos trabajado hacia el otro lado siempre hay que estar enhebrando la aguja introducimos 2 perlas rojas y luego tomamos el otro hilo y enhebramos y la pasamos por las dos perlas que ya habiamos introducido y jalamos el hilo y te queda esta flor.
As we have already passed through the first threads we go with the ones we have not worked with to the other side always threading the needle we introduce 2 red beads and then we take the other thread and thread it and pass it through the two beads that we have already introduced and pull the thread and you have this flower.
PASO 6:
STEP 6:
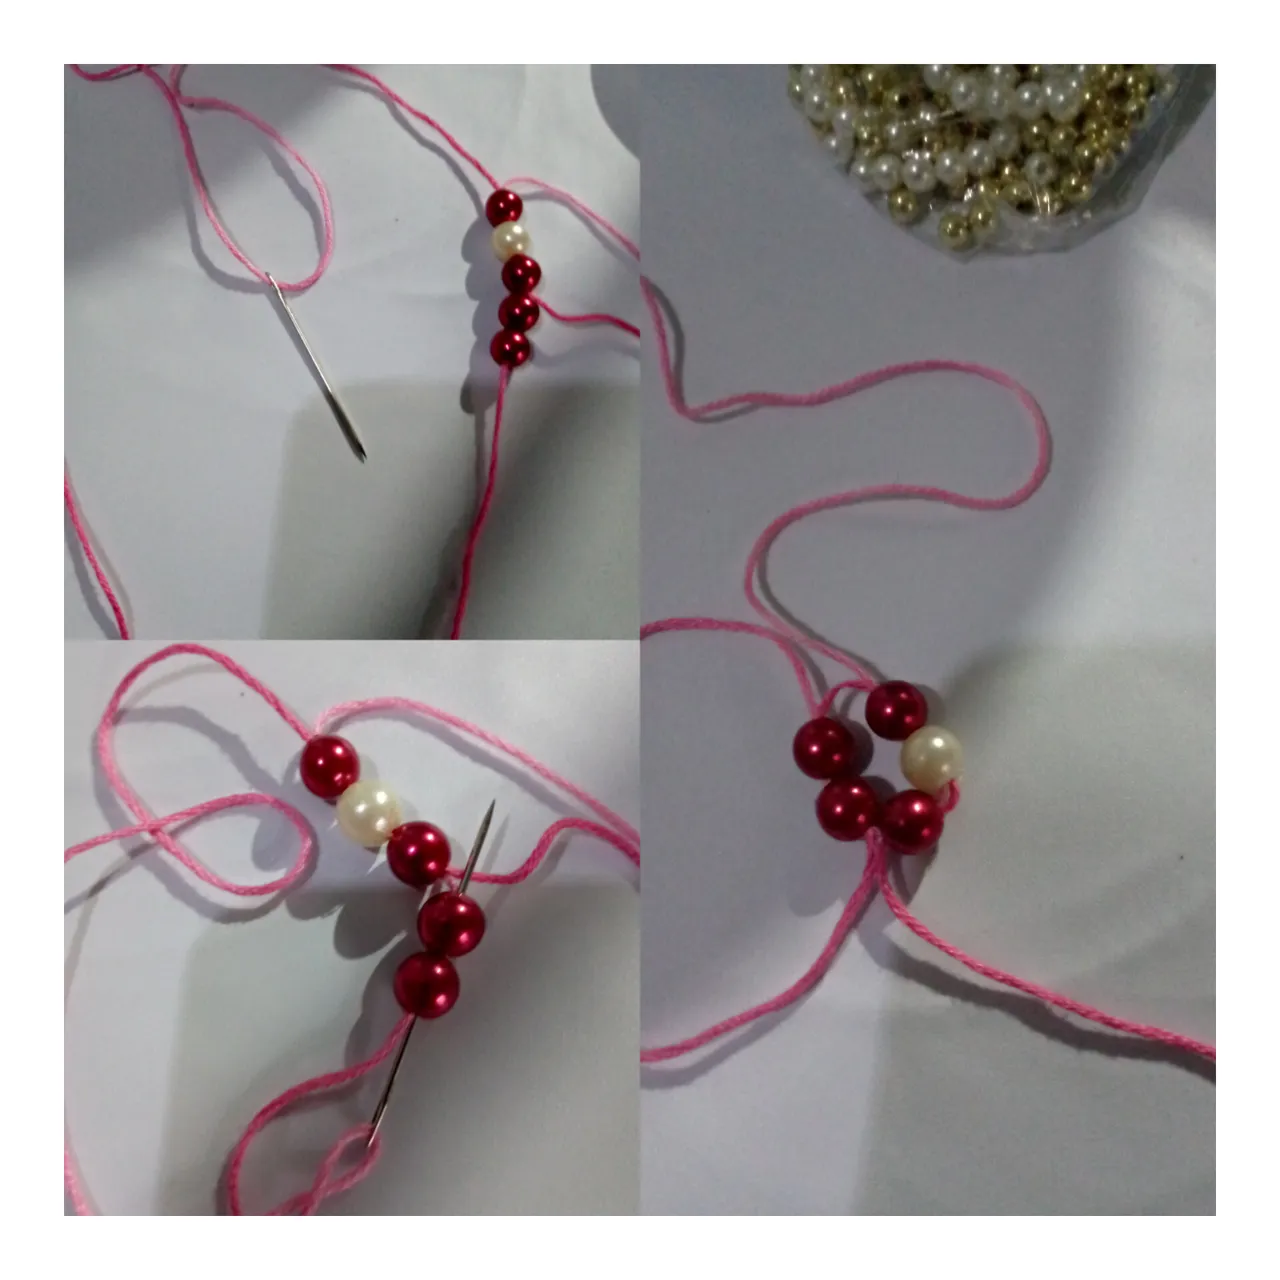
Una vez más enhebramos la aguja e introducimos 5 perlas pequeñas de un lado y después lo repetimos hacia el otro lado y luego tomamos los dos hilos y enhebramos la aguja y pasamos una perla y te queda así.
Once again we thread the needle and introduce 5 small beads on one side and then we repeat it on the other side and then we take the two threads and thread the needle and pass a bead and it looks like this.
PASO 7:
STEP 7:
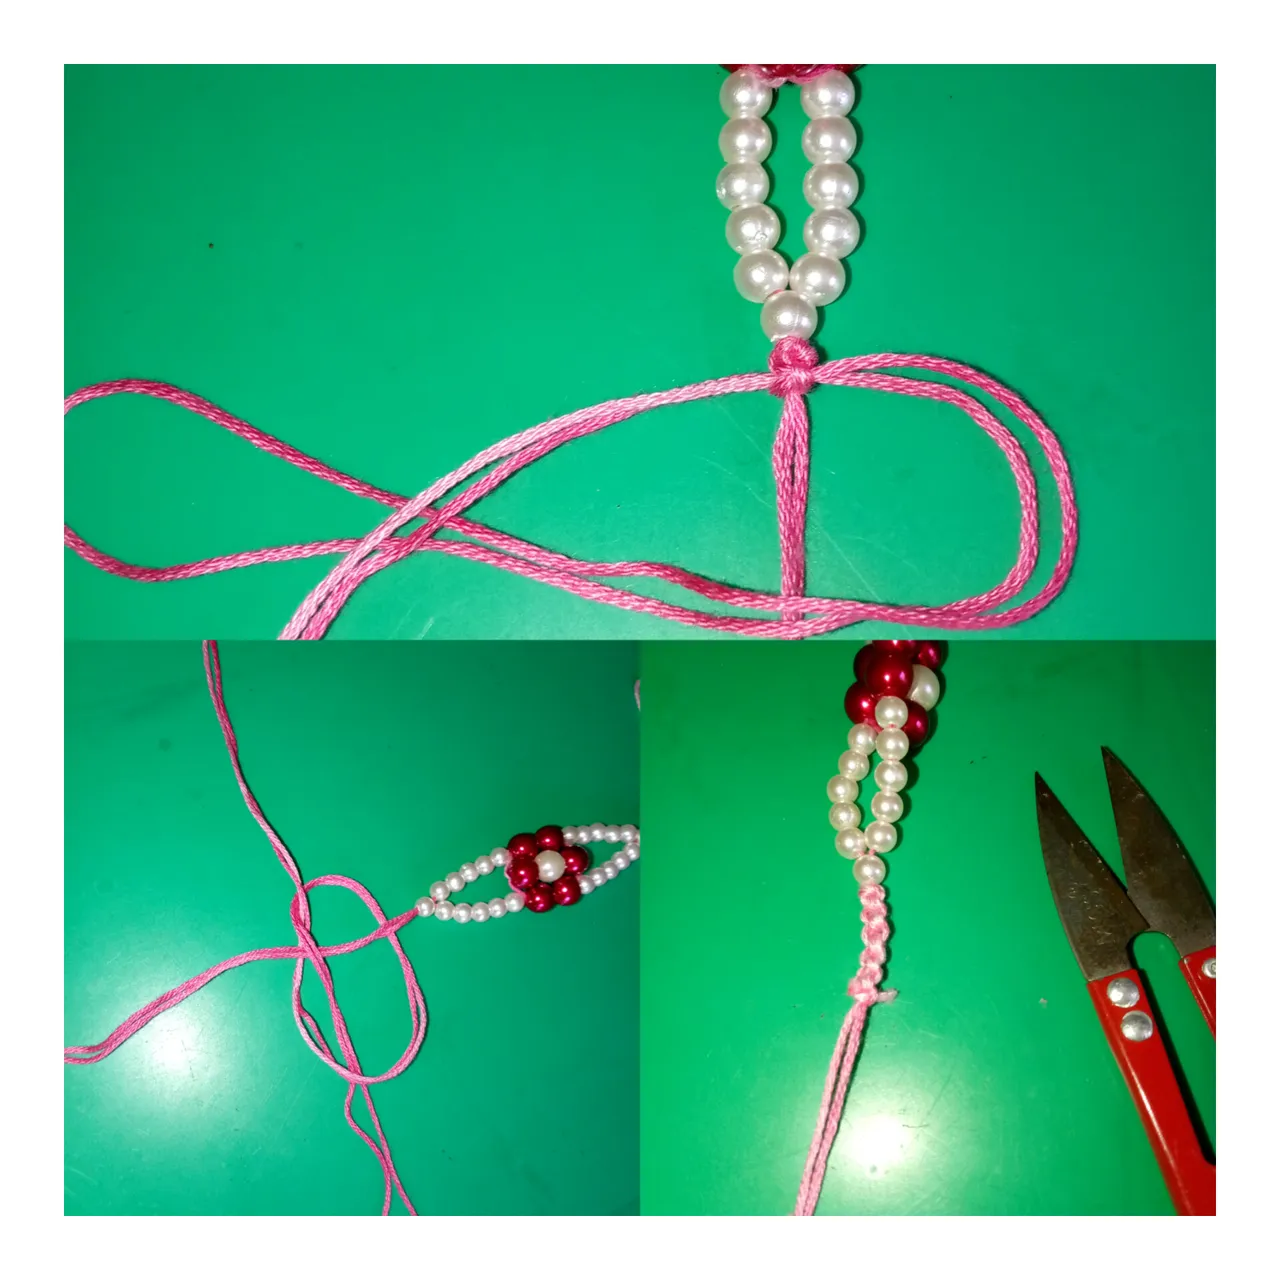
Después repetimos hacia el otro lado de la pulsera introducimos 5 perlas blancas de ambos lados y cerramos con una y así te queda la pulsera de ambos lados, ahora vamos hacer un trenzado macramé así que le colocó un pedacito de tirro para ajustar y no se ruede y después corto un 40 cms de largo de hilo para empezar el trenzado.
Then we repeat to the other side of the bracelet we introduce 5 white beads on both sides and close with one and so you have the bracelet on both sides, now we will make a macramé braid so I put a little piece of string to adjust and do not roll and then cut a 40 cms long thread to start the braid.
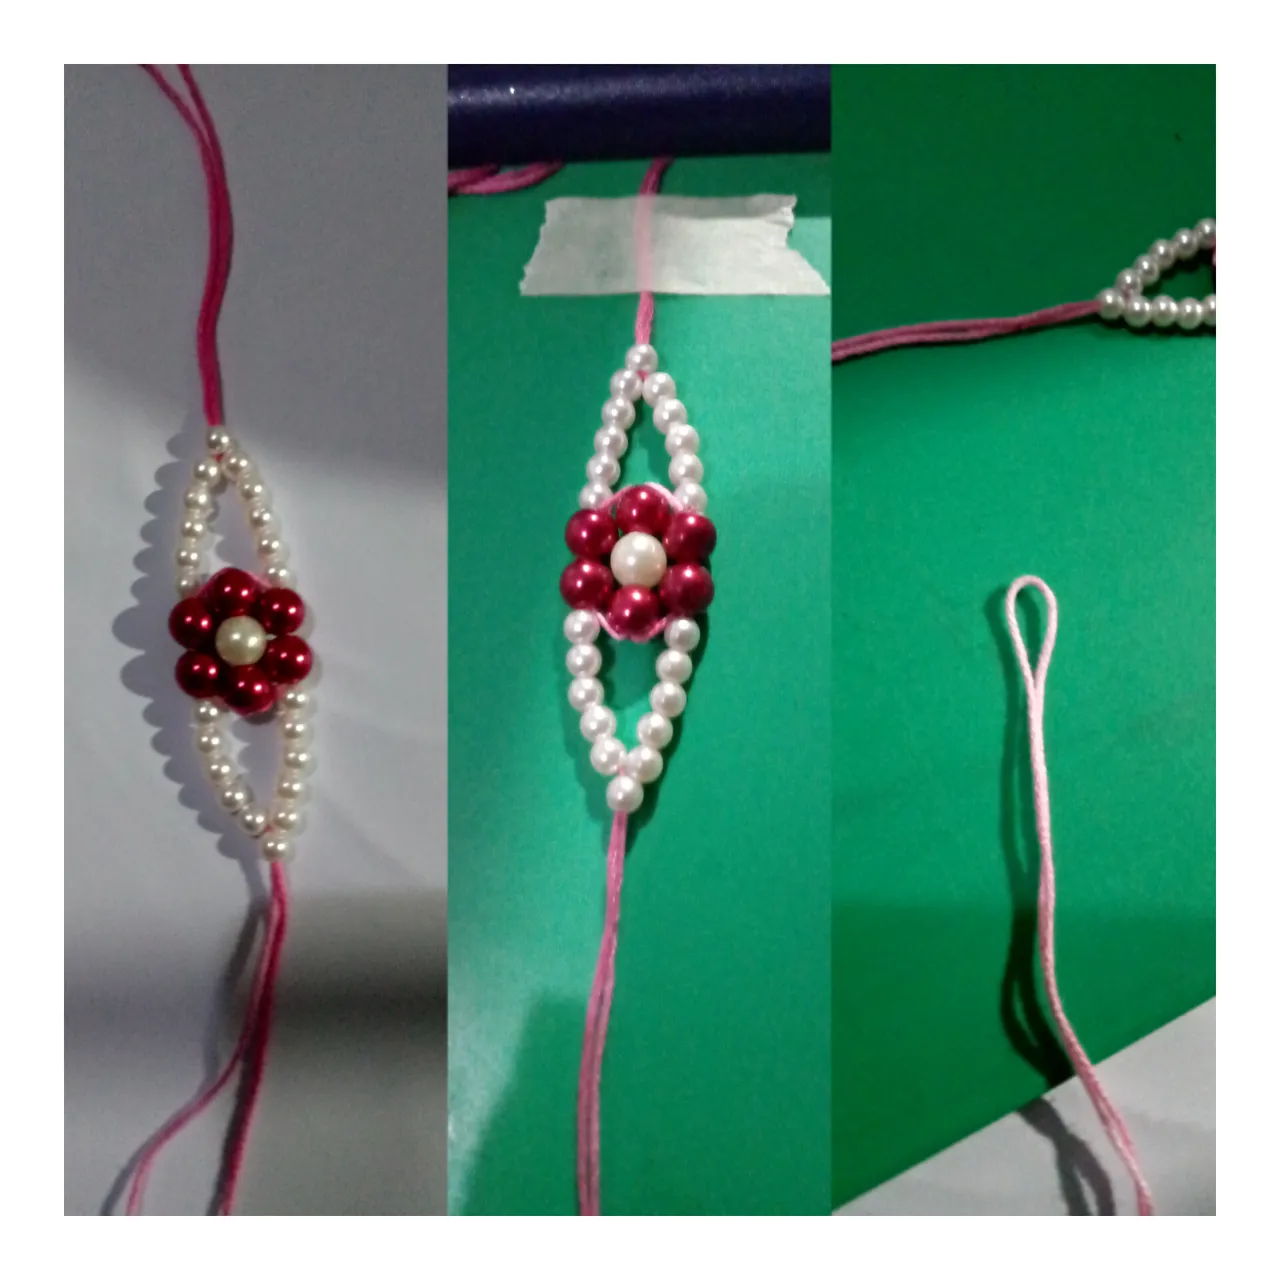
PASO 8:
STEP 8:
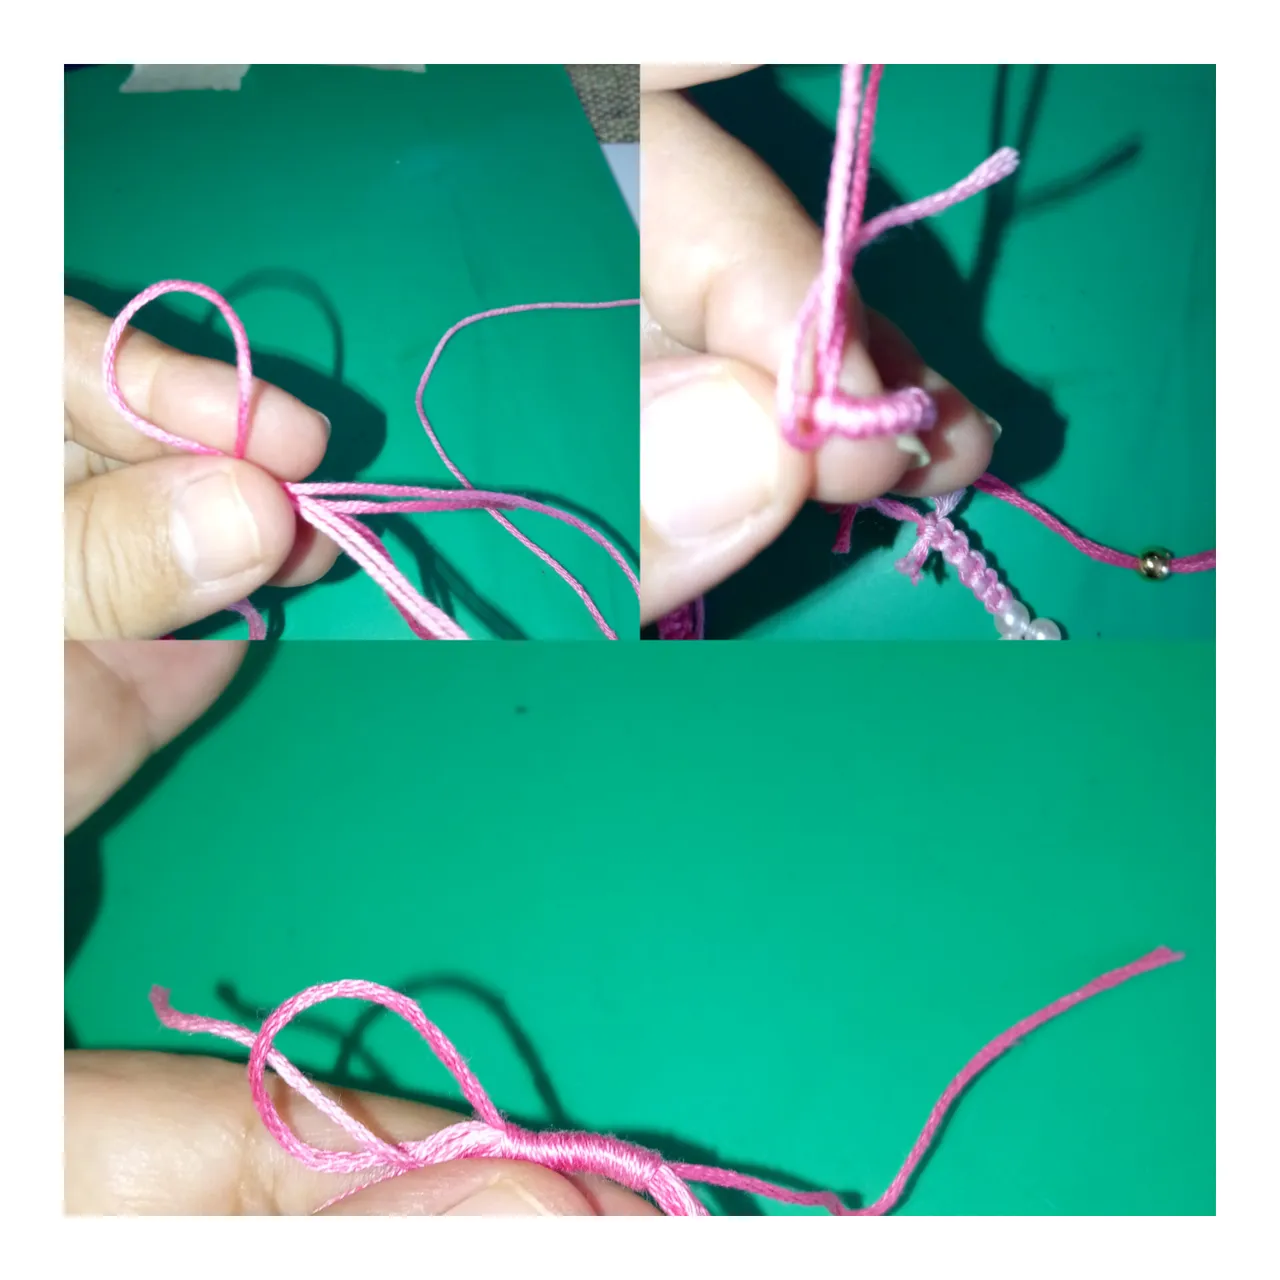
Ok vamos a empezar hacer el trenzado doblo a la mitad el pedazo de hilo y luego lo voy a pasar por debajo del hilo que le pertenece a la pulsera paso el hilo de la izquierda hacia mi derecha por encima y el hilo de mi derecha lo voy a pasar por debajo del hilo de la izquierda y el circulo que ven a la izquierda lo meten por allí y luego jalan.
Ok let's start making the braid I fold the piece of thread in half and then I will pass it under the thread that belongs to the bracelet I pass the thread on the left to my right over it and the thread on my right I will pass it under the thread on the left and the circle that you see on the left you put it through there and then pull.
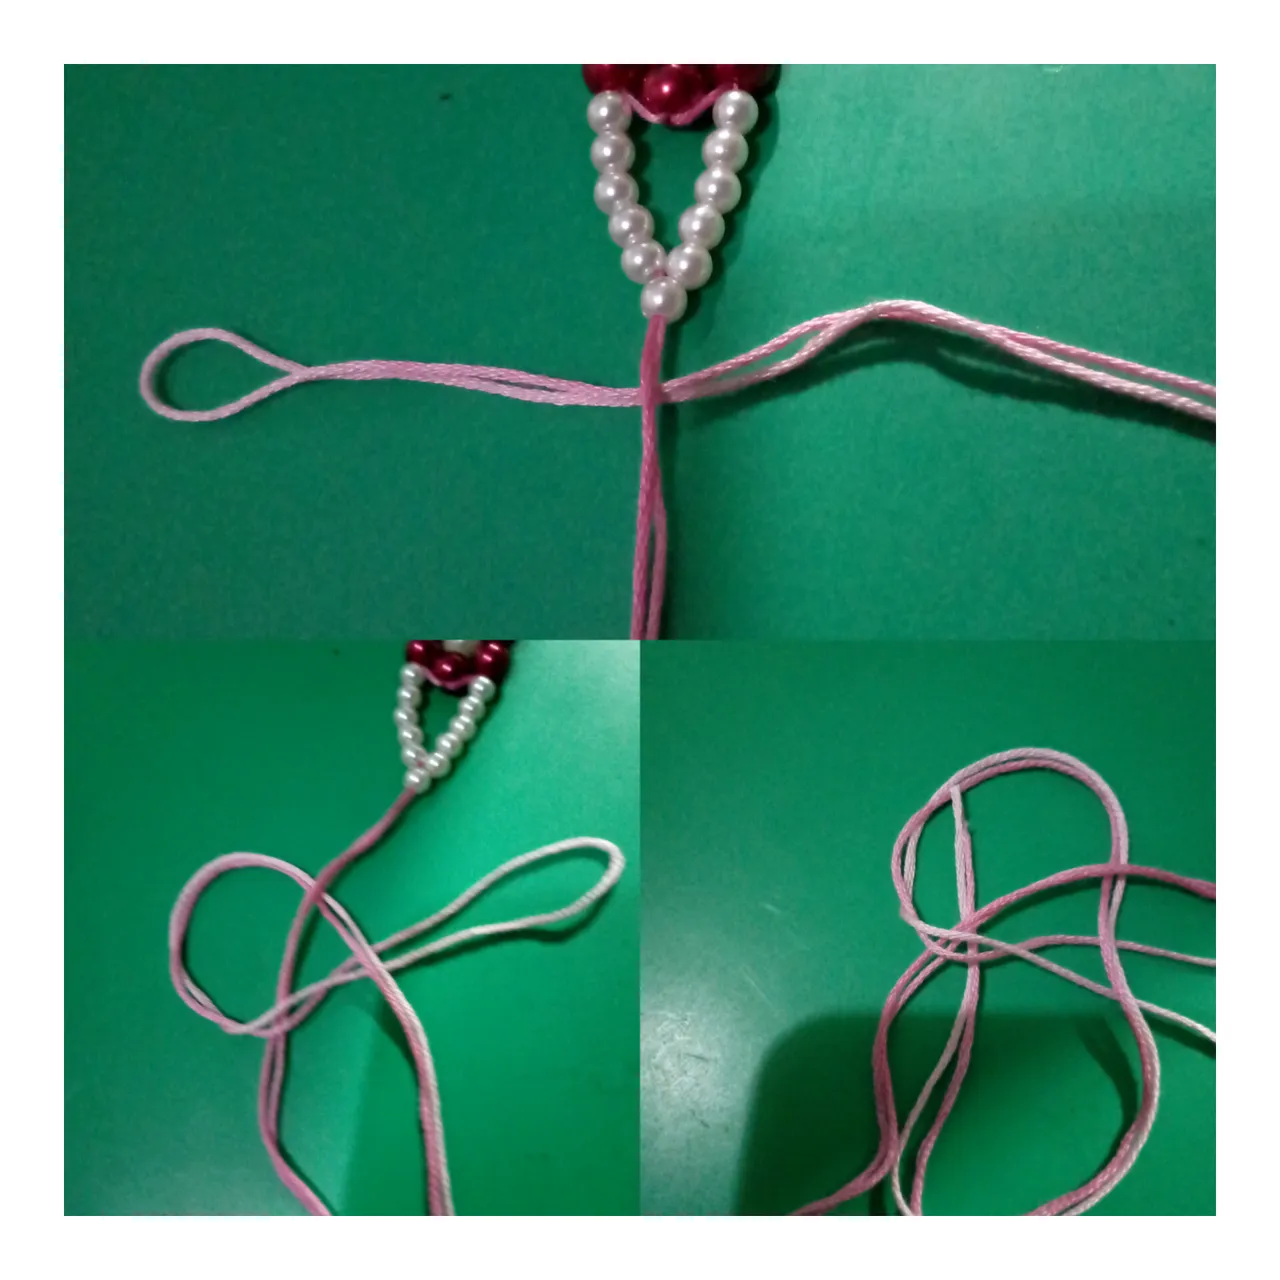
PASO 9:
STEP 9:
Y así tienen el primer nudo y ajustar su pulsera y luego vuelven hacer el procedimiento pero del lado contrario.
And so have the first knot and adjust your bracelet and then do the procedure again but on the opposite side.
PASO 10:
STEP 10:
Repetimos el procedimiento paso el hilo derecho por encima hacia el lado izquierdo y el izquierdo lo metes por debajo y lo sacas por el lado derecho donde ves el circulo y jala y luego repites al contrario y asi vas haciendo tu tejido y te queda así, yo lo hice hasta allí pero si prefieres lo haces hasta al final todo es como la prefieras y el excedente lo corto.
We repeat the procedure passing the right thread over to the left side and the left thread you put it under and pull it out on the right side where you see the circle and pull and then repeat the opposite and so you are making your fabric and you have it like this, I did it until there but if you prefer you do it until the end everything is as you prefer and the surplus I cut it.
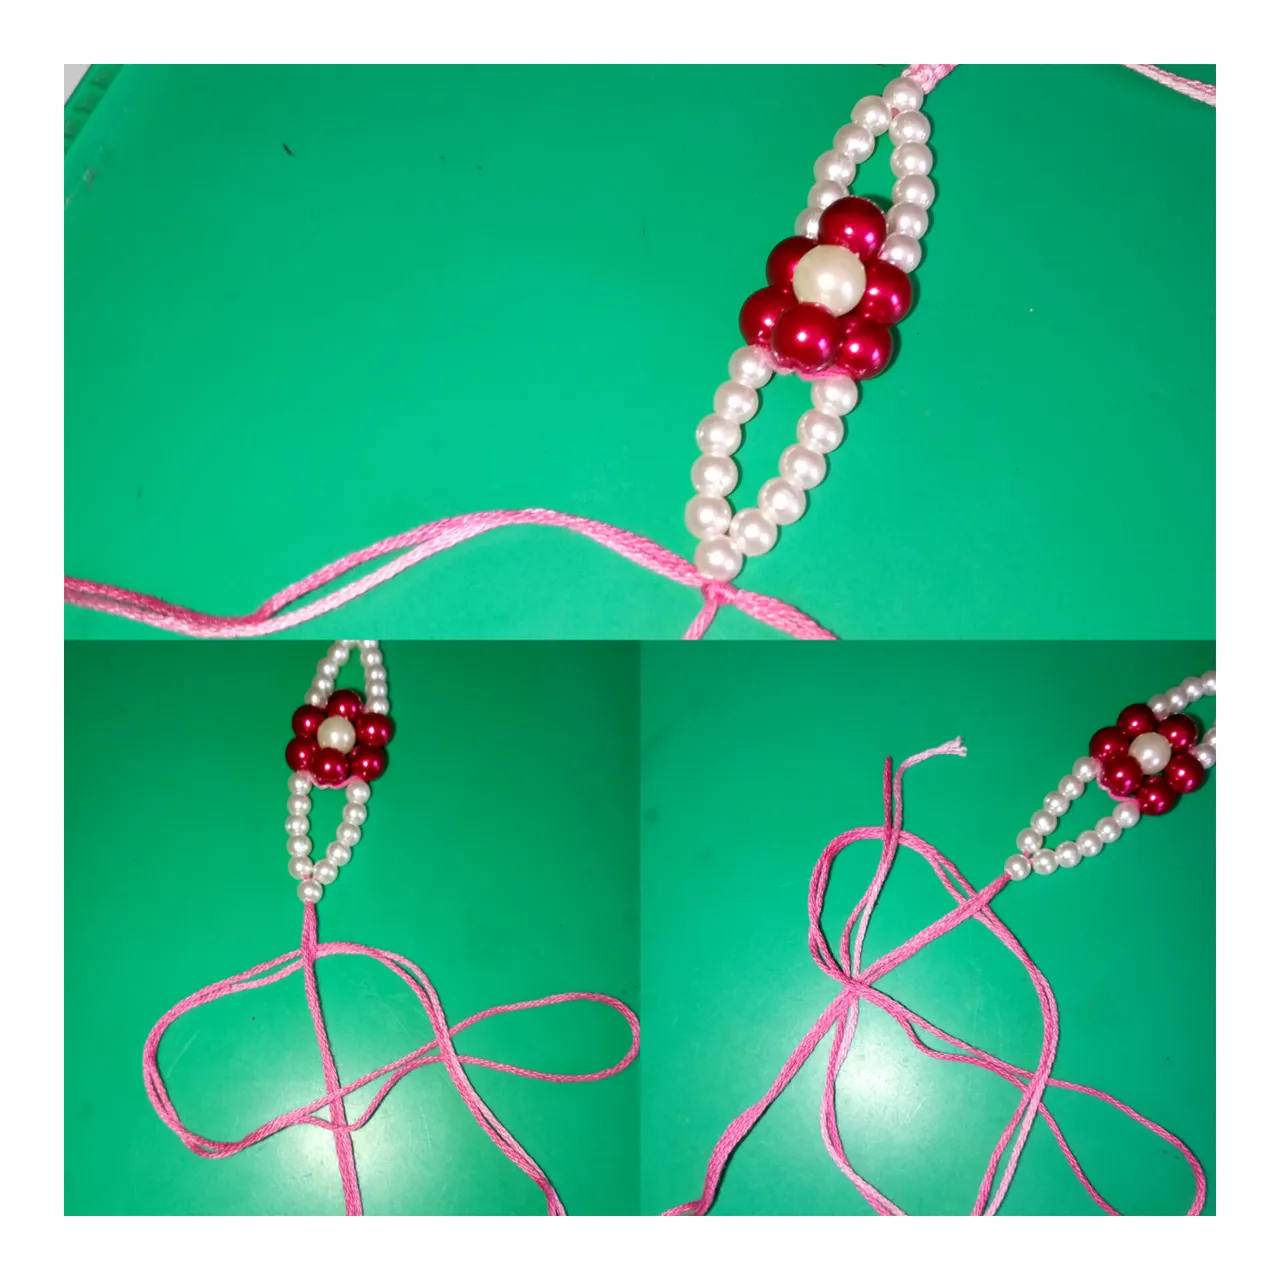
PASO 11:
STEP 11:
E igualmente repetimos hacia el otro lado el mismo procedimiento enhebramos la aguja con los dos hilos y pasamos una perla dorada esta es para decorar las puntas y repetimos hacia el otro lado y la mantenemos asi hasta que hagamos el cierre de la pulsera, luego tomamos la pulsera y con nuestra mano la colocamos en el medio y los hilos lo cruzamos sin amarrar, es la forma para centralizar.
And likewise we repeat to the other side the same procedure we thread the needle with the two threads and pass a golden pearl this is to decorate the tips and repeat to the other side and keep it that way until we make the closure of the bracelet, then we take the bracelet and with our hand we place it in the middle and the threads cross it without tying, is the way to centralize.
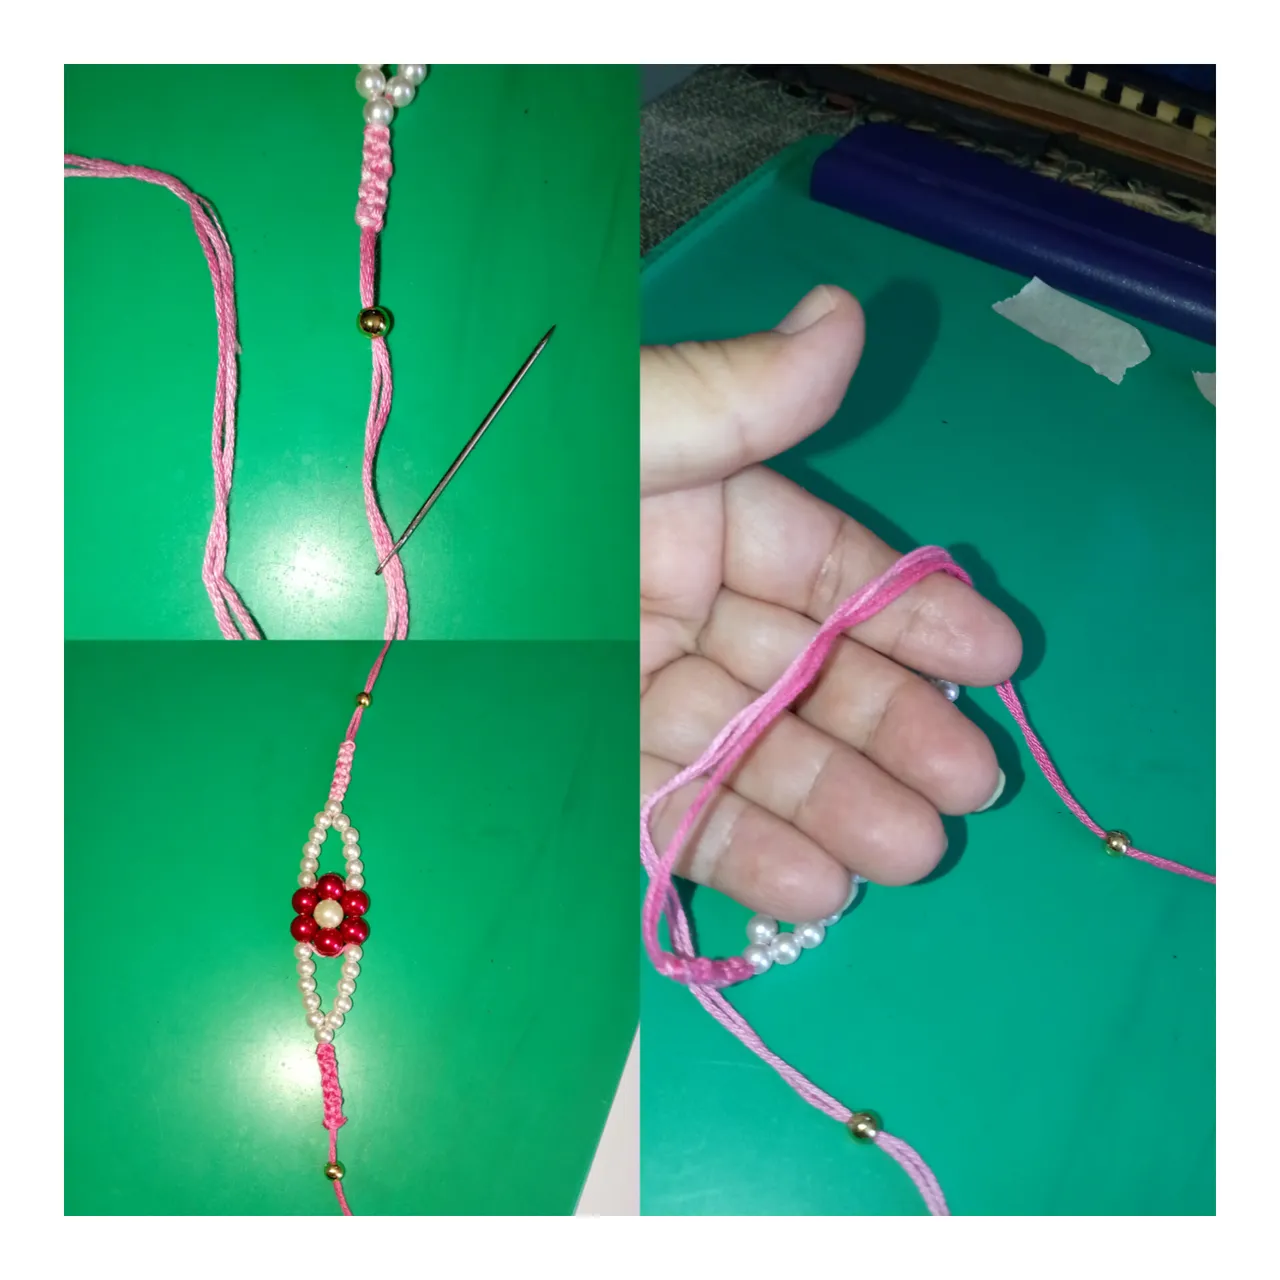
PASO 12:
STEP 12:
Ahora tomamos un hilo aparte para hacer el soporte de 10 cms de largo en el medio de la pulsera lo colocamos pero doblamos el hilo y que nos quede un circulo y dejamos un largo y empezamos a enrrollar es para hacer un nudo franciscano cuando ya hayas llegado casi al final por el circulo que dejaste por alli introduce el hilo y la parte que dejaste de hilo jalas bien y aprieta.
Now we take a separate thread to make the support of 10 cms long in the middle of the bracelet we place it but we fold the thread and that we have a circle and leave a length and begin to wind is to make a Franciscan knot when you've almost reached the end by the circle that you left over there introduce the thread and the part you left of thread pull well and tighten.
PASO 13:
STEP 13:
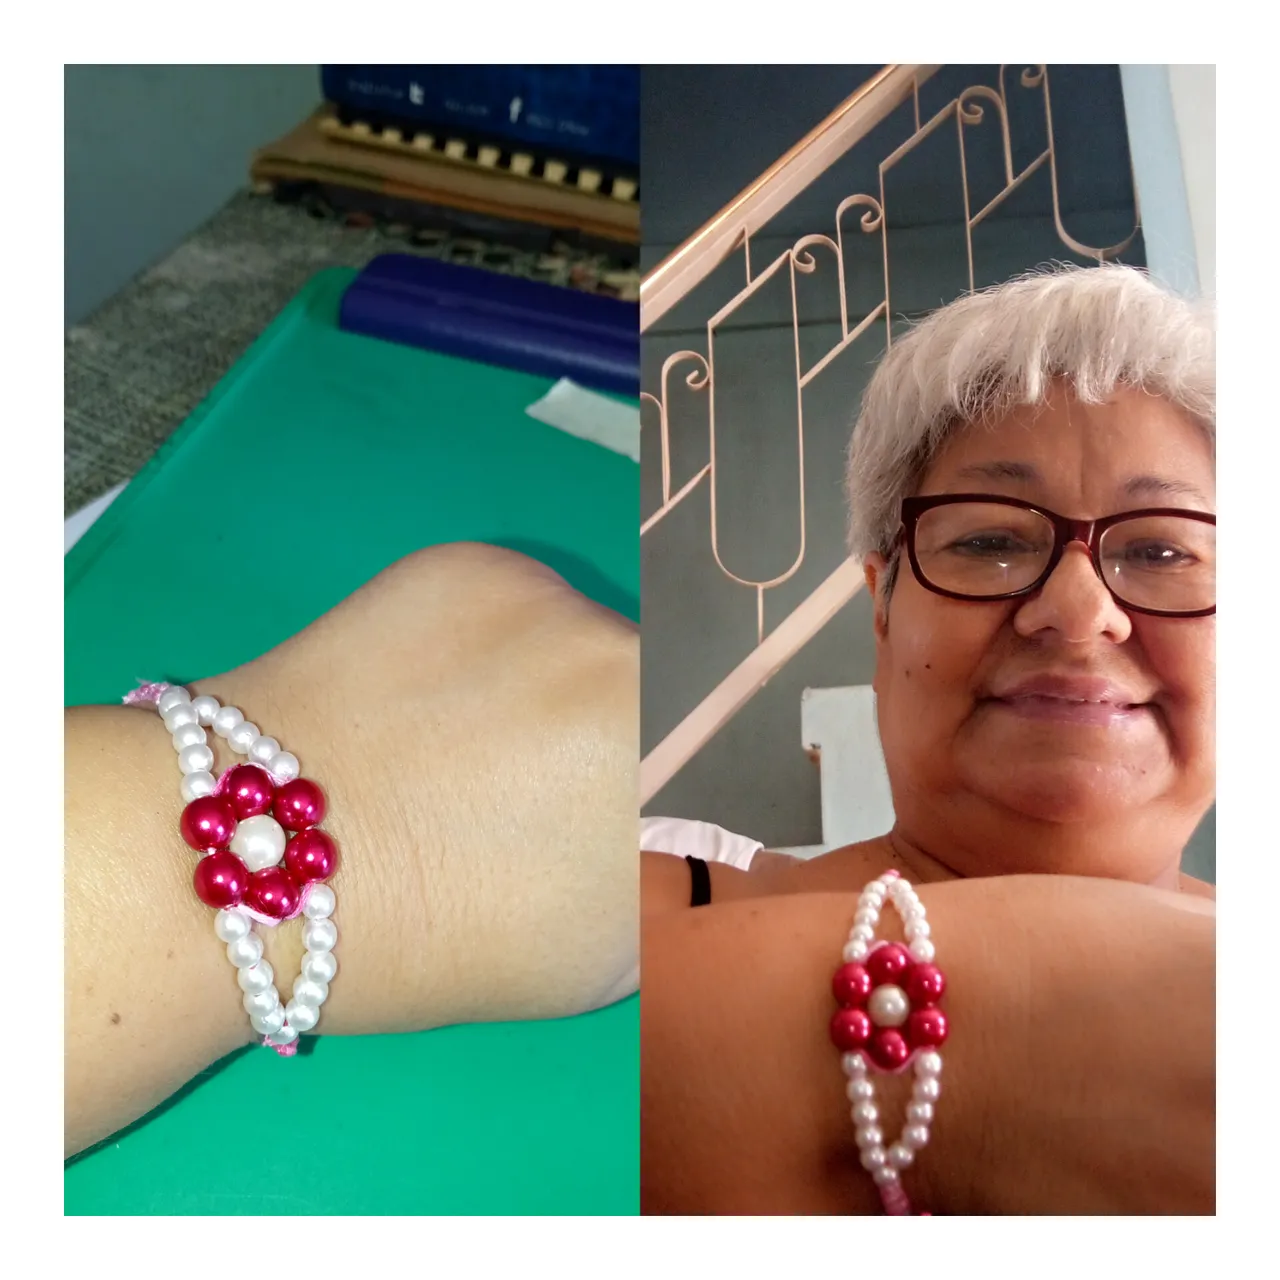
Como podrán ver ya esta asegurada nuestra pulsera y corto el excedente y ahora procedo a medir la pulsera me quedó muy larga y estuve que recortar a la medida y las dos perlas que van a quedar colgando le hice 2 nudos para asegurar y ya con esto terminé la pulsera vean que belleza me encantó en resultado.
As you can see our bracelet is already secured and I cut the excess and now I proceed to measure the bracelet, it was very long and I had to cut it to size and the two pearls that will be hanging I made 2 knots to secure it and with this I finished the bracelet, see how beautiful I loved the result.
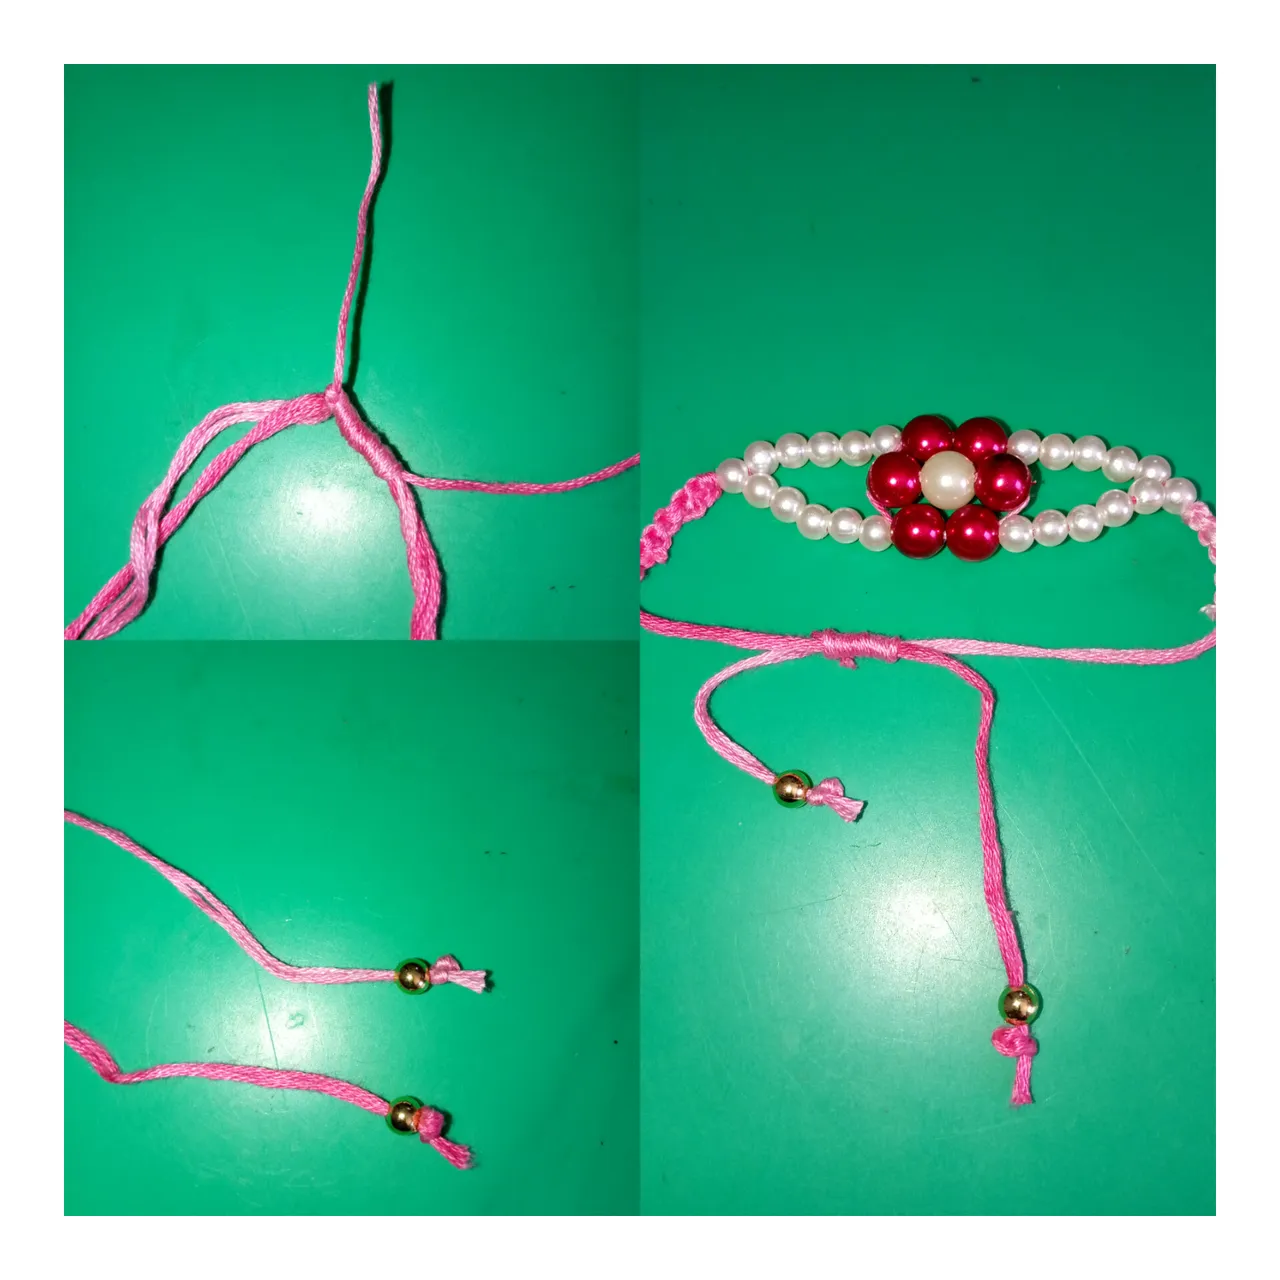
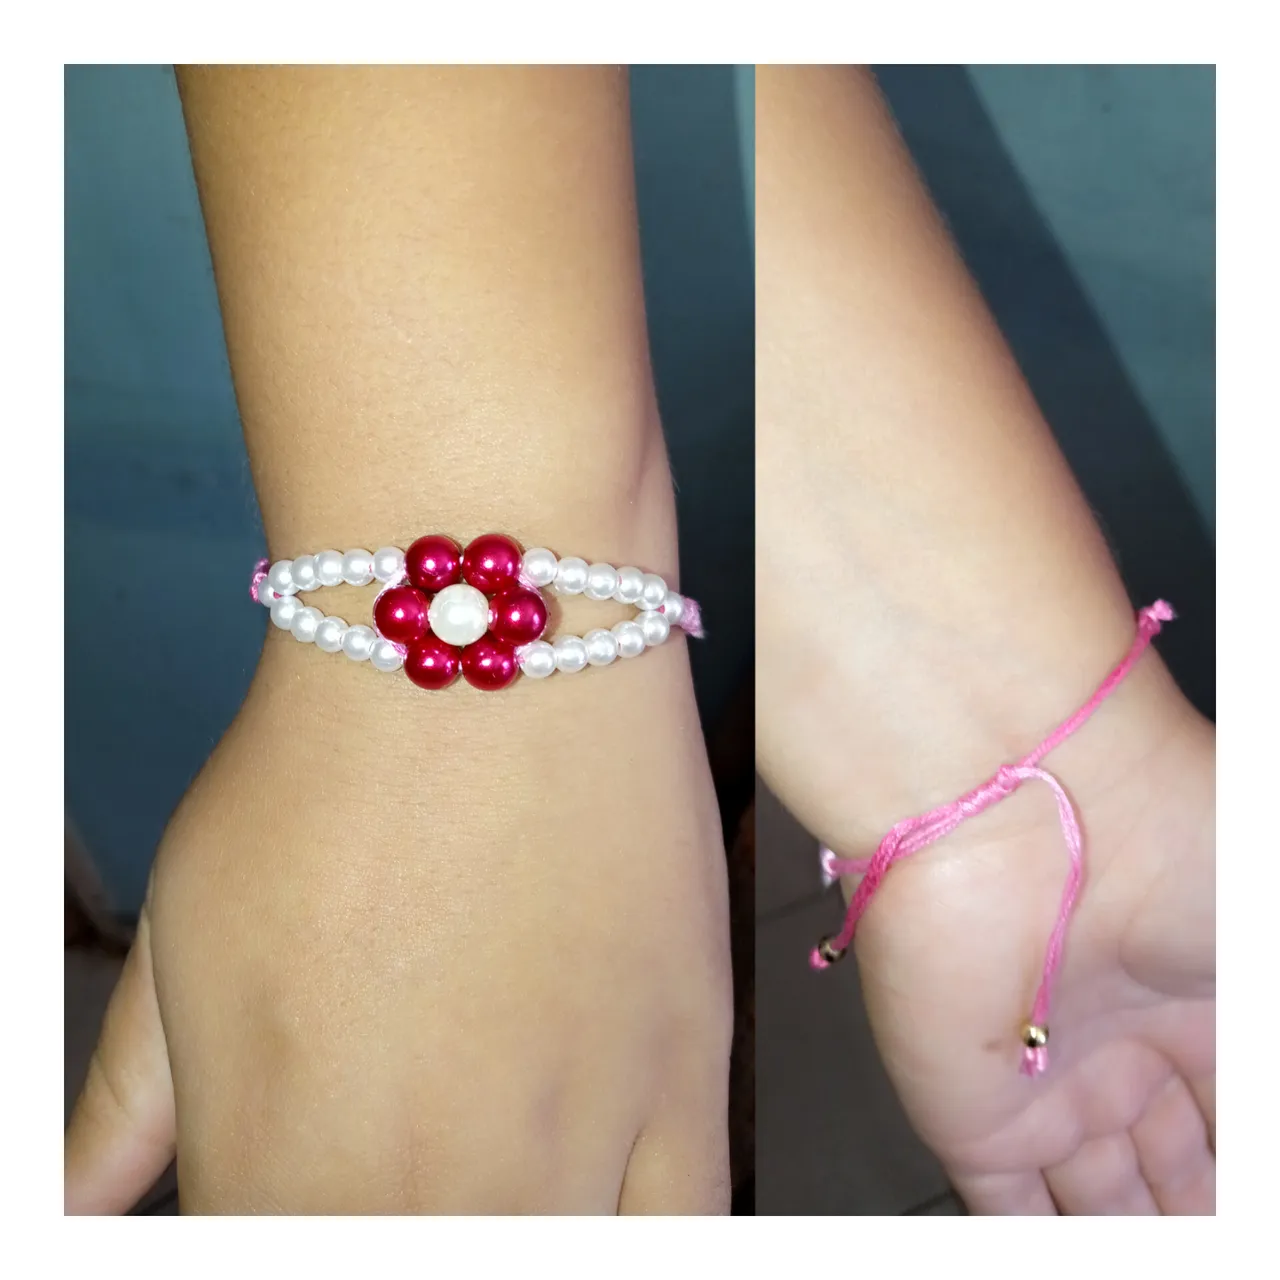
Mi yerna se la midió le quedó espectacular y le muestro por ambos lados este es un obsequio que ella le va hacer a una amiga que está de cumpleaños.
My daughter-in-law measured it and it looked spectacular and I show it on both sides. This is a gift that she is going to give to a friend who is having a birthday.
Gracias por haberme acompañado hasta acá espero le agrade este tutorial de esta hermosa pulsera de perlas es muy fácil de realizar y con muy poco material.
Thank you for joining me here I hope you like this tutorial of this beautiful pearl bracelet is very easy to make and with very little material.
Las imágenes son tomadas con mi celular tecno go spark y editada con la aplicación collage.
Traducida con deepl translate.
The images are taken with my tecno go spark cell phone and edited with the collage application.
Translated with deepl translate.
BENDICIONES PARA TODOS.
BLESSINGS TO ALL.