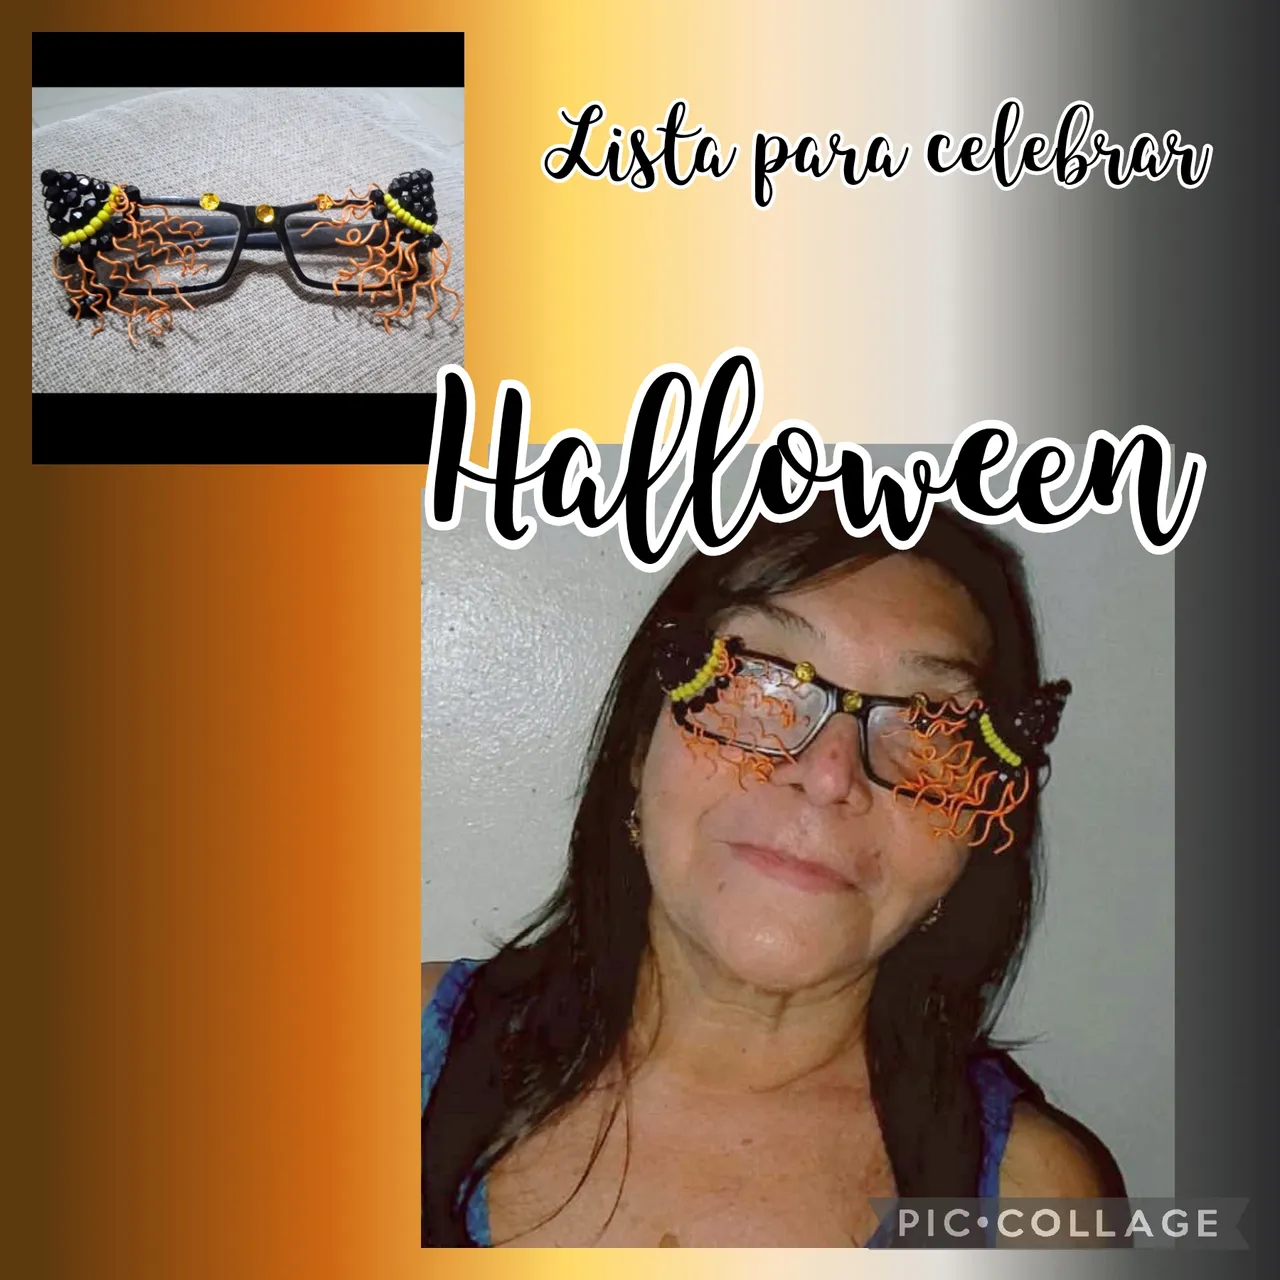
Saluditos mis Artistas Creativos de las Manualidades y la Joyería como se encuentran hoy? Espero que todos estén de maravilla preparandose y puliendo esas escobas para celebrar en grande las festividades de halloween, y es que particularmente siempre fui fanática de estás fiestas me volvía loca pensar en ir a Salem a disfrutar con mis colegas brujildas, que tiempos aquellos 😟 pero en fin el tiempo no pasa en vano y por más que tome mis pócimas rejuvenecedoras cien años son muchos, asi que para esta vez decidí ir como una brujita de edad con mis lentes para ver todo mejor; así que la coquetería siempre presente despertó mi musa y les cuento como decore mis lentes con diseño de Judenhat, les comento que este es un modelo de sombrero puntiagudo en forma de cono que usaban los judíos y se dice que fué inspiración para las brujas ese tipo de atuendo de allí que cuando se habla de brujas siempre asociamos el vestido negro, la escoba y el sombrero puntiagudo.
Los invito a que sigan leyendo para que vean como usando el diseño de dos judenhat converti mis lentes en un accesorio para celebrar halloween además de coqueto, así lo hice:
Greetings my Creative Artists of Crafts and Jewelry, how are you today? I hope you are all doing great preparing and polishing those brooms to celebrate the Halloween festivities in a big way, and I have always been a fan of these festivities, I was crazy thinking about going to Salem to enjoy with my fellow witches, those were the days 😟 but anyway time does not pass in vain and even if I take my rejuvenating potions a hundred years is a lot, so this time I decided to go as an old witch with my glasses to see everything better; so the ever-present coquetry awakened my muse and I will tell you how I decorated my glasses with a Judenhat design, I tell you that this is a model of a pointed cone-shaped hat that the Jews used and it is said that this type of outfit was the inspiration for the witches, hence when we talk about witches we always associate the black dress, the broom and the pointed hat. I invite you to continue reading to see how using the design of two judenhats I turned my glasses into an accessory to celebrate Halloween as well as being flirtatious, this is how I did it:
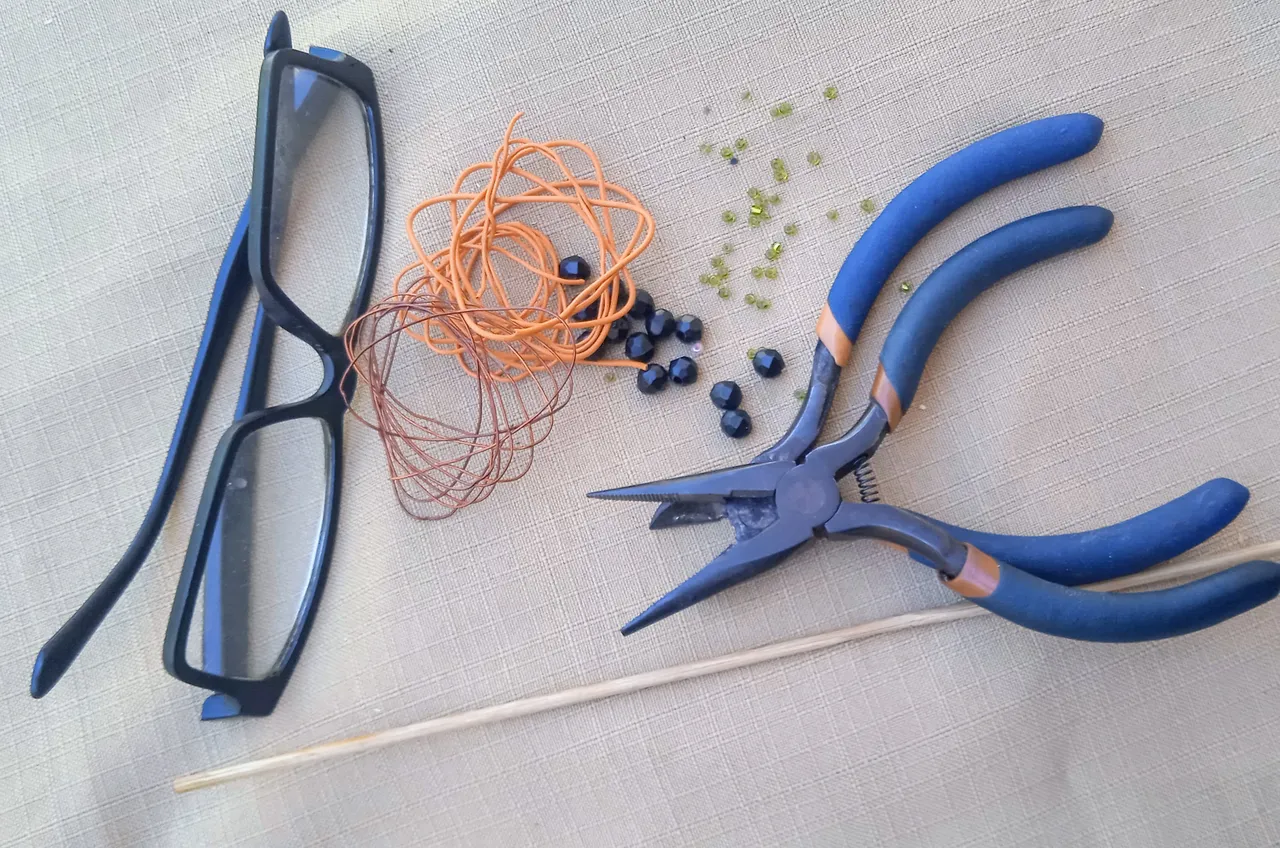
MATERIALES USADOS PARA ELABORAR ESTE COQUETO Y ORIGINAL ACCESORIO:
✓ Lentes.
✓ Piedras acrílicas tafetada negra.
✓ Mostacillones amarillo.
✓ Alambre de cobre calibre 26 pulgadas.
color naranja .
✓ Silicón líquido transparente.
✓ Lentejuelas doradas.
✓ Pinza plana.
✓ Pinza de corte.
MATERIALS USED TO MAKE THIS COZY AND ORIGINAL ACCESSORY:
✓ Lenses.
✓ Black taffeta acrylic stones.
✓ Yellow seed beads.
✓ 26-inch gauge copper wire.
orange color.
✓ Transparent liquid silicone.
✓ Gold sequins.
✓ Flat tweezers.
✓ Cutting tweezers.
USE ESTOS SENCILLOS Y POCOS PASOS PARA ELABORAR ESTE COQUETO PROYECTO:
PRIMER PASO:
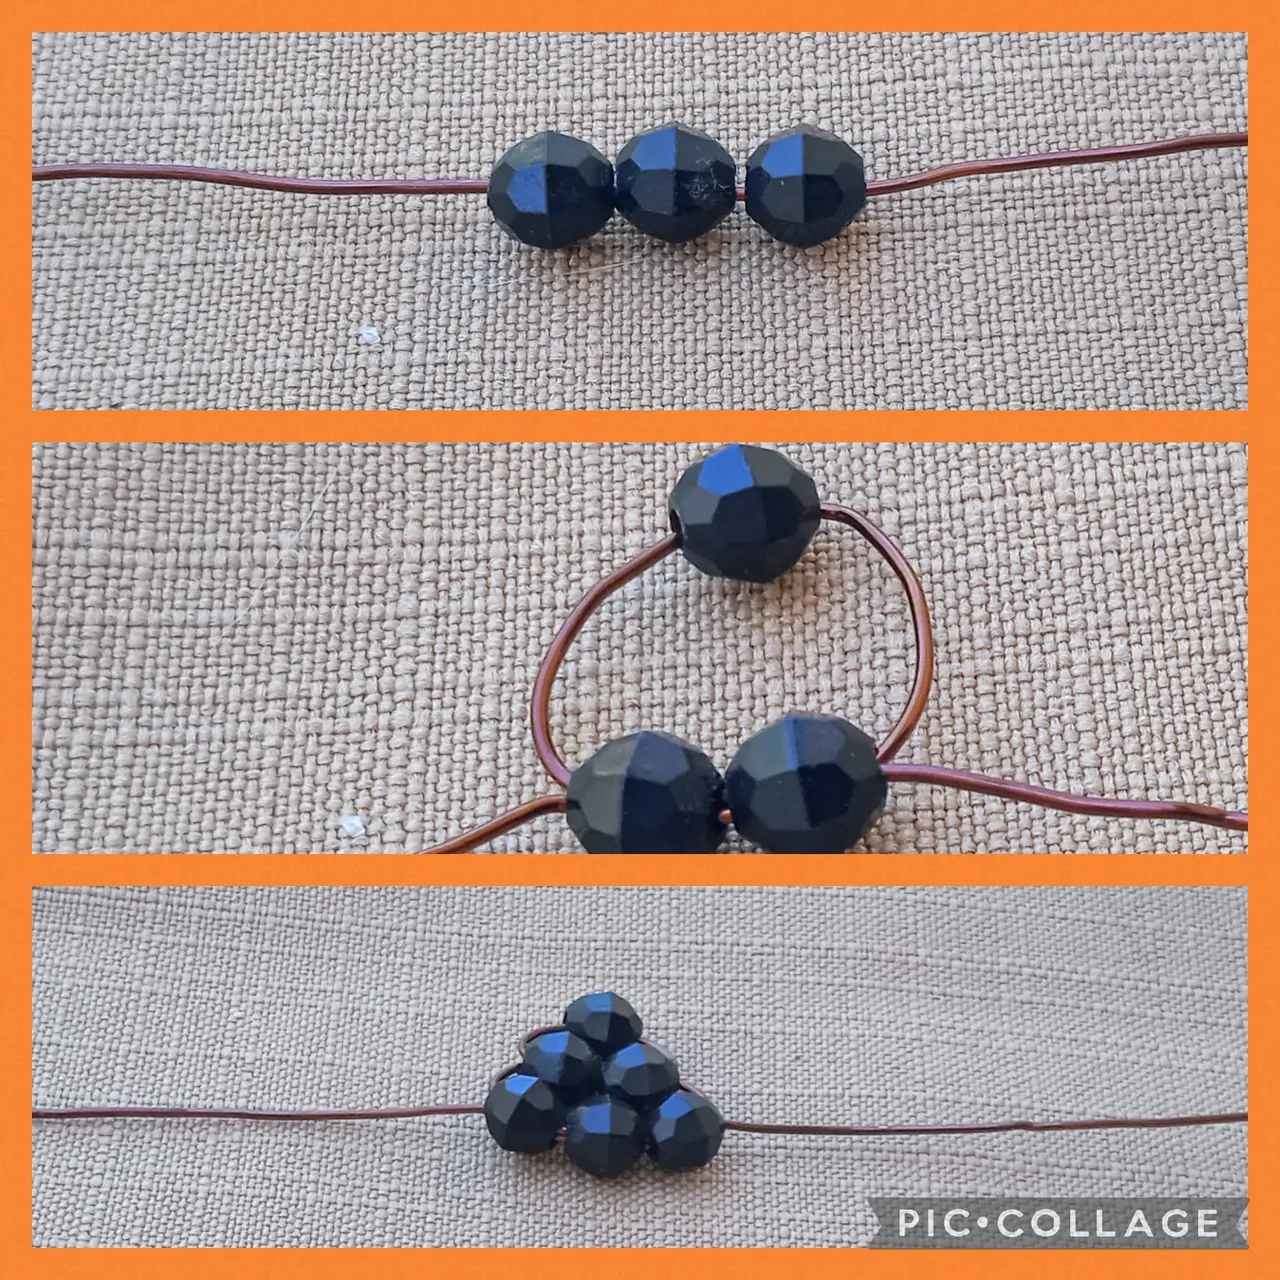
Voy a comenzar elaborando dos diseños que usualmente se identifican con las brujas, son los conos puntiagudos sombreros judenhat . Lo primero que hago es en un alambre de cobre calibre 26 pulgadas en una medida de quince centímetros introducir por una de las puntas tres piedras tafetadas negras, ahora con la otra punta cruzo dos de las tres piedras y me queda un pequeño triángulo como se ve en la imagen
USE THESE SIMPLE AND FEW STEPS TO MAKE THIS COZY PROJECT:
FIRST STEP:
I'm going to start by making two designs that are usually identified with witches, they are the pointed cones and judenhat hats. The first thing I do is insert three black taffeta stones into one of the ends of a 26-inch gauge copper wire measuring fifteen centimeters. Now, with the other end, I cross two of the three stones and I have a small triangle as seen in the image.
PASO DOS:
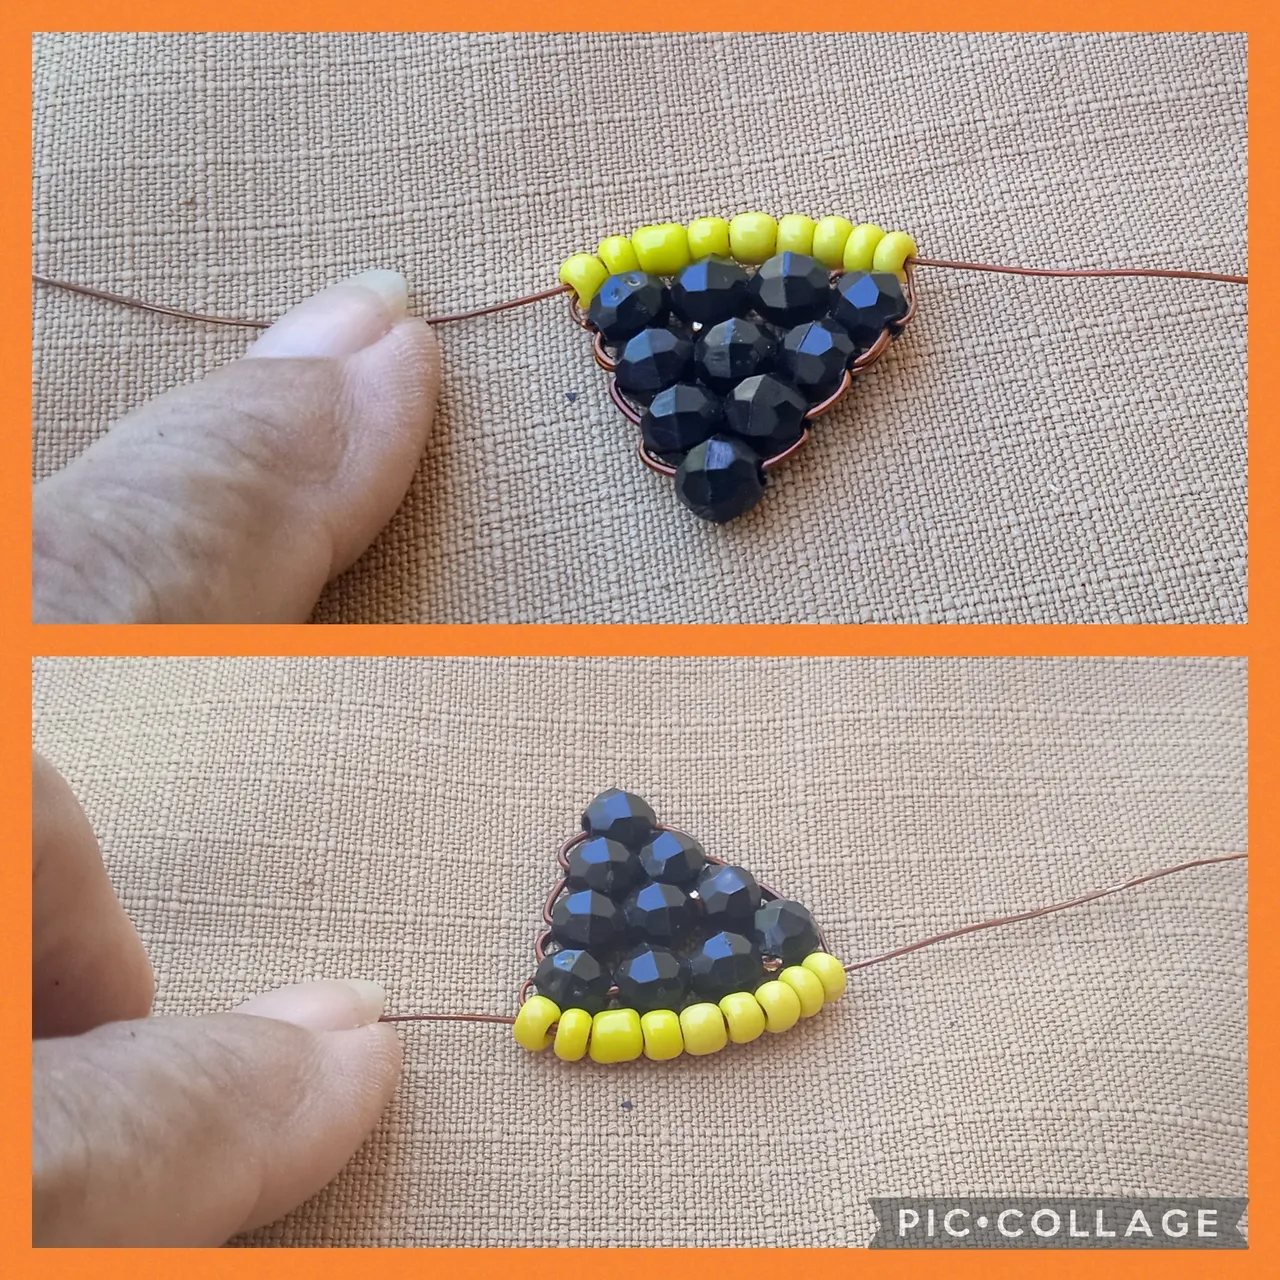
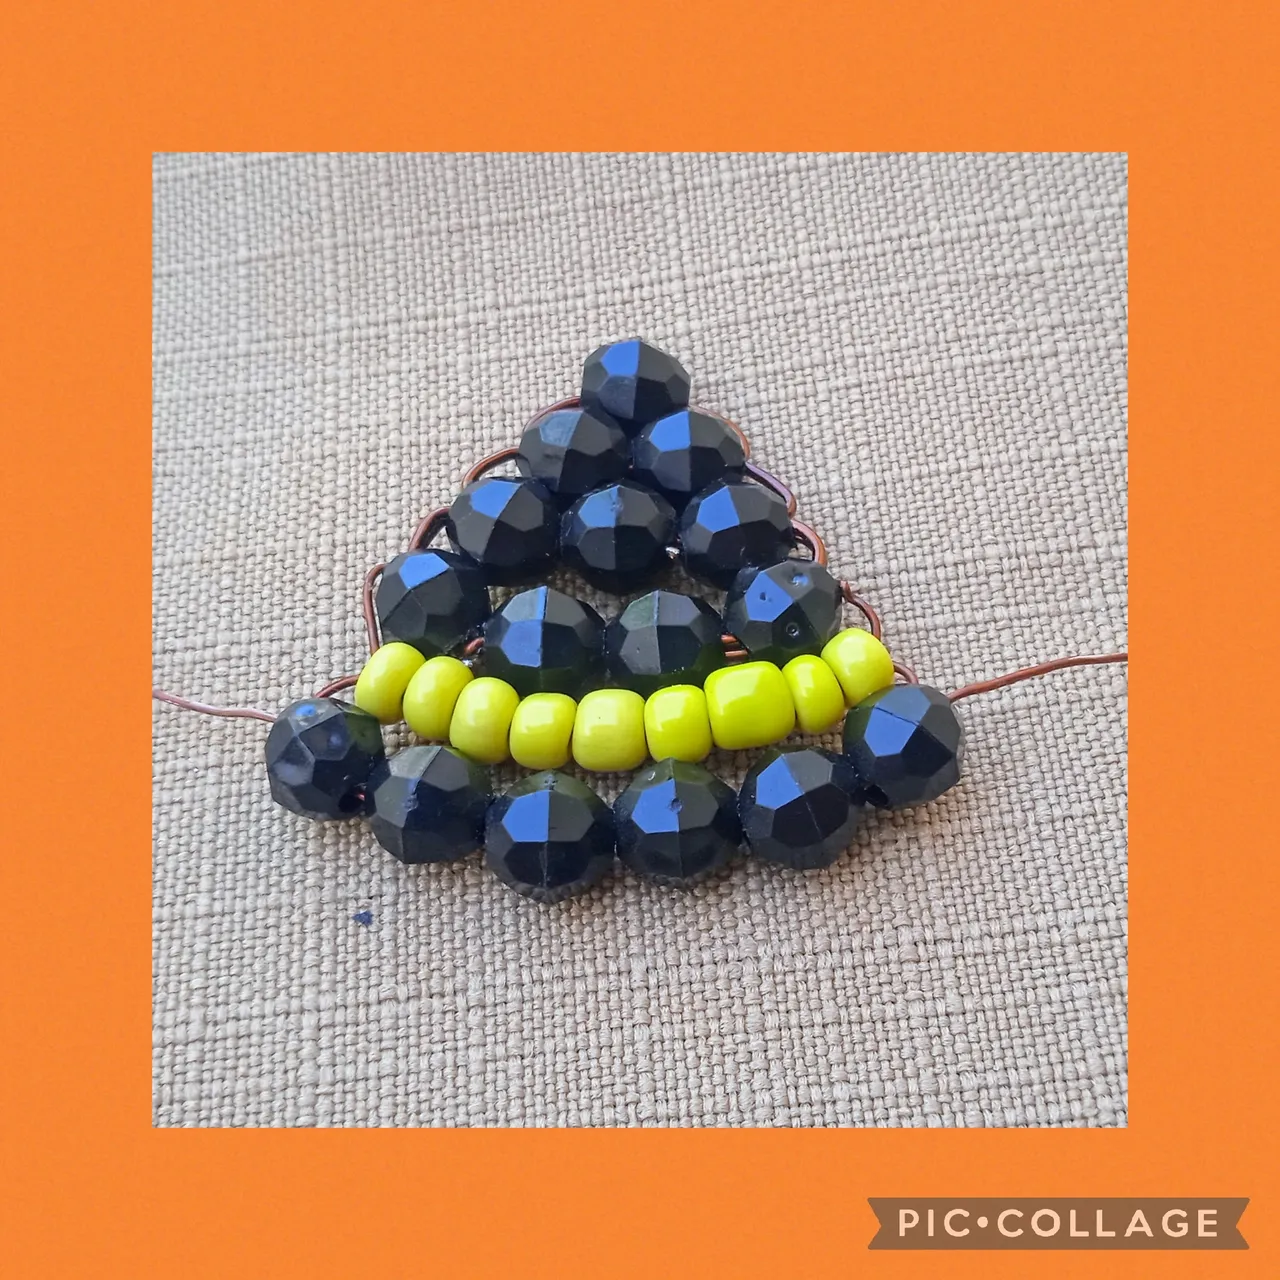
En este paso continúo la secuencia del paso anterior, inserto cuatro piedras negras tafetadas por una punta y la cruzo con la otra punta, luego para darle el toque coqueto a este original sombrero, inserto por una punta nueve mostacillones amarillos y los cruzo, en esta última vuelta introduzco seis piedras negras tafetadas las cruzo. Ahora paso de nuevo el alambre por los mostacillones halo pien las puntas y cruzo de nuevo por las cuatro piedras negras tafetadas fijando bien, uso la pinza de corte y quito los excedentes y queda como en la imagen.
STEP TWO:
In this step I continue the sequence of the previous step, I insert four black taffeta stones through one end and cross it with the other end, then to give this original hat a flirtatious touch, I insert nine yellow seed beads through one end and cross them, in this last turn I insert six black taffeta stones and cross them. Now I pass the wire through the halo seed beads again, I pin the ends and cross it again through the four black taffeta stones, securing it well, I use the cutting pliers and remove the excess and it looks like in the image
PASO TRES:
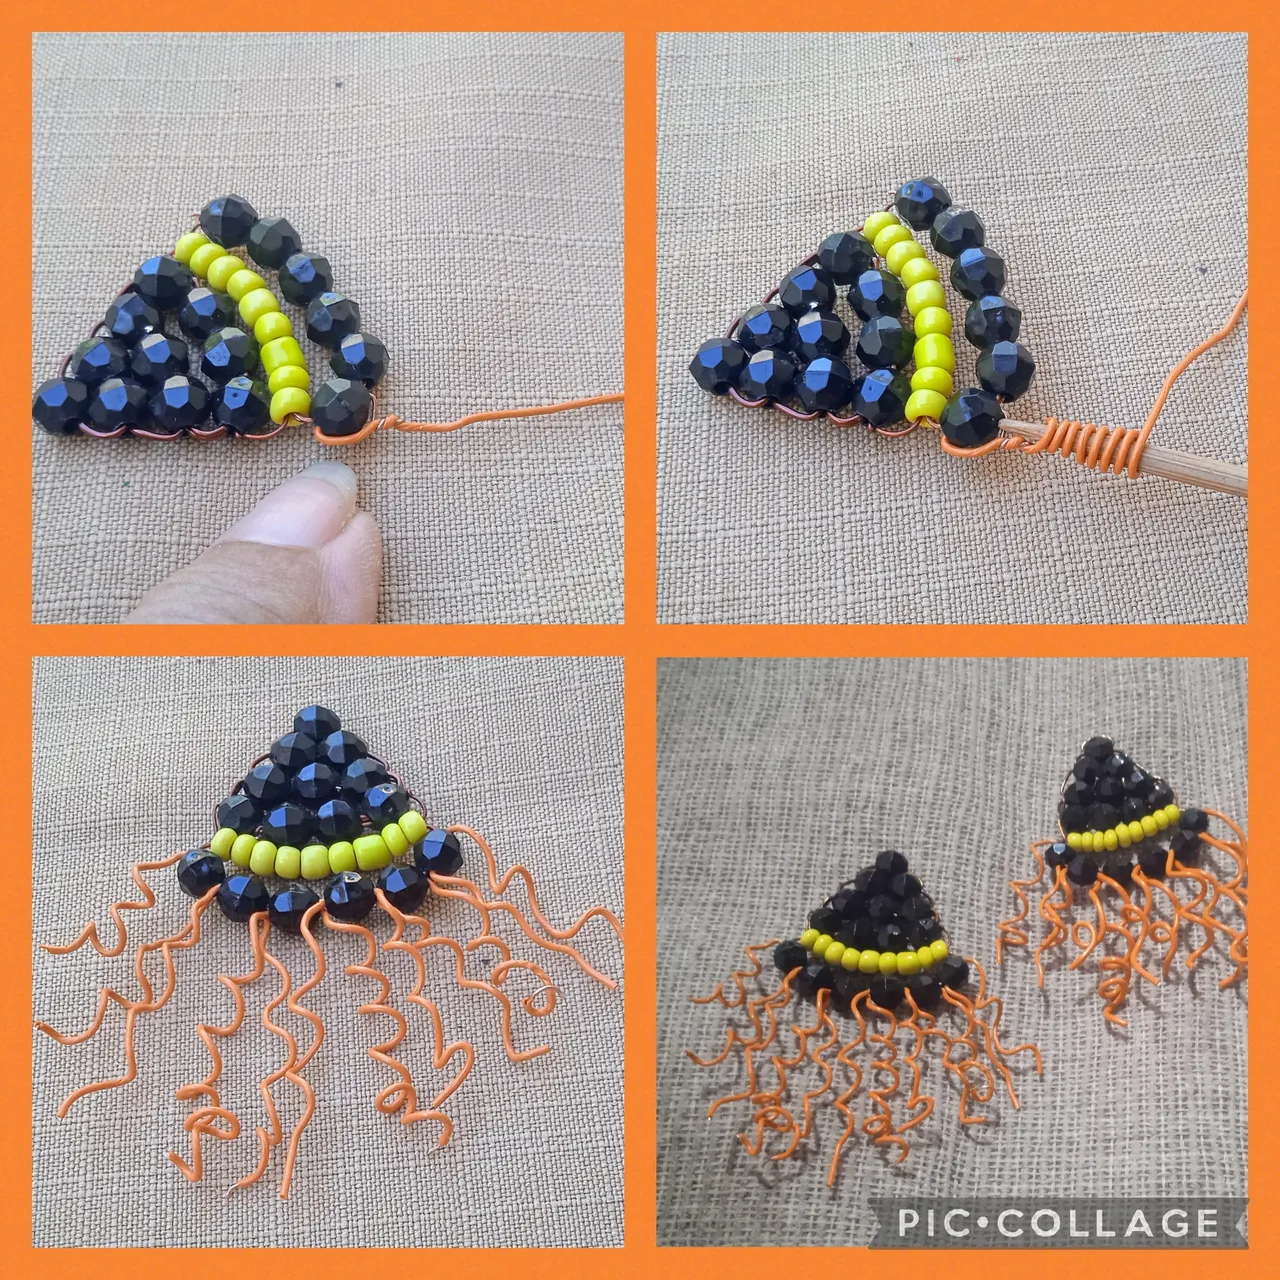
En este paso voy a cortar del alambre color naranja seis trozos que los voy a pasar de uno en uno por las piedras negras igualo las puntas y así tendré doce alambres, ahora con un palito de altura voy a enroscar para hacer especie de rulos y semejar cabello de bruja estos los voy a estirar un poco para darles forma de melena, corto los excedentes para quedar de esta forma.
STEP THREE:
In this step I am going to cut six pieces of orange wire that I am going to pass one by one through the black stones, I will even out the ends and this way I will have twelve wires, now with a tall stick I am going to twist them to make some kind of curls and look like a witch's hair, I am going to stretch these a little to give them the shape of a mane, I cut the excess to leave it like this.
PASO CUATRO:
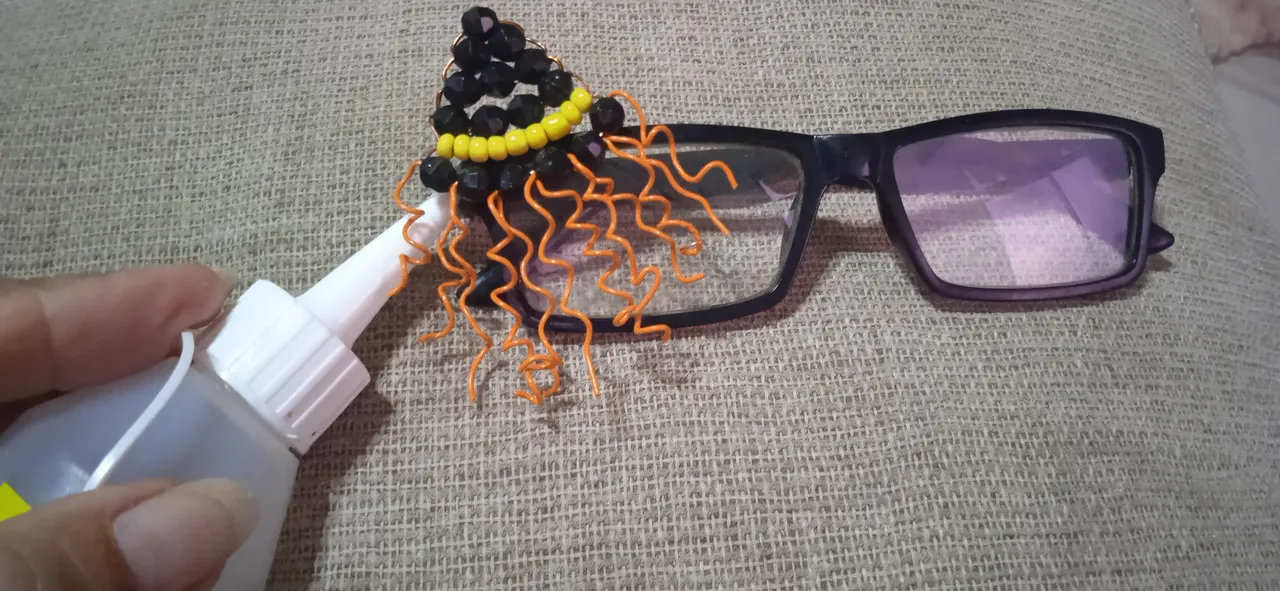
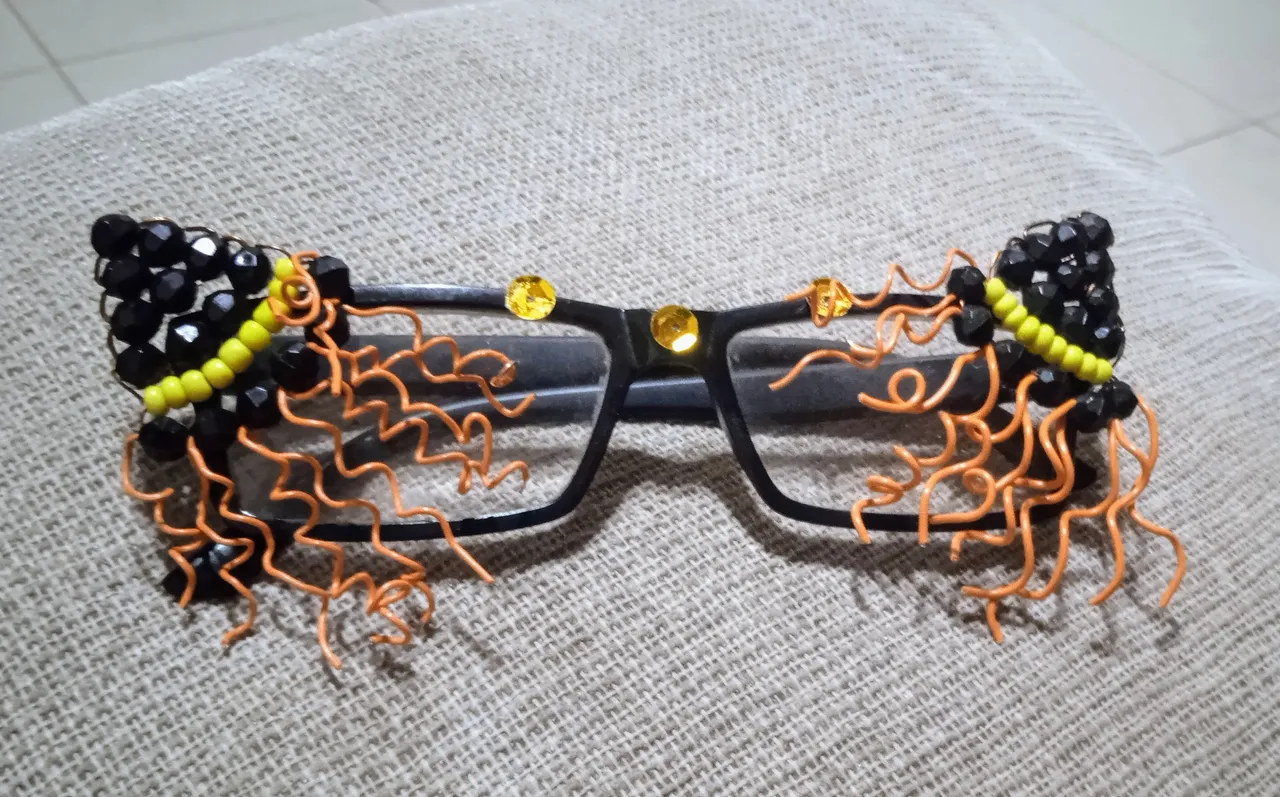
Una vez realizado los dos diseños de sombreros Judenhat, los voy a unir a los lentes; usando silicón líquido coloco una pequeña porción en el sombrero y lo pongo en uno de los extremos del lente hago presión y espero que seque, ahora repito el proceso en el otro extremo y así va quedando
STEP FOUR:
Once the two Judenhat hat designs are done, I'm going to attach them to the glasses; using liquid silicone I place a small portion on the hat and put it on one end of the lens, apply pressure and wait for it to dry, now I repeat the process on the other end and this is how it will look.
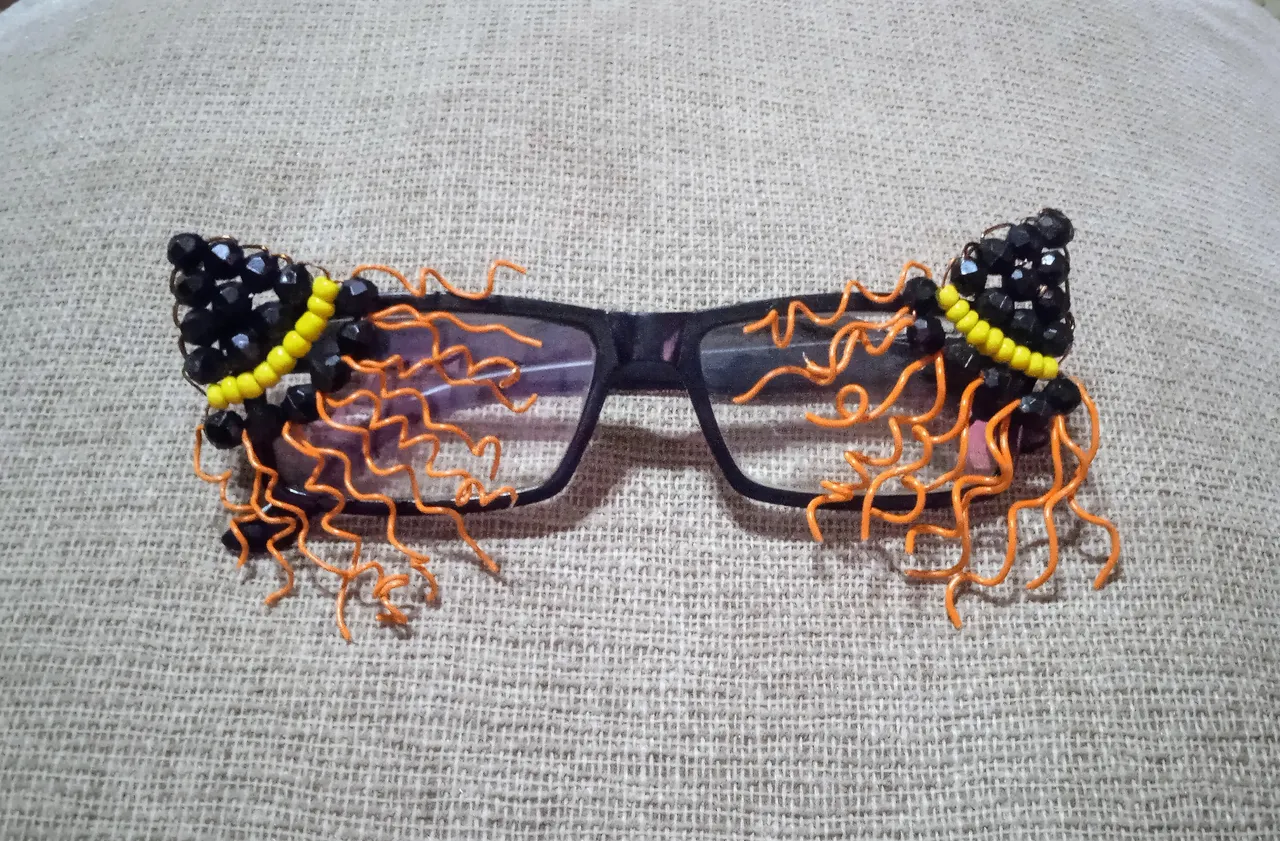
Queridos Artistas Creativos de las Manualidades y la Joyería para el resultado final de mi original proyecto, coloqué tres lentejuelas doradas entre los sombreros y me encantó está sencilla pero divertida manualidad, espero que ustedes con su toque personal usen esta idea para aretes, dijes, llaveros queda estupendo, como siempre agradecida por sus valiosos comentarios y apoyo , nos veremos en la próxima manualidad, feliz halloween 🎃 bye bye.
Dear Creative Artists of Crafts and Jewelry, for the final result of my original project, I placed three gold sequins between the hats and I loved this simple but fun craft. I hope that you, with your personal touch, use this idea for earrings, charms, key chains, it looks great. As always, grateful for your valuable comments and support. We'll see you in the next craft. Happy Halloween 🎃 Bye bye.

Las imágenes y redacción de éste tutorial son de mi exclusiva propiedad, las fotos fueron tomadas con mi teléfono celular redmi 9 y las edite con una aplicación gratis del mismo.
Para traducir texto use Google traductor.
The images and writing of this tutorial are my exclusive property, the photos were taken with my redmi 9 cell phone and I edited them with a free application of the same.
To translate text use Google translator
