WELCOME TO MY BLOG
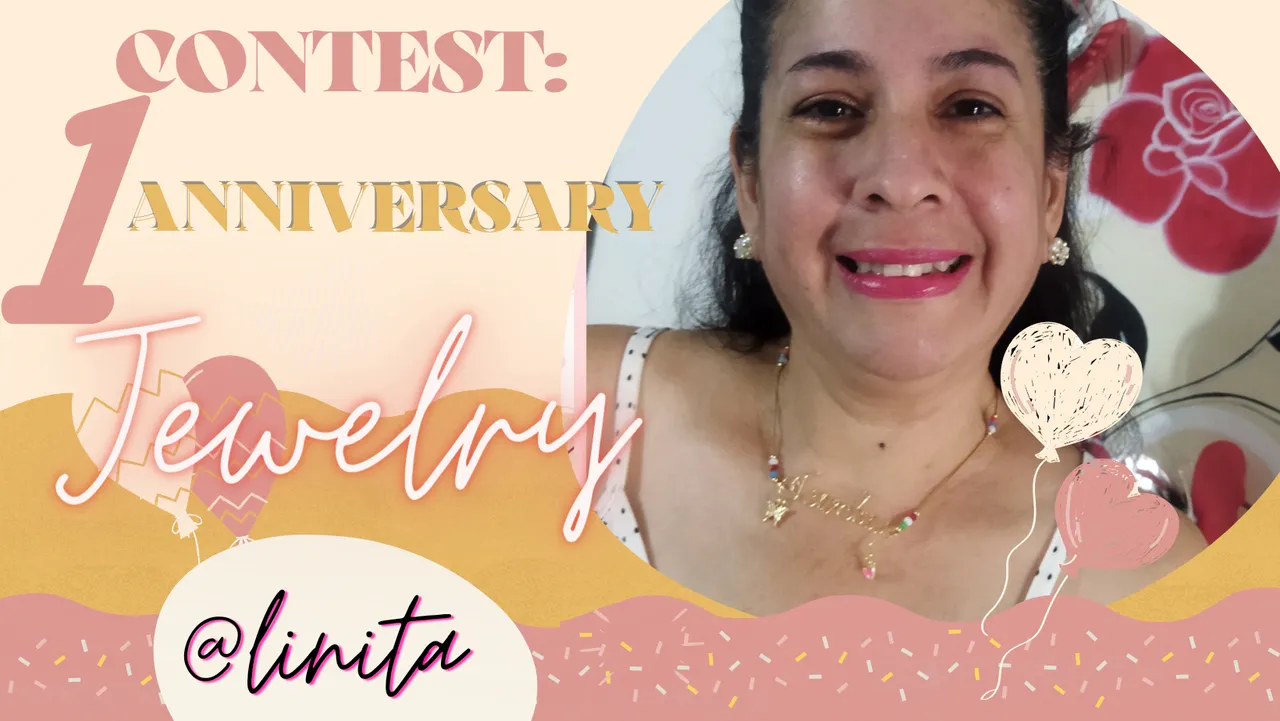
Hellooooo, hellooooo! My congratulations to #Jewelry on their first anniversary. A year in which we have enjoyed great challenges thanks to @yolimarag who motivates us every day with a new proposal and to all those who share their creations and experiences with us. During this year, I can say that it has been one of growth, I have felt motivated to acquire materials to learn a little more about the art of jewelry, the macramé technique and what I like the most and I want to continue learning day by day, the technique of the wire. This technique has been a true personal challenge and although I am not very skilled at performing so many figures "yet", I think that the progress achieved has been noticeable.
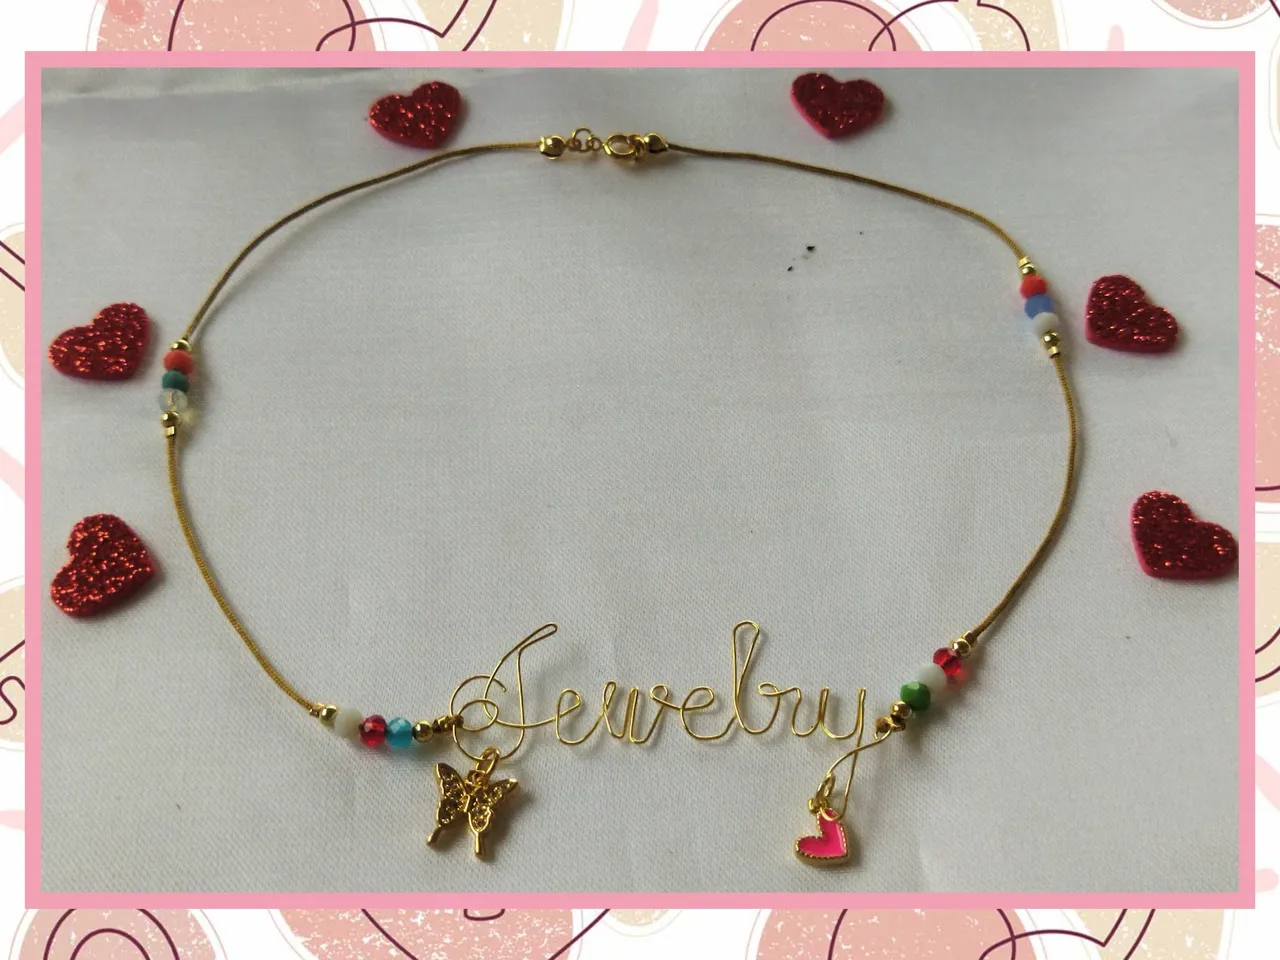
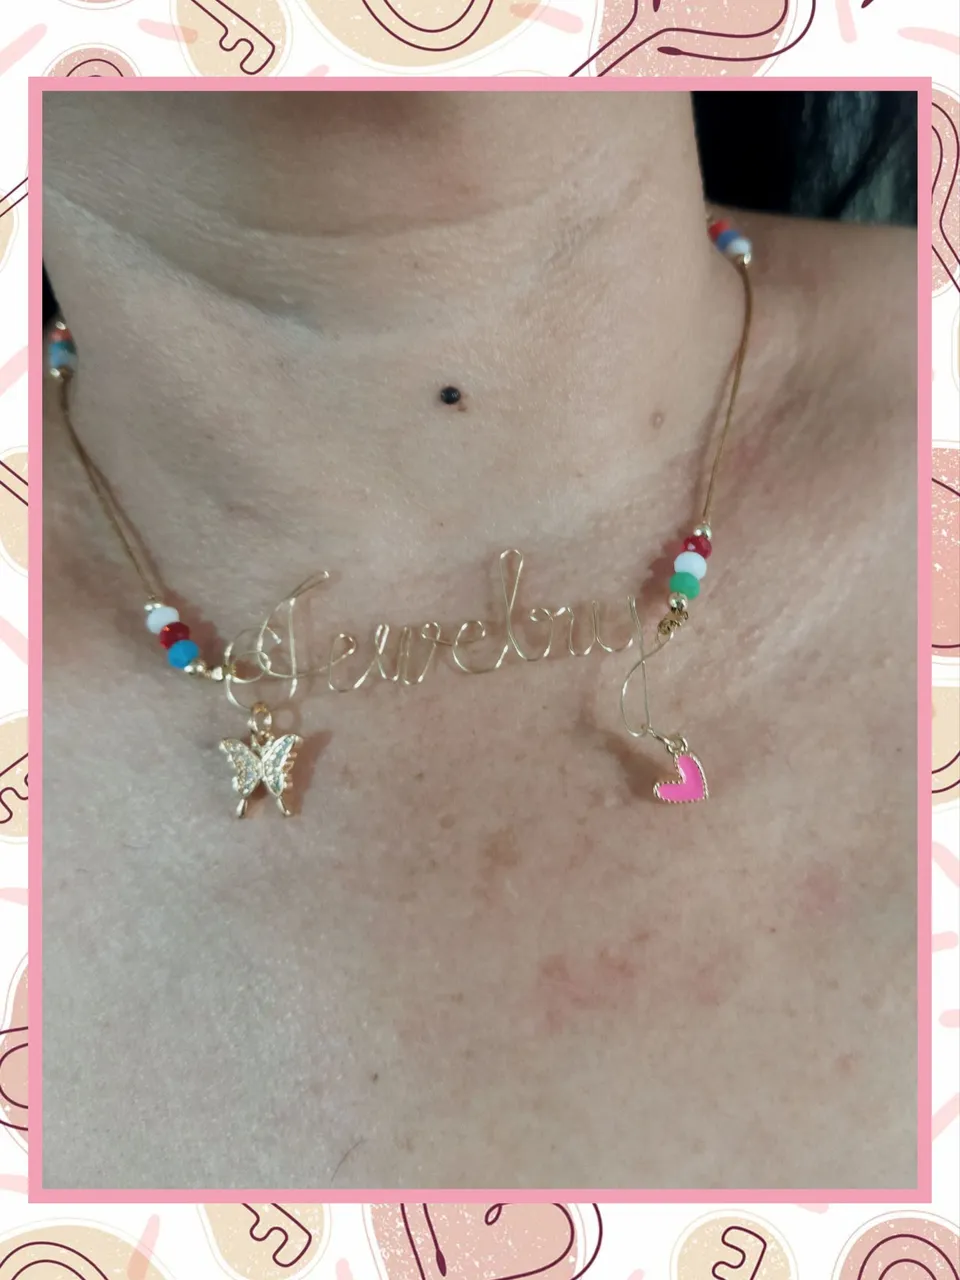
That is why to celebrate the First Anniversary of the community I wanted to make a choker with the name of Jewelry made in this beautiful wire rope technique.
I spent two whole days practicing the design of the letters as similar to those that appear in the logo. It was very fun, in these two days I valued the work of all the artisans much more, the dedication that must be put into this art and the delicacy to achieve neat and precious pieces.
I say goodbye but not before wishing the community a Happy Anniversary and that it continues to grow and reap great achievements in the coming years.
BIENVENIDOS A MI BLOG
¡Holaaaa, holaaaaa! Mis felicitaciones a #Jewelry por su primer aniversario. Un año en el que hemos disfrutado de grandes desafíos gracias a @yolimarag que día a día nos motiva con una nueva propuesta y a todos los que nos comparten sus creaciones y experiencias. Durante este año, puedo decir que ha sido de crecimiento, me he sentido motivada a adquirir materiales para aprenden un poco más el arte de la bisutería, la técnica del macramé y lo que más me gusta y quiero seguir aprendiendo día a día, la técnica del alambrismo. Esta técnica ha sido un verdadero reto personal y aunque no soy muy habilidosa para realizar tantas figuras "aún", creo que el avance logrado ha sido notorio.
Es por ello que para celebrar el Primer Aniversario de la comunidad quise realizar u choker con el nombre de Jewelry hecho en esta bella técnica de alambrismo.
Estuve dos días enteros practicando el diseño de las letras lo más parecidas a las que aparecen en el logo. Fue my divertido, en estos dos días valoré mucho más el trabajo de todos los artesanos, la dedicación que hay que ponerle a este arte y la delicadeza para lograr piezas prolijas y preciosas.
Me despido no sin antes desearle a la comunidad un Feliz Aniversario y que siga en crecimiento y cosechando grandes logros en los próximos años venideros.
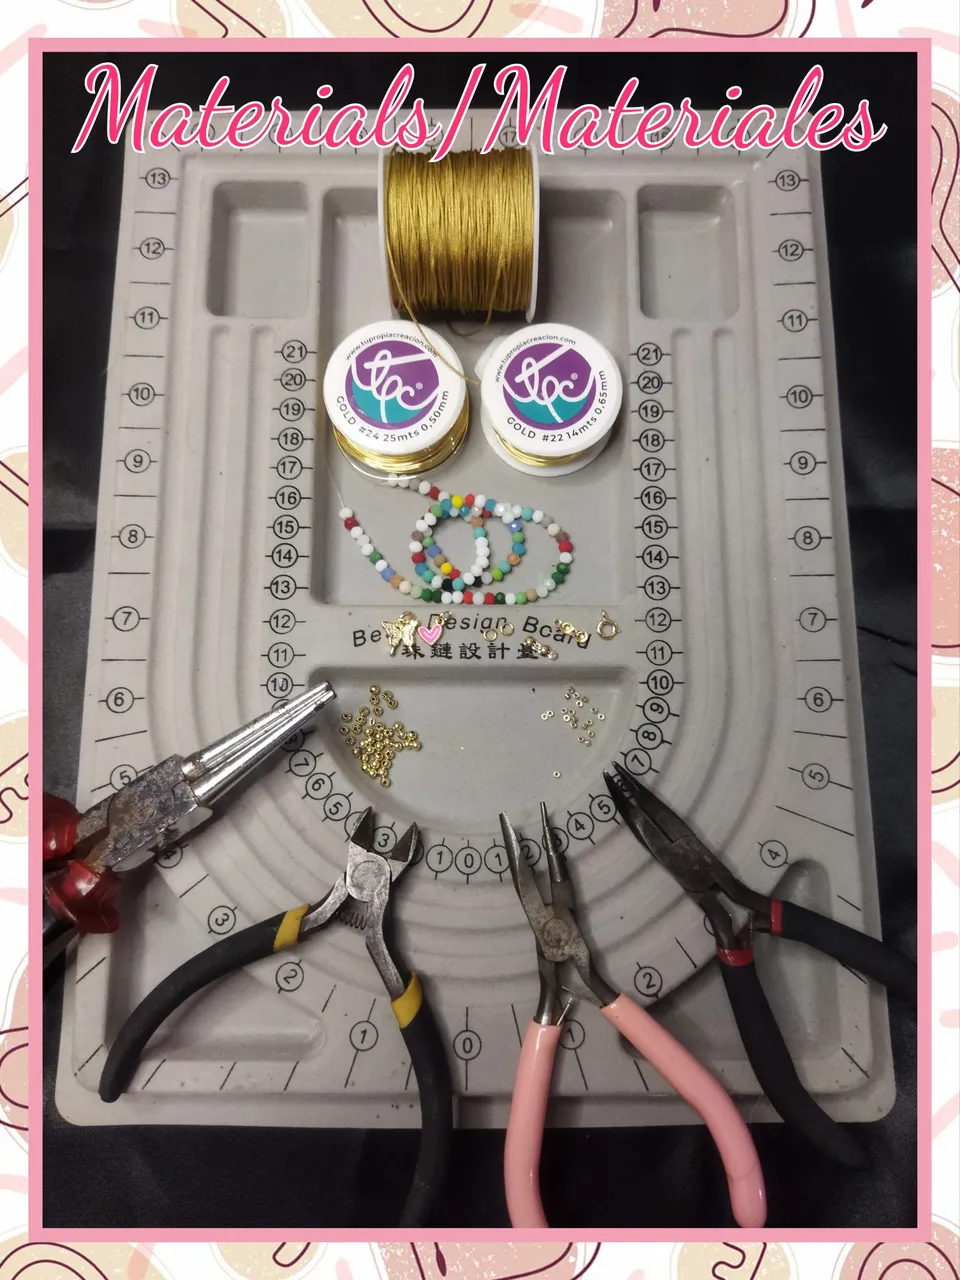
MATERIALS
- Wire #24
- Golden Chinese thread
- Czech Crystals #4
- Charms (Heart and Butterfly)
- Pellets #2
- Staples
- Hoops #3
- Safe for necklace
- Cover knots
- Scissors
- Lighter
- Measuring tape
- Jewelery table
- Tweezers (cut, flat, conical)
MATERIALES
- Alambre #24
- Hilo chino dorado
- Cristales checo #4
- Dijes (Corazón y Mariposa)
- Balines #2
- Grapas
- Aros #3
- Seguro para collar
- Tapa nudos
- Tijera
- Encendedor
- Cinta métrica
- Tabla de bisutería
- Pinzas (corte, plana, cónica)
STEP BY STEP // PASO A PASO
NAME CREATION
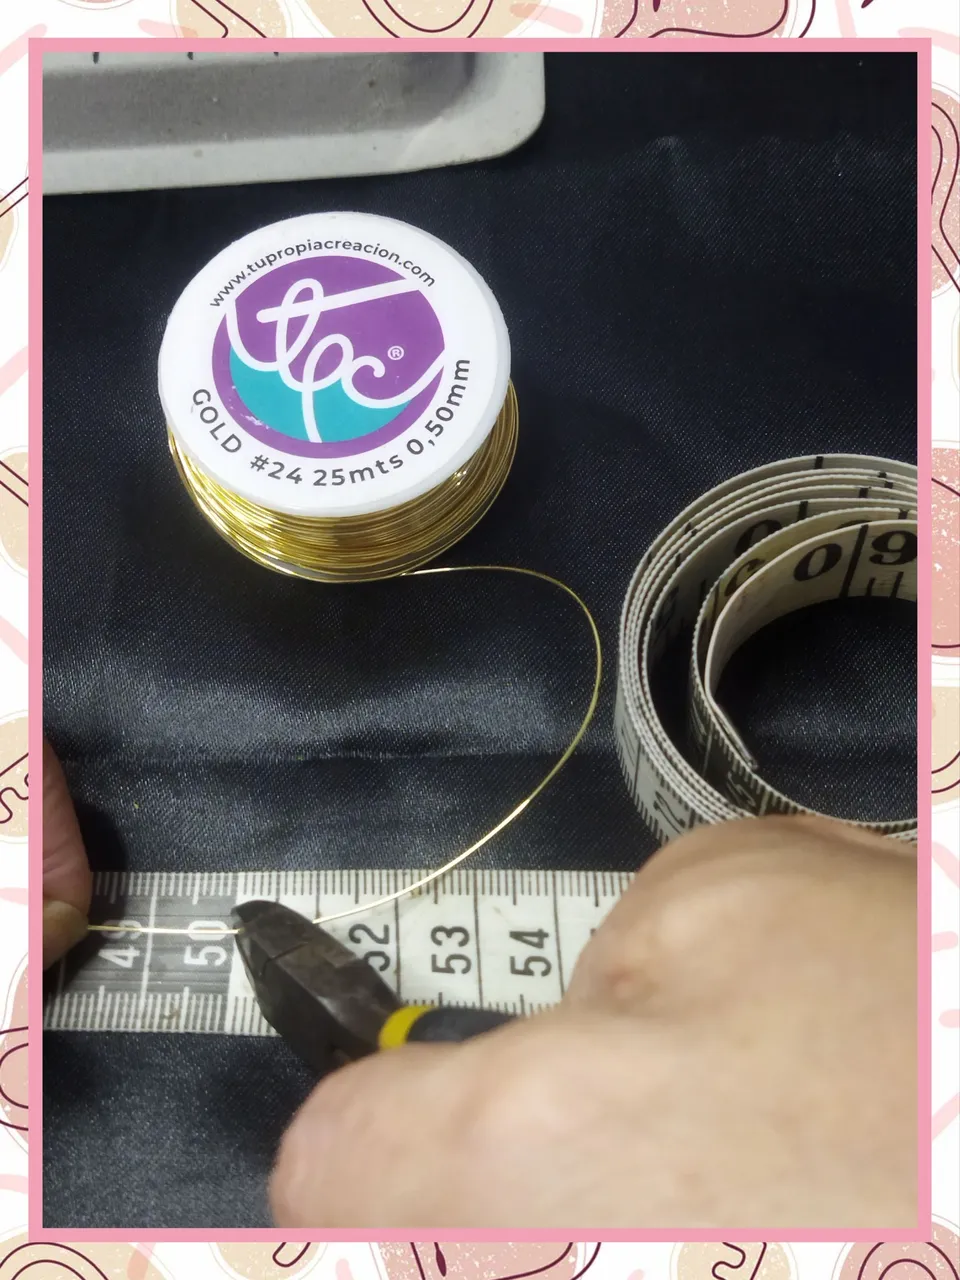
To create the name of the Jewelry, I used 50 cm of #24 gold wire and previously calculated the size that I wanted so that it would not be too small or too extravagant.
CREACIÓN DEL NOMBRE
Para crear el nombre de Jewelry, utilicé 50 cm de alambre dorado #24 y previamente hice un cálculo del tamaño que lo quería para que no quedará ni muy pequeño ni muy extravagante.
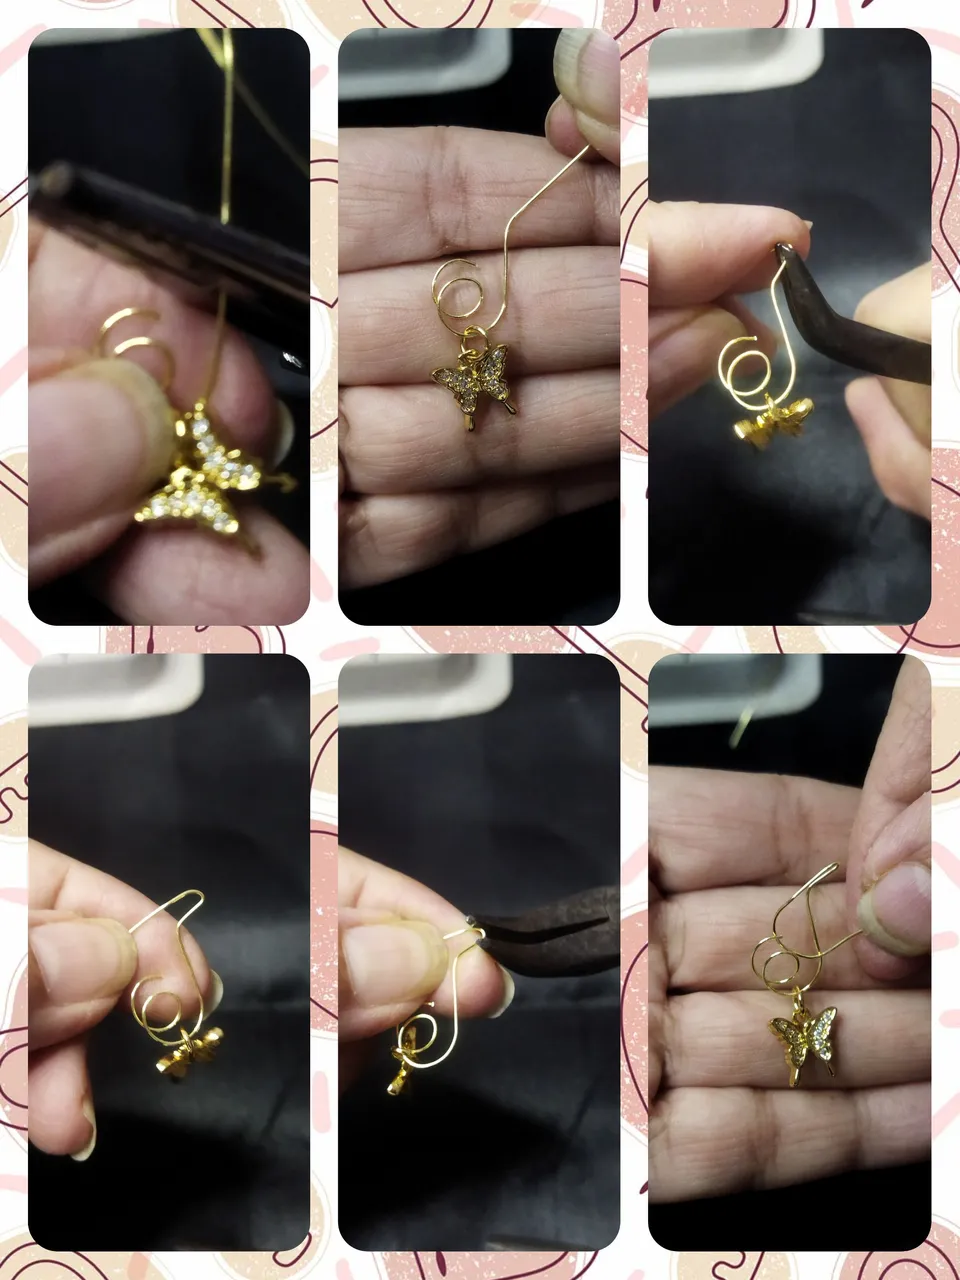
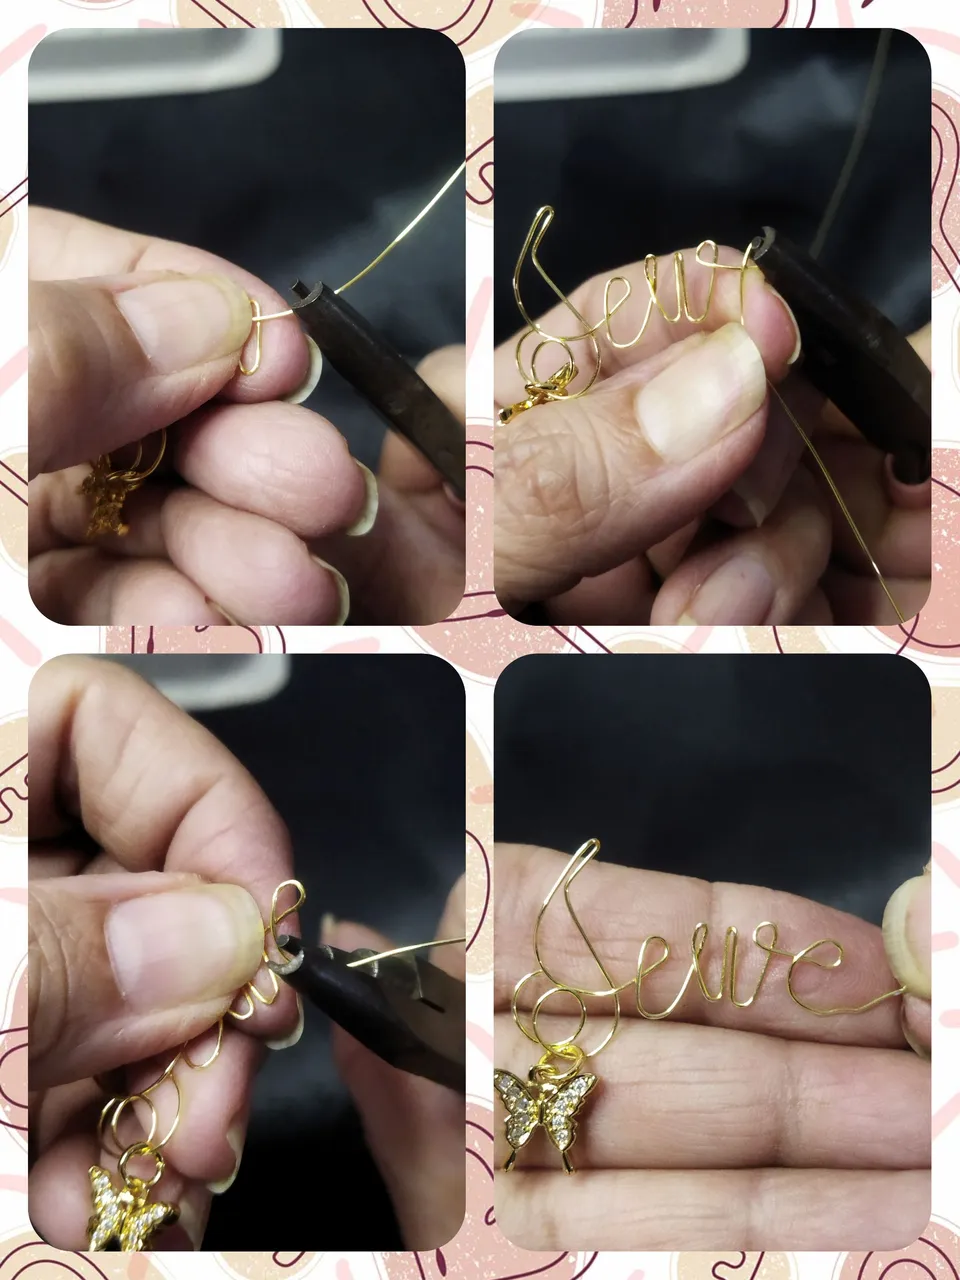
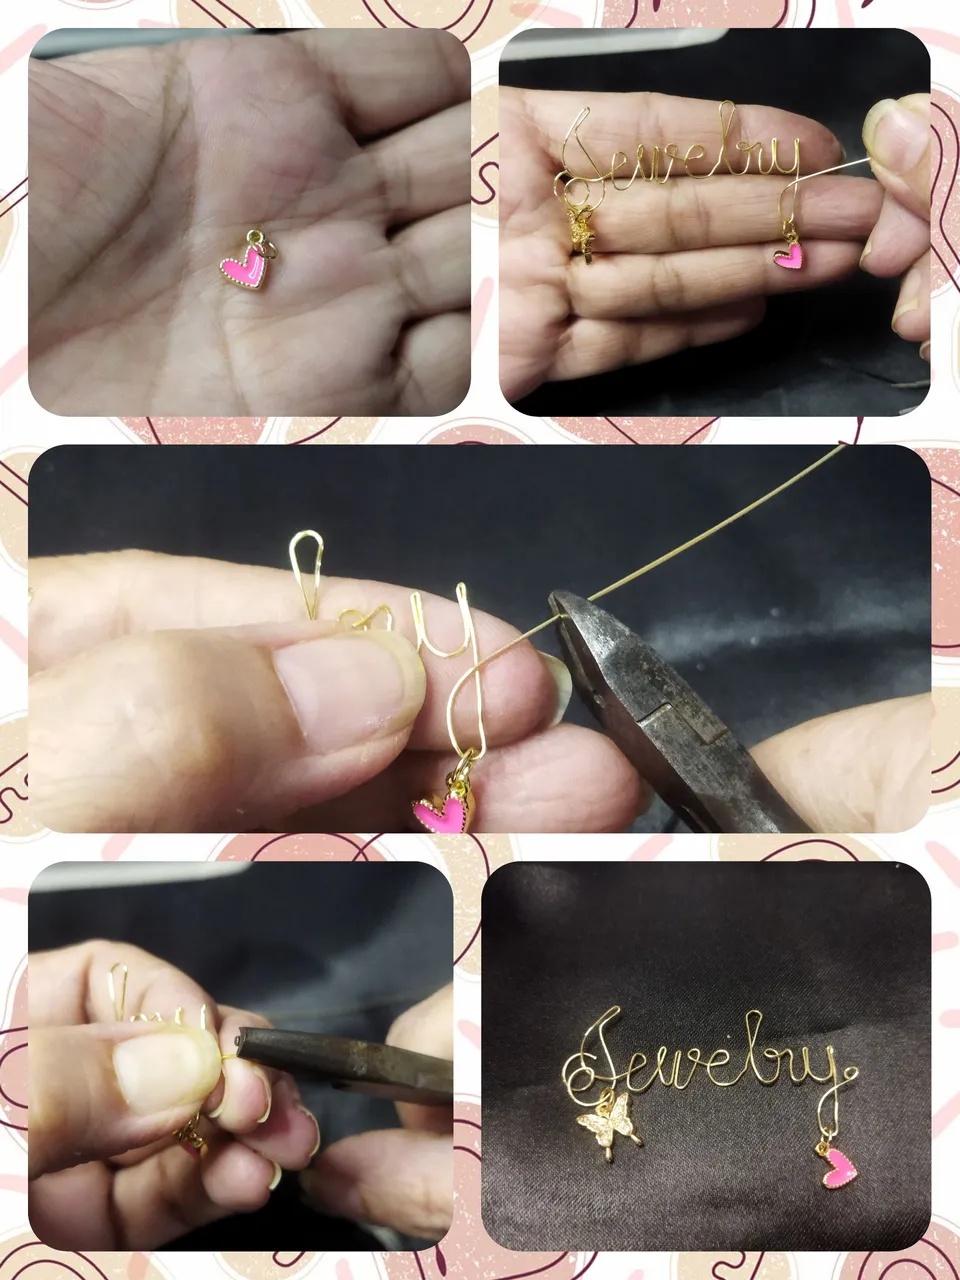
I started by making the letter "J" similar to the one on the community mud. With the conical pliers I made two turns with the #24 wire, then I stretched it until I gave it the desired shape and inserted the first pendant, in this case the butterfly one.
Comencé realizando la letra "J" semejante a la del lodo de la comunidad. Con la pinza cónica realicé dos vuelta con el alambre #24, luego estiré hasta darle la forma deseada e introduje el primer dije, en este caso el de la mariposa.
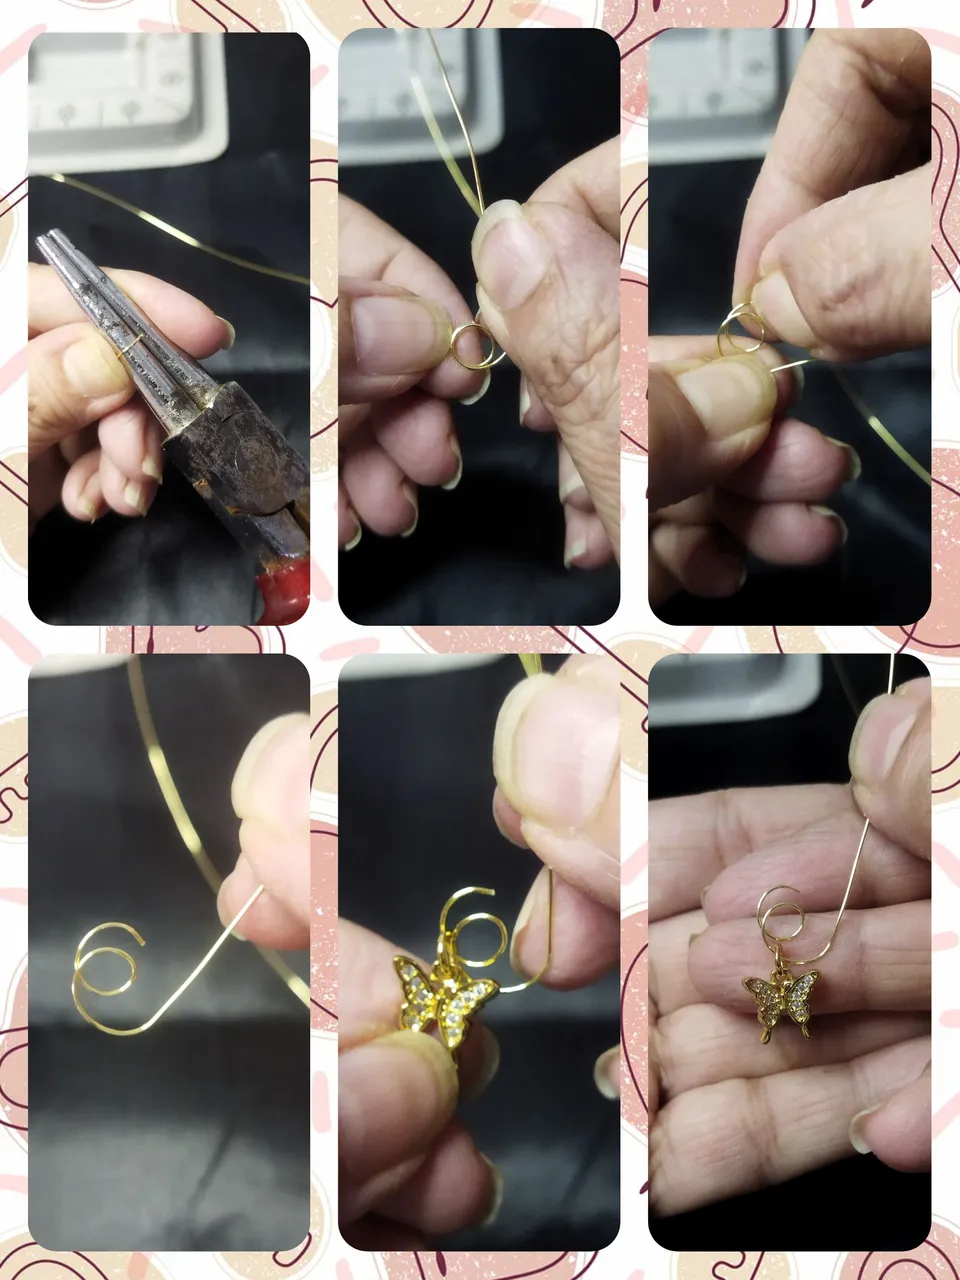
Once the charm was located, with the curved tweezers I made a 45º fold leaving 1 cm of distance and then another to the opposite side to make the shape of the letter and with the tweezers I folded until the tip was glued. Then mold until you finish forming the letter.
Una vez ubicado el dije , con la pinza curva realicé un doblez de 45º dejando 1 cm de distancia y luego otro hacia el lado opuesto para hacer la forma de la letra y con la pinza doblé hasta pegar la punta. Luego moldee hasta terminar de formar la letra.
The letter "e" is the easiest to do, since you only make a bend with the conical pliers and grind the wire to form the letter.
La letra "e" es la que más fácil se realiza, ya que sólo se hace un doblez con la pinza cónia y se molea el alambre hasta formar la letra.
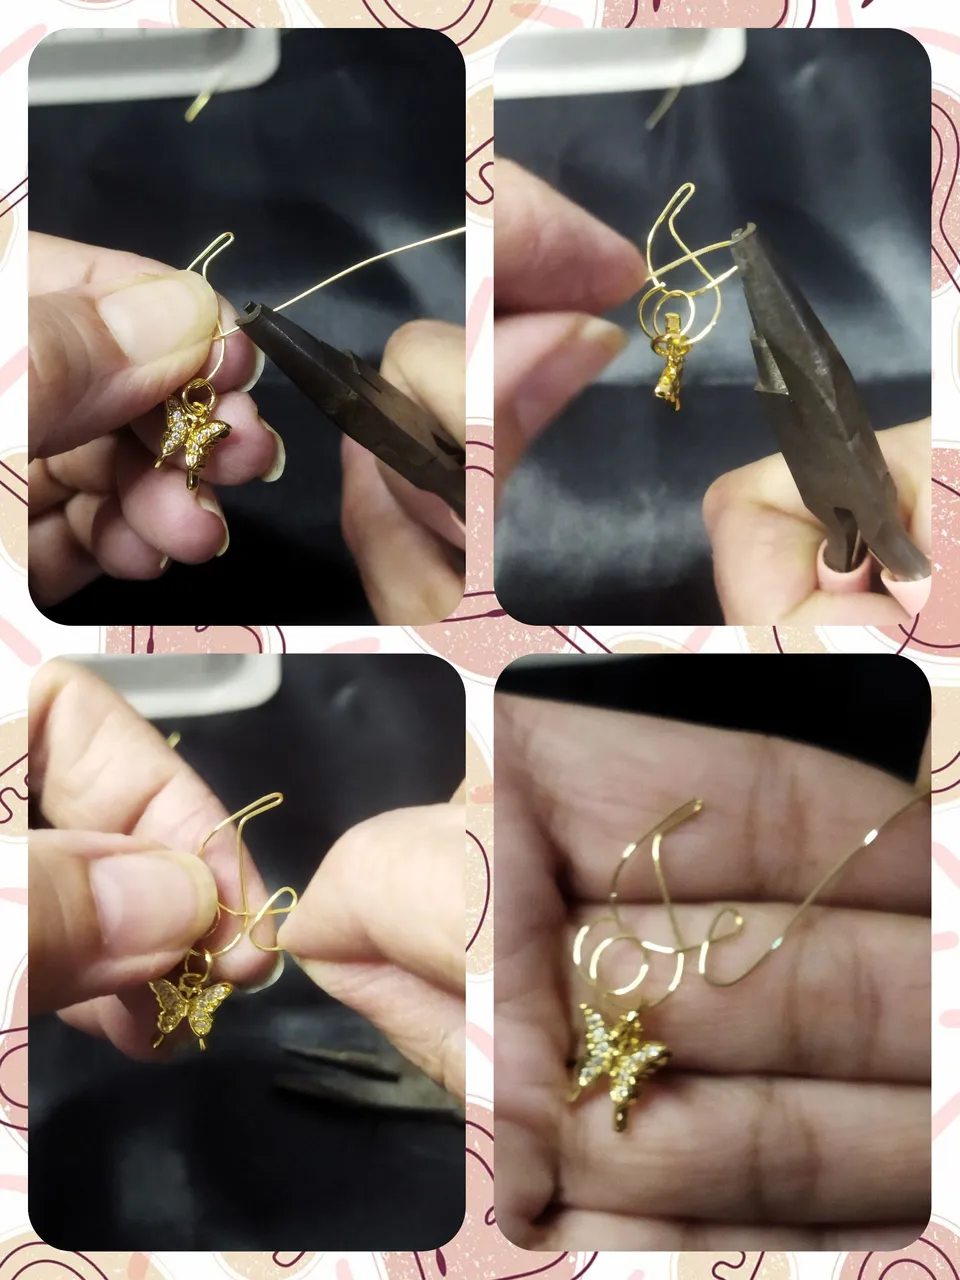
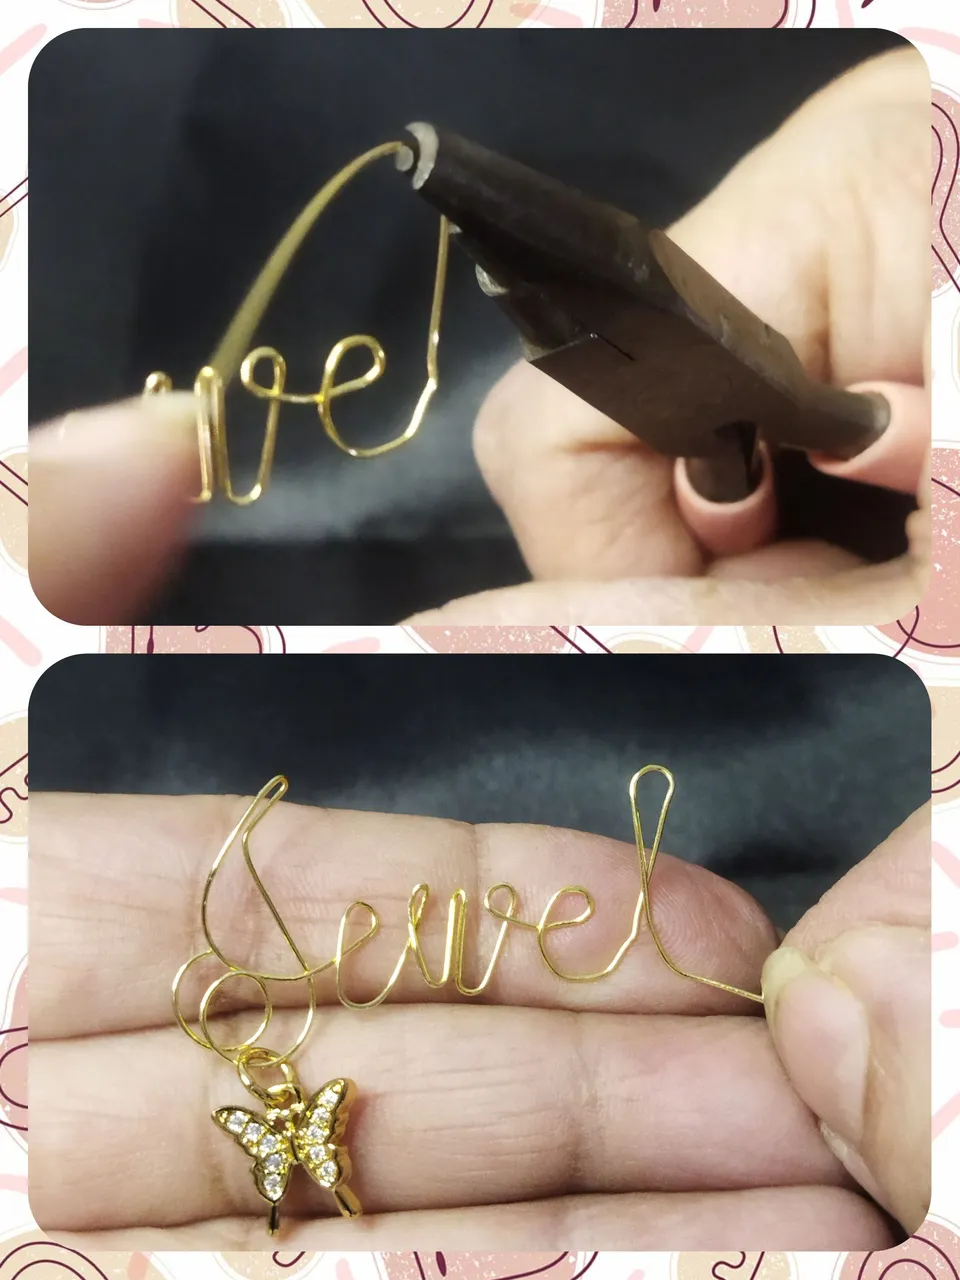
We continue with the letter "w", without a doubt the most difficult since you have to make two folds and try to make them the same. We begin by making a 180º fold and with the pliers we press the upper end and make a 180º turn.
Continuamos con la letra "w", sin duda la más difícil ya que hay que realizar dos dobleces y tratar de que queden iguales. Comenzamos realizando un doblez de 180º y con la pinza apretamos el extremo superior y damos un giro de 180º.
Then with the conical pliers we make a "u" bend and we lower the wire and we make another "u" again, adjusting the union of both "u" with the curved pliers. and at the end of forming the "W" we make a small turn at the top of the letter forming a small ring to shape the wire and begin to form the next letter.
Luego con la pinza cónica hacemos un doblez en forma de "u" y bajamos el alambre y realizamos nuevamente otra "u" ajustando la unión de ambas "u" con la pinza curva. y al finalizar de formar la "W" hacemos una pequeña vuelta en la parte superior de la letra formando un pequeño aro para darle forma al alambre y comenzar a formar la siguiente letra.
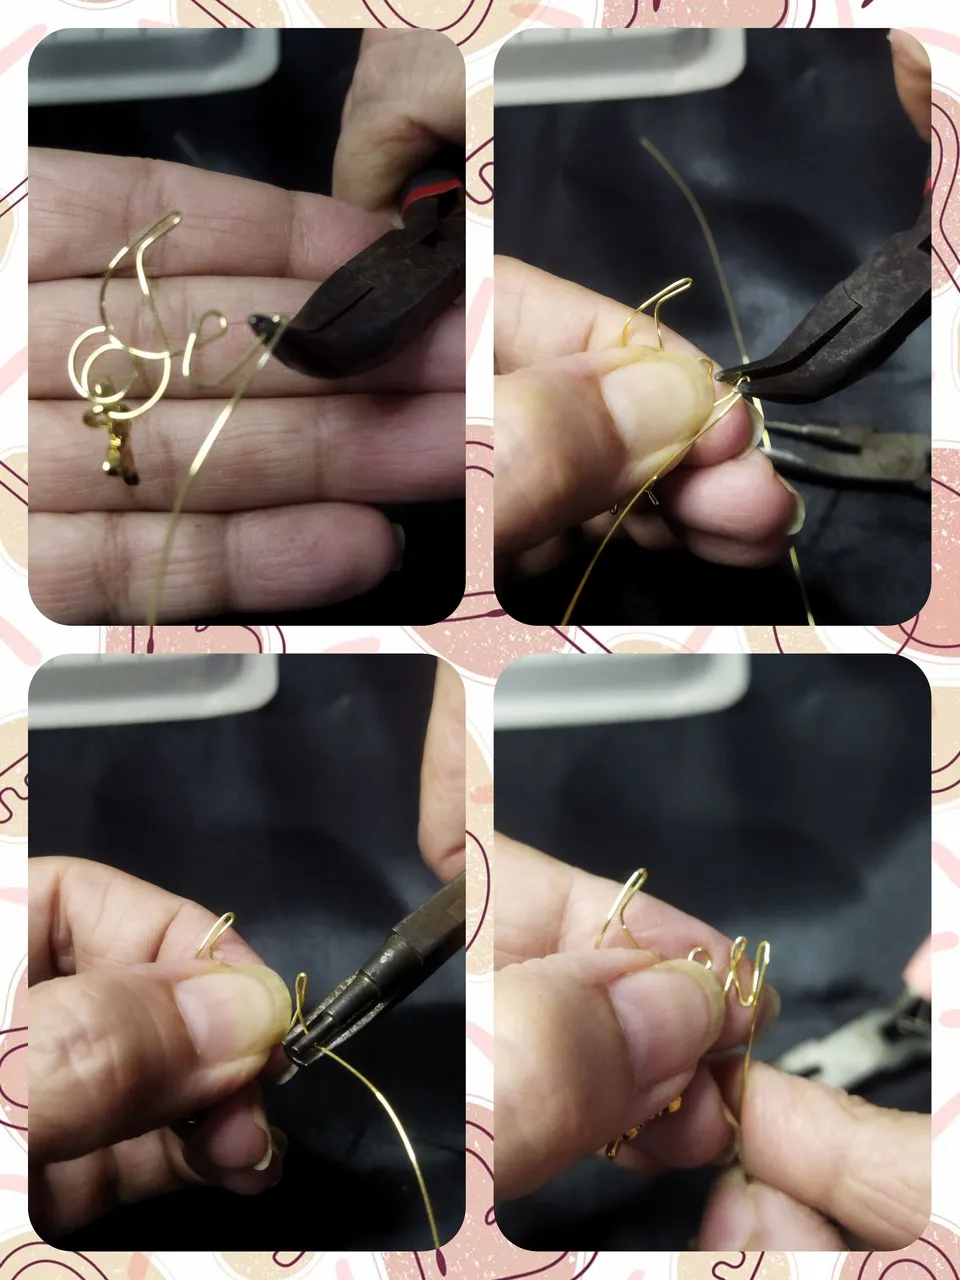
We continue with the letter "e" again. Just like the first one, we only make a turn with the conical pliers and shape the wire until we form the letter.
Continuamos con la letra "e" nuevamente. al igual que la primera, sólo hacemos un giro con la pinza cónica y moldeamos el alambre hasta formar la letra.
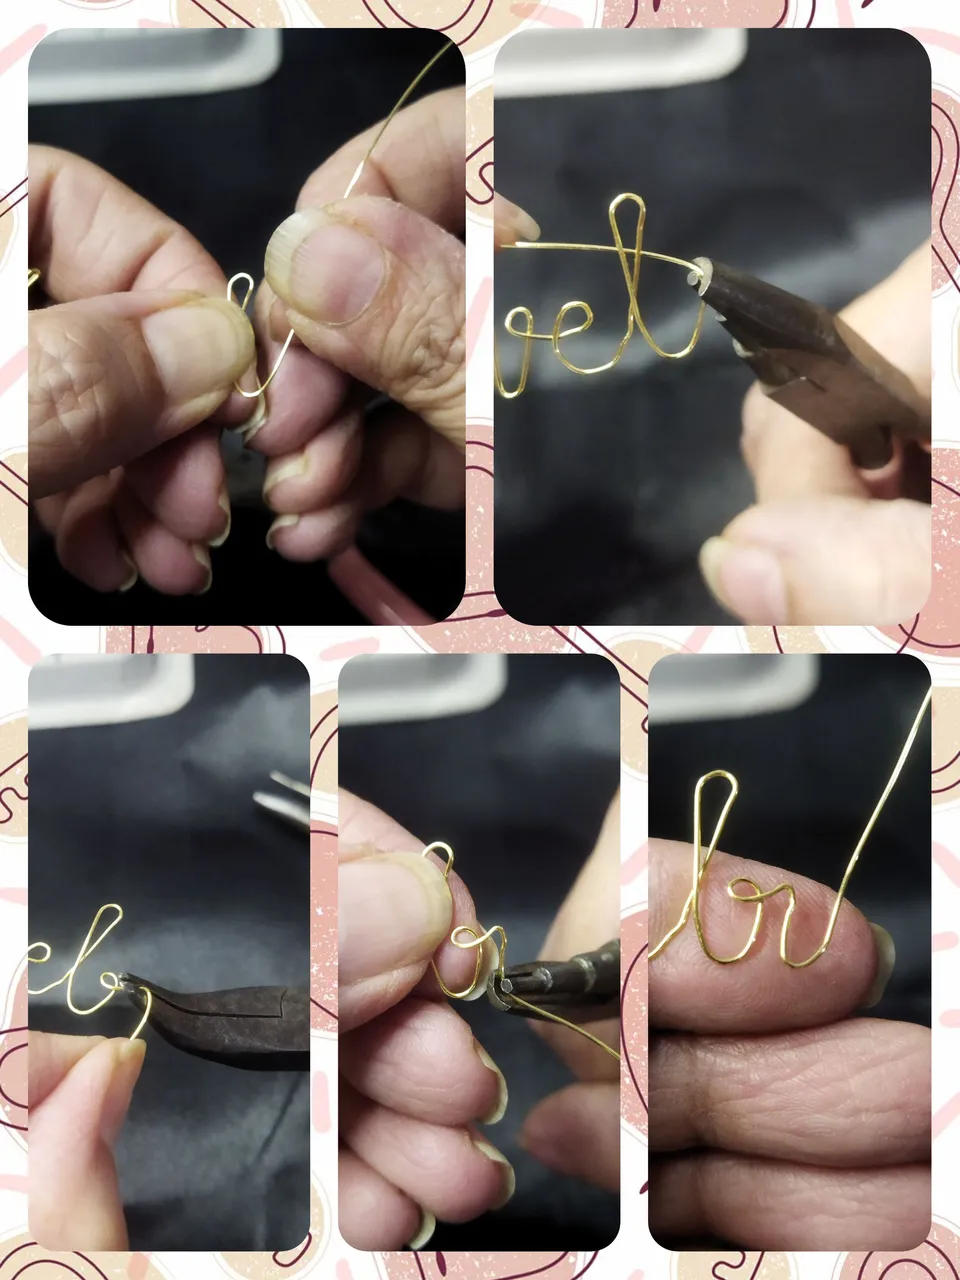
The letter "l" like the "e", only consists of raising the wire and bending 180º and then turning to the right side until forming the letter.
La letra "l" al igual que la "e", sólo consiste en subir el alambre y doblar a 180º y luego girar al lado derecho hasta formar la letra.
The letter "r", another one that also implies a small degree of complexity because of how small it is. What we will do is raise the wire to the height of the other letters and with the conical pliers we make a turn to form the fold and then with the curved pliers we make another double downwards leaving a few millimetres of distance between the small ring and the fold. Then we mold the wire to form the letter.
La letra "r", otra que también implica un pequeño grado de complejidad por lo pequeña que es. Lo que haremos será subir el alambre a la altura de las demás letras y con la pinza cónica hacemos un giro para formar el doblez y luego con la pinza curva realizamos otro doble hacia abajo dejando unos milímetros de distancia entre el pequeño aro y el doblez. Luego moldeamos el alambre hasta formar la letra.
And we culminate with the letter "y", we form a kind of "u" using the conical and curved pliers to give it an oblique shape and make the union of the wire at the ends, then we lower the wire, at the desired height we make a bend with the conical clamp and we go up until turning and forming the letter.
Y culminamos con la letra "y", formamos una especie de "u" utilizando las pinzas cónica y curva para darla forma oblicua y realizar la unión del alambre en los extremos, luego bajamos el alambre, a la altura deseada hacemos un doblez con la pinza cónica y subimos hasta girar y formar la letra.
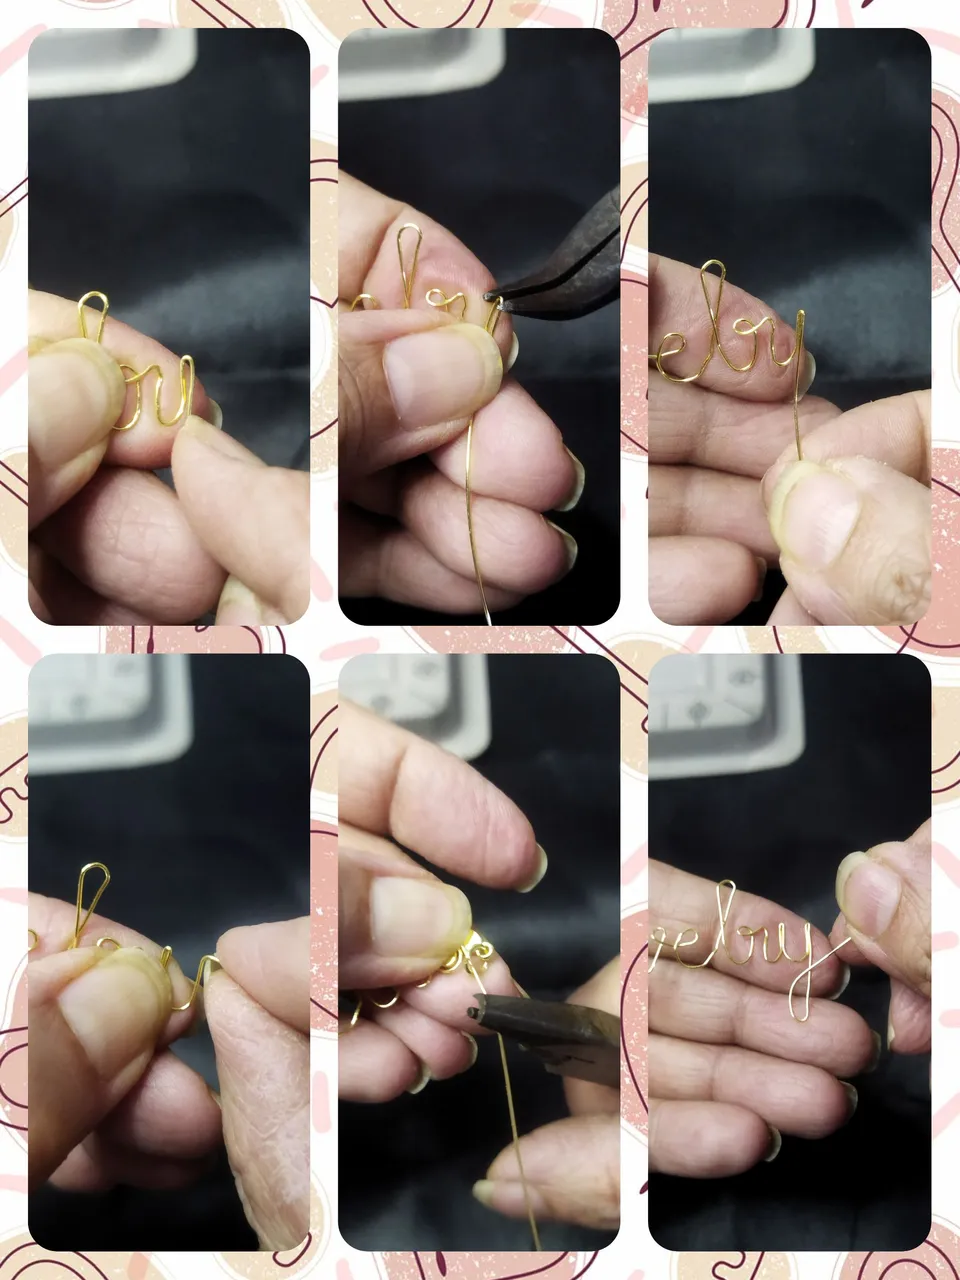
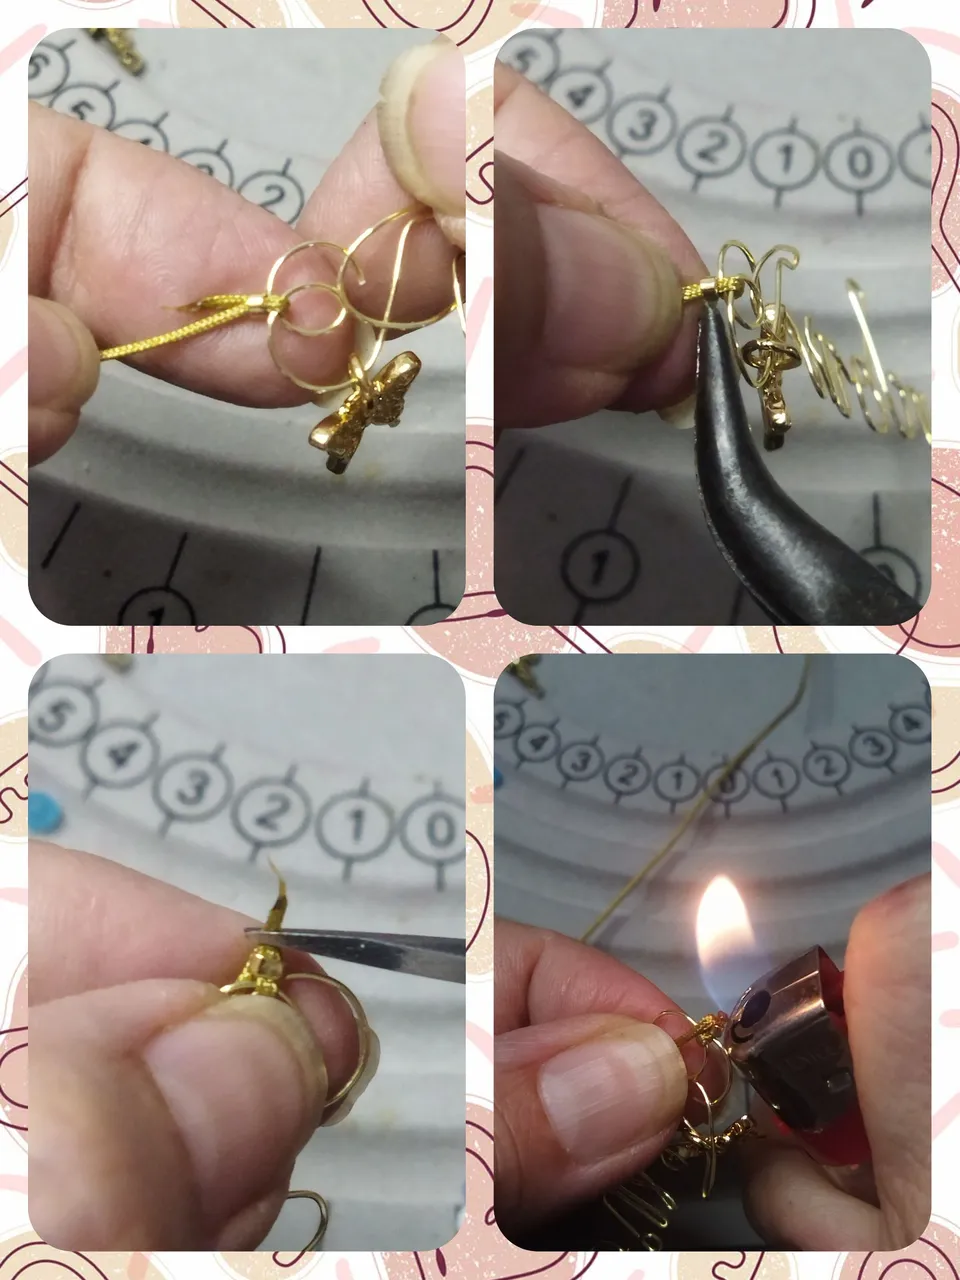
Then we introduce the second charm, in the shape of a heart and we take it to the bottom of the letter "y" and cut the wire. With the conical pliers we make a double ring to complete the name and that will also serve as a hook to make the necklace.
Luego introducimos el segundo dije, en forma de corazón y lo llevamos a la parte inferior de la letra "y" y cortamos el alambre. Con la pinza cónica realizamos un aro doble para culminar el nombre y que también nos servirá de anzuelo para realizar el collar.
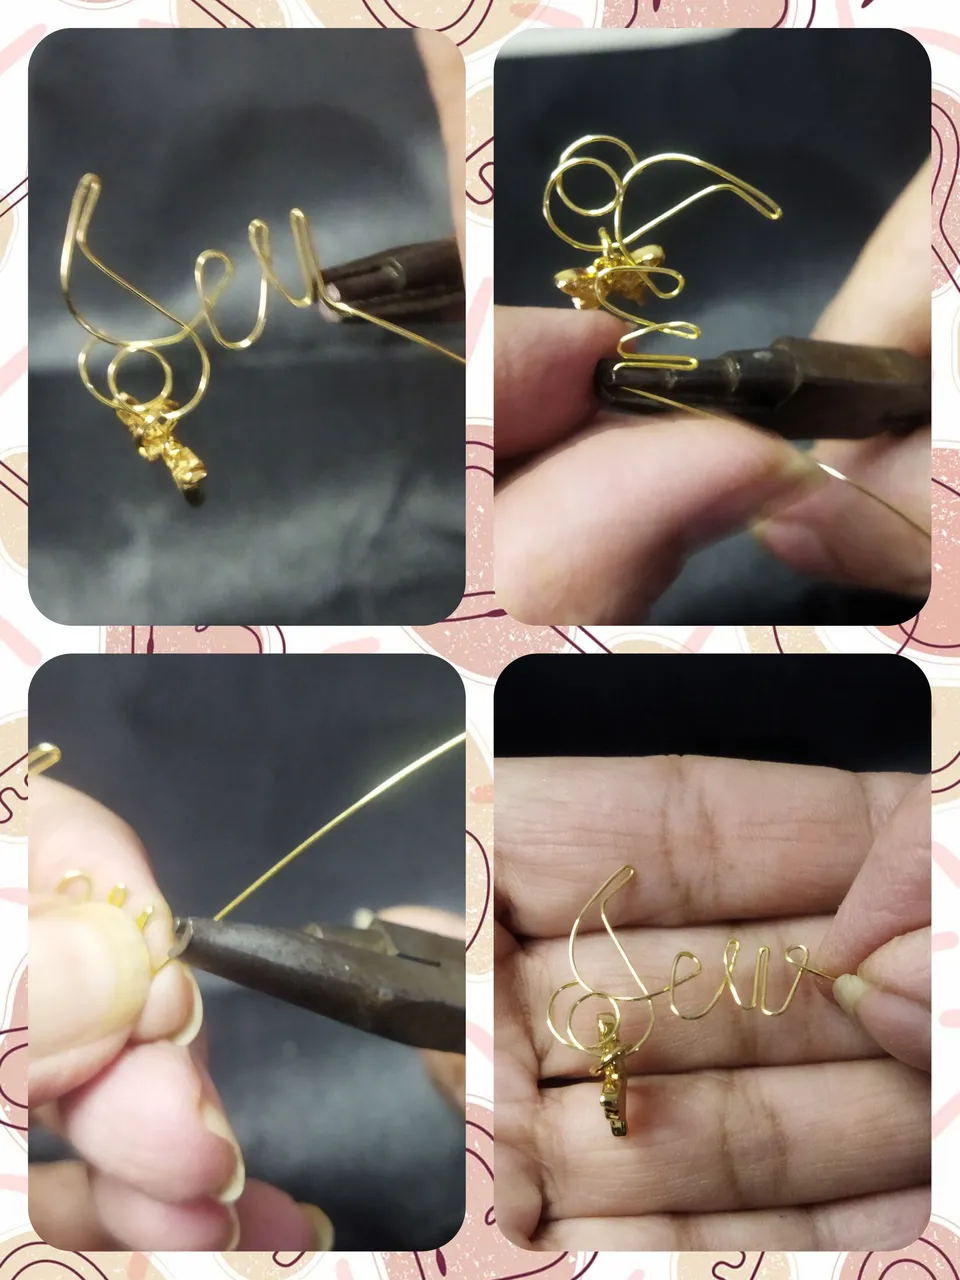
CHOKER
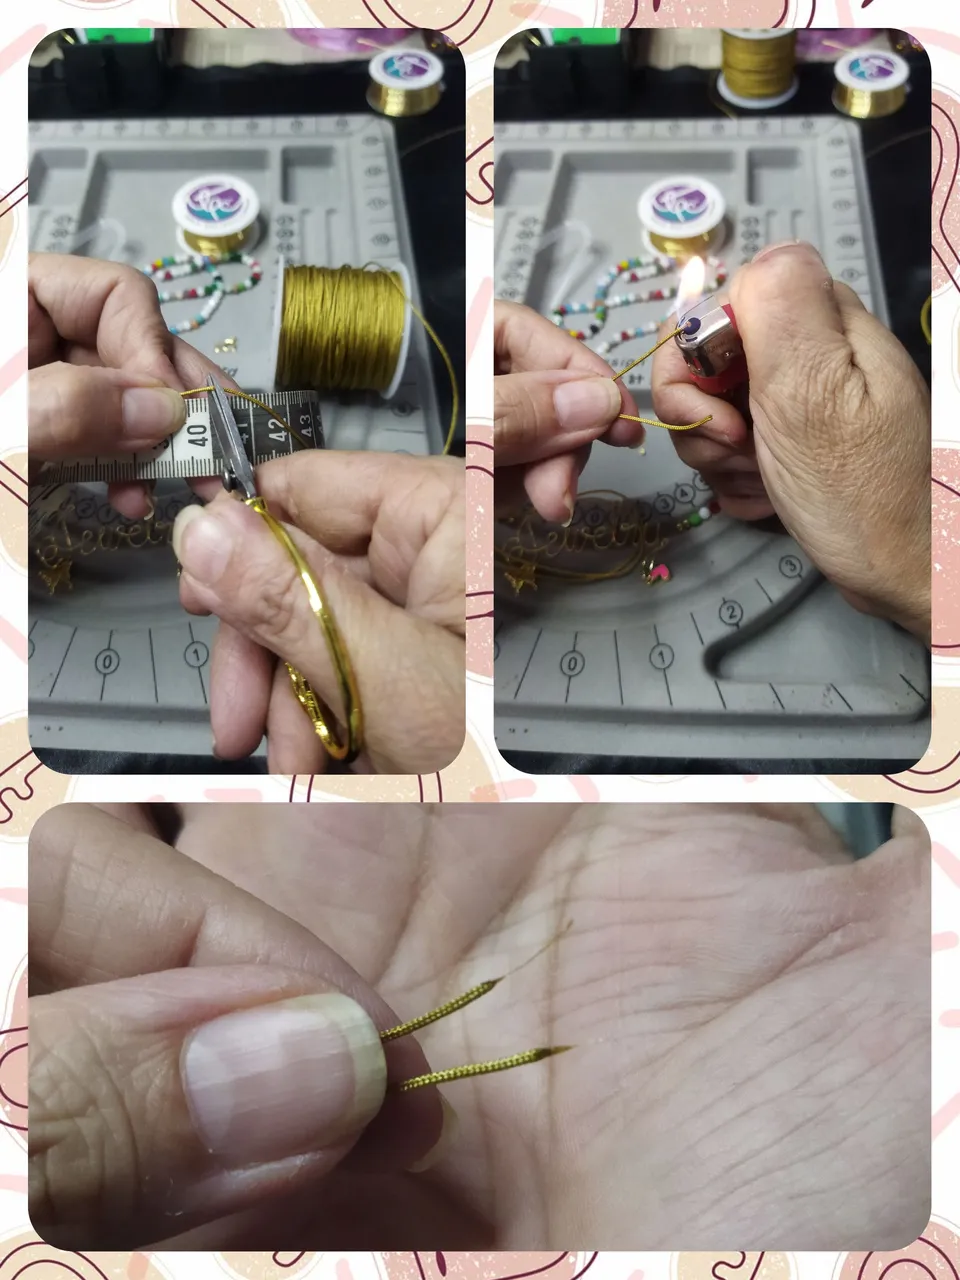
To make the choker, once the pendant with the name has been formed, the first thing we will do is cut 40 cm of golden Chinese thread, which in turn will be divided into two 20 cm pieces. Then with the lighter we make the respective tips to introduce the beads.
CHOKER
Para realizar el choker, una vez ya formado el dije con el nombre, lo primero que haremos será cortar 40 cm de hilo chino dorado, que a su vez lo dividiremos en dos de 20 cm. Luego con el encendedor realizamos las respectivas puntas para introducir los abalorios.
In the costume jewelery table we form the way in which we want each of the pieces that will form the choker to go. And once located we begin to assemble it.
En la tabla de bisutería formamos la manera en que queremos que vaya cada una de las piezas que formará el choker. Y una vez ubicado comenzamos a armarlo.

We start by adjusting the thread on the Jewelry charm. We place a staple in the thread and introduce it through the ring that we left for this purpose. Then we pass the thread through the staple again, we take it until it sticks to the pendant and we tighten it with the pliers so that it fits well. Cut the excess thread and seal with the lighter.
Comenzamos ajustando el hilo en el dije Jewelry. Colocamos una grapa en el hilo y lo introducimos por el aro que dejamos para tal fin. Luego pasamos el hilo nuevamente por la grapa, los llevamos hasta pegarlo del dije y lo apretamos con la pinza para que quede bien ajustado. Cortamos el exceso de hilo y sellamos con el encendedor.
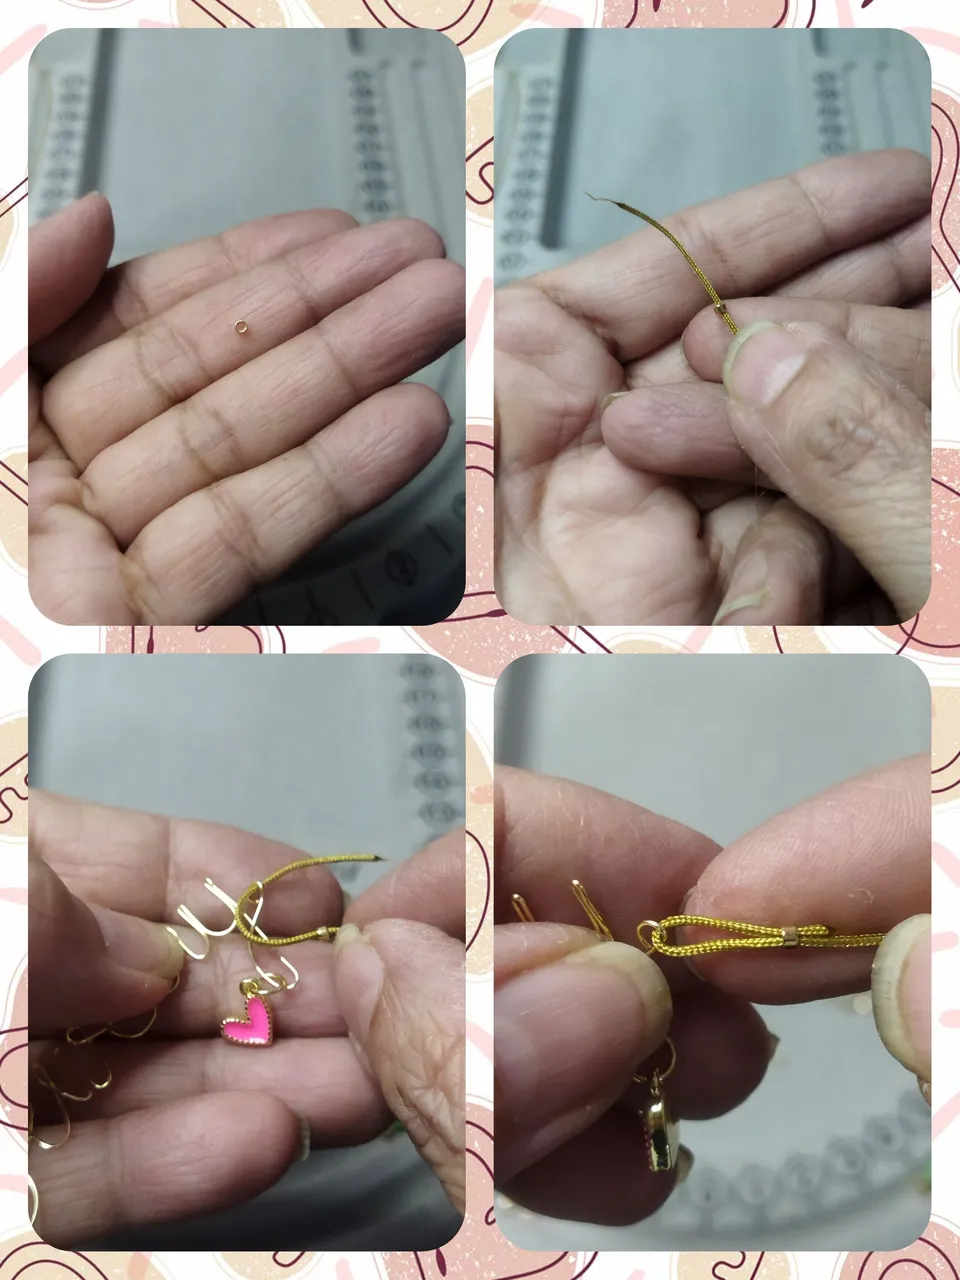
In the same way we do at the beginning of the pendant but we will make the link between the spiral of the letter J. We eliminate the excess and seal.
De la misma forma realizamos en el inicio del dije pero haremos el enlace entre el espiral de la letra J. Eliminamos el exceso y sellamos.
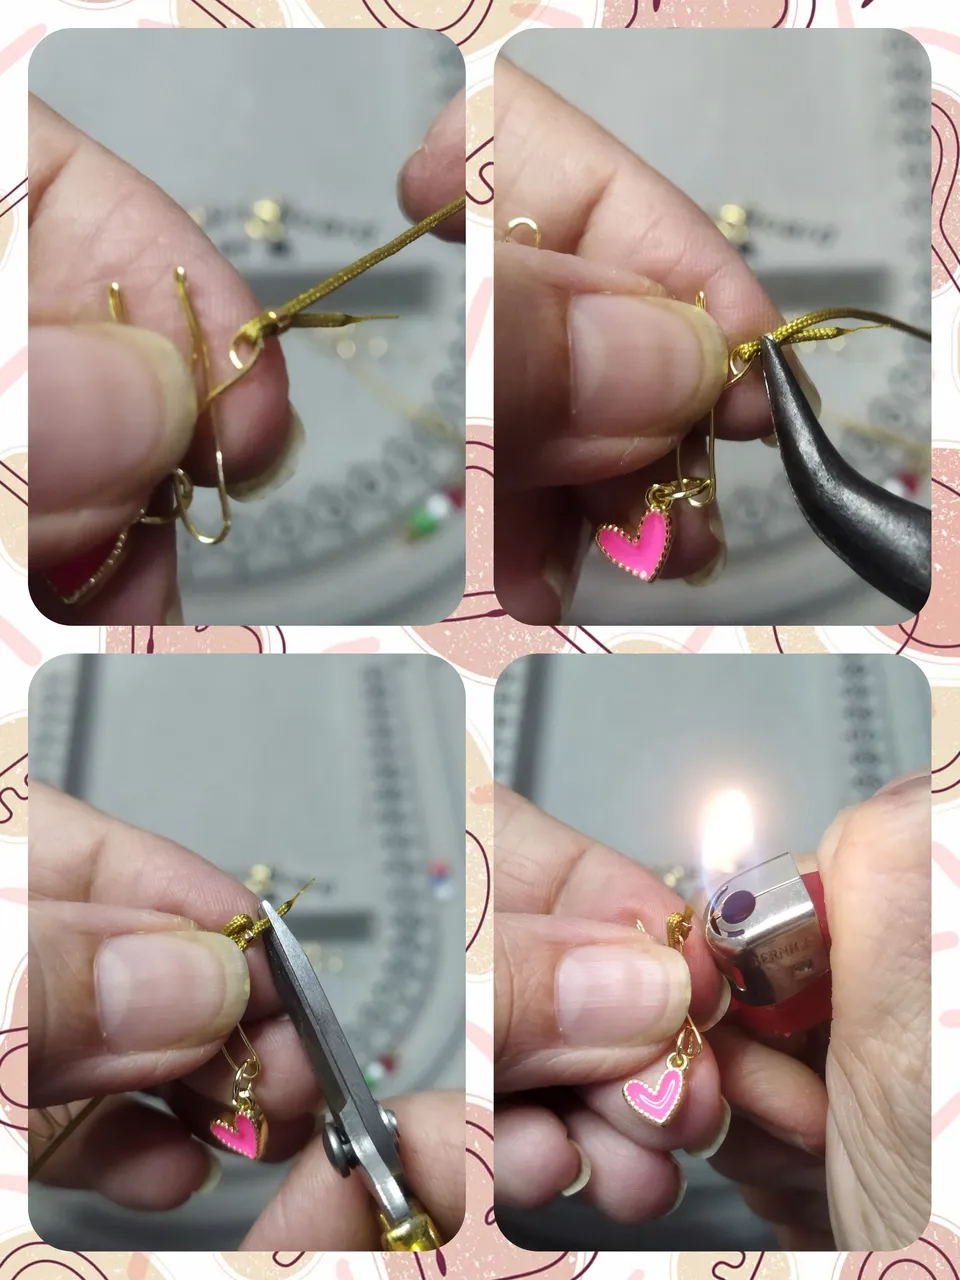
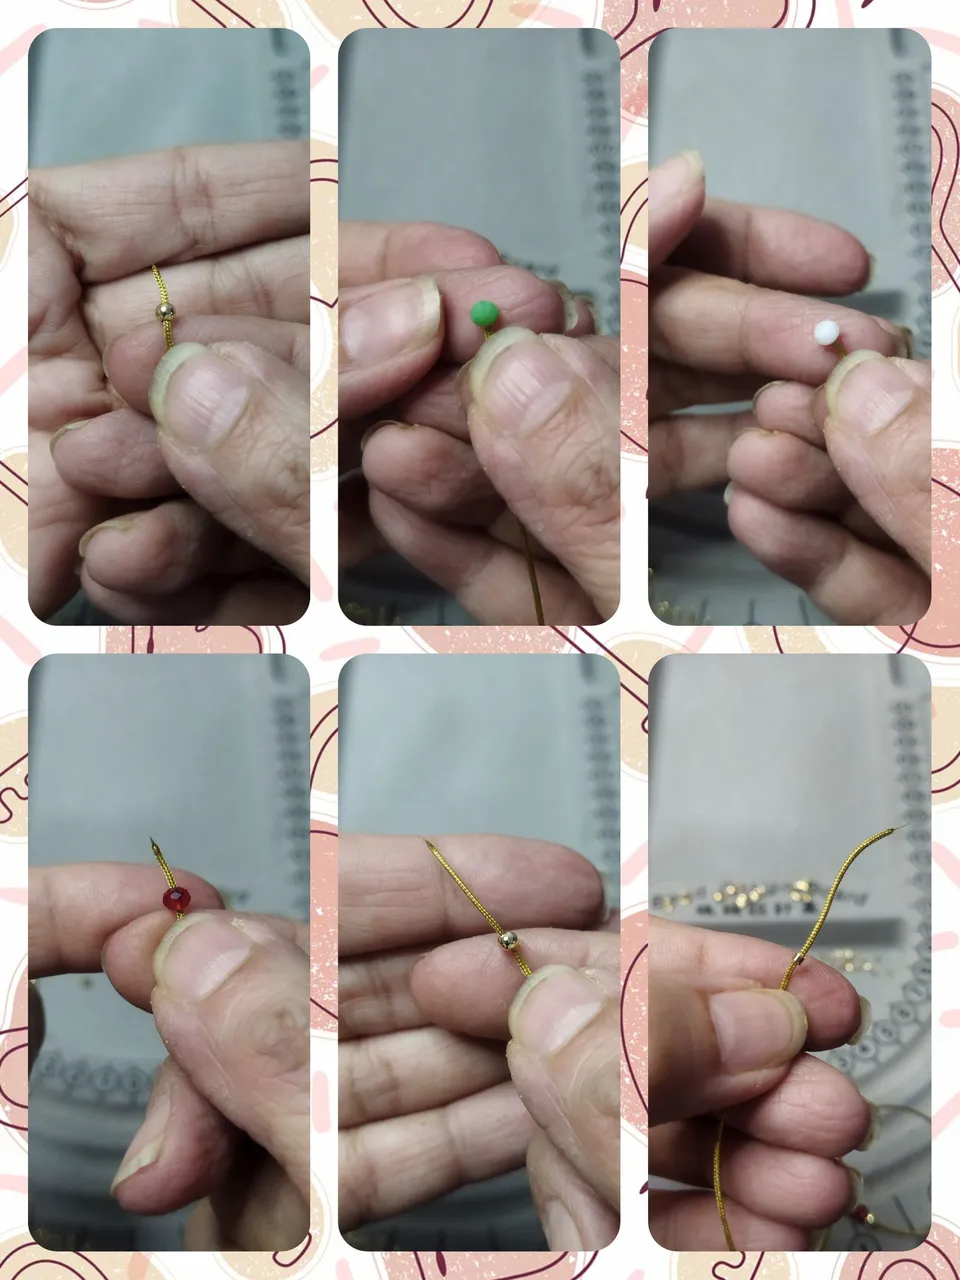
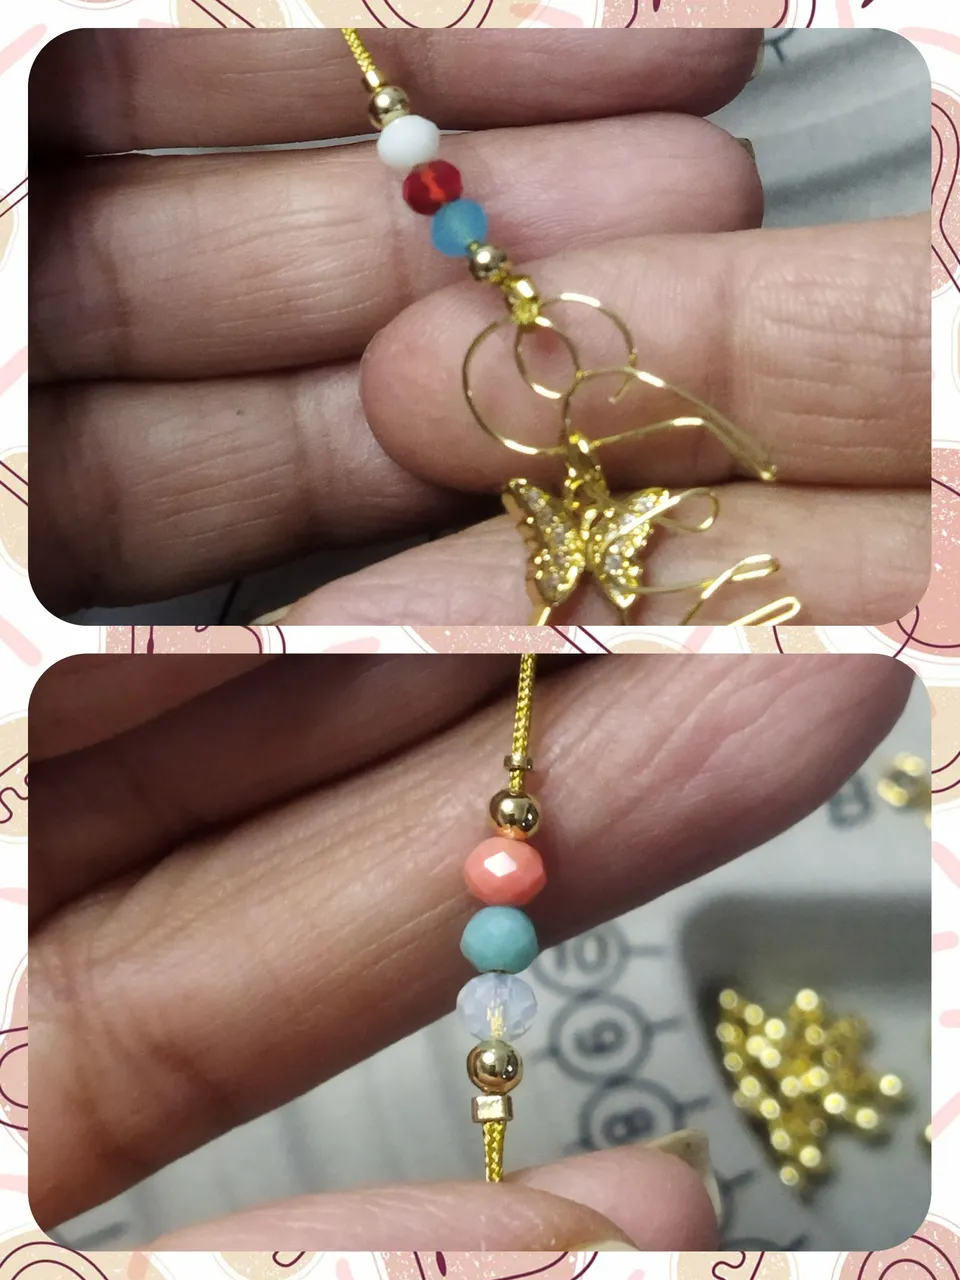
We begin to place the beads starting with a ball, then we introduce the crystals in the same order that we formed them on our table and culminating with a staple to adjust and prevent them from moving.
Comenzamos a colocar los abalorios empezando con un balín luego introducimos los cristales en el mismo orden que lo formamos en nuestra tabla y y culminamos con una grapa para ajusta y evitar que se muevan. Ajustamos con la pinza curva.
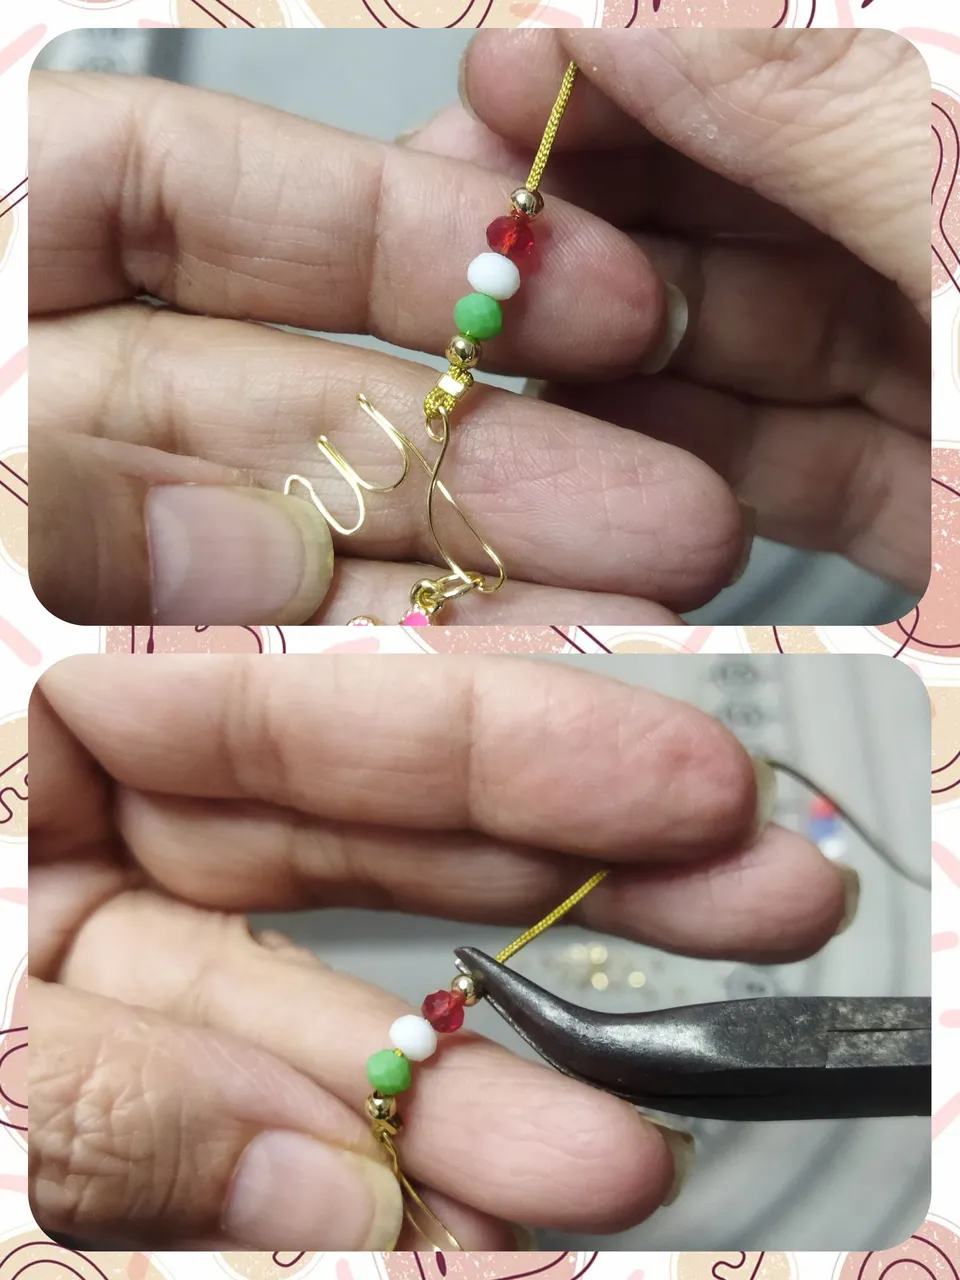
Then we position the thread on the costume jewelry table and introduce the beads at the height that we have already calculated on the table and adjust the staples with the pliers.
Luego posicionamos el hilo en la tabla de bisutería e introducimos los abalorios a la altura que ya hemos calculado en la tabla y ajustamos las grapas con la pinza.
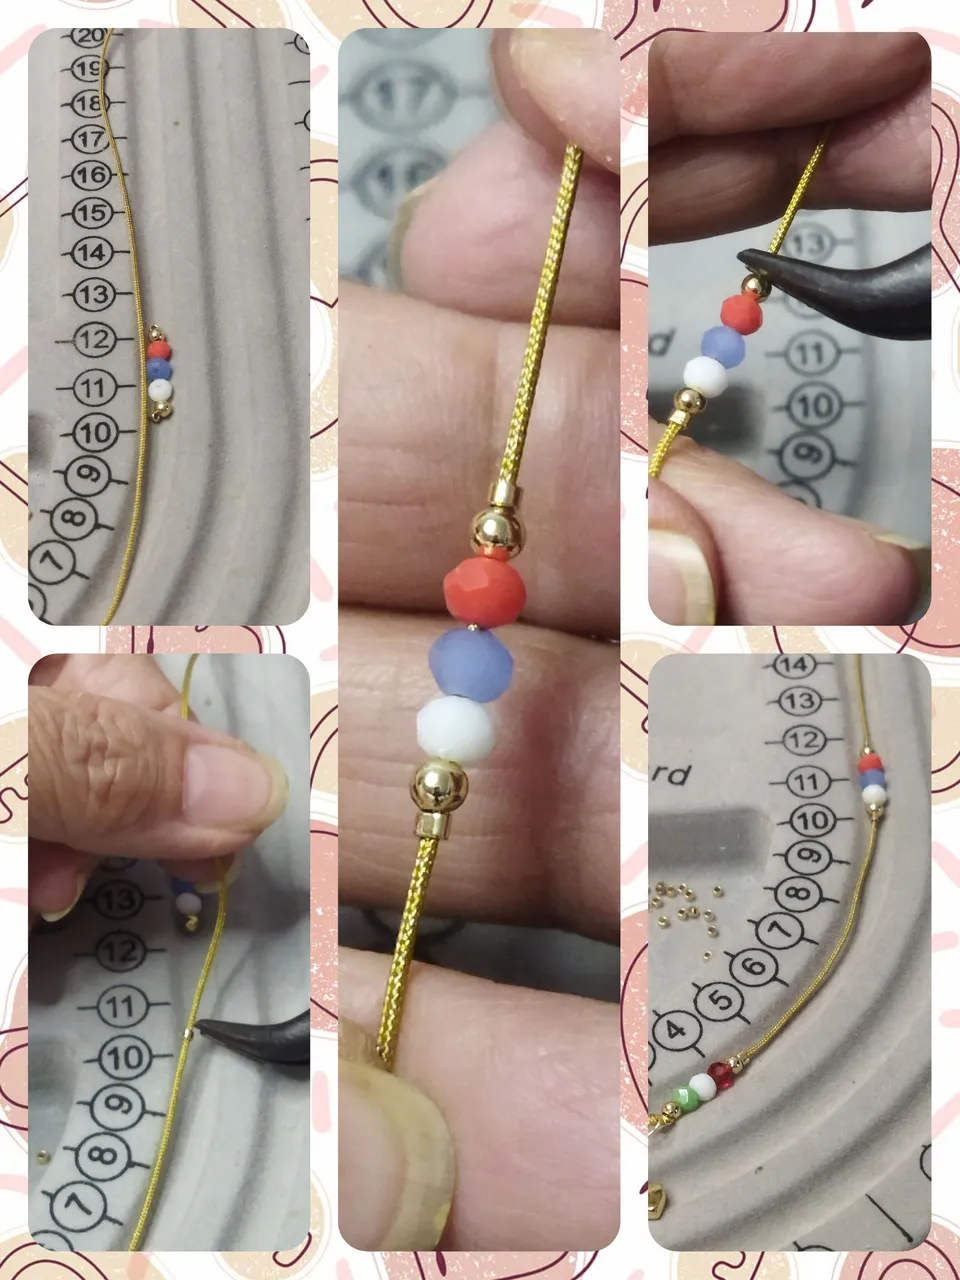
We do the same procedure on the other side of the pendant in the same way, using the beads that we have selected for this side.
Hacemos el mismo procedimiento al otro lado del dije de la mismo forma, utilizando los abalorios que hemos seleccionado para este lado.
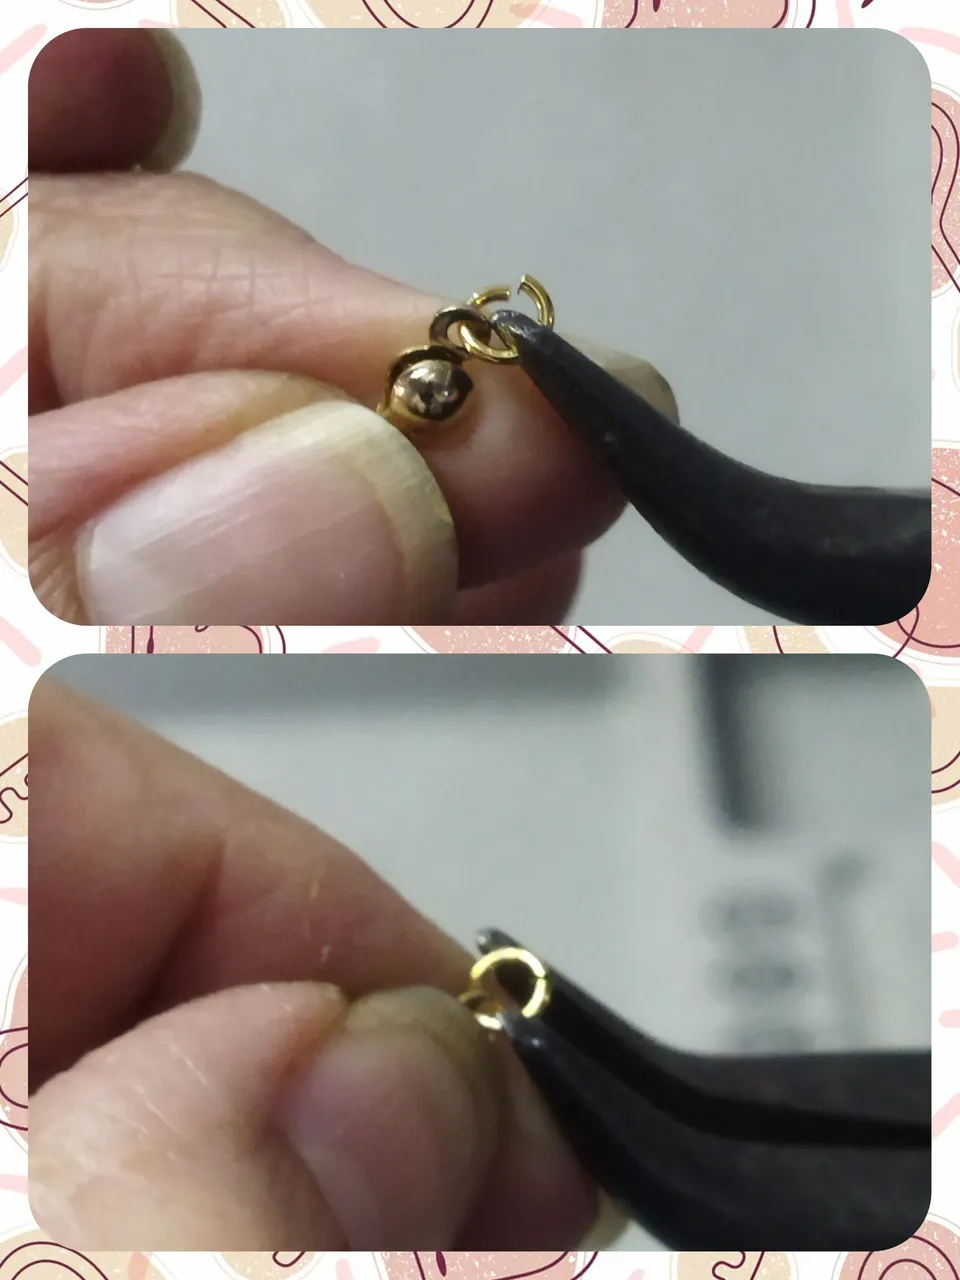
Once the choker is formed, now we take the measurement we want and place it on the table and place the knot covers, tie a knot, cut the excess thread and close with the clamp. We do this on both sides.
Ya formado el choker, ahora tomamos la medida que lo queremos y lo ubicamos en la tabla y colocamos los tapa nudos, hacemos un nudo, cortamos el exceso de hilo y cerramos con la pinza. Esto lo hacemos en ambos lados.

Then we take a ring and the safety and place it in one of the knot covers, close the ring and tighten with the clamp. And we place the other ring in the other knot cover that will serve to close the choker.
Luego tomamos un aro y el seguro y lo colocamos en uno de los tapa nudos, cerramos el aro y apretamos con la pinza. Y colocamos el otro aro en el otro tapa nudos que servirá para cerrar el choker.

And this is the result, a choker to commemorate the first anniversary of this community that has supported our projects every day and helped us grow as artisans. It is a pleasure for me to be a member of it. I say goodbye, but not before inviting @creacioneslelys, @agathalara, @aarolita and @vicmito74 to participate in this contest anniversary. See you next time.
Y este es el resultado, Un choker para conmemorar el primer aniversario de esta comunidad que ha apoyado cada día nuestros proyectos y colaborado para que crezcamos como artesanos. Es un placer para mi ser miembro de ella. Me despido, no sin antes invitar a @creacioneslelys, @agathalara, a @aarolita y a @vicmito74 a participar de este concurso aniversario. Nos vemos en la próxima.
.