Hola amigos de @jewelry bienvenidos a mi blog ❤
Mis buenos amigos de esta bella comunidad de creadores tengan todos un fuerte abrazo, hoy vengo con una idea genial para organizar y decorar lindos cintillos en diferentes modelos y color además con diferentes materiales y texturas, espero que le guste es un regalo para las más pequeñitas de la casa y si pueden ver podemos recuperar cintillos que tengan roto o incompleto.
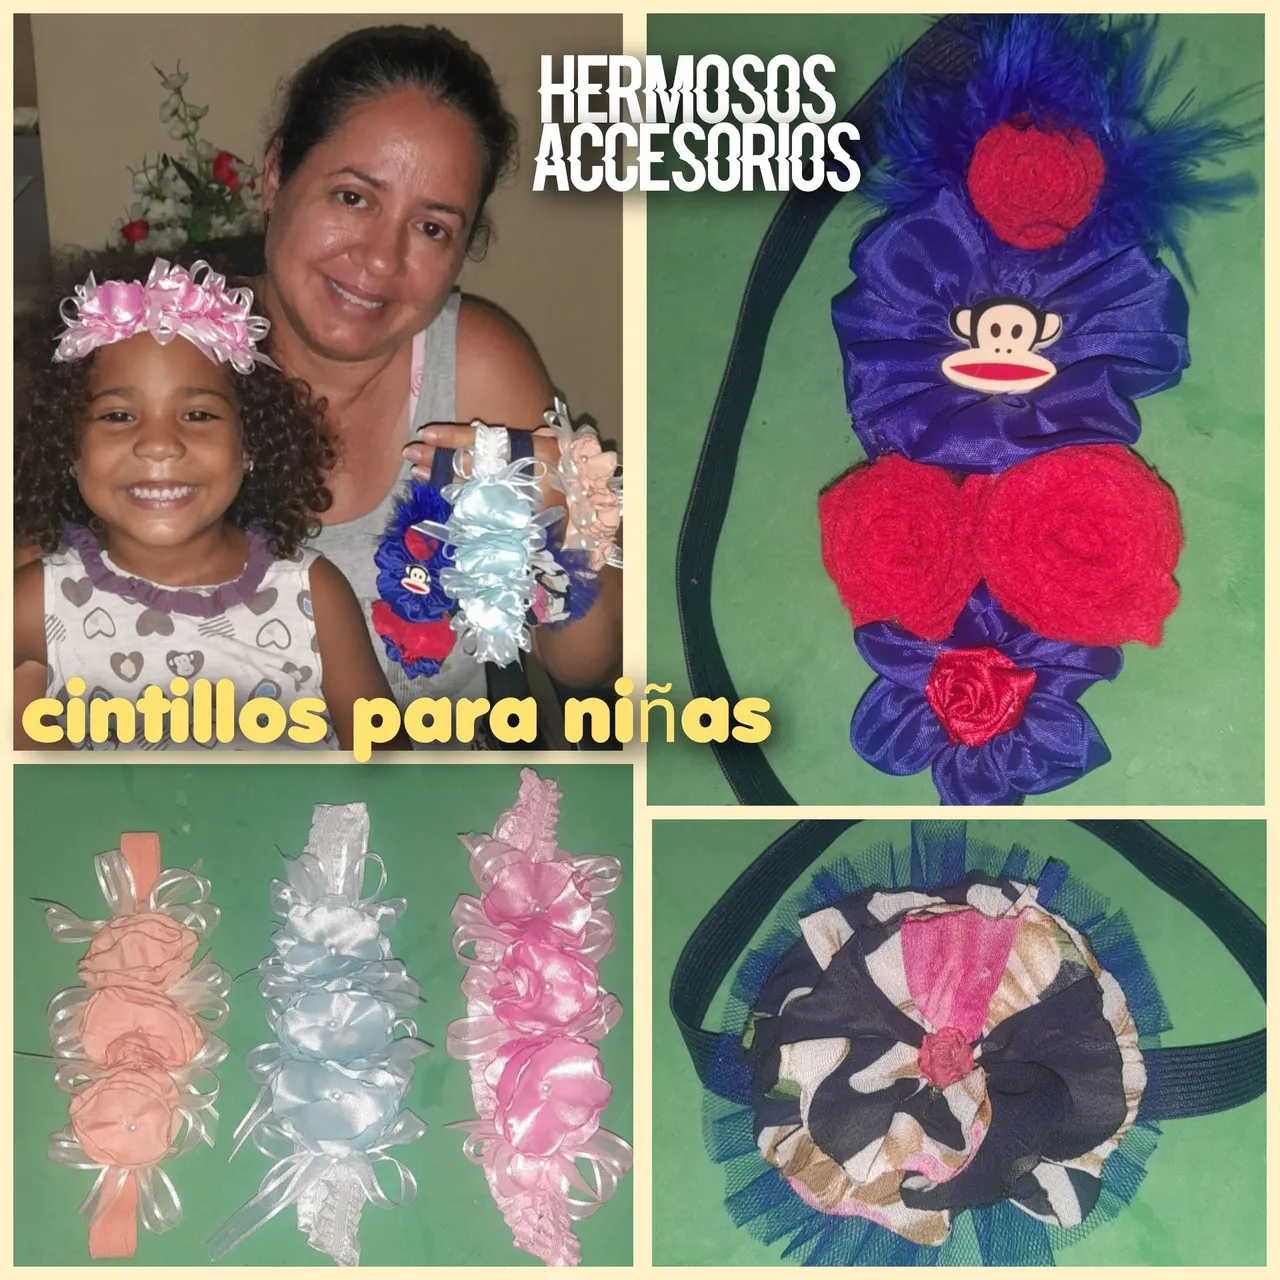
Los cintillos son lindos accesorios que van a complementar el atuendo de las niñas así se verán más lindas para el colegio, parque y fiesta ... entonce desde luego aquí en este tutorial les muestro paso a paso como decoramos cinco cintillos con tres técnicas de decoración diferente es muy fácil sólo debemos tener todos los materiales a la mano y dejar volar su imaginación.
Hello friends of @jewelry welcome to my blog ❤
My good friends of this beautiful community of creators have all a big hug, today I come with a great idea to organize and decorate cute headbands in different models and color also with different materials and textures, I hope you like it is a gift for the smallest of the house and if you can see we can recover headbands that have broken or incomplete.
The headbands are nice accessories that will complement the attire of the girls so they will look prettier for school, park and party ... then of course here in this tutorial I show you step by step how to decorate five headbands with three different decoration techniques is very easy only we must have all the materials at hand and let your imagination fly.
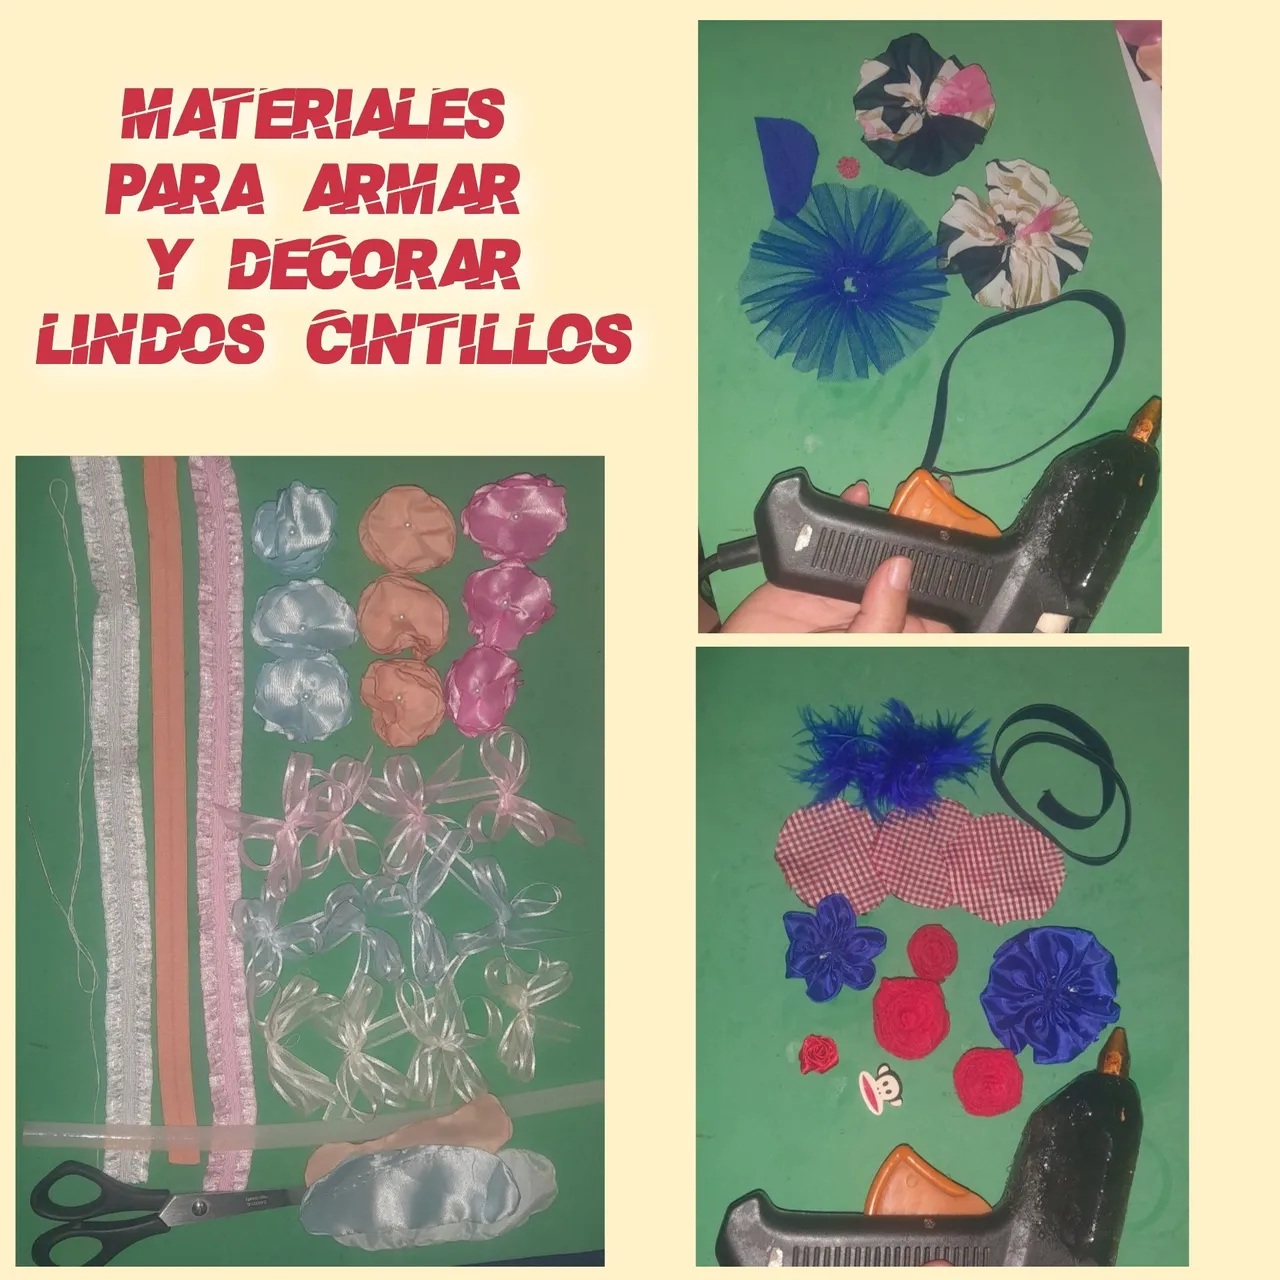
A continuación les enseño los materiales en general y los pasos que vamos a necesitar para la realización de los 5 cintillos en tres modelos distinto :
Here I will show you the general materials and the steps we will need to make the 5 headbands in three different models:
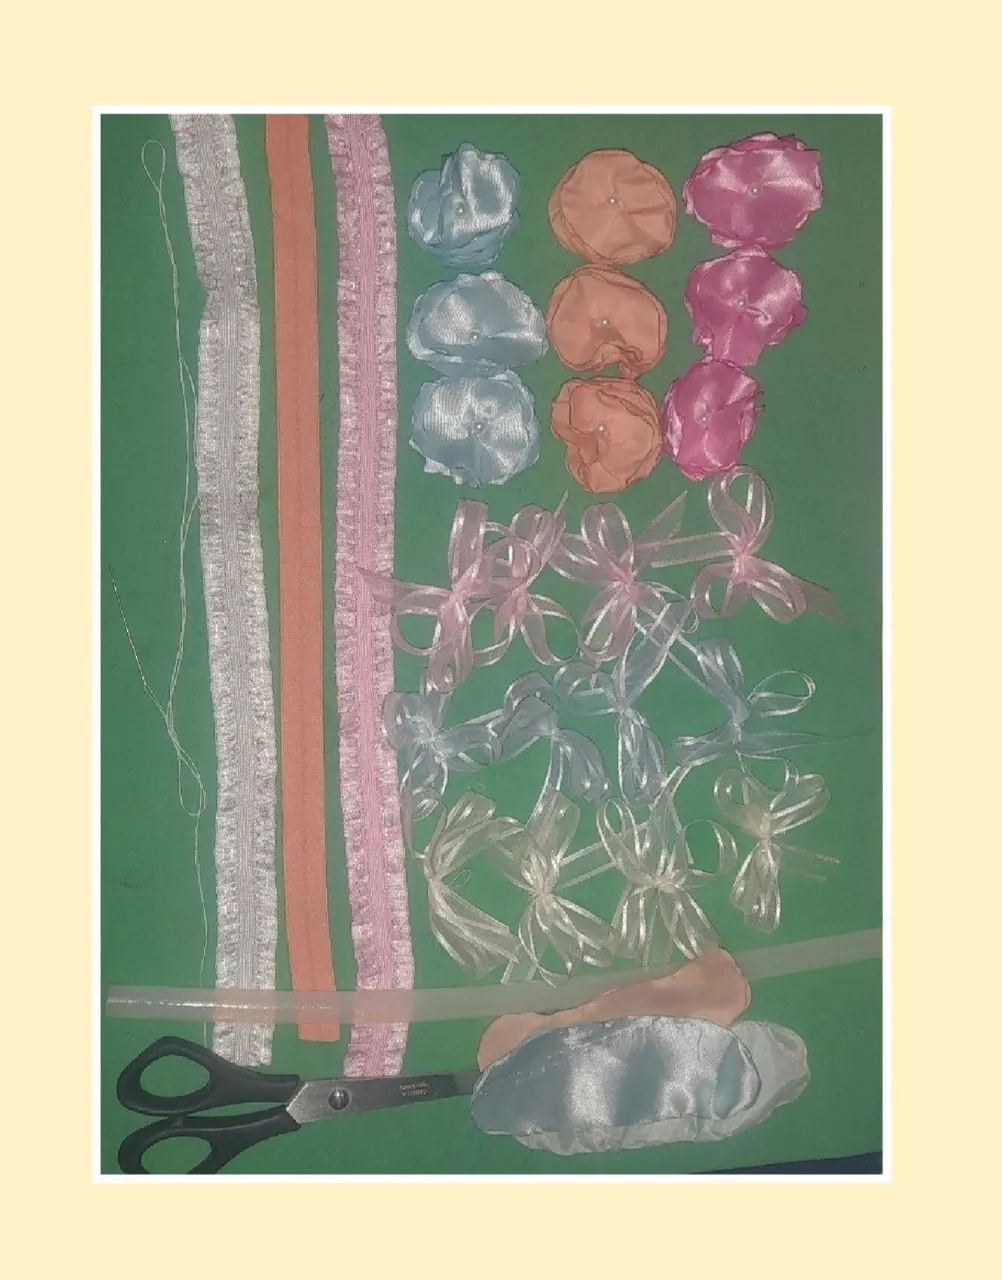
MATERIALES PARA DECORAR EL CINTILLO MODELO UNO EN TRES COLORES (rosado azul y melón):
▪︎ 3 cintas corrugada elástica de color rosado, azul y melón de 33 cm cada una.
▪︎ 9 flores hechas de tela color rosada azul y melón.
▪︎ 12 lazos de cintas trasparente , es decir 4 rosado, 4 azul y 4 melón.
▪︎ 3 pieza de tela alargada de 12 cm de color rosada, azul y melón.
▪︎ pistola de silicón.
▪︎ 1 tijera.
MATERIALS FOR DECORATING THE MODEL ONE BELT IN THREE COLORS (pink, blue and melon):
▪︎ 3 pink, blue and melon colored elastic corrugated ribbons of 33 cm each.
▪︎ 9 flowers made of pink blue and melon colored fabric.
▪︎ 12 bows made of transparent ribbons , i.e. 4 pink, 4 blue and 4 melon.
▪︎ 3 pieces of 12 cm long fabric in pink, blue and melon.
▪︎ silicone gun.
▪︎ 1 scissors.
MODELO 1 :
Paso 1 :
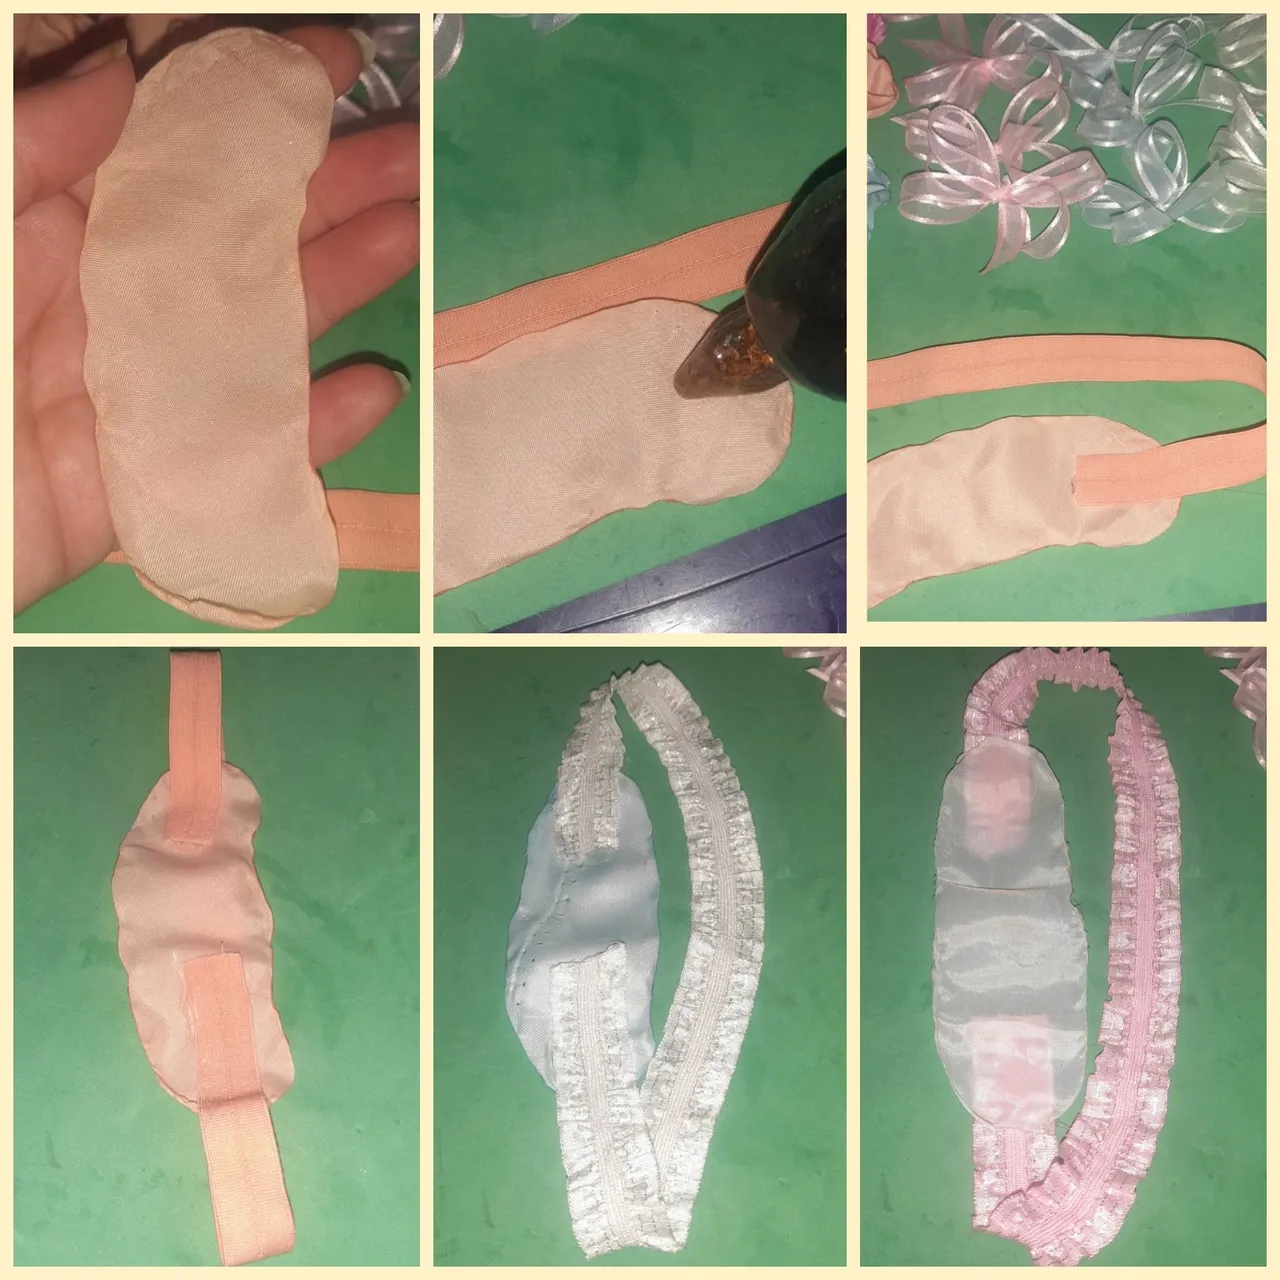
Como pueden ver estas rosas son fácil de hacer ya la hicimos en un post anterior así ya tenía lista éstos tres colores de flores, entonce procedemos enseguida a armar y decorar los tres cintillos del mismo modelo pero en diferente colores, éste cintillo es ideal para niñas de meses hasta hasta 6 años .
Comenzamos colocando las bases de tela que ya tenemos recortada y quemada por los bordes luego le echamos el silicón caliente a la tela seguimos pegado la punta del trozo de cinta elástica melón y lo pegamos por los dos extremos de la tela base del cintillo melón, así mismo seguimos con base del cintillo azul y rosada.
MODEL 1 :
Step 1 :
As you can see these roses are easy to make and we did it in a previous post so I already had ready these three colors of flowers, then we proceed immediately to assemble and decorate the three headbands of the same model but in different colors, this headband is ideal for girls from months to 6 years.
We begin by placing the fabric bases that we have already cut and burned on the edges, then we put the hot silicone on the fabric, we continue gluing the tip of the piece of melon elastic ribbon and we glue it on the two ends of the fabric base of the melon headband, and we continue with the base of the blue and pink headband.
Paso 2 :
Ya tenemos las tres base de cintillos melón, rosada y azul lista para decorar recuerden que las flores las pueden comprar en algunas tiendas de bisuterías o lencería o simplemente la pueden hacer ustedes misma, yo ya tengo hechas éstas así que comenzamos la decoración con el cintillo rosado, con el silicón pegamos las lindas flores rosadas con perla blanca en el centro y seguidamente alternándose con los lazos de cinta trasparente.
Step 2 :
We already have the three base of ribbons melon, pink and blue ready to decorate remember that the flowers can be purchased in some jewelry stores or lingerie or you can simply do it yourself, I already have made these so we start the decoration with the pink ribbon, with the silicone we glue the pretty pink flowers with white pearl in the center and then alternating with the transparent ribbon bows.
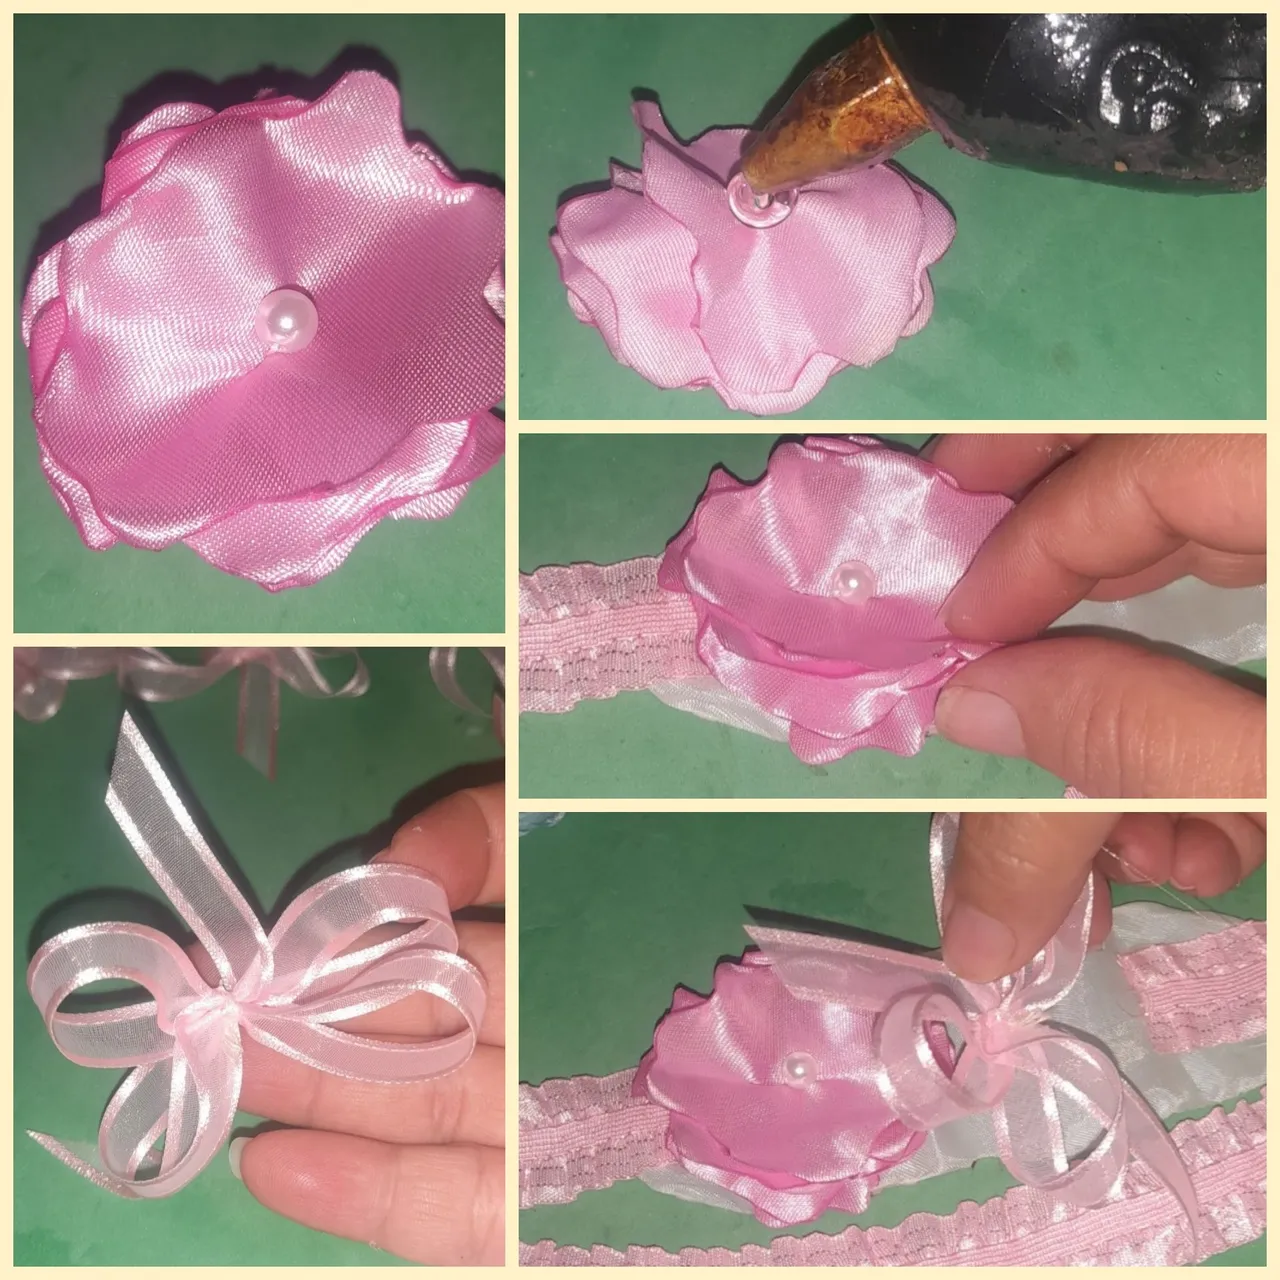
Paso 3 :
Seguidamente pasamos a armar el cintillo de color azul del mismo modelo 1 pegamos las lindas flores en azul con perla en el centro y también le pegamos en secuencia las tres flores y los cuatros lazos de cinta de color azul trasparente.
Step 3 :
Next, we will assemble the blue headband of the same model 1, glue the pretty blue flowers with pearl in the center and also glue the three flowers and the four transparent blue ribbon bows in sequence.
Paso 4 :
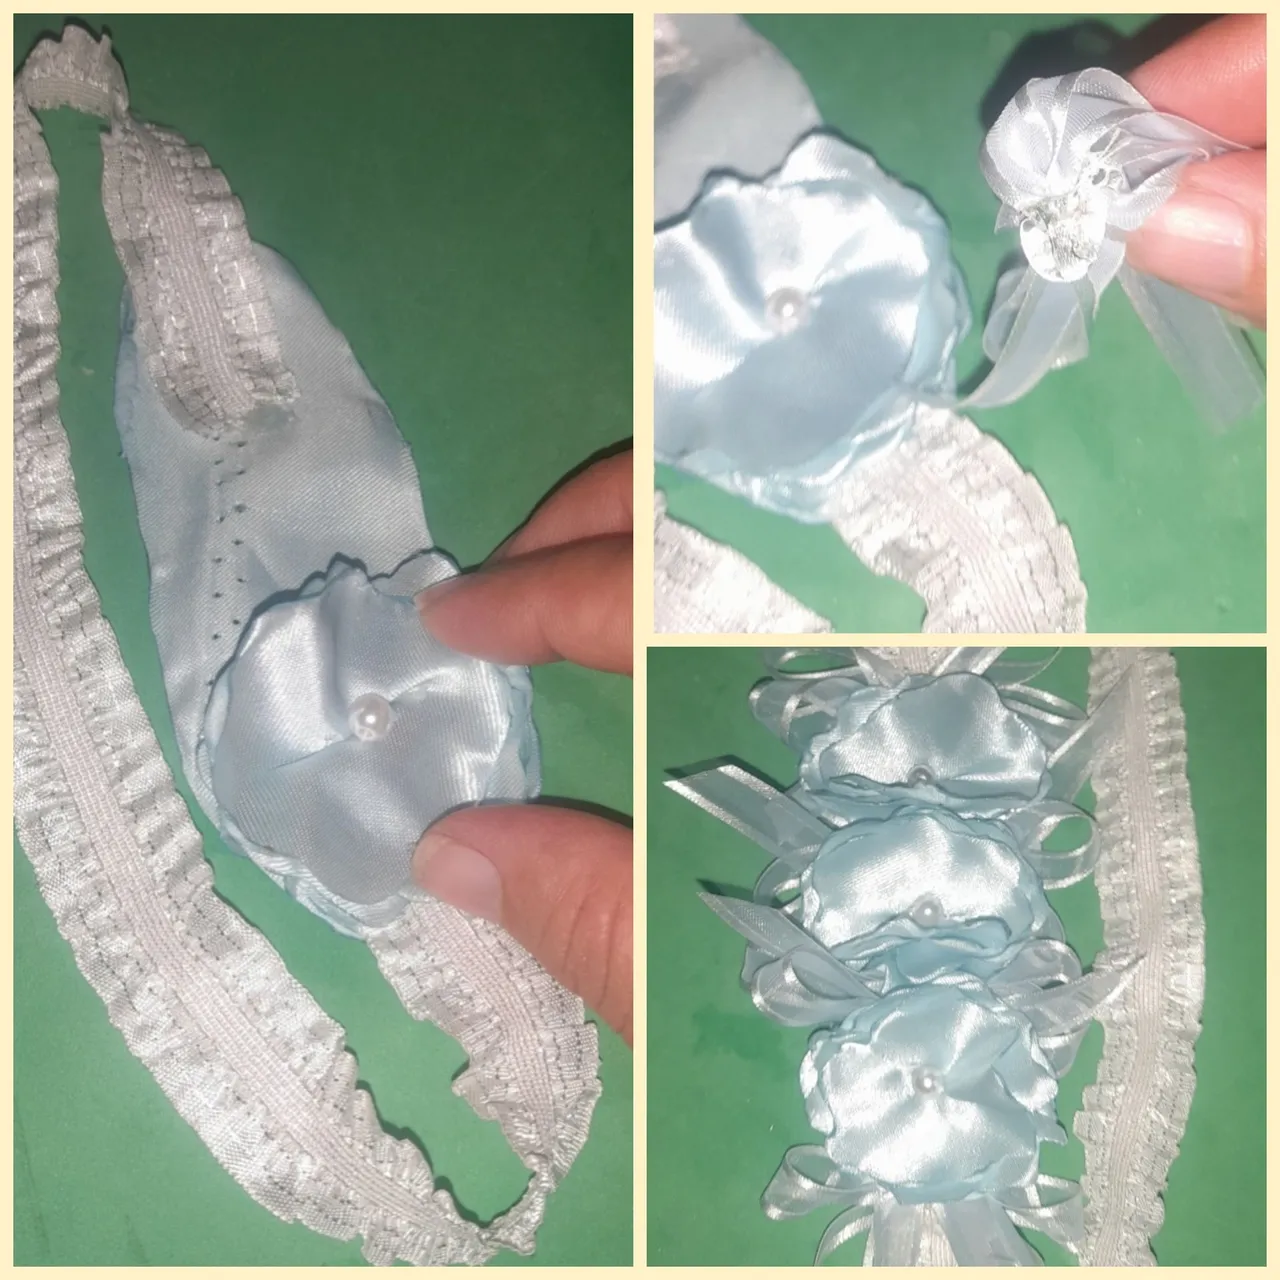
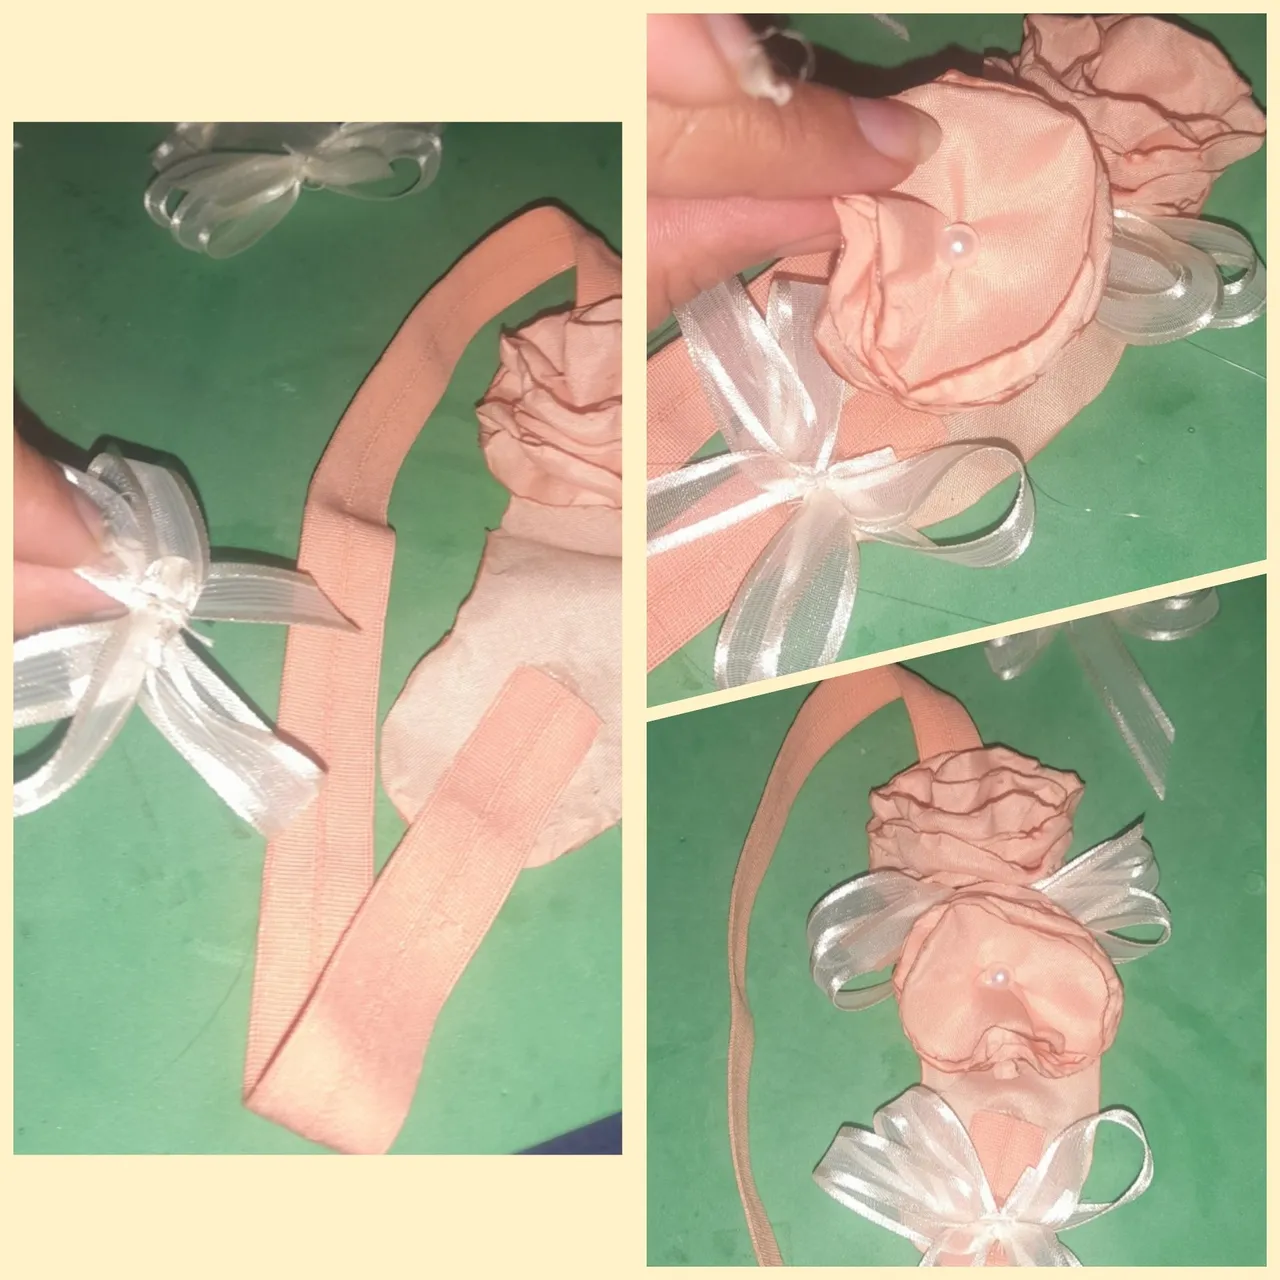
Seguimos decorando el tercer cintillo con el mismo modelo 1 , pero ahora en color melón, procedemos de la misma manera que en el de color rosado y azul ya tenemos la base del cintillo lista y les pegamos las flores de color melón con la perla blanca en el centro y igualmente los cuatros lazos de la cinta blanca trasparente.
Y con éste paso 4 quedan listos decorados los tres cintillos para niñas del modelos número 1.
Step 4 :
We continue decorating the third headband with the same model 1, but now in melon color, we proceed in the same way as in the pink and blue color and we have the base of the headband ready and we glue the melon color flowers with the white pearl in the center and also the four loops of the transparent white ribbon.
And with this step 4 the three headbands for girls of the model number 1 are ready.
MATERIALES PARA LA DECORACIÓN DEL CINTILLO MODELO NÚMERO 2 :
▪︎ Pistola de barra de silicón.
▪︎ 1 cinta elástico azul de 33 cm.
▪︎ 2 flor hecha de tela reciclada estampada.
▪︎ 1 flor hecha de tul azul .
▪︎ 1 semi círculo hecho de tela azul para la base.
▪︎ 1 flor decorativa rosada .
MATERIALS FOR HEADBAND DECORATION MODEL NUMBER 2 :
▪︎ Silicone bar gun.
▪︎ 1 x 33 cm blue elastic ribbon.
▪︎ 2 flower made of recycled printed fabric.
▪︎ 1 flower made of blue tulle .
▪︎ 1 half circle made of blue fabric for the base.
▪︎ 1 pink decorative flower .
Paso 1:
Aquí comenzamos a armar y pegar la base del cintillo con la cinta elástica y el trozo de tela semi círculo azul...estas flores de tela reciclada son muy fácil de hacer cortamos 70 cm de largo de tela y de unos 4 o 5 cm de ancho con una aguja cosemos toda la orilla y luego arruchamos y queda como estas flores que vamos a pegar aquí en este cintillo.
Step 1:
Here we start to assemble and glue the base of the headband with the elastic band and the piece of blue semi circle fabric...these recycled fabric flowers are very easy to make we cut 70 cm long fabric and about 4 or 5 cm wide with a needle we sew all the edge and then we ruffle and it looks like these flowers that we are going to glue here in this headband.
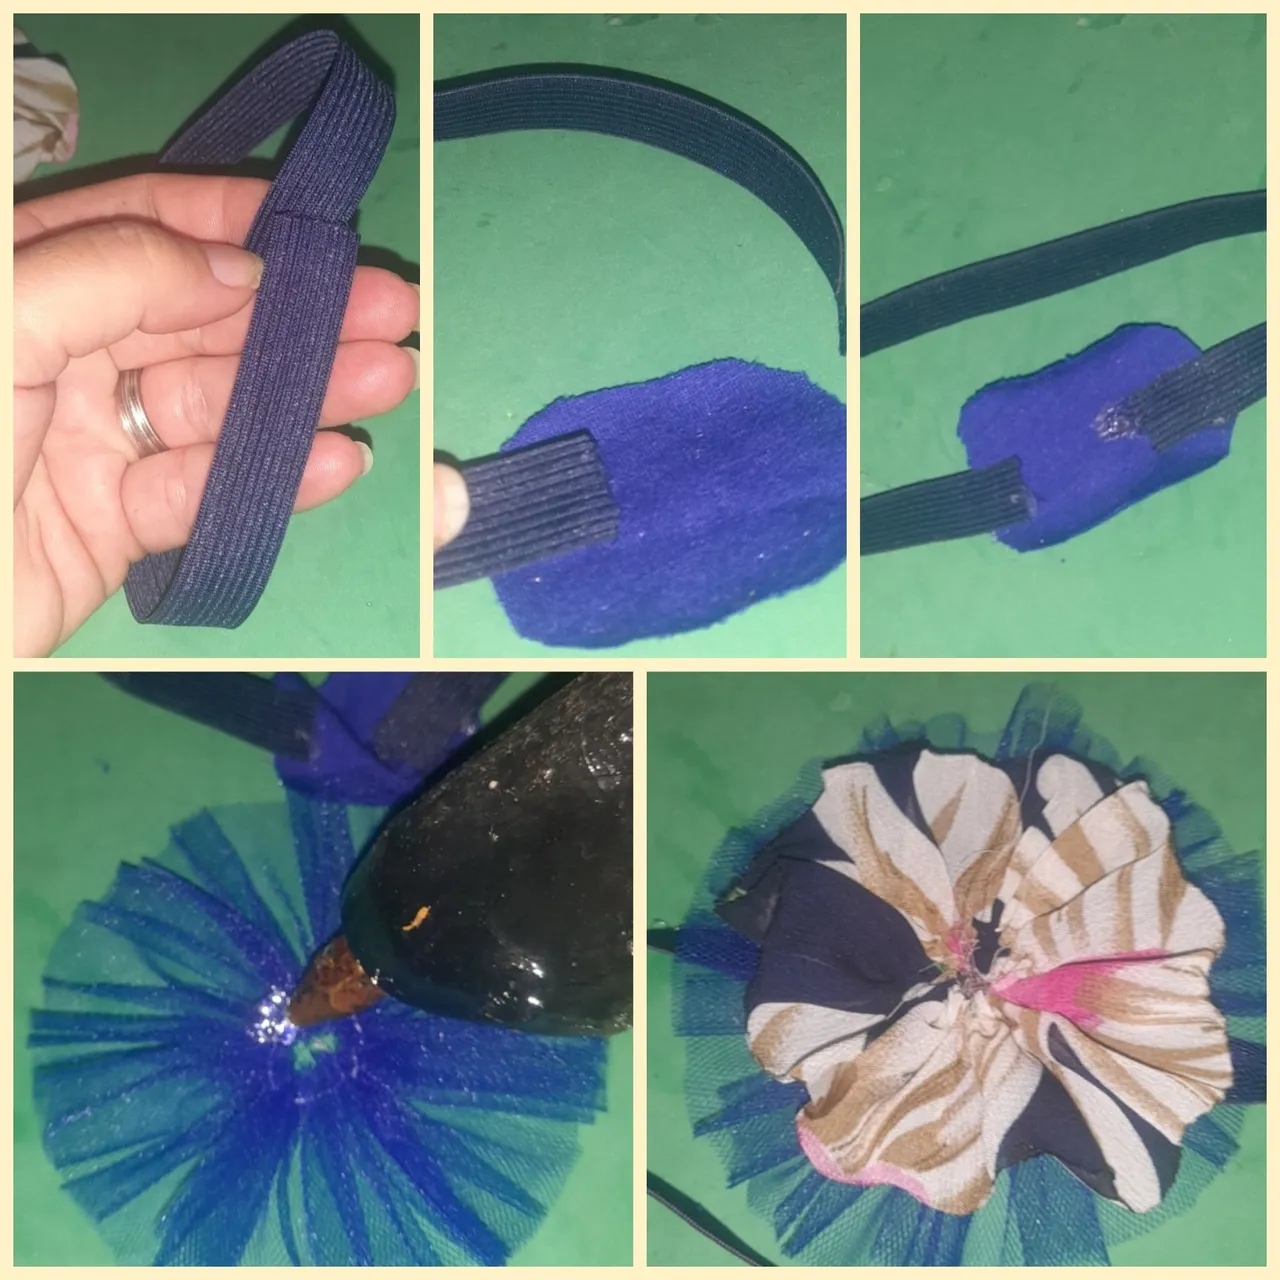
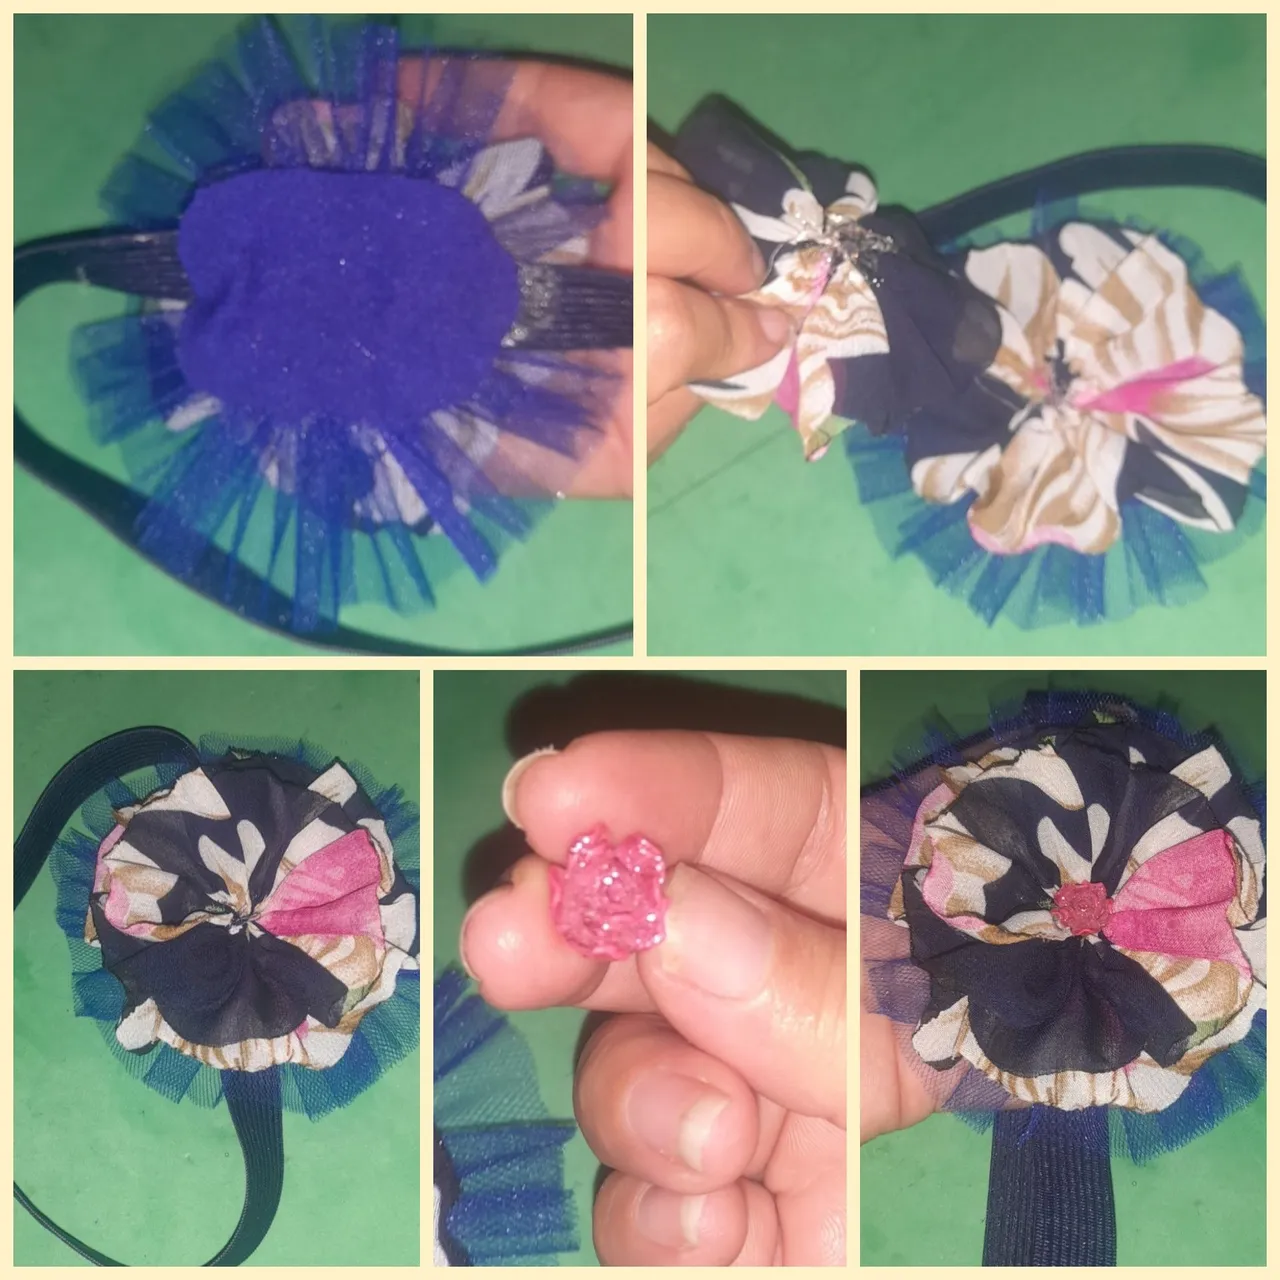
Paso 2 :
Luego de tener la base del cintillo listo procedemos a pegar primero la flor azul de tul seguidamente las dos flores de tela estampadas una primero y otra arriba de esa primera, para decorar finalmente éste cintillo colocamos un detalle en el centro de la flor que no es más que una mini flor rosada .
Step 2 :
After having the base of the headband ready we proceed to glue first the blue tulle flower, then the two printed fabric flowers, one first and the other on top of the first one, to finally decorate this headband we place a detail in the center of the flower which is nothing more than a pink mini flower .
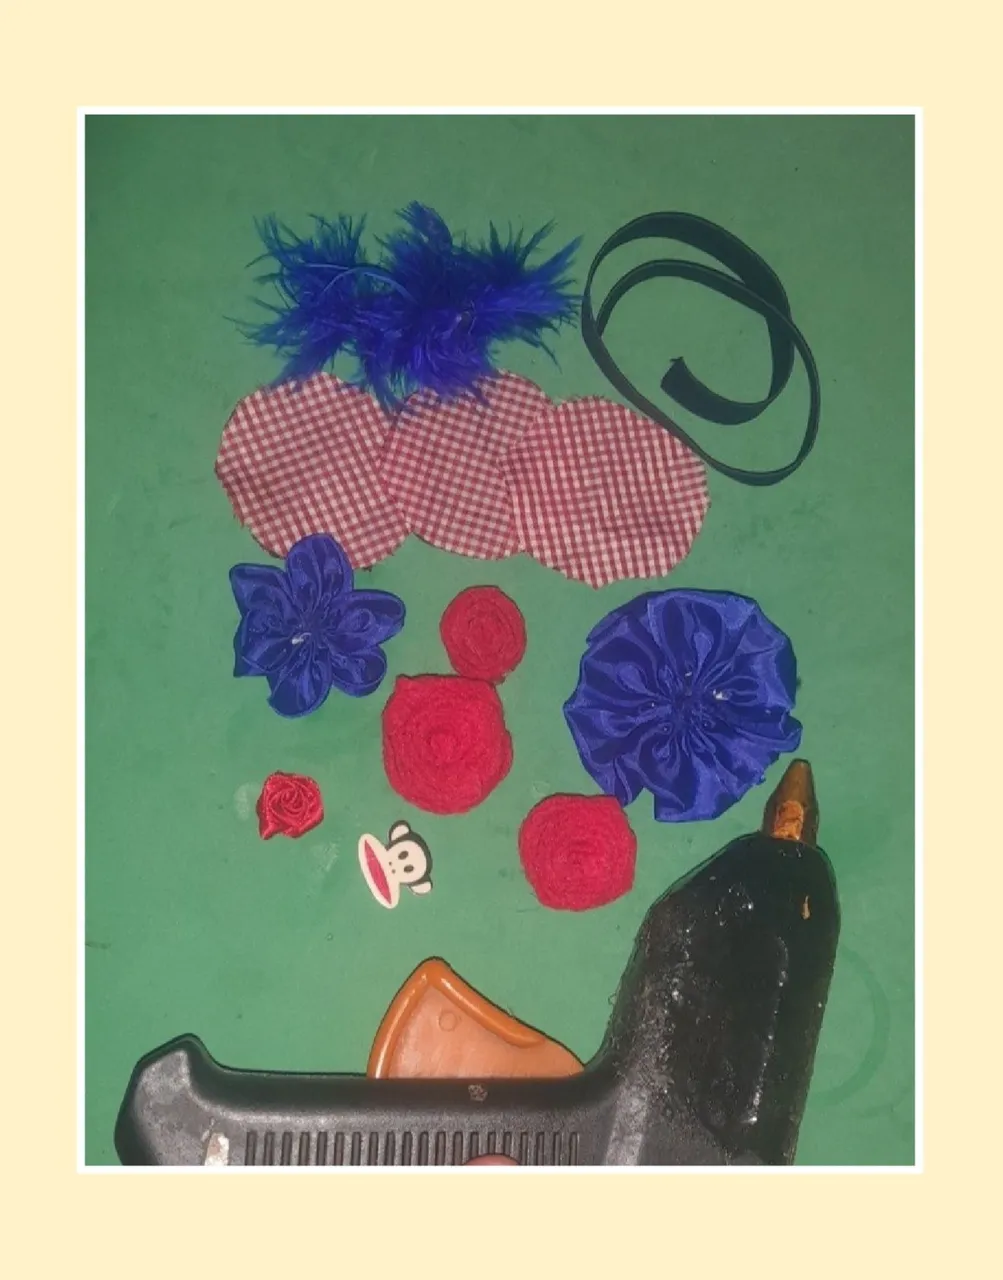
MATERIALES PARA DECORAR EL CINTILLO MODELO NÚMERO 3 :
▪︎ 1 cinta elástica color azul oscuro de 33 cm.
▪︎ 3 flores de fieltro rojas.
▪︎ 1 flor de cinta roja.
▪︎ 2 flores azules.
▪︎ 8 cm de pluma azul.
▪︎ pistola de barra de silicón.
▪︎ 3 círculos de tela roja y blanca para la base.
▪︎ 1 figura de mono decorativa.
MATERIALS TO DECORATE THE HEADBAND MODEL NUMBER 3 :
▪︎ 1 dark blue elastic ribbon 33 cm.
▪︎ 3 red felt flowers.
▪︎ 1 red ribbon flower.
▪︎ 2 blue flowers.
▪︎ 8 cm blue feather.
▪︎ silicone stick gun.
▪︎ 3 circles of red and white fabric for the base.
▪︎ 1 decorative monkey figure.
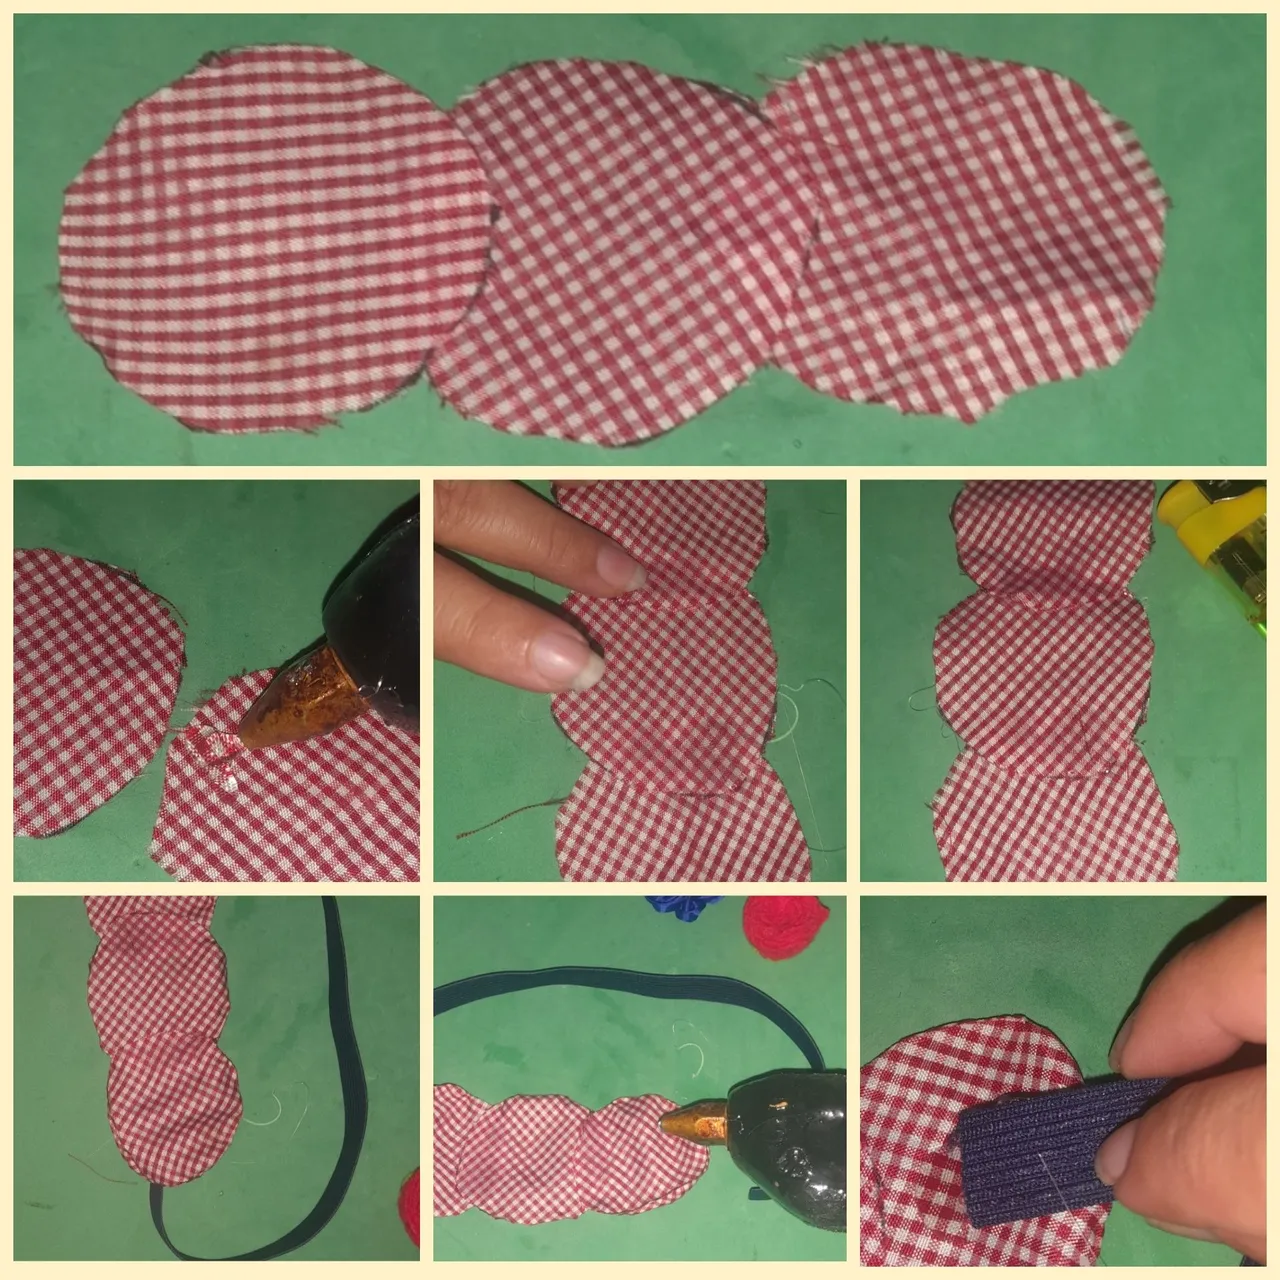
Paso 1 :
Iniciamos este tercer modelo de cintillo pegamos los tres círculos de tela roja y blanca seguidamente en cada extremo de esos círculos pegamos la cinta elástica azul oscura para así formar la base de éste lindo cintillo.
Step 1 :
We start this third headband model by gluing the three circles of red and white fabric, then at each end of these circles we glue the dark blue elastic ribbon to form the base of this beautiful headband.
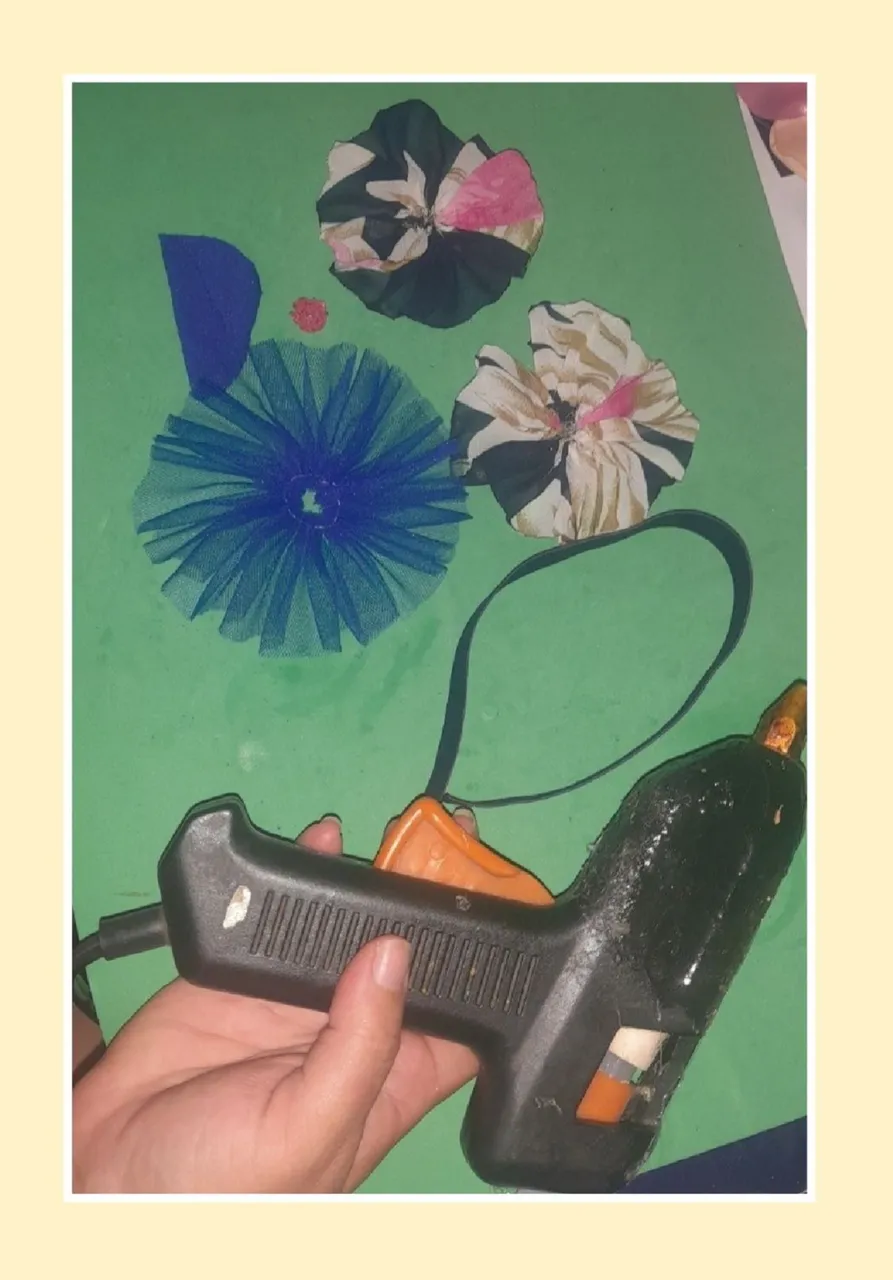
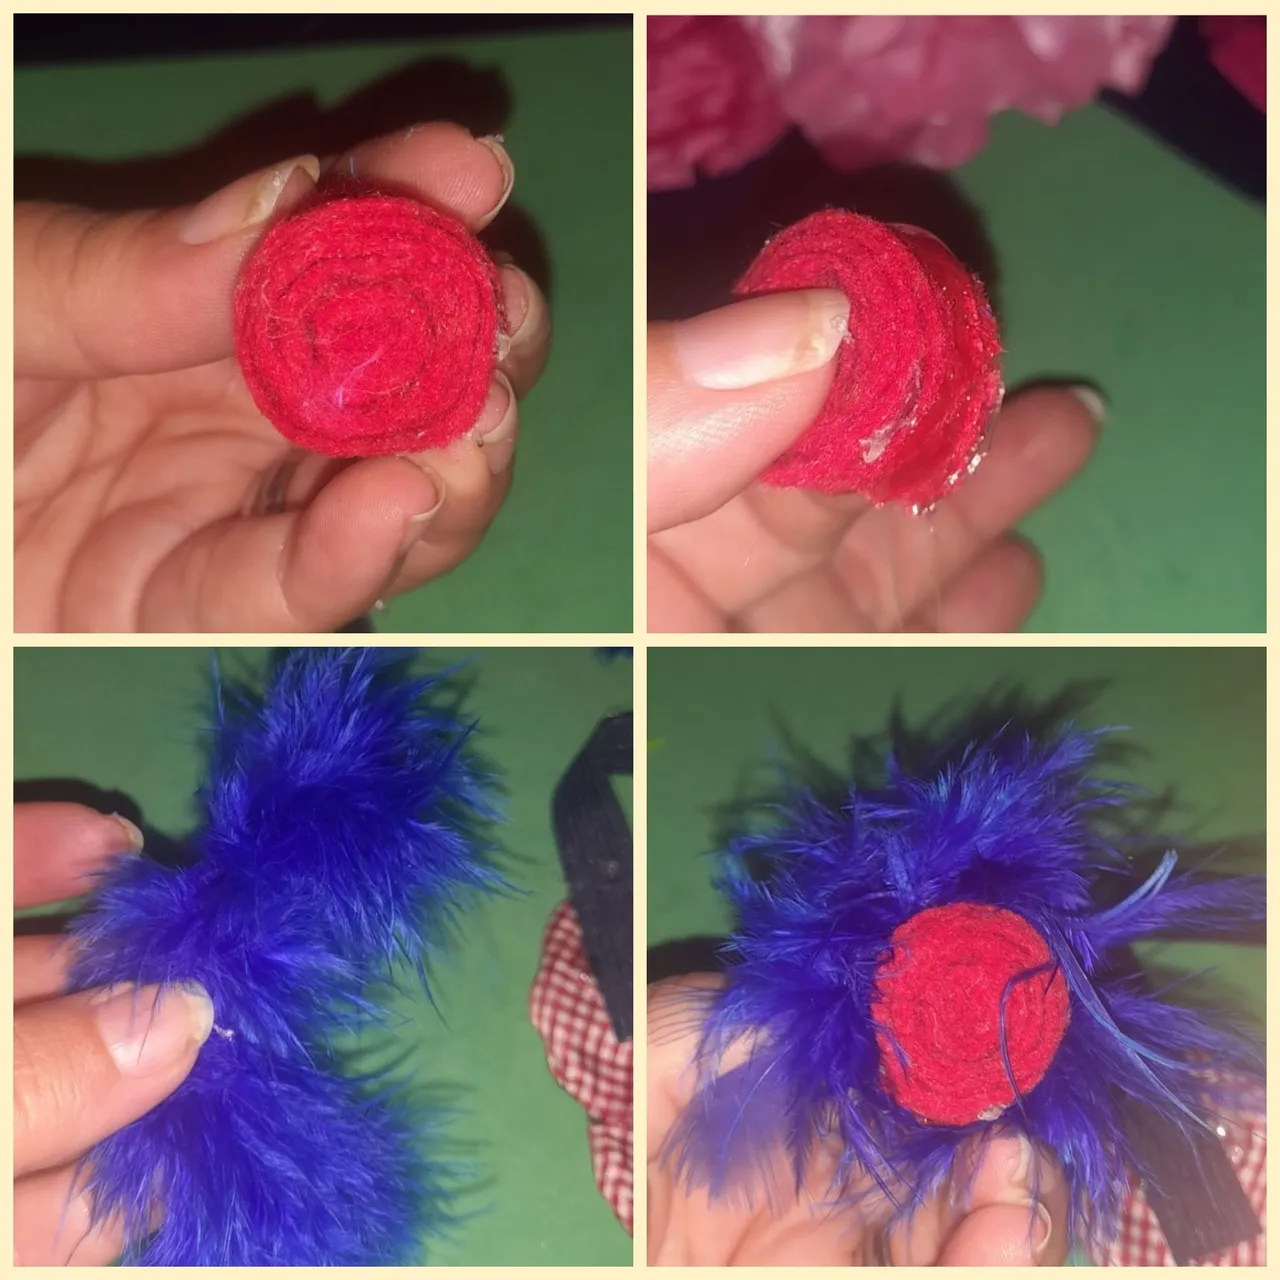
Paso 2 :
Ya tenemos elaborado las tres flores de fieltro roja y las dos de tela azul más la de cinta roja, de la flores de fieltro tomamos una la más pequeña y con las plumas azules de 8 cm la pegamos con silicón enrollando a la flor de fieltro roja y así queda muy linda esta pieza decorativa.
Step 2 :
We already have elaborated the three red felt flowers and the two blue fabric flowers plus the red ribbon flower, from the felt flowers we take the smallest one and with the blue feathers of 8 cm we glue it with silicone rolling it to the red felt flower and this way this decorative piece looks very nice.
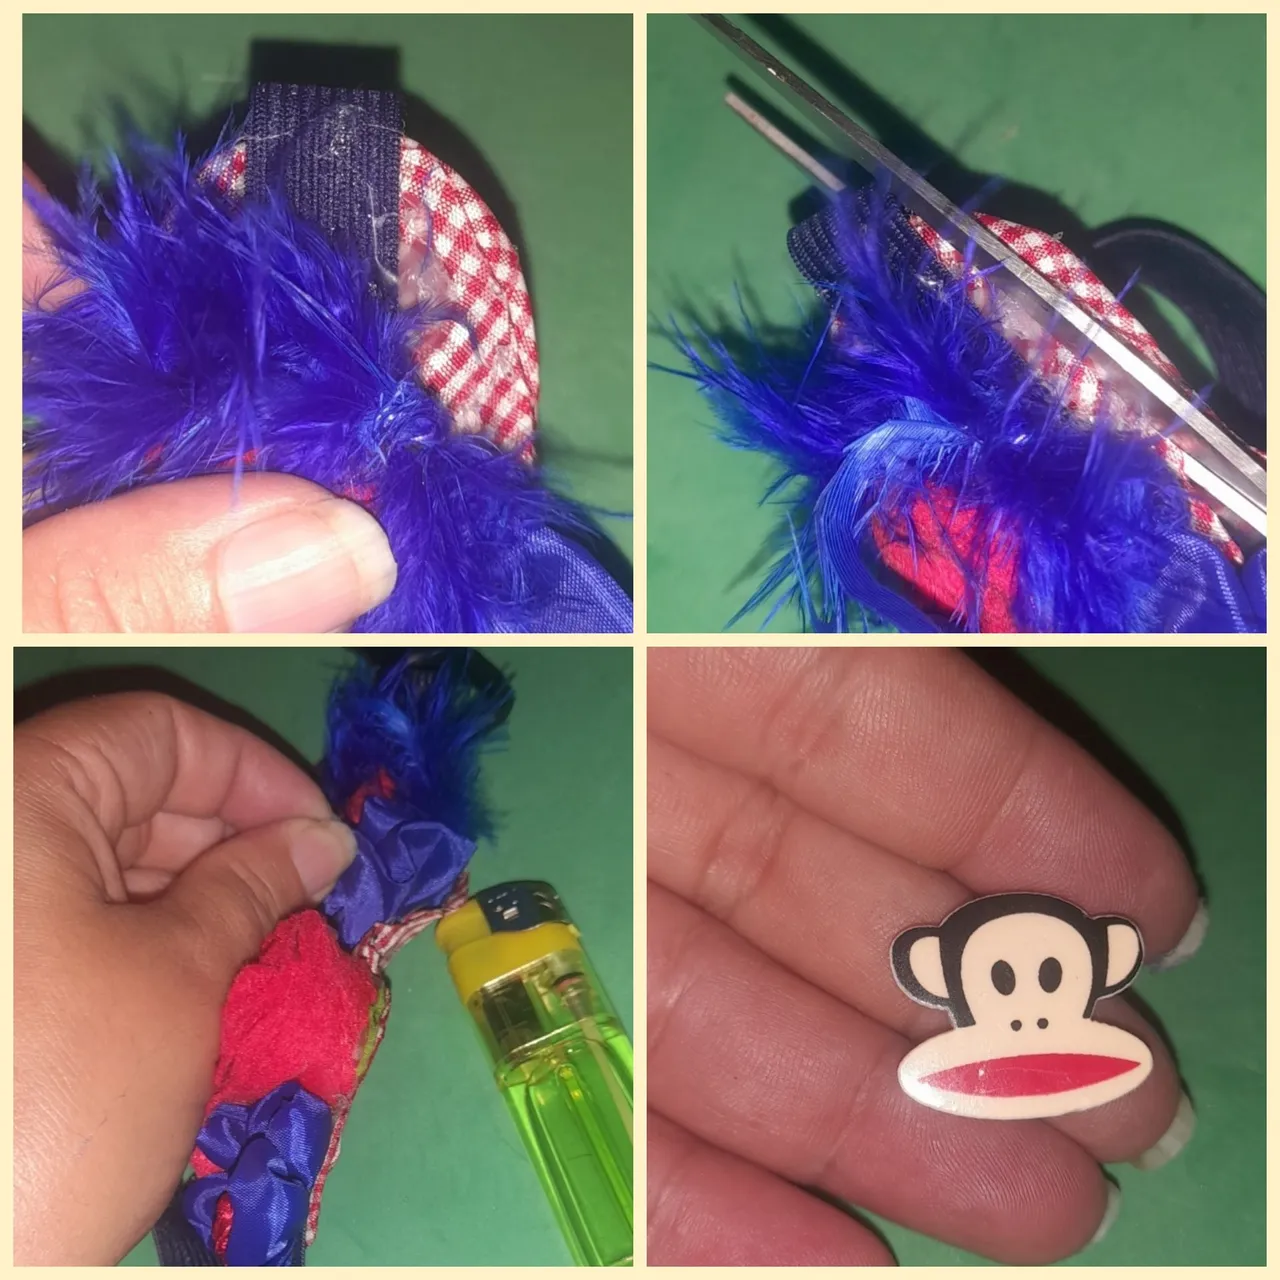
Paso 3 :
Continuamos decorando procedemos a pegar todas las flores a la base del cintillo primeramente las flores azules, más una pequeña flor roja que la vamos a colocar sobre la flor azul pequeña, enseguida vamos a pegar las otras dos flores de fieltro roja y la flor con las plumas, para finalizar colocamos la figura de un mono en el centro de la flor azul más grande del cintillo.
Step 3 :
We continue decorating proceed to glue all the flowers to the base of the headband firstly the blue flowers, plus a small red flower that we will place on the small blue flower, then we will glue the other two red felt flowers and the flower with the feathers, to finish we place the figure of a monkey in the center of the largest blue flower of the headband.

Paso 4:
Cortamos todos los excedentes de tela en la base del cintillo con la tijera y con un yesquero quemamos las orilla de la base del cintillo y así tememos un buen acabado en el cintillo.
Step 4:
Cut off all the excess fabric at the base of the headband with the scissors and burn the edges of the base of the headband with a tinder and so we have a good finish on the headband.
Miren aquí amigos de @jewelry como quedaron estos lindos cintillos para las princesas de la casa con tres tipo de decoración diferente en los cintillo.
Look here friends of @jewelry how these cute headbands for the princesses of the house turned out with three different types of decoration on the headbands.
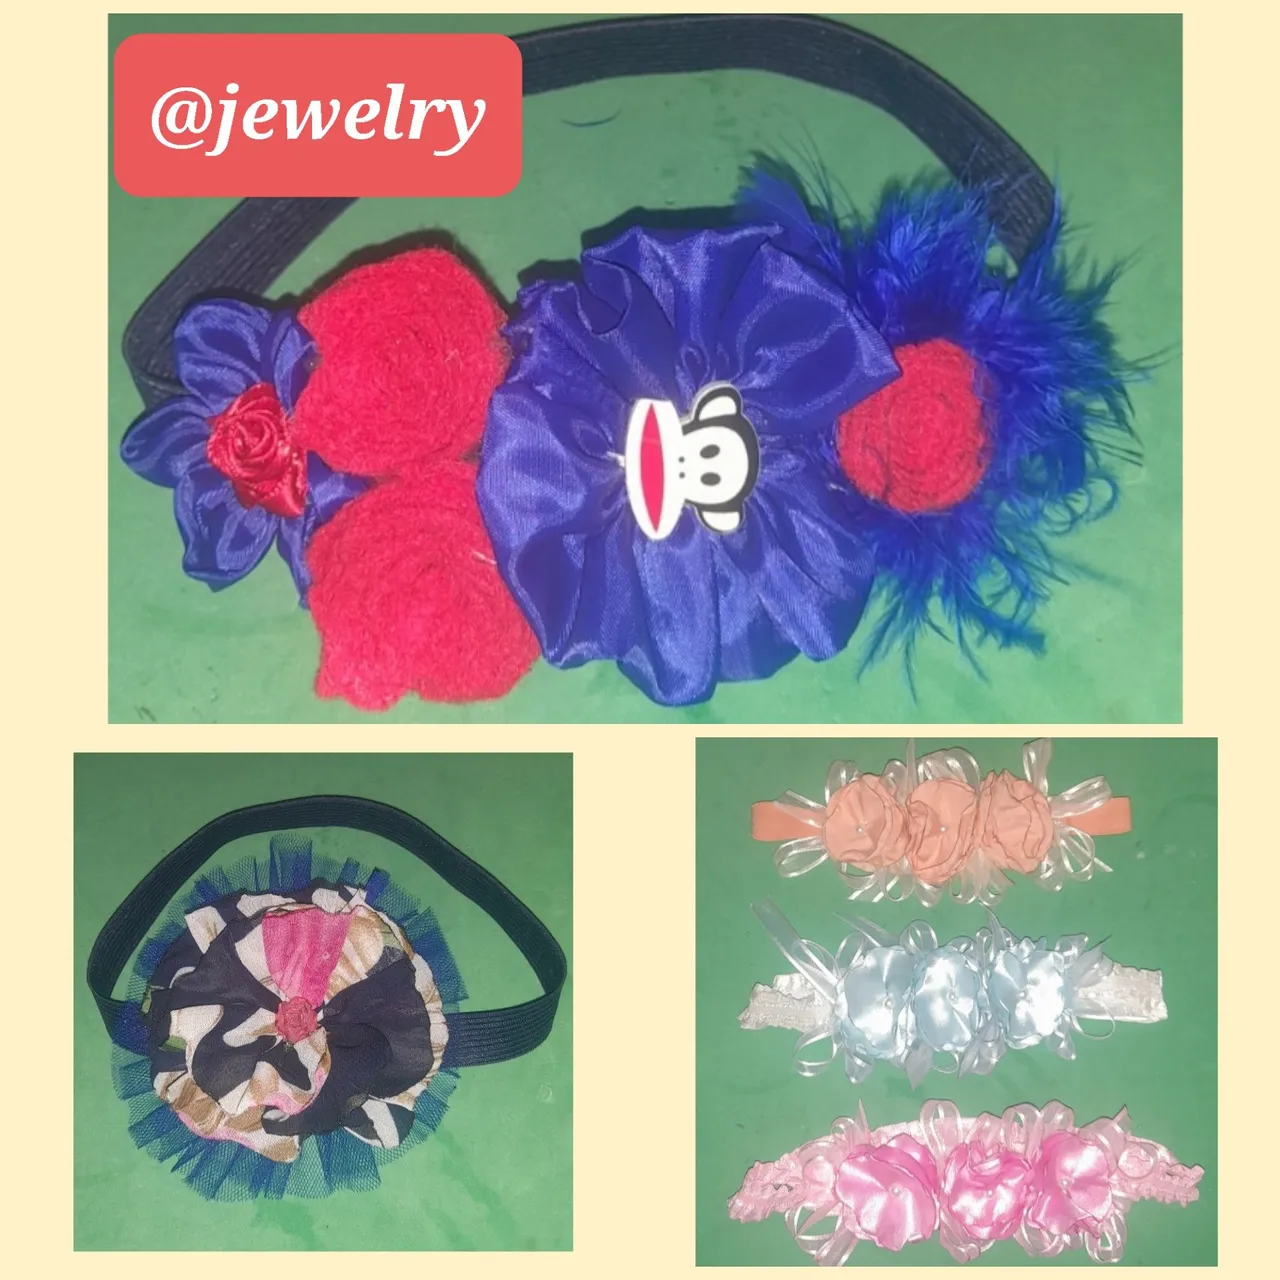
Es algo sencillo de hacer solo deje volar su imaginación lo puede decorar como quieran y hacer los modelos que deseen.
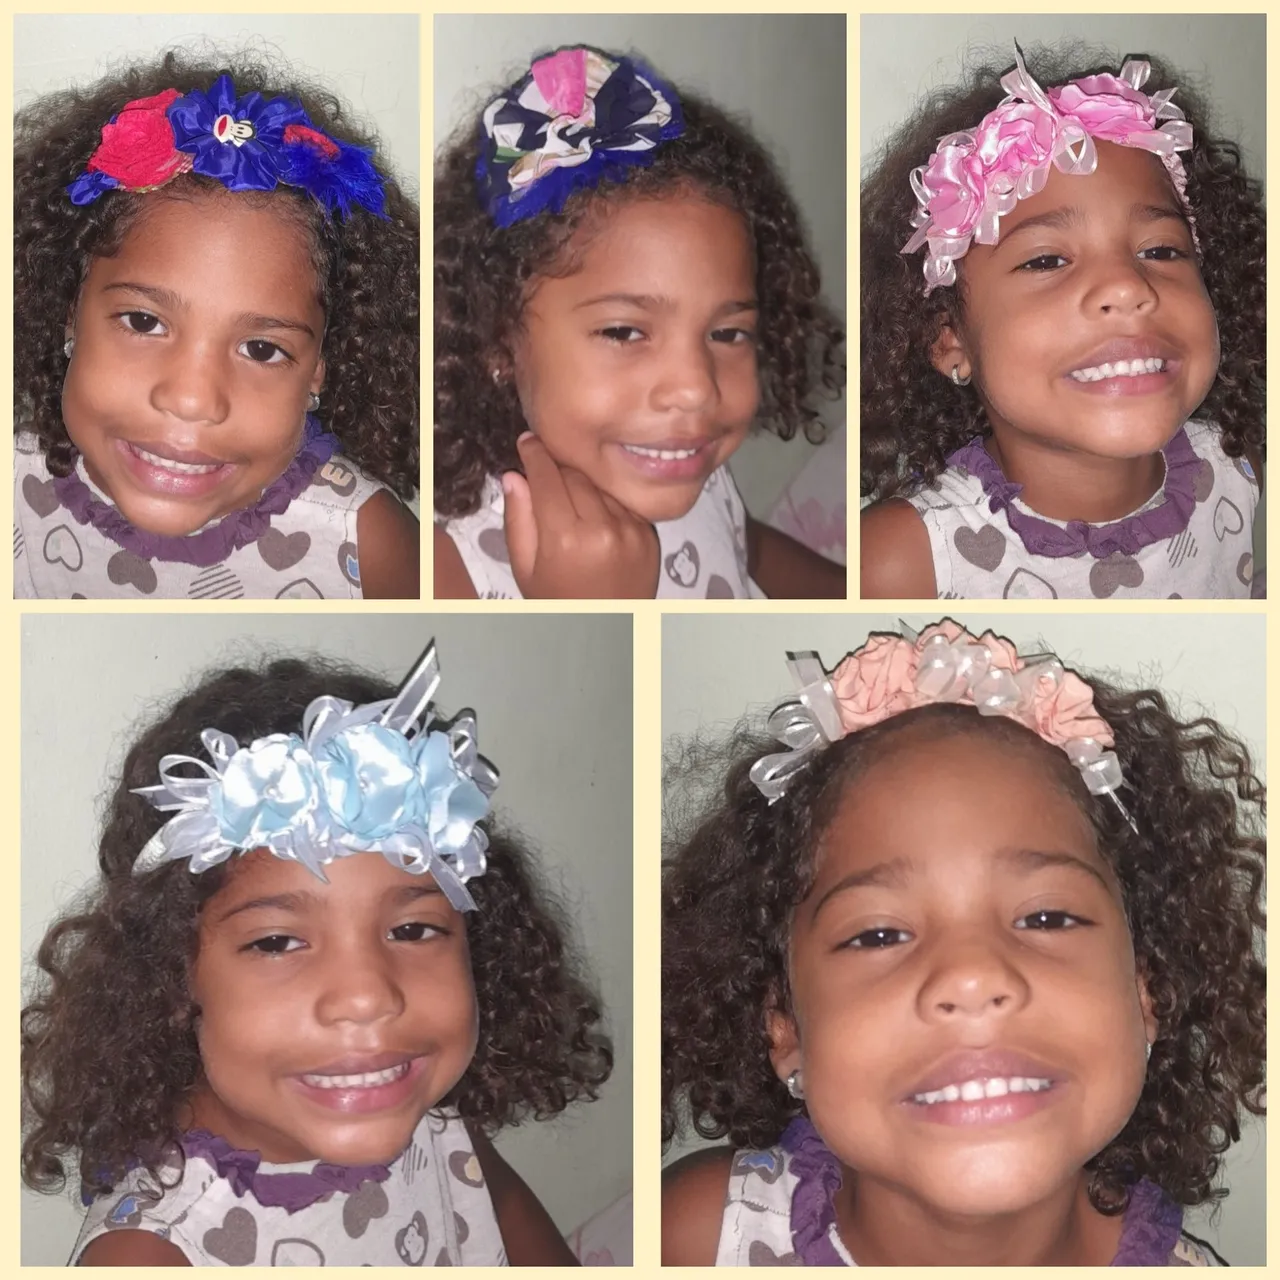
Aquí le muestro con mi segunda modelo la más pequeña y traviesa de la casa, miren como se le ve los cinco cintillos de lindos.
Déjenme contarle que tuve que hacer un curso con mi modelo número dos, para tomarle las fotos a esta tremendura de niña; pero a la vez muy divertida experiencia, pues ella es muy inquieta pero finalmente se dejo tomar las fotos.... hice muchos intento ja ja ja con resultados geniales .
It is something simple to make, just let your imagination fly, you can decorate it as you like and make the models you want.
Here I show you with my second model, the smallest and naughtiest of the house, look how cute the five ribbons are.
Let me tell you that I had to do a course with my model number two, to take the pictures of this little girl; but at the same time a very funny experience, because she is very restless but finally she let me take the pictures.... I made many attempts ha ha ha ha with great results.
Imágenes mías creadas y tomadas desde mi teléfono.
Imágenes editadas originalmente desde foto collage frame.
Texto de mi autoria escrito con creatividad.
Traductor deepl.
Images of mine created and taken from my phone.
Images originally edited from photo collage frame.
Creatively written text of my authorship.
Translator deepl.
Siempre es una experiencia maravillosa crear algún accesorio lindo para las niñas de la casa y si es con nuestras manos mejor, bueno mis amigos esperó que le allá gustado mis decoraciones en éstos cinco cintillos tan lindos, delicados y complementarios para que su niña luzca como una princesa. Es un tutorial hecho Con cariño trabajando de la mano de Dios y creando lindos accesorios y bisutería para ustedes y un futuro lleno de emprendimiento.
Muchas gracias amigos de @jewelry por el apoyo hasta una nueva publicación.
Siempre creando con amor para ustedes❤
It is always a wonderful experience to create a cute accessory for the girls of the house and if it is with our hands even better, well my friends I hope you liked my decorations in these five so cute, delicate and complementary headbands for your little girl to look like a princess. It is a tutorial made with love working hand in hand with God and creating beautiful accessories and jewelry for you and a future full of entrepreneurship.