¡Hola, hola! Hivers y hermosa comunidad de Jewelry , espero todos se encuentren súper bien, animados e inspirados 💟
Han pasado casi 2 meses desde mi ultima publicación, y es que ahora tengo mas carga de trabajo y había estado algo enferma de mis manitas, ya que sufro de túnel carpiano; sigo recuperándome, pero gracias a Dios estoy mucho mejor y he vuelto a tejer cositas sencillas y también he regresado a hacer trabajos en la PC.
Y pues aprovechando que este proyecto de tejido da para un post cortito y no me tomara demasiado tiempo realizarlo decidí que es perfecto para retomar mis publicaciones en Hive.
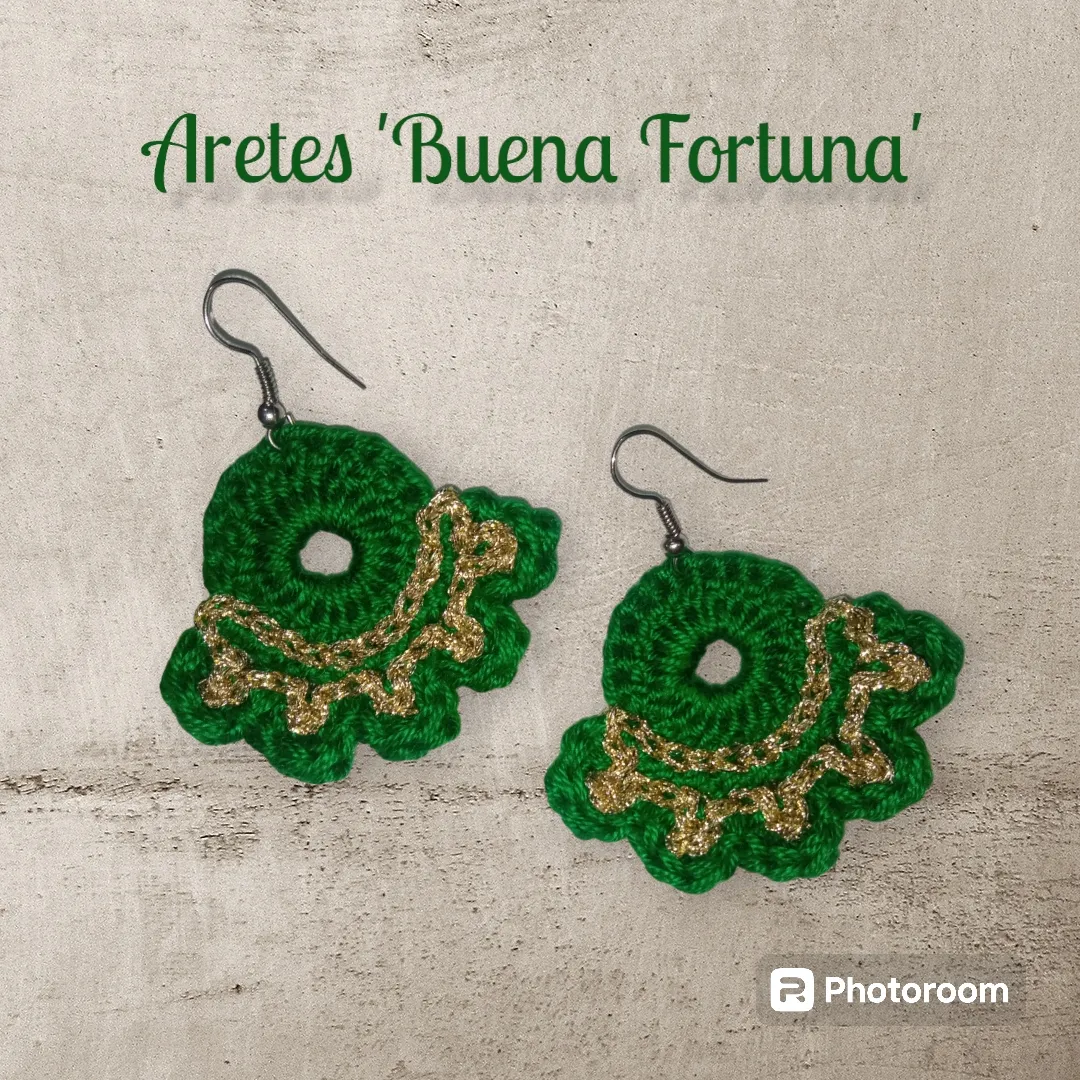
Hoy les quiero mostrar un nuevo diseño de aretes tejidos a crochet, este diseño lo realice de mi propia inspiración y como no tenia un patrón pues me dedique a hacer mi propio patrón mientras lo iba tejiendo, la verdad fue bastante fácil tejerlos y estoy realmente feliz con el resultado y por esa razón estoy aquí compartiendo con ustedes mi proceso creativo de este hermoso par de Aretes tejidos a crochet con forma de abanico, por su hermoso color verde y dorado decidí nombrarlos ´Aretes Buena Fortuna´.
Hello, hello! Hivers and beautiful Jewelry community , I hope you all are super well, encouraged and inspired 💟.
It has been almost 2 months since my last publication, and now I have more workload and I had been a little sick in my hands, as I suffer from carpal tunnel; I am still recovering, but thank God I am much better and I have returned to knit simple things and I have also returned to do work on the PC.
And since this knitting project is enough for a short post and it won't take me too much time to make it, I decided that it's perfect to resume my publications in Hive.
Today I want to show you a new design of crocheted earrings, this design I made it from my own inspiration and as I didn't have a pattern I dedicated myself to make my own pattern while I was knitting it, the truth was quite easy to knit them and I am really happy with the result and for that reason I am here sharing with you my creative process of this beautiful pair of Crocheted earrings with fan shape, for its beautiful green and gold color I decided to name them 'Good Fortune Earrings'.
A continuación les contare sobre los materiales que use para realizar los aretes y sobre el proceso de tejido.
🍀 MATERIALES:
🍀Hilo verde de algodón (use el de la marca Carmencita, que es súper delgado).
🍀Hilo Lame color dorado.
🍀Ganchillo #1.
🍀Aguja lanera.
🍀Tijeras.
🍀Un par de aretes tipo anzuelo.
Next I will tell you about the materials I used to make the earrings and about the weaving process.
🍀 MATERIALS:.
🍀 Green cotton thread (use Carmencita brand, which is super thin).
🍀 Gold colored Lame yarn.
🍀 Crochet hook #1.
🍀 Wool needle.
🍀 Scissors.
🍀 A pair of fishhook earrings.

🍀PROCESO DE TEJIDO:
Como les dije anteriormente los aretes los tejí sin tener un patrón previo, así que fue un proceso de tejer y destejer hasta dar con los puntos correctos para que los aretes tuvieran el tamaño deseado. pero la verdad fueron bastante sencillos y rápidos de tejer.
Una vez definido mi patrón realice un diagrama de lo que tejí para ya tenerlo guardado en mi cuaderno de patrones y se me hiciera súper rápido tejerlos en otra ocasión, claro también describo lo que dibujo en la diagrama, para evitar errores y a la hora de repetir el patrón quede siempre igual.
Les dejo mi diagrama y la descripción, si se animan a tejerlos por favor no olvides etiquetarme como @laranitacrochet tanto en Instagram como en Hive y mencionar que soy la autora del patrón.
🍀WEAVING PROCESS:
As I told you before, I knitted the earrings without a previous pattern, so it was a process of knitting and unknitting until I found the right stitches so that the earrings would have the desired size, but the truth is that they were quite simple and fast to knit.
Once I defined my pattern I made a diagram of what I knitted to have it saved in my pattern notebook and it would be super fast to knit them on another occasion, of course I also describe what I draw in the diagram, to avoid mistakes and when repeating the pattern it will always be the same.
I leave you my diagram and description, if you are encouraged to knit them please do not forget to tag me as @laranitacrochet both on Instagram and Hive and mention that I am the author of the pattern.
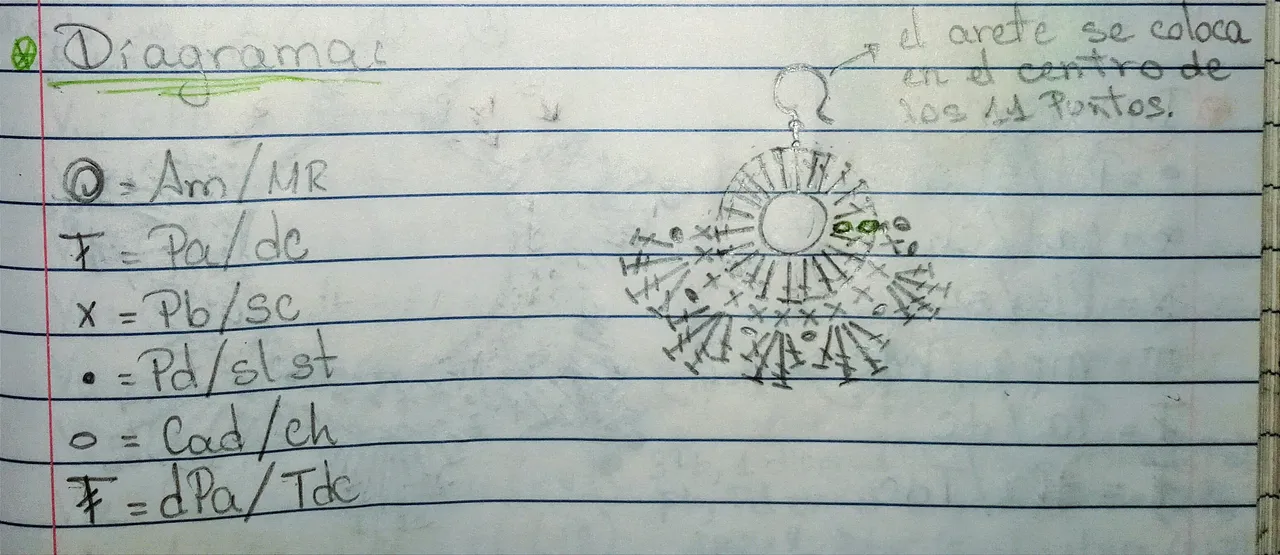
Igual por si aun no entienden los diagramas para tejer, o por si prefieren los patrones escritos, a continuación les describo lo que refleja el diagrama y detallitos que no se ven en el mismo:
V1: realizar un anillo mágico doble, tejer 2 puntos cadena y seguidamente hacer 22 puntos altos, cerrar la vuelta con punto deslizado ( las 2 cadenetas del inicio no cuentan como punto).
V2: tejer 1 cadena para dar altura y luego tejer 11 puntos bajos.
V3: para realizar las ondulaciones lo que hice fue seguir la siguiente secuencia, [1Pd, (1Pa, 2dPa,1Pa)] x 6 y terminar con punto deslizado.
V4: esta vuelta es básicamente el adorno o decoración del arete, y la idea es que parezca una cadena pegada al tejido, así que lo que hice fue tejer puntos deslizados por el borde de la vuelta anterior.
Just in case you still don't understand the knitting diagrams, or if you prefer the written patterns, here is a description of what the diagram shows and details that are not shown in the diagram:
R1: knit a double magic ring, knit 2 chain stitches and then knit 22 double crochet stitches, close the row with slip stitch (the 2 chains at the beginning do not count as stitches).
R2: knit 1 chain to give height and then knit 11 single crochet stitches.
R3: to make the undulations what I did was to follow the following sequence, [1 sl st, (1dc, 2Tdc,1dc)] x 6 and finish with slip stitch.
R4: this row is basically the ornament or decoration of the earring, and the idea is to make it look like a chain attached to the fabric, so what I did was to knit slipped stitches along the edge of the previous row.
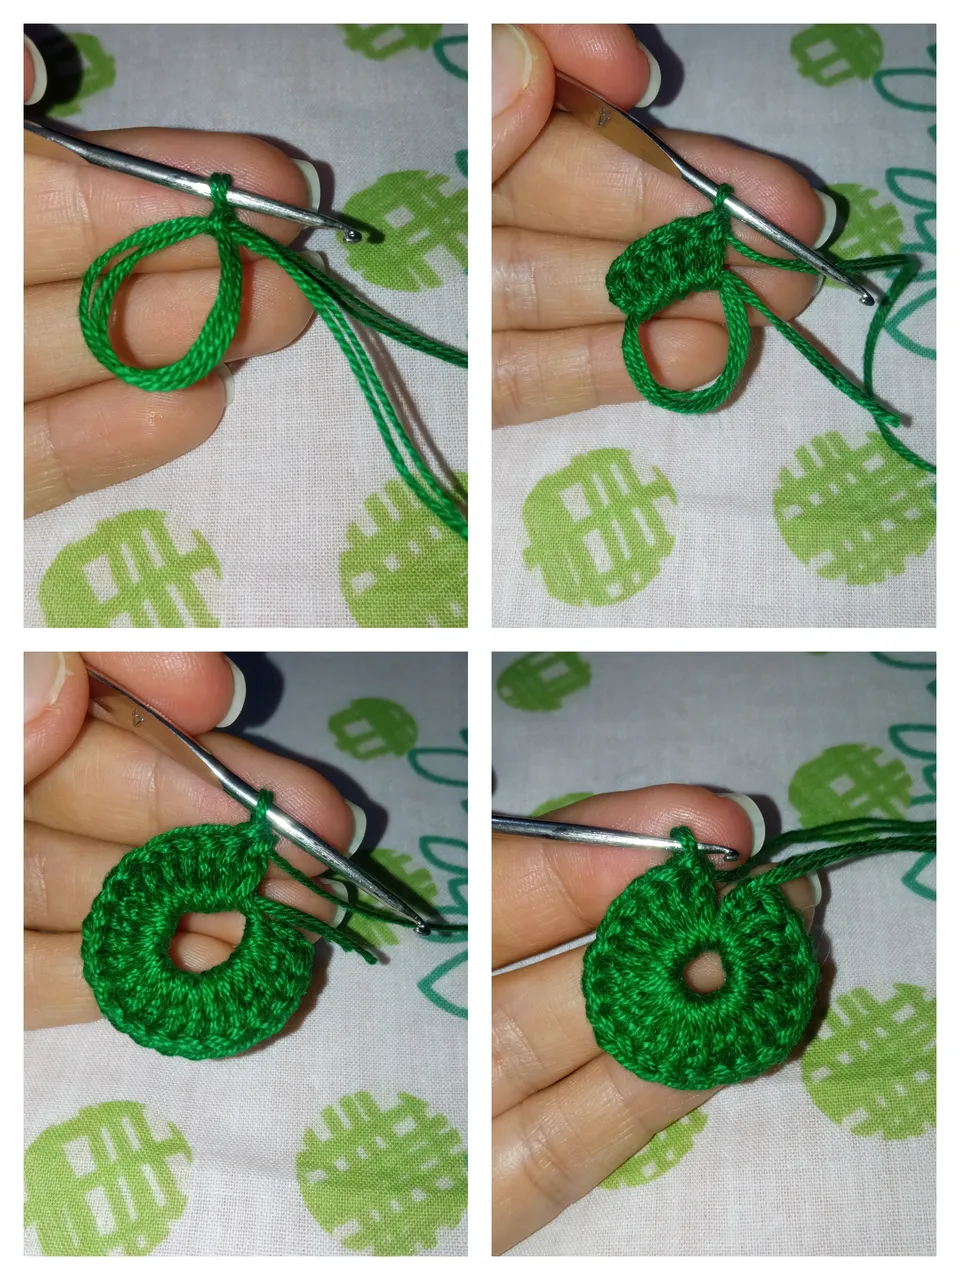
V1 / R1
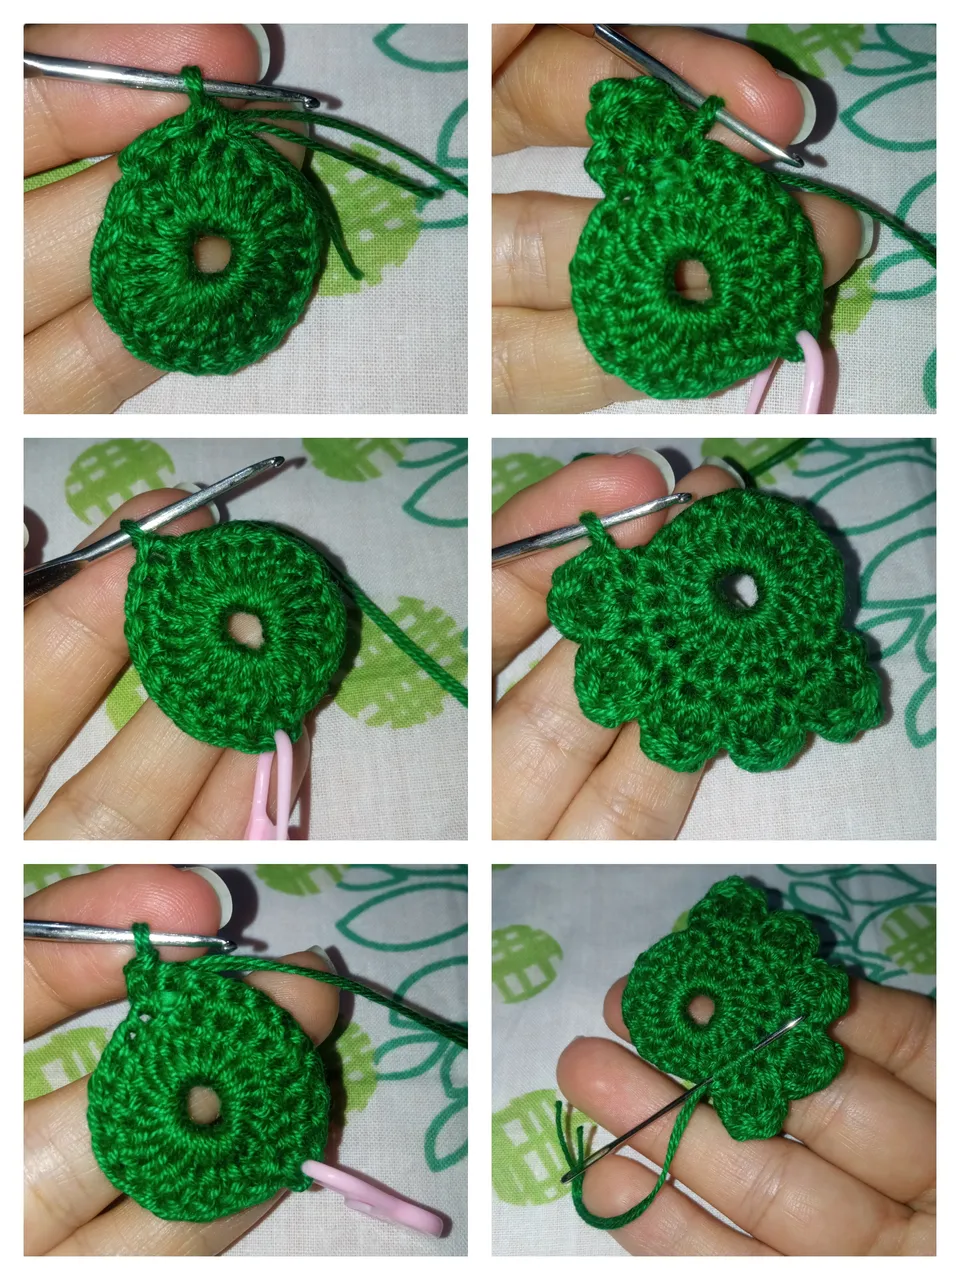
V 2 Y 3 / R 2 AND 3

V4 / R4
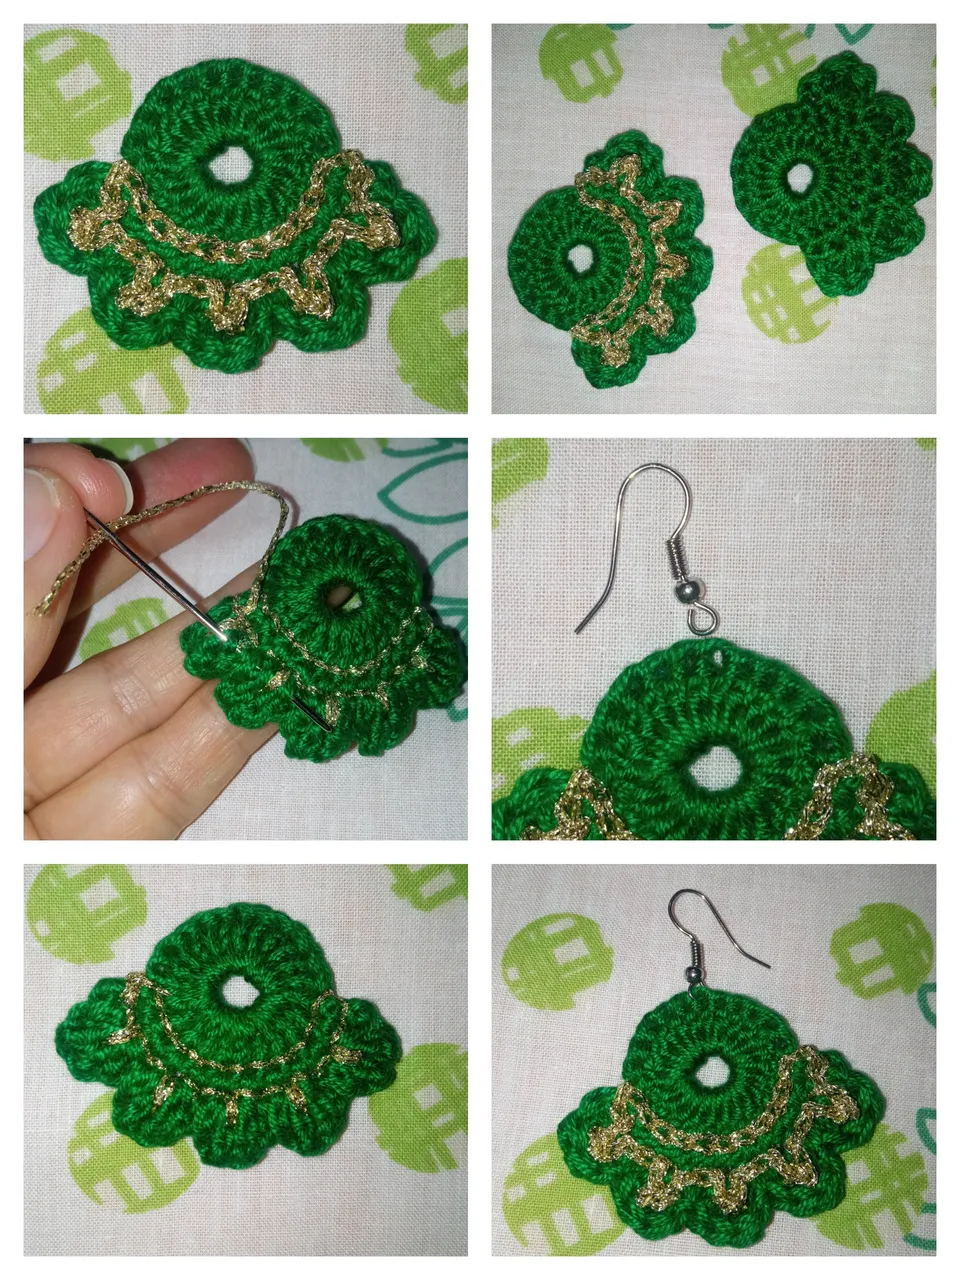
Ya para finalizar lo que hice fue asegurar y ocultar los hilos y colocar los aretes tipo anzuelo.
Los aretes los coloque justo en el centro de los 11 puntos libres de la primera vuelta.
Finally, what I did was to secure and hide the threads and place the hook earrings.
I placed the earrings right in the center of the 11 free stitches of the first row.
Ya solo queda lucir estos hermosos aretes tejidos a crochet, que resaltan ser súper originales, elegantes y llamativos.
Yo los ame, sobre todo me encanta este tono de verde 😍💖.
All that's left is to wear these beautiful crocheted earrings, which stand out for being super original, elegant and eye-catching.
I love them, especially I love this shade of green 😍💖.

Realmente deseo les haya gustado tanto como a mí el resultado final de estos hermosos Aretes en forma de Abanico, y se animen a realizarlos.
I really hope you liked as much as I did the final result of these beautiful Abanico shaped Earrings, and I encourage you to make them.

Resultado Final / Final Result
ESPERO SUS BONITOS COMENTARIOS Y/O VOTOS, ASÍ ME MOTIVAN PARA SEGUIR COMPARTIENDO MIS CREACIONES CON USTEDES, YO ESTARÉ FELIZ DE RESPONDER TODOS SUS COMENTARIOS, ¡SEAN FELICES Y QUE LA MUSA DE LA CREATIVIDAD NUNCA LOS ABANDONE!
¡GRACIAS POR VISITAR MI BLOG!
Se despide de ustedes con mucho cariño su amiga Nathalie @laranitacrochet
I HOPE YOUR NICE COMMENTS AND/OR VOTES MOTIVATE ME TO CONTINUE SHARING MY CREATIONS WITH YOU, I WILL BE HAPPY TO ANSWER ALL YOUR COMMENTS, BE HAPPY AND MAY THE MUSE OF CREATIVITY NEVER LEAVE YOU!
THANK YOU FOR VISITING MY BLOG!
Your friend Nathalie @laranitacrochet bids you a fond farewell.
*Todas las fotografías utilizadas en la publicación son propiedad de la autora.
*Las fotografías fueron tomadas y editadas con mi REDMI 9 y con la App FotoRoom.
*La traducción la hice en https://www.deepl.com/es/translator
*All photographs used in this publication are property of the author.
*The pictures were taken and edited with my REDMI 9 and the FotoRoom App.
*The translation was done at https://www.deepl.com/es/translator