(ENG)
Hello everyone, it is a pleasure to greet you today, wishing you a good start to the week, on this occasion, I will show you on @jewelry, a very simple tutorial on how to make a beautiful set of accessories, inspired by delicate and showy leaves, where I use the crochet and jewelry technique, always giving that touch of elegance and distinction. I invite you. My blog, where you are always welcome.

Materials:
. Golden wire.
. White pearls.
. Sewing thread, green color.
. knitting needle .
Hook for earrings..
.wooden beads, with flowers.
. Golden pearls.
. Scissors.
. Thin chain without pendant. .bjewelry tweezers
. Measuring tape.
. Metal bar.
. Transparent orange n6 beads.
Steps:
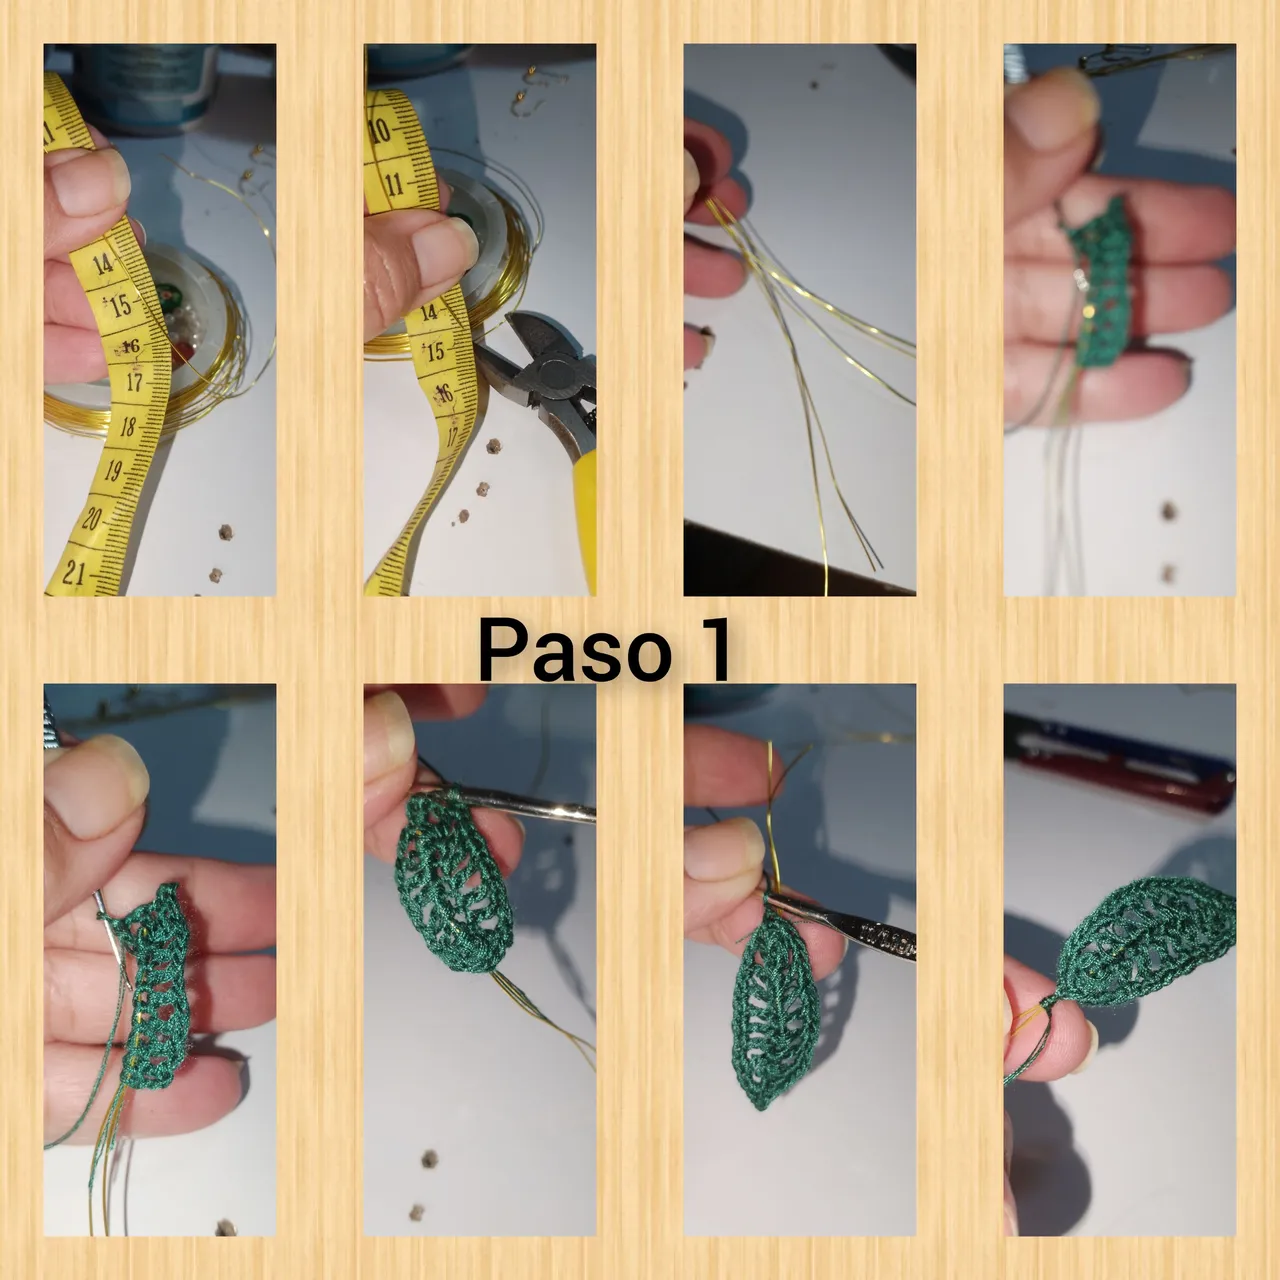
1.) Start marking and cutting four 14cm long pieces of wire. I place a first piece of wire in equal parts, I put the sewing thread, to use it in three strands, I tie well in the cut of the wire and begin to cover, part of it, with half stitches, I knit a total of 14, half stitches, I turn and knit the next side. Once I have reached the starting point, I knit a slip stitch. I pick up three chain stitches, one more chain stitch, and I knit a double crochet, in each half crochet, I knit a double crochet, separated by two chain stitches, in this way, I go forward and knit both sides to give shape, to a small and delicate leaf, once the leaf is formed, I knit a route of half stitches, two in each space.
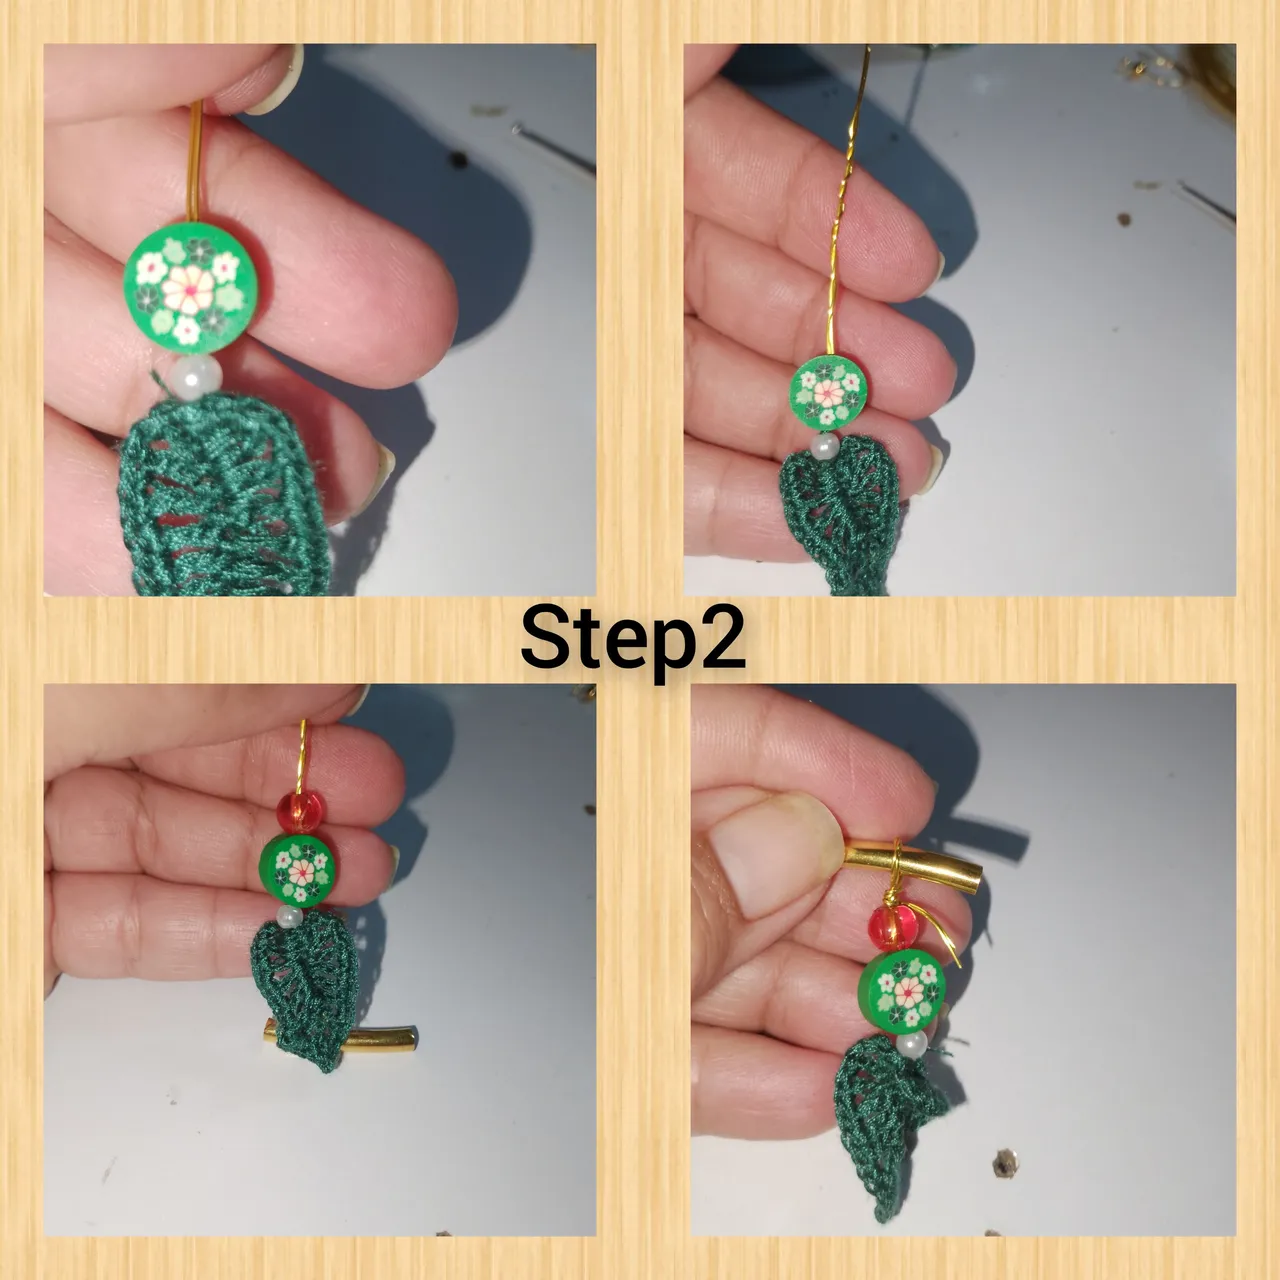
2.) Once the leaf is obtained, I place a white bead, the green wooden bead, followed by the orange bead. Using a thin metal bar, I make a ring with the residual wire.
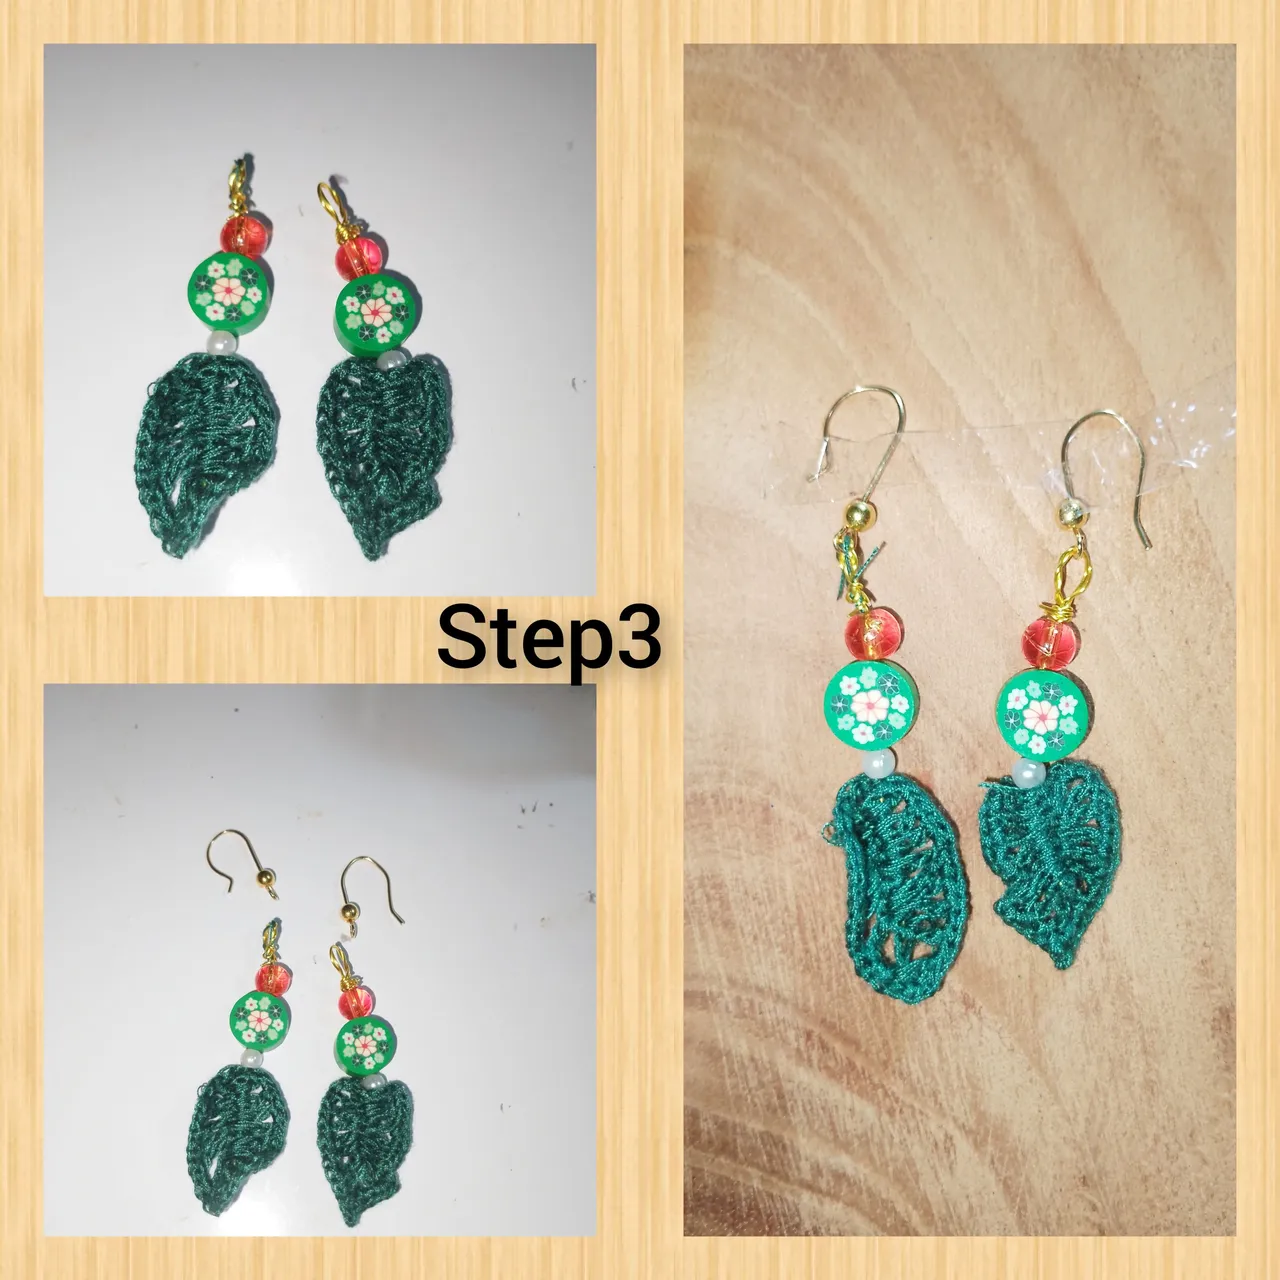
3.) After repeating the previous step, to complete the earrings, I will place the hooks with the help of the jewelry pliers.
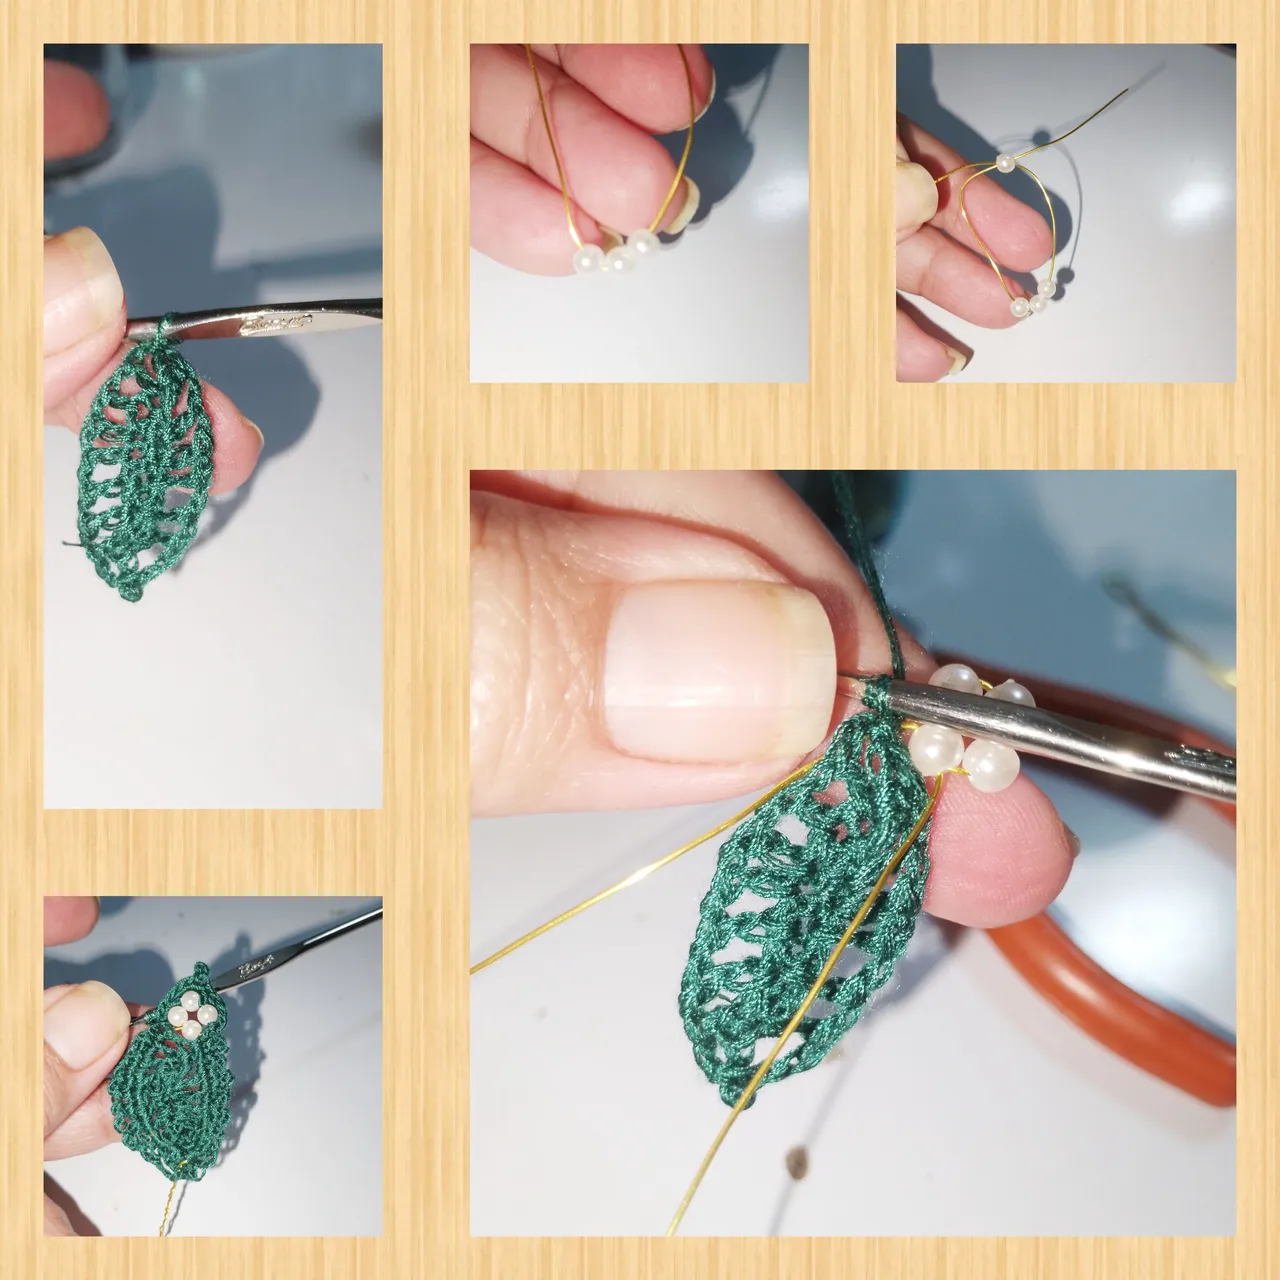
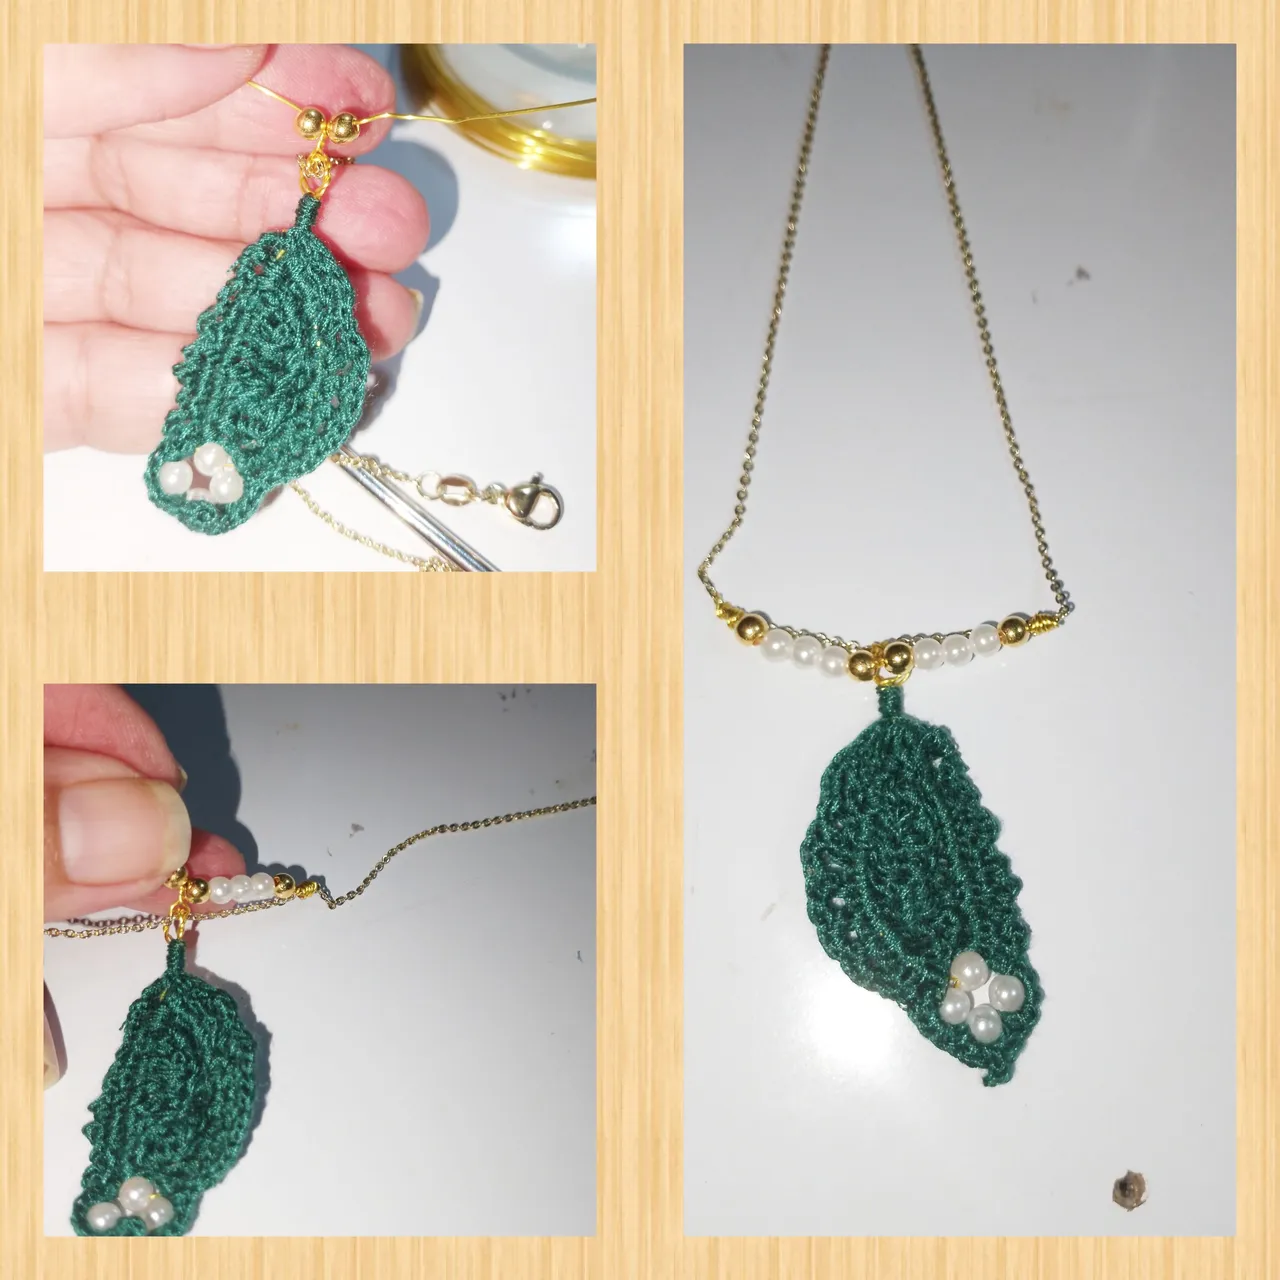
4.) To knit, the pendant of the necklace, continue, knitting, twelve chain stitches, and say half stitches on both sides. I lift five chain stitches, leaving a half-point space, and in the next one I will knit a double crochet. In the same way, I will do the entire route, until it forms a leaf, I take a piece of wire, I place three pearls and a quarter to it, where I crosswise insert the next tip of wire, forming a delicate flower. I position myself at the top of the leaf and with half points I begin to involve the wire in the leaf.
 5.) With the wire, residual and using the metal tube, formed the hoop. I use a last little piece of wire, I turn it several times, place on each side a golden pearl followed by three white pearls and one gold. Centering on the chain, going around with the wire, I fix as much as I can. Thus leaving the necklace ready.
. All photos have been taken, during the execution of the project, with my smartphone.
. Use incollage.
. Use language translator.
It was a pleasure to show you my most recent creation, I hope you liked the result as much as you did. Me, it will be until the next opportunity.
( ESP)
Hola a todos, es un gusto saludarles el día de hoy, deseando sea un buen inicio de semana, en est a oportunidad, les mostraré en @jewelry, un muy sencillo, tutorial, de como realizar un hermoso set, de accesorios, inspirados en delicadas y vistosas hojas, dónde use la técnica de crochet y bisutería, siempre dando ese toque de elegancia y distinción. Les invito. Ami blog, dónde siempre son bienvenidos.
Materiales:
. Alambre dorado.
. Perlitas de color blanca.
. Hilo de coser, color verde.
. Aguja para tejer
. Anzuelo para aretes..
.cuentas de madera, con flores.
. Perlitas doradas.
. Tijeras.
. Cadena delgada sin dije.
.bpinzas de bisutería
. Cinta métrica.
. Barrita de metal.
. Cuentas n6de color anaranjada transparente.
Pasos:
1.) comienzo marcado y cortando, cuatro pedazos de 14cm, de largo, de alambres. Coloco una primera pieza de alambre en partes iguales, pongo el hilo de coser, para usarlo en tres hebras, ato bien en el corte de el alambre y comienzo a cubrir, parte de este, con medios puntos, teji un total de 14, medios puntos, doy vuelta y tejo el siguiente lado. Alcanzado el punto de partida, tejo un punto deslizado. Levanto tres puntos cadenas, un punto cadena más, y tejo un punto alto, en cada medio punto, tejo un punto alto, separado por dos puntos cadenas, de esta manera, avanzo y tejo ambos lados par Adar forma, a una pequeña y delicada hoja, formada la hoja, tejo un recorrido de medios puntos, dos en cada espacio.
2.) Obtenida la hoja, coloco una perlita de color blanca, la cuenta de madera de color verde, seguida, de la cuenta anaranjada. usando una barra delgada de metal, hago un arito con el alambre, residual.
3.) repetido el paso anterior, para completar los aretes, colocaré los anzuelos con ayuda de la pinza de bisutería.
4.) Para tejer, el dije de el collar, continuo, tejiendo, doce puntos cadenas, y dice medios puntos de ambos lados. Levanto cinco puntos cadenas, dejo un espacio de medio puntos, y en el siguiente tejere, un punto alto. De igual manera, haré todo el recorrido, hasta forma una hoja, tomo trozo de alambre, coloco a el tres perlitas y una cuata, dónde introduzco de forma cruzada el siguiente punta de alambre, formando una delicada flor. Me ubico en la parte superior de la hoja y con medios puntos comienzo a involucrar el alambre a la hoja.
5.) con el alambre, residual y usando el tubo de metal, formó el arito. Uso un último pedacito de alambre doy varias vueltas, coloco en cada lado, una perlita dorada seguida de tres perlitas blancas y una dorada. Centrando en la cadena, dando vueltas con el alambre, fijo loas que pueda. Quedando de esta manera listo el collar.
. Toda las fotos hn sido tomadas, durante la ejecución de el proyecto, con mí teléfono inteligente.
. Use incollage.
. Use traductor lenguaje.
Fue un gusto mostrarles , mi más reciente creación, deseo les haya gustado el, resultado tanto como. Mí, sera hasta un próxima oportunidad.