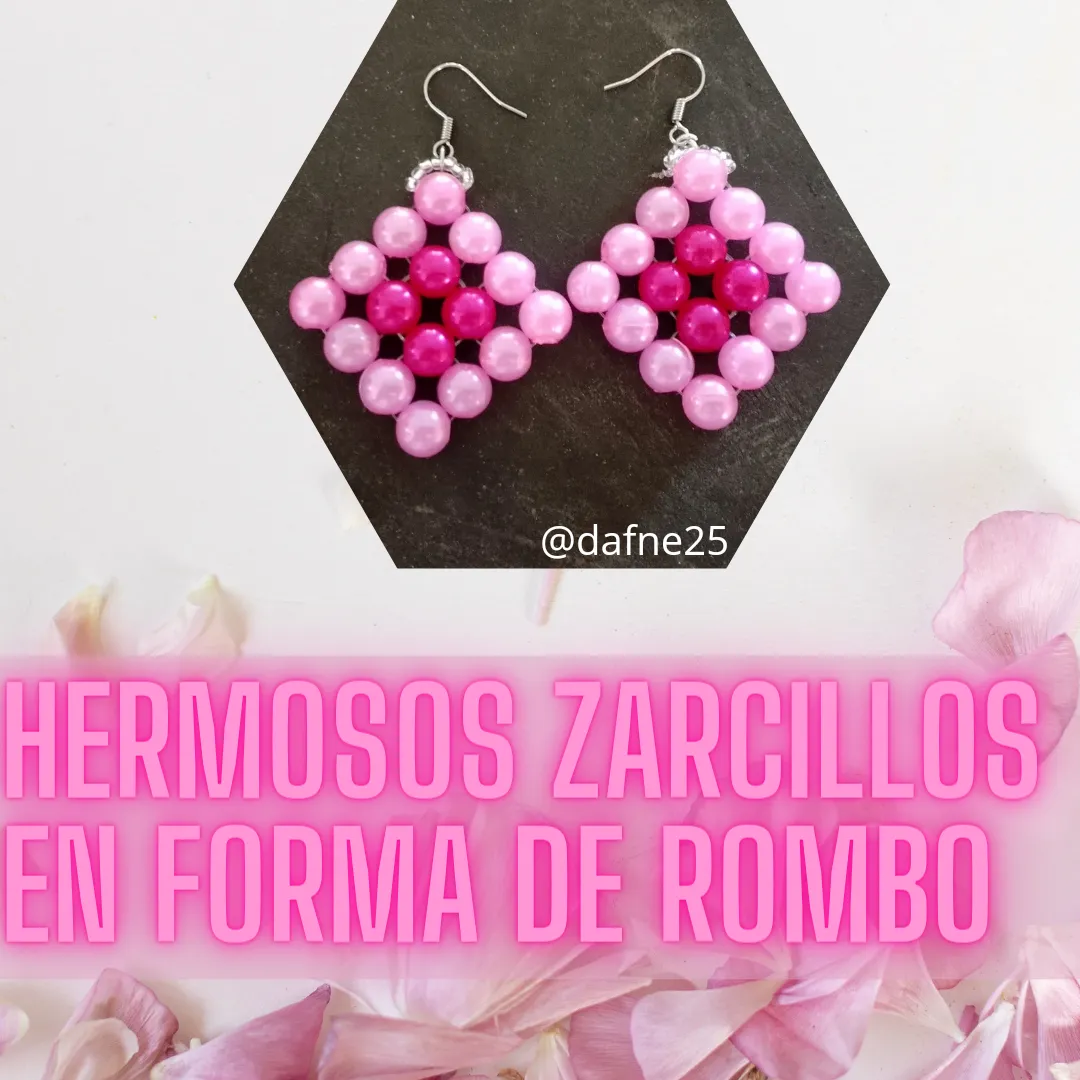

Buenas tardes queridos amigos de Hive y Jewelry, cómo están?, espero que estén muy bien y que hayan tenido y disfrutado de este bello día. En esta preciosa noche les quiero compartir como hice estos bellos zarcillos con forma de rombo en dos tonos del color rosado. Son sencillos de hacer y también rápidos de hacer, mi recomendación para estos zarcillos es que al terminarlos les coloquen algo pesado encima para que fijen su forma de rombo.
Los Materiales que vamos a necesitar son:
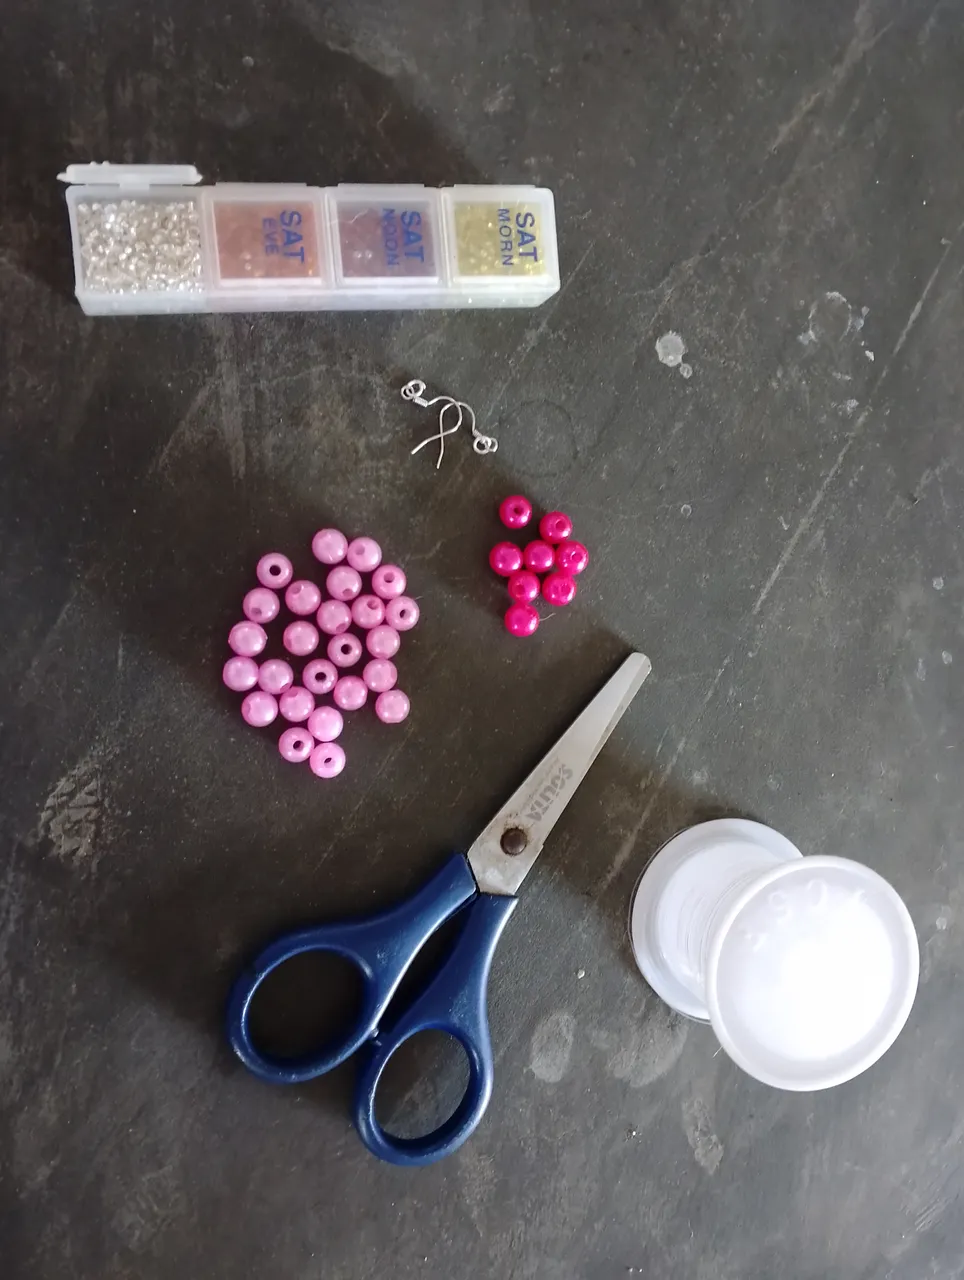
24 Perlas de color rosado claro y tamaño mediano
Mostacillas transparentes
2 Anzuelos para zarcillos
2 mt de nylon 0,3
Procedimiento
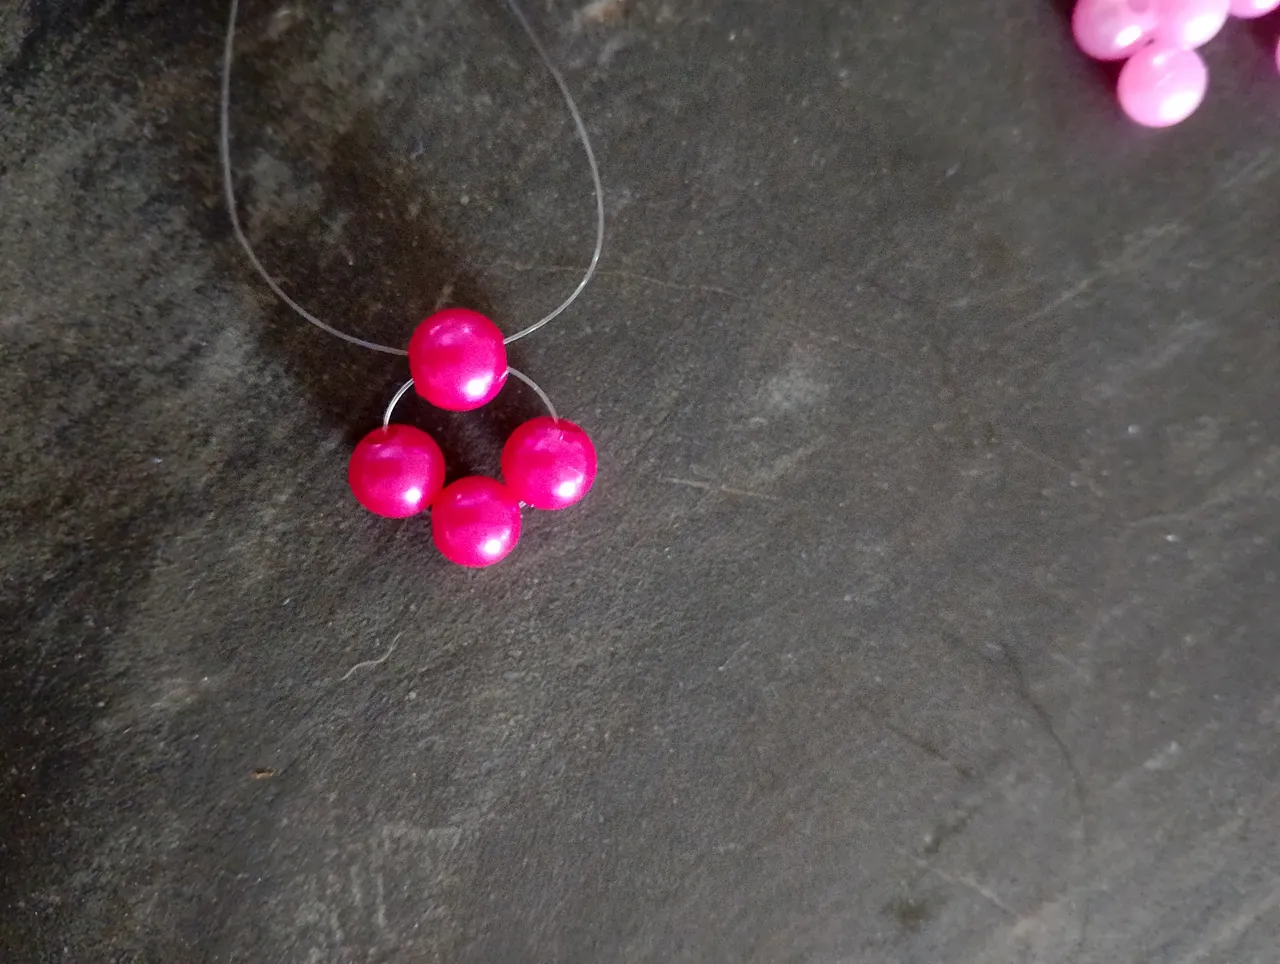
Cortamos 1mt de nylon, en el nylon añadimos 4 perlas de color fucsia y cruzamos por la última perla de color fucsia que acabamos de insertar.

En uno de los nylon vamos a insertar 3 perlas de color rosa claro y cruzamos por la última perla de color rosa claro que acabamos de insertar. Pasamos los nylon por las perlas rosa claro y fucsia hasta quedar en la siguiente perla de color fucsia que insertamos en el paso 1, volvemos a añadir 3 perlas de color rosa claro y cruzamos por la última perla que insertamos, repetimos otra vez, pasamos los nylon por las perlas de color rosa claro y las perlas fucsia hasta llegar a la siguiente perla fucsia, en un nylon agregamos 3 perlas de color rosado claro más y cruzamos por la última perla de color rosado claro. Pasamos los nylon por las perlas hasta quedar en la última perla de color fucsia. Añadimos en cada nylon una perla de color rosado claro y cruzamos por una nueva perla de color rosado claro.

En uno de los nylon insertamos 4 mostacillas transparentes, un anzuelo para zarcillo, 4 mostacillas transparentes más y hacemos un nudo doble para asegurar bien el zarcillo.

Repetimos los pasos 1, 2 y 3 con el otro metro de nylon para hacer la pareja del zarcillo. En el nylon añadimos 4 perlas de color fucsia y cruzamos por la última perla de color fucsia que acabamos de insertar. En uno de los nylon vamos a insertar 3 perlas de color rosa claro y cruzamos por la última perla de color rosa claro que acabamos de insertar. Pasamos los nylon por las perlas rosa claro y fucsia hasta quedar en la siguiente perla de color fucsia que insertamos en el paso 1, volvemos a añadir 3 perlas de color rosa claro y cruzamos por la última perla que insertamos, repetimos otra vez, pasamos los nylon por las perlas de color rosa claro y las perlas fucsia hasta llegar a la siguiente perla fucsia, en un nylon agregamos 3 perlas de color rosado claro más y cruzamos por la última perla de color rosado claro. Pasamos los nylon por las perlas hasta quedar en la última perla de color fucsia. Añadimos en cada nylon una perla de color rosado claro y cruzamos por una nueva perla de color rosado claro. En uno de los nylon insertamos 4 mostacillas transparentes, un anzuelo para zarcillo, 4 mostacillas transparentes más y hacemos un nudo doble para asegurar bien el zarcillo. Y listo.
Hasta la próxima 👋
Créditos
Traductor: App DeepL
Editores de fotos usado: editor de fotos Canva

Good evening dear friends of Hive and Jewelry, how are you, I hope you are very well and that you have had and enjoyed this beautiful day. On this beautiful evening I want to share with you how I made these beautiful diamond-shaped tendrils in two shades of pink. They are simple to make and also quick to make, my recommendation for these tendrils is that when you finish them, place something heavy on top of them to fix their diamond shape.
The materials we are going to need are:
24 medium-sized light pink beads
Clear beads
2 hooks for tendrils
2 mt of nylon 0,3
Procedure
We cut 1mt of nylon, on the nylon we add 4 fuchsia colored beads and cross through the last fuchsia colored bead we just inserted.
On one of the nylons we are going to insert 3 light pink beads and cross over the last light pink bead we just inserted. We pass the nylons through the light pink and fuchsia beads until we get to the next fuchsia bead that we inserted in step 1, we add again 3 light pink beads and cross through the last bead that we inserted, we repeat again, we pass the nylons through the light pink beads and the fuchsia beads until we get to the next fuchsia bead, in one nylon we add 3 more light pink beads and cross through the last light pink bead. We pass the nylons through the beads until we reach the last fuchsia bead. Add one light pink bead on each nylon and cross through one more light pink bead.
In one of the nylons we insert 4 clear beads, a tendril hook, 4 more clear beads and tie a double knot to secure the tendril.
We repeat steps 1, 2 and 3 with the other meter of nylon to make the pair of the tendril. On the nylon we add 4 fuchsia beads and cross over the last fuchsia bead we just inserted. In one of the nylons we are going to insert 3 light pink beads and we cross through the last light pink bead that we have just inserted. We pass the nylons through the light pink and fuchsia beads until we reach the next fuchsia bead we inserted in step 1, we add again 3 light pink beads and cross through the last bead we inserted, we repeat again, we pass the nylons through the light pink beads and the fuchsia beads until we reach the next fuchsia bead, in one nylon we add 3 more light pink beads and cross through the last light pink bead. We pass the nylons through the beads until we reach the last fuchsia bead. We add in each nylon a light pink bead and we cross through a new light pink bead. In one of the nylons we insert 4 transparent beads, a tendril hook, 4 more transparent beads and we make a double knot to secure the tendril. And that's it.
See you next time 👋
Credits
Translator: App DeepL
Photo editors used: Canva photo editor