

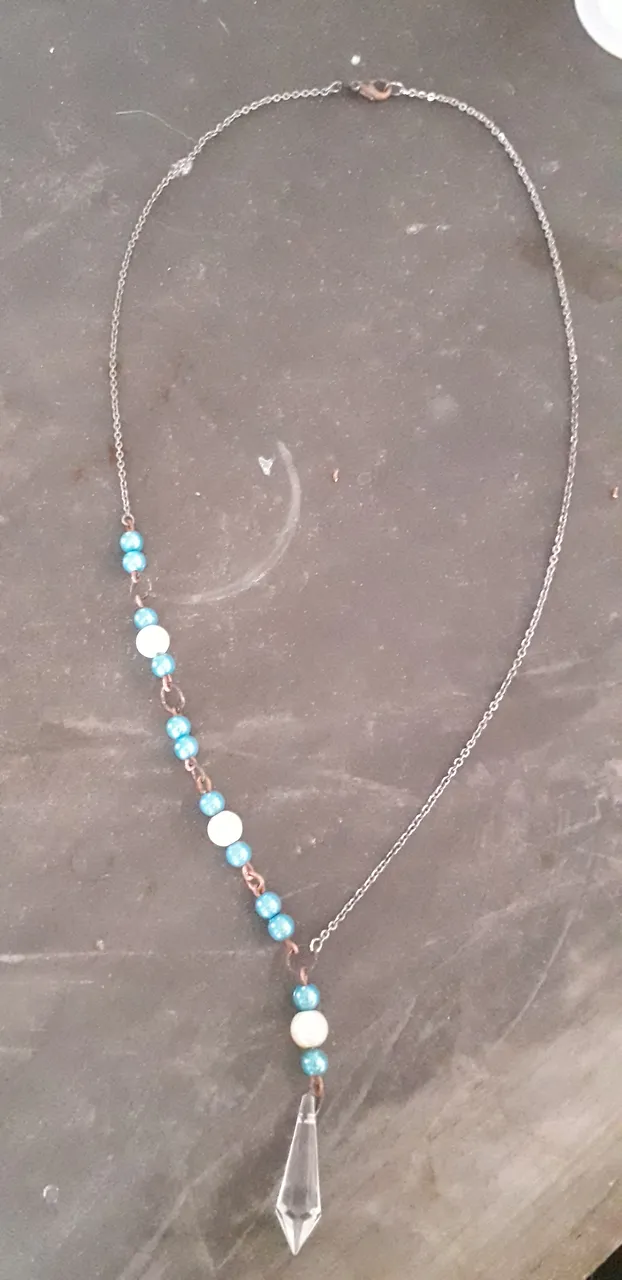
Buenas tardes queridos amigos de Hive y Jewelry, cómo están?, espero que estén muy bien y que hayan tenido y disfrutado de este bello día. En esta preciosa tarde de les quiero compartir un sencillo tutorial para hacer este bello y sencillo collar de perlas que hice hace unas horas, es un nuevo diseño que quería intentar desde hace bastante tiempo pero no me había atrevido hasta hoy, es muy diferente a lo que he hecho y no sabía si quedaría bien. Los materiales que quise usar para dar vida a este collar fueron perlas de dos colores, un azul claro que me encanta y compré hace unas semanas y perlas blancas para darle contraste. El color azul de las perlas es lo que más llama la atención del collar además del diseño y para completar el diseño le agregué una lágrima en el extremo del collar. Sinceramente está cadena no tarda mucho si se tienen todos los materiales a la mano para usarlos, aunque yo me tardé un poco en los dos primeros pasos.
Los Materiales que vamos a necesitar son:
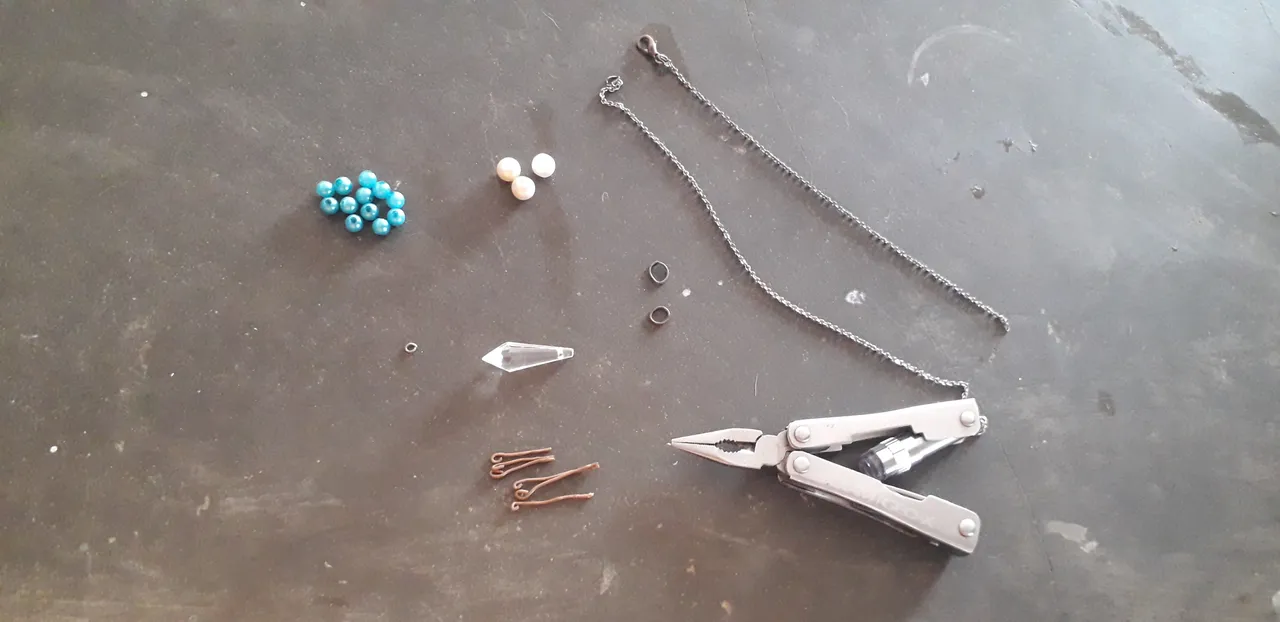
3 Perlas de color blanco y tamaño mediano
1 Lágrima Trasparente
Alambre de joyería
8 Argollas
Broche
44cm de cadena fina plateada
Procedimiento
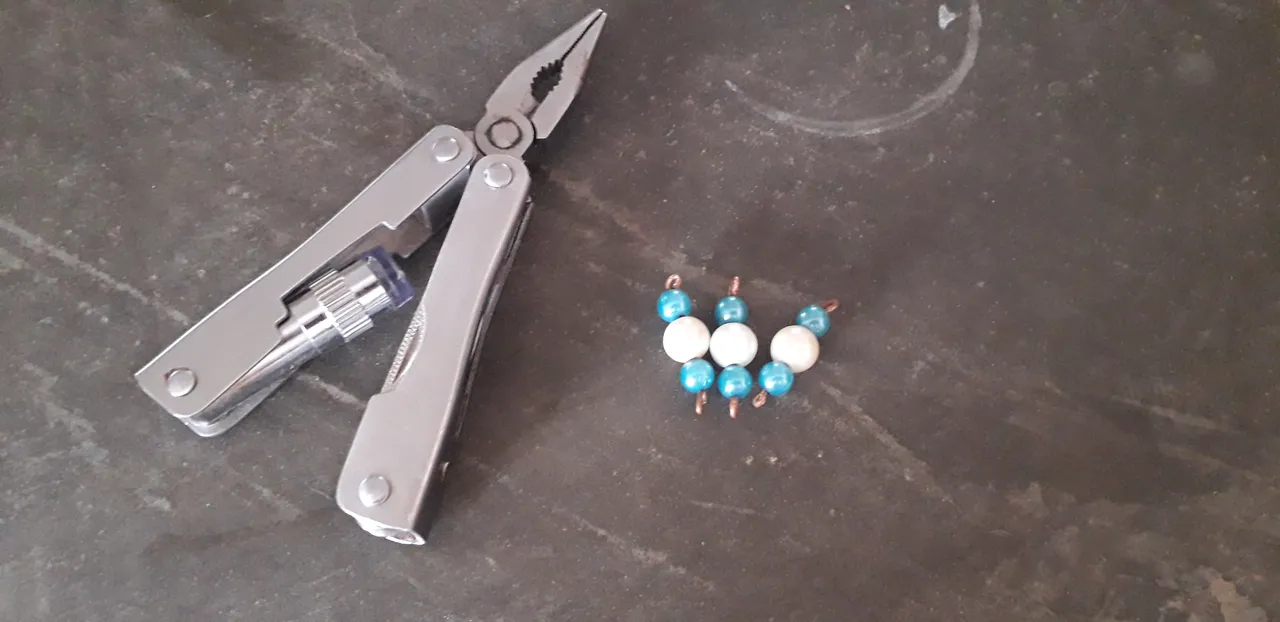
Para empezar vamos a cortar 3 tiras de alambre de joyería de 3,5cm. Comenzamos con una de ellas, en un extremo vamos a hacer un aro lo suficientemente grande para que pase una argolla, en el otro extremo insertamos en el alambre una perla de color azul y tamaño pequeño, una perla de color blanco y tamaño mediano, y una nueva perla de color azul y tamaño pequeño. Realizamos el mismo procedimiento para las otras dos tiras de alambre y dejamos a un lado para seguir con el siguiente paso.
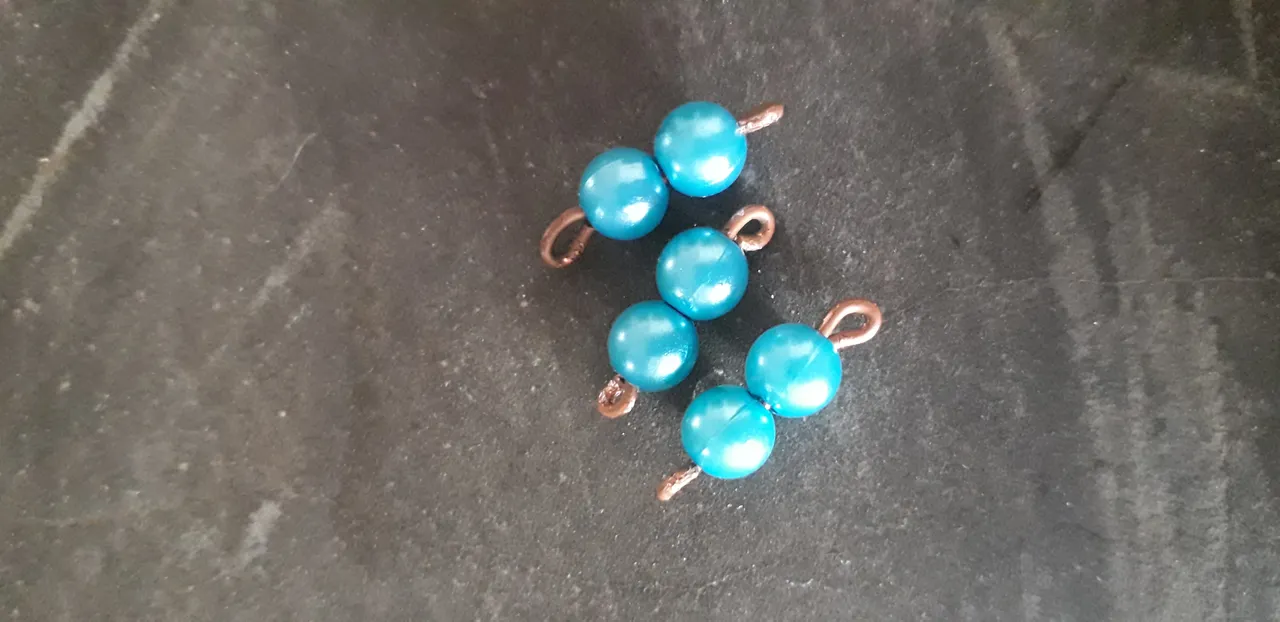
Ahora cortamos tres tiras más de alambre de 2,5cm. En una de ellas vamos a hacer un aro en uno de los extremos, nuevamente por este aro debe pasar una argolla por lo que hay que procurar hacerlo lo suficientemente grande para ello. Luego en el otro extremo del alambre insertamos dos perlas de color azul y tamaño pequeño y hacemos un nuevo aro en ese extremo. Realizamos el mismo procedimiento para las otras dos tiras de alambre.
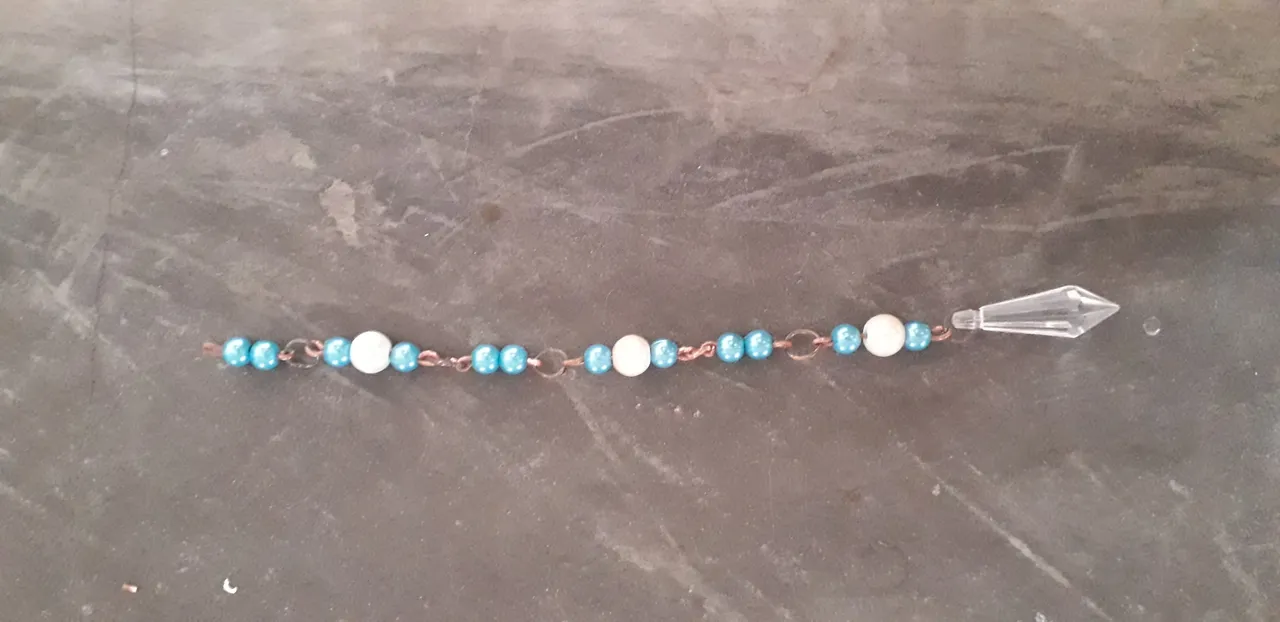
Tomamos una de las argollas y le insertamos la lágrima trasparente y uno de los aros con perlas de color blanco del primer paso. En el otro extremo Insertamos una nueva argolla junto con un aro de las perlas azules del paso dos. En el siguiente extremo añadimos una argolla y en ella un extremo del segundo alambre con la perla de color blanco del primer paso. Seguimos con una argolla, una tira de alambre de perlas azules, argolla, tercer alambre con una perla de color blanco, argolla y la última tira de perlas azules del segundo paso.
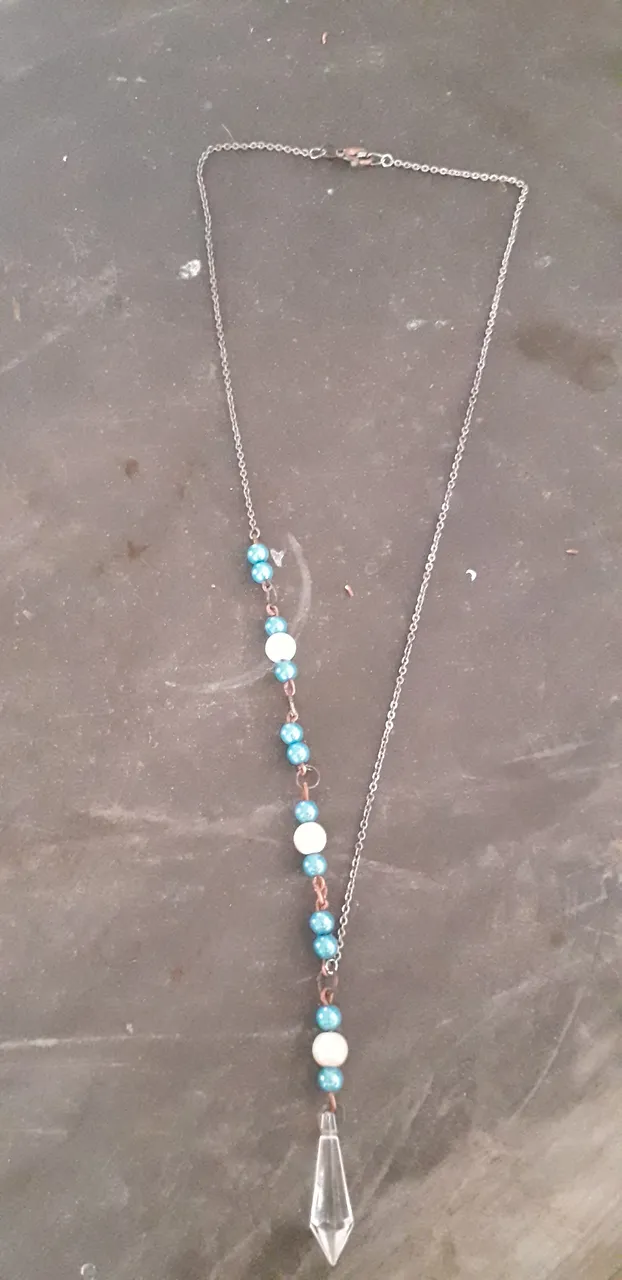
Por último vamos a insertar la cadena. Cortamos dos trozos de cadena, una de 16cm y otra de 28cm. En la argolla después de la primera tira de alambre con la perla blanca (la que se encuentra seguida de la lágrima trasparente) insertamos la tira de cadena de 28cm y en el extremo añadimos una argolla. En el extremo de la tercera tira de alambre con dos perlas de color azul insertamos una argolla, la tira de cadena de 16cm y en el extremo insertamos el broche.
Hasta la próxima 👋
Créditos
Traductor: App DeepL
Editores de fotos usados: editor de fotos Polish y Canva

Good afternoon dear friends of Hive and Jewelry, how are you, I hope you are very well and that you have had and enjoyed this beautiful day. On this beautiful afternoon I want to share with you a simple tutorial to make this beautiful and simple pearl necklace that I made a few hours ago, it is a new design that I wanted to try for quite some time but I had not dared until today, it is very different from what I have done and I did not know if it would look good. The materials I wanted to use to give life to this necklace were pearls of two colors, a light blue that I love and I bought a few weeks ago and white pearls to give it contrast. The blue color of the pearls is what attracts the most attention of the necklace besides the design and to complete the design I added a teardrop at the end of the necklace. Honestly this chain doesn't take long if you have all the materials on hand to use, although it took me a little while for the first two steps.
The Materials we are going to need are:
3 white pearls of medium size
1 Transparent Tear
Jewelry wire
8 earrings
Brooch
44cm of fine silver plated chain
Procedure
To start we are going to cut 3 strips of 3,5cm jewelry wire. We start with one of them, at one end we are going to make a ring big enough for a ring to pass through, at the other end we insert in the wire a small size blue pearl, a medium size white pearl, and a new small size blue pearl. We perform the same procedure for the other two strips of wire and set aside to continue with the next step.
Now we cut three more 2.5cm strips of wire. In one of them we are going to make a ring at one of the ends, again through this ring must pass a ring so try to make it big enough for it. Then at the other end of the wire we insert two small blue beads and make a new ring at that end. We do the same procedure for the other two strips of wire.
We take one of the rings and insert the transparent teardrop and one of the rings with white pearls from the first step. At the other end we insert a new ring together with a ring of blue pearls from step two. At the next end we add a ring and in it an end of the second wire with the white pearl from step one. We continue with a ring, a strip of blue pearl wire, ring, third wire with a white colored pearl, ring and the last strip of blue pearls from step two.
Finally we are going to insert the chain. We cut two pieces of chain, one 16cm and one 28cm. In the ring after the first strip of wire with the white pearl (the one followed by the transparent teardrop) we insert the 28cm strip of chain and at the end we add a ring. At the end of the third strip of wire with two blue pearls we insert a ring, the 16cm strip of chain and at the end we insert the brooch.
Until next time 👋
Credits
Translator: App DeepL
Photo editors used: Polish photo editor and Canva